Git Product home page Git Product logo

sage-slam's Introduction

SAGE: SLAM with Appearance and Geometry Prior for Endoscopy

This work has been published in ICRA 2022 and can be found here. Please contact Xingtong Liu ([email protected]) or Mathias Unberath ([email protected]) if you have any questions.

If you find our work relevant, please consider citing it as

@INPROCEEDINGS{liu2022sage,
  author={Liu, Xingtong and Li, Zhaoshuo and Ishii, Masaru and Hager, Gregory D. and Taylor, Russell H. and Unberath, Mathias},
  booktitle={2022 International Conference on Robotics and Automation (ICRA)}, 
  title={SAGE: SLAM with Appearance and Geometry Prior for Endoscopy}, 
  year={2022},
  volume={},
  number={},
  pages={5587-5593},
  doi={10.1109/ICRA46639.2022.9812257}}

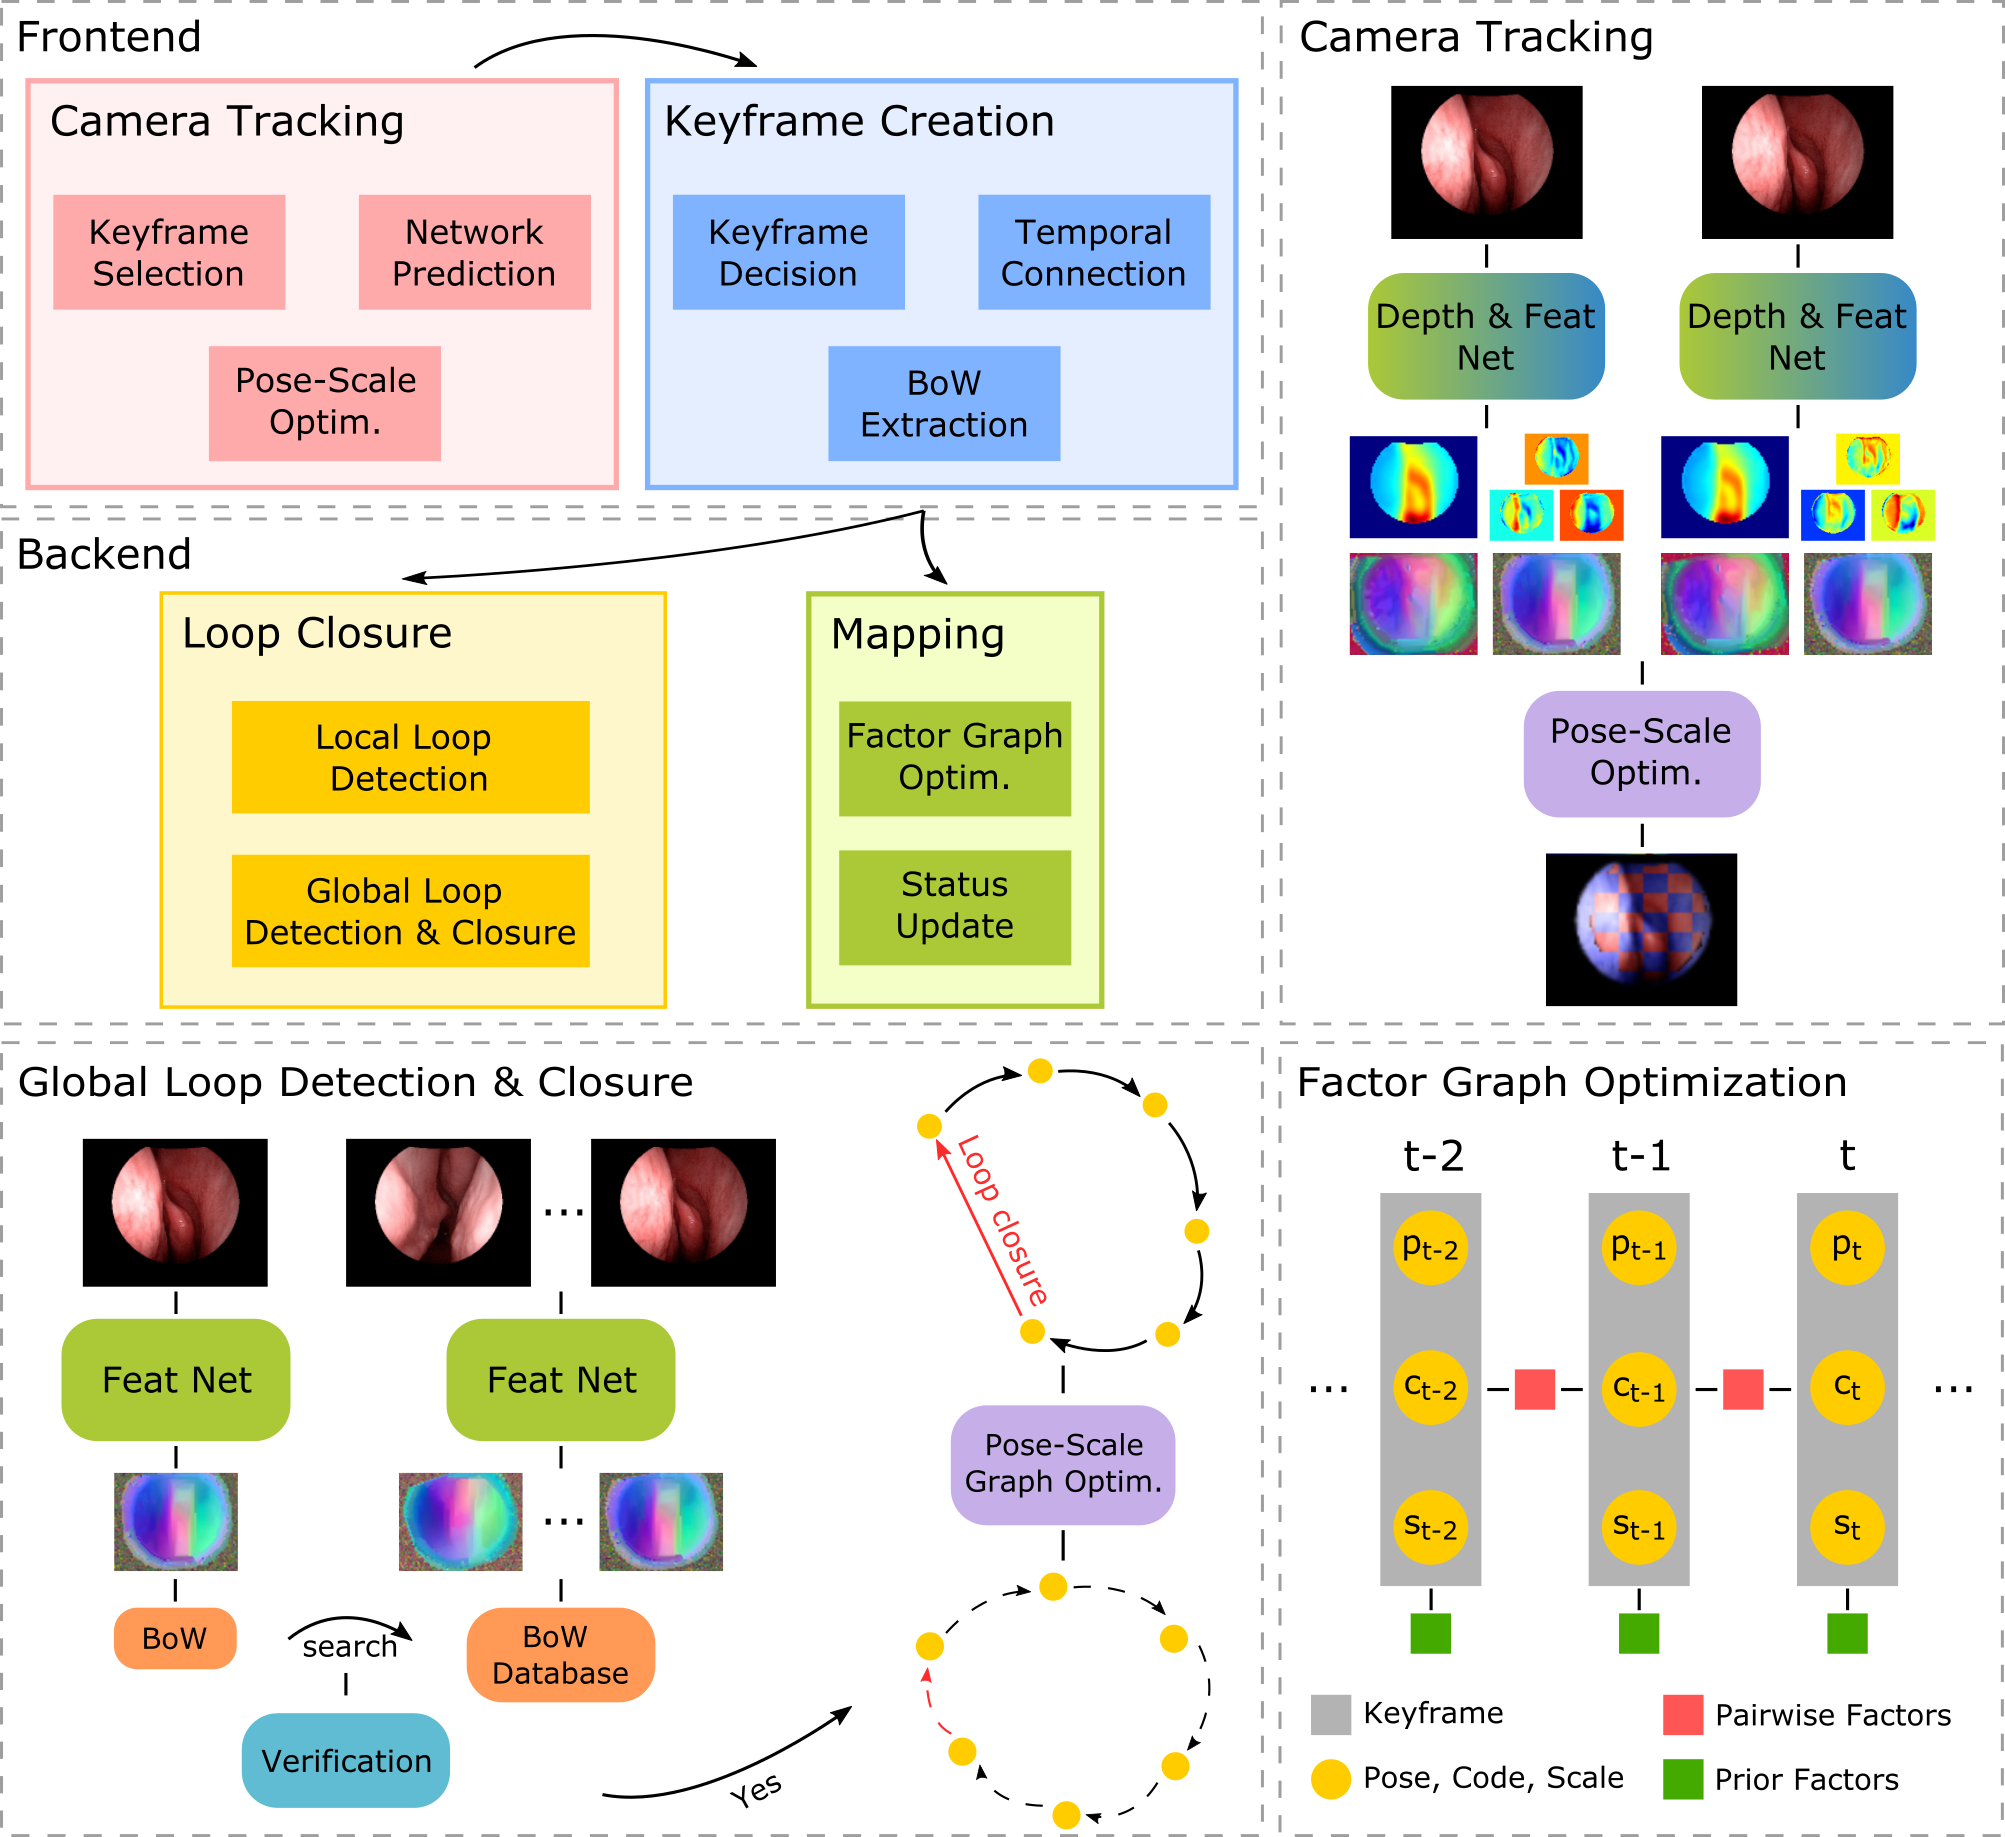
SAGE-SLAM system diagram:

ICRA 2022 supplementary video (YouTube video):

ICRA 2022 supplementary video

Fly-through of surface reconstruction:

For each GIF above, from left to right are the original endoscopic video, the textured rendering of the surface reconstruction through the camera trajectory from the SLAM system, the depth rendering of the reconstruction, and the dense depth map estimated from the SLAM system. For each sequence, the surface reconstruction is generated using volumetric TSDF with the dense depth maps and camera poses of all keyframes from the SLAM system as input. Note that all sequences above were unseen during the representation learning.

Instructions

  1. Clone this repository with

    git clone [email protected]:lppllppl920/SAGE-SLAM.git
    
  2. Download an example dataset from this link. (To generate HDF5 of your own dataset for training, you can follow this repo. Note that you will need to store depth_image and mask_image rendered in this code block in the 'render_depth' and 'render_mask' keys of the HDF5 file created.)

  3. Create a data folder inside the cloned repository and put the downloaded folder bag_1 inside the data folder.

  4. After the steps above, the folder structure of the cloned repository will be shown as below with the command tree -d -L 2 <path of the cloned repository>

    ├── data
    │   └── bag_1
    ├── pretrained
    ├── representation
    │   ├── configs
    │   ├── datasets
    │   ├── losses
    │   ├── models
    │   ├── scripts
    │   └── utils
    └── system
        ├── configs
        ├── sources
        └── thirdparty
    
  5. Install the Docker Engine with the instructions here and here, build a Docker image, and start a Docker container created from the built Docker image. Note that the PW in the docker build command can be specified as any string as the password to access the sudo priviledge inside the Docker container. Note that the step 6, 7, and 8 below are optional if you only want to test run the SAGE-SLAM system, because we have pre-generated all required data.

    cd <path of the cloned repository> && \
    docker build \
    --build-arg UID=$(id -u) \
    --build-arg GID=$(id -g) \
    --build-arg UNAME=$(whoami) \
    --build-arg PW=<password of your choice> \
    -f Dockerfile \
    -t sage-slam \
    . && \
    docker run \
    -it \
    --privileged \
    --env DISPLAY=$DISPLAY \
    -v /tmp/.X11-unix:/tmp/.X11-unix:rw \
    -v $HOME/.Xauthority:$HOME/.Xauthority:rw \
    --gpus=all \
    --ipc=host \
    --net=host \
    --mount type=bind,source=<path of the cloned repository>,target=$HOME \
    --mount type=bind,source=/tmp,target=/tmp \
    --name sage-slam \
    sage-slam
    

    Note that some of the options in the docker run command are to enable X11 display inside the Docker container. Run sudo apt install -y firefox and firefox within the container to install the firefox browser and open it up to test if the X11 display is working normally. Recent versions MacOS seem to have problems supporting the X11 display used by the third-party library Pangolin of this repository. In this case, the GUI can be disabled when the SLAM system is ran, which is introduced later.

  6. Now the current working directory should be the home directory of the Docker container. To start the representation learning process, run the following command:

    cd $HOME && \
    /opt/conda/bin/python $HOME/representation/training.py \
    --config_path "$HOME/representation/configs/training.json"
    

    Note that a set of pre-trained network models are provided inside $HOME/pretrained folder. With the given setting specified in the $HOME/representation/configs/training.json, these pre-trained models are loaded. Set net_load_weights inside the training.json to false if you want to train the networks from scratch.

  7. To visualize the tensorboard outputs during the training process, open a new terminal console that is outside of the Docker container, and run the following command:

    tensorboard --logdir="/tmp/SAGE-SLAM_<time of the experiment>" \
    --host=127.0.0.1 \
    --port=6006
    

    Then open a compatible browser (such as Google Chrome) and type in http://localhost:6006/ to open the tensorboard dashboard. Note that the value of the option logdir should be the path of the experiment of which you want to inspect the results.

  8. Inside the Docker container, to generate Pytorch JIT ScriptModule's that will be used in the SAGE-SLAM system, change net_depth_model_path, net_feat_model_path, net_ba_model_path, and net_disc_model_path inside $HOME/representation/configs/export.json to the corresponding model paths and run the following command:

    cd $HOME && \
    /opt/conda/bin/python $HOME/representation/training.py \
    --config_path "$HOME/representation/configs/export.json" 
    
  9. To build the SAGE-SLAM system implemented in C++, run the following command:

    SLAM_BUILD_TYPE=Release && \
    $HOME/system/thirdparty/makedeps_with_argument.sh $SLAM_BUILD_TYPE && \
    mkdir -p $HOME/build/$SLAM_BUILD_TYPE && \
    cd $HOME/build/$SLAM_BUILD_TYPE && \
    cmake -DCMAKE_BUILD_TYPE=$SLAM_BUILD_TYPE $HOME/system/ && \
    make -j6 && \
    cd $HOME
    

    Note the SLAM_BUILD_TYPE can be changed to Debug to enable debugging if you want to further develop the SLAM system. With this command executed, the folder structure within the Docker container should look like below with the command tree -d -L 3 $HOME:

    ├── build
    │   └── Release
    │       ├── bin
    │       ├── CMakeFiles
    │       ├── sources
    │       └── thirdparty
    ├── data
    │   └── bag_1
    │       ├── _start_002603_end_002984_stride_1000_segment_00
    │       ├── _start_003213_end_003527_stride_1000_segment_00
    │       └── _start_004259_end_004629_stride_1000_segment_00
    ├── pretrained
    ├── representation
    │   ├── configs
    │   ├── datasets
    │   ├── losses
    │   ├── models
    │   ├── scripts
    │   └── utils
    └── system
        ├── configs
        ├── sources
        │   ├── common
        │   ├── core
        │   ├── cuda
        │   ├── demo
        │   ├── drivers
        │   ├── gui
        │   └── tools
        └── thirdparty
            ├── build_Release
            ├── camera_drivers
            ├── DBoW2
            ├── eigen
            ├── gtsam
            ├── install_Release
            ├── opengv
            ├── Pangolin
            ├── Sophus
            ├── TEASER-plusplus
            └── vision_core
    
  10. Run the SAGE-SLAM system with the following command:

    SLAM_BUILD_TYPE=Release && \
    cd $HOME && \
    LD_LIBRARY_PATH=$LD_LIBRARY_PATH:$HOME/system/thirdparty/install_$SLAM_BUILD_TYPE/lib \
    MESA_GL_VERSION_OVERRIDE=3.3 \
    $HOME/build/$SLAM_BUILD_TYPE/bin/df_demo \
    --flagfile $HOME/system/configs/slam_run.flags \
    --enable_gui=false
    

    Note that the X11 display should work normally with host operating system as linux. In this case, the option enable_gui can be set to true to bring up the GUI of the SLAM system. Besides the common SLAM GUI, if enable_gui is set to true, appending --v=1 to the command above will show more outputting messages and an image of the recent loop pair when a global loop is detected. Changing the verbose option above to --v=3 will display even more messages and images for the debugging purpose.

  11. If you would like to run the system outside the Docker container, you will need to manually setup the environment (libraries, packages, etc.) the same way as what is indicated in the Dockerfile.

More Details

As mentioned in the paper related to this repository, more details of the method are provided here.

Related Projects

sage-slam's People

Contributors

lppllppl920 avatar

Stargazers

 avatar  avatar  avatar  avatar  avatar  avatar  avatar  avatar  avatar  avatar  avatar  avatar  avatar  avatar  avatar  avatar  avatar  avatar  avatar  avatar  avatar  avatar  avatar  avatar  avatar  avatar  avatar  avatar  avatar  avatar  avatar  avatar  avatar  avatar  avatar  avatar  avatar  avatar  avatar  avatar  avatar  avatar  avatar  avatar  avatar  avatar  avatar  avatar  avatar  avatar  avatar  avatar  avatar  avatar  avatar  avatar  avatar  avatar  avatar  avatar  avatar  avatar  avatar  avatar  avatar  avatar  avatar  avatar  avatar  avatar  avatar  avatar  avatar  avatar  avatar  avatar  avatar  avatar  avatar  avatar  avatar  avatar  avatar  avatar  avatar  avatar  avatar  avatar  avatar  avatar  avatar  avatar  avatar  avatar  avatar

Watchers

 avatar  avatar  avatar  avatar

sage-slam's Issues

Generate fly through surface reconstructions

I do see in the github repo that fly-through surface reconstruction results are present, and I am trying to generate the same. I understand that the script - 'generate_reconstruction_fly_through.py' should be used, but it requires a lot of input files that I am not entirely sure how to generate. It would be very useful if you can show an example of how to use the script.

OpenGL error: GL_INVALID_ENUM in glCreateShader(GL_GEOMETRY_SHADER)

Thanks for trying to solve my problem! (Sophus ensure failed in function)
I exported the docker container and copied it to another computer.And now it can run successfully. (That's so weird.)

Then I got a new problem……
I set '--enable_gui=true' and I got

I0418 13:35:04.774458   200 main.cpp:370] Logging directory: /tmp/SAGE-SLAM__start_002603_end_002984_stride_1000_segment_00_2022-04-18-13:35:04
I0418 13:35:06.797400   205 deepfactors.cpp:1251] [DeepFactors<Scalar, CS>::MappingBackend] Mapping update thread started
I0418 13:35:06.797688   200 live_demo.cpp:147] [LiveDemo<CS>::ProcessingLoop] Entering processing loop
I0418 13:35:06.797719   200 live_demo.cpp:161] [LiveDemo<CS>::ProcessingLoop] Initializing system on the first frame
I0418 13:35:06.798633   200 live_demo.cpp:164] [LiveDemo<CS>::ProcessingLoop] Bootstrap frame 0(0)
Framebuffer with requested attributes not available. Using available framebuffer. You may see visual artifacts.I0418 13:35:06.912933   206 visualizer.cpp:46] [OglDebugCallback] OpenGL Debug message: GL_INVALID_ENUM in glCreateShader(GL_GEOMETRY_SHADER)
F0418 13:35:06.912987   206 visualizer.cpp:49] [OglDebugCallback] OpenGL error: GL_INVALID_ENUM in glCreateShader(GL_GEOMETRY_SHADER)
*** Check failure stack trace: ***
    @     0x7f43f5ef21c3  google::LogMessage::Fail()
    @     0x7f43f5ef725b  google::LogMessage::SendToLog()
    @     0x7f43f5ef1ebf  google::LogMessage::Flush()
    @     0x7f43f5ef26ef  google::LogMessageFatal::~LogMessageFatal()
    @     0x7f43f639177c  df::OglDebugCallback()
    @     0x7f431bb17ffa  (unknown)
    @     0x7f431bba9c54  (unknown)
    @     0x7f43f643d68b  pangolin::GlSlProgram::AddPreprocessedShader()
    @     0x7f43f643e6a6  pangolin::GlSlProgram::AddShaderFile()
    @     0x7f43f643e965  pangolin::GlSlProgram::AddShaderFromFile()
    @     0x7f43f643bcbb  df::KeyframeRenderer::Init()
    @     0x7f43f6391c58  df::Visualizer::Init()
    @     0x556b4e10189a  df::LiveDemo<>::VisualizerLoop()
    @     0x556b4e1721d0  std::__invoke_impl<>()
    @     0x556b4e17212f  std::__invoke<>()
    @     0x556b4e172099  _ZNSt5_BindIFMN2df8LiveDemoILi16EEEFvvEPS2_EE6__callIvJEJLm0EEEET_OSt5tupleIJDpT0_EESt12_Index_tupleIJXspT1_EEE
    @     0x556b4e17201d  std::_Bind<>::operator()<>()
    @     0x556b4e171fc4  std::__invoke_impl<>()
    @     0x556b4e171f6d  std::__invoke<>()
    @     0x556b4e171f0e  _ZNSt6thread8_InvokerISt5tupleIJSt5_BindIFMN2df8LiveDemoILi16EEEFvvEPS5_EEEEE9_M_invokeIJLm0EEEEvSt12_Index_tupleIJXspT_EEE
    @     0x556b4e171ee0  std::thread::_Invoker<>::operator()()
    @     0x556b4e1714e0  std::thread::_State_impl<>::_M_run()
    @     0x7f43a2ea219d  execute_native_thread_routine
    @     0x7f43f5957609  start_thread
    @     0x7f43a2cf1133  clone
signal 6 (Aborted), address is 0x3e8000000c8 from 0x7f43a2c1500b
[bt]: (1) /usr/lib/x86_64-linux-gnu/libc.so.6(gsignal+0xcb) [0x7f43a2c1500b]
[bt]: (2) /usr/lib/x86_64-linux-gnu/libc.so.6(gsignal+0xcb) [0x7f43a2c1500b]
[bt]: (3) /usr/lib/x86_64-linux-gnu/libc.so.6(abort+0x12b) [0x7f43a2bf4859]
[bt]: (4) /usr/lib/x86_64-linux-gnu/libglog.so.0(+0xa90e) [0x7f43f5eef90e]
[bt]: (5) /usr/lib/x86_64-linux-gnu/libglog.so.0(+0xd1c3) [0x7f43f5ef21c3]
[bt]: (6) /usr/lib/x86_64-linux-gnu/libglog.so.0(_ZN6google10LogMessage9SendToLogEv+0x26b) [0x7f43f5ef725b]
[bt]: (7) /usr/lib/x86_64-linux-gnu/libglog.so.0(_ZN6google10LogMessage5FlushEv+0xbf) [0x7f43f5ef1ebf]
[bt]: (8) /usr/lib/x86_64-linux-gnu/libglog.so.0(_ZN6google15LogMessageFatalD2Ev+0xf) [0x7f43f5ef26ef]
[bt]: (9) /home/pwn20tty/build/Debug/sources/gui/libdf_gui.so(_ZN2df16OglDebugCallbackEjjjjiPKcPKv+0x182) [0x7f43f639177c]
[bt]: (10) /usr/lib/x86_64-linux-gnu/dri/swrast_dri.so(+0x310ffa) [0x7f431bb17ffa]
[bt]: (11) /usr/lib/x86_64-linux-gnu/dri/swrast_dri.so(+0x3a2c54) [0x7f431bba9c54]
[bt]: (12) /home/pwn20tty/build/Debug/sources/gui/libdf_gui.so(_ZN8pangolin11GlSlProgram21AddPreprocessedShaderENS_14GlSlShaderTypeERKNSt7__cxx1112basic_stringIcSt11char_traitsIcESaIcEEES9_+0x59) [0x7f43f643d68b]
[bt]: (13) /home/pwn20tty/build/Debug/sources/gui/libdf_gui.so(_ZN8pangolin11GlSlProgram13AddShaderFileERKNS0_16ShaderFileOrCodeE+0x460) [0x7f43f643e6a6]
[bt]: (14) /home/pwn20tty/build/Debug/sources/gui/libdf_gui.so(_ZN8pangolin11GlSlProgram17AddShaderFromFileENS_14GlSlShaderTypeERKNSt7__cxx1112basic_stringIcSt11char_traitsIcESaIcEEERKSt3mapIS7_S7_St4lessIS7_ESaISt4pairIS8_S7_EEERKSt6vectorIS7_SaIS7_EE+0xe9) [0x7f43f643e965]
[bt]: (15) /home/pwn20tty/build/Debug/sources/gui/libdf_gui.so(_ZN2df16KeyframeRenderer4InitERKNS_13PinholeCameraIfEE+0x2d1) [0x7f43f643bcbb]
[bt]: (16) /home/pwn20tty/build/Debug/sources/gui/libdf_gui.so(_ZN2df10Visualizer4InitERKNS_13PinholeCameraIfEENS_18DeepFactorsOptionsE+0x150) [0x7f43f6391c58]
[bt]: (17) /home/pwn20tty/build/Debug/bin/df_demo(+0x19389a) [0x556b4e10189a]
[bt]: (18) /home/pwn20tty/build/Debug/bin/df_demo(+0x2041d0) [0x556b4e1721d0]
[bt]: (19) /home/pwn20tty/build/Debug/bin/df_demo(+0x20412f) [0x556b4e17212f]
[bt]: (20) /home/pwn20tty/build/Debug/bin/df_demo(+0x204099) [0x556b4e172099]
[bt]: (21) /home/pwn20tty/build/Debug/bin/df_demo(+0x20401d) [0x556b4e17201d]
[bt]: (22) /home/pwn20tty/build/Debug/bin/df_demo(+0x203fc4) [0x556b4e171fc4]
[bt]: (23) /home/pwn20tty/build/Debug/bin/df_demo(+0x203f6d) [0x556b4e171f6d]
[bt]: (24) /home/pwn20tty/build/Debug/bin/df_demo(+0x203f0e) [0x556b4e171f0e]
[bt]: (25) /home/pwn20tty/build/Debug/bin/df_demo(+0x203ee0) [0x556b4e171ee0]
[bt]: (26) /home/pwn20tty/build/Debug/bin/df_demo(+0x2034e0) [0x556b4e1714e0]
[bt]: (27) /opt/conda/lib/libstdc++.so.6(+0xc819d) [0x7f43a2ea219d]
[bt]: (28) /usr/lib/x86_64-linux-gnu/libpthread.so.0(+0x8609) [0x7f43f5957609]
[bt]: (29) /usr/lib/x86_64-linux-gnu/libc.so.6(clone+0x43) [0x7f43a2cf1133]
signal 11 (Segmentation fault), address is (nil) from 0x7f43ede8753e
[bt]: (1) /opt/conda/lib/python3.8/site-packages/torch/lib/libtorch_cpu.so(_ZNKSt10_HashtableINSt7__cxx1112basic_stringIcSt11char_traitsIcESaIcEEESt4pairIKS5_mESaIS8_ENSt8__detail10_Select1stESt8equal_toIS5_ESt4hashIS5_ENSA_18_Mod_range_hashingENSA_20_Default_ranged_hashENSA_20_Prime_rehash_policyENSA_17_Hashtable_traitsILb1ELb0ELb1EEEE19_M_find_before_nodeEmRS7_m+0x2e) [0x7f43ede8753e]
[bt]: (2) /opt/conda/lib/python3.8/site-packages/torch/lib/libtorch_cpu.so(_ZNKSt10_HashtableINSt7__cxx1112basic_stringIcSt11char_traitsIcESaIcEEESt4pairIKS5_mESaIS8_ENSt8__detail10_Select1stESt8equal_toIS5_ESt4hashIS5_ENSA_18_Mod_range_hashingENSA_20_Default_ranged_hashENSA_20_Prime_rehash_policyENSA_17_Hashtable_traitsILb1ELb0ELb1EEEE19_M_find_before_nodeEmRS7_m+0x2e) [0x7f43ede8753e]
[bt]: (3) /opt/conda/lib/python3.8/site-packages/torch/lib/libtorch_cpu.so(_ZN5torch3jit10is_enabledEPKcNS0_16JitLoggingLevelsE+0x1c8) [0x7f43ede9f4c8]
[bt]: (4) /opt/conda/lib/python3.8/site-packages/torch/lib/libtorch_cpu.so(_ZN5torch3jit6InlineERNS0_5GraphE+0x39) [0x7f43edf248f9]
[bt]: (5) /opt/conda/lib/python3.8/site-packages/torch/lib/libtorch_cpu.so(_ZN5torch3jit16preoptimizeGraphERSt10shared_ptrINS0_5GraphEE+0x10) [0x7f43edd62ad0]
[bt]: (6) /opt/conda/lib/python3.8/site-packages/torch/lib/libtorch_cpu.so(+0x3869559) [0x7f43edd64559]
[bt]: (7) /opt/conda/lib/python3.8/site-packages/torch/lib/libtorch_cpu.so(+0x386b18b) [0x7f43edd6618b]
[bt]: (8) /opt/conda/lib/python3.8/site-packages/torch/lib/libtorch_cpu.so(_ZN5torch3jit13GraphFunction3runERSt6vectorIN3c106IValueESaIS4_EE+0xe) [0x7f43edd628ee]
[bt]: (9) /opt/conda/lib/python3.8/site-packages/torch/lib/libtorch_cpu.so(+0x3b0effd) [0x7f43ee009ffd]
[bt]: (10) /opt/conda/lib/python3.8/site-packages/torch/lib/libtorch_cpu.so(_ZN5torch3jit16InterpreterState3runERSt6vectorIN3c106IValueESaIS4_EE+0x30) [0x7f43edff7630]
[bt]: (11) /opt/conda/lib/python3.8/site-packages/torch/lib/libtorch_cpu.so(+0x3aef534) [0x7f43edfea534]
[bt]: (12) /opt/conda/lib/python3.8/site-packages/torch/lib/libtorch_cpu.so(_ZN5torch3jit13GraphFunctionclESt6vectorIN3c106IValueESaIS4_EERKSt13unordered_mapINSt7__cxx1112basic_stringIcSt11char_traitsIcESaIcEEES4_St4hashISD_ESt8equal_toISD_ESaISt4pairIKSD_S4_EEE+0x3e) [0x7f43edd62d9e]
[bt]: (13) /opt/conda/lib/python3.8/site-packages/torch/lib/libtorch_cpu.so(_ZN5torch3jit6MethodclESt6vectorIN3c106IValueESaIS4_EERKSt13unordered_mapINSt7__cxx1112basic_stringIcSt11char_traitsIcESaIcEEES4_St4hashISD_ESt8equal_toISD_ESaISt4pairIKSD_S4_EEE+0x168) [0x7f43edd72748]
[bt]: (14) /home/pwn20tty/build/Debug/sources/core/libdf_core.so(_ZN5torch3jit6Module7forwardESt6vectorIN3c106IValueESaIS4_EE+0x103) [0x7f43f4ff5065]
[bt]: (15) /home/pwn20tty/build/Debug/sources/core/libdf_core.so(_ZN2df14FeatureNetwork19GenerateFeatureMapsEN2at6TensorES2_RS2_S3_+0x2e1) [0x7f43f4ff843f]
[bt]: (16) /home/pwn20tty/build/Debug/sources/core/libdf_core.so(_ZN2df6MapperIfLi16EE13BuildKeyframeEdRKN2cv3MatERKN6Sophus3SE3IfLi0EEE+0xcde) [0x7f43f4fa1066]
[bt]: (17) /home/pwn20tty/build/Debug/sources/core/libdf_core.so(_ZN2df6MapperIfLi16EE12InitOneFrameEdRKN2cv3MatE+0x96) [0x7f43f4f977bc]
[bt]: (18) /home/pwn20tty/build/Debug/sources/core/libdf_core.so(_ZN2df11DeepFactorsIfLi16EE17BootstrapOneFrameEdRKN2cv3MatE+0x101) [0x7f43f5000019]
[bt]: (19) /home/pwn20tty/build/Debug/bin/df_demo(+0x192b26) [0x556b4e100b26]
[bt]: (20) /home/pwn20tty/build/Debug/bin/df_demo(+0x1918b1) [0x556b4e0ff8b1]
[bt]: (21) /home/pwn20tty/build/Debug/bin/df_demo(main+0xfe3) [0x556b4e1739cf]
[bt]: (22) /usr/lib/x86_64-linux-gnu/libc.so.6(__libc_start_main+0xf3) [0x7f43a2bf6083]
[bt]: (23) /home/pwn20tty/build/Debug/bin/df_demo(+0x18995e) [0x556b4e0f795e]

I am sure that X11 display is working normally. I can run firefox within the docker.
Did this only happening on my machine?
Could you please help me to solve this?

hdf5 data

hello dear author,
I'd like to know how to obtain the hdf5 data, cause I didn't find it in your google drive. could you give me some instructions?

Step 9: There is no build file after running

Hello dear author
When I ran to step 9 according to the steps you provided (of which steps 6, 7, and 8 I skipped directly without running), the error "Building TEASER-plusplus"
make: *** No rule to make target 'install'. Stop."
,
and after using tree -d -L 3, the build folder did not appear in the project file directory , and where the command for step nine I was running in the docker desktop terminal

Training on Custom Video

Hello,

I am attempting to run training on my own endoscopy video sequence. I see that the given dataset already has groundtruth as well as hdf5 file for the data. In addition, the training code already assumes this data format. What would you recommend to do to run training and the system from my own image sequence? Thank you.

just run monolithic depth estimation

Hello author, I now have my own monocular dataset, which is also the scene of the channel, I just want to do monolithic depth estimation (I just want to generate a depth map like yours), which program should I run or refer to, or what are my execution steps, thank you author

BOW model

Hi auther~I wonder if I need to train the Bag-Of-Word model on my datasets ?

How to solve the dependency of generate_reconstruction_fly_through.py?

I have run and get some result of the SLAM, and I want to generate surface. But I found when I run the generate_reconstruction_fly_through.py, there always have dependency error.
And I found that I need to install a in-house version of the meshrender, and I only find a link in your another repo DenseReconstruction-Pytorch, but I don't know whether it is right. But I found there still an error need to be solved.
The first is

ImportError: cannot import name 'RenderMode' from 'perception'

I try to solve this by convert perception to autolab_core or meshpy, but it is no use. Can you help me by show me your dependency about these package?
Thanks!

Sophus ensure failed in function

hello dear author,
I followed your steps but when I tried to test run the SAGE-SLAM system on the example dataset, I got this

I0410 12:37:23.335498   486 main.cpp:370] Logging directory: /tmp/SAGE-SLAM__start_002603_end_002984_stride_1000_segment_00_2022-04-10-12:37:23
I0410 12:37:26.994796   490 deepfactors.cpp:1251] [DeepFactors<Scalar, CS>::MappingBackend] Mapping update thread started
I0410 12:37:26.995555   486 live_demo.cpp:147] [LiveDemo<CS>::ProcessingLoop] Entering processing loop
I0410 12:37:26.995613   486 live_demo.cpp:161] [LiveDemo<CS>::ProcessingLoop] Initializing system on the first frame
I0410 12:37:26.997876   486 live_demo.cpp:164] [LiveDemo<CS>::ProcessingLoop] Bootstrap frame 0(0)
I0410 12:37:34.324018   486 live_demo.cpp:206] [LiveDemo<CS>::ProcessingLoop] Process frame 1(1)
Sophus ensure failed in function 'Sophus::SO3<Scalar_, Options>::SO3(const Transformation&) [with Scalar_ = float; int Options = 0; Sophus::SO3<Scalar_, Options>::Transformation = Eigen::Matrix<float, 3, 3>]', file '/home/pwn20tty/system/thirdparty/install_Debug/include/sophus/so3.hpp', line 472.
R is not orthogonal:
      1.00001  7.31088e-08  1.09612e-07
 7.31088e-08      1.00001 -4.67872e-08
 1.09612e-07 -4.67872e-08            1
signal 6 (Aborted), address is 0x3e8000001e6 from 0x7fb75a6bf00b
[bt]: (1) /usr/lib/x86_64-linux-gnu/libc.so.6(gsignal+0xcb) [0x7fb75a6bf00b]
[bt]: (2) /usr/lib/x86_64-linux-gnu/libc.so.6(gsignal+0xcb) [0x7fb75a6bf00b]
[bt]: (3) /usr/lib/x86_64-linux-gnu/libc.so.6(abort+0x12b) [0x7fb75a69e859]
[bt]: (4) /home/pwn20tty/build/Debug/bin/df_demo(_ZN6Sophus13defaultEnsureIJKN5Eigen7ProductINS1_6MatrixIfLi3ELi3ELi0ELi3ELi3EEENS1_9TransposeIKS4_EELi0EEEEEEvPKcSB_iSB_DpOT_+0xa9) [0x5648b1be56e4]
[bt]: (5) /home/pwn20tty/build/Debug/bin/df_demo(_ZN6Sophus3SO3IfLi0EEC1ERKN5Eigen6MatrixIfLi3ELi3ELi0ELi3ELi3EEE+0x9b) [0x5648b1bdbbff]
[bt]: (6) /home/pwn20tty/build/Debug/sources/core/libdf_core.so(_ZN2df13CameraTracker13TrackNewFrameERNS_5FrameIfEEbbbbb+0x2ecc) [0x7fb7ac94632c]
[bt]: (7) /home/pwn20tty/build/Debug/sources/core/libdf_core.so(_ZN2df11DeepFactorsIfLi16EE10TrackFrameEv+0x5c1) [0x7fb7acaacbbb]
[bt]: (8) /home/pwn20tty/build/Debug/sources/core/libdf_core.so(_ZN2df11DeepFactorsIfLi16EE12ProcessFrameEdRKN2cv3MatE+0x26e) [0x7fb7acaa7f0c]
[bt]: (9) /home/pwn20tty/build/Debug/bin/df_demo(+0x1931af) [0x5648b1bd21af]
[bt]: (10) /home/pwn20tty/build/Debug/bin/df_demo(+0x1918b1) [0x5648b1bd08b1]
[bt]: (11) /home/pwn20tty/build/Debug/bin/df_demo(main+0xfe3) [0x5648b1c449cf]
[bt]: (12) /usr/lib/x86_64-linux-gnu/libc.so.6(__libc_start_main+0xf3) [0x7fb75a6a0083]
[bt]: (13) /home/pwn20tty/build/Debug/bin/df_demo(+0x18995e) [0x5648b1bc895e]

I am a noob. I have no idea about how to solve this problem.
Could you give me some instructions?

std_depth && render_depth

HelloSorry to bother youI want to know the difference between std_depth and render_depth in the given datasets, besides, how can I acquire them?
Thank you~

about the data

hello, the data bag_1 is the full dataset? if not, could you give me the whole dataset? there are only about 1000 pictures, I want to get all to train other model thank you?

Recommend Projects

  • React photo React

    A declarative, efficient, and flexible JavaScript library for building user interfaces.

  • Vue.js photo Vue.js

    🖖 Vue.js is a progressive, incrementally-adoptable JavaScript framework for building UI on the web.

  • Typescript photo Typescript

    TypeScript is a superset of JavaScript that compiles to clean JavaScript output.

  • TensorFlow photo TensorFlow

    An Open Source Machine Learning Framework for Everyone

  • Django photo Django

    The Web framework for perfectionists with deadlines.

  • D3 photo D3

    Bring data to life with SVG, Canvas and HTML. 📊📈🎉

Recommend Topics

  • javascript

    JavaScript (JS) is a lightweight interpreted programming language with first-class functions.

  • web

    Some thing interesting about web. New door for the world.

  • server

    A server is a program made to process requests and deliver data to clients.

  • Machine learning

    Machine learning is a way of modeling and interpreting data that allows a piece of software to respond intelligently.

  • Game

    Some thing interesting about game, make everyone happy.

Recommend Org

  • Facebook photo Facebook

    We are working to build community through open source technology. NB: members must have two-factor auth.

  • Microsoft photo Microsoft

    Open source projects and samples from Microsoft.

  • Google photo Google

    Google ❤️ Open Source for everyone.

  • D3 photo D3

    Data-Driven Documents codes.