Git Product home page Git Product logo

ndf's Introduction

Neural Unsigned Distance Fields

Neural Unsigned Distance Fields for Implicit Function Learning
Julian Chibane, Aymen Mir, Gerard Pons-Moll

Teaser

Paper - Supplementaty - Project Website - Arxiv - Published in NeurIPS 2020.

Citation

If you find our project useful, please cite the following.

@inproceedings{chibane2020ndf,
    title = {Neural Unsigned Distance Fields for Implicit Function Learning},
    author = {Chibane, Julian and Mir, Aymen and Pons-Moll, Gerard},
    booktitle = {Advances in Neural Information Processing Systems ({NeurIPS})},
    month = {December},
    year = {2020},
}

Install

A linux system with cuda 10 is required for the project.

Please clone the repository and navigate into it in your terminal, its location is assumed for all subsequent commands.

The NDF_env.yml file contains all necessary python dependencies for the project. To conveniently install them automatically with anaconda you can use:

conda env create -f NDF_env.yml
conda activate NDF

To replicate our experiments, please download the corresponding raw ShapeNet data or the closed (watertight) data preprocessed by the authors of DISN [Xu et. al. NeurIPS'19] from here. Then use our data preparation code (see below).

Quick Start with Pretrained Model

Alternatively, to quickly start, you can download the readily prepared data for raw, (not closed) ShapeNet cars: 
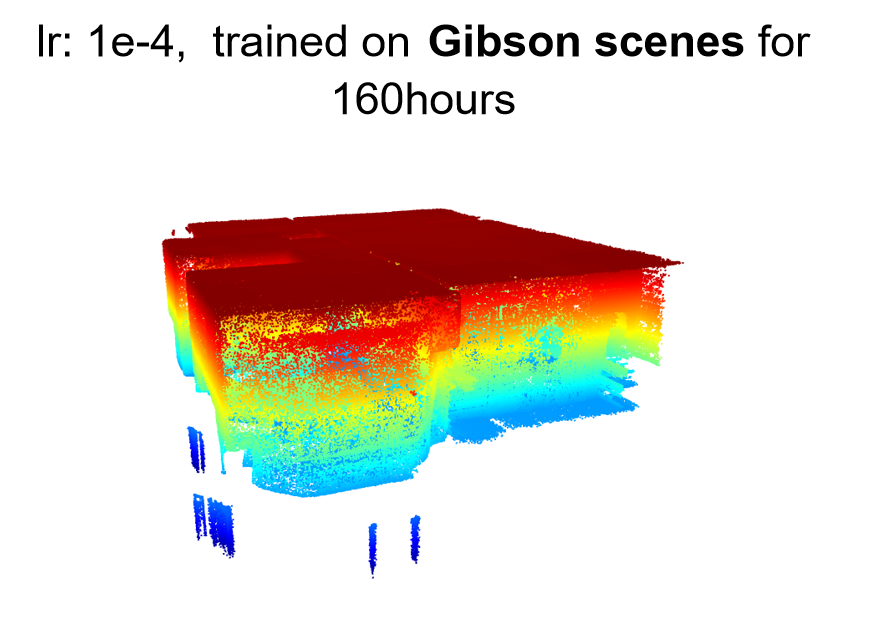
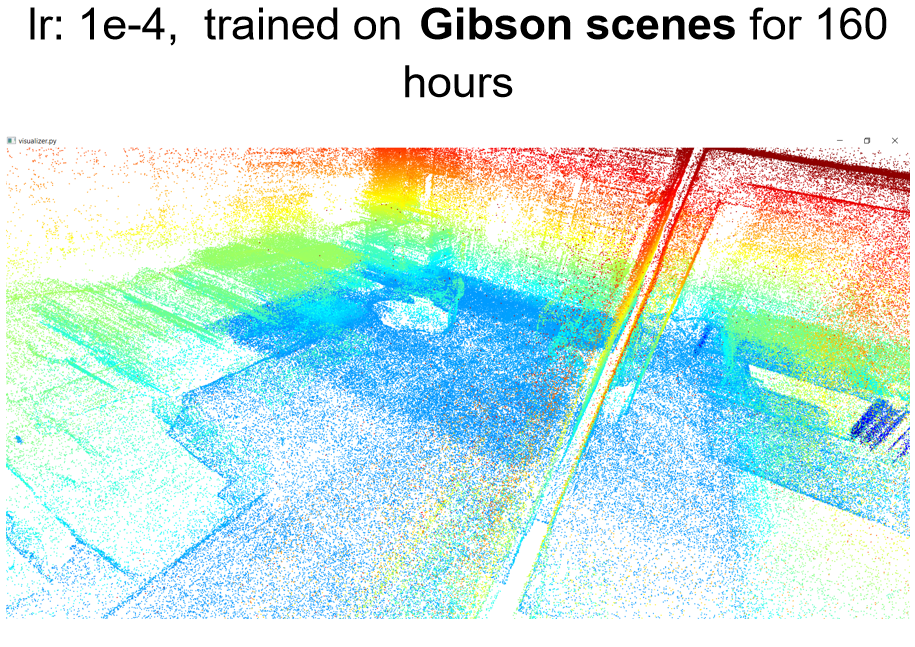
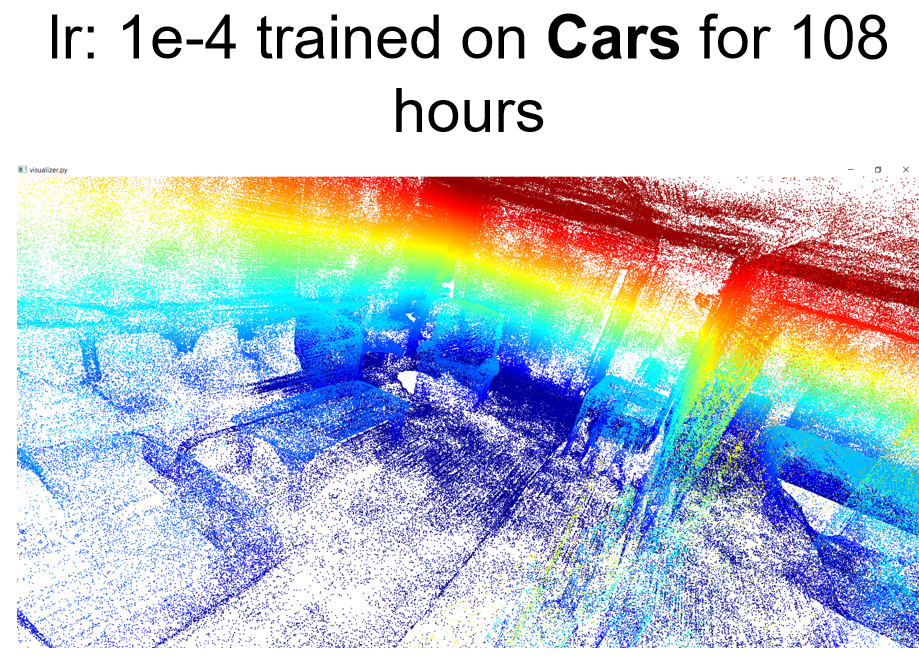
10.000 input points are given to the network as input to infer the detailed, continuous surface. Please download the needed data from here, and unzip it into shapenet/data - unzipped files require 150 GB free space.

Next, you can start generation of instances from the test set via

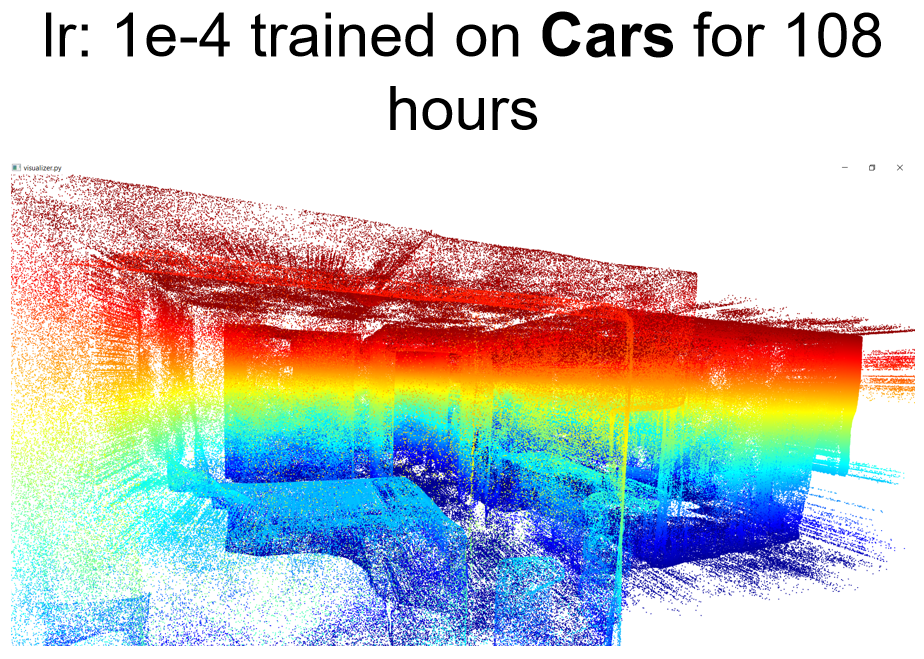
python generate.py --config configs/shapenet_cars_pretrained.txt

Note: Results are generated in the coordinate system of pytorch's grid_sample function (also see here).

Experiment Preparation

First, create a configuration file in folder configs/, use configs/shapenet_cars.txt as reference and see configs/config_loader.py for detailed explanation of all configuration options.

Next, prepare the data for NDF using

python dataprocessing/preprocess.py --config configs/shapenet_cars.txt

and generate a random test/training/validation split of the data using

python dataprocessing/create_split.py --config configs/shapenet_cars.txt

but replacing configs/shapenet_cars.txt in the commands with the desired configuration.

Note: The preprocessing with dataprocessing/preprocess.py can be time intensive. In case multiple compute machines are available, the script can be run in parralell on those machines by splitting the overall files to preprocess into chuncks. For this, use:
python dataprocessing/preprocess.py --num_chunks X --current_chunk Y
where X is the desired number of chunks (e.g. the number of availiable machines) and Y is the chunk to be processed with execution of this command. Y needs to be an integer between 0 to X-1, including O and X-1. In case you have SLURM available you can adapt slurm_scripts/run_preprocessing.sh and use it via

sbatch slurm_scripts/run_preprocessing.sh

Training and generation

To train NDF use

python train.py --config configs/shapenet_cars.txt

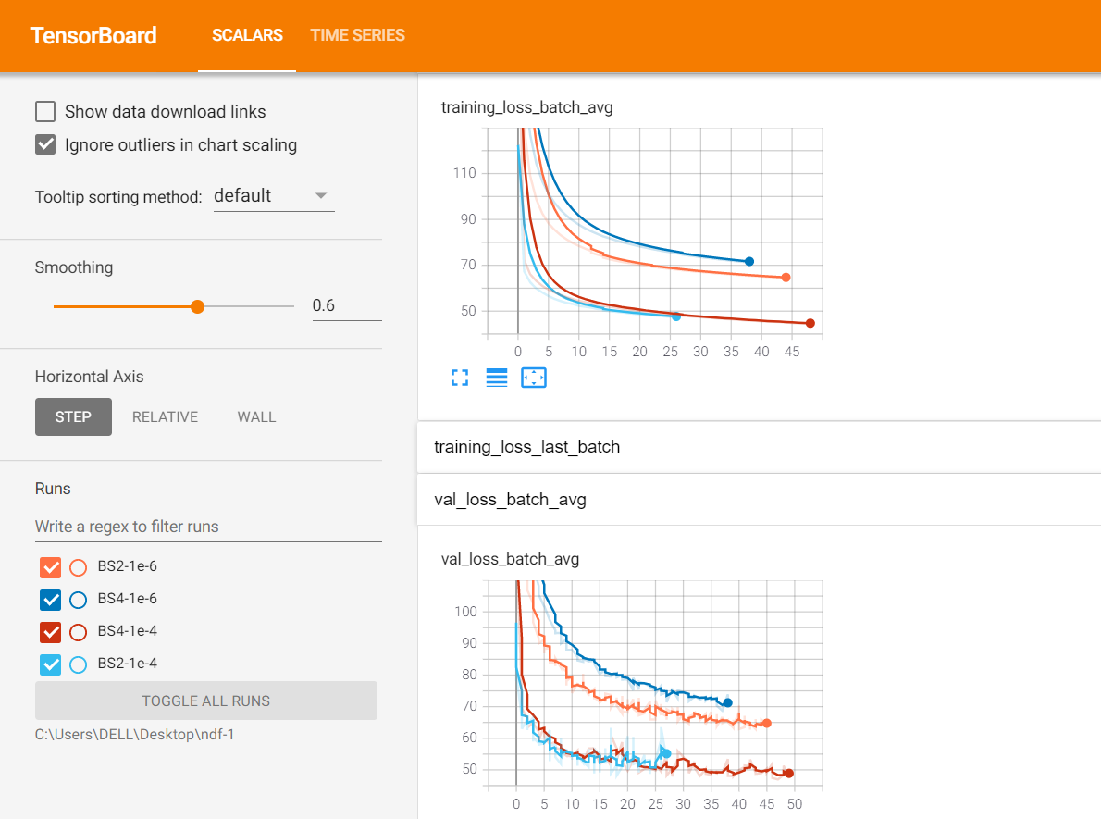
In the experiments/ folder you can find an experiment folder containing the model checkpoints, the checkpoint of validation minimum, and a folder containing a tensorboard summary, which can be started at with

tensorboard --logdir experiments/EXP_NAME/summary/ --host 0.0.0.0

To generate results for instances of the test set, please use

python generate.py --config configs/shapenet_cars.txt

Again, replacing configs/shapenet_cars.txt in the above commands with the desired configuration and EXP_NAME with the experiment name defined in the configuration.

Contact

For questions and comments please contact Julian Chibane via mail.

License

Copyright (c) 2020 Julian Chibane, Max-Planck-Gesellschaft

Please read carefully the following terms and conditions and any accompanying documentation before you download and/or use this software and associated documentation files (the "Software").

The authors hereby grant you a non-exclusive, non-transferable, free of charge right to copy, modify, merge, publish, distribute, and sublicense the Software for the sole purpose of performing non-commercial scientific research, non-commercial education, or non-commercial artistic projects.

Any other use, in particular any use for commercial purposes, is prohibited. This includes, without limitation, incorporation in a commercial product, use in a commercial service, or production of other artefacts for commercial purposes. For commercial inquiries, please see above contact information.

THE SOFTWARE IS PROVIDED "AS IS", WITHOUT WARRANTY OF ANY KIND, EXPRESS OR IMPLIED, INCLUDING BUT NOT LIMITED TO THE WARRANTIES OF MERCHANTABILITY, FITNESS FOR A PARTICULAR PURPOSE AND NONINFRINGEMENT. IN NO EVENT SHALL THE AUTHORS OR COPYRIGHT HOLDERS BE LIABLE FOR ANY CLAIM, DAMAGES OR OTHER LIABILITY, WHETHER IN AN ACTION OF CONTRACT, TORT OR OTHERWISE, ARISING FROM, OUT OF OR IN CONNECTION WITH THE SOFTWARE OR THE USE OR OTHER DEALINGS IN THE SOFTWARE.

You understand and agree that the authors are under no obligation to provide either maintenance services, update services, notices of latent defects, or corrections of defects with regard to the Software. The authors nevertheless reserve the right to update, modify, or discontinue the Software at any time.

The above copyright notice and this permission notice shall be included in all copies or substantial portions of the Software. You agree to cite the Neural Unsigned Distance Fields for Implicit Function Learning paper in documents and papers that report on research using this Software.

ndf's People

Contributors

jchibane avatar

Stargazers

 avatar  avatar  avatar  avatar  avatar  avatar  avatar  avatar  avatar  avatar  avatar  avatar  avatar  avatar  avatar  avatar  avatar  avatar  avatar  avatar  avatar  avatar  avatar  avatar  avatar  avatar  avatar  avatar  avatar  avatar  avatar  avatar  avatar  avatar  avatar  avatar  avatar  avatar  avatar  avatar  avatar  avatar  avatar  avatar  avatar  avatar  avatar  avatar  avatar  avatar  avatar  avatar  avatar  avatar  avatar  avatar  avatar  avatar  avatar  avatar  avatar  avatar  avatar  avatar  avatar  avatar  avatar  avatar  avatar  avatar  avatar  avatar  avatar  avatar  avatar  avatar  avatar  avatar  avatar  avatar  avatar  avatar  avatar  avatar  avatar  avatar  avatar  avatar  avatar  avatar  avatar  avatar  avatar  avatar  avatar  avatar  avatar  avatar  avatar  avatar

Watchers

 avatar  avatar  avatar  avatar  avatar  avatar  avatar

ndf's Issues

Point Cloud Generation is "Patchy"

Here is the input mesh, I've sampled 100K points from this for training

image

Here is the output from model

image

image

as you can see there are a lot of patches in the output. the points are not evenly spread out.

what could be the reason for this?

How to handle the normal inconsistent ?

if we use ball pivoting, we need normal. So we can compute normal via moving least square. However, the normal do not have orientation. The reconstructed mesh might be inconsistent. How to solve this problem. or does rendering really need the normal orientation?

Questions about training Gibson scenes

Hey Julian,

Thank you for your great work!

Cars:
Previously, I have trained NDF on ShapeNet cars. And I found that the learning rate is 1e-6 in your code. In this case the convergence would be affected. It's too slow and the performance is not good. So I alter the learning rate to 1e-4, and that worked out as well as the pre-trained model.

Also the batch_size and the initialization will not affect the performance. Here are the loss value for different BS and lr:
image

Scenes:
I also tried to use this learning rate 1e-4 for scenes. Looking at the loss value. It's also much better than before. However, the loss value is simply 3~4 times bigger than the loss of cars. I also tried to use your model pre-trained on cars to directly apply to scenes to generalize and it's even better than training on scenes. Please look at the example below:

Loss:
My training settings: Trained for 160 hours, batchsize1 (I think we can only use 1 because the point number in each cube is different), lr 1e-4. Other arguments remaining the same as cars(e.g. threshold). For preprocessing I was just using the script you released in NDF-1 repo and got many cubes for each scene. During training I just adapt the dataloader from Cars, and feed the split cubes into the network one by one (batchsize1), so the steps number in each epoch is the total cubes' number. For cars, the boundary sampled points number fed into the network is 50000, which is a half of the boundary sampled points(100000 sampled from mesh). So I also use 2 strategies to train on scenes, one is using all points in the cube as boundary points input(decoder input), the other one is using a half of them, but both of them did not work well:

image

Qualitative results:
image
image
image
image

Questions:
Q1. Do you remember how long it would take to train on scenes? Could you provide a pre-trained model if possible?

Q2. When do you plan to release the code for scenes? Or could you give us a brief introduction or guide line of how to train and test on scenes?

Q3. Have you changed arguments (e.g. thresholds) for training and testing on scenes (e.g. filter_val)? How do you train on scenes? Do you use a batch size 1 using the pre-processed data? Is there any other difference between the training on cars and scenes? (e.g. sample number?)

Q4. In Supplementary, What does this sentence in section 1 Hyperparameters - Network training part: 'To speed up training we initialized all networks with parameters gained by training on the full ShapeNet' means?

  • I didn't see any code related to this. Instead, you just train from scratch. I also tried loading your pre-trained model on cars to continue train on scenes but the loss is bigger than the ones trained on scenes (0.02 and 0.003), which is really weird. Because obviously the generation result using cars' model is much better than the one trained on scenes but somehow the loss is much bigger. In the mean time, the performance would degenerate if I load the pre-trained model and continue to train on scenes. The best performing one now for me is still the model pre-trained on cars.

(updates: I found that during generation of each cubes' dense point cloud, the gradients produced by the model trained on scenes is not as precise as the one trained on cars. Though, for scenes' model, the df is generally smaller (more points with df < 0.03) at the beginning, after 7 refinement steps, only a small amount of them would have smaller df than before resulting in less points with df<0.009, so the generation will take much more steps and time, which I think is due to the inaccurate gradients because after we move the points along the gradients, the df should be smaller. On the other hand, the cars' model have less points with df<0.03 to begin with, but after 7 refinement steps, almost all of them can be correctly moved closer to the surface, resulting in more points with df<0.009.). I think something's gone wrong during training, it doesn't make sense. The loss is smaller, but the gradient is somehow more inaccurate. It seems like the ground truth might be incorrect, but the only adaption I made is switch pymesh to igl to compute gt_df. That's all.

Q5. Do you use different dense pc generation strategies for cars and scenes? Do you use the same script for both of them?

  • My method: I generate the scenes by first generating each cube using the same generation script(only decrease sample_num for each cube to ~50000) as cars and then based on the cube corner to stack them together.

  • However, The iteration for generating the dense point cloud sometimes will be infinite, because after each iteration no new points would fall within the 'filter_val' threshold (you keep those points with df < filter_val after each iteration) So I tried to increase the sample_num for the iteration to 200000 to increase the possibility of selecting correct points, but it did not improve the performance but only to some extent avoid the infinite loop described.

  • I think there might be 2 reasons:

  1. Some arguments for generation has changed for scenes (e.g. filter_val, sample_num..). But I think it's not the key, because I also tried use your model pre-trained on cars to directly perform on scenes with exactly the same generation settings , it looks even better than the model I trained on scenes.
  2. You might have a different training strategy or arguments I don't know.

Hope you can help me, thanks for your time!

Best,
Zhengdi

data.zip download too slow

Thank you for your great work!
And it's too slow to download data.zip from nextcloud,could you share another link to download the dataset?

Thanks again!

How to preprocess the scene dataset

I try to use the preprocessing script boundary sample to compute distance field for the scannet scene, which should be quiet similar to the Gibson dataset. However, I found that some distance field is not correctly computed after visualization (Actually most of the distance field is not computed corrected, for example, query points behind the walls will have weirdly very small distance field). I assume this is caused by reason that libigl is not able to compute the signed distance field on open surface. Therefore, I wonder how the author preprocess the scene data, will be preprocessing script for scene data released in the future?
Thank you in advances!

How to handle the normal inconsistent ?

if we use ball pivoting, we need normal. So we can compute normal via moving least square. However, the normal do not have orientation. The reconstructed mesh might be inconsistent. How to solve this problem. or does rendering really need the normal orientation?
123456

Questions about data preprocessing

Hi Julian,

Thanks for your sharing. I have two questions regarding the data preprocessing part:

  1. What is sample_sigmas represents? At the beginning, I thought the boundary_{sigma}_samples.npz file saves the sampled points around the surface with UDF as a Gaussian distribution of mean=0 and std=sigma, but I load some of them and find they are not. Could you explain a little bit about these three files?
  2. I find the voxelized_point_cloud_256res_10000points.npz file contains a field called compressed_occupancies which save the occupancy of a 256 * 256 * 256 voxel grid. But I am confused about what is the occupancy of an open surface? Is is just a voxelization of the input sparse point cloud? I think you mentioned in the paper that SDF and occupancy are not well defined for open surfaces.

Besides, would you mind share the data preprocessing code? Thanks a lot in advance.

Best,
Xuyang.

About grid_sample

feature_0 = F.grid_sample(f_0, p, padding_mode='border')

Hi, jchibane,
In Pytorch document, it's said that grid specifies the sampling pixel locations normalized by the input spatial dimensions. Therefore, it should have most values in the range of [-1, 1]. For example, values x = -1, y = -1 is the left-top pixel of input, and values x = 1, y = 1 is the right-bottom pixel of input.

The range of query points here is [-0.5, 0.5].
Don't we need to normalize the range of query points to [-1,1] here, which means that adding "p = p * 2" before this line?

Best,
Max Lin

Reproducibility

I am trying to generate the results that are uploaded under 'ndf/experiments/shapenet_cars_pretrained/evaluation/generation/02958343/' using the provided pre-trained model at the 41st epoch, but the results don't seem to match at all.
Can you kindly specify how many epochs was the model trained for before generating the given results?

Algorithm 1 vs. code

  1. In Algorithm 1 in the paper there is a single value for δ. In the code there are 3 different values if I am not mistaken.

grafik

samples = samples[df_pred < 0.03].unsqueeze(0)

grafik

samples += (self.threshold / 3) * torch.randn(samples.shape).to(self.device) # 3 sigma rule

grafik

samples_cpu = np.vstack((samples_cpu, samples[df_pred < filter_val].detach().cpu().numpy()))

  1. Also

grafik

samples = samples[df_pred < 0.03].unsqueeze(0)

is happening before the refinement in the algorithm and after the refinement in the code.

or is

grafik

actually referring to

df_pred = torch.clamp(self.model.decoder(samples, *encoding), max=self.threshold)
?

What is

samples = samples[df_pred < 0.03].unsqueeze(0)

then?

Can you please clarify?

Missing data in preprocessed data.zip

Thank you for your great work.

But in the data.zip there are some data missing compared to the split file you provided(split_cars.npz). There are 5249 1499 749 sequences in split_cars.npz['train'], split_cars.npz['test'], split_cars.npz['val'] separately, but there are only 5750 sequences in the data.zip.

Could you check this up? Than you!

Different range for sampling coordinates and network predictions

Hi @jchibane,
Thanks for sharing your work (and nice code btw).

I have some doubts on the point cloud generation algorithm in ndf/models/generation.py.
More precisely:

  • samples are created in the range [-1.5, 1.5] here; if I understand it correctly, this is because pytorch grid_sample requires the grid coordinates to be in the range [-1, 1] and you add and extra 0.5 because the network was trained with coordinates possibly out of the [-1, 1] range
  • df_pred though should be distances predicted by the network for coordinates in the range [-0.5, 0.5] since the udf ground truth is computed here on coordinates belonging to the range [-0.5, 0.5]
  • thus, I think that the computation samples = samples - F.normalize(gradient, dim=2) * df_pred.reshape(-1, 1) here is moving samples in the range [-1.5, 1.5] with udf predictions for the range [-0.5, 0.5]

Also: since samples x and z dimensions are not swapped before feeding them to the network (as it is done for training), it seems to me that samples and udf predictions are in a different reference system.

What am I missing?
Thanks in advance!

Grid_coords

Hello, Julian,
Thank you for sharing your code. It is a wonderful work.
I am trying to running your code. and meet one issue about data preparation.
I see that in boundary_sampling.py we have this

    grid_coords = boundary_points.copy()
    grid_coords[:, 0], grid_coords[:, 2] = boundary_points[:, 2], boundary_points[:, 0]
    grid_coords = 2 * grid_coords

boundary_points are the points that you mentioned in the paper to compute distance to the surface. Indeed, we see that ground truth df = np.abs(igl.signed_distance(boundary_points, mesh.vertices, mesh.faces)[0]) is distance of boundary_points to the mesh. In theory, we should use boundary_points in training.py
but why do you use grid_coords in the decoder instead of boundary_points shown as follows?

      p = batch.get('grid_coords').to(device)
      df_gt = batch.get('df').to(device) #(Batch,num_points)
      inputs = batch.get('inputs').to(device)
     df_pred = self.model(p,inputs) #(Batch,num_points

and why grid_coords switch x and z coordinates, and scaled by 2x ? Grid_coords is misaligned with inputs. right ?
Thanks a lot for your time.
Best regards
Antony

Scene Reconstruction

Hi @jchibane,

Thanks for this very interesting work and for sharing the code. I am curious about how you trained NDF on large scenes like the Gibson dataset. My understanding is that the scenes are divided into small cubes, and the cubes were used to populate the input grid for training. Assuming my understanding is correct, do you normalize the cubes to [-0.5, 0.5]? Could you please share some detail about the data preparation procedure and training? I would really appreciate it.

Thanks

the checkpoints .tar file can not been extracted

Hi,
I found that the file

"checkpoint_108h:5m:50s_389150.3971107006.tar"

stroed in "experiments/pretrained_dist-0.01_0.49_0.5_sigmas-0.08_0.02_0.003_res-256/checkpoints" can not been extracted.
I used the command

'tar -xvf checkpoint_108h:5m:50s_389150.3971107006.tar'

but just failed.

Maybe this .tar file has been destroyed, could you update a new file?

Could you offer the obj/off files of the dataset?

Hello,

I hope to do some test on your dataset and compare to the original obj/off models.

The dataset you used contains 5750 objects. However, the dataset I found in the If-Net project is only 3091. And the overlap is roughly 2400.

So could you help to give us the entire dataset or tell us where to download them?

Thank you.

Query about Training on Point Clouds

Hi,

I am trying to train your model on point cloud, so that i can generate a clean mesh from my rough sparse point cloud. since your model can provide a dense point cloud given a sparse point cloud, and then using Ball Pivoting Algorithm, it should produce a nice clean mesh.

But for data generation we need to compute the distance field, either using igl or pymesh, but for doing so we need a defined mesh, both igl and pymesh ask for faces to be present in the input, which i don't have. how do i solve this problem ?

How to evaluate the reconstructed meshes against GT?

Hi,
i was trying to reproduce the experiment and compare its performance with other methods. However, i didn't find the code to evaluate the reconstruction quality with metrics like CD and F-score. I tried to conduct the evaluation using code provided in another method, but the results are completely wrong with CD being over hundreds!
So, it will be of great help if you can kindly provide the code for evaluation!
Thanks!

Issues on point to mesh conversion

Hi @jchibane ,

Thanks for sharing the amazing work!

We are trying to convert the generated point clouds (under the folder experiments/shapenet_cars_pretrained/evaluation/generation/) to mesh using the ball pivoting algorithm. However, we found that it is very difficult to obtain high-quality meshing results. We use the ball pivoting algorithm provided by MeshLab. When the radius is large, e.g. 0.05, the reconstructed mesh is incomplete. However, if a small radius, e.g. 0.01, is used, though the reconstructed surface is more complete, there exist a lot of artifacts and the surface normals are not consistent.
The results are shown below:

Reconstruction result using radius = 0.05
Screenshot from 2021-08-23 23-33-54

Reconstruction result using radius = 0.01
Screenshot from 2021-08-23 23-34-03

Could you provide more details on how you generate mesh from the point cloud? Or could you share your code of point-to-mesh conversion?
Since we are trying to compare your work in our paper, we would like to ensure our comparison is fair.

Thank you for your response in advance!

Recommend Projects

  • React photo React

    A declarative, efficient, and flexible JavaScript library for building user interfaces.

  • Vue.js photo Vue.js

    🖖 Vue.js is a progressive, incrementally-adoptable JavaScript framework for building UI on the web.

  • Typescript photo Typescript

    TypeScript is a superset of JavaScript that compiles to clean JavaScript output.

  • TensorFlow photo TensorFlow

    An Open Source Machine Learning Framework for Everyone

  • Django photo Django

    The Web framework for perfectionists with deadlines.

  • D3 photo D3

    Bring data to life with SVG, Canvas and HTML. 📊📈🎉

Recommend Topics

  • javascript

    JavaScript (JS) is a lightweight interpreted programming language with first-class functions.

  • web

    Some thing interesting about web. New door for the world.

  • server

    A server is a program made to process requests and deliver data to clients.

  • Machine learning

    Machine learning is a way of modeling and interpreting data that allows a piece of software to respond intelligently.

  • Game

    Some thing interesting about game, make everyone happy.

Recommend Org

  • Facebook photo Facebook

    We are working to build community through open source technology. NB: members must have two-factor auth.

  • Microsoft photo Microsoft

    Open source projects and samples from Microsoft.

  • Google photo Google

    Google ❤️ Open Source for everyone.

  • D3 photo D3

    Data-Driven Documents codes.