
| Standard | Satelite | Hybrid |

|

|

|
| 1. Storyboard: drag into a ViewController , segmentedControl , mapView | |
| 2. Asign mapView to the viewController |  |
| add MapKit library |  |
notes:
permission is handeled by the line:
locaionManager.requestAlwaysAuthorization() // prompt user current location for Allwayd
or
locaionManager.requestWhenInUseAuthorization() // prompt user current location For just when the app in use
import MapKit and add the implementation of MKMapViewDelegate to the view controller as following :
ViewController.swift
import UIKit
import MapKit

class ViewController: UIViewController, MKMapViewDelegate {

    @IBOutlet var myMap: MKMapView!
    var locaionManager: CLLocationManager!

    override func viewDidLoad() {
        locaionManager = CLLocationManager() //initialize location manager
        locaionManager.requestAlwaysAuthorization()// prompt user current location
        myMap.delegate = self //assign instance self as delegate property

        //show user's current location
        myMap.showsUserLocation = true
        //map layer type
        myMap.mapType = .standard

        //add markers
        addMarker()
    }

    //when user's location changed (walking, driving, etc..)
    func mapView(_ mapView: MKMapView, didUpdate userLocation: MKUserLocation) {
        //reset region to each location changed
        let newPlace = userLocation.coordinate
        myMap.setRegion(MKCoordinateRegionMakeWithDistance(newPlace, 8000, 8000), animated: true)
    }

    @IBAction func changeType(_ seg: UISegmentedControl) {
        let i = seg.selectedSegmentIndex
        myMap.mapType = MKMapType(rawValue: UInt(i))!
    }

    func addMarker() {
        let pin = MKPointAnnotation()
        pin.title = "My Pin"
        pin.coordinate = CLLocationCoordinate2D(latitude: 32.0, longitude: 34.9)
        myMap.addAnnotation(pin) //add to map
    }
}modeling managed object and sotre in presistence in sqlite tutorial MyCoreData
- start a project and enable "use code data"
- define a model in the file with the extention .xcdatamodeld (it's a gui to model the data)
- in viewcontroller.swift import CoreData and use the following example to use the model
import UIKit
import CoreData

class ViewController: UIViewController {

    var context = (UIApplication.shared.delegate as! AppDelegate).persistentContainer.viewContext

    override func viewDidLoad() {
//        insertNewPerson(name: "Shoval", age: 21)
//        insertNewPerson(name: "Bar", age: 22)
//        insertNewPerson(name: "Guidon", age: 23)
        query()
        print("Done")

    }

    func insertNewPerson(name: String, age: Int16) {

        let person = Person(context: context)// create new person and insert it to CoreData
        //edit
        person.name = name
        person.age = age

        try! context.save()
    }

    func query(){
        let req: NSFetchRequest<Person> = Person.fetchRequest()

        let people = try! context.fetch(req)
        for p in people {
            print("\(p.name!), \(p.age)")
        }
    }
}
MySqlite FMDB
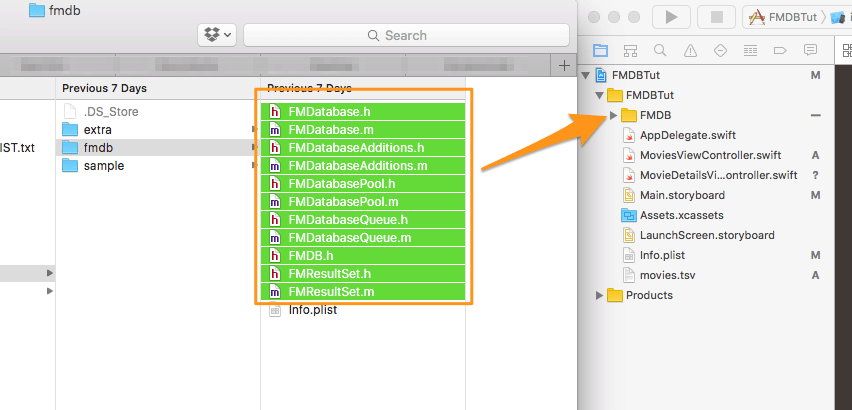
- create a folder FMDB in the project and fill inside files from from here or download directly from fmdb github Once you open the zip and decompress its contents, navigate to the fmdb-master/src/fmdb directory (in Finder). The files you’ll find there are those that you need to add to the starter project. Select them (there’s also a .plist file, you don’t really need it), and then drag and drop into the Project navigator in Xcode.

now you have to add a bridging header file. inorder to do this, go to the top tree of the project , select it and go to build settings and search for bridg to find it quiqly


#import "FMDB.h"
1
#import "FMDB.h"
Now, the FMDB classes will be available throughout our Swift project, and we’re ready to start making use of them
ViewController.swift
class ViewController: UIViewController {

    let fileMgr = FileManager.default
    var docs, dbPath: String!
    var db: FMDatabase!

    override func viewDidLoad() {
        //directory path to documents folder
        docs = fileMgr.urls(for: .documentDirectory, in: .userDomainMask)[0].path
        dbPath = docs + "/my.db"
        db = FMDatabase(path: dbPath) //create DB object
        print(docs)

        if db.open() { //connection seccussful
            c() //Creation example
            r() //Reading example
            u() //Updateing example
            d() //Delete Example
            print("done")
            db.close()
        }

    }

    func c(){
        //create table
        exec("CREATE TABLE IF NOT EXISTS stuff (id INTEGER PRIMARY KEY, name VARCHAR(20))")

        //create data in table
        exec("INSERT INTO stuff (name) VALUES ('Phone'), ('Marker'), ('Laptop')")
    }

    func r(){
        let results = db.executeQuery("SELECT * FROM stuff", withArgumentsIn: nil)!
        while results.next() {
            print(results.string(forColumn: "id"))
            print(results.string(forColumn: "name"))
        }
    }

    func u() {
        //change table
        exec("ALTER TABLE stuff ADD COLUMN price DOUBLE DEFAULT 0.0")

        //update data
        exec("UPDATE stuff SET price=5.5")
    }

    func d(){
        //delete data
        exec("DELETE FROM stuff")

        //delete Table itself
        exec("DROP TABLE IF EXISTS stuff")
    }

    //own reuse
    func exec(_ sql: String){
        db.executeStatements(sql)
    }
}custom tabelview that presents an image and a label

define the p.list (copy and past) movies.plist
enable networking in info.plist: (in the correct file and not under tests!)
  <key>NSAppTransportSecurity</key>
    <dict>
        <key>NSAllowsArbitraryLoads</key>
        <true/>
    </dict>
in storyboard define tableview , tabelviewcell, inside of the cell define an image, label and textview asign the cell with the following class:
first asign the custom class to the TableCellView in the storyboard inspector.
inorder to corectly choose the TabelCellView and aign the custome class choose it from the left storyboard tree as foolowing image shows:

Assign Identifier for the tabelCell in Attributes inspector:
Assign the identifier:
 Affter Assigning the identifier:

MovieTableCell.swift
class MovieTableCell: UITableViewCell {
    @IBOutlet var imgV: UIImageView!
    @IBOutlet var ttl: UILabel!
    @IBOutlet var desc: UITextView!
}
ViewController.swift
class ViewController: UIViewController, UITableViewDataSource {

    var movies: [String: [String]] = [:]
    var titles: [String] = []

    override func viewDidLoad() {
        super.viewDidLoad()

        let path = Bundle.main.path(forResource: "movies", ofType: "plist")!
        movies = NSDictionary(contentsOfFile: path) as! Dictionary
        titles = Array(movies.keys)
    }

    func tableView(_ tableView: UITableView, numberOfRowsInSection section: Int) -> Int {
        return titles.count
    }

    func tableView(_ tableView: UITableView, cellForRowAt indexPath: IndexPath) -> UITableViewCell {
        let cell = tableView.dequeueReusableCell(withIdentifier: "movieCell") as! MovieTableCell
        let title = titles[indexPath.row] //get title

        cell.ttl.text = title //set label for movie title
        cell.desc.text = movies[title]![0] //set text for textView

        //set img
        let url = URL(string: movies[title]![1])! //url to img
        URLSession.shared.dataTask(with: url) { (imgData, r, e) in
            let img = UIImage(data: imgData!) //in background

            DispatchQueue.main.async {
                cell.imgV.image = img
            }
        }.resume()

        return cell
    }
}
put a table view inside the viewcontroller and then drag and drop inside a tabelviewcell 

the following class shell be asign to the tabelviewcell in the storyboard identity inspector
MyCustomCell.swift
class MyCustomCell: UITableViewCell {

    private var value: Int = 0
    @IBOutlet weak var numLbl: UILabel!

    @IBAction func plusOne(_ sender: UIButton) {
        value += 1
        numLbl.text = "\(value)"
    }
}
asign an identifier to the cell: 
ViewController.swift
class ViewController: UIViewController, UITableViewDataSource {

    override func viewDidLoad() {
        super.viewDidLoad()
    }

    func tableView(_ tableView: UITableView, numberOfRowsInSection section: Int) -> Int {
        return 10
    }

    func tableView(_ tableView: UITableView, cellForRowAt indexPath: IndexPath) -> UITableViewCell {
        //get cell from tableviews custom cells bu identifier
        let cell = tableView.dequeueReusableCell(withIdentifier: "myCell") as! MyCustomCell

        //we have access to custom views and functions
        //cell.numLbl
        //cell.plusOne()

        return cell
    }
}class ViewController: UIViewController, UITableViewDataSource {
typealias Coin = [String: Any]
var coins: [Coin] = []
@IBOutlet var tbl: UITableView!
override func viewDidAppear(_ animated: Bool) {
let url = URL(string: "https://api.coinmarketcap.com/v1/ticker/?limit=10")!
URLSession.shared.dataTask(with: url, completionHandler: {(d,r,e) in
AsyncTask(backgroundTask: { (d: Data) -> [Coin]? in
return (try? JSONSerialization.jsonObject(with: d, options: .mutableContainers)) as? [Coin]
}, afterTask: { coins in
if coins == nil {print("nil was found HERE")}
self.coins = coins ?? []
self.tbl.reloadData()
}).execute(d!)
}).resume()
}
func tableView(_ tableView: UITableView, numberOfRowsInSection section: Int) -> Int {
return coins.count
}
func tableView(_ tableView: UITableView, cellForRowAt indexPath: IndexPath) -> UITableViewCell {
let cell = UITableViewCell()
let index = indexPath.row
cell.textLabel?.text = "\(coins[index]["name"]!) \(coins[index]["price_usd"]!)"
return cell
}
}the json response looks like that:
[
    {
        "id": "bitcoin",
        "name": "Bitcoin",
        "symbol": "BTC",
        "rank": "1",
        "price_usd": "11465.7",
        "price_btc": "1.0",
        "24h_volume_usd": "13844400000.0",
        "market_cap_usd": "192757048762",
        "available_supply": "16811625.0",
        "total_supply": "16811625.0",
        "max_supply": "21000000.0",
        "percent_change_1h": "-0.01",
        "percent_change_24h": "1.16",
        "percent_change_7d": "-16.56",
        "last_updated": "1516341265"
    },
    {
        "id": "ethereum",
        "name": "Ethereum",
        "symbol": "ETH",
        "rank": "2",
        "price_usd": "1035.88",
        "price_btc": "0.0912114",
        "24h_volume_usd": "5294810000.0",
        "market_cap_usd": "100554747642",
        "available_supply": "97071811.0",
        "total_supply": "97071811.0",
        "max_supply": null,
        "percent_change_1h": "-0.12",
        "percent_change_24h": "3.29",
        "percent_change_7d": "-14.01",
        "last_updated": "1516341552"
    }, .....
    ]
serialise deserialise
//Serialize
let object: [String: Any] = ["grade 1": 10,"grade 2": 20,"grade 3": 30,"grade 4": 40] //some object
let jsonData = try JSONSerialization.data(withJSONObject: object, options: .prettyPrinted)// serialize to Data
let jsonStr = String(data: jsonData, encoding: .utf8)!
print(jsonStr)

let json = """
[
    {
        "first": "Bubu",
        "last": "Bubu is the king",
        "gender": "male"
    },
    {
        "first": "Groot",
        "last": "I am Groot",
        "gender": "other"
    },
    {
        "first": "Deadpool",
        "last": "Chimichangas",
        "gender": "male"
    }
]
"""

//convert to swift object
let jObject = try JSONSerialization.jsonObject(with: json.data(using: .utf8)!, options: .mutableContainers) as! [[String: Any]]

//work with object from json
for item in jObject {
    print("first name: \(item["first"]!)")
} let path = Bundle.main.path(forResource: "users", ofType: "plist")!
myUsers = NSDictionary(contentsOfFile: path) as! Dictionary // contains username - password key - values
// asign variables pass , name
// check ig name & pass exsist in dictionary:
if pass == myUsers[name] { //if password & user are ok
//legal user -
} else {
//not found in dictionary, illegal user
} private let prefs = UserDefaults.standard
user = prefs.string(forKey: ViewController.LOG_USER)
prefs.set(name, forKey: ViewController.LOG_USER)this projects include textfield, label, 3 buttons for : save,load and delete. ViewController.swift
class ViewController: UIViewController {

    let MESSAGE = "msg"

    @IBOutlet var input: UITextField!
    @IBOutlet var output: UILabel!

    let prefs = UserDefaults.standard


    @IBAction func save() { //save value to user defaults
        prefs.set(input.text!, forKey: MESSAGE)
    }

    @IBAction func load() { // load value from your defaults
//        if let msg = prefs.string(forKey: "msg") {
//            output.text = msg
//        } else {
//            output.text = "no message"
//        }
        let msg = prefs.string(forKey: MESSAGE)
        output.text = msg ?? "No message"
    }

    @IBAction func del() { //
        prefs.removeObject(forKey: MESSAGE)
    }
} let alert = UIAlertController(title: "Login", message: nil, preferredStyle: .alert)
//text fields
alert.addTextField(configurationHandler: {(tf) in
tf.placeholder = "username"
})
alert.addTextField(configurationHandler: {(tf) in
tf.placeholder = "password"
tf.isSecureTextEntry = true
})
func okHandler(action: UIAlertAction) {
let name = alert.textFields![0].text!
let pass = alert.textFields![1].text!
if pass == myUsers[name] { //if password & user are ok
//legal user -> save in UserDefaults
prefs.set(name, forKey: ViewController.LOG_USER)
//set button text & visibility
profileBtn.setTitle(name, for: .normal)
profileBtn.isHidden = false
} else {
//recursive call - because wrong user
alertLogin()
}
}
//action buttons
alert.addAction(UIAlertAction(title: "OK", style: .default, handler: okHandler))
alert.addAction(UIAlertAction(title: "Cancel", style: .cancel, handler: nil))
//show it
present(alert, animated: true, completion: nil)more exmples of the same type of alert dialog builder: MyAlerts
make a class and then set the button in storyboard with identity inspector to this class
class MyButton: UIButton {

    override func draw(_ rect: CGRect) {
        layer.backgroundColor = UIColor.magenta.cgColor
        let width = frame.width
        layer.cornerRadius = CGFloat(15)
    }

}
in didlviewload change the UIView parameters such as:
 btn: UIButton!
 btn.layer.borderColor = UIColor.red.cgColor
 btn.setTitleColor(UIColor.red, for: UIControlState.normal)
 section: UIView!
section.layer.borderWidth = 2make a view using UIView constructor
    //origin & size
    let origin = CGPoint(x: 40, y: 20)
    let size = CGSize(width: 50, height: 50)
    //CGRect => width * height
    let frame = CGRect(origin: origin, size: size)
    let squareView = UIView(frame: frame)
    // construct directly:
    let ttl = UILabel(frame: CGRect(x: 20, y: 60, width: 150, height: 50))
    ttl.text = "Zohar"
    ttl.textAlignment = .center
    ttl.layer.borderWidth = 1

    UILabel(frame: CGRect(x: 20, y: 60, width: 150, height: 50))
after creating the desired view and adding properties to the look and feel you should add it to a parent groupView, for exmple to the super view:
view.addSubview(squareView) let movies = ["John wick", "John wick Part 2", "Jurassic park", "Freddy Krueger"]
var y: CGFloat = 20 //reuse y position, start from status bar
for m in movies {
let ttl = UILabel()
ttl.text = m //assign relevant text
ttl.sizeToFit() //wrap content
ttl.frame.origin.x = 10 //x position
ttl.frame.origin.y = y //last stored y position
y += ttl.frame.height //increment y position
view.addSubview(ttl) //show to user
}
# iterating all subviews in the super view:
for v in view.subviews { //iterate on all subviews
if v is UILabel { //each one that is label
v.removeFromSuperview() //remove
}//in iOS gradient is a sort of layer
let layer = CAGradientLayer()
//gradient colors
layer.colors = [
UIColor.red.cgColor, //start color
UIColor.blue.cgColor //end color
]
//resuse CGRect of View
layer.frame = view.frame
layer.frame.origin = CGPoint(x: 0, y: 0)
//add gradient layer to existing list of layers of that view
view.layer.insertSublayer(layer, at: 0)func grad2(){
let l = CAGradientLayer()
l.colors = [
UIColor.red.cgColor,
UIColor.blue.cgColor,
UIColor.red.cgColor,
]
//peak points
l.locations = [0.1, 0.3, 0.8]
let s = view.frame.size
l.frame = CGRect(
origin: CGPoint(x:0, y:0),
size: CGSize(width: s.width, height: s.height))
view.layer.addSublayer(l)
}//directions
let l = layer //(aboth example)
l.startPoint = CGPoint(x: 0, y: 0)
l.endPoint = CGPoint(x: 1, y: 1)
l.frame.size = view.frame.size
l.frame.origin.x = 0
l.frame.origin.y = 0
//center in view
let s = view.frame.size
l.frame.size = CGSize(width: s.width / 2, height: s.height / 2)
l.frame.origin.x = s.width / 4
l.frame.origin.y = s.height / 4 typealias Sequence = (Int)->()
private var sliderValue = 1
@IBOutlet var timesLbl: UILabel!
var sequence: Sequence!
let allSequences: [Sequence] = [
//Fibonacci
{ (times: Int) in
var small = 1
var big = 1
for t in 1...times {
print(small)
big = big + small
small = big - small
}
} ,
//Triangular
{ (times: Int) in
var sum = 0
for t in 1...times {
sum += t
print(sum)
}
},
//Count
{ (times: Int) in
for t in 1...times {
print(t)
}
}
]
@IBAction func seletSequence(_ seg: UISegmentedControl) {
let index = seg.selectedSegmentIndex
sequence = allSequences[index]
}
@IBAction func slide(_ slider: UISlider) {
sliderValue = Int(slider.value)
timesLbl.text = "Times: \(sliderValue)"
}
@IBAction func go(_ sender: Any) {
sequence(sliderValue)
}
public class MyGens{
    public init() { }

    //method with generic parameter
    public func printSome <Temp> (_ some: Temp){
        print(some)
    }

    //method with generic parameter & return type
    public func singleVal <T> (_ val: T) -> [T] {

        return [val]
    }

    public func swapVals <G> (v1: inout G, v2: inout G){
        let temp = v1
        v1 = v2
        v2 = temp
    }
}
more generic (contents):
var mg = MyGens()
//Example 1
mg.printSome("Hello world")
mg.printSome(100)
mg.printSome(1.5)
mg.printSome(false)

//Example 2
var nums:[Int] = mg.singleVal(4)
print(nums)

//Example 3
var x = 10, y = 5
mg.printSome([x, y])
mg.swapVals(v1: &x, v2: &y)
mg.printSome([x, y])

var a = ["Orin","Yossi", "Dima"], b = ["Omri","Rami"]
mg.printSome([a, b])
mg.swapVals(v1: &a, v2: &b)
mg.printSome([a, b])class ViewController: UIViewController {
@IBOutlet var input: UITextField!
@IBOutlet var output: UILabel!
var docs, filePath, fileName: String!
let fileMgr = FileManager.default
override func viewDidLoad() {
//path for documents directory
let paths = NSSearchPathForDirectoriesInDomains(
.documentDirectory, //FileManager.SearchDirectory.documentDirectory
.userDomainMask, //FileManager.SearchPathDomainMask.userDomainMask
true) //expand tilde (~) to show full path
docs = paths[0] //first
print(docs)
fileName = "bubu.txt"
filePath = docs + "/" + fileName
print(filePath)
//CRUD
// create
// read
// update
// delete
}
@IBAction func save(_ btn: UIButton) {
let txt = input.text!
if txt.isEmpty { return } //if empty - abort
//c//write from scratch (override content)
write(string: read() + txt) //append to existing
input.text = "" //reset input
}
@IBAction func load(_ btn: UIButton) {
output.text = read() //load content from file
}
@IBAction func deleteIt(_ btn: UIButton) {
//deleteContent()
deleteFile()
}
private func write(string data: String) {
do {
try data.write(toFile: filePath,
atomically: true,
encoding: .utf8)
} catch {
print("Couldn't wirite to file")
}
}
private func read() -> String {
// if let txt = try? String(contentsOfFile: filePath) {
// return txt
// } else {
// return "no data"
// }
return (try? String(contentsOfFile: filePath)) ?? ""
}
//clear file contents
private func deleteContent() {
write(string: "")
}
//remove file entirely
private func deleteFile(){
do {
try fileMgr.removeItem(atPath: filePath)
} catch {
print("File Couldn't be deleted")
}
}
}class ViewController: UIViewController {
//animator -> control animations behavour
var anim: UIDynamicAnimator!
override func viewDidLoad() {
super.viewDidLoad()
//set animator to given reference view
anim = UIDynamicAnimator(referenceView: view)
}
override func viewDidAppear(_ animated: Bool) {
//views to animate
let rect1 = UIView(frame: CGRect(
x: view.frame.width/2,
y: 20,
width: 60,
height: 20))
let rect2 = UIView(frame: rect1.frame)
let rect3 = UIView(frame: rect1.frame)
//put rect2 & rect 3 on different points
rect2.frame.origin.x -= 10
rect2.frame.origin.y = 50
rect3.frame.origin.y = view.frame.height/2
//set colors
rect1.backgroundColor = UIColor.red
rect2.backgroundColor = UIColor.green
rect3.backgroundColor = UIColor.blue
//add to super view
view.addSubview(rect1)
view.addSubview(rect2)
view.addSubview(rect3)
//Animation behaviours
//gravity
let grav = UIGravityBehavior(items: [rect1, rect2])
grav.gravityDirection = CGVector(dx: 0, dy: 1)
anim.addBehavior(grav)
//collision
let col = UICollisionBehavior(items: [rect1, rect2, rect3])
col.translatesReferenceBoundsIntoBoundary = true
anim.addBehavior(col)
//elasticity
let b = UIDynamicItemBehavior(items: [rect1])
b.elasticity = CGFloat(0.8) //range 0 - 1
anim.addBehavior(b)
}
}create a view inside the viewcontroller and asign it the class MyOvalView MyOvalView.swift:
class MyOvalView: UIView {
    typealias p = CGPoint

    override func draw(_ rect: CGRect) {
        let c = UIGraphicsGetCurrentContext()!
        c.setFillColor(UIColor.yellow.cgColor)
//        c.fillEllipse(in: rect)
        let center = p(x: rect.width / 2, y: rect.height / 2)
        c.addArc(center: center, radius: rect.width / 2, startAngle: 0, endAngle: CGFloat(Double.pi / 180 * 360), clockwise: true)
        c.fillPath()
    }

    override func touchesBegan(_ touches: Set<UITouch>, with event: UIEvent?) {
        func distance(toPoint p:CGPoint) -> CGFloat {
            var c = CGPoint()
            c.x = frame.width/2
            c.y = frame.height/2
            return sqrt(pow(c.x - p.x, 2) + pow(c.y - p.y, 2))
        }
        let radius = frame.width / 2
        let tl = touches.first!.location(in: self)
        let dis = distance(toPoint: tl)

        if dis <= radius {
            UIView.animate(withDuration: 1, animations: {
                self.alpha = 0
            }, completion: { b in
                self.removeFromSuperview()
            })
        }
    }
}
view controller.swift:
class ViewController: UIViewController {

    @IBOutlet var oval: MyOvalView!
    var anim: UIDynamicAnimator!

    override func viewDidLoad() {
        super.viewDidLoad()
        anim = UIDynamicAnimator(referenceView: view)

        let grav = UIGravityBehavior(items: [oval])
        grav.gravityDirection = CGVector(dx: 0, dy: 0.4)
        anim.addBehavior(grav)

        let col = UICollisionBehavior(items: [oval])
        col.translatesReferenceBoundsIntoBoundary = true
        anim.addBehavior(col)
    }
}project: FilesEx this projet contains two viewcontrollers.
- firt contains two fieldtext for user and password. button for login and register. for new user & password, pressing register button saves this sequence user-pass to a file. in didLoad all the content of the file is loaded to a dictionary so each user&pass compare to this content in login button function, and if valid goToSecond view controller.
- second view controllerr contains button "delete All" to delete all users from the file, touch any where in the screen to return back to first controller and a table view to present all the users from the file. the users and file path are sent from first controller to the second when login function excecute. attention: nice function to read from two fields for user & password and return it as a credential (cred.user, cred.pass) struct
class ViewController: UIViewController {

    @IBOutlet var username: UITextField!
    @IBOutlet var password: UITextField!

    var filePath: String!
    var users: [String:String] = [:]
    //user-pass;user-pass;user-pass;user-pass;user-pass;user-pass;

    override func viewDidLoad() {
        super.viewDidLoad()
        let docs = NSSearchPathForDirectoriesInDomains(.documentDirectory,
                                            .userDomainMask,
                                            true)[0]
        filePath = docs + "/users.txt"
        loadUsers(readUsers())
    }


    @IBAction func login() {
        let credi = getTexts()
        if users[credi.user] == credi.pass {
            //login
            print("login good")
            goToSecond()
        } else {
            print("not invalid login..")
        }
    }

    @IBAction func regist() {
        let cred = getTexts()
        do {
            try (readUsers() + "\(cred.user)-\(cred.pass);").write(
                toFile: filePath,
                atomically: true,
                encoding: .utf8)
            users[cred.user] = cred.pass
        } catch {
            print("error writing")
        }
    }

    private func getTexts() -> (user: String, pass:String) {
        return (user: username.text!, pass: password.text!)
    }

    private func readUsers() -> String{
        return (try? String(contentsOfFile: filePath)) ?? ""
    }

    private func loadUsers(_ data: String) {
        let usersStr: [Substring] = data.split(separator: ";")

        for uStr in usersStr {
            let cred = uStr.split(separator: "-")
            users["\(cred[0])"] = "\(cred[1])"
        }
    }

    func goToSecond() {
        let next = storyboard!.instantiateViewController(withIdentifier: "second") as! SecondController
        next.set(users: users)
        next.set(filePath: filePath)

        show(next, sender: self)
    }
}class ViewController: UIViewController {
@IBOutlet var section: UIView!
@IBOutlet var footer: UIView!
override func viewDidAppear(_ animated: Bool) {
/*
//Example 1
UIView.animate(withDuration: 1.5, animations: {
self.section.alpha = 0 //fade out
})
*/
//Example 2
func changeFooter(){
footer.backgroundColor = UIColor.yellow
}
UIView.animate(withDuration: 2.25, animations: changeFooter)
/*
//Example 3
UIView.animate(withDuration: 1.8, animations: {
//width = 50%, height = 200%
let tranform = CGAffineTransform(scaleX: 0.5, y: 2.0)
self.footer.transform = tranform
})
*/
//Example 4
UIView.animate(withDuration: 2.1, animations: {
self.section.backgroundColor = UIColor.magenta
}, completion: { (b) in //when animation completed
self.footer.backgroundColor = UIColor.red
})
// * /
//Example 5
UIView.animate(withDuration: 1, animations: {
//PI / 180 * degrees -> dergrees to rotate
let halfTurn = CGFloat(Double.pi / 180 * 90) //degrees
let t = CGAffineTransform(rotationAngle: halfTurn) //rotation object
self.section.transform = t.concatenating(CGAffineTransform(translationX: 150, y: 0))
})
// */
//Example 6 - animation chain
let x = self.view.frame.width / 4
let tx = CGAffineTransform(translationX: x, y: 0) //transformation obj
UIView.animate(withDuration: 2, animations: {
self.footer.transform = tx
}, completion: { b in
//another animation
UIView.animate(withDuration: 1.5, animations: {
self.footer.backgroundColor = UIColor.yellow
})
})
}
}class MyDrawingView: UIView {
override func draw(_ rect: CGRect) {
//rect => frame => canvas of view
let w = rect.width, h = rect.height
print("canvas width: \(w) & height: \(h)")
//CGContext to draw with
let c = UIGraphicsGetCurrentContext()!
typealias p = CGPoint
/*
//Example 1 - line
//starting point
c.move(to: p(x: 0, y: 0))
//line to ending point
c.addLine(to: p(x: w, y: h))
//how to draw
c.setStrokeColor(UIColor.red.cgColor)
c.setLineWidth(CGFloat(3))
c.strokePath() //draw
/ * /
//Example 2 - fill
c.move(to: p(x: 10, y: 30))
//what to draw
c.addLine(to: p(x: 10, y: 100))
c.addLine(to: p(x: 150, y: 100))
c.addLine(to: p(x: 150, y: 30))
c.addLine(to: p(x: 80, y: 0))
c.addLine(to: p(x: 10, y: 30))
//how to draw
c.setFillColor(UIColor.green.cgColor)
c.fillPath()
/ * /
//Example 3 - curves
c.setStrokeColor(UIColor.cyan.cgColor)
c.setLineWidth(2)
c.move(to: p(x: 100, y: 250)) //starting point
let ctrl = p(x: 150, y: 200)
c.addQuadCurve(to: p(x: 200, y: 250), control: ctrl)
c.addQuadCurve(to: p(x: 200, y: 150), control: ctrl)
c.addQuadCurve(to: p(x: 100, y: 150), control: ctrl)
c.addQuadCurve(to: p(x: 100, y: 250), control: ctrl)
c.strokePath()
/ * /
//Example 4 - arc
let center = p(x: w / 2, y: h / 2)
//PI / 180 * degrees
c.addArc(center: center,
radius: w / 4,
startAngle: CGFloat(Double.pi / 180 * 360),
endAngle: CGFloat((Double.pi / 180) * 0),
clockwise: true)
c.setStrokeColor(UIColor.blue.cgColor)
c.strokePath()
c.addArc(center: center,
radius: w / 6,
startAngle: CGFloat(Double.pi),
endAngle: 0,
clockwise: true)
c.strokePath()
/ */
//Example 5
let points: [[p]] = [
[p(x: 240, y:0), p(x: 315, y:25)],
[p(x: 265, y:25), p(x: 265, y:63)],
[p(x: 265, y:100), p(x: 290, y:100)],
[p(x: 290, y:120), p(x: 270, y:125)],
[p(x: 300, y:120), p(x: 305, y:100)],
[p(x: 365, y:100), p(x: 365, y:63)],
[p(x: 365, y:25), p(x: 315, y:25)],
]
//Example 6 - img
let img = UIImage(named: "deadpool")!
let imgFrame = CGRect(x: 10, y: 10, width: w-20, height: h-20)
img.draw(in: imgFrame)
draw(points: points, context: c)
}
private func draw(points: [[CGPoint]], context c: CGContext){
c.setLineWidth(3)
c.move(to: points[0][1])
for p in points {
c.addQuadCurve(to: p[1], control: p[0])
}
c.strokePath()
}
override func touchesBegan(_ touches: Set<UITouch>, with event: UIEvent?) {
let t = touches.first! //UITouch object
let p = t.location(in: self) //CGPoint location in this view
print("touches at \(p.x) \(p.y)")
}
}class SecondController: UIViewController, UITableViewDataSource {
@IBOutlet var tbl: UITableView!
private var filePath: String!
private var users: [String:String]!
private var uNames: [String] = []
override func viewDidLoad() {
for (key, _) in users {
uNames.append(key)
}
tbl.reloadData()
}
public func set(filePath: String){
self.filePath = filePath
}
public func set(users: [String: String]){
self.users = users
}
@IBAction func deleteAllUsers() {
try! "".write(toFile: filePath,
atomically: true,
encoding: .utf8)
dismiss(animated: true, completion: nil)
}
func tableView(_ tableView: UITableView, numberOfRowsInSection section: Int) -> Int {
return uNames.count
}
func tableView(_ tableView: UITableView, cellForRowAt indexPath: IndexPath) -> UITableViewCell {
let cell = UITableViewCell()
cell.textLabel?.text = uNames[indexPath.row]
return cell
}
override func touchesBegan(_ touches: Set<UITouch>, with event: UIEvent?) {
dismiss(animated: true, completion: nil)
}
}class ViewController: UIViewController {
override func viewDidLoad() {
async1()
async2()
async3()
async4()
}
//Example 1
func async1(){
//what to do asynchronously
DispatchQueue.global(qos: .background).async(execute: {
print("do in background")
//usleep(1000000)
//when need to sync - UI main thread
DispatchQueue.main.async {
print("post execute")
}
})
}
func async2() {
AsyncTask(backgroundTask: {(p:Int) in
//doing in background
if p > 0 {
print("positive")
}
}).execute(1)
}
func async3() {
AsyncTask(backgroundTask: { (p: Bool) -> Int in
if p {
return 100
}
return -50
}, afterTask: { (res: Int) in
//UI main thread functionality
print(res)
}).execute(false)
}
//Example 4
func async4(){
let task = AsyncTask(beforeTask: {
//in current thread
}, backgroundTask: { (plist: String) -> [String: [String]] in
//In background thread
let path = Bundle.main.path(forResource: plist, ofType: "plist")!
return NSDictionary(contentsOfFile: path) as! Dictionary
}, afterTask: { (dict) in
//In Main thread
print(dict)
})
task.execute("Data") //parameter to pass to backgroundTask closure
}
}where AsyncTask class is: download
public class AsyncTask <BGParam,BGResult>{
    private var pre:(()->())?;//Optional closure -> called before the backgroundTask
    private var bgTask:(_ param:BGParam)->BGResult;//background task
    private var post:((_ param:BGResult)->())?;//Optional closure -> called after the backgroundTask
    /**
     *@param beforeTask Optional closure -> which called just before the background task
     *@param backgroundTask closure -> the background task functionality with generic param & return
     *@param afterTask Optional -> which called just after the background task
     */
    public init(beforeTask: (()->())?=nil, backgroundTask: @escaping (_ param:BGParam)->BGResult, afterTask:((_ param:BGResult)->())?=nil){
        self.pre=beforeTask;
        self.bgTask=backgroundTask;
        self.post=afterTask;
    }
    /**
     *Execution method for current backgroundTask with given parameter value in background thread.
     *@param BGParam passed as a parameter to backgroundTask
     */
    public func execute(_ param:BGParam){
        pre?()//if beforeTask exists - invoke it before bgTask
        DispatchQueue.global(qos: .background).async {
            let bgResult=self.bgTask(param);//execute backgroundTask in background thread
            if(self.post != nil){//if afterTask exists - invoke it in UI thread after bgTask
                DispatchQueue.main.async {self.post!(bgResult)}
            }
        }
    }
}import UIKit
import SafariServices
class ViewController: UIViewController {
private let users = ["Omri","Gidon", "Natalia", "Yossi", "Ido", "Shoval", "Sarel"]
@IBOutlet var webView: UIWebView!
@IBAction func innerData(_ sender: Any) {
var html = "<h1 id='ttl'>hello from HTML</h1>"
html += "<ul>"
for u in users{
html += "<li>\(u)</li>"
}
html += "</ul>"
webView.loadHTMLString(html, baseURL: nil)
}
@IBAction func localFiles(_ sender: Any) {
let path = Bundle.main.path(forResource: "my", ofType: "html")!
print(path) //only path without schema
let url = URL(string: "file://" + path)!
webView.loadRequest(URLRequest(url: url))
}
@IBAction func internet(_ sender: Any) {
let url = URL(string: "http://www.apple.com")!
webView.loadRequest(URLRequest(url: url))
}
@IBAction func safariVC(_ sender: Any) {
let url = URL(string: "http://www.apple.com")!
let svc = SFSafariViewController(url: url)
show(svc, sender: self)
}
}Note: my.html is a file created by the following definitions: files
Protocol and Animals excrecise:
protocol example: Drivable.swift
public protocol Drivable {
    //method
    func drive()

    //get property
    var counter: Int { get }
}
Fliable.swift
public protocol Fliable {
    func takeOff()

    func land()

    var counter: Int {get}
}
now we create classes that obey to those protocols: car.swift
public class Car: Drivable {
    private var _counter = 0
    public func drive(){
        print("car is driving")
        _counter += 1
    }
    public var counter: Int {
        return _counter
    }
}
Helicopter.swift
public class Helicopter: Fliable {
    private var _counter: Int = 0
    public func takeOff(){
        print("helicopter takes off")
        _counter += 10
    }
    public func land(){
        print("heli lands")
    }
    public var counter: Int {
        return _counter
    }
}
plane is drivable and fliable: plane.swift
public class Plane: Fliable, Drivable {
    private var _counter: Int = 0
    public func drive(){
        _counter += 1
        print("plane drives")
    }
    public func takeOff(){
        print("plance takes off")
        _counter += 10
    }
    public func land(){
        print("plane lands")
    }
    public var counter: Int {
        return _counter
    }
}must configure: NSAppTransportSecurity & info.plist Cocoa keys:general concept:
NSAppTransportSecurity : Dictionary {
    NSAllowsArbitraryLoads : Boolean
    NSAllowsArbitraryLoadsForMedia : Boolean
    NSAllowsArbitraryLoadsInWebContent : Boolean
    NSAllowsLocalNetworking : Boolean
    NSExceptionDomains : Dictionary {
        <domain-name-string> : Dictionary {
            NSIncludesSubdomains : Boolean
            NSExceptionAllowsInsecureHTTPLoads : Boolean
            NSExceptionMinimumTLSVersion : String
            NSExceptionRequiresForwardSecrecy : Boolean   // Default value is YES
            NSRequiresCertificateTransparency : Boolean
        }
    }
}
inside existing info.plist: add to the dictionary the following key:
    <key>NSAppTransportSecurity</key>
    <dict>
        <!-- White list - http requests configuration -->
        <key>NSAllowsArbitraryLoads</key>
        <true/>
    </dict>
Only then you can:
class ViewController: UIViewController {
    let session  = URLSession.shared

 @IBAction func req2() {
        let req = URLRequest(url: URL(string: "http://nikita.hackeruweb.co.il:80/hackSwift/dugma.txt")!)
        //use shared Session to send http Request
        session.dataTask(with: req, completionHandler: {(d,r,e) in
            let str = String(data: d!, encoding: .utf8)! // the return string from the url is: Vova,Shlomit,Batel,Sarit,Nikita,Deadpool
            let names = str.components(separatedBy: ",") //split string by comma
            for n in names {
                print (n)
            }
        }).resume()
    }

 @IBOutlet var feed: UITextView!

    @IBAction func req3() {
        let url = URL(string: "http://nikita.hackeruweb.co.il:80/hackSwift/dugma.txt")!
        session.dataTask(with: url, completionHandler: {(d,r,e) in
            AsyncTask(backgroundTask: { (d: Data) -> String in
                return String(data: d, encoding: .utf8)!
            }, afterTask: { (str) in
                // in ui main
                self.feed.text = str
            }).execute(d!)
        }).resume()
    }
Note: AsyncTask contains optional parameters, the first one is backgroundTask, I deleted it because it is optional and didn't need it here.
use do and then try for any function that throws error MYErrors.swift
class MyErrors {
    //custom examples
    struct GalError: Error {}
    enum WorkError: Error {
        case isSunday, notEnoughSleep, notEnoughCoffee
    }

    //dangerous method
    func doSomeBad() throws {
        //some normal functionality
        print("will be bad")
        //actual danger
        throw GalError()
    }

    func notRealyBad() throws {
        print("not realy bad")
    }

    func goToWork() throws {
        print("going to work")
        throw WorkError.notEnoughSleep
    }

    func badAndClean() throws {
        //equivalent to finally - for cleanups
        defer {
            print("defer - clean up")
        }
        print("doing normal stuff")
        throw GalError()
    }

    //maybe throws
    func badOrNot() throws {
        defer {
            print("bad or not - cleanup")
        }
        //some logic
        if arc4random_uniform(10)%2 == 0 {
            //not throwing
        } else {
            throw GalError()
        }
    }
}
ViewController.swift
class ViewController: UIViewController {
    let e = MyErrors()

    override func viewDidLoad() {
        super.viewDidLoad()
        print ("entering to viewdidload")
        //Example 1
        do {
            //can have multiple tries in the same block
             try e.notRealyBad()
             try e.doSomeBad()

            //success handling

        } catch {
            //failure handling
            print("error handler")
        }

        //Example 2 - muliple catch block
        do {
            try e.goToWork()
        } catch MyErrors.WorkError.isSunday {
            print("return to sleep")
        } catch MyErrors.WorkError.notEnoughSleep {
            print("Drink more coffee")
        } catch MyErrors.WorkError.notEnoughCoffee {
            print("at this point there is not much you can do")
        } catch {
            print("another error")
        }

        //Example 3
        do {
            try e.badAndClean()
        } catch { }

        //Example 4 - inline syntax
       // try! e.badOrNot() //if thrown - crash
        try? e.badOrNot() //if thrown - return nil

    }


    @IBAction func bad(_ sender: Any) {
        do {
            try e.doSomeBad()
        } catch {
            print("bad catched..")
        }
    }

    @IBAction func notBad(_ sender: Any) {
        try? e.notRealyBad()
    }

    @IBAction func badOrNot(_ sender: Any) {
        try! e.badOrNot()
    }
}ViewController.swift
class ViewController: UIViewController, UITableViewDataSource {
    //number fo section (sub lists) - in table view
    func numberOfSections(in tableView: UITableView) -> Int {
        return 1
    }

    //how many rows in each section
    func tableView(_ tableView: UITableView, numberOfRowsInSection section: Int) -> Int {
        return 100
    }

    //visual representation of each row
    func tableView(_ tableView: UITableView, cellForRowAt indexPath: IndexPath) -> UITableViewCell {
        let row = UITableViewCell()

        row.textLabel?.text = "Bubu is the king"

        return row
    }
}
SecondController.swift
class SecondController: UIViewController, UITableViewDataSource {

    //DB simulation
    let stuff: [[String]] = [
        ["Kuba", "Pizza", "Hamburger", "Cuscus", "Hummus", "Pickles"],
        ["iPhone 5", "iPhone X", "LG", "Nokia", "Motorola"],
        ["Apple", "Lemon", "Tomato", "Banana"]
    ]

    func numberOfSections(in tableView: UITableView) -> Int {
        //section for eacn inner array
        return stuff.count
    }

    func tableView(_ tableView: UITableView, numberOfRowsInSection section: Int) -> Int {
        //row for each string
        return stuff[section].count
    }

    func tableView(_ tableView: UITableView, cellForRowAt indexPath: IndexPath) -> UITableViewCell {
        let cell = UITableViewCell()
        //assign relevant String by given section & row index
        cell.textLabel?.text = stuff[indexPath.section][indexPath.row]
        return cell
    }
}
ThridController.swift
class ThridController: UIViewController, UITableViewDataSource, UITableViewDelegate {

    //data source
    func numberOfSections(in tableView: UITableView) -> Int {
        return 2
    }

    func tableView(_ tableView: UITableView, numberOfRowsInSection section: Int) -> Int {
        return 18
    }

    func tableView(_ tableView: UITableView, cellForRowAt indexPath: IndexPath) -> UITableViewCell {
        let cell = UITableViewCell()
        cell.textLabel?.text = "section:\(indexPath.section), row:\(indexPath.row)"
        return cell
    }


    //delegate
    func tableView(_ tableView: UITableView, didSelectRowAt indexPath: IndexPath) {
        print("selected at section:\(indexPath.section) row:\(indexPath.row)")
    }
}
FourthController.swift
class FourthController: UIViewController, UITableViewDataSource, UITableViewDelegate {

    @IBOutlet var ttl:UILabel!

    let colors:[UIColor] = [UIColor.red, UIColor.blue, UIColor.cyan]

    func numberOfSections(in tableView: UITableView) -> Int {
        return colors.count
    }

    func tableView(_ tableView: UITableView, numberOfRowsInSection section: Int) -> Int {
        return 8
    }

    func tableView(_ tableView: UITableView, cellForRowAt indexPath: IndexPath) -> UITableViewCell {
        let cell = UITableViewCell()
        cell.textLabel?.text = "row \(indexPath.section):\(indexPath.row)"
        return cell
    }

    func tableView(_ tableView: UITableView, didSelectRowAt indexPath: IndexPath) {
        ttl.backgroundColor = colors[indexPath.section]
        ttl.text = "row \(indexPath.row)"
    }

    func tableView(_ tableView: UITableView, titleForHeaderInSection section: Int) -> String? {
        return "Header \(section)"
    }

    func tableView(_ tableView: UITableView, titleForFooterInSection section: Int) -> String? {
        return "Footer \(section)"
    }

}person.swift
public class Person {
    var name: String

    public init(){
        self.name = "Incognito"
    }
}
extension: extension.swift
extension Person {
    public func getName() -> String{
        return self.name
    }

    public func setName(_ name: String) {
        self.name = name
    }
}
playground test
var p = Person()
p.setName("Bubu")
print("hello from \(p.getName())")
lets define protocol and later on asign it to the person LivingBeing.swift
public protocol LivingBeing {
    func breath()
}
extensions.swift
extension Person: LivingBeing {
    public func breath() {

    }
}
let us extend the Init (integer) type:
extension Int {
    public func timesTwo() -> Int {
        return self + self
    }

    //with mutating
    public mutating func twice() {
        self += self
    }
}
and test this new functionality:
var a = 42.timesTwo()
print(a) // prints 84
mutating keyword – when you’re actually changing the variables in your struct!
struct Point {
    var x: Int
    var y: Int

    mutating func reborn(){
//        self.x = 0
//        self.y = 0
        self = Point(x: 0, y: 0)
    }
}

//Tests
var p1 = Point(x: 3, y: 5)
var p2 = p1
print(p1)
p1.reborn()
print(p1)

print(p2)
inout means that modifying the local variable will also modify the passed-in parameters. Without it, the passed-in parameters will remain the same value. Trying to think of reference type when you are using inout and value type without using it.
//Example 1
func square(n: inout Int){
    n = n * n
}

var n1 = 10
print(n1)
square(n: &n1)
print(n1)

//Example 2
func swapInt(n1: inout Int, n2: inout Int){
//    let temp = n1
//    n1 = n2
//    n2 = temp

    //n1: 5, n2: 7
    n1 += n2 //n1: 12
    n2 = n1 - n2 //n2: 5
    n1 = n1 - n2 //n1: 7
}

var n2 = 5
print("n1: \(n1), n2: \(n2)")
swapInt(n1: &n1, n2: &n2)
print("n1: \(n1), n2: \(n2)")class ViewController: UIViewController, UIPickerViewDataSource, UIPickerViewDelegate {
//how many components (slots) in picker
func numberOfComponents(in pickerView: UIPickerView) -> Int {
return 1
}
//number of rows in each component
func pickerView(_ pickerView: UIPickerView, numberOfRowsInComponent component: Int) -> Int {
return 10
}
//title for each component
func pickerView(_ pickerView: UIPickerView, titleForRow row: Int, forComponent component: Int) -> String? {
return "Bubu \(row)"
}
}
    //present(green, animated: true, completion: nil)
    green.onRoute(routeFlag)
    show(green, sender: self)
}
following is the viewcontroller we going to, in adition,
a viewcontroller kill / dismiss itself to return back to the previous viewcontroller . shown on the stack
```swift
 class GreenViewController: UIViewController {

    private var routeFlag = false

    override func viewDidLoad() {
        super.viewDidLoad()

        // Do any additional setup after loading the view.
        if routeFlag {
            print("Won")
        }
    }


    @IBAction func kill(_ sender: Any) {
        dismiss(animated: true, completion: nil)
    }

    public func onRoute(_ flag:Bool){
        self.routeFlag = flag
    }
}
Screens4 severally viewcontrollers, each with buttons and only a specific route print "win" ScreensEx1 simple login viewcontroller sucess login pass with storyboard_id to anoth viewcontroller
  override func shouldPerformSegue(withIdentifier identifier: String, sender: Any?) -> Bool {
        if identifier == "toPresentation" {
            return input.hasText
        }

        return false
    }

    override func prepare(for segue: UIStoryboardSegue, sender: Any?) {
        if segue.identifier == "toPresentation" {
            //pass data
            let next = segue.destination as? ViewController

            next?.set(msg: input.text!)
        }
}navbar
 |
 |
 |
    //works only in navigation controller
    @IBAction func toBlue() {
        navigationController!.popViewController(animated: true)
    }

    @IBAction func toRoot() {
        navigationController?.popToRootViewController(animated: true)
} @IBAction func toMagenta(_ sender: UIButton) {
let next = storyboard!.instantiateViewController(withIdentifier: "magenta")
//push next screen with navigation controller
//*
navigationController!.pushViewController(next, animated: true)
/*/
//present next screen without navigation controller
present(next, animated: true, completion: nil)
// */
}
@IBAction func prev(_ sender: UIButton) {
//go back to previous screen
navigationController!.popViewController(animated: true)
}
    //only works when presenting outside of navigation controller
    override func touchesBegan(_ touches: Set<UITouch>, with event: UIEvent?) {
        dismiss(animated: true, completion: nil)
}How to set Image corectly:
- set imageView width and height as you need and asign "aspect fit" in attribute inspector (story board on imageview) in such a way the image will fit as much as it can without going out of the imageview bounderies


