
- The extension method for Foundation & UIKit Class.
GitHub:QianChia | Blog:QianChia(Chinese)
pod 'QExtension'
- Drag all source files under floder
QExtensionto your project. - Import the main header file:
#import "QExtension.h"
-
本地化打印输出
 	Xcode 没有针对国际化语言做特殊处理,直接 Log 数组,只打印 UTF8 的编码,不能显示中文。

 	- (NSString *)descriptionWithLocale:(nullable id)locale;

 	重写这个方法,就能够解决输出问题,这个方法是专门为了本地话提供的一个调试方法,只要重写,
 	不需要导入头文件,程序中所有的 NSLog 数组的方法,都会被替代。
 	NSArray *localeArray = @[@"hello", @"你好", @"欢迎"];
 	NSLog(@"%@", localeArray);
- 效果,使用前后对比


-
1、文件上传拼接,指定文件数据
 	NSMutableData *formData = [NSMutableData data];

 	// 设置分割字符串
 	static NSString *boundary = @"uploadBoundary";

 	// 设置请求头
 	[formData q_setHttpHeaderFieldWithRequest:request fileBoundary:boundary];

 	// 添加文件
 	NSData *filedata = [NSData dataWithContentsOfFile:[[NSBundle mainBundle] pathForResource:@"demo1" ofType:@"png"]];
 	[formData q_appendPartWithFileData:filedata
 	                      fileBoundary:boundary
 	                              name:@"userfile"
 	                          fileName:@"test1.png"
 	                          mimeType:@"image/png"];

 	// 添加文本内容
 	[formData q_appendPartWithText:@"QianChia_test1" textName:@"username" fileBoundary:boundary];

 	// 添加结束分隔符
 	[formData q_appendPartEndingWithFileBoundary:boundary];
- 效果
-
2、文件上传拼接,指定文件路径
 	NSMutableData *formData = [NSMutableData data];

 	// 设置分割字符串
 	static NSString *boundary = @"uploadBoundary";

 	// 设置请求头
 	[formData q_setHttpHeaderFieldWithRequest:request fileBoundary:boundary];

 	// 添加文件
 	NSURL *fileURL = [NSURL fileURLWithPath:[[NSBundle mainBundle] pathForResource:@"demo1" ofType:@"png"]];
 	[formData q_appendPartWithFileURL:fileURL
 	                     fileBoundary:boundary
 	                             name:@"userfile"
 	                         fileName:@"test2.png"
 	                         mimeType:@"image/png"];

 	// 添加文本内容
 	[formData q_appendPartWithText:@"QianChia_test2" textName:@"username" fileBoundary:boundary];

 	// 添加结束分隔符
 	[formData q_appendPartEndingWithFileBoundary:boundary];
- 效果
-
3、单文件上传封装,指定文件数据,不带文本内容
 	// 添加文件
 	NSData *filedata = [NSData dataWithContentsOfFile:[[NSBundle mainBundle] pathForResource:@"demo1" ofType:@"png"]];

 	NSData *formData = [NSData q_formDataWithRequest:request
 	                                        fileData:filedata
 	                                            name:@"userfile"
 	                                        fileName:@"test3.png"
 	                                        mimeType:@"image/png"];
- 效果
-
4、单文件上传封装,指定文件路径,不带文本内容
 	// 添加文件
 	NSURL *fileURL = [NSURL fileURLWithPath:[[NSBundle mainBundle] pathForResource:@"demo1" ofType:@"png"]];

 	NSData *formData = [NSData q_formDataWithRequest:request
 	                                        fileURL:fileURL
 	                                            name:@"userfile"
 	                                        fileName:@"test4.png"
 	                                        mimeType:@"image/png"];
- 效果
-
5、单文件上传封装,指定文件数据,带文本内容
 	// 添加文件
 	NSData *filedata = [NSData dataWithContentsOfFile:[[NSBundle mainBundle] pathForResource:@"demo1" ofType:@"png"]];

 	NSData *formData = [NSData q_formDataWithRequest:request
 	                                            text:@"QianChia_test5"
 	                                        textName:@"username"
 	                                        fileData:filedata
 	                                            name:@"userfile"
 	                                        fileName:@"test5.png"
 	                                        mimeType:@"image/png"];
- 效果
-
6、单文件上传封装,指定文件路径,带文本内容
 	// 添加文件
 	NSURL *fileURL = [NSURL fileURLWithPath:[[NSBundle mainBundle] pathForResource:@"demo1" ofType:@"png"]];

 	NSData *formData = [NSData q_formDataWithRequest:request
 	                                            text:@"QianChia_test6"
 	                                        textName:@"username"
 	                                         fileURL:fileURL
 	                                            name:@"userfile"
 	                                        fileName:@"test6.png"
 	                                        mimeType:@"image/png"];
- 效果
-
7、多文件上传封装,指定文件数据,不带文本内容
 	// 添加文件
 	NSData *filedata1 = [NSData dataWithContentsOfFile:[[NSBundle mainBundle] pathForResource:@"demo1" ofType:@"png"]];
 	NSData *filedata2 = [NSData dataWithContentsOfFile:[[NSBundle mainBundle] pathForResource:@"demo2" ofType:@"jpg"]];

 	NSData *formData = [NSData q_formDataWithRequest:request
 	                                       fileDatas:@[filedata1, filedata2]
 	                                            name:@"userfile[]"
 	                                       fileNames:@[@"test7.png", @"test7.jpg"]
 	                                       mimeTypes:@[@"image/png", @"image/jpeg"]];
- 效果
-
8、多文件上传封装,指定文件路径,不带文本内容
 	// 添加文件
 	NSURL *fileURL1 = [NSURL fileURLWithPath:[[NSBundle mainBundle] pathForResource:@"demo1" ofType:@"png"]];
 	NSURL *fileURL2 = [NSURL fileURLWithPath:[[NSBundle mainBundle] pathForResource:@"demo2" ofType:@"jpg"]];

 	NSData *formData = [NSData q_formDataWithRequest:request
 	                                        fileURLs:@[fileURL1, fileURL2]
 	                                            name:@"userfile[]"
 	                                       fileNames:@[@"test8.png", @"test8.jpg"]
 	                                       mimeTypes:@[@"image/png", @"image/jpeg"]];
- 效果
-
9、多文件上传封装,指定文件数据,带文本内容
 	// 添加文件
 	NSData *filedata1 = [NSData dataWithContentsOfFile:[[NSBundle mainBundle] pathForResource:@"demo1" ofType:@"png"]];
 	NSData *filedata2 = [NSData dataWithContentsOfFile:[[NSBundle mainBundle] pathForResource:@"demo2" ofType:@"jpg"]];

 	NSData *formData = [NSData q_formDataWithRequest:request
 	                                           texts:@[@"QianChia_test9"]
 	                                       textNames:@[@"username"]
 	                                       fileDatas:@[filedata1, filedata2]
 	                                            name:@"userfile[]"
 	                                       fileNames:@[@"test9.png", @"test9.jpg"]
 	                                       mimeTypes:@[@"image/png", @"image/jpeg"]];
- 效果
-
10、多文件上传封装,指定文件路径,带文本内容
 	// 添加文件
 	NSURL *fileURL1 = [NSURL fileURLWithPath:[[NSBundle mainBundle] pathForResource:@"demo1" ofType:@"png"]];
 	NSURL *fileURL2 = [NSURL fileURLWithPath:[[NSBundle mainBundle] pathForResource:@"demo2" ofType:@"jpg"]];

 	NSData *formData = [NSData q_formDataWithRequest:request
 	                                           texts:@[@"QianChia_test10"]
 	                                       textNames:@[@"username"]
 	                                        fileURLs:@[fileURL1, fileURL2]
 	                                            name:@"userfile[]"
 	                                       fileNames:@[@"test10.png", @"test10.jpg"]
 	                                       mimeTypes:@[@"image/png", @"image/jpeg"]];
- 效果


-
本地化打印输出
 	Xcode 没有针对国际化语言做特殊处理,直接 Log 数组,只打印 UTF8 的编码,不能显示中文。

 	- (NSString *)descriptionWithLocale:(nullable id)locale;

 	重写这个方法,就能够解决输出问题,这个方法是专门为了本地话提供的一个调试方法,只要重写,
 	不需要导入头文件,程序中所有的 NSLog 数组的方法,都会被替代。
 	NSArray *localeArray = @[@"hello", @"你好", @"欢迎"];
 	NSLog(@"%@", localeArray);
- 效果,使用前后对比


-
获取当前 Wifi 信息
 	NSDictionary *wifiInfo = [NSDictionary q_getCurrentWifiInfo];

 	NSLog(@"%@", wifiInfo);

 	NSString *bssid = wifiInfo[BSSIDKey];
 	NSString *ssid = wifiInfo[SSIDKey];
 	NSString *ssidData = [[NSString alloc] initWithData:wifiInfo[SSIDDATAKey] encoding:NSUTF8StringEncoding];

 	NSLog(@"%@\n %@\n %@", bssid, ssid, ssidData);
-
JSON
 	NSString *jsonStr = @"{\"msgType\":\"msg\",\"fromUser\":\"rose\",\"toUser\":\"jack\"}";

 	// JSON 字符串转换成字典
 	NSDictionary *dic = [NSDictionary q_dictionaryWithJSONString:jsonStr];
-
Base64 加密解密
 	NSString *str = @"hello world";

 	// Base64 编码
 	NSString *base64Str = [str q_base64Encode];
 	NSLog(@"base64Str: %@", base64Str);

 	// Base64 解码
 	NSString *asciiStr = [base64Str q_base64Decode];
 	NSLog(@"asciiStr: %@", asciiStr);

 	// 服务器基本授权字符串编码
 	NSString *authStr = [str q_basic64AuthEncode];
 	NSLog(@"authStr: %@", authStr);
- 效果

-
文件路径拼接
 	NSString *filePath = @"~/Desktop/file.txt";

 	// 拼接文档路径

 	NSString *documentPath = [filePath q_appendDocumentPath];
 	NSLog(@"documentPath: \n%@\n\n", documentPath);

 	NSString *md5DocumentPath = [filePath q_appendMD5DocumentPath];
 	NSLog(@"md5DocumentPath: \n%@\n\n", md5DocumentPath);

 	// 拼接缓存路径

 	NSString *cachePath = [filePath q_appendCachePath];
 	NSLog(@"cachePath: \n%@\n\n", cachePath);

 	NSString *md5CachePath = [filePath q_appendMD5CachePath];
 	NSLog(@"md5CachePath: \n%@\n\n", md5CachePath);

 	// 拼接临时路径

 	NSString *tempPath = [filePath q_appendTempPath];
 	NSLog(@"tempPath: \n%@\n\n", tempPath);

 	NSString *md5TempPath = [filePath q_appendMD5TempPath];
 	NSLog(@"md5TempPath: \n%@\n\n", md5TempPath);

 	// 添加文件不备份属性

 	NSString *filePath1 = @"~/Desktop/Test";
 	[filePath1 q_addSkipBackupAttribute];

 	NSURL *fileURL1 = [NSURL fileURLWithPath:filePath1];
 	[fileURL1.path q_addSkipBackupAttribute];
- 效果

-
散列函数
 	NSString *str = @"hello world";
 	NSString *filePath = [[NSBundle mainBundle] pathForResource:@"Info.plist" ofType:nil];

 	// 散列

 	NSString *md5Str = [str q_md5String];
 	NSLog(@"md5Str: %@", md5Str);

 	NSString *sha1Str = [str q_sha1String];
 	NSLog(@"sha1Str: %@", sha1Str);

 	NSString *sha224Str = [str q_sha224String];
 	NSLog(@"sha224Str: %@", sha224Str);

 	NSString *sha256Str = [str q_sha256String];
 	NSLog(@"sha256Str: %@", sha256Str);

 	NSString *sha384Str = [str q_sha384String];
 	NSLog(@"sha384Str: %@", sha384Str);

 	NSString *sha512Str = [str q_sha512String];
 	NSLog(@"sha512Str: %@\n\n", sha512Str);

 	// hmac 散列

 	NSString *hmacMD5Str = [str q_hmacMD5StringWithKey:@"yourKey"];
 	NSLog(@"hmacMD5Str: %@", hmacMD5Str);

 	NSString *hmacSHA1Str = [str q_hmacSHA1StringWithKey:@"yourKey"];
 	NSLog(@"hmacSHA1Str: %@", hmacSHA1Str);

 	NSString *hmacSHA224Str = [str q_hmacSHA224StringWithKey:@"yourKey"];
 	NSLog(@"hmacSHA224Str: %@", hmacSHA224Str);

 	NSString *hmacSHA256Str = [str q_hmacSHA256StringWithKey:@"yourKey"];
 	NSLog(@"hmacSHA256Str: %@", hmacSHA256Str);

 	NSString *hmacSHA384Str = [str q_hmacSHA384StringWithKey:@"yourKey"];
 	NSLog(@"hmacSHA384Str: %@", hmacSHA384Str);

 	NSString *hmacSHA512Str = [str q_hmacSHA512StringWithKey:@"yourKey"];
 	NSLog(@"hmacSHA512Str: %@\n\n", hmacSHA512Str);

 	// 时间戳 MD5 散列

 	NSString *timeStr = [str q_timeMD5StringWithKey:@"yourKey"];
 	NSLog(@"timeStr: %@\n\n", timeStr);

 	// 文件 散列

 	NSString *fileMD5Str = [filePath q_fileMD5Hash];
 	NSLog(@"fileMD5Str: %@", fileMD5Str);

 	NSString *fileSHA1Str = [filePath q_fileSHA1Hash];
 	NSLog(@"fileSHA1Str: %@", fileSHA1Str);

 	NSString *fileSHA256Str = [filePath q_fileSHA256Hash];
 	NSLog(@"fileSHA256Str: %@", fileSHA256Str);

 	NSString *fileSHA512Str = [filePath q_fileSHA512Hash];
 	NSLog(@"fileSHA512Str: %@", fileSHA512Str);
- 效果

-
正则表达式
 	// 验证手机号码的有效性

 	NSString *mobileNum1 = @"15188886666";
 	BOOL isValidMobileNum1 = [mobileNum1 q_isValidMobileNum];
 	NSLog(@"MobileNum1: %zi", isValidMobileNum1);

 	NSString *mobileNum2 = @"19188886666";
 	BOOL isValidMobileNum2 = [mobileNum2 q_isValidMobileNum];
 	NSLog(@"MobileNum2: %zi", isValidMobileNum2);

 	// 验证邮箱的有效性

 	NSString *emailAddress1 = @"[email protected]";
 	BOOL isValidEmailAddress1 = [emailAddress1 q_isValidEmailAddress];
 	NSLog(@"EmailAddress1: %zi", isValidEmailAddress1);

 	NSString *emailAddress2 = @"qian@[email protected]";
 	BOOL isValidEmailAddress2 = [emailAddress2 q_isValidEmailAddress];
 	NSLog(@"EmailAddress2: %zi", isValidEmailAddress2);
- 效果

-
网络
 	// 获取本地 IP 地址
 	NSString *ipStr = [NSString q_getIPAddress];

 	// 由域名获取 IP 地址
 	NSString *ipStr = [NSString q_getIPWithDomain:@"www.baidu.com"];
-
JSON
 	NSMutableDictionary *dic = [NSMutableDictionary dictionary];
 	[dic setValue:@"msg" forKey:@"msgType"];
 	[dic setValue:@"rose" forKey:@"fromUser"];
 	[dic setValue:@"jack" forKey:@"toUser"];

 	// 字典转换成 JSON 字符串
 	NSString *jsonStr = [NSString q_jsonStringWithDictionary:dic];
-
Date
 	NSDate *date1 = [NSDate dateWithTimeInterval:-60 * 60 * 25 sinceDate:[NSDate date]];
 	NSString *dateStr1 = [NSString q_dateStringFromDate:date1
 	                                         dateFormat:@"MM HH:mm"
 	                                         showYTTDay:YES
 	                                          showCYear:YES];

 	NSDate *date2 = [NSDate dateWithTimeInterval:0 sinceDate:[NSDate date]];
 	NSString *dateStr2 = [NSString q_dateStringFromDate:date2
 	                                         dateFormat:@"dd HH:mm"
 	                                         showYTTDay:YES
 	                                          showCYear:YES];

 	NSDate *date3 = [NSDate dateWithTimeInterval:60 * 60 * 25 sinceDate:[NSDate date]];
 	NSString *dateStr3 = [NSString q_dateStringFromDate:date3
 	                                         dateFormat:@"MM-dd HH:mm"
 	                                         showYTTDay:YES
 	                                          showCYear:YES];

 	NSDate *date4 = [NSDate dateWithTimeInterval:-60 * 60 * 50 sinceDate:[NSDate date]];
 	NSString *dateStr4 = [NSString q_dateStringFromDate:date4
 	                                         dateFormat:@"MM-dd HH:mm"
 	                                         showYTTDay:YES
 	                                          showCYear:YES];

 	NSDate *date5 = [NSDate dateWithTimeInterval:-60 * 60 * 24 * 30 * 12 sinceDate:[NSDate date]];
 	NSString *dateStr5 = [NSString q_dateStringFromDate:date5
 	                                         dateFormat:@"yyyy-MM-dd HH:mm"
 	                                         showYTTDay:NO
 	                                          showCYear:NO];

 	NSDate *date6 = [NSDate dateWithTimeInterval:0 sinceDate:[NSDate date]];
 	NSString *dateStr6 = [NSString q_dateStringFromDate:date6
 	                                         dateFormat:@"yyyy-MM-dd HH:mm"
 	                                         showYTTDay:NO
 	                                          showCYear:NO];

 	NSDate *date7 = [NSDate dateWithTimeInterval:-60 * 60 * 24 sinceDate:[NSDate date]];
 	NSString *dateStr7 = [NSString q_dateStringFromDate:date7
 	                                         dateFormat:@"yyyy-MM-dd HH:mm"
 	                                         showYTTDay:YES
 	                                          showCYear:YES];

 	NSDate *date8 = [NSDate dateWithTimeInterval:0 sinceDate:[NSDate date]];
 	NSString *dateStr8 = [NSString q_dateStringFromDate:date8
 	                                         dateFormat:@"yy-MM-dd HH:mm"
 	                                         showYTTDay:YES
 	                                          showCYear:NO];

 	NSDate *date9 = [NSDate dateWithTimeInterval:-60 * 60 * 24 sinceDate:[NSDate date]];
 	NSString *dateStr9 = [NSString q_dateJudgeStringFromDate:date9];

 	NSDate *date10 = [NSDate dateWithTimeInterval:0 sinceDate:[NSDate date]];
 	NSString *dateStr10 = [NSString q_dateJudgeStringFromDate:date10];

 	NSString *dateStr11 = [NSString q_dateStringFromDateSeconds:1437494603
 	                                                 dateFormat:@"yyyy-MM-dd HH:mm"
 	                                                 showYTTDay:NO
 	                                                  showCYear:YES];

 	NSString *dateStr12 = [NSString q_dateJudgeStringFromDateSeconds:1437494603];
- 效果
 	QExtensionExample[56246:849192] 昨天 06:10
 	QExtensionExample[56246:849192] 今天 07:10
 	QExtensionExample[56246:849192] 明天 08:10
 	QExtensionExample[56246:849192] 02-20 05:10
 	QExtensionExample[56246:849192] 2016-02-28 07:10
 	QExtensionExample[56246:849192] 02-22 07:10
 	QExtensionExample[56246:849192] 昨天 07:10
 	QExtensionExample[56246:849192] 今天 07:10
 	QExtensionExample[56246:849192] 1 天前
 	QExtensionExample[56246:849192] 刚刚
 	QExtensionExample[56246:849192] 2015-07-22 00:03
 	QExtensionExample[56246:849192] 1 年前
-
进度按钮
 	// 创建进度按钮
 	QProgressButton *progressButton = [QProgressButton q_progressButtonWithFrame:CGRectMake(100, 100, 100, 50)
 	                                                                       title:@"开始下载"
 	                                                                   lineWidth:10
 	                                                                   lineColor:[UIColor blueColor]
 	                                                                   textColor:[UIColor redColor]
 	                                                                   backColor:[UIColor yellowColor]
 	                                                                     isRound:YES];

 	// 设置按钮点击事件
 	[progressButton addTarget:self action:@selector(progressUpdate:) forControlEvents:UIControlEventTouchUpInside];

 	// 将按钮添加到当前控件显示
 	[self.view addSubview:progressButton];

 	// 设置按钮的进度值
 	self.progressButton.progress = progress;

 	// 设置按钮的进度终止标题,一旦设置了此标题进度条就会停止
 	self.progressButton.stopTitle = @"下载完成";
- 效果


-
1、截取全屏幕图
UIImage *image = [UIImage q_imageWithScreenShot];- 效果
-
2、截取指定视图控件屏幕图
UIImage *image = [UIImage q_imageWithScreenShotFromView:self.imageView1];
- 效果
-
3、调整图片的尺寸
 	UIImage *image = [UIImage imageNamed:@"demo2.jpg"];
 	UIImage *newImage = [image q_imageByScalingAndCroppingToSize:CGSizeMake(200, 200)];
- 效果
-
4、裁剪圆形图片
 	UIImage *image = [UIImage imageNamed:@"demo2.jpg"];
 	UIImage *newImage = [image q_imageByCroppingToRound];
- 效果
-
5、添加图片水印
 	// 设置水印文本属性
 	NSMutableDictionary *textAttrs = [NSMutableDictionary dictionary];
 	textAttrs[NSFontAttributeName] = [UIFont boldSystemFontOfSize:50];
 	textAttrs[NSForegroundColorAttributeName] = [[UIColor redColor] colorWithAlphaComponent:0.2];
 	textAttrs[NSStrokeWidthAttributeName] = @5;

 	// 添加图片水印
 	UIImage *image = [UIImage imageNamed:@"demo2.jpg"];
 	UIImage *newImage = [image q_imageWithWaterMarkString:@"QianChia"
 	                                           attributes:textAttrs
 	                                                image:[UIImage imageNamed:@"demo5"]
 	                                                frame:CGRectMake(30, 300, 50, 50)];
- 效果
 	// 添加图片水印
 	UIImage *image = [UIImage imageNamed:@"demo8"];
 	UIImage *newImage = [image q_imageWithWaterMarkString:nil
 	                                           attributes:nil
 	                                                image:[UIImage imageNamed:@"demo5"]
 	                                                frame:CGRectMake(-1, -1, 88, 88)];
- 效果


-
GIF 动图
 	// 通过名称加载 gif 图片,不需要写扩展名
 	self.imageView1.image = [UIImage q_gifImageNamed:@"demo3"];

 	// 通过数据加载 gif 图片
 	NSData *imageData = [NSData dataWithContentsOfFile:[[NSBundle mainBundle] pathForResource:@"demo3" ofType:@"gif"]];
 	self.imageView1.image = [UIImage q_gifImageWithData:imageData];
- 效果

-
生成二维码
 	// 生成普通的二维码
 	UIImage *qrImage = [UIImage q_imageWithQRCodeFromString:@"http://weixin.qq.com/r/xUqbg1-ENgJJrRvg9x-X"
 	                                               headIcon:nil
 	                                                  color:nil
 	                                              backColor:nil];

 	// 生成带头像的二维码
 	UIImage *qrImage = [UIImage q_imageWithQRCodeFromString:@"http://weixin.qq.com/r/xUqbg1-ENgJJrRvg9x-X"
 	                                               headIcon:[UIImage imageNamed:@"demo6"]
 	                                                  color:[UIColor blackColor]
 	                                              backColor:[UIColor whiteColor]];

 	// 生成指定图片大小的二维码
 	UIImage *qrImage = [UIImage q_imageWithQRCodeFromString:@"http://weixin.qq.com/r/xUqbg1-ENgJJrRvg9x-X"
 	                                              imageSize:CGSizeMake(2048, 2048)
 	                                               headIcon:[UIImage imageNamed:@"demo6"]
 	                                              headFrame:CGRectMake(819, 819, 410, 410)
 	                                                  color:nil
 	                                              backColor:nil];
- 效果
-
识别二维码
NSString *result = [image q_stringByRecognizeQRCode];
- 效果
-
生成条形码
 	// 生成条形码
 	UIImage *qrImage = [UIImage q_imageWithBarCodeFromString:@"cnblogs: QianChia"
 	                                                   color:nil
 	                                               backColor:nil];

 	// 生成指定图片大小的条形码
 	UIImage *qrImage = [UIImage q_imageWithBarCodeFromString:@"cnblogs: QianChia"
 	                                               imageSize:CGSizeMake(1024, 512)
 	                                                   color:[UIColor blueColor]
 	                                               backColor:[UIColor redColor]];
- 效果


-
从 Bundle 文件中加载图片
 	// 不带扩展名
 	UIImage *image = [UIImage q_imageNamed:@"demoPic" fromBundle:@"demoBundle"];

 	// 带扩展名
 	UIImage *image = [UIImage q_imageNamed:@"demoPic" fromBundle:@"demoBundle.bundle"];
-
直接设置控件的位置尺寸值
view.x = 20; view.y = 200; view.width = 200; view.height = 100; view.centerX = 160; view.centerY = 300; view.size = CGSizeMake(100, 200);- 效果

-
分页视图
 	// 创建分页视图控件
 	CGRect frame = CGRectMake(0, 20, self.view.bounds.size.width, self.view.bounds.size.width / 2);

 	QPageView *pageView = [[QPageView alloc] initWithFrame:frame];

 	// 设置显示的图片
 	pageView.imageNames = @[@"page_00", @"page_01", @"page_02", @"page_03", @"page_04"];

 	// 设置页码视图的颜色
 	pageView.currentPageIndicatorColor = [UIColor redColor];
 	pageView.pageIndicatorColor = [UIColor greenColor];

 	// 设置页码视图的位置
 	pageView.pageIndicatorPosition = QPageIndicatorPositionRight;

 	// 设置是否隐藏页码视图
 	pageView.hidePageIndicator = NO;

 	// 设置滚动方向
 	pageView.scrollDirectionPortrait = YES;

 	[self.view addSubview:pageView];
 	// 设置显示的图片
 	NSArray *imageNameArr = @[@"page_00", @"page_01", @"page_02", @"page_03", @"page_04"];

 	// 创建分页视图控件
 	CGRect frame = CGRectMake(0, 50 + self.view.bounds.size.width / 2,
 	                          self.view.bounds.size.width, self.view.bounds.size.width / 2);

 	QPageView *pageView = [QPageView q_pageViewWithFrame:frame
 	                                          imageNames:imageNameArr
 	                                          autoScroll:YES
 	                                      autoScrollTime:3.0
 	                               pageIndicatorPosition:QPageIndicatorPositionCenter];

 	[self.view addSubview:pageView];
- 效果

-
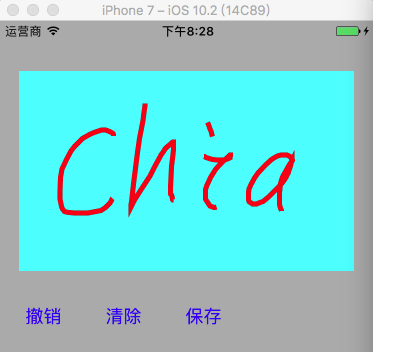
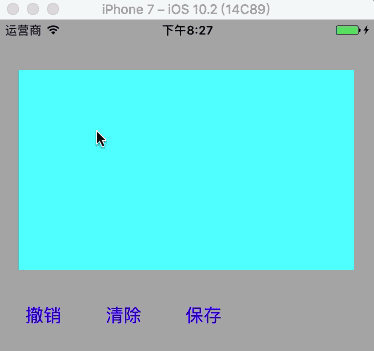
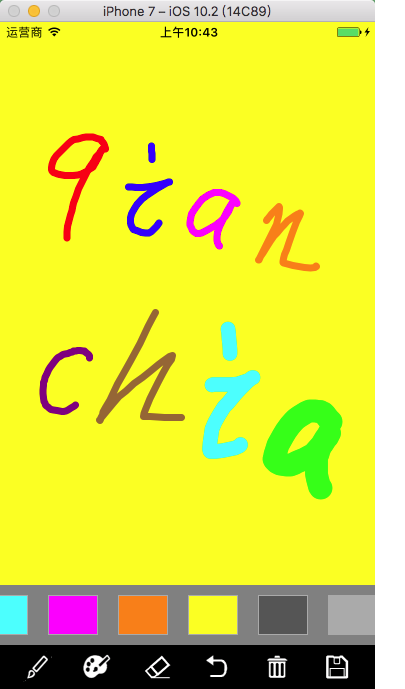
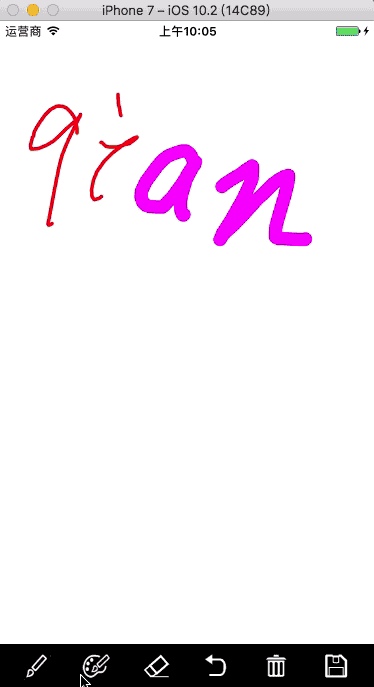
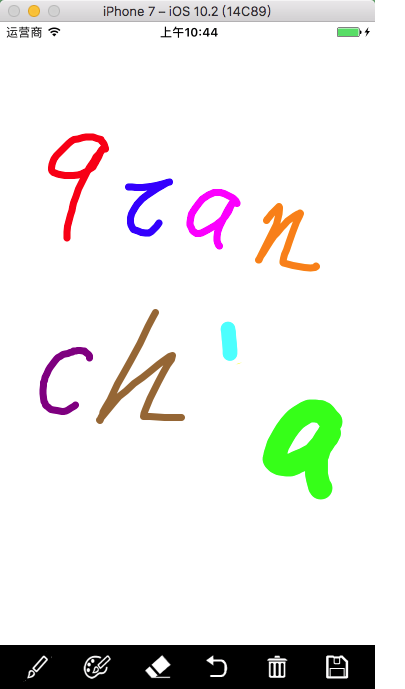
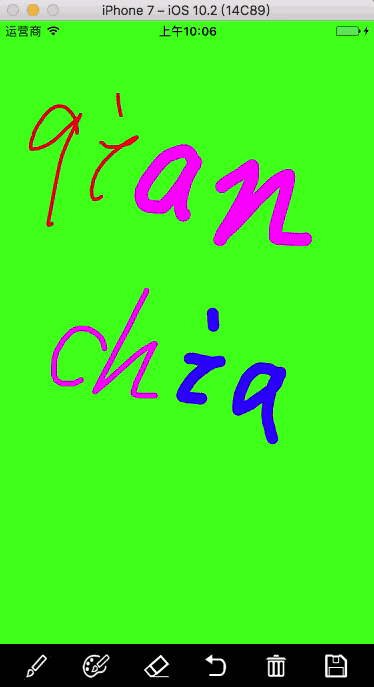
1、创建简单画板
 	// 创建简单画板
 	CGRect frame = CGRectMake(20, 50, self.view.bounds.size.width - 40, 200);

 	QPaintBoardView *paintBoardView = [QPaintBoardView q_paintBoardViewWithFrame:frame];

 	// 可选属性值设置
 	paintBoardView.paintLineWidth = 5;                         // default is 1
 	paintBoardView.paintLineColor = [UIColor redColor];        // default is blackColor
 	paintBoardView.paintBoardColor = [UIColor cyanColor];      // default is whiteColor

 	[self.view addSubview:paintBoardView];
 	self.paintBoardView = paintBoardView;

 	// 撤销绘画结果
 	[self.paintBoardView q_back];

 	// 清除绘画结果
 	[self.paintBoardView q_clear];

 	// 获取绘画结果
 	UIImage *image = [self.paintBoardView q_getPaintImage];
- 效果
-
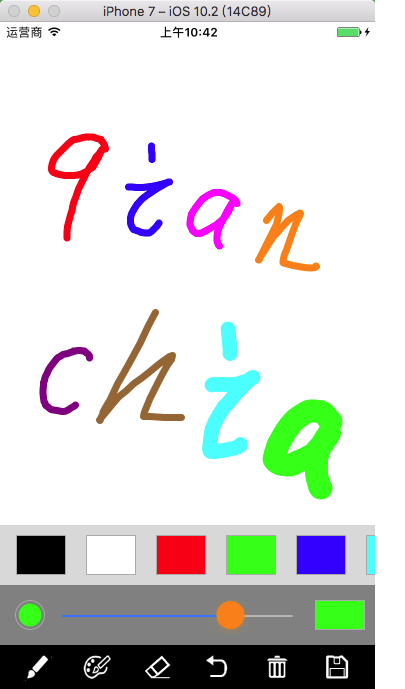
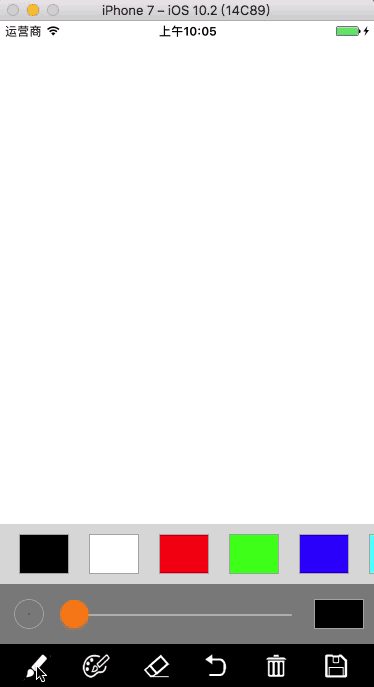
2、创建画板
 	// 创建画板
 	QPaintBoardView *paintBoard = [QPaintBoardView q_paintBoardViewWithFrame:self.view.bounds
 	                                                               lineWidth:0
 	                                                               lineColor:nil
 	                                                              boardColor:nil
 	                                                             paintResult:^(UIImage * _Nullable image) {

 	    if (image) {
 	        NSData *data = UIImagePNGRepresentation(image);
 	        [data writeToFile:@"/Users/JHQ0228/Desktop/Images/pic.png" atomically:YES];
 	    }
 	}];

 	[self.view addSubview:paintBoard];
- 效果
-
手势截屏
 	// 创建手势截屏视图
 	QTouchClipView *touchClipView = [QTouchClipView q_touchClipViewWithView:self.imageView
 	                                                             clipResult:^(UIImage * _Nullable image) {

 	    // 获取处理截屏结果
 	    if (image) {
 	        UIImageWriteToSavedPhotosAlbum(image, self, @selector(image:didFinishSavingWithError:contextInfo:), nil);
 	    }
 	}];

 	// 添加手势截屏视图
 	[self.view addSubview:touchClipView];
- 效果

-
手势锁
 	// 设置 frame
 	CGFloat margin = 50;
 	CGFloat width = self.view.bounds.size.width - margin * 2;
 	CGRect frame = CGRectMake(margin, 200, width, width);

 	// 创建手势锁视图界面,获取滑动结果
 	QTouchLockView *touchLockView = [QTouchLockView q_touchLockViewWithFrame:frame
 	                                                              pathResult:^(BOOL isSucceed, NSString * _Nonnull result) {

 	    // 处理手势触摸结果
 	    [self dealTouchResult:result isSucceed:isSucceed];
 	}];

 	[self.view addSubview:touchLockView];
 	- (void)dealTouchResult:(NSString *)result isSucceed:(BOOL)isSucceed {

 	    // 处理手势触摸结果

 	    if (isSucceed) {

 	        // 判读密码是否存在
 	        NSUserDefaults *df = [NSUserDefaults standardUserDefaults];

 	        if ([df objectForKey:@"touchLock"] == nil) {

 	            // 设置手势锁

 	            [self.passWordArrM addObject:result];

 	            if (self.passWordArrM.count == 1) {
 	                self.touchLockView.alertLabel.text = @"请再设置一次";
 	            }

 	            if (self.passWordArrM.count == 2) {
 	                if ([self.passWordArrM[0] isEqualToString:self.passWordArrM[1]]) {

 	                    // 存储密码
 	                    [df setValue:self.passWordArrM[0] forKey:@"touchLock"];
 	                    [df synchronize];

 	                    self.touchLockView.alertLabel.text = @"手势密码设置成功";

 	                } else {

 	                    // 两次滑动结果不一致
 	                    [self.passWordArrM removeAllObjects];

 	                    self.touchLockView.alertLabel.text = @"两次滑动的结果不一致,请重新设置";
 	                }
 	            }

 	        } else {

 	            // 解锁

 	            if ([result isEqualToString:[df objectForKey:@"touchLock"] ]) {
 	                self.touchLockView.alertLabel.text = @"解锁成功";
 	            } else {
 	                self.touchLockView.alertLabel.text = @"密码不正确,请重试";
 	            }
 	        }

 	    } else {

 	        // 滑动点数过少
 	        self.touchLockView.alertLabel.text = result;
 	    }
 	}
- 效果


-
跑马灯
-
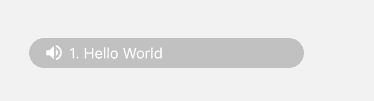
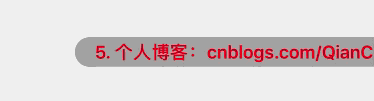
1、垂直滚动,左侧对齐
 	// 创建跑马灯视图控件
 	CGRect frame = CGRectMake(0, 50, self.view.bounds.size.width, 30);
 	QMarqueeView *marqueeView = [[QMarqueeView alloc] initWithFrame:frame];

 	// 设置显示的内容
 	NSArray *showList = @[@"1. Hello World",
 	                      @"2. 欢迎大家关注哦!",
 	                      @"3. GitHub:QianChia",
 	                      @"4. 新浪微博:QianChia0123",
 	                      @"5. 个人博客:cnblogs.com/QianChia"];

 	marqueeView.contentTexts = showList;
 	marqueeView.contentTextColor = [UIColor whiteColor];
 	marqueeView.contentTextFont = [UIFont boldSystemFontOfSize:18];

 	// 设置动画时间
 	marqueeView.animationDuration = 0.2;

 	// 常规设置
 	marqueeView.backgroundColor = [UIColor colorWithRed:102/255.0f green:133/255.0f blue:253/255.0f alpha:1];
 	[self.view addSubview:marqueeView];

 	// 开始滚动
 	[marqueeView q_startAnimation];
- 效果
-
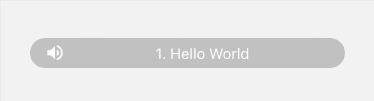
2、垂直滚动,中间对齐
 	// 创建跑马灯视图控件
 	CGRect frame = CGRectMake(0, 50, self.view.bounds.size.width, 30);
 	QMarqueeView *marqueeView = [[QMarqueeView alloc] initWithFrame:frame];

 	// 设置显示的内容
 	NSArray *showList = @[@"1. Hello World",
 	                      @"2. 欢迎大家关注哦!",
 	                      @"3. GitHub:QianChia",
 	                      @"4. 新浪微博:QianChia0123",
 	                      @"5. 个人博客:cnblogs.com/QianChia"];

 	marqueeView.contentTexts = showList;
 	marqueeView.contentTextColor = [UIColor whiteColor];
 	marqueeView.contentTextFont = [UIFont boldSystemFontOfSize:18];

 	// 设置动画时间
 	marqueeView.animationDuration = 0.2;

 	// 设置显示的内容对齐方式
 	marqueeView.contentTextAlign = NSTextAlignmentCenter;

 	// 常规设置
 	marqueeView.backgroundColor = [UIColor colorWithRed:102/255.0f green:133/255.0f blue:253/255.0f alpha:1];
 	[self.view addSubview:marqueeView];

 	// 开始滚动
 	[marqueeView q_startAnimation];
- 效果
-
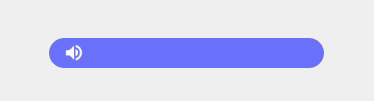
3、垂直滚动,带图标
 	// 创建跑马灯视图控件
 	CGRect frame = CGRectMake(30, 150, self.view.bounds.size.width - 150, 30);
 	QMarqueeView *marqueeView = [[QMarqueeView alloc] initWithFrame:frame];

 	// 设置显示的内容
 	NSArray *showList = @[@"GitHub:QianChia"];
 	marqueeView.contentTexts = showList;
 	marqueeView.contentTextColor = [UIColor whiteColor];

 	// 设置显示的图标
 	marqueeView.contentIcon = [UIImage imageNamed:@"waring1"];

 	// 设置动画时间
 	marqueeView.animationDuration = 0.5;

 	// 常规设置
 	marqueeView.layer.cornerRadius = 15;
 	marqueeView.layer.masksToBounds = YES;
 	marqueeView.backgroundColor = [UIColor colorWithRed:102/255.0f green:133/255.0f blue:253/255.0f alpha:1];
 	[self.view addSubview:marqueeView];

 	// 开始滚动
 	[marqueeView q_startAnimation];
- 效果
-
4、垂直滚动,向下滚动
 	// 创建跑马灯视图控件
 	CGRect frame = CGRectMake(30, 200, self.view.bounds.size.width - 150, 30);
 	QMarqueeView *marqueeView = [[QMarqueeView alloc] initWithFrame:frame];

 	// 设置显示的内容
 	NSArray *showList = @[@"GitHub:QianChia"];
 	marqueeView.contentTexts = showList;
 	marqueeView.contentTextColor = [UIColor whiteColor];
 	marqueeView.contentIcon = [UIImage imageNamed:@"waring1"];

 	// 设置动画时间
 	marqueeView.animationDuration = 0.5;

 	// 设置动画方向
 	marqueeView.animationDirection = QMarqueeViewDirectionDown;

 	// 常规设置
 	marqueeView.layer.cornerRadius = 15;
 	marqueeView.layer.masksToBounds = YES;
 	marqueeView.backgroundColor = [UIColor colorWithRed:102/255.0f green:133/255.0f blue:253/255.0f alpha:1];
 	[self.view addSubview:marqueeView];

 	// 开始滚动
 	[marqueeView q_startAnimation];
- 效果
-
5、垂直滚动,由类方法创建
 	// 设置显示的内容
 	NSArray *showList = @[@"1. Hello World",
 	                      @"2. 欢迎大家关注哦!",
 	                      @"3. GitHub:QianChia",
 	                      @"4. 新浪微博:QianChia0123",
 	                      @"5. 个人博客:cnblogs.com/QianChia"];

 	// 创建跑马灯视图控件,开始滚动
 	CGRect frame = CGRectMake(30, 250, self.view.bounds.size.width - 100, 30);
 	QMarqueeView *marqueeView = [QMarqueeView q_marqueeViewWithFrame:frame
 	                                                           texts:showList
 	                                                           color:[UIColor whiteColor]
 	                                                            font:nil
 	                                                           align:NSTextAlignmentLeft
 	                                                            icon:[UIImage imageNamed:@"waring1"]
 	                                                       direction:QMarqueeViewDirectionDown
 	                                                        duration:1.0
 	                                                           delay:0
 	                                                          target:self];

 	// 常规设置
 	marqueeView.layer.cornerRadius = 15;
 	marqueeView.layer.masksToBounds = YES;
 	marqueeView.backgroundColor = [[UIColor grayColor] colorWithAlphaComponent:0.5];
 	[self.view addSubview:marqueeView];
- 效果
-
6、水平滚动,向左滚动
 	// 创建跑马灯视图控件
 	CGRect frame = CGRectMake(50, 350, self.view.bounds.size.width - 100, 30);
 	QMarqueeView *marqueeView = [[QMarqueeView alloc] initWithFrame:frame];

 	// 设置显示的内容
 	NSArray *showList = @[@"1. Hello World",
 	                      @"2. 欢迎大家关注哦!",
 	                      @"3. GitHub:QianChia",
 	                      @"4. 新浪微博:QianChia0123",
 	                      @"5. 个人博客:cnblogs.com/QianChia"];

 	marqueeView.contentTexts = showList;
 	marqueeView.contentTextColor = [UIColor whiteColor];
 	marqueeView.contentTextFont = [UIFont boldSystemFontOfSize:18];
 	marqueeView.contentIcon = [UIImage imageNamed:@"waring1"];

 	// 设置动画时间
 	marqueeView.animationDuration = 5.0;

 	// 设置动画方向
 	marqueeView.animationDirection = QMarqueeViewDirectionLeft;

 	// 常规设置
 	marqueeView.layer.cornerRadius = 15;
 	marqueeView.layer.masksToBounds = YES;
 	marqueeView.backgroundColor = [UIColor colorWithRed:102/255.0f green:133/255.0f blue:253/255.0f alpha:1];
 	[self.view addSubview:marqueeView];

 	// 开始滚动
 	[marqueeView q_startAnimation];
- 效果
-
7、水平滚动,向右滚动
 	// 创建跑马灯视图控件
 	CGRect frame = CGRectMake(50, 400, self.view.bounds.size.width - 100, 30);
 	QMarqueeView *marqueeView = [[QMarqueeView alloc] initWithFrame:frame];

 	// 设置显示的内容
 	NSArray *showList = @[@"1. Hello World",
 	                      @"2. 欢迎大家关注哦!",
 	                      @"3. GitHub:QianChia",
 	                      @"4. 新浪微博:QianChia0123",
 	                      @"5. 个人博客:cnblogs.com/QianChia"];

 	marqueeView.contentTexts = showList;
 	marqueeView.contentTextColor = [UIColor whiteColor];
 	marqueeView.contentTextFont = [UIFont boldSystemFontOfSize:18];
 	marqueeView.contentIcon = [UIImage imageNamed:@"waring1"];

 	// 设置动画时间
 	marqueeView.animationDuration = 5.0;

 	// 设置动画方向
 	marqueeView.animationDirection = QMarqueeViewDirectionRight;

 	// 常规设置
 	marqueeView.layer.cornerRadius = 15;
 	marqueeView.layer.masksToBounds = YES;
 	marqueeView.backgroundColor = [UIColor colorWithRed:102/255.0f green:133/255.0f blue:253/255.0f alpha:1];
 	[self.view addSubview:marqueeView];

 	// 开始滚动
 	[marqueeView q_startAnimation];
- 效果
-
8、水平滚动,由类方法创建
 	// 设置显示的内容
 	NSArray *showList = @[@"1. Hello World",
 	                      @"2. 欢迎大家关注哦!",
 	                      @"3. GitHub:QianChia",
 	                      @"4. 新浪微博:QianChia0123",
 	                      @"5. 个人博客:cnblogs.com/QianChia"];

 	// 创建跑马灯视图控件,开始滚动
 	CGRect frame = CGRectMake(30, 450, self.view.bounds.size.width - 60, 30);
 	QMarqueeView *marqueeView = [QMarqueeView q_marqueeViewWithFrame:frame
 	                                                           texts:showList
 	                                                           color:nil
 	                                                            font:nil
 	                                                           align:0
 	                                                            icon:[UIImage imageNamed:@"waring2"]
 	                                                       direction:QMarqueeViewDirectionLeft
 	                                                        duration:4.0
 	                                                           delay:0
 	                                                          target:self];

 	// 常规设置
 	marqueeView.layer.cornerRadius = 15;
 	marqueeView.layer.masksToBounds = YES;
 	marqueeView.backgroundColor = [[UIColor grayColor] colorWithAlphaComponent:0.5];
 	[self.view addSubview:marqueeView];
- 效果


-
弹幕
-
1、水平向左移动
 	// 创建弹幕视图控件
 	CGRect frame = CGRectMake(0, 100, 0, 30);   // x, width 设置无效
 	QBulletScreenView *bulletScreenView = [[QBulletScreenView alloc] initWithFrame:frame];

 	// 设置显示的内容
 	NSArray *showList = @[@"1. Hello World",
 	                      @"2. 欢迎大家关注哦!",
 	                      @"3. GitHub:QianChia",
 	                      @"4. 新浪微博:QianChia0123",
 	                      @"5. 个人博客:cnblogs.com/QianChia"];

 	bulletScreenView.contentTexts = showList;
 	bulletScreenView.contentTextColor = [UIColor whiteColor];
 	bulletScreenView.contentTextFont = [UIFont boldSystemFontOfSize:18];
 	bulletScreenView.contentIcon = [UIImage imageNamed:@"waring1"];

 	// 设置动画时间
 	bulletScreenView.animationDuration = 5.0;

 	// 设置动画方向
 	bulletScreenView.animationDirection = QBulletScreenViewDirectionLeft;

 	// 常规设置
 	bulletScreenView.layer.cornerRadius = 15;
 	bulletScreenView.layer.masksToBounds = YES;
 	bulletScreenView.backgroundColor = [UIColor colorWithRed:102/255.0f green:133/255.0f blue:253/255.0f alpha:1];
 	[self.view addSubview:bulletScreenView];

 	// 开始滚动
 	[bulletScreenView q_startAnimation];
- 效果
-
2、水平向右移动
 	// 设置显示的内容
 	NSArray *showList = @[@"1. Hello World",
 	                      @"2. 欢迎大家关注哦!",
 	                      @"3. GitHub:QianChia",
 	                      @"4. 新浪微博:QianChia0123",
 	                      @"5. 个人博客:cnblogs.com/QianChia"];

 	// 创建弹幕视图控件
 	CGRect frame = CGRectMake(0, 200, 0, 30);   // x, width 设置无效
 	QBulletScreenView *bulletScreenView = [QBulletScreenView q_bulletScreenWithFrame:frame
 	                                                                           texts:showList
 	                                                                           color:[UIColor whiteColor]
 	                                                                            font:nil
 	                                                                            icon:[UIImage imageNamed:@"waring1"]
 	                                                                       direction:QBulletScreenViewDirectionRight
 	                                                                        duration:5.0
 	                                                                          target:nil];

 	// 常规设置
 	bulletScreenView.layer.cornerRadius = 15;
 	bulletScreenView.layer.masksToBounds = YES;
 	bulletScreenView.backgroundColor = [[UIColor blackColor] colorWithAlphaComponent:0.5];
 	[self.view addSubview:bulletScreenView];

 	// 开始滚动
 	[bulletScreenView q_startAnimation];
- 效果
-
3、水平向上移动
 	// 创建弹幕视图控件
 	CGRect frame = CGRectMake(10, 0, 0, 30);   // y, width 设置无效
 	QBulletScreenView *bulletScreenView = [[QBulletScreenView alloc] initWithFrame:frame];

 	// 设置显示的内容
 	NSArray *showList = @[@"1. Hello World",
 	                      @"2. 欢迎大家关注哦!",
 	                      @"3. GitHub:QianChia",
 	                      @"4. 新浪微博:QianChia0123",
 	                      @"5. 个人博客:cnblogs.com/QianChia"];

 	bulletScreenView.contentTexts = showList;
 	bulletScreenView.contentTextColor = [UIColor whiteColor];
 	bulletScreenView.contentTextFont = [UIFont boldSystemFontOfSize:18];
 	bulletScreenView.contentIcon = [UIImage imageNamed:@"waring1"];

 	// 设置动画时间
 	bulletScreenView.animationDuration = 2.0;

 	// 设置动画方向
 	bulletScreenView.animationDirection = QBulletScreenViewDirectionUp;

 	// 常规设置
 	bulletScreenView.layer.cornerRadius = 15;
 	bulletScreenView.layer.masksToBounds = YES;
 	bulletScreenView.backgroundColor = [UIColor colorWithRed:102/255.0f green:133/255.0f blue:253/255.0f alpha:1];
 	[backView addSubview:bulletScreenView];

 	// 开始滚动
 	[bulletScreenView q_startAnimation];
- 效果
-
4、水平向下移动
 	// 设置显示的内容
 	NSArray *showList = @[@"1. Hello World",
 	                      @"2. 欢迎大家关注哦!",
 	                      @"3. GitHub:QianChia",
 	                      @"4. 新浪微博:QianChia0123",
 	                      @"5. 个人博客:cnblogs.com/QianChia"];

 	// 创建弹幕视图控件
 	CGRect frame = CGRectMake(10, 0, 0, 30);   // y, width 设置无效
 	QBulletScreenView *bulletScreenView = [QBulletScreenView q_bulletScreenWithFrame:frame
 	                                                                           texts:showList
 	                                                                           color:[UIColor whiteColor]
 	                                                                            font:[UIFont boldSystemFontOfSize:18]
 	                                                                            icon:[UIImage imageNamed:@"waring1"]
 	                                                                       direction:QBulletScreenViewDirectionDown
 	                                                                        duration:2.0
 	                                                                          target:nil];

 	// 常规设置
 	bulletScreenView.layer.cornerRadius = 15;
 	bulletScreenView.layer.masksToBounds = YES;
 	bulletScreenView.backgroundColor = [UIColor colorWithRed:102/255.0f green:133/255.0f blue:253/255.0f alpha:1];
 	[backView addSubview:bulletScreenView];

 	// 开始滚动
 	[bulletScreenView q_startAnimation];
- 效果


-
1、创建二维码/条码扫描视图控制器
 	// 创建二维码/条码扫描视图控制器
 	QQRCode *qrCode = [QQRCode q_qrCodeWithResult:^(BOOL isSucceed, NSString *result) {

 	    if (isSucceed) {

 	        [[[UIAlertView alloc] initWithTitle:@"Succeed"
 	                                    message:result
 	                                   delegate:nil
 	                          cancelButtonTitle:@"确定"
 	                          otherButtonTitles:nil] show];

 	    } else {

 	        [[[UIAlertView alloc] initWithTitle:@"Failed"
 	                                    message:result
 	                                   delegate:nil
 	                          cancelButtonTitle:@"确定"
 	                          otherButtonTitles:nil] show];
 	    }
 	}];

 	// 设置我的二维码信息
 	qrCode.myQRCodeInfo = @"http://weixin.qq.com/r/xUqbg1-ENgJJrRvg9x-X";
 	qrCode.headIcon = [UIImage imageNamed:@"demo6"];

 	// 打开扫描视图控制器
 	[self presentViewController:qrCode animated:YES completion:nil];
- 效果
_
_
-
2、生成二维码
 	// 生成普通的二维码
 	UIImage *qrImage = [UIImage q_imageWithQRCodeFromString:@"http://weixin.qq.com/r/xUqbg1-ENgJJrRvg9x-X"
 	                                               headIcon:nil
 	                                                  color:nil
 	                                              backColor:nil];

 	// 生成带头像的二维码
 	UIImage *qrImage = [UIImage q_imageWithQRCodeFromString:@"http://weixin.qq.com/r/xUqbg1-ENgJJrRvg9x-X"
 	                                               headIcon:[UIImage imageNamed:@"demo6"]
 	                                                  color:[UIColor blackColor]
 	                                              backColor:[UIColor whiteColor]];

 	// 生成指定图片大小的二维码
 	UIImage *qrImage = [UIImage q_imageWithQRCodeFromString:@"http://weixin.qq.com/r/xUqbg1-ENgJJrRvg9x-X"
 	                                              imageSize:CGSizeMake(2048, 2048)
 	                                               headIcon:[UIImage imageNamed:@"demo6"]
 	                                              headFrame:CGRectMake(819, 819, 410, 410)
 	                                                  color:nil
 	                                              backColor:nil];
- 效果
-
3、识别二维码
 	// 创建图片,添加长按手势
 	self.imageView.image = [UIImage imageNamed:@"demo4"];

 	UILongPressGestureRecognizer *longPress = [[UILongPressGestureRecognizer alloc] initWithTarget:self action:@selector(dealLongPress:)];
 	[self.imageView addGestureRecognizer:longPress];

 	// 处理长按手势,识别图片中的二维码
 	- (void)dealLongPress:(UIGestureRecognizer *)gesture {

 	    if (gesture.state == UIGestureRecognizerStateBegan) {

 	        UIImageView *pressedImageView = (UIImageView *)gesture.view;
 	        UIImage *image = pressedImageView.image;

 	        // 识别图片中的二维码
 	        NSString *result = [image q_stringByRecognizeQRCode];

 	        [[[UIAlertView alloc] initWithTitle:@"Succeed"
 	                                    message:result
 	                                   delegate:nil
 	                          cancelButtonTitle:@"确定"
 	                          otherButtonTitles:nil] show];
 	    }
 	}
- 效果
-
4、生成条形码
 	// 生成条形码
 	UIImage *qrImage = [UIImage q_imageWithBarCodeFromString:@"cnblogs: QianChia"
 	                                                   color:nil
 	                                               backColor:nil];

 	// 生成指定图片大小的条形码
 	UIImage *qrImage = [UIImage q_imageWithBarCodeFromString:@"cnblogs: QianChia"
 	                                               imageSize:CGSizeMake(1024, 512)
 	                                                   color:[UIColor blueColor]
 	                                               backColor:[UIColor redColor]];
- 效果


-
由十六进制颜色值创建 RGB 颜色值
 	// 0X 前缀格式
 	UIColor *color = [UIColor q_colorWithHexString:@"0Xc83c23"];
 	UIColor *color = [UIColor q_colorWithHexString:@"0Xc83c23" alpha:0.5];

 	// # 前缀格式
 	UIColor *color = [UIColor q_colorWithHexString:@"#c83c23"];
 	UIColor *color = [UIColor q_colorWithHexString:@"#c83c23" alpha:0.5];

 	// 无前缀格式
 	UIColor *color = [UIColor q_colorWithHexString:@"c83c23"];
 	UIColor *color = [UIColor q_colorWithHexString:@"c83c23" alpha:0.5];
-
获取 UIColor 的 RGB 值
 	NSArray *rgbComponents = [[UIColor cyanColor] q_getRGBComponents];

 	CGFloat r = [rgbComponents[0] floatValue];
 	CGFloat g = [rgbComponents[1] floatValue];
 	CGFloat b = [rgbComponents[2] floatValue];
 	CGFloat a = [rgbComponents[3] floatValue];

 	NSLog(@"R: %f, G: %f B:%f, A: %f", r, g, b, a);
-
输出结果为
- R: 0.000000, G: 1.000000 B:1.000000, A: 1.000000
-
-
1、整数样式数字的变化
 	@property (nonatomic, strong) QCountingLabel *countingLabel;

 	// 创建 QCountingLabel 对象
 	self.countingLabel = [[QCountingLabel alloc] initWithFrame:CGRectMake(0, 0, 300, 120)];
 	[self.view addSubview:self.countingLabel];

 	// 常规设置,QCountingLabel 继承 UILabel, 设置和 UILabel 一样
 	self.countingLabel.center = self.view.center;
 	self.countingLabel.backgroundColor = [[UIColor lightGrayColor] colorWithAlphaComponent:0.5];
 	self.countingLabel.font = [UIFont systemFontOfSize:50];
 	self.countingLabel.textColor = [UIColor redColor];
 	self.countingLabel.textAlignment = NSTextAlignmentCenter;

 	// 设置文本样式
 	self.countingLabel.format = @"%d";

 	// 设置变化范围及动画时间
 	[self.countingLabel q_countFromValue:10 toValue:1000 withDuration:1.0f];
- 效果
-
2、浮点数样式数字的变化
 	@property (nonatomic, strong) QCountingLabel *countingLabel;

 	// 创建 QCountingLabel 对象
 	self.countingLabel = [[QCountingLabel alloc] initWithFrame:CGRectMake(0, 0, 300, 120)];
 	[self.view addSubview:self.countingLabel];

 	// 常规设置,QCountingLabel 继承 UILabel, 设置和 UILabel 一样
 	self.countingLabel.center = self.view.center;
 	self.countingLabel.backgroundColor = [[UIColor lightGrayColor] colorWithAlphaComponent:0.5];
 	self.countingLabel.font = [UIFont systemFontOfSize:50];
 	self.countingLabel.textColor = [UIColor redColor];
 	self.countingLabel.textAlignment = NSTextAlignmentCenter;

 	// 设置文本样式
 	self.countingLabel.format = @"%.2f";

 	// 设置变化范围及动画时间
 	[self.countingLabel q_countFromValue:0 toValue:3198.23 withDuration:1.0f];
- 效果
-
3、带有千分位分隔符的浮点数
 	@property (nonatomic, strong) QCountingLabel *countingLabel;

 	// 创建 QCountingLabel 对象
 	self.countingLabel = [[QCountingLabel alloc] initWithFrame:CGRectMake(0, 0, 300, 120)];
 	[self.view addSubview:self.countingLabel];

 	// 常规设置,QCountingLabel 继承 UILabel, 设置和 UILabel 一样
 	self.countingLabel.center = self.view.center;
 	self.countingLabel.backgroundColor = [[UIColor lightGrayColor] colorWithAlphaComponent:0.5];
 	self.countingLabel.font = [UIFont systemFontOfSize:50];
 	self.countingLabel.textColor = [UIColor redColor];
 	self.countingLabel.textAlignment = NSTextAlignmentCenter;

 	// 设置文本样式
 	self.countingLabel.format = @"%.2f";

 	// 设置分隔符样式
 	self.countingLabel.positiveFormat = @"###,###.##";

 	// 设置变化范围及动画时间
 	[self.countingLabel q_countFromValue:0 toValue:3048.64 withDuration:1.0f];
- 效果


-
1、使用秘钥证书文件进行加密解密
-
使用 .der 和 .p12 秘钥文件进行加密、解密。
 	// 原始数据
 	NSString *originalString = @"这是一段将要使用 '.der' 文件加密的字符串!";
 	NSLog(@"加密前: %@", originalString);

 	// 秘钥证书文件 .der 和 .p12 路径
 	NSString *public_key_path = [[NSBundle mainBundle] pathForResource:@"public_key" ofType:@"der"];
 	NSString *private_key_path = [[NSBundle mainBundle] pathForResource:@"private_key" ofType:@"p12"];

 	// 加密
 	NSString *encryptStr = [QRSAEncryptor q_encryptWithString:originalString publicKeyFilePath:public_key_path];
 	NSLog(@"加密后: %@", encryptStr);

 	// 解密
 	NSString *DencryptStr = [QRSAEncryptor q_decryptWithString:encryptStr privateKeyFilePath:private_key_path password:@"qianchia"];
 	NSLog(@"解密后: %@", DencryptStr);
- 效果
-
-
2、使用秘钥字符串进行加密解密
-
秘钥字符串可以来这里:http://web.chacuo.net/netrsakeypair, 这是一个在线生成 RSA 秘钥的网站, 生成公钥和秘钥后, 复制出来用于测试。
 	// 原始数据
 	NSString *originalString = @"这是一段将要使用 '秘钥字符串' 进行加密的字符串!";
 	NSLog(@"加密前: %@", originalString);

 	// 加密
 	NSString *publicKeyStr = @"MIGfMA0GCSqGSIb3DQEBAQUAA4GNADCBiQKBgQDsQ44uzMg83T6z7/dvNn2B1KHlzGwccgo055PeimXdBbzUVBECE0nQeNGb9tkO3mVnu8R4Iu5faoX7MY/muiTVZ3NDAvtk+WBjXfNqHmWvlMfj5jwxnITosnHMLVgrqDFc9q1yfmbTLhd8cJhMXsVBlduCSYbdNitA2z4B3hKS5wIDAQAB";

 	NSString *encryptStr = [QRSAEncryptor q_encryptWithString:originalString publicKey:publicKeyStr];
 	NSLog(@"加密后: %@", encryptStr);

 	// 解密
 	NSString *privateKeyStr = @"MIICdwIBADANBgkqhkiG9w0BAQEFAASCAmEwggJdAgEAAoGBAOxDji7MyDzdPrPv9282fYHUoeXMbBxyCjTnk96KZd0FvNRUEQITSdB40Zv22Q7eZWe7xHgi7l9qhfsxj+a6JNVnc0MC+2T5YGNd82oeZa+Ux+PmPDGchOiyccwtWCuoMVz2rXJ+ZtMuF3xwmExexUGV24JJht02K0DbPgHeEpLnAgMBAAECgYB1cuPEihJkh0t7YagsRfdASjatKOD5hwth31kXwM8Af7CuEJhf4rzIALeag6zFgnMAjUwOuLatAiRWif3SIejapMaY/DcXWM/5ugYNi1exS1U8BeBjAOyZuQf/onOn0c0eBqT912CFnjEO5iNuNDkheRQK/FBv2XuMpnAI1FbGQQJBAPmmJkXtEDoM90PxPcL/+ecoNCe2aabiN/D9JlHtOE64DJzRQG4HHpizsvzxMQ00+ItTsG089BjpZPPHuLMO3AcCQQDyRjwPri2lyRC7GHgkgjB03NFL16ENkNER5/7X6TE15uqH/kdrKwrVUNNFwq9a11CHKtJqZOSgy0iN6rKF1JohAkBihAR6d7B9l/xDnYFn4Ce35o+eVEehCYhV2zAyCFC+D7c6cwDf6oNScydg1bUrpwmlwaLPmMwiwIeMA/aJAoYlAkEAoFjJwZsHDTWRBDNCuO8NgRrwzuBs8FyLcu135pCpCELHsLAjtpMrPVmcKwyaIGZnHr7BurcB9kX0xDC0bQzz4QJBAKKCz52lxwWboqo5h4lmk0F3R17O7bUNOaSn1kauX5ADBoQ2zsfl3LrPNB2Tt+97+wRyjnF9Gkwjg2okUc4V1MY=";

 	NSString *dencryptStr = [QRSAEncryptor q_decryptWithString:encryptStr privateKey:privateKeyStr];
 	NSLog(@"解密后: %@", dencryptStr);
- 效果
-


-
1、Validate JSON
-
Given
 	NSDictionary *json = @{
 	                       @"phoneNumber" : @"123-555-6789",
 	                       @"name" : @"Johnny Ringo",
 	                       @"age" : @"BANANA",
 	                       @"weight" : @"130.3",
 	                       @"ssn" : [NSNull null],
 	                       @"children" : @[],
 	                       @"parents" : @[
 	                                       @{
 	                                           @"name" : @"Mickey"
 	                                        },
 	                                       @{
 	                                           @"name" : @"Minnie"
 	                                        }
 	                                    ]
 	                       };
-
Before
 	BOOL validated = YES;

 	NSString *phoneNumber = [json objectForKey:@"phoneNumber"];
 	if (!phoneNumber || ![phoneNumber isKindOfClass:[NSString class]] || [phoneNumber length] < 7) {
 	    NSLog(@"Phone number didn't validate (not found or not an NSString or length < 7)");
 	    validated = NO;
 	}

 	NSString *name = [json objectForKey:@"name"];
 	if (!name || ![phoneNumber isKindOfClass:[NSString class]]) {
 	    NSLog(@"Phone number didn't validate (not found or not an NSString)");
 	    validated = NO;
 	}

 	NSNumber *age = [json objectForKey:@"age"];
 	if (age && ![age isKindOfClass:[NSNumber class]]) {
 	    NSLog(@"Age exists but didn't validate (not an NSNumber)");
 	    validated = NO;
 	}

 	NSNumber *weight = [json objectForKey:@"weight"];
 	if (weight && ![weight isKindOfClass:[NSString class]]) {
 	    NSLog(@"Weight exists but didn't validate (not an NSString)");
 	    validated = NO;
 	}

 	NSString *ssn = [json objectForKey:@"ssn"];
 	if (ssn != [NSNull null]) {
 	    NSLog(@"ssn should be null");
 	    validated = NO;
 	}

 	NSString *height = [json objectForKey:@"height"];
 	if(height && ![weight isKindOfClass:[NSString class]]) {
 	    NSLog(@"Height exists but didn't validate (not an NSString)");
 	    validated = NO;
 	}

 	NSArray *children = [json objectForKey:@"children"];
 	if(children && ![children isKindOfClass:[NSArray class]]) {
 	    NSLog(@"Children exists but didn't validate (not an NSArray)");
 	    validated = NO;
 	}

 	NSArray *parents = [json objectForKey:@"parents"];
 	if(parents && ![parents isKindOfClass:[NSArray class]] && [parents count] <= 1) {
 	    NSLog(@"Parents exists but didn't validate (not an NSArray or count <= 1)");
 	    validated = NO;
 	}

 	if (validated) {
 	    NSLog(@"Woohoo, no errors!");
 	}
-
After
     NSError *error;

     [QJSONValidator q_validateValuesFrom:json
                         withRequirements:@{
                                           @"phoneNumber" : [QValidatorPredicate.isString lengthIsGreaterThanOrEqualTo:@7],
                                           @"name"        : QValidatorPredicate.isString,
                                           @"age"         : QValidatorPredicate.isNumber.isOptional,
                                           @"weight"      : QValidatorPredicate.isString,
                                           @"ssn"         : QValidatorPredicate.isNull,
                                           @"height"      : QValidatorPredicate.isString,
                                           @"children"    : QValidatorPredicate.isArray,
                                           @"parents"     : [QValidatorPredicate.isArray lengthIsGreaterThan:@1]
                                           }
                                    error:&error];

     if (error) {
         NSLog(@"%@", [QJSONValidator q_prettyStringGivenQJSONValidatorError:error]);
     } else {
         NSLog(@"Woohoo, no errors!");
     }
-
-
2、Pretty Printing
 	NSDictionary *json = @{...};
 	NSError *error;

 	[RPJSONValidator validateValuesFrom:json
 	                   withRequirements:@{...}
 	                              error:&error];

 	NSLog(@"%@", [RPJSONValidator prettyStringGivenRPJSONValidatorError:error];

 	2014-03-19 23:08:02.451 RPJSONValidator[42273:60b]
 	* age
 	     * Requires NSNumber, given (__NSCFConstantString)
 	* height
 	     * Key not found
 	* parents
 	     * Requires NSString, given (__NSArrayI)
 	     * Requires length or count less than or equal to (3)
-
3、Sub-JSON Validating
 	NSDictionary *json = @{
 	                       @"car" : @{
 	                                    @"make" : @"Ford",
 	                                    @"model" : @"Mustang"
 	                               },
 	                       };

 	NSError *error;

 	[QJSONValidator q_validateValuesFrom:json
 	                    withRequirements:@{
 	                                      @"car" : @{
 	                                              @"make"  : [QValidatorPredicate valueIsEqualTo:@"Ford"],
 	                                              @"model" : [QValidatorPredicate valueIsEqualTo:@"Mustang"]
 	                                              }
 	                                      }
 	                               error:&error];

 	if (error) {
 	    NSLog(@"%@", [QJSONValidator q_prettyStringGivenQJSONValidatorError:error]);
 	} else {
 	    NSLog(@"Woohoo, no errors!");
 	}
-
4、Validate by Index
 	NSDictionary *json = @{
 	                       @"cars" : @[
 	                                    @{
 	                                       @"make" : @"Ford",
 	                                       @"model" : @"Mustang"
 	                                    },
 	                                    @{
 	                                       @"make" : @"Tesla Motors",
 	                                       @"model" : @"Model S"
 	                                    },
 	                               ],
 	                       };

 	NSError *error;

 	[QJSONValidator q_validateValuesFrom:json
 	                    withRequirements:@{
 	                                      @"cars" : @{
 	                                              @0 : @{   // Access the first element
 	                                                      @"make"  : QValidatorPredicate.isString,
 	                                                      @"model" : QValidatorPredicate.isString
 	                                                      }
 	                                              }
 	                                      }
 	                               error:&error];

 	if (error) {
 	    NSLog(@"%@", [QJSONValidator q_prettyStringGivenQJSONValidatorError:error]);
 	} else {
 	    NSLog(@"Woohoo, no errors!");
 	}
-
5、Validate an array
 	NSDictionary *json = @{
 	                       @"friends" :  @[
 	                               @{@"name" : @"Anna", @"age" : @25},
 	                               @{@"name" : @"Maria", @"age" : @19},
 	                               @{@"name" : @"WrongObject", @"counry" : @"UA"}]
 	                       };

 	NSError *error;
 	[QJSONValidator q_validateValuesFrom:json
 	                    withRequirements:@{
 	                                      @"friends" : [QValidatorPredicate.isArray valuesWithRequirements:
 	                                                    @{
 	                                                      @"name" : QValidatorPredicate.isString,
 	                                                      @"age"  : QValidatorPredicate.isNumber
 	                                                    }]
 	                                      }
 	                               error:&error];

 	if (error) {
 	    NSLog(@"%@", [QJSONValidator q_prettyStringGivenQJSONValidatorError:error]);
 	} else {
 	    NSLog(@"Woohoo, no errors!");
 	}
-
1、Validate JSON
 	NSDictionary *json = @{
 	                       @"tag1": @"star",
 	                       @"tag2": @"jason",
 	                       @"totalNum": @(1616),
 	                       @"start_index": @"60",
 	                       @"return_number": @(30),
 	                       @"data" : @[@"1", @"2"],
 	                       @"tags" : [NSNull null],
 	                       @"config" : @{
 	                               @"max_num" : @(30000),
 	                               @"tag" : [NSNull null]
 	                               }
 	                       };

 	// Normal
 	NSDictionary *configDic1 = [json objectForKey:@"config"];
 	if (configDic1 != nil && [configDic1 isKindOfClass:[NSDictionary class]]) {

 	    id number = [configDic1 objectForKey:@"max_num"];
 	    if ([number isKindOfClass:[NSNumber class]] || [number isKindOfClass:[NSString class]]) {
 	        NSInteger maxNum = [number integerValue];
 	        NSLog(@"maxNum: %@", @(maxNum));
 	    }
 	}

 	// Or just this!
 	NSInteger maxNum = [[json q_dictionaryKey:@"config"] q_integerKey:@"max_num"];
 	NSLog(@"maxNum: %@", @(maxNum));

 	// default value
 	NSInteger minNum = [[json q_dictionaryKey:@"config"] q_integerKey:@"min_num" defaultValue:-1];
 	NSLog(@"minNum: %@", @(minNum));

 	// Handle NSNull
 	NSArray *tags = [json q_arrayKey:@"tags"];
 	NSLog(@"%@", tags);

 	// Handle wrong type
 	NSString *string = [[json q_dictionaryKey:@"data"] q_stringKey:@"1"];
 	NSLog(@"%@", string);

