![]()
Run ComfyUI in a docker container locally or in the cloud.
These container images are tested extensively at Vast.ai & Runpod.io but compatibility with other GPU cloud services is expected.
Note
These images do not bundle models or third-party configurations. You should use a provisioning script to automatically configure your container. You can find examples in config/provisioning.
Simply declare your environment variables and launch a container with docker compose or choose a pre-configured cloud template.
ComfyUI is a powerful and modular stable diffusion GUI and backend with a user-friendly interface that empowers users to effortlessly design and execute intricate Stable Diffusion pipelines. This innovative system employs a visual approach with nodes, flowcharts, and graphs, eliminating the need for manual coding.
Some features:
-
Graphical Workflow Design: Create complex Stable Diffusion workflows through a user-friendly node-based interface, without requiring coding skills.
-
Wide Compatibility: Fully supports SD1.x, SD2.x, and SDXL for comprehensive applicability.
-
Efficient Queue System: Incorporates an asynchronous queue system for streamlined workflow execution.
-
Selective Optimization: Optimizes execution by re-running only the parts of the workflow that have changed.
-
CPU Support: Capable of functioning on CPUs with the --cpu option, although at a slower pace.
-
Model Integration: Load ckpt, safetensors, diffusers models/checkpoints, standalone VAEs, CLIP models, and more.
-
Diverse Capabilities: Handle embeddings, textual inversion, Loras (regular, locon, loha), hypernetworks, inpainting, control networks, upscale models, unCLIP models, GLIGEN, model merging, and latent previews with TAESD.
-
Workflow Flexibility: Save and load workflows conveniently in JSON format, facilitating easy modification and reuse.
-
Advanced Workflows: The node interface empowers the creation of intricate workflows, from high-resolution fixes to more advanced applications.
-
Area Composition: Supports area composition techniques for enhanced creative control.
-
Offline Functionality: Operates completely offline, ensuring data privacy and eliminating any need for downloads.
-
Configuration Control: Utilize a configuration file to set specific search paths for models.
Docker images are built automatically through a GitHub Actions workflow and hosted at the GitHub Container Registry.
An incremental build process is used to avoid needing a huge cache - The following images are used to provide functionality:
- nvidia/cuda / ubuntu ↴
- ai-dock/base-image ↴
- ai-dock/python ↴
- ai-dock/pytorch / ai-dock/jupyter-pytorch ↴
- ai-dock/comfyui
The :latest tag points to :latest-cuda
Tags follow these patterns:
-
:pytorch-[pytorch-version]-py[python-version]-cuda-[x.x.x]-base-[ubuntu-version] -
:latest-cuda→:pytorch-2.1.1-py3.10-cuda-11.8.0-base-22.04 -
:latest-cuda-jupyter→:jupyter-pytorch-2.1.1-py3.10-cuda-11.8.0-base-22.04
-
:pytorch-[pytorch-version]-py[python-version]-rocm-[x.x.x]-runtime-[ubuntu-version] -
:latest-rocm→:pytorch-2.1.1-py3.10-rocm-5.6-runtime-22.04 -
:latest-rocm-jupyter→:jupyter-pytorch-2.1.1-py3.10-rocm-5.6-runtime-22.04
-
:pytorch-[pytorch-version]-py[python-version]-ubuntu-[ubuntu-version] -
:latest-cpu→:pytorch-2.1.1-py3.10-cpu-22.04 -
:latest-cpu-jupyter→:jupyter-pytorch-2.1.1-py3.10-cpu-22.04
Browse here for an image suitable for your target environment.
You can also build from source by editing .env and running docker compose build.
Supported Python versions: 3.11, 3.10
Supported Pytorch versions: 2.1.1, 2.0.1
Supported Platforms: NVIDIA CUDA, AMD ROCm, CPU
You can self-build from source by editing docker-compose.yaml or .env and running docker compose build.
It is a good idea to leave the main source tree alone and copy any extra files you would like in the container into build/COPY_ROOT_EXTRA/.... The structure within this directory will be overlayed on / near the end of the build process.
After copying has been completed, the script build/COPY_ROOT_EXTRA/opt/ai-dock/bin/build/layer1/init.sh will be executed. A template for this file capable of downloading models and nodes is provided for convenience.
Any directories and files that you add into opt/storage will be made available in the running container at $WORKSPACE/storage through symbolic links.
This directory is monitored by inotifywait. Any items appearing here will be automatically symlinked to the application directories as defined in /opt/ai-dock/storage_monitor/etc/mappings.sh.
- Fork this repository and clone
- Create and switch to a new branch
- Create
.envto override theIMAGE_TAG - Copy non-public models to
build/COPY_ROOT_EXTRA/opt/storage/stable_diffusion/ckpt/ - Edit
build/COPY_ROOT_EXTRA/opt/ai-dock/bin/build/layer1/init.shto download public models and nodes - Run
docker compose build - Run
docker compose push
A 'feature-complete' docker-compose.yaml file is included for your convenience. All features of the image are included - Simply edit the environment variables in .env, save and then type docker compose up.
If you prefer to use the standard docker run syntax, the command to pass is init.sh.
This image should be compatible with any GPU cloud platform. You simply need to pass environment variables at runtime.
Note
Please raise an issue on this repository if your provider cannot run the image.
Container Cloud
Container providers don't give you access to the docker host but are quick and easy to set up. They are often inexpensive when compared to a full VM or bare metal solution.
All images built for ai-dock are tested for compatibility with both vast.ai and runpod.io.
Images that include Jupyter are also tested to ensure compatibility with Paperspace Gradient
See a list of pre-configured templates here
Warning
Container cloud providers may offer both 'community' and 'secure' versions of their cloud. If your usecase involves storing sensitive information (eg. API keys, auth tokens) then you should always choose the secure option.
VM Cloud
Running docker images on a virtual machine/bare metal server is much like running locally.
You'll need to:
- Configure your server
- Set up docker
- Clone this repository
- Edit
.envanddocker-compose.yml - Run
docker compose up
Find a list of compatible VM providers here.
All services listen for connections at 0.0.0.0. This gives you some flexibility in how you interact with your instance:
Expose the Ports
This is fine if you are working locally but can be dangerous for remote connections where data is passed in plaintext between your machine and the container over http.
SSH Tunnel
You will only need to expose port 22 (SSH) which can then be used with port forwarding to allow secure connections to your services.
If you are unfamiliar with port forwarding then you should read the guides here and here.
Cloudflare Tunnel
You can use the included cloudflared service to make secure connections without having to expose any ports to the public internet. See more below.
| Variable | Description |
|---|---|
CF_TUNNEL_TOKEN |
Cloudflare zero trust tunnel token - See documentation. |
CF_QUICK_TUNNELS |
Create ephemeral Cloudflare tunnels for web services (default false) |
COMFYUI_BRANCH |
ComfyUI branch/commit hash. Defaults to master |
COMFYUI_FLAGS |
Startup flags. eg. --gpu-only --highvram |
COMFYUI_PORT |
ComfyUI interface port (default 8188) |
DIRECT_ADDRESS |
IP/hostname for service portal direct links (default localhost) |
DIRECT_ADDRESS_GET_WAN |
Use the internet facing interface for direct links (default false) |
GPU_COUNT |
Limit the number of available GPUs |
PROVISIONING_SCRIPT |
URL of a remote script to execute on init. See note. |
RCLONE_* |
Rclone configuration - See rclone documentation |
SKIP_ACL |
Set true to skip modifying workspace ACL |
SSH_PORT_LOCAL |
Set a non-standard port for SSH (default 22) |
SSH_PUBKEY |
Your public key for SSH |
WEB_ENABLE_AUTH |
Enable password protection for web services (default true) |
WEB_USER |
Username for web services (default user) |
WEB_PASSWORD |
Password for web services (default password) |
WORKSPACE |
A volume path. Defaults to /workspace/ |
WORKSPACE_SYNC |
Move mamba environments and services to workspace if mounted (default true) |
Environment variables can be specified by using any of the standard methods (docker-compose.yaml, docker run -e...). Additionally, environment variables can also be passed as parameters of init.sh.
Passing environment variables to init.sh is usually unnecessary, but is useful for some cloud environments where the full docker run command cannot be specified.
Example usage: docker run -e STANDARD_VAR1="this value" -e STANDARD_VAR2="that value" init.sh EXTRA_VAR="other value"
By default, all exposed web services other than the port redirect page are protected by HTTP basic authentication.
The default username is user and the password is password.
You can set your credentials by passing environment variables as shown above.
The password is stored as a bcrypt hash. If you prefer not to pass a plain text password to the container you can pre-hash and use the variable WEB_PASSWORD_HASH.
If you are running the image locally on a trusted network, you may disable authentication by setting the environment variable WEB_ENABLE_AUTH=false.
Note
You can use set-web-credentials.sh <username> <password> change the username and password in a running container.
It can be useful to perform certain actions when starting a container, such as creating directories and downloading files.
You can use the environment variable PROVISIONING_SCRIPT to specify the URL of a script you'd like to run.
The URL must point to a plain text file - GitHub Gists/Pastebin (raw) are suitable options.
If you are running locally you may instead opt to mount a script at /opt/ai-dock/bin/provisioning.sh.
Note
If configured, sshd, caddy, cloudflared, rclone, serviceportal, storagemonitor & logtail will be launched before provisioning; Any other processes will launch after.
Warning
Only use scripts that you trust and which cannot be changed without your consent.
A small software collection is installed by apt-get to provide basic utility.
All other software is installed into its own environment by micromamba, which is a drop-in replacement for conda/mamba. Read more about it here.
Micromamba environments are particularly useful where several software packages are required but their dependencies conflict.
| Environment | Packages |
|---|---|
base |
micromamba's base environment |
comfyui |
ComfyUI and dependencies |
python_[ver] |
python |
If you are extending this image or running an interactive session where additional software is required, you should almost certainly create a new environment first. See below for guidance.
| Command | Function |
|---|---|
micromamba env list |
List available environments |
micromamba activate [name] |
Activate the named environment |
micromamba deactivate |
Close the active environment |
micromamba run -n [name] [command] |
Run a command in the named environment without activating |
All ai-dock images create micromamba environments using the --always-softlink flag which can save disk space where multiple environments are available.
To create an additional micromamba environment, eg for python, you can use the following:
micromamba --always-softlink create -y -c conda-forge -c defaults -n [name] python=3.10
Data inside docker containers is ephemeral - You'll lose all of it when the container is destroyed.
You may opt to mount a data volume at /workspace - This is a directory that ai-dock images will look for to make downloaded data available outside of the container for persistence.
When the runtime scripts detect a mounted workspace, the ComfyUI directory will be moved there from its original location in /opt. If the workspace is not mounted then a symlink will be created for convenience.
You can define an alternative path for the workspace directory by passing the environment variable WORKSPACE=/my/alternative/path/ and mounting your volume there. This feature will generally assist where cloud providers enforce their own mountpoint location for persistent storage.
The provided docker-compose.yaml will mount the local directory ./workspace at /workspace.
As docker containers generally run as the root user, new files created in /workspace will be owned by uid 0(root).
To ensure that the files remain accessible to the local user that owns the directory, the docker entrypoint will set a default ACL on the directory by executing the commamd setfacl -d -m u:${WORKSPACE_UID}:rwx /workspace.
If you do not want this, you can set the environment variable SKIP_ACL=true.
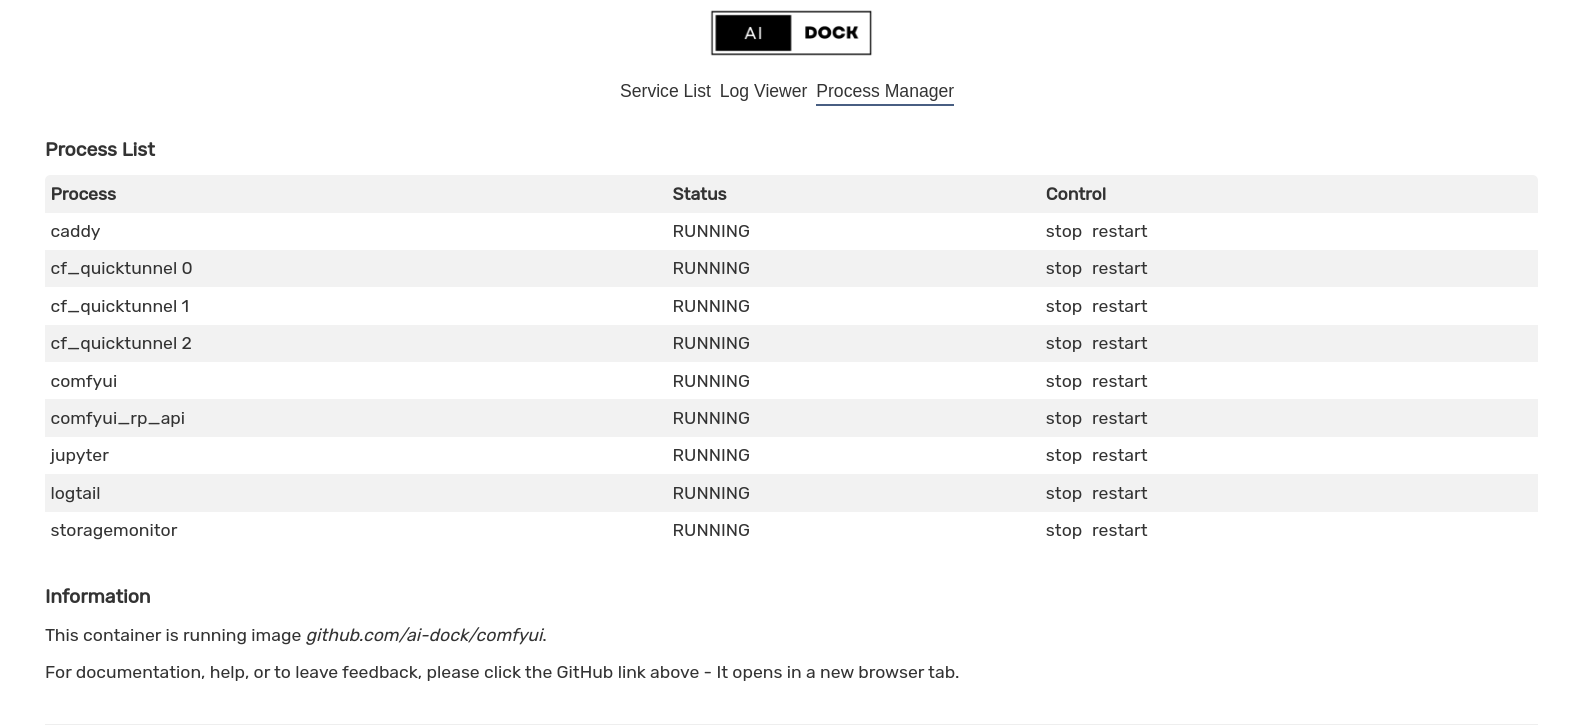
This image will spawn multiple processes upon starting a container because some of our remote environments do not support more than one container per instance.
All processes are managed by supervisord and will restart upon failure until you either manually stop them or terminate the container.
Note
Some of the included services would not normally be found inside of a container. They are, however, necessary here as some cloud providers give no access to the host; Containers are deployed as if they were a virtual machine.
The service will launch on port 8188 unless you have specified an override with COMFYUI_PORT.
ComfyUI will be updated to the latest version on container start. You can pin the version to a branch or commit hash by setting the COMFYUI_BRANCH variable.
You can set startup flags by using variable COMFYUI_FLAGS.
To manage this service you can use supervisorctl [start|stop|restart] comfyui.
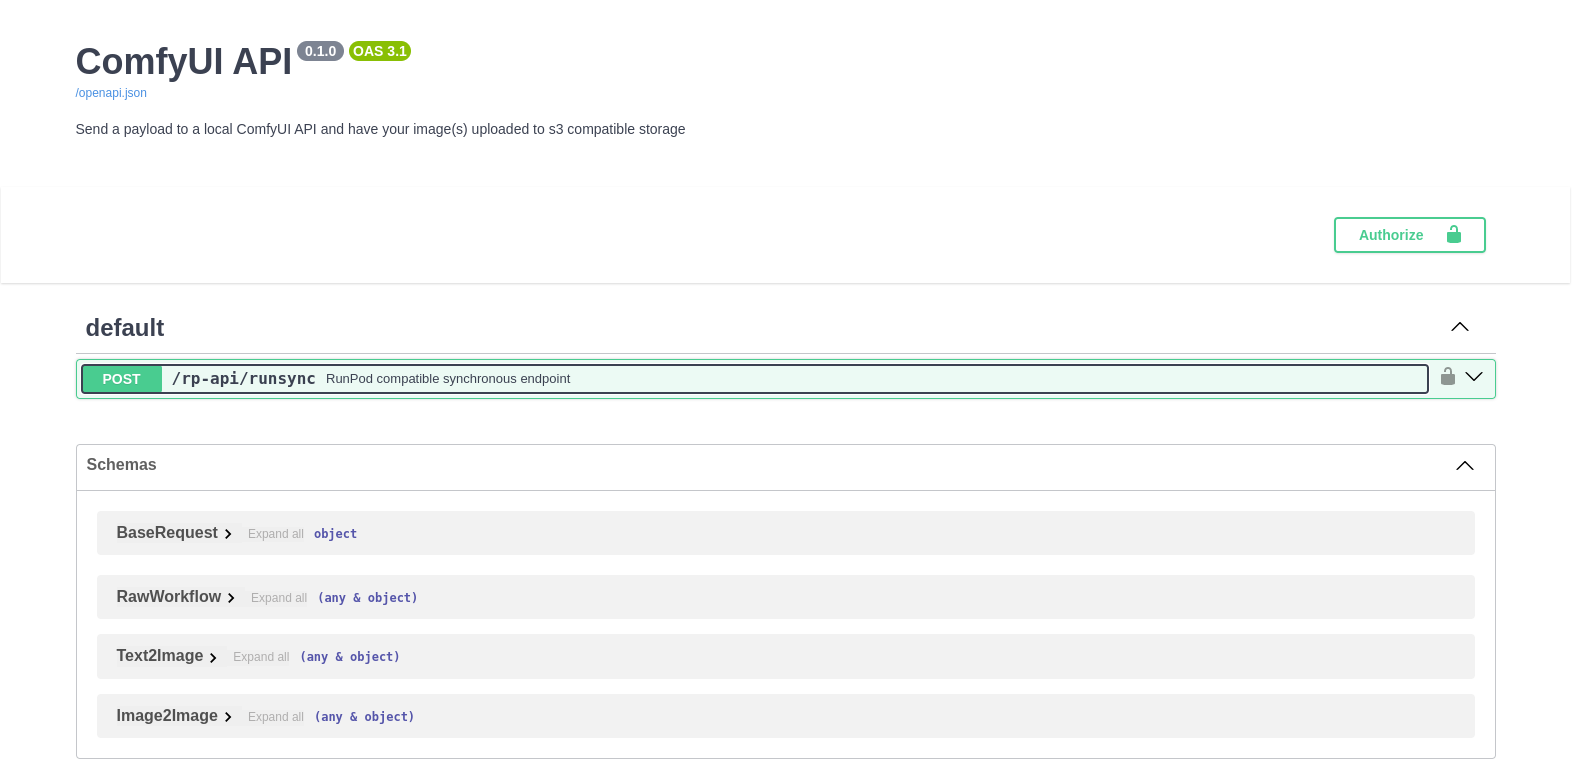
This service is available on port 8188 and is used to test the RunPod serverless API.
You can access the api directly at /rp-api/runsync or you can use the Swager/openAPI playground at /rp-api/docs.
There are several example payloads included in this repository.
This API is available on all platforms - But the container can ony run in serverless mode on RunPod infrastructure.
To learn more about the serverless API see the serverless section
API Playground
The jupyter server will launch a lab instance unless you specify JUPYTER_MODE=notebook.
Jupyter server will listen on port 8888 unless you have specified an alternative with the JUPYTER_PORT environment variable.
A python kernel will be installed coresponding with the python version of the image.
Jupyter's official documentation is available at https://jupyter.org/
This is a simple webserver acting as a reverse proxy.
Caddy is used to enable basic authentication for all sensitive web services.
This is a simple list of links to the web services available inside the container.
The service will bind to port 1111.
For each service, you will find a direct link and, if you have set CF_QUICK_TUNNELS=true, a link to the service via a fast and secure Cloudflare tunnel.
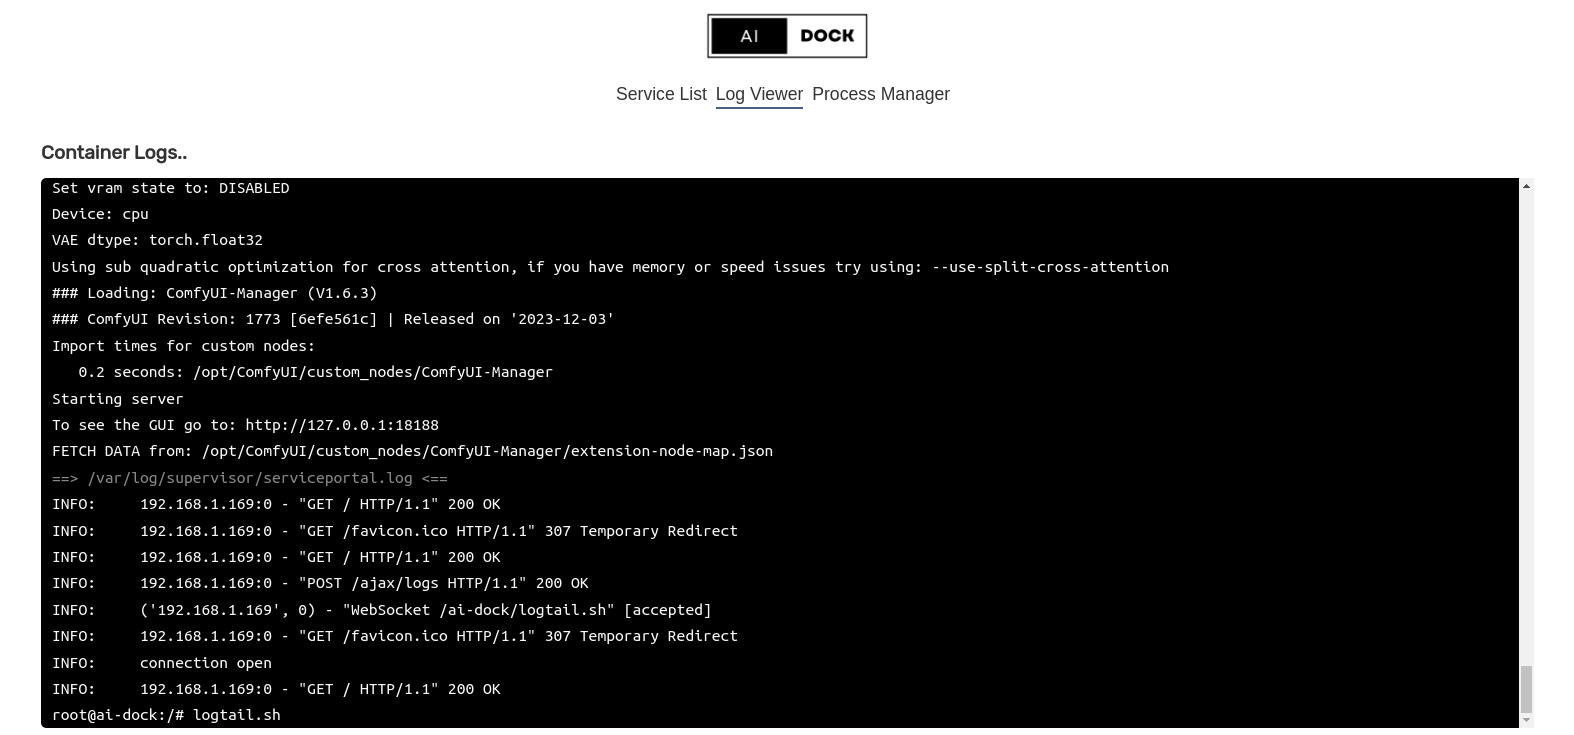
A simple web-based log viewer and process manager are included for convenience.
Service Portal links

Service Portal logs
Service Portal process manager
The Cloudflare tunnel daemon will start if you have provided a token with the CF_TUNNEL_TOKEN environment variable.
This service allows you to connect to your local services via https without exposing any ports.
You can also create a private network to enable remote connecions to the container at its local address (172.x.x.x) if your local machine is running a Cloudflare WARP client.
If you do not wish to provide a tunnel token, you could enable CF_QUICK_TUNNELS which will create a throwaway tunnel for your web services.
Secure links can be found in the service portal and in the log files at /var/log/supervisor/quicktunnel-*.log.
Full documentation for Cloudflare tunnels is here.
Note
Cloudflared is included so that secure networking is available in all cloud environments.
Warning
You should only provide tunnel tokens in secure cloud environments.
A SSH server will be started if at least one valid public key is found inside the running container in the file /root/.ssh/authorized_keys
The server will bind to port 22 unless you specify variable SSH_PORT.
There are several ways to get your keys to the container.
-
If using docker compose, you can paste your key in the local file
config/authorized_keysbefore starting the container. -
You can pass the environment variable
SSH_PUBKEYwith your public key as the value. -
Cloud providers often have a built-in method to transfer your key into the container
If you choose not to provide a public key then the SSH server will not be started.
To make use of this service you should map port 22 to a port of your choice on the host operating system.
See this guide by DigitalOcean for an excellent introduction to working with SSH servers.
Note
SSHD is included because the end-user should be able to know the version prior to deloyment. Using a providers add-on, if available, does not guarantee this.
Rclone allows you to access your cloud storage from within the container by configuring one or more remotes. If you are unfamiliar with the project you can find out more at the Rclone website.
Any Rclone remotes that you have specified, either through mounting the config directory or via setting environment variables will be mounted at /workspace/remote/[remote name]. For this service to start, the following conditions must be met:
- Fuse3 installed in the host operating system
- Kernel module
fuseloaded in the host - Host
/etc/passwdmounted in the container - Host
/etc/groupmounted in the container - Host device
/dev/fusemade available to the container - Container must run with
cap-add SYS_ADMIN - Container must run with
securiry-opt apparmor:unconfined - At least one remote must be configured
The provided docker-compose.yaml includes a working configuration (add your own remotes).
In the event that the conditions listed cannot be met, rclone will still be available to use via the CLI - only mounts will be unavailable.
If you intend to use the rclone create command to interactively generate remote configurations you should ensure port 53682 is accessible. See https://rclone.org/remote_setup/ for further details.
Note
Rclone is included to give the end-user an opportunity to easily transfer files between the instance and their cloud storage provider.
Warning
You should only provide auth tokens in secure cloud environments.
This script follows and prints the log files for each of the above services to stdout. This allows you to follow the progress of all running services through docker's own logging system.
If you are logged into the container you can follow the logs by running logtail.sh in your shell.
This service detects changes to files in $WORKSPACE/storage and creates symbolic links to the application directories defined in /opt/ai-dock/storage_monitor/etc/mappings.sh
Some ports need to be exposed for the services to run or for certain features of the provided software to function
| Open Port | Service / Description |
|---|---|
22 |
SSH server |
1111 |
Service Portal web UI |
8188 |
ComfyUI Interface |
8888 |
Jupyter |
53682 |
Rclone interactive config |
Vast.ai
Runpod.io
Paperspace
- Create a new notebook with the
Start from Scratchtemplate. - Select
Advanced options - In Container Name enter
ghcr.io/ai-dock/comfyui:latest-jupyter - In Command enter
init.sh WORKSPACE=/notebooks PROVISIONING_SCRIPT="https://raw.githubusercontent.com/ai-dock/comfyui/main/config/provisioning/get-models-sd-official.sh" CF_QUICK_TUNNELS=true
You can use the web UI to do further configuration, or you can supply further environment variables as detailed above.
Note
The use of CF_QUICK_TUNNELS enables us to reach the web UI with a link supplied by Cloudflare. You can find the link in /var/log/supervisor/quicktunnel-comfyui.log
Warning
Do not attempt to use tunnels to circumvent Paperspace restrictions (eg. SSH & private networking) - You will lose your account.
Note
These templates are configured to use the :latest tag but you are free to change to any of the available Pytorch CUDA tags listed here
Images that do not require a GPU will run anywhere - Use an image tagged :*-cpu-xx.xx
Where a GPU is required you will need either :*cuda* or :*rocm* depending on the underlying hardware.
A curated list of VM providers currently offering GPU instances:
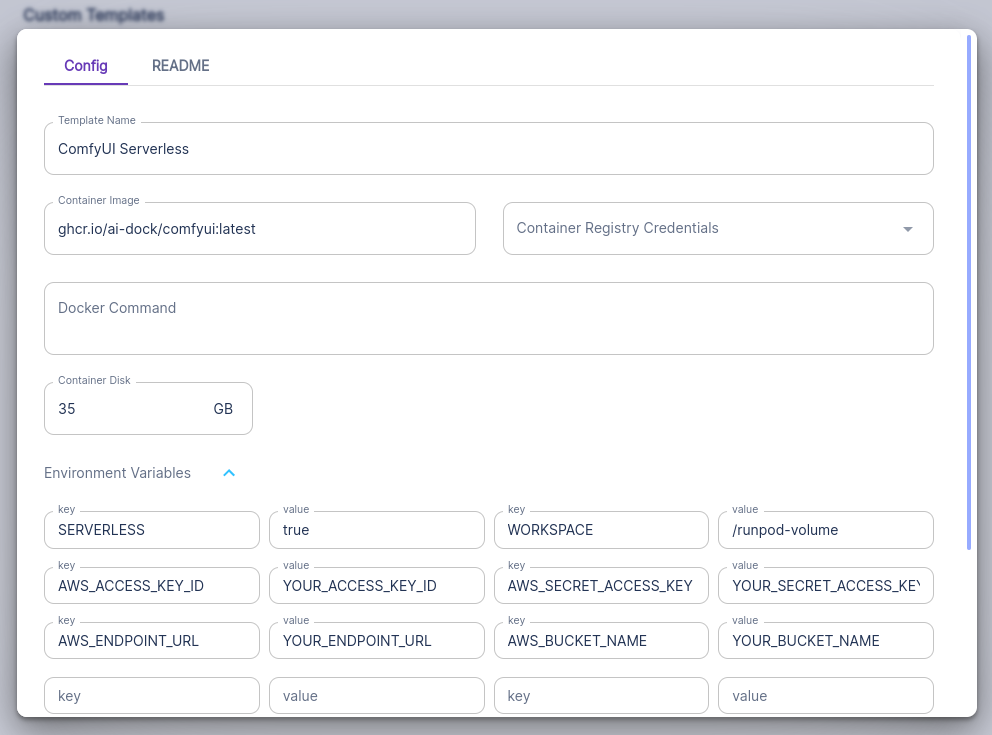
The container can be used as a RunPod serverless worker. To enable serverless mode you must run the container with environment variables SERVERLESS=true and WORKSPACE=runpod-volume.
The handlers will accept a job, process it and upload your images to s3 compatible storage.
You may either set your s3 credentials as environment variables or you can pass them to the worker in the payload.
You should set AWS_ACCESS_KEY_ID, AWS_SECRET_ACCESS_KEY, AWS_ENDPOINT_URL and AWS_BUCKET_NAME.
Serverless template example
If passed in the payload these variables should be in lowercase.
Incorrect or unset s3 credentials will not resut in job failure. You can still retrieve your images from the network volume.
When used in serverless mode, the container will skip provisioning and will not update ComfyUI or the nodes on start so you must either ensure everyting you need is built into the image (see Building Images) or first run the container with a network volume in GPU Cloud to get everything set up before launching your workers.
After launching a serverless worker, any instances of the container launched on the network volume in GPU cloud will also skip auto-updating. All updates must be done manually.
The API is documented in openapi format. You can test it in a running container on the ComfyUI port at /rp-api/docs - See ComfyUI RP API for more information.
The API can use multiple handlers which you may define in the payload. Three handlers have been included for your convenience
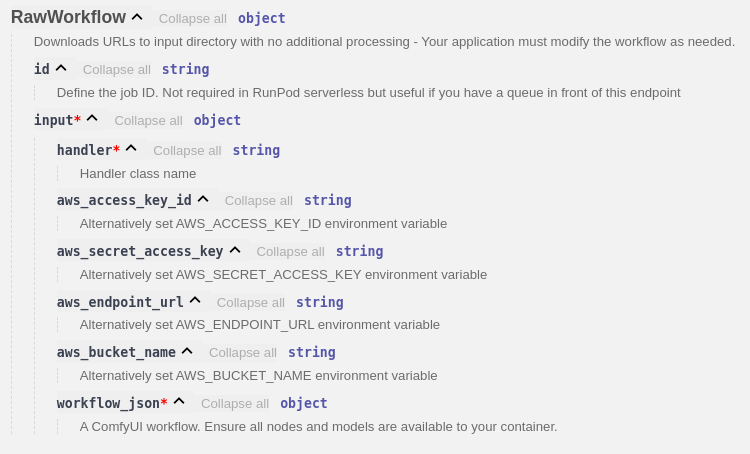
This handler should be passed a full ComfyUI workflow in the payload. It will detect any URL's and download the files into the input directory before replacing the URL value with the local path of the resource. This is very useful when working with image to image and controlnets.
This is the most flexible of all handlers.
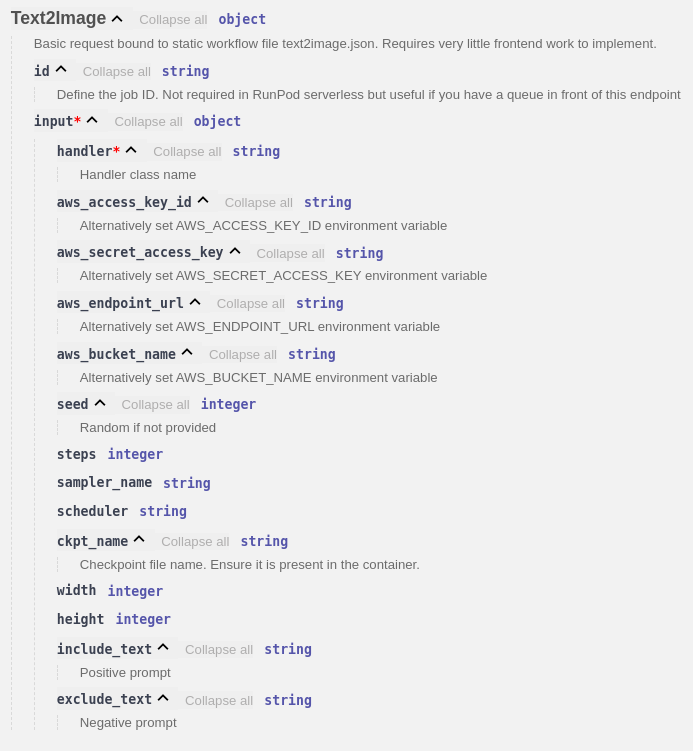
This is a basic handler that is bound to a static workflow file (/opt/serverless/workflows/text2image.json).
You can define several overrides to modify the workflow before processing.
This is a basic handler that is bound to a static workflow file (/opt/serverless/workflows/image2image.json).
You can define several overrides to modify the workflow before processing.
These handlers demonstrate how you can create a very simple endpoint which will require very little frontend work to implement.
You can find example payloads for these handlers here
The author (@robballantyne) may be compensated if you sign up to services linked in this document. Testing multiple variants of GPU images in many different environments is both costly and time-consuming; This helps to offset costs

