In this standalone lesson for The Newline Guide To NFCs With React Native, I will first walk you through what we'll cover in the full course, after that we will incrementally build a NFC game app for iOS and Android.
NFC, as you might already know, is a wireless technology for short-range communication.
It is already widely used in our daily life. Let's see some practical use-cases:
- Payment: Apple Pay and Samsung Pay both use NFC.
- Transportation and ticketing systems: for example, the Suica in Japan uses NFC.
- Access control and security systems: lots of applications in this domain choose NFC to be their communication protocol.
- Even in gaming: Nintendo Amiibo uses NFC to exchange data between Amiibo figures and the Nintendo Switch console.
Among these use-cases, we will focus on how to build mobile apps to interact with NFC tags.
First, I will provide an overview of NFC technology in the next lesson.
After that, we will build three apps throughout this course.

App 1 is a game app to count how much time a user needs to scan five NFC tags. You will learn how to properly set up an NFC project and how to trigger the scanning.
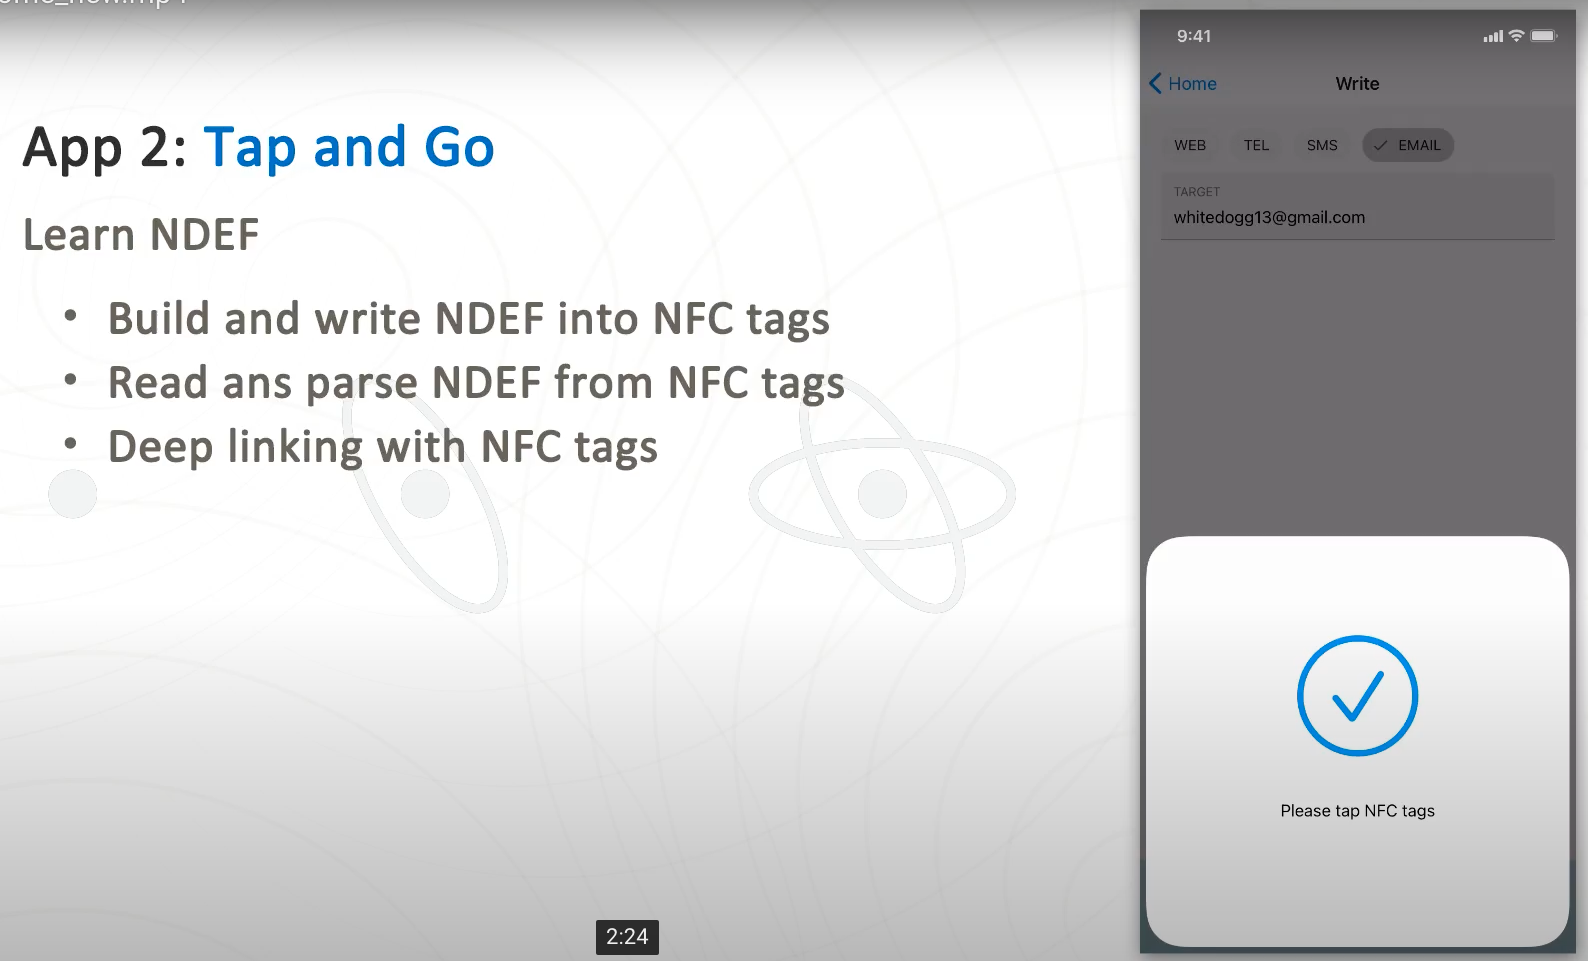
App 2 is about NFC Data Exchange Format (NDEF), which is the standard NFC data format supported by both iOS and Android. NDEF can be used for almost any NFC tag. We will build an NDEF reader-writer app to write specific links into NFC tags to trigger specific actions, for example, opening an URL, making a phone call, or sending a message. At the end of this module, we will also cover how to use deep linking with NFC tags.

App 3 dives into low-level NFC programming, which directly manipulates the NFC tag’s internal memory and uses proprietary NFC commands. The app we'll build is called "NFC Pokemon," which is a digital identity management platform. It can seal a specific Pokemon, for example, a Pikachu, into an NFC tag.
When building this app, we will also learn how to create digital signatures and use a proprietary password protection command to free our NFC Pokemon tags from attack.
This course is for NFC beginners, so we won't cover advanced topics here.
NFC, as derived from radio-frequency identification (RFID), has lots of existing standards. We won't cover NFC operation modes other than reader mode, and we won't cover NFC tag types other than type 2 (we will talk more about these terminologies in the next lesson).
We won't show you every API and parameter for the React Native NFC library either, since our goal is to make you comfortable writing an NFC app rather than being an API reference.
To get the most out of this course, you will need:
- A basic understanding of React Native
- A mobile phone with NFC feature because NFC features cannot be tested using a simulator
- If you're an iOS user, all iPhones after iPhone 7 come with NFC support. (Please note that the iPad doesn't have NFC, only iPhone does.)
- If you're an Android user, you should check your phone's settings. If your Android phone has NFC support, you should be able to find the NFC-related menu in your connectivity settings.
- iOS users will need to enroll in the "Apple Developer Program" in order to test our apps
- Finally, you need some NFC tags. We choose NXP NTAG 213 or 215 for this course. These are the most-used, cheapest NFC tags and can be purchased easily from Amazon.
In the next lesson, I will give you a more detailed introduction to NFC technology. I'll see you there!
In this lesson, we will dive into writing code. We will show you how to:
- Check NFC availability
- Scan NFC tags
- Implement our game logic
In the following section, I have extracted parts of our first Tag Counter Game app to give you a little tasts about programming NFC with React Native.
To build a NFC app with React Native, I recommend you to create a skeleton app via react-native-cli, and then install react-native-nfc-manager:
npx react-native init <MyNfcApp>
cd <MyNfcApp>
npm i react-native-nfc-manager
cd ios && pod install
There's some extra set up required, please check here
The first thing for a NFC app is to detect whether the target mobile device has NFC support or not.
Let's create a hasNfc state. This state has an initial value to be null, which means we've not yet confirmed whether NFC is supported or not. Once we do, this state will be a boolean value true or false.
The next step is to actually check the NFC availability. By importing the react-native-nfc-manager, we can use the isSupported API, and it will resolve a boolean value to indicate whether the underlying device supports NFC or not.
Since the availability won't change during the whole app lifecycle, we can do this inside a useEffect hook, with no dependency. This basically simulates the componentDidMount behavior for React Class component.
And please be aware that the isSupported API (and most of the APIs for a native module) is an async function because our JavaScript code will need to cross the bridge and ask the corresponding native part for the result.
  React.useEffect(() => {
    async function checkNfc() {
      setHasNfc(await NfcManager.isSupported());
    }

    checkNfc();
  }, []);
If you're in simulator, the result will always be not supported, which is expected.
Let's run the code on a real iOS device. (All recent iPhones from iPhone 8 all support NFC)
Once we confirm that the device does support NFC, we can do the native module initialization by calling the NfcManager.start function.
  React.useEffect(() => {
    async function checkNfc() {
      const supported = await NfcManager.isSupported();
      if (supported) {
        await NfcManager.start();
      }
      setHasNfc(supported);
    }

    checkNfc();
  }, []);
Quick review: We just used the
isSupportedAPI to check the NFC availability, and if the device supports it, we then callstartto initialize our NFC native module.
Now we're ready to scan NFC tags.
Again, import NfcManager and NfcEvents from react-native-nfc-manager.
Then, use setEventListener to listen to NfcEvents.DiscoverTag event. For now, we just log the message to the console.
The actual tag scanning is through the registerTagEvent API. Once it discovers any NFC tags, the native side will emit DiscoverTag event with the tag data to the JavaScript side.
  async function scanTag() {
    NfcManager.setEventListener(NfcEvents.DiscoverTag, (tag) => {
      console.warn('tag found', tag);
    });
    await NfcManager.registerTagEvent();
  };
Okay, let's test it on a real device. Please remember, the NFC antenna for an iPhone is on the top of the device, so the proper position to scan a tag is probably like this picture.
Now let's scan a tag.
Cool, something indeed happened. We can see the iOS NFC prompt pop up once we hit our start button, and the icon changes when the tag is scanned.
Let's see what's in our warning message here. It is an object that contains a ndefMessage property, which is an array. The object in this array contains properties such as payload, type, tnf, and id:
{
  ndefMessage: [
    {
      payload: [
        4,
        114,
        101,
        97,
        99,
        116,
        110,
        97,
        116,
        105,
        118,
        101,
        46,
        100,
        101,
        118,
      ],
      type: [85],
      id: [],
      tnf: 1,
    },
  ],
};
Don't worry about them now; we will deep dive into these properties in our next app.
Next, let's move the event listener setup and clean up code into a useEffect hook.
  React.useEffect(() => {
    NfcManager.setEventListener(NfcEvents.DiscoverTag, (tag) => {
      console.warn(JSON.stringify(tag));
    });

    return () => {
      NfcManager.setEventListener(NfcEvents.DiscoverTag, null);
    };
}, []);Let's write a simple game to calculate how much time a player needs to scan five NFC tags. The shorter time means a better score.
First, create a start state to track when a player hits the start button. Our useEffect hook should depend on this start state and re-run the hook logic when it is changed. Because in such a case, it basically means the user re-started the game.
Then, we use a variable called count inside the closure of our hook to track the remaining count left for a player to scan.
Once the count becomes 0, the game is finished, and we should stop the NFC scanning by calling NfcManager.unregisterTagEvent and calculate the total elapsed time.
  React.useEffect(() => {
    let count = 5;

    NfcManager.setEventListener(NfcEvents.DiscoverTag, (tag) => {
      count--;

      if (count <= 0) {
        NfcManager.unregisterTagEvent().catch(() => 0);
        setDuration(new Date().getTime() - start.getTime());
      }
    });

    return () => {
      NfcManager.setEventListener(NfcEvents.DiscoverTag, null);
    };
  }, [start]);
And, of course, we will have to also render the duration into React elements.
Before testing it on a real device, we notice one thing. That is, during gameplay, the user cannot see any UI updates because the iOS default scan UI is on top of our Game component.
In order to provide users some messages while they play the game, we can use NfcManager.setAlertMessageIOS to update the iOS NFC scan prompt.
  React.useEffect(() => {
    let count = 5;

    NfcManager.setEventListener(NfcEvents.DiscoverTag, (tag) => {
      count--;

      // show some updates to our player!
      NfcManager.setAlertMessageIOS(`${count}...`);

      if (count <= 0) {
        NfcManager.unregisterTagEvent().catch(() => 0);
        setDuration(new Date().getTime() - start.getTime());
      }
    });

    return () => {
      NfcManager.setEventListener(NfcEvents.DiscoverTag, null);
    };
  }, [start]);
The finished app code looks like this:
import React from 'react';
import {View, Text, StyleSheet, TouchableOpacity} from 'react-native';
import NfcManager from 'react-native-nfc-manager';
import Game from './Game';

function App(props) {
  const [hasNfc, setHasNfc] = React.useState(null);

  React.useEffect(() => {
    async function checkNfc() {
      const supported = await NfcManager.isSupported();
      if (supported) {
        await NfcManager.start();
      }
      setHasNfc(supported);
    }

    checkNfc();
  }, []);

  if (hasNfc === null) {
    return null;
  } else if (!hasNfc) {
    return (
      <View style={styles.wrapper}>
        <Text>You device doesn't support NFC</Text>
        <TouchableOpacity onPress={() => setModalVisible(true)}>
          <Text>Test</Text>
        </TouchableOpacity>
      </View>
    );
  }

  return <Game />;
}

const styles = StyleSheet.create({
  wrapper: {
    flex: 1,
    alignItems: 'center',
    justifyContent: 'center',
  },
});

export default App;
Here's the Game.js:
import React from 'react';
import {TouchableOpacity, View, Text, StyleSheet} from 'react-native';
import NfcManager, {NfcEvents} from 'react-native-nfc-manager';

function Game(props) {
  const [start, setStart] = React.useState(null);
  const [duration, setDuration] = React.useState(0);

  React.useEffect(() => {
    let count = 5;
    NfcManager.setEventListener(NfcEvents.DiscoverTag, (tag) => {
      count--;
      NfcManager.setAlertMessageIOS(`${count}...`);
      if (count <= 0) {
        NfcManager.unregisterTagEvent().catch(() => 0);
        setDuration(new Date().getTime() - start.getTime());
      }
    });

    return () => {
      NfcManager.setEventListener(NfcEvents.DiscoverTag, null);
    };
  }, [start]);

  async function scanTag() {
    await NfcManager.registerTagEvent();
    setStart(new Date());
    setDuration(0);
  }

  return (
    <View style={styles.wrapper}>
      <Text>NFC Game</Text>
      {duration > 0 && <Text>{duration} ms</Text>}
      <TouchableOpacity style={styles.btn} onPress={scanTag}>
        <Text>START</Text>
      </TouchableOpacity>
    </View>
  );
}

const styles = StyleSheet.create({
  wrapper: {
    flex: 1,
    alignItems: 'center',
    justifyContent: 'center',
  },
  btn: {
    margin: 15,
    padding: 15,
    borderRadius: 8,
    backgroundColor: '#ccc',
  },
});

export default Game;Let's first run our previous work on a real Android device.
As you can see, I have pressed the START button several times, but it looks like there's nothing happened.
What's wrong here? Actually, it's nothing wrong. It's because Android provides no built-in NFC scanning UI, so even though our app is ready to scan NFC tags, there's no visual cue for our users.
So, our next step in this lesson is to build a component to mimic the behavior for iOS NFC scanning UI.
Let's call it AndroidPrompt. This component will use React Native's built-in Modal component to present content above the enclosing view.
Normally in React, we use props passing as the primary interface between components. That's because of React's declarative nature. However, in our case, providing an imperative API set will be much easier.
The API we want to expose is something like React Native's built-in Alert module. For Alert, we simply call Alert.alert, and it will appear. From the caller's perspective, we don't need to preserve a state like isAlertVisible and pass it as props into Alert. We'd like to do something similar for our AndroidPrompt component here.
In order to accomplish this, we will use ref:
// omit imports

function AndroidPrompt(props, ref) { // notice the second argument
  const {hintText} = props;
  const [visible, setVisible] = React.useState(false);

  React.useEffect(() => {
    if (ref) {
      ref.current = { // allow clients code to call internal .setVisible()
        setVisible,
      };
    }
  }, [ref]);

  return (
    <Modal visible={visible} transparent={true}>
      <View style={styles.content}>
        <View style={[styles.backdrop, StyleSheet.absoluteFill]} />

        <View style={styles.prompt}>
          <Text style={styles.hint}>{hintText || 'Please Scan NFC'}</Text>

          <TouchableOpacity
            style={styles.btn}
            onPress={() => setVisible(false)}>
            <Text>CANCEL</Text>
          </TouchableOpacity>
        </View>
      </View>
    </Modal>
  );
}

// omit the styling codes

export default React.forwardRef(AndroidPrompt); // wrap component with forwardRefNow, it's the fun part. We'd like to add some animation into our AndroidPrompt component.
The thought process for creating animation:
- What state triggers the animation?
- How to update the
Animated.Valueobject according to prior state change? - How to update the
styleusing the changingAnimated.Valueobject?
To handle the first and second questions, we create a new useEffect hook that depends on the _visible state and the animValue object.
This hook function will be triggered when _visible value changed, and if this value is true, which means we're about to show our component, we first set the visible state to true and use Animated.timing to gradually change the animValue from 0 to 1,
On the other hand, if the _visible is false, which means we're about to hide our component, we need to call Animated.timing first and then toggle the visible state to false in the completion handler, which is the callback passed into the start function. If we use the wrong order, the Modal will disappear instantly with no animation at all. That's why we need a second _visible state to signal the beginning of a transition, and the visible state is the one actually passed into our Modal component.
After that, we change all the existing setVisible into _setVisible. Since its actual usage is to trigger the useEffect hook, we should only call setVisible inside our effect hook.
The next step is to update the style using the animValue:
- for fade-in fade-out effect, we update the
backdropwith theopacity. - for slide-up effect, we use
transateYtransform and let theanimValueinterpolate from 0 to 1.
By the way, always remember that only the Animated View can have animation-style in it. Otherwise, you'll have some trouble.
The final code looks like this:
import React from 'react';
import {
  View,
  Text,
  Modal,
  StyleSheet,
  Dimensions,
  TouchableOpacity,
  Animated, // new import
} from 'react-native';

function AndroidPrompt(props, ref) {
  const [_visible, _setVisible] = React.useState(false);
  const [visible, setVisible] = React.useState(false);
  const [hintText, setHintText] = React.useState('');
  const animValue = React.useRef(new Animated.Value(0)).current;

  React.useEffect(() => {
    if (ref) {
      ref.current = {
        setVisible: _setVisible, // client codes can only access _visible
        setHintText,
      };
    }
  }, [ref]);

  React.useEffect(() => {
    if (_visible) {
      setVisible(true); // set to visible first, then do transition
      Animated.timing(animValue, {
        duration: 300,
        toValue: 1,
        useNativeDriver: true,
      }).start();
    } else {
      Animated.timing(animValue, { // do transition first, then set to invisible
        duration: 300,
        toValue: 0,
        useNativeDriver: true,
      }).start(() => {
        setVisible(false);
        setHintText('');
      });
    }
  }, [_visible, animValue]); // detect _visible change, use it to drive our animation

  const backdropAnimStyle = {
    opacity: animValue,
  };

  const promptAnimStyle = {
    transform: [
      {
        translateY: animValue.interpolate({ // for the slide-up effect
          inputRange: [0, 1],
          outputRange: [500, 0],
        }),
      },
    ],
  };

  return (
    <Modal visible={visible} transparent={true}>
      <View style={styles.content}>
        <Animated.View
          style={[styles.backdrop, StyleSheet.absoluteFill, backdropAnimStyle]}
        />

        <Animated.View style={[styles.prompt, promptAnimStyle]}>
          <Text style={styles.hint}>{hintText || 'Hello NFC'}</Text>

          <TouchableOpacity
            style={styles.btn}
            onPress={() => {
              _setVisible(false);
            }}>
            <Text>CANCEL</Text>
          </TouchableOpacity>
        </Animated.View>
      </View>
    </Modal>
  );
}

// omit the styling codes

export default React.forwardRef(AndroidPrompt);The final step is to use our AndroidPrompt component in our game.
The logic is pretty straightforward
- when the
NfcManager.registerTagEventis called, we should set ourAndroidPromptto be visible, by callingandroidPromptRef.current.setVisible(true). - When the user is playing, we can update the hint text according to the platform. If it's
Android, we will call our customsetHintTextfunction from ref; if it'siOS, we simply callsetAlertMessageIOS. - Once the game is finished, we should set our
AndroidPromptto be invisible.
Okay, it seems like we're ready to test it. Before testing, you will need to check the position of the NFC antenna for your Android device because they might be in different places according to different Android manufacturers.
The updated Game component looks like this (notice the AndroidPrompt related code):
// omit other imports
import AndroidPrompt from './AndroidPrompt';

function Game(props) {
  const [start, setStart] = React.useState(null);
  const [duration, setDuration] = React.useState(0);
  const androidPromptRef = React.useRef(); // call React.useRef() to obtain a ref object

  React.useEffect(() => {
    let count = 5;
    NfcManager.setEventListener(NfcEvents.DiscoverTag, (tag) => {
      count--;

      if (Platform.OS === 'android') { // set hint text for AndroidPrompt
        androidPromptRef.current.setHintText(`${count}...`);
      } else {
        NfcManager.setAlertMessageIOS(`${count}...`);
      }

      if (count <= 0) {
        NfcManager.unregisterTagEvent().catch(() => 0);
        setDuration(new Date().getTime() - start.getTime());

        if (Platform.OS === 'android') { // hide AndroidPrompt
          androidPromptRef.current.setVisible(false);
        }
      }
    });

    return () => {
      NfcManager.setEventListener(NfcEvents.DiscoverTag, null);
    };
  }, [start]);

  async function scanTag() {
    await NfcManager.registerTagEvent();
    if (Platform.OS === 'android') { // show AndroidPrompt
      androidPromptRef.current.setVisible(true);
    }
    setStart(new Date());
    setDuration(0);
  }

  return (
    <View style={styles.wrapper}>
      <Text style={styles.label}>NFC Game</Text>

      <View style={styles.content}>
        {(duration > 0 && (
          <Text style={styles.minLabel}>{duration} ms</Text>
        )) || <Text style={styles.minLabel}>Let's go!</Text>}
      </View>

      <TouchableOpacity onPress={scanTag}>
        <View style={styles.btn}>
          <Text style={styles.playLabel}>PLAY!</Text>
        </View>
      </TouchableOpacity>

      <AndroidPrompt
        ref={androidPromptRef}
      />
    </View>
  );
}

// omit the stylesThough the app seems to be working correctly, there's actually a potential bug.
That is, once the user presses the CANCEL button in our AndroidPrompt, we won't actually stop the NFC from scanning because our Game component is not aware of it.
To fix this issue, we first add the onCancelPress into our AndroidPrompt component and call it when the CANCEL button is pressed.
And then, go back to our Game component, pass the onCancelPress prop into AndroidPrompt component, and call unregisterTagEvent inside it.
Besides the system-scanning UI, there's another difference between Android and iOS. That is, NFC can be disabled in Android.
So, for the Android app, before the game starts, we will need to confirm that the NFC is enabled. Let's do it right now.
First, create an enabled state, and in our checkNfc function, we call NfcManager.isEnabled(). This API will resolve to a boolean value to indicate whether the NFC is enabled or not.
Let's use this state in our render logic: if the NFC is supported but not enabled, we show a hint to our users and provide a button for the user to jump to the NFC system setting screen by calling NfcManager.goToNfcSetting(). (Please be aware, this API only works on Android.)
You might wonder, what about iOS? Actually, our NfcManager.isEnabled() will always return true since there's no NFC switch for iOS. So, we can confirm that the runtime execution flow will never reach here.
Finally, we also provide a button to let the user re-check the NFC enable state.
It's about time to test our modifications.
We first disable NFC and then launch our app. As you can see, our UI provides a hint about our NFC state. Hit "GO TO SETTINGS" to enable NFC. Then back to our app again, re-check the state, and now the user can enter the game.
Cool! Now we have a simple but fully functional NFC tag counter game app for both Android and iOS!
Here's the modified code for App.js:
// omit imports

function App(props) {
  const [hasNfc, setHasNfc] = React.useState(null);
  const [enabled, setEnabled] = React.useState(null); // new state

  React.useEffect(() => {
    async function checkNfc() {
      const supported = await NfcManager.isSupported();
      if (supported) {
        await NfcManager.start();
        setEnabled(await NfcManager.isEnabled()); // only for Android, always true for iOS
      }
      setHasNfc(supported);
    }

    checkNfc();
  }, []);

  if (hasNfc === null) {
    return null;
  } else if (!hasNfc) {
    return (
      <View style={styles.wrapper}>
        <Text>You device doesn't support NFC</Text>
      </View>
    );
  } else if (!enabled) { // only for Android
    return (
      <View style={styles.wrapper}>
        <Text>Your NFC is not enabled!</Text>

        <TouchableOpacity
          onPress={() => {
            NfcManager.goToNfcSetting();
          }}>
          <Text>GO TO NFC SETTINGS</Text>
        </TouchableOpacity>

        <TouchableOpacity
          onPress={async () => {
            setEnabled(await NfcManager.isEnabled());
          }}>
          <Text>CHECK AGAIN</Text>
        </TouchableOpacity>
      </View>
    );
  }

  return <Game />;
}
// omit styles


