- Install XAMPP
- Install composer
- Open terminal and type
composer -Vto check composer version - Type
composer global require laravel/installerin terminal to install laravel - To create a new project we use
laravel new [project_name]. Example: To createpizzahouseproject we uselaravel new pizzahouse cdintopizzahousedir and then typephp artisan serveto host localhost server.
- We can pass the data to views using
['varibale' => ' ']in./routes/web.php. Example below:
// .\routes\web.php
Route::get('/pizzas', function() {
    return view('pizzas', ['type' => 'vietnam']);
});- In views file, to get infomation we can use
{{$varibale}}in.blade.phpfile. Example bellow:
// .\resources\views\pizzas.blade.php
{{$type}}- We can add multiple values and store it in variable then return it like this:
$pizzas = [
    'type' => 'Pizza Việt Nam',
    'ingredients' => 'Bột, đường, muối, ...',
    'price' => 80000
];@if(<condition>)
return
@elseif(<condition>)
return
@else
return
@endif()@unless(<condition>)
return
@endunless()@php
// write php code in here
@endphp@for(<$temp = start>; <$temp condition>; <$temp++> )
do
@endforIf we have a list like this one
$pizzas = [
    ['type' => 'hawaiian', 'base' => 'cheesy crust'],
    ['type' => 'volcano', 'base' => 'garlic crust'],
    ['type' => 'veg supreme', 'base' => 'thin & crispy']
];
We can do a for loop through list by using for loop:
@for($i = 0; $i < count($pizzas); $i++)
    <p> {{$pizzas[$i]['type']}} - {{$pizzas[$i]['base']}}</p>
@endforThe layout file is a template file so that we can re-use it (header, footer, js-scirpt, ...) for another view page. So how to use that?
- Create a new folder call
layoutsinresources/views/and then we createlayout.blade.phpfile inlayoutsfolder. - In
welcome.blade.phpuse@extends('dir/to/layout/file')and then use the code below to create a section
@section('section-name')
    //write content here!
@endsection()- We can re-write header, script, footer, ... in layout file, then add
@yield('section-name)to use the from views folder
- To re-use css style file, we can create
cssfolder inpublicfolder and then create a css file. - In view file, we add this code below in head tag to use css
<link rel="stylesheet" href="/css/main.css">- We can create a new
imgfolder inpublicfolder to store image that we use in the website, and then use this code bellow to use the img
<img src="/img/pizza-house.png" alt="pizza-house-logo">Note: We don't need to write href="/public/css/main.css" because everything in public folder is in the root level so that every view page can access that.
We can pass data through parameters in the URL like this one bellow
http://localhost:8000/?name=vinh
In the web.php file, we have to use request() function to recive the data. Example below:
$name = request('name');Then we pass $name variable into return() function, or we can pass request() function direct into return() like this one below:
return view('pizzas', [
    'pizzas' => $pizzas,
    'name' => request('name'),
    'age' => request('age')
]);There is another way to get the data through parameters in URL like this one bellow
http://localhost:8000/pizzas/1
So how can we do that? We can use the code below
Route::get('/pizzas/{id}', function($id) {
    //Use the $id variable to query the db for the record
    return view('info', [
        'id' => $id
    ]);
});
Then we create a new views blade file call info.blade.php
Insted of create too much Route with a lot of code inside that, we can create a controller to manage a group of function and then we can call that function inside Route. So how to create a controller?
- To create controller (In this case we will create a new controller called
PizzaController), we have to type this code bellow into a terminal
php artisan make:controller PizzaController
Then, a new controller file will be create in directory /app/Http/Controllers
- To call function from Controller, we have to referring to the Controller by using this code bellow
use App\Http\Controllers\PizzaController;Then we can call function
Route::get('/pizzas', [PizzaController::class, 'function_name']);Go to terminal and type these code below to create new database
mysql -u root
MariaDB [(none)]> create database pizzahouse;
Go to .env file and replace DB_DATABASE= match with database name.
Go to terminal and then type the code bellow:
php artisan make:migration create_pizzas_table
We can create some column by add more $table->type('name') in public function up
Go to terminal and enter this code
php artisan migrate
If we want to check migrate status, just using
php artisan migrate:status
If we want to rollback the last migration
php artisan migrate:rollback
Note: If you have excute migrate file and you want to add more column in that table, DO NOT add more column in old migrate file. Create new migrate file using
php artisan make:migration add_column_to_old_table
Then add new column and then run migrate bellow code again
php artisan migrate
Using Eloquent models to access database
php artisan make:model Pizza
Go ahead into PizzaController.php file, then declare the Pizza model using this code below:
use App\Models\Pizza;$pizzas = Pizza::all();If you want to orderby ascending, using asc. Else, using desc
$pizzas = Pizza::orderBy('column', 'desc/asc') -> get();$pizzas = Pizza::where('column', 'value') -> get();To get the latest value
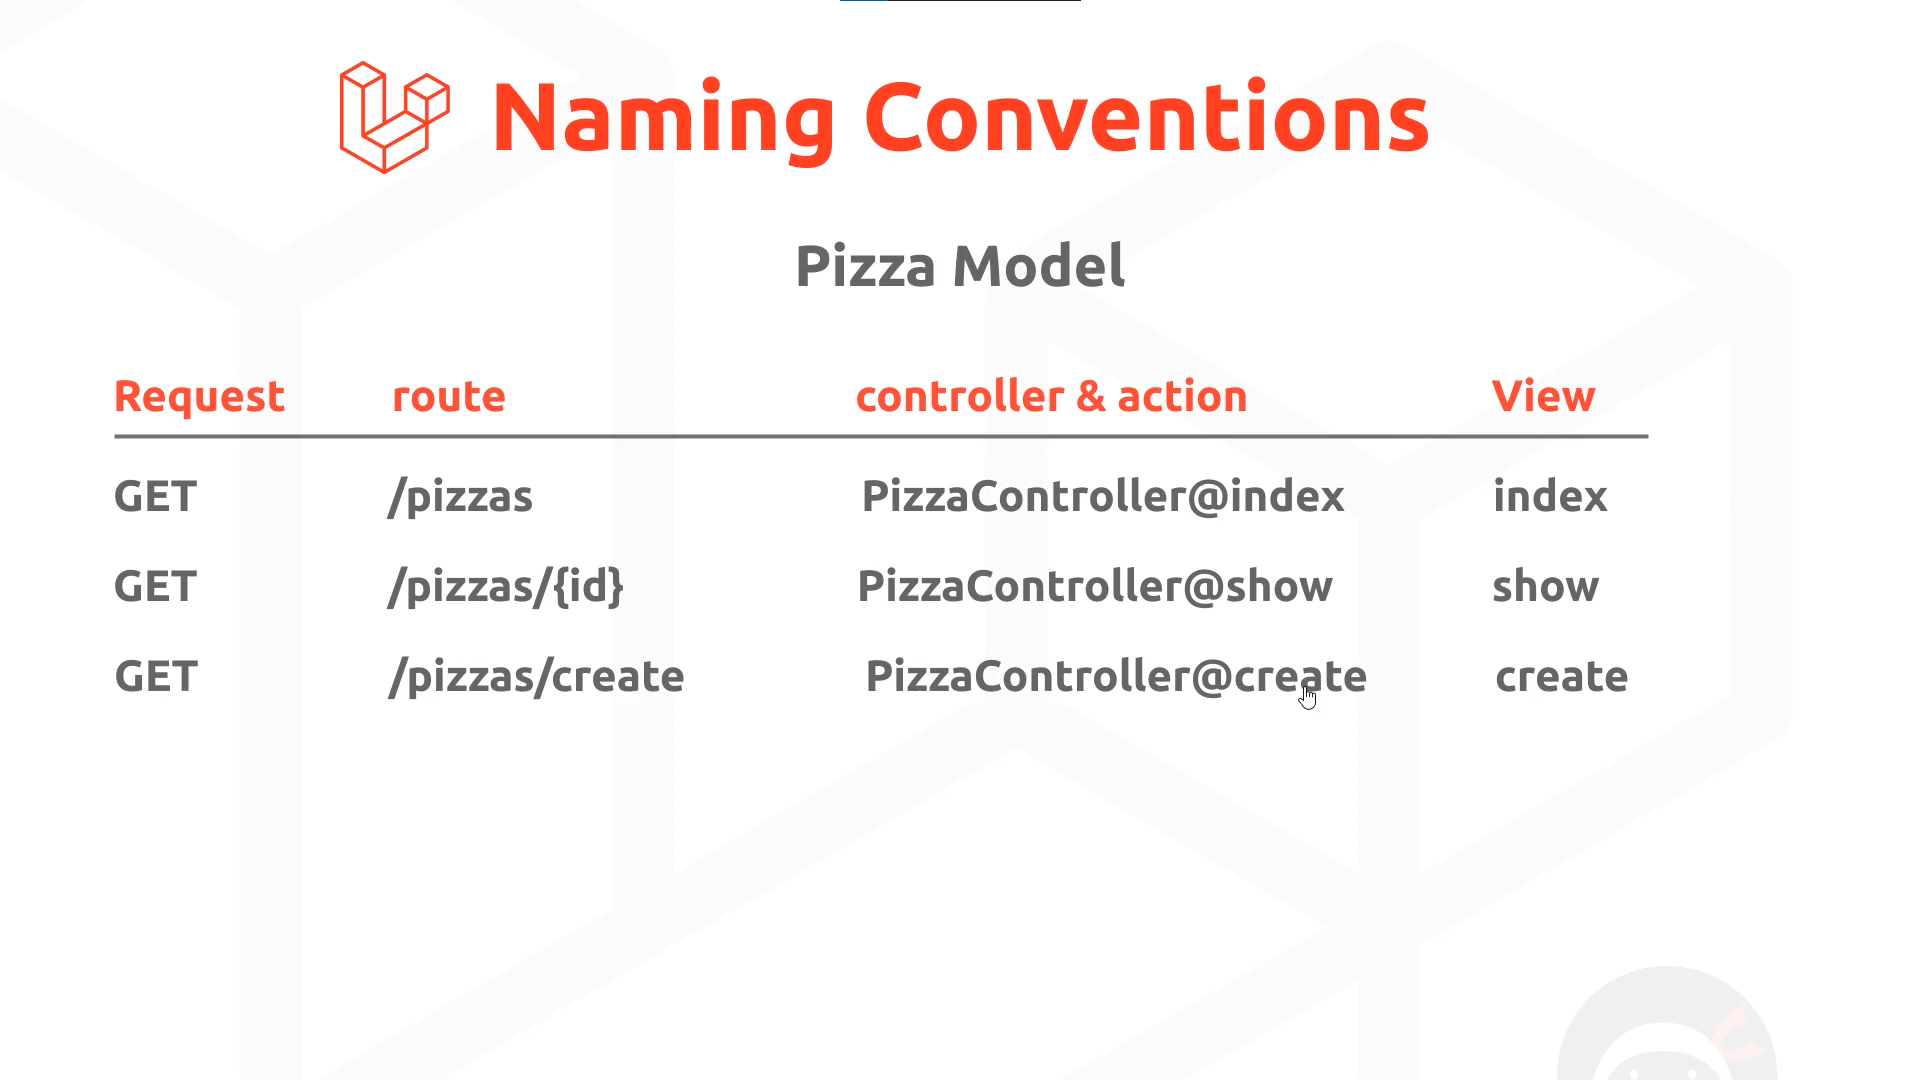
$pizzas = Pizza::latest() -> get();We should following the naming convention table below
To save the records, we will have create a new object
$pizzas = new Pizza();Then recive data from request web form
$pizzas -> name = request('name');Finally, we save it into data base
$pizzas -> save();So we can redirect to homepage using
return redirect('/')In controller file, we can return file like this
return redirect('/') -> with('mssg', 'Thanks for your order!');Then in view file, we can write this code bellow. It will show message while redirect
{{session('mssg')}}How to get array from a web form, we have to create a checkbox and then in name field, we have to pass it as array like this code bellow:
<input type="checkbox" name="toppings[]" value="mushrooms">Mushrooms<br />How can we convert array into json to pass it in database. First we have to go to Pizza model in app/Http/models/Pizza.php. Then add this code into class Pizza:
protected $casts = [
    'toppings' => 'array'
];We have to create a delete method
Route::delete('/pizzas/{id}', [PizzaController::class, 'destroy']);Then in Controller, we have to find the $id and delete that
public function destroy($id){
    $pizzas = Pizza::findOrFail($id);
    $pizzas -> delete();
    return redirect('/pizzas');
}npm install
In webpack.mix.js file, we have to add sass path like this
mix.js('resources/js/app.js', 'public/js')
    .postCss('resources/css/app.css', 'public/css', [
        //
    ])
    .sass('resources/sass/main.scss', 'public/css');
Then create a new folder call sass in resources folder, then create a new file call main.scss. After writing some css code in that file, then we run this command in terminal
npm run dev
Add -> middleware('auth') to the route that we need to hide and force user login


