Colorectal cancer ranks as the second most common cancer type among women and the third most common among men, with polyps being precursors to this disease. The detection and assessment of polyps through colonoscopy are crucial for early disease detection, which significantly impacts survival rates. However, studies have shown that polyps are often overlooked during colonoscopies, with miss rates of 14%-30% depending on the polyp's type and size. Thus, improving polyp detection can play a crucial role in preventing colorectal cancer and enhancing patient outcomes.
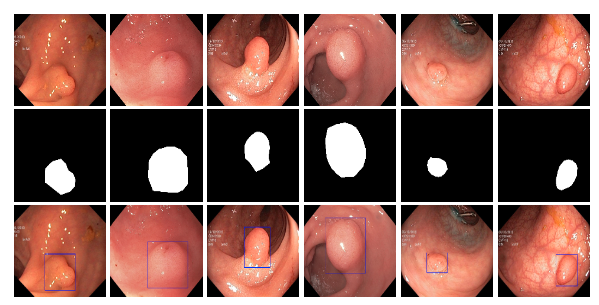
By leveraging the Kvasir-SEG dataset, an open-access collection of gastrointestinal polyp images and corresponding segmentation masks, manually annotated and verified by experienced gastroenterologists, this Polyp Segmentation Tool is designed to assist healthcare professionals by providing an automated way to segment polyps from colonoscopy images. Utilizing a deep learning model based on the U-Net architecture, this tool aims to enhance the preliminary diagnosis process and aid in treatment planning by offering visual segmentation masks of detected polyps.
-
Access the Tool: Navigate to the Streamlit app URL.
-
Download Sample Images: Download sample images provided within the app. Look for the link to download sample images on the app's homepage.
-
Upload Images: Use the file uploader to select colonoscopy images (JPG/JPEG) for segmentation.
-
Process Images: Click 'Process Images' to start the segmentation process.
-
View and Download Results: Segmentation masks are displayed alongside the original images. A ZIP file containing all masks can be downloaded.

-
Deep Learning Model Optimization: Employed a U-Net architecture, fine-tuned for high accuracy in medical image segmentation, demonstrating the effective application of established AI models to address specific challenges in medical diagnostics.
-
Data Preprocessing and Augmentation: Highlighted the implementation of a robust pipeline for image resizing, normalization, and augmentation to improve model generalizability across different colonoscopy images.
-
Streamlit Web Application: Developed a Streamlit web application that prioritizes ease of use. The application supports batch processing and provides downloadable results for offline analysis. The deep learning model used for segmentation is securely stored on AWS S3 and is dynamically loaded by the application as needed.
-
Exploratory Data Analysis (EDA): Conducted detailed EDA to gain insights into polyp characteristics, which informed the preprocessing and augmentation strategies to enhance detection accuracy.
-
Clone the Repository
First, clone the repository to local machine using Git.
git clone https://github.com/TimKong21/Polyp-Segmentation.git
cd .\Polyp-Segmentation\
-
Set Up a Virtual Environment
Create a virtual environment to manage the dependencies.
# Create a virtual environment
python -m venv venv
Activate the virtual environment.
# On Windows
.\venv\Scripts\activate

# On macOS and Linux
source venv/bin/activate
-
Install Dependencies
Install the required Python packages using
pip.pip install -r requirements.txt
-
Model Training
Prior to running the Streamlit app, the model must be trained unless a trained model file (
model/unet.h5) is already available or can be downloaded here. Model training can be conducted by executing theImage preprocessing Data generator and Modeling.ipynbnotebook. This process can occur locally if the environment is suitably equipped or on Google Colab for GPU access.-
Local Training: Ensure the machine possesses necessary computational resources. Dataset organization according to the data generator's requirements is crucial, with distinct folders for images and masks. For example:
new_data/ │ ├── train/ │ ├── images/ │ │ ├── 0001.jpg │ │ ├── 0002.jpg │ │ └── ... │ │ │ └── masks/ │ ├── 0001.png │ ├── 0002.png │ └── ... │ ├── validation/ │ ├── images/ │ │ ├── 0008.jpg │ │ ├── 0009.jpg │ │ └── ... │ │ │ └── masks/ │ ├── 0008.png │ ├── 0009.png │ └── ... │ └── test/ ├── images/ │ ├── 0011.jpg │ ├── 0024.jpg │ └── ... │ └── masks/ ├── 0011.png ├── 0024.png └── ... -
Training on Google Colab: Upload the notebook to Colab, adjusting paths for data loading and model saving accordingly. Colab's GPU access can significantly expedite the training process.
Note: Training your own model allows for customization and adaptation to specific datasets. Consider setting up your own AWS S3 bucket or similar cloud storage solution for model storage and access if you plan to deploy or share your application.
-
-
Run the Streamlit App
Initiate the application locally with Streamlit.
streamlit run app.py
This command activates the Streamlit server, generating a URL in the terminal for web browser access to the application.