LetsRobot.tv is a robotic telepresence network. Anyone can connect a robot and allow users all over the world to interact with it. Our vision is to have a social platform that powers robots worldwide. These robots will be controlled by the crowd to offer experiences unlike that of any current media experience, turning passive viewers into active doers.
You can find additional documentation including information about our API on our readme.io page as well.
The brain of your robot is the Raspberry Pi, it connects everything to LetsRobot.tv and runs all of the hardware. The first step is to set up your Pi.
-
Start by flashing an 8GB microSD card on your PC or Mac. You will need a micro SD card reader, or an adapter and a standard SD card reader.
Download Etcher and flash an 8GB (or more) micro SD card with the Raspian Stretch Lite disk image (.img file). You can also do it manually.
-
If it is your first time with a Raspberry Pi you should connect an HDMI monitor and keyboard as well as power the Pi with a quality micro USB cord with a power supply that is providing 5V and at least 2.0 amps. The official Raspberry Pi power supplyprovides 5V 2.5 amps.
One of the major issues most robot builders come across is poor quality USB Power packs and USB cables. Many batteries will not actually provide the amperage they say they are rated for. The Raspberry Pi should optimally be run at a steady 5V 2.4amps
We will be doing things in a non GUI (Graphical User Interface) fashion and instead setting things up using the command line. This is so that you begin to better familiarize yourself with programming and navigating the brain of your robot this way. There are many ways to do this part but learning to navigate the terminal and command line will be important an important step.
You can find some commonly used commands or the raspberry pi here.
-
Once your raspberry pi has finished booting, the first prompt you should see is the login prompt. Enter the default username and pasword.
Username: pi Password: raspberry -
-
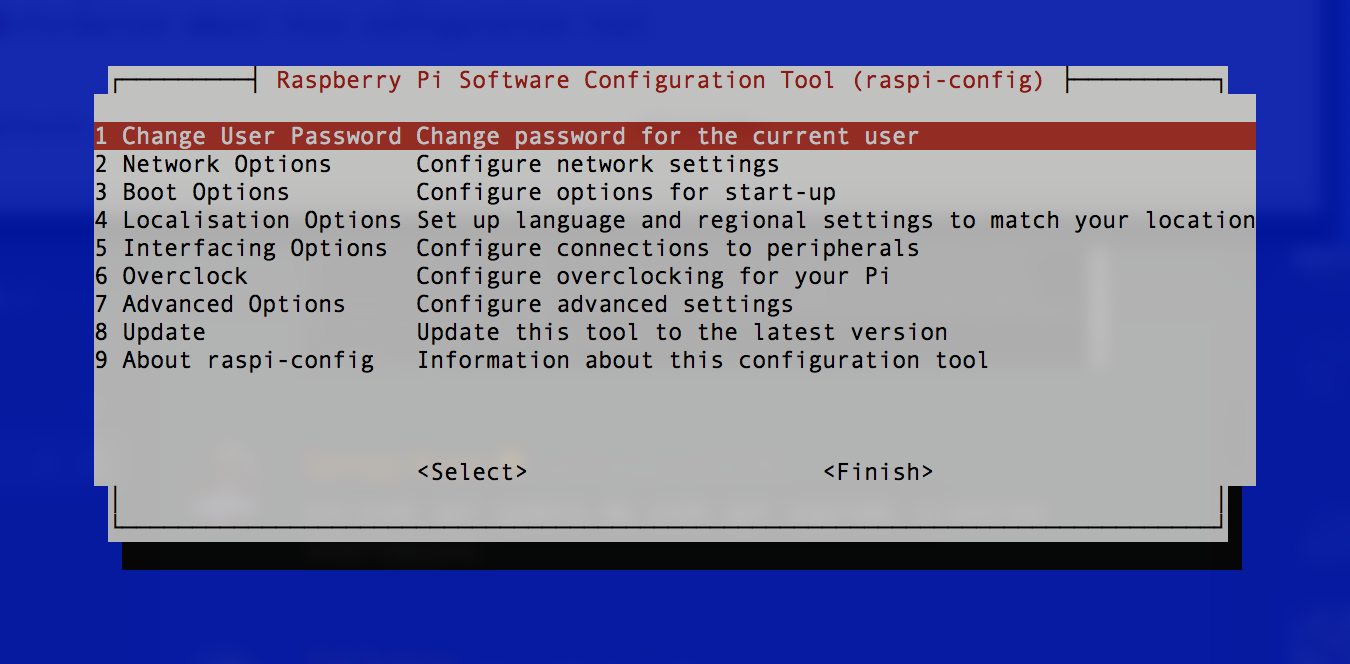
Enter raspi-config by entering the following at the command prompt:
sudo raspi-config -
If this is your first time running raspi-config, it will ask you to Setup Locale, Timezone, and Wifi Country as soon as you start raspi-config. Choose appropriate settings for your location.
-
Change your password! This is very important as leaving the password as the default, will allow anyone on the same network to gain direct access to you robot.
-
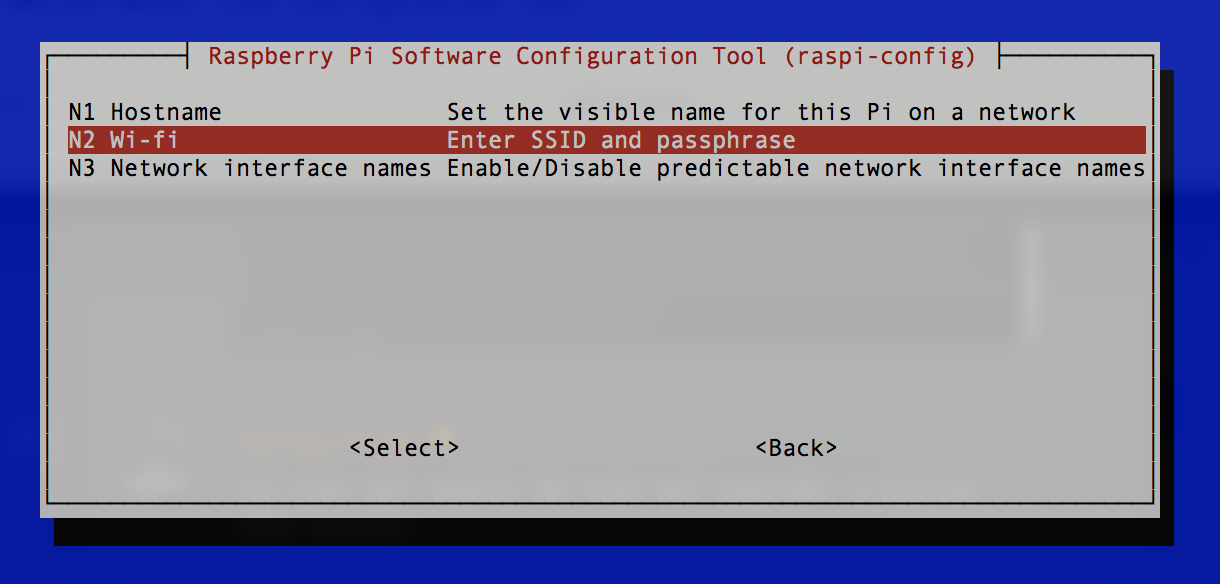
Network Options. Add your wifi SSID and Password, if that fails to connect try these instructions after exiting raspi-config.
-
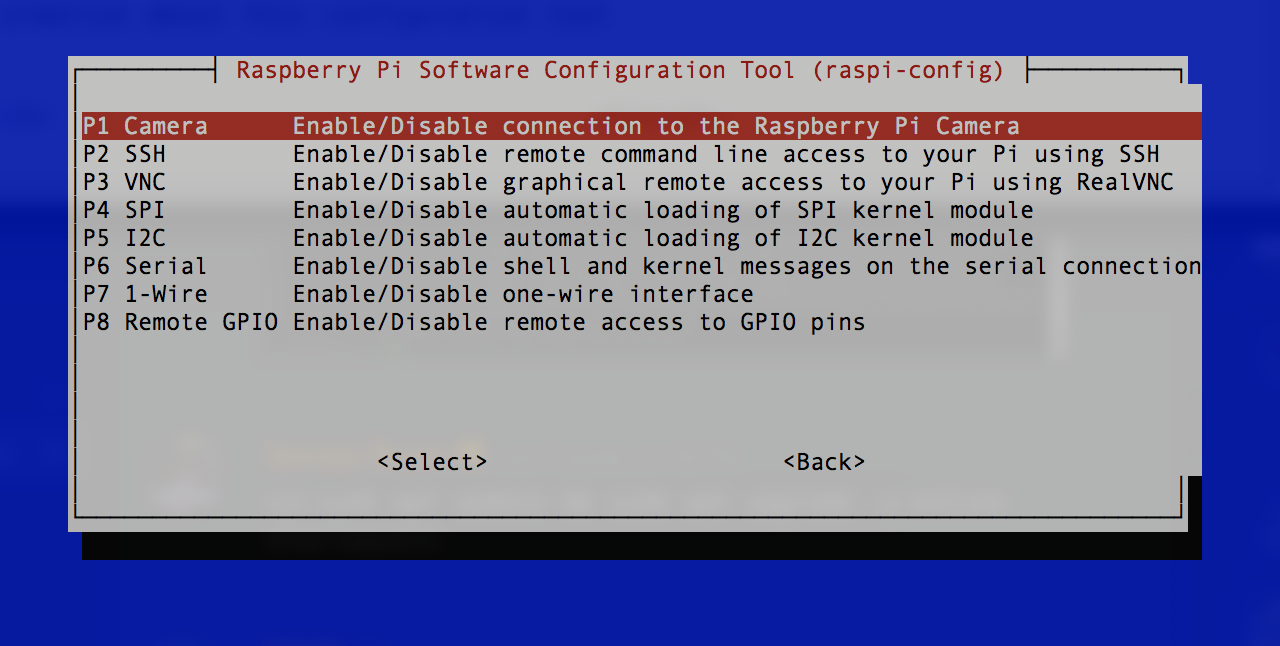
Interfacing Options. Enable SSH, you will want to be able to connect to your robot using your computer remote. If for no other reason to copy and paste the command line instructions to avoid typos. You may want to also enable I2C here if you plan on using the Adafruit Motor Hat or others that use I2C.
-
Exit the Raspi-config. To exit use your right arrow key to move and select
<Back>, hit enter. Then do the same thing to select the<Finish>button.
-
-
To restart your Raspberry Pi, type the following into the command prompt:
sudo rebootWhen you reboot to the command line your IP address should be shown in the last few messages before the login prompt. Write it down.
-
Switch over to your computer on the connected to the same network as the Raspberry pi is connected.
-
Open the Terminal program on your PC or Mac.
ssh pi@YOUR-PI-IPADDRESS -
Enter your login details.
username: pi password: the new password you just set- Copy and paste all of the commands below into the terminal instead of typing them arduously line by line.
-
-
Run the following command through the ssh terminal.
sudo apt-get update
-
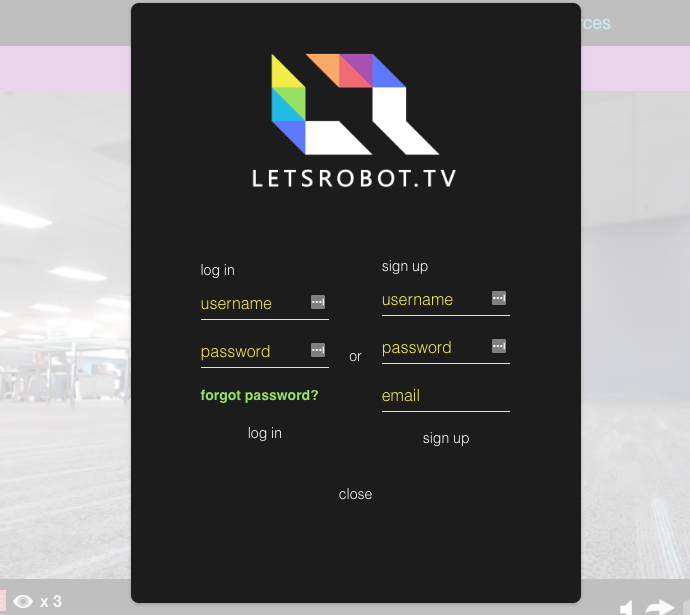
Load LetsRobot.tv and select sign up / log in on the upper right of the page.
-
Login or create an account
-
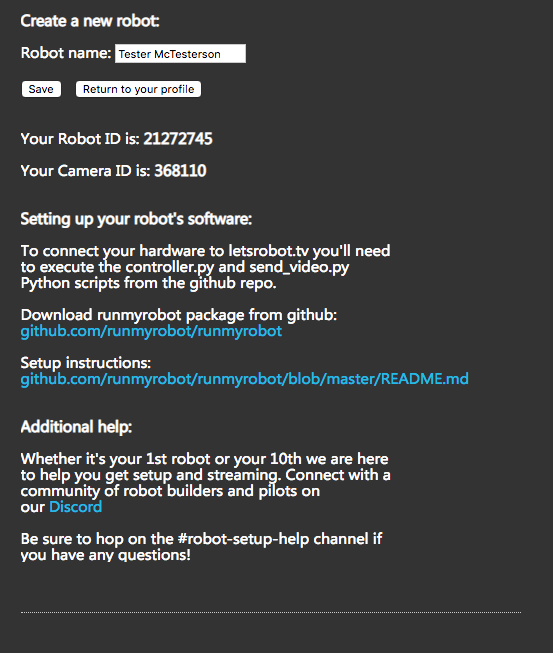
Navigate to your profile and click + Add a new Robot!

-
Now edit your new robot.
-
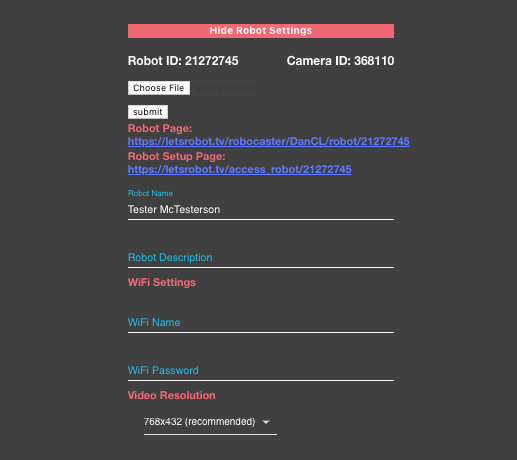
Fill out the Name and Description, then select a resolution.
-
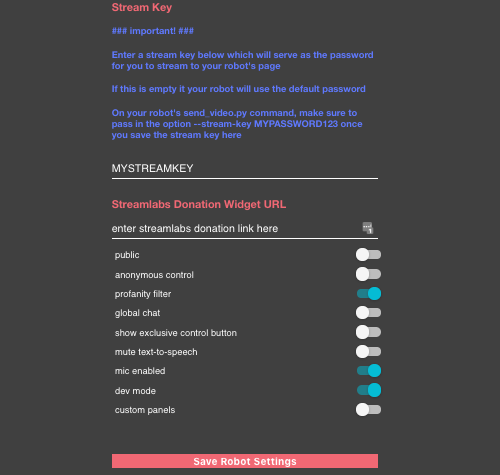
Enter a Stream Key and BE SURE TO SAVE
The RasPi will need the following things install so it can talk to your motors and talk to the internet. Make sure you don’t get any errors in the console when doing the step below. If you have an issue, you can run this line again, and that will usually fix it!
-
Install the required software libraries and tools. Make sure you don’t get any errors in the console when doing the step below. If you have an issue, you can run this line again, and that will usually fix it!
sudo apt-get install ffmpeg python-serial python-dev libgnutls28-dev espeak python-smbus python-pip libttspico-utils git -
Download the LetsRobot control scripts from our github
git clone https://github.com/letsRobot/letsrobot.git ~/letsrobot -
Install python requirements
sudo python -m pip install -r ~/letsrobot/requirements.txt -
Copy letsrobot.sample.conf to letsrobot.conf
cp letsrobot.sample.conf letsrobot.conf
-
Edit the letsrobot.conf file created in the previous section.
nano ~letsrobot.conf -
Configure the [robot] section
- owner should be the username you have registered the robot under on the LetsRobot site.
- robot_id should be the robot ID for your robot, obtained in step 2 of the Bring your Bot to life section.
- camera_id should be the camera ID for your robot, obtained in same step as robot ID.
- turn_delay is only used by the motor_hat and mdd10. This changes how long your bot turns for. I suggest you leave this at the default value until after you bot is moving.
- straight_delay is only used by the motor_hat and mdd10. This changes how long your bot turns for. I suggest you leave this at the default value until after you bot is moving.
- type should be the hardware type for the motor controller of your bot. Available types are currently.
- adafruit_pwm
- cozmo
- gopigo2
- gopigo3
- l298n
- maestro-servo
- max7219
- mc33926
- mdd10
- motor_hat
- motozero
- none
- owi_arm
- pololu
- serial_board
- telly
- Configure your hardwares section. Each hardware type can have their own section it the controller. Look through the file for a section named the same as your hardware controller. If the section exists, read through it and adjust the variable as required.
-
Configure the [camera] section
- no-mic This allows the microphone to be disabled.
- no-camera This allows the camera to be disabled.
- type This sets the audio / video handler to use. Currently only ffmpeg and ffmpeg-arecord are supported.
- x_res Sets the resolution for the x axis.
- y_res Sets the resolution for the y axis.
- camera_device Sets the device name for the camera.
- audio_hw_num Set the audio hardware number for the microphone.
-
Configure the [tts] section
- tts_volume This is the volume level you want your bot to start with.
- anon_tts This allows you to enable or disable anonymous users access to your bots TTS features.
- filter_url_tts This option allows URLs pasted into chat to be blocked from the TTS function.
- ext_chat This enables or disables the extended chat functions.
- hw_hum This is the ALSA hardware number for your pi. 0 is the first sound card and should work for most bots.
- type should be the type of TTS software you are using. The currently supported TTS types are. espeak was installed in the previous steps, and makes a good default tts.
- espeak
- fesitval
- pico
- Amazon Polly
- cozmo_tts
-
Copy the start_robot script to your home directory.
cp ~/letsrobot/scipts/start_robot ~ -
Add the startup script to the crontab
crontab -eNote: If you accidently use the wrong editor try
EDITOR=nano crontab -e -
Insert the following text at the bottom
@reboot /bin/bash /home/pi/start_robotExample:
# Edit this file to introduce tasks to be run by cron. # # Each task to run has to be defined through a single line # indicating with different fields when the task will be run # and what command to run for the task # # To define the time you can provide concrete values for # minute (m), hour (h), day of month (dom), month (mon), # and day of week (dow) or use '*' in these fields (for 'any').# # Notice that tasks will be started based on the cron's system # daemon's notion of time and timezones. # # Output of the crontab jobs (including errors) is sent through # email to the user the crontab file belongs to (unless redirected). # # For example, you can run a backup of all your user accounts # at 5 a.m every week with: # 0 5 * * 1 tar -zcf /var/backups/home.tgz /home/ # # For more information see the manual pages of crontab(5) and cron(8) # # m h dom mon dow command @reboot /bin/bash /home/pi/start_robot -
Now just plug in the Camera and USB Speaker and reboot
sudo reboot
Hopefully you’ll hear your robot say “OK” and everything will be working! If not, it is time to checking the Technical FAQ and Troubleshooting Tips. Also drop in to our Discord Channel and ask for help.
We use ffmpeg to stream audio and socket.io to send control messages.
The is a community project. Making your own bot? Adding your own control stuff? Cool! We'd like to hear from you. Drop in to our Discord Channel and say Hi!
The following hardware is supported.
- Adafruit Motor Hat
- Adafruit PWM / Servo Hat
- Anki Cozmo
- GoPiGo 2
- GoPiGo 3
- L298N Dual Motor Controller
- Pololu Maestro Servo Controller (experimental)
- MAX7219 SPI Led Driver
- Pololu Dual MC33926 Motor Driver (experimental)
- Pololu DRV8835 Dual Motor Driver
- Cytron MDD10 10 Amp Motor Driver
- MotoZero 4 Motor Controller
- OWI 535 Robotic Arm (USB controller)
- Serial Based controllers (Parallaxy or Arduinos)
Missing something?, you can add it, open source! Instructions for adding new hardware can be found here.
When ext_chat is enabled, the following chat commands are available. To use, just type them into the chat box on your bots page. These chat commands have no effect on how the site behaves, they only affect the bot. There are some functions that duplicate functions on the site. These changes are not saved and are lots on reboot.
.devmode XSet dev mode. In dev mode, only the owner can drive. If demode is set to mods, your local mods can also drive [on|off|mods]..anon control XSets if anonymous users can drive your bot [on|off]..anon tts XSets if anonymous users messages are passed to TTS [on|of]..anon XSets both anonymous control and tts access [on|off]..tts XMute the bots TTS [mute|unmute].ban NAMEBan user NAME from controlling your bots.unban NAMEremove user NAME from the ban list.timeout NAMETimeout user NAME from controlling your bots for 5 minutes.untimout NAMEremove user NAME from the timeout list..brightness Xset the camera brightness [0..255].contrast Xset the camera contrast [0..255].saturation Xset the camera saturation [0..255].stationaryToggles stationary mode on and off. When enabled, forward / backward commands will be blocked.
Hardware modules can have their own hardware specific TTS commands.
For Anki Cozmo on Mac or Linux, please see the intructions here. For Windows instructions, please see the instructions here.
For GoPiGo3, you will need to install the gopigo3 python module (which is different than older versions). It will need to be installed with the installation script from Dexter. Also, PYTHONPATH needs to be set to "/home/pi/Dexter/GoPiGo3/Software/Python"
Refer to this: https://github.com/DexterInd/GoPiGo3
sudo git clone http://www.github.com/DexterInd/GoPiGo3.git /home/pi/Dexter/GoPiGo3
sudo bash /home/pi/Dexter/GoPiGo3/Install/install.sh
sudo reboot
Install motor HAT software:
Install PWM / Servo hat software
Install Maestro Servon controller library into the hardware/ subdirectory.
Install DRV8835 Motor Driver library
Install MC33926 Motor Driver library

The robot client connects via websockets to the API service to retrieve configuration information, to the chat to receive chat messages, the video/audio relays to send its camera and microphone capture, and to the control service to receive user commands.
Control server via socket.io Application server via socket.io and HTTP Chat server via socket.io Sends video stream via websockets Sends audio stream via websockets
Capturing Audio and Video Relays commands to robot hardware Text to Speech Supports remote login for diagnostics and updates Configuration updates from the web client (partially implemented)
The robot client connects to four external services: API Service, Chat Service, Video/Audio Service, and the Control Service.
Provides information about which host and port to connect to for the chat service, video/audio service, and control service
Relays chat messages sent from the web clients to the robot
The robot client streams ffmpeg output to the video/audio service
Relays control messages sent from the web clients to the robot