广告位出租
Billboard rental
看板レンタル
Powered by Google translate
🍋 [My Blog] See discussions
Home Page: https://github.com/techiall/Blog/discussions
License: MIT License


有关的配置如下
将 git 默认的 nano 编辑器修改为 vim
vim ~/.bashrc ,在该文件的最后一行添加 export EDITOR=/usr/bin/vim 。
Git 全局设置
git config --global user.name "name"
git config --global user.email "email"
如果当期仓库为空的,参考一下命令创建一个 git 仓库
mkdir demo
cd demo
git init
touch README.md
git add README.md
git commit -m "first commit"
若项目已经存在
cd demo
git init
git add --all
git commit -m "first commit"
如果还绑定了远程,使用 git remote rm origin 命令可以取消和远程库的连接。
# Linux 服务器创建好 git 仓库后,切换到 demo 父目录
cd ..

# 从刚才的库复制一个新的仓库,不含源码
git clone --bare ./demo

# ls 命令查看目录结构,会发现多了一个 demo.git
ls

# 回到刚才的 demo 目录下,我们要绑定远程库了
cd demo
git remote add origin ../demo.git

# 推送并绑定
git push -u origin maser
到此,在 Linux 服务器配置完成。
强烈推荐 cmder 这款软件
# git clone ssh://<登录的用户名>@<ip/域名><git仓库所在的目录> <存放本地的目录>
git clone ssh://<username>@<ip>~/demo.git ./demo
clone 下来后,在 Windows 写完代码,add commit,然后 git push origin master 即可,和远程操作一样, 如 push / pull / fetch 等等。
在 Linux 的文件夹里面使用 Git 合并从 Windows 提交的 commit 即可实现同步。
本文的示例如下,集合名称为 Message。
{
  "_id" : ObjectId("5ccaff6ff86fa11cd44b68e1"),
  "title" : "title",
  "content" : "content",
  "editorId" : "1",
  "list" : [{
      "id" : "2",
      "isRead" : "READ",
      "readTime" : ISODate("2019-05-02T14:33:58.558Z")
    },
    {
      "id" : "3",
      "isRead" : "READ",
      "readTime" : ISODate("2019-05-02T14:35:51.658Z")
    }],
  "createTime" : ISODate("2019-05-02T14:32:15.284Z")
}
自动注入该变量。
@Autowired
private MongoTemplate mongoTemplate;可能你第一反应写出以下代码,但是结果不如你所愿,他返回的集合是空。
Query query = Query.query(Criteria.where("_id").in("5ccaff6ff86fa11cd44b68e1");
mongoTemplate.find(query, Message.class);
我们改成一下这种方式即可查询得到。引入 ObjectId 即可。
import org.bson.types.ObjectId; // 引入 ObjectId;

Query query = Query.query(Criteria.where("_id")
                          .in(new ObjectId("5ccaff6ff86fa11cd44b68e1"));
mongoTemplate.find(query, Message.class);我们可以用 . 点表示法来查询嵌入文档里的字段。格式为 <嵌入的文档名>.<字段>。
假设我们需要根据 list 中 id 进行查询。使用 . 点表示法进行查询,方法如下
Query query = Query.query(Criteria.where("list.id").in("2"));
mongoTemplate.find(query, Message.class);list 文档里面是一个数组,如果我们对 list 中的 id 字段为 "2" 进行更新,那我们得先查到这条数据,接着在对他进行更新。若只想更新一条,可以使用 mongoTemplate.updateFirst,更新多条,可以使用 mongoTemplate.findAndModify 或者 mongoTmplate.updateMulti 。
下面以 mongoTmplate.updateMulti 为例。
mongoTemplate.updateMulti(
	Query.query(Criteria.where("_id").in(new ObjectId("5ccaff6ff86fa11cd44b68e1"))),
	Update.update("list.$.isRead", "READ")
		.set("list.$.readTime", new Date()),
	Message.class
);
update 用到了 $ 运算符, $ 运算符充当占位符,表示访问嵌入文档中的字段。你可以把 $ 当成一个下标。查询的时候不需要用 $,更新的时候就需要。
个人觉得这方法超级好用!
我们想把 list 中的每一个元素输出成一份新的文档,也就是变成
{
  "_id" : ObjectId("5ccaff6ff86fa11cd44b68e1"),
  "title" : "title",
  "content" : "content",
  "editorId" : "1",
  "list" : {
      "id" : "2",
      "isRead" : "READ",
      "readTime" : ISODate("2019-05-02T14:33:58.558Z")
    },
  "createTime" : ISODate("2019-05-02T14:32:15.284Z")
},
{
  "_id" : ObjectId("5ccaff6ff86fa11cd44b68e1"),
  "title" : "title",
  "content" : "content",
  "editorId" : "1",
  "list" : {
      "id" : "3",
      "isRead" : "READ",
      "readTime" : ISODate("2019-05-02T14:35:51.658Z")
    },
  "createTime" : ISODate("2019-05-02T14:32:15.284Z")
}
我们就需要 unwind 这个操作符了。他是属于 mongodb 中的聚合查询。
我们需要在被操作的字段名称前加上 $ 符号,在这个示例之中需要被操作的字段也就是 list。
mongoTemplate 操作如下。我们需要定义一个新的类来接受返回的数据,如果懒得定义,使用 java.lang.Object 来接收也是可以的。
Aggregation aggregation = Aggregation.newAggregation(
    Aggregation.unwind("$list"),
);
mongoTemplate
	.aggregate(aggregation, Message.class, NotifyMessage.class)
    // 以上那句也可以改成
    // 	.aggregate(aggregation, Message.class, Object.class)
    .getMappedResults()
    .stream()
.collect(Collectors.toList());写多了 for 循环,都感觉 for 写的太丑了,能不用 for 就不用 for。后来发现 函数式编程就可以很好的代替 for。
要理解函数式编程,你需要特别明确的知道你要输入的东西,和你要输出的东西。不用考虑中间的过程。这和写的语句有一些不一样,要深入理解函数式编程,首先先要转化一下思考方式。

| 函数接口 | 形式 | 作用 |
|---|---|---|
| Function | Function<A, B> toA = (B a) -> {...}; |
将 B 转换成 A |
| Predicate | Predicate<A> aIsTrue = (A a) -> {...}; |
判断 A 是 true 还是 false |
| Consumer | Consumer<A> aConsumer = (A a) -> {...} |
执行某些操作,没有返回值。 |
| Supplier | Supplier<A> aSupplier = () -> {return A;} |
返回一个对象 |
日常使用中,Function 和 Predicate 用的比较多,把某些方法用函数接口封装起来后,利用 Java 的 stream,可以让你的代码看起来更加简洁,在也不用写 for 循环了。
这些函数接口其实还扩展出来很多其他的接口,如接收两个参数返回一个对象的 BiFunction<A, B, C>,接收 B 和 C,并返回 A;接受一个对象 A 返回一个 int 类型的 IntFunction<A>。其实想想,这个接口也就是相当于 Function<int, A> 接受一个 A 对象,返回一个 int 类型。
我们可以通过猜方法名来知道他的意思,如 ToIntBiFunction<A,B> ,意思也就是 接收 A 和 B 两个对象,返回一个 int 类型。
如果你觉得自带的这些满足不了你的需求,那你可以选择自定义函数接口。
使用 @FunctionalInterface 注解。
比如你想传进 3 个参数,然后返回 1 个值,那你可以选择写两个 Function,或者就自定义函数接口。形式如下。
    @FunctionalInterface
    public interface toA<A, B, C, D> {
        A apply(B b, C c, D d);
    }
这段代码的意思是,输入 B,C,D 然后输出 A。当然了,你也可以调换顺序写,改成输入 A,B,C 然后输出 D。
    @FunctionalInterface
    public interface toD<A, B, C, D> {
        D apply(A a, B b, C c);
    }
调用的时候,我们可以这样子写
toA<A, B, C, D> toA = (B b, C c, D d) -> {...};
A a = toA(b, c, d);
把过程了解了,为什么要执行这条命令也就轻松多了。
| 静态库 | 动态库 | |
|---|---|---|
| 特点 | 编译的时候将所有数据整合进目标代码中 | 编译时没有被编译进目标代码,执行到相关函数才调用 |
| 后缀 | *.a | *.so |
| 命名规范 | lib*.a | lib*.so.major.minor |
| 共同点 | 得存在 *.o | 得存在 *.o |
| 编译 | ar crv out.a src_1.o src_2.o ... | gcc -shared -fPIC -o libout.so src.o |
| 链接 | gcc main.c out.a -o out | gcc -o out main.c libout.so |
| 注意事项 | / | 将 *.so 放在 /usr/lib 或者 设置 export LD_LIBRARY_PATH="./" |
跟我一起写Makefile 感觉一篇文章就够了。
单行注释
# this is comment多行注释(方式一
 # this is comment \
 	this is comment \
 	... \
多行注释(方式二
 # this is comment
 # this is comment
# ...写 Makefile 文件之前,首先得先明白编译和链接过程,知道要生成什么中间文件,过程懂了,再配合 Makefile 的书写规则,就没有什么太多问题。
在讲述这个makefile之前,还是让我们先来粗略地看一看makefile的规则。
target ... : prerequisites ...
   command
   ...
   ...
target
可以是一个object file(目标文件),也可以是一个执行文件,还可以是一个标签(label)。对 于标签这种特性,在后续的“伪目标”章节中会有叙述。
prerequisites
生成该target所依赖的文件和/或target
command
该target要执行的命令(任意的shell命令)
这是一个文件的依赖关系,也就是说,target这一个或多个的目标文件依赖于prerequisites中的文件, 其生成规则定义在command中。说白一点就是说:
prerequisites中如果有一个以上的文件比target文件要新的话,command所定义的命令就会被执行。这就是makefile的规则,也就是makefile中最核心的内容。
原文链接 https://seisman.github.io/how-to-write-makefile/introduction.html#id1
Trips 表中存所有出租车的行程信息。每段行程有唯一健 Id,Client_Id 和 Driver_Id 是 Users 表中 Users_Id 的外键。Status 是枚举类型,枚举成员为 (‘completed’, ‘cancelled_by_driver’, ‘cancelled_by_client’)。
+----+-----------+-----------+---------+--------------------+----------+
| Id | Client_Id | Driver_Id | City_Id |        Status      |Request_at|
+----+-----------+-----------+---------+--------------------+----------+
| 1  |     1     |    10     |    1    |     completed      |2013-10-01|
| 2  |     2     |    11     |    1    | cancelled_by_driver|2013-10-01|
| 3  |     3     |    12     |    6    |     completed      |2013-10-01|
| 4  |     4     |    13     |    6    | cancelled_by_client|2013-10-01|
| 5  |     1     |    10     |    1    |     completed      |2013-10-02|
| 6  |     2     |    11     |    6    |     completed      |2013-10-02|
| 7  |     3     |    12     |    6    |     completed      |2013-10-02|
| 8  |     2     |    12     |    12   |     completed      |2013-10-03|
| 9  |     3     |    10     |    12   |     completed      |2013-10-03|
| 10 |     4     |    13     |    12   | cancelled_by_driver|2013-10-03|
+----+-----------+-----------+---------+--------------------+----------+
Users 表存所有用户。每个用户有唯一键 Users_Id。Banned 表示这个用户是否被禁止,Role 则是一个表示(‘client’, ‘driver’, ‘partner’)的枚举类型。
+----------+--------+--------+
| Users_Id | Banned |  Role  |
+----------+--------+--------+
|    1     |   No   | client |
|    2     |   Yes  | client |
|    3     |   No   | client |
|    4     |   No   | client |
|    10    |   No   | driver |
|    11    |   No   | driver |
|    12    |   No   | driver |
|    13    |   No   | driver |
+----------+--------+--------+
写一段 SQL 语句查出 2013年10月1日 至 2013年10月3日 期间非禁止用户的取消率。基于上表,你的 SQL 语句应返回如下结果,取消率(Cancellation Rate)保留两位小数。
+------------+-------------------+
|     Day    | Cancellation Rate |
+------------+-------------------+
| 2013-10-01 |       0.33        |
| 2013-10-02 |       0.00        |
| 2013-10-03 |       0.50        |
+------------+-------------------+
mysql
解决这题得知道以下几个。
t1.Banned = 'No' //该用户未被禁止
Request_at BETWEEN '2013-10-01' AND '2013-10-03' // 题目要求的时间范围
round(sum(if(Status like 'ca%', 1, 0)) / count(*), 2) // 对得到的值保留小数点后两位,利用 if sum 进行计数,就可以算得取消率
select Request_at DAY,

        round(sum(if(Status like 'ca%', 1, 0)) / count(*), 2) 'Cancellation Rate'

from Trips t inner join Users t1 on t.Client_Id = t1.Users_Id

where t1.Banned = 'No' AND (Request_at BETWEEN '2013-10-01' AND '2013-10-03')

GROUP BY t.Request_at;密文格式:
-... -.- -.-. - ..-. -- .. ... -.-.
在线解密链接: http://atool.org/morse.php
密文格式:
++++++++++[>+++++++>++++++++++>+++>+<<<<-]
>++.>+.+++++++..+++.>++.<<+++++++++++++++.
>.+++.------.--------.>+.>.密文格式:
Ook. Ook. Ook. Ook. Ook. Ook. Ook. Ook. Ook. Ook. Ook. Ook. Ook. Ook. Ook. Ook. Ook. Ook. Ook. Ook. Ook. Ook. Ook! Ook? Ook! Ook! Ook. Ook? Ook. Ook. Ook. Ook. Ook. Ook. Ook. Ook. Ook. Ook. Ook. Ook. Ook. Ook. Ook. Ook. Ook. Ook. Ook. Ook. Ook. Ook. Ook? Ook. Ook? Ook! Ook. Ook? Ook. Ook. Ook! Ook. Ook! Ook! Ook! Ook! Ook! Ook! Ook! Ook! Ook! Ook! Ook! Ook! Ook! Ook! Ook! Ook. Ook? Ook. Ook. Ook. Ook. Ook. Ook. Ook. Ook. Ook. Ook! Ook? Ook! Ook! Ook. Ook? Ook! Ook! Ook! Ook! Ook! Ook! Ook! Ook! Ook? Ook. Ook? Ook! Ook. Ook? Ook! Ook. Ook? Ook. Ook. Ook. Ook. Ook. Ook. Ook. Ook. Ook. Ook! Ook? Ook! Ook! Ook. Ook? Ook. Ook. Ook. Ook. Ook. Ook. Ook. Ook. Ook? Ook. Ook? Ook! Ook. Ook? Ook. Ook. Ook! Ook. Ook? Ook. Ook. Ook. Ook. Ook. Ook. Ook. Ook! Ook? Ook! Ook! Ook. Ook? Ook! Ook! Ook! Ook! Ook! Ook! Ook? Ook. Ook? Ook! Ook. Ook? Ook! Ook! Ook! Ook! Ook! Ook! Ook! Ook! Ook! Ook! Ook! Ook. Ook? Ook. Ook. Ook. Ook. Ook. Ook. Ook. Ook. Ook. Ook! Ook? Ook! Ook! Ook. Ook? Ook. Ook. Ook. Ook. Ook. Ook. Ook. Ook. Ook? Ook. Ook? Ook! Ook. Ook? Ook. Ook. Ook. Ook. Ook. Ook. Ook. Ook. Ook. Ook. Ook! Ook. Ook? Ook. Ook. Ook. Ook. Ook. Ook. Ook. Ook. Ook. Ook. Ook. Ook. Ook. Ook. Ook. Ook! Ook? Ook! Ook! Ook. Ook? Ook! Ook! Ook! Ook! Ook! Ook! Ook! Ook! Ook! Ook! Ook! Ook! Ook! Ook! Ook? Ook. Ook? Ook! Ook. Ook? Ook! Ook. Ook? Ook. Ook. Ook. Ook. Ook. Ook. Ook. Ook. Ook. Ook. Ook. Ook. Ook. Ook! Ook? Ook! Ook! Ook. Ook? Ook. Ook. Ook. Ook. Ook. Ook. Ook. Ook. Ook. Ook. Ook. Ook. Ook? Ook. Ook? Ook! Ook. Ook? Ook. Ook. Ook. Ook. Ook. Ook. Ook. Ook. Ook. Ook. Ook. Ook. Ook. Ook. Ook! Ook. Ook? Ook. Ook. Ook. Ook. Ook. Ook. Ook. Ook. Ook. Ook. Ook. Ook. Ook. Ook. Ook. Ook. Ook. Ook! Ook? Ook! Ook! Ook. Ook? Ook! Ook! Ook! Ook! Ook! Ook! Ook! Ook! Ook! Ook! Ook! Ook! Ook! Ook! Ook! Ook! Ook? Ook. Ook? Ook! Ook. Ook? Ook! Ook. Ook? Ook. Ook. Ook. Ook. Ook. Ook. Ook. Ook. Ook. Ook. Ook. Ook! Ook? Ook! Ook! Ook. Ook? Ook. Ook. Ook. Ook. Ook. Ook. Ook. Ook. Ook. Ook. Ook? Ook. Ook? Ook! Ook. Ook? Ook. Ook. Ook. Ook. Ook. Ook. Ook. Ook. Ook. Ook. Ook. Ook. Ook! Ook. Ook? Ook. Ook. Ook. Ook. Ook. Ook. Ook. Ook! Ook? Ook! Ook! Ook. Ook? Ook. Ook. Ook. Ook. Ook. Ook. Ook? Ook. Ook? Ook! Ook. Ook? Ook. Ook. Ook. Ook. Ook! Ook. Ook? Ook. Ook. Ook. Ook. Ook. Ook. Ook. Ook. Ook. Ook! Ook? Ook! Ook! Ook. Ook? Ook! Ook! Ook! Ook! Ook! Ook! Ook! Ook! Ook? Ook. Ook? Ook! Ook. Ook? Ook! Ook. Ook? Ook. Ook. Ook. Ook. Ook. Ook. Ook. Ook. Ook. Ook. Ook. Ook! Ook? Ook! Ook! Ook. Ook? Ook. Ook. Ook. Ook. Ook. Ook. Ook. Ook. Ook. Ook. Ook? Ook. Ook? Ook! Ook. Ook? Ook. Ook. Ook. Ook. Ook. Ook. Ook. Ook. Ook. Ook. Ook. Ook. Ook. Ook. Ook! Ook. Ook? Ook. Ook. Ook. Ook. Ook. Ook. Ook. Ook. Ook. Ook. Ook. Ook. Ook. Ook! Ook? Ook! Ook! Ook. Ook? Ook! Ook! Ook! Ook! Ook! Ook! Ook! Ook! Ook! Ook! Ook! Ook! Ook? Ook. Ook? Ook! Ook. Ook? Ook! Ook. Ook? Ook. Ook. Ook. Ook. Ook. Ook. Ook. Ook. Ook. Ook. Ook. Ook. Ook. Ook! Ook? Ook! Ook! Ook. Ook? Ook! Ook! Ook! Ook! Ook! Ook! Ook! Ook! Ook! Ook! Ook! Ook! Ook? Ook. Ook? Ook! Ook. Ook? Ook! Ook! Ook! Ook! Ook! Ook! Ook! Ook! Ook! Ook! Ook! Ook! Ook! Ook. Ook? Ook. Ook. Ook. Ook. Ook. Ook. Ook. Ook. Ook. Ook. Ook. Ook. Ook. Ook. Ook. Ook. Ook. Ook. Ook. Ook! Ook? Ook! Ook! Ook. Ook? Ook. Ook. Ook. Ook. Ook. Ook. Ook. Ook. Ook. Ook. Ook. Ook. Ook. Ook. Ook. Ook. Ook. Ook. Ook? Ook. Ook? Ook! Ook. Ook? Ook. Ook. Ook. Ook. Ook. Ook. Ook. Ook. Ook. Ook. Ook. Ook. Ook. Ook. Ook. Ook. Ook. Ook. Ook. Ook. Ook. Ook. Ook! Ook. Ook? Ook.密文格式:
[][(![]+[])[+[[+[]]]]+([][[]]+[])[+[[!+[]+!+[]+!+[]+!+[]+!+[]]]]+(![]+[])[+[[!+[]+!+[]]]]+(!![]+[])[+[[+[]]]]+(!![]+[])[+[[!+[]+!+[]+!+[]]]]+(!![]+[])[+[[+!+[]]]]][([][(![]+[])[+[[+[]]]]+([][[]]+[])[+[[!+[]+!+[]+!+[]+!+[]+!+[]]]]+(![]+[])[+[[!+[]+!+[]]]]+(!![]+[])[+[[+[]]]]+(!![]+[])[+[[!+[]+!+[]+!+[]]]]+(!![]+[])[+[[+!+[]]]]]+[])[+[[!+[]+!+[]+!+[]]]]+([][(![]+[])[+[[+[]]]]+([][[]]+[])[+[[!+[]+!+[]+!+[]+!+[]+!+[]]]]+(![]+[])[+[[!+[]+!+[]]]]+(!![]+[])[+[[+[]]]]+(!![]+[])[+[[!+[]+!+[]+!+[]]]]+(!![]+[])[+[[+!+[]]]]]+[])[+[[!+[]+!+[]+!+[]+!+[]+!+[]+!+[]]]]+([][[]]+[])[+[[+!+[]]]]+(![]+[])[+[[!+[]+!+[]+!+[]]]]+(!![]+[])[+[[+[]]]]+(!![]+[])[+[[+!+[]]]]+([][[]]+[])[+[[+[]]]]+([][(![]+[])[+[[+[]]]]+([][[]]+[])[+[[!+[]+!+[]+!+[]+!+[]+!+[]]]]+(![]+[])[+[[!+[]+!+[]]]]+(!![]+[])[+[[+[]]]]+(!![]+[])[+[[!+[]+!+[]+!+[]]]]+(!![]+[])[+[[+!+[]]]]]+[])[+[[!+[]+!+[]+!+[]]]]+(!![]+[])[+[[+[]]]]+([][(![]+[])[+[[+[]]]]+([][[]]+[])[+[[!+[]+!+[]+!+[]+!+[]+!+[]]]]+(![]+[])[+[[!+[]+!+[]]]]+(!![]+[])[+[[+[]]]]+(!![]+[])[+[[!+[]+!+[]+!+[]]]]+(!![]+[])[+[[+!+[]]]]]+[])[+[[!+[]+!+[]+!+[]+!+[]+!+[]+!+[]]]]+(!![]+[])+[[+!+[]]]][+[[+!+[]]]]+(![]+[])[+[[!+[]+!+[]]]]+(!![]+[])[+[[!+[]+!+[]+!+[]]]]+(!![]+[])[+[[+!+[]]]]+(!![]+[])[+[[+[]]]]+([][(![]+[])[+[[+[]]]]+([][[]]+[])[+[[!+[]+!+[]+!+[]+!+[]+!+[]]]]+(![]+[])[+[[!+[]+!+[]]]]+(!![]+[])[+[[+[]]]]+(!![]+[])[+[[!+[]+!+[]+!+[]]]]+(!![]+[])[+[[+!+[]]]]]+[])[+[[+!+[]]]+[[!+[]+!+[]+!+[]+!+[]+!+[]]]]+[+!+[]]+([][(![]+[])[+[[+[]]]]+([][[]]+[])[+[[!+[]+!+[]+!+[]+!+[]+!+[]]]]+(![]+[])[+[[!+[]+!+[]]]]+(!![]+[])[+[[+[]]]]+(!![]+[])[+[[!+[]+!+[]+!+[]]]]+(!![]+[])[+[[+!+[]]]]]+[])[+[[+!+[]]]+[[!+[]+!+[]+!+[]+!+[]+!+[]+!+[]]]])()在线解密链接: http://www.jsfuck.com/
格林尼治平时(Greenwich Mean Time),简称 GMT
世界时(Universal Time),简称 UT
协调世界时(Coordinated Universal Time),简称 UTC
UTC, UT, GMT 三者出现的先后顺序: GMT -> UT -> UTC,我们可以把 GMT 和 UTC 看作一样的。
GMT 和 UTC 都是用 秒 数来计算的。
全球划分为 24 个时区
时区可以用 UTC 表示,范围为 UTC-12 --- UTC-11 --- UTC-1 --- UTC --- UTC-1 --- UTC+11 --- UTC+12,依次增加
相差多少个时区,就是相差多少个小时
时区可以按 区域/位置 的格式表示,就可以得到一个独有的名称(时区有很多种表示方式)
以 **时区 为例。
China Standard Time (CST), UTC +8、
无夏令时,全年 UTC 偏移量不变
**的 IANA 时区标识符为 Asia/Shanghai。
时间戳(Timestamp)是指字符串或编码信息用于辨识记录下来的时间日期。国际标准为 ISO 8601
时间戳是从 协调世界时(UTC) 1970 年 1 月 1 日 0 时 0 分 0 秒 起至现在的总秒数,不考虑闰秒
时间戳是用无符号整数表示
时间戳 和 UTC 进行转换,UTC 和 时区 进行转换,因此 时间戳 也可以和 UTC 进行转换
有 秒级(10 位), 毫秒级(13 位) 的时间戳,也有纳米级(19 位) 的时间戳,如 Java 就可以处理到纳米级
本地时间是指当前操作系统设定的时区。例如北京时区是东8区,则本地时间:
2015-04-19 12:20:00实际上就是UTC+8:00时区的时间:
2015-04-19 12:20:00 UTC+8:00而此刻的格林威治标准时间与北京时间差了8小时,也就是UTC+0:00时区的时间应该是:
2015-04-19 04:20:00 UTC+0:00原文链接:https://blog.csdn.net/zheng_lan_fang/article/details/79448965
因为时区的关系,由于没设置使用者的时区,所以就会看到在一些系统上会出现时间慢了 8 个小时的现象(以北京时区为例)
不同的编程语言可以通过设置的方式来调整时区
不同的编程语言 格式化 时间的方式也不同(如:yyyy-mm-dd hh:mm:ss),为确保统一,我们可以使用时间戳(mysql,Java,JavaScript 存放时间都用 时间戳,就不会产生写入和读出不一致了。
编写一个函数,输入是一个无符号整数,返回其二进制表达式中数字位数为 ‘1’ 的个数(也被称为汉明重量)。
示例 1:
输入:00000000000000000000000000001011
输出:3
解释:输入的二进制串 00000000000000000000000000001011 中,共有三位为 '1'。
示例 2:
输入:00000000000000000000000010000000
输出:1
解释:输入的二进制串 00000000000000000000000010000000 中,共有一位为 '1'。
示例 3:
输入:11111111111111111111111111111101
输出:31
解释:输入的二进制串 11111111111111111111111111111101 中,共有 31 位为 '1'。
提示:
-3。进阶:
如果多次调用这个函数,你将如何优化你的算法?
二进制中 1 的个数,首先会联想到 位运算。
& 运算:x & y 当且仅当 x 和 y 都为 1 的时候,结果才为 1,其余结果为 0 。| 运算: x | y 当且仅当 x 和 y 都为 0 的时候,结果才为 0,其他结果都为 1 。这道题目我们可以用 与运算 &,和这个数的每一位作比较,有 1 的位累加起来即可。
Java 要看作无符号,所以在进行位运算的时候,要使用无符号的左移(<<<)或者右移(>>>)。
public class Solution {
    // you need to treat n as an unsigned value
    public int hammingWeight(int n) {
        int count = 0;
        while (n != 0) {
            count += (n & 1);
            n >>>= 1;
        }
        return count;
    }
}在某宝上买了 SIM800C 开发板(店家记得给我广告费),这样子就不需要自己焊板子了,233
里面店铺还给了相关的资料,动手难度不大。https://pan.baidu.com/s/1b01Wrc
还需要一张卡,买那种 物联卡 就行了,卡放在模块里面前,先要插入手机,激活后才可以使用。注意模块 SIM 插槽的方向,有坑。
需要 USB-TTL,连线如下
SIM800C - USB-TTL
GND - GND
VCC - 5.0V (3.3V 也是可以的,没什么问题)
R - RXD
T - TXD
SSCOM 软件波特率选择 9600,记得勾选回车换行。
虽然说 SIM800C 自动识别波特率,但是发现选择其他波特率的时候不够稳定。若通过 Arduino Uno 连接,使用 115200 波特率不够稳定,发送 AT 指令后,模块返回数值时会出现乱码,因此才选择使用 9600。
在提供的资料里面,算是很全面了。包括 AT 指令。使用 SIM800C 模块进行 TCP/IP 连接服务器。相关指令。具体参考资料里面的文档 SIM800系列_TCPIP_应用文档_V1.01.pdf 。
AT+CPIN?
AT+CSQ
AT+CREG?
AT+CGATT?
AT+CSTT="CMNET"
AT+CIICR
AT+CIFSR
AT+CIPSTART="TCP","test.com","8500"
AT+CIPSEND
连接方式,参考链接:http://www.ayomaonline.com/programming/quickstart-sim800-sim800l-with-arduino/
代码
#include <SoftwareSerial.h>

//SIM800 TX is connected to Arduino D8
#define SIM800_TX_PIN 8

//SIM800 RX is connected to Arduino D7
#define SIM800_RX_PIN 7

//Create software serial object to communicate with SIM800
SoftwareSerial serialSIM800(SIM800_TX_PIN,SIM800_RX_PIN);

void setup() {
  //Begin serial comunication with Arduino and Arduino IDE (Serial Monitor)
  Serial.begin(9600);
  while(!Serial);

  //Being serial communication witj Arduino and SIM800
  serialSIM800.begin(9600);
  delay(1000);

  Serial.println("Setup Complete!");
}

void loop() {
  //Read SIM800 output (if available) and print it in Arduino IDE Serial Monitor
  if(serialSIM800.available()){
    Serial.write(serialSIM800.read());
  }
  //Read Arduino IDE Serial Monitor inputs (if available) and send them to SIM800
  if(Serial.available()){
    serialSIM800.write(Serial.read());
  }
}在网上找了这个这个硬件的封装库,发现只找到和他类似的,然后就下载来用,后来出了一些问题,看了下实现的源码,发现有些和我使用不符,而且实现起来不是很难,因此自己就写了一个,只写了 HTTP 发送数据。
编写一个 SQL 查询,查找所有至少连续出现三次的数字。
+----+-----+
| Id | Num |
+----+-----+
| 1  |  1  |
| 2  |  1  |
| 3  |  1  |
| 4  |  2  |
| 5  |  1  |
| 6  |  2  |
| 7  |  2  |
+----+-----+
例如,给定上面的 Logs 表, 1 是唯一连续出现至少三次的数字。
+-----------------+
| ConsecutiveNums |
+-----------------+
| 1               |
+-----------------+
使用自连接,利用别名,将同一张表使用三次
连续至少出现三次,那也是就 id 号得相差 1,并且 num 的值得相等。
再利用 distinct 去重即可。
mysql
select distinct a.Num ConsecutiveNums from

Logs a

inner join Logs b on a.id = b.id - 1

inner join Logs c on b.id = c.id - 1

where a.Num = b.Num and b.Num = c.Num;anaconda ,里面带了 selenium。pip 安装 selenium: pip install selenium (如果用了 anaconda,会提示已经存在
根据自己的使用的浏览器选择对应的驱动(我用的是 Chrome
打开 Chrome — 设置 — 关于Chrome,找到 Chrome 的版本号
版本 69.0.3497.23(正式版本) (64 位) ,之前用的是 70.+ 版本,驱动没支持 70.0 版本以上只能回退回来。http://chromedriver.chromium.org/downloads Chrome 版本对应的驱动号
ChromeDriver 2.40

Supports Chrome v66-68
https://chromedriver.storage.googleapis.com/index.html 找到自己电脑对应 Chrome 版本驱动和平台下载到本地,解压。
将 Chromedriver 的目录添加到 环境变量 。如果不想配置环境变量的话写代码就得添加 Chromedriver 的路径。
from selenium.webdriver import Chrome,ChromeOptions

driver_path = r"D://chromedriver.exe"  # Chromedriver 路径
Options = ChromeOptions()

# 浏览器路径,如果有 Chrome 安装的话, 会自动查找,绿色版会有问题
# 如果有多个版本的 Chrome,可以指定对应的版本
Options.binary_location = r"Chrome.exe" # 浏览器路径
driver = Chrome(chrome_options=Options, executable_path = driver_path, port=9515)

driver.get( "https://www.baidu.com") #打开百度我用的是 GreenChrome,绿色版的 Chrome 方便携带,如果知道的是 MyChrome.exe 的路径的话,虽然可以调用起 Chrome,但还是有问题
$ ls
Chrome/ MyChrome.exe* MyChrome.ini MyChrome.vbs 'User Data'/参考链接
如果只是单纯的使用 redis 来当缓存,用缓存注解的话,就不需要导入以下这个依赖。
        <dependency>
            <groupId>org.springframework.boot</groupId>
            <artifactId>spring-boot-starter-redis</artifactId>
            <version>RELEASE</version>
</dependency>根据自己的需要进行配置即可,spring boot 里面都有默认配置。
不全部列举。
spring:
  redis:
    database: 0     # 选择 redis 数据库
    host: localhost # ip
    port: 6379      # 端口
    timeout: 0      # 超时时间(毫秒)
    jedis:
      pool:
        min-idle: 0 # 最小空闲连接
        max-idle: 8 # 最大空闲连接
之后在 main 方法的那个类上,加入 @EnableCaching 注解。
每个要想写入 redis 的类都需要 实现(implements) Serializable 这个接口。 不然会报错。
@CacheConfig 一般放在类上。@Cacheable 放在方法上,只缓存一次,之后只返回 缓存 里面的数据,不会刷新。@CachePut 放在方法上,都会调用函数。也是会刷新,将刷新的值放入 缓存。@CacheEvict 放在方法上,从缓存中移除数据。| 属性 | 描述 | 示例 |
|---|---|---|
| methodName | 当前方法名 | #root.methodName |
| method | 当前方法 | #root.method.name |
| target | 当前被调用的对象 | #root.target |
| targetClass | 当前被调用的对象的class | #root.targetClass |
| args | 当前方法参数数组 | #root.args[0] |
| caches | 当前被调用的方法使用的Cache | #root.caches[0].name |
挺奇葩的一道题目。
flag格式:zsctf{}

636A56355279427363446C4A49454A7154534230526D6843 56445A31614342354E326C4B4946467A5769426961453067
先对这一段进行了单词出现频率统计,发现范围在 0 - 9,A - E,发现刚好符合 16 进制,而且长度为 48。
分析代码如下
word = {}
string = '636A56355279427363446C4A49454A7154534230526D684356445A31614342354E326C4B4946467A5769426961453067'
for i in string:
        if i not in word:
                word[i] = 1
        else:
                word[i] = word[i] + 1

print(word)
print(sorted(word.keys()))
print(word.keys())
print(word.values())
输出结果
{'6': 16, '3': 12, 'A': 5, '5': 12, '2': 7, '7': 6, '9': 5, '4': 21, 'C': 2, '1': 4, '0': 2, 'D': 1, '8': 1, 'E': 1, 'B': 1}
['0', '1', '2', '3', '4', '5', '6', '7', '8', '9', 'A', 'B', 'C', 'D', 'E']
dict_keys(['6', '3', 'A', '5', '2', '7', '9', '4', 'C', '1', '0', 'D', '8', 'E', 'B'])
dict_values([16, 12, 5, 12, 7, 6, 5, 21, 2, 4, 2, 1, 1, 1, 1])
那么把这个字符串按每两位,拆成 16 进制。(直接用正则
h = b'\x63\x6A\x56\x35\x52\x79\x42\x73\x63\x44\x6C\x4A\x49\x45\x4A\x71\x54\x53\x42\x30\x52\x6D\x68\x43\x56\x44\x5A\x31\x61\x43\x42\x35\x4E\x32\x6C\x4B\x49\x46\x46\x7A\x57\x69\x42\x69\x61\x45\x30\x67'
print(h.decode('utf-8'))
print(h.decode('utf-8').__len__())
print(base64.b64decode(h.decode('utf-8')))
输出结果
cjV5RyBscDlJIEJqTSB0RmhCVDZ1aCB5N2lKIFFzWiBiaE0g
48
b'r5yG lp9I BjM tFhBT6uh y7iJ QsZ bhM '
先把十六进制变成 utf-8 格式,再用 base64 进行解密,得到了 b'r5yG lp9I BjM tFhBT6uh y7iJ QsZ bhM ' ,后来以为是 qwe 加密,发现不是。
我们直接观察键盘,发现每一小段字符串,标记在键盘上,会发现围成一圈,中间刚好有一个字母。将所有的字母合并起来。
不知道大小写,都提交一遍,小写成功。
正确答案:zsctf{tongyuan} 。
小美是一所中学的信息科技老师,她有一张 seat 座位表,平时用来储存学生名字和与他们相对应的座位 id。
其中纵列的 id 是连续递增的
小美想改变相邻俩学生的座位。
你能不能帮她写一个 SQL query 来输出小美想要的结果呢?
示例:
+---------+---------+
|    id   | student |
+---------+---------+
|    1    | Abbot   |
|    2    | Doris   |
|    3    | Emerson |
|    4    | Green   |
|    5    | Jeames  |
+---------+---------+
假如数据输入的是上表,则输出结果如下:
+---------+---------+
|    id   | student |
+---------+---------+
|    1    | Doris   |
|    2    | Abbot   |
|    3    | Green   |
|    4    | Emerson |
|    5    | Jeames  |
+---------+---------+
注意:
如果学生人数是奇数,则不需要改变最后一个同学的座位。
mysql
sql 里面有 if 函数,if 的使用方法如下,和 编程语言的 if...else... 差不多。
if(expr1, expr2, expr3),当 exp1 的值为 true 时,运行的 exp2,否则运行 exp3。
这题就逻辑题,用伪代码表达如下。
id = function(id) {
	if (id % 2 == 1) { // 如果 id 不是 2 的倍数,也就是奇数
		if (id == count(*)) { // 如果是最后一行, 就还是自己
			return id;
		} else { // 第一个条件满足,第二个不满足时和下一个交换
			return id + 1;
		}
	} else { // id 为偶数,和上一个交换
		return id - 1;
	}

};
以下为提交代码
select if (id % 2 = 1, if (id = (select count(*) from seat), id, id + 1), id - 1) id, student

from seat order by id;给定一个整数数组和一个目标值,找出数组中和为目标值的两个数。
你可以假设每个输入只对应一种答案,且同样的元素不能被重复利用。
示例:
给定 nums = [2, 7, 11, 15], target = 9

因为 nums[0] + nums[1] = 2 + 7 = 9
所以返回 [0, 1]
c++
利用哈希,先判断相减后的值是否存在,不存在的话将该数组中的值作为主键,存入哈希中,之后匹配。
查找成功则返回。
若找不到索引,find() 的返回值为 .end()。
class Solution {
	public:
		vector<int> twoSum(vector<int>& nums, int target) {
			map<int, int> hash_map;
			vector<int> re;
			for (size_t i = 0; i < nums.size(); i++) {
				int tmp = target - nums[i];
				if (hash_map.find(tmp) != hash_map.end()) {
					re.push_back(hash_map[target - nums[i]]);
					re.push_back(i);
					break;
				}
				hash_map[nums[i]] = i;
			}
			return re;
		}
};
Java
public class Solution {
	public int[] twoSum(int []nums, int target) {
		Map<Integer, Integer> map = new HashMap<>();
		for (int i = 0; i < nums.length; i++) {
			Integer tmp = target - nums[i];
			if (map.containsKey(tmp)) {
				return new int[]{map.get(tmp), i};
			}
			map.put(nums[i], i);
		}
		return new int[]{0};
	}
}若在表 A 中的某一列设置了外键,在表 A 的这一列中的数据必须来自你设置的外键的来源(这个来源可以是本表,或者是其他表),不然无法设置成功。
| 类型 | 作用 |
|---|---|
| RESTRICT | 默认类型,不指定时默认使用这种类型,等同于 NO ACTION |
| CASCADE | 跟随外键改动 |
| SET NULL | 设为空值 |
| NO ACTION | 无动作 |
使用 @interface 就可以自定义注解,Java 也给我们提供了一些元注解。
在 spring boot 中可以利用 aop (面向侧面的程序设计 aspect-oriented programming)简化处理自定义注解。spring boot 使用 aop 需要导入如下依赖。
        <dependency>
            <groupId>org.springframework.boot</groupId>
            <artifactId>spring-boot-starter-aop</artifactId>
        </dependency>
自定义注解使用如下
@Target({ ElementType.PARAMETER, ElementType.METHOD })
@Retention(RetentionPolicy.RUNTIME)
@Documented
public @interface Log {}@Target@Retention@Documented@Inherited元注解作用在其他注解上时,不需要每个都使用。
标识注解的使用范围,多个范围用花括号括起来即可。
使用:@Target({ElementType.PARAMETER, ElementType.METHOD })
| 类型 | 范围 |
|---|---|
| ElementType.TYPE | 接口、类、枚举、注解 |
| ElementType.FIELD | 字段、枚举的常量 |
| ElementType.METHOD | 方法 |
| ElementType.PARAMETER | 方法参数 |
| ElementType.CONSTRUCTOR | 构造函数 |
| ElementType.LOCAL_VARIABLE | 局部变量 |
| ElementType.ANNOTATION_TYPE | 注解 |
| ElementType.PACKAGE | 包 |
使用了该注解,就会包含在 Javadoc 中。
使用了该注解,子类可以继承父类的注解。
一般指的是 extents,接口不算继承,只能说是实现(implement)。
注解的保留策略,只能选一。
使用: @Retention(RetentionPolicy.SOURCE)
| 类型 | 范围 |
|---|---|
| RetentionPolicy.SOURCE | 只作用在 代码 中,字节码(Class)中不存在 |
| RetentionPolicy.CLASS | default,@retention 默认策略,只在字节码中存在 |
| RetentionPolicy.RUNTIME | 字节码中存在,运行的时候可以用 反射 得到 |
给定一个 Weather 表,编写一个 SQL 查询,来查找与之前(昨天的)日期相比温度更高的所有日期的 Id。
+---------+------------------+------------------+
| Id(INT) | RecordDate(DATE) | Temperature(INT) |
+---------+------------------+------------------+
|       1 |       2015-01-01 |               10 |
|       2 |       2015-01-02 |               25 |
|       3 |       2015-01-03 |               20 |
|       4 |       2015-01-04 |               30 |
+---------+------------------+------------------+
例如,根据上述给定的 Weather 表格,返回如下 Id:
+----+
| Id |
+----+
|  2 |
|  4 |
+----+
mysql
题目不是很难,就是有一个函数需要了解一下,TO_DAYS 给定一个日期 date,返回一个天数(年份从0开始的天数)。第一次直接拿两个值进行比较,挂了一次。和日期有关的值,记得使用 TO_DAYS。
select b.Id from
Weather a inner join Weather b
on TO_DAYS(a.RecordDate) = TO_DAYS(b.RecordDate) - 1
where b.Temperature > a.Temperature最近将之前看的 RESTful API 设计指南翻出来重新看了一下,根据这阵子做的项目,总结一下。
资源
https://demo.com/api/users 代表所有用户这个群体,你可以对 /users 进行一系列操作。资源 一般是一个集合,所以最好用 复数。数据库和 HTTP 请求对应如下
| 数据库 | HTTP 动词 |
|---|---|
| 增 (insert) | POST |
| 删 (delete) | DELETE |
| 改 (update) | 修改分为 全量 更新,和 局部 更新。 如果全部更新,用 PUT,如果是局部更新,用 PATHCH |
| 查 (select) | GET |
以 https://demo.com/api/users 为例。
| link | HTTP 动词 | 效果 |
|---|---|---|
| /api/users | GET | 列出 user 的信息 |
| /api/users | POST | 添加 user 信息 |
| /api/users/id | DELETE | 删除某个 user |
| /api/users/id | PUT | 更新该 user 的全部信息 |
| /api/users/id | PATCH | 更新该 user 的部分信息 |
| 状态码 | 信息 |
|---|---|
| 200 | 成功 |
| 401 | 权限不足,无权限,可用在登录时密码错误 |
| 403 | 没有权限访问,和 401 有点区别 管理员权限可观看所有用户信息,当普通用户权限请求这个接口,就可以返回 403 状态码 |
| 404 | 资源未找到,没登录状态时,应该显示 404,而不使用 401 或 403 |
| 500 | 服务器内部错误 |
最近从 redis 数据库中获得一些数据,数据非主要部分已做处理。数据如下:
[{
	"Path": "MTBA",
	"Timestamp": "636948697749377910",
	"Current": "27.384489640391596"
}, {
	"Path": "temperature",
	"Timestamp": "636948697738137200",
	"Current": "27.899760796418597"
}]
有点让我好奇的是 Timestamp 字段的数据值,咋一看,不是时间戳,也有点不太确定是不是,之前写过一篇关于时间戳的文章 #52
难道是纳米级的时间戳么?把当前时间转换成纳米级时间戳,发现对应不上;利用 JS 计算一下长度,排除了是时间戳,压根没对应。
> "636948697749377910".length
< 18
上谷歌搜了一下关键词 十八位 时间戳,2333,找到了线索,原来是和 C# 的 DateTime 有关。
DateTime值类型表示日期和时间的值范围从 00:00:00 (午夜),1 月 1 日 0001 午夜 11:59:59 止 (基督纪元) 通过 11:59:59 PM,到公元 9999 年 12 月 31 日 (C.E.)在公历。
那怎么把 DateTime.Ticks 转成 时间戳 或者 当前时区的时间呢?后来发现 JS 就可以做到了。一句就可以搞定。
> Date(636948697749377910)
< "Sat Jun 01 2019 00:11:38 GMT+0800 (China Standard Time)"
在找这个问题的过程中还发现了一个有趣的问题,日本立法年号改变了(平成变成了令和)。那岂不是会影响日历的程序。23333
Employee 表包含所有员工,他们的经理也属于员工。每个员工都有一个 Id,此外还有一列对应员工的经理的 Id。
+----+-------+--------+-----------+
| Id | Name  | Salary | ManagerId |
+----+-------+--------+-----------+
| 1  | Joe   | 70000  | 3         |
| 2  | Henry | 80000  | 4         |
| 3  | Sam   | 60000  | NULL      |
| 4  | Max   | 90000  | NULL      |
+----+-------+--------+-----------+
给定 Employee 表,编写一个 SQL 查询,该查询可以获取收入超过他们经理的员工的姓名。在上面的表格中,Joe 是唯一一个收入超过他的经理的员工。
+----------+
| Employee |
+----------+
| Joe      |
+----------+
利用内连接,若该员工为经理,则他的 ManagerId 为 null,
当 员工的 ManagerId = 经理的 Id 时,说明为员工,
Managerld 为 null,内连接不会成立。
连接成功后,剩下的都是有经理的员工,只需要判断他的薪水高于经理的薪水即可。
使用 > 或者 >= 都可以通过。
mysql
select a.Name Employee

from Employee a inner join Employee b

on a.ManagerId = b.Id

and a.Salary > b.SalarygVim Windows 环境。
gg VG:+y:%y+pycharm 重构常用快捷键
| 快捷键 | 用途 |
|---|---|
| CTRL + ALT + M | 将选取的代码提取成函数 |
| CTRL + ALT + V | 将选取的代码段赋值给一个变量 |
| bytes | str | |
|---|---|---|
| 序列 | 字节序列,字节没有编码这一说法,和进制更没有任何关系 | 文本序列,因此存在编码 |
| 编码 | 无编码 | py3 默认是 utf-8,其他编码如 gbk,ascii ... |
| 标记 | 用 b'' 包含 |
用 '' 或者 "" 包含 |
| 转换 | bytes.decode() 转换成 str |
str.encode() 转换成 bytes |
| 修改 | 不可以被修改,会抛异常 | 可修改,有很多方法,如 replace() ... |
bytes.decode() 可能会出错,因为 utf-8 等编码可能无法解码一些字节print(bytes) 可以显示正常解码的部分str 和 bytes 没有任何关系,不过你可以利用已有的方法将他们进行转换利用 binascii 库,可以将 str 转为 十六进制,不过是保存在 bytes 中,我们如果要处理需要将 bytes 转为 str。
测试代码如下
if __name__ == '__main__':
	test = 'admin'
	print(type(test))
	x = binascii.b2a_hex(test.encode('ascii'))
	print(type(x))
	print(x)
	string = x.decode()
	print(type(string))
	print(string)
	result = re.sub("(..)", r"0x\1 ", string, 0, re.MULTILINE)
	print(result)
运行结果
<class 'str'>
<class 'bytes'>
b'61646d696e'
<class 'str'>
61646d696e
0x61 0x64 0x6d 0x69 0x6e
将形如 0x00 和 \x00 的字符串编码转换成 str 。
python 中的 十六进制 是 \x00, 使用之前得想转成 \x00 格式。
def to_bytes(data: str) -> str:
	data = data.replace('0x', '\\x')
	return str.encode(data, encoding='utf-8').decode()


if __name__ == '__main__':
	data = '\x4D\x51\x54\x54'
	print(to_bytes(data=data))
def encode(s):
    return ' '.join([bin(ord(c)).replace('0b', '') for c in s])

def decode(s):
    return ''.join([chr(i) for i in [int(b, 2) for b in s.split(' ')]])

>>>encode('hello')
'1101000 1100101 1101100 1101100 1101111'
>>>decode('1101000 1100101 1101100 1101100 1101111')
'hello'python 中 十六进制 是以 0x \x 开头
八进制是以 0o 开头
二进制是以 0b 开头
>>> hex(1024)
'0x400'
>>> bin(1024)
'0b10000000000'
>>> oct(1024)
'0o2000'
>>> int('0x1024', 16)
4132
>>> bin(int('0x1024', 16))
'0b1000000100100'
>>> oct(0x1024)
'0o10044'
>>> int('1024', 8)
532
>>> hex(int('1024', 8))
'0x214'
>>> bin(int('1024', 8))
'0b1000010100'
>>> int('1010', 2)
10
>>> oct(0b1010)
'0o12'
>>> hex(int('1010', 2))
'0xa'
我觉得看一下知乎上关于 Python 编码的讨论。https://www.zhihu.com/question/31833164
题库链接
http://acm.two.moe:808/JudgeOnline/
Linux 内核代码风格(供参考
https://www.kernel.org/doc/html/v4.13/translations/zh_CN/coding-style.html
1092: 输入输出练习之A+B(1)
题目描述
计算a+b

输入
若干组测试数据,每组测试数据占一行,包含2个整数a和b,空格隔开。

输出
对于每组测试数据,输出占一行,结果为a+b的和。

样例输入
1 5
10 20
样例输出
6
30
#include <stdio.h>
int main(void)
{
	int a, b;
	while (~scanf("%d %d", &a, &b)) {
		printf("%d\n", a + b);
	}
	return 0;
}

//#include <stdio.h>
//int main(void)
//{
//	int a, b;
//	while (scanf("%d %d", &a, &b) != EOF) {
//		printf("%d\n", a + b);
//	}
//	return 0;
//}
1093: 输入输出练习之A+B(2)
题目描述
计算a+b
输入
第一行为一个整数n,接下来有n行。每行包含2个整数a和b,空格隔开。
输出
对于每对a和b,计算它们的和,并占一行输出。
样例输入
2
1 5
10 20
样例输出
6
30
#include <stdio.h>
int main(void)
{
  	int t;
  	scanf("%d", &t);
  	while (t--) {
		int a, b;
		scanf("%d %d", &a, &b);
		printf("%d\n", a + b);
    }
	return 0;
}
1094: 输入输出练习之A+B(3)
题目描述
计算a+b
输入
输入包含多组测试用例。每组用例占一行,包含2个整数a和b。最后一组用例为0 0,表示输入结束,该用例不需要处理。
输出
对于每组输入用例,输入a+b的和,占一行。
样例输入
1 5
10 20
0 0
样例输出
6
30
#include <stdio.h>
int main(void)
{
	int a, b;
	while (~scanf("%d %d", &a, &b) ) {
      	if (a == 0 && b == 0) {
        	break;
      	}
		printf("%d\n", a + b);
	}
	return 0;
}

//#include <stdio.h>
//int main(void)
//{
//#ifdef _DEBUG
//	freopen("in.txt", "r", stdin);
//	//freopen("out.txt", "w", stdout);
//#endif // _DEBUG
//	int a, b;
//	while (~scanf("%d %d", &a, &b) && (a || b)) {
//		printf("%d\n", a + b);
//	}
//	return 0;
//}
1095: 输入输出练习之A+B(4)
题目描述
计算整数的和。
输入
输入包含多组测试用例。每组用例占一行,每行第一个整数为n,接下来有n个整数。以0开头的用例表示输入结束,该组用例不需要处理。
输出
对于每组测试用例,计算该用例中n个整数的和,占一行输出。
样例输入
4 1 2 3 4
5 1 2 3 4 5
0
样例输出
10
15
#include <stdio.h>
int main(void)
{
    int t;
    while (scanf("%d", &t) && t) {
        int n;
        int sum = 0;
        for (int i = 0; i < t; i++) {
            scanf("%d", &n);
            sum += n;
            if (sum == 0) {
                break;
            }
        }
        printf("%d\n", sum);
    }
    return 0;
}
1096: 输入输出练习之A+B(5)
题目描述
计算整数的和。
输入
第一行为一个整数n,接下来有n行。每一行第一个整数为m,该行接下来有m个整数。
输出
对于每组测试用例,计算m个整数的和,输出占一行。
样例输入
2
4 1 2 3 4
5 1 2 3 4 5
样例输出
10
15
#include <stdio.h>
int main(void)
{
	int t;
	scanf("%d", &t);
	while (t--) {
		int n;
		scanf("%d", &n);
		int x;
		int num = 0;
		for (int i = 0; i < n; i++) {
			scanf("%d", &x);
			num += x;
		}
		printf("%d\n", num);
	}
	return 0;
}
1097: 输入输出练习之A+B(6)
题目描述
计算整数的和。
输入
输入包含多组测试用例,每组用例占一行。每组用例第一个整数为n,接下来该行有n个整数。
输出
对于每组用例,计算n个整数的和,占一行输出。
样例输入
4 1 2 3 4
5 1 2 3 4 5
样例输出
10
15
#include <stdio.h>
int main(void)
{
	int n;
	while (~scanf("%d", &n)) {
		int x;
		int num = 0;
		for (int i = 0; i < n; i++) {
			scanf("%d", &x);
			num += x;
		}
		printf("%d\n", num);
	}
	return 0;
}
1098: 输入输出练习之A+B(7)
题目描述
计算a+b
输入
输入包含多组数据,每组占一行。每一行有2个整数a和b,空格隔开。
输出
对于每组数据,计算a+b的和,然后输出一个空行。
样例输入
1 5
10 20
样例输出
6
30
#include <stdio.h>
int main(void)
{
	int a, b;
	while (~scanf("%d %d", &a, &b)) {
		printf("%d\n\n", a + b);
	}
	return 0;
}
1099: 输入输出练习之A+B(8)
题目描述
计算整数的和。
输入
输入第一行为一个整数n,接下来有n行。每一行开头有一个整数m,接下来有m个整数。
输出
对于每组数据,输出m个整数的和。同时每组输出之间有一个空行。
样例输入
3
4 1 2 3 4
5 1 2 3 4 5
3 1 2 3
样例输出
10
15
6
#include <stdio.h>
int main(void)
{
#ifdef _DEBUG
	freopen("in.txt", "r", stdin);
	freopen("out.txt", "w", stdout);
#endif // _DEBUG

	int n;
	scanf("%d", &n);
	int falg = 0;
	while (n--) {
		int t;
		scanf("%d", &t);
		int x;
		int sum = 0;
		for (int i = 0; i < t; i++) {
			scanf("%d", &x);
			sum += x;
		}
		printf("%d%s", sum, n == 0 ? "" : "\n\n");
	}
	return 0;
}骄傲的使用 谷歌翻译
原文链接 https://docs.jboss.org/hibernate/orm/5.2/userguide/html_single/chapters/domain/naming.html
不想看原文的话,最后我会说下的理解。
对象模型到关系数据库的映射的一部分是将对象模型中的名称映射到相应的数据库名称。 Hibernate 将此视为两阶段过程:
@Column 或 @Table),也可以由 Hibernate 通过 ImplicitNamingStrategy 隐式确定。PhysicalNamingStrategy 定义的物理名称。之前 Hibernate 只定义了一个 org.hibernate.cfg.NamingStrategy 。这个单一的 NamingStrategy 现在已经拆成ImplicitNamingStrategy 和 PhysicalNamingStrategy。
此外,NamingStrategy 通常不够灵活,无法正确应用给定的命名“规则”,因为 API 缺乏可供决定的信息,或者因为 API 实际上没有得到很好的定义。
由于这些限制,org.hibernate.cfg.NamingStrategy 已被弃用,然后被删除,转而使用 ImplicitNamingStrategy 和 PhysicalNamingStrategy 。
每种命名策略背后的想法是最小化数量,开发人员必须提供的重复信息,用于映射域模型。
JPA 定义了关于隐式逻辑名称确定的固有规则。如果 JPA 提供程序可移植性是一个主要问题,或者您真的喜欢 JPA 定义的隐式命名规则,请务必坚持使用 ImplicitNamingStrategyJpaCompliantImpl(默认值)
此外,JPA 定义逻辑名称和物理名称之间没有分离。遵循 JPA 规范,逻辑名称是物理名称。如果 JPA 提供程序可移植性很重要,应用程序应该不要指定 PhysicalNamingStrategy 。
当实体没有显式命名它映射到的数据库表时,我们需要隐式确定该表名。或者,当某个特定属性没有显式命名它映射到的数据库列时,我们需要隐式确定该列名。当映射未提供显式名称时, org.hibernate.boot.model.naming.ImplicitNamingStrategy 用于确定逻辑名称。
Hibernate定义了多个 ImplicitNamingStrategy 实现。应用程序也可以免费插入自定义实现。
有多种方法可以指定要使用的 ImplicitNamingStrategy 。首先,应用程序可以使用 hibernate.implicit_naming_strategy 配置设置来指定实现,该设置接受:
org.hibernate.boot.model.name.ImplicitNamingStrategyJpaCompliantImpl jpa 的别名org.hibernate.boot.model.naming.ImplicitNamingStrategyJpaCompliantImpl 符合 JPA 2.0 标准的命名策略org.hibernate.boot.model.naming.ImplicitNamingStrategyLegacyHbmImpl 符合原始的 Hibernate 命名策略org.hibernate.boot.model.naming.ImplicitNamingStrategyLegacyJpaImpl 符合为 JPA 1.0开发的旧版命名策略,遗憾的是,在很多方面,隐式命名规则都不清楚org.hibernate.boot.model.naming.ImplicitNamingStrategyComponentPathImpl 主要遵循ImplicitNamingStrategyJpaCompliantImpl 规则,除了它使用完整的复合路径,而不仅仅是结束属性部分org.hibernate.boot.model.naming.ImplicitNamingStrategy 类的引用org.hibernate.boot.model.naming.ImplicitNamingStrategy 的类的 FQN其次,应用程序和集成可以利用 org.hibernate.boot.MetadataBuilder#applyImplicitNamingStrategy 来指定要使用的 ImplicitNamingStrategy。有关引导的其他详细信息,请参阅 Bootstrap。
许多组织围绕数据库对象(表,列,外键等)的命名定义规则。 PhysicalNamingStrategy 的想法是帮助实现这样的命名规则,而不必通过显式名称将它们硬编码到映射中。
虽然 ImplicitNamingStrategy 的目的是确定名称为 accountNumber 的属性在未明确指定时映射到 accountNumber 的逻辑列名称,PhysicalNamingStrategy 的目的是,例如,假设物理列名称应缩写为 acct_num 。
确实,在这种情况下,acct_num 的解析可以在 ImplicitNamingStrategy 中处理。但重点是分离关注点。无论属性是否明确指定列名,或者我们是否隐式确定,都将应用 PhysicalNamingStrategy 。仅当未给出显式名称时,才会应用ImplicitNamingStrategy 。所以它取决于需求和意图。
默认实现是简单地使用逻辑名称作为物理名称。但是,应用程序和集成可以定义此 PhysicalNamingStrategy 合同的自定义实现。以下是一个名为 Acme Corp 的虚构公司的 PhysicalNamingStrategy 示例,其命名标准是:
示例1. PhysicalNamingStrategy 实现示例
/*
 * Hibernate, Relational Persistence for Idiomatic Java
 *
 * License: GNU Lesser General Public License (LGPL), version 2.1 or later.
 * See the lgpl.txt file in the root directory or <http://www.gnu.org/licenses/lgpl-2.1.html>.
 */
package org.hibernate.userguide.naming;

import java.util.LinkedList;
import java.util.List;
import java.util.Locale;
import java.util.Map;
import java.util.TreeMap;

import org.hibernate.boot.model.naming.Identifier;
import org.hibernate.boot.model.naming.PhysicalNamingStrategy;
import org.hibernate.engine.jdbc.env.spi.JdbcEnvironment;

import org.apache.commons.lang3.StringUtils;

/**
 * An example PhysicalNamingStrategy that implements database object naming standards
 * for our fictitious company Acme Corp.
 * <p/>
 * In general Acme Corp prefers underscore-delimited words rather than camel casing.
 * <p/>
 * Additionally standards call for the replacement of certain words with abbreviations.
 *
 * @author Steve Ebersole
 */
public class AcmeCorpPhysicalNamingStrategy implements PhysicalNamingStrategy {
	private static final Map<String,String> ABBREVIATIONS = buildAbbreviationMap();

	@Override
	public Identifier toPhysicalCatalogName(Identifier name, JdbcEnvironment jdbcEnvironment) {
		// Acme naming standards do not apply to catalog names
		return name;
	}

	@Override
	public Identifier toPhysicalSchemaName(Identifier name, JdbcEnvironment jdbcEnvironment) {
		// Acme naming standards do not apply to schema names
		return name;
	}

	@Override
	public Identifier toPhysicalTableName(Identifier name, JdbcEnvironment jdbcEnvironment) {
		final List<String> parts = splitAndReplace( name.getText() );
		return jdbcEnvironment.getIdentifierHelper().toIdentifier(
				join( parts ),
				name.isQuoted()
		);
	}

	@Override
	public Identifier toPhysicalSequenceName(Identifier name, JdbcEnvironment jdbcEnvironment) {
		final LinkedList<String> parts = splitAndReplace( name.getText() );
		// Acme Corp says all sequences should end with _seq
		if ( !"seq".equalsIgnoreCase( parts.getLast() ) ) {
			parts.add( "seq" );
		}
		return jdbcEnvironment.getIdentifierHelper().toIdentifier(
				join( parts ),
				name.isQuoted()
		);
	}

	@Override
	public Identifier toPhysicalColumnName(Identifier name, JdbcEnvironment jdbcEnvironment) {
		final List<String> parts = splitAndReplace( name.getText() );
		return jdbcEnvironment.getIdentifierHelper().toIdentifier(
				join( parts ),
				name.isQuoted()
		);
	}

	private static Map<String, String> buildAbbreviationMap() {
		TreeMap<String,String> abbreviationMap = new TreeMap<> ( String.CASE_INSENSITIVE_ORDER );
		abbreviationMap.put( "account", "acct" );
		abbreviationMap.put( "number", "num" );
		return abbreviationMap;
	}

	private LinkedList<String> splitAndReplace(String name) {
		LinkedList<String> result = new LinkedList<>();
		for ( String part : StringUtils.splitByCharacterTypeCamelCase( name ) ) {
			if ( part == null || part.trim().isEmpty() ) {
				// skip null and space
				continue;
			}
			part = applyAbbreviationReplacement( part );
			result.add( part.toLowerCase( Locale.ROOT ) );
		}
		return result;
	}

	private String applyAbbreviationReplacement(String word) {
		if ( ABBREVIATIONS.containsKey( word ) ) {
			return ABBREVIATIONS.get( word );
		}

		return word;
	}

	private String join(List<String> parts) {
		boolean firstPass = true;
		String separator = "";
		StringBuilder joined = new StringBuilder();
		for ( String part : parts ) {
			joined.append( separator ).append( part );
			if ( firstPass ) {
				firstPass = false;
				separator = "_";
			}
		}
		return joined.toString();
	}
}
有多种方法可以指定要使用的 PhysicalNamingStrategy。首先,应用程序可以使用 hibernate.physical_naming_strategy 配置设置指定实现,该设置接受:
org.hibernate.boot.model.naming.PhysicalNamingStrategy 类的引用org.hibernate.boot.model.naming.PhysicalNamingStrategy 类的FQN其次,应用程序和集成可以利用 org.hibernate.boot.MetadataBuilder#applyPhysicalNamingStrategy。有关引导的其他详细信息,请参阅Bootstrap。
首先也就是 Hibernate 中的 NamingStrategy 已经被 ImplicitNamingStrategy 和 PhysicalNamingStrategy取代。
PhysicalNamingStrategyStandardImpl不做修改,直接映射SpringPhysicalNamingStrategy 首字母小写,大写字母变为下划线加小写org.hibernate.boot.model.naming.ImplicitNamingStrategyJpaCompliantImpl 符合 JPA 2.0 标准的命名策略org.hibernate.boot.model.naming.ImplicitNamingStrategyLegacyHbmImpl 符合原始的 Hibernate 命名策略org.hibernate.boot.model.naming.ImplicitNamingStrategyLegacyJpaImpl 符合为 JPA 1.0开发的旧版命名策略,遗憾的是,在很多方面,隐式命名规则都不清楚org.hibernate.boot.model.naming.ImplicitNamingStrategyComponentPathImpl 主要遵循ImplicitNamingStrategyJpaCompliantImpl 规则,除了它使用完整的复合路径,而不仅仅是结束属性部分几个属性的例子可以参考这个链接 https://stackoverflow.com/questions/41267416/hibernate-5-naming-strategy-examples
在 Spring Boot 中的 application.yml 建议做如下配置。
spring:
  jpa:
    hibernate:
      naming:
        physical-strategy: org.springframework.boot.orm.jpa.hibernate.SpringPhysicalNamingStrategy
implicit-strategy: org.hibernate.boot.model.naming.ImplicitNamingStrategyComponentPathImplGet-flagimport base64
import requests
if __name__ == '__main__':
url = 'http://118.89.138.44:10003/index.php'
r = requests.post(url=url)
source = base64.b64decode(r.headers['Get-flag'])
print(source)
print(r.cookies.get_dict())
r = requests.post(url=url, data={'zsctf': source},
cookies=r.cookies.get_dict())
print(r.text)cookies 要是存在了,也就是你设置了,再去请求同一个网站,是不会返回 cookie,因为 cookies 已经存在requests.cookies.get_dict() 将请求后得到的 cookies 格式化成一个 dict。编写一个 SQL 查询来实现分数排名。如果两个分数相同,则两个分数排名(Rank)相同。请注意,平分后的下一个名次应该是下一个连续的整数值。换句话说,名次之间不应该有“间隔”。
+----+-------+
| Id | Score |
+----+-------+
| 1  | 3.50  |
| 2  | 3.65  |
| 3  | 4.00  |
| 4  | 3.85  |
| 5  | 4.00  |
| 6  | 3.65  |
+----+-------+
例如,根据上述给定的 Scores 表,你的查询应该返回(按分数从高到低排列):
+-------+------+
| Score | Rank |
+-------+------+
| 4.00  | 1    |
| 4.00  | 1    |
| 3.85  | 2    |
| 3.65  | 3    |
| 3.65  | 3    |
| 3.50  | 4    |
+-------+------+
原先的想法使用 SQL 里面的变量来做的,然后点执行代码的时候发现过不去,就放弃了这种想法。
使用 count 计数, distinct 去重,比较两个分数,在利用 order by 进行排序即可。
mysql
select s.Score, (select count(distinct s1.Score)

	from Scores s1 where s1.Score >= s.Score) Rank

from Scores s order by s.Score desc;
测试成功后,发现用的时间有点长……
我看了一下其他人的提交,找了执行用时较少的代码看,居然发现他们是使用变量,而且思路更简单。
(其实执行代码那里使用变量测试不通过,但是直接提交一发,就知道是不是正确了。
思路如下
预选设置一个分数,实际生活中是不存在负的分数的,因此选一个负数的值作为预置的分数即可。
rank 的起始为 0,递增即可。
rank 递增的条件:等于上一次的 rank,加上判断分数是否等于上一次的分数。
比较的两个值不相等就是 1,就递增,如果相等,就不递增。
@cur_rank := @cur_rank + (@pre_score != (@pre_score := s.Score))

相当于

@tmp1 = (@pre_score := s.Score);

@tmp2 = @pre_score != tmp; // 值只会是 0 或者 1

@cur_rank = @cur_rank + tmp2;
set @pre_score = -324234;

set @cur_rank = 0;

select s.Score, (@cur_rank := @cur_rank + (@pre_score != (@pre_score := s.Score))) Rank

from Scores s order by 1 desc;------------------------- 2018.05.09 update -------------------------------------
强烈安利用 Vim ,再加上配置 Makefile ,写起来更方便,保存直接编译成 hex 文件。
------------------------- 2018.05.09 update -------------------------------------
AVR 开发环境很简单,老师让我们使用的是 ICC AVR 这个软件,基于 Mega16。
AVR 开发软件链接:AVR开发软件下载
界面如上
个人是觉得这个界面很简单,对于一个强迫症患者来说,颜值第一,再考虑实用性,可惜这个软件,这两点都达不到。
我觉得写代码也要写的舒适一点,为革命保护视力,给 Visual Studio 换颜色 ,这个是之前看的文章。我觉得一个好的编译器配色方案,可以让人写代码更加舒服。
下面介绍如何用 vscode 写 avr 程序并编译成 hex 文件。
先安装好 ICC AVR ,接着找到 ICC AVR 安装路径。打开 bin 文件夹,复制该文件夹的路径。
假设路径为 D:\iccv7avr\bin
其实和配置 Java 和 Python 环境变量差不多。
电脑(右键) - 属性 - 高级系统设置 - 环境变量 - 系统变量 - Path - 新建 - 粘贴 bin 路径 - 保存 - 退出。
打开 cmd ,输入 imakew ,若出现以下信息则说明配置成功。
D:\iccv7avr\bin\imakew.exe: Can't open makefile
安装 vscode 的过程就省了,官网就可以下载安装即可。
新建一个文件夹,名字任意。
vscode 打开该文件夹。
接着创建三个文档。
main.o
CC = iccavr
LIB = ilibw
CFLAGS =  -e -D__ICC_VERSION=722 -DATMega16  -l -g -MLongJump -MHasMul -MEnhanced -Wf-const_is_flash -DCONST=""
ASFLAGS = $(CFLAGS)
LFLAGS =  -g -e:0x4000 -ucrtatmega.o -bfunc_lit:0x54.0x4000 -dram_end:0x45f -bdata:0x60.0x45f -dhwstk_size:16 -beeprom:0.512 -fihx_coff -S2
FILES = main.o

FIRST:	$(FILES)
	$(CC) -o FIRST $(LFLAGS) @FIRST.lk   -lcatm128
main.o: D:\iccv7avr\include\iom16v.h D:\iccv7avr\include\macros.h D:\iccv7avr\include\AVRdef.h
main.o:	main.c
	$(CC) -c $(CFLAGS) main.c
D:\iccv7avr\include\iom16v.h D:\iccv7avr\include\macros.h D:\iccv7avr\include\AVRdef.h 这个
include的路径要修改成安装 avr 的目录。
该文件为什么要这样子配置,前半部分是单片机的一些配置,后半部分类似Makefile,有兴趣可以去了解一下。
/*
imakew -f FIRST.mak
*/
#include <iom16v.h>
#include <macros.h>

int main(void)
{
	return 0;
}
按下 ctrl + ` 快捷键,打开终端,或者从 vscode 界面下方拉起。
在该文件夹的目录下,输入以下命令 imakew -f FIRST.mak ,即可编译成功。成功编译的截图如下
回到项目工程的文件夹,会发现生成了一下其他的文件,其中就包括了后缀名为 hex 的文件。
修改 main.c 文件的内容,保存后使用刚才的编译命令即可编译生成新的文件。其实这个过程和用 Java 写代码,然后用命令行编译 Java 过程类似。
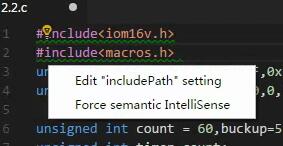
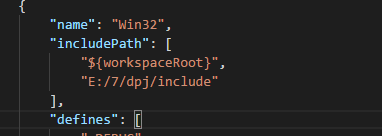
为啥用链接头文件库?因为强迫症,头文件下方有波浪线,受不了。
把鼠标放到头文件处,如下图。
点击 Edit "includePath" setting ,弹出配置文件,,找到 name: "Win32" ,如下图。
在 includepath 的最后面添加 ivvavr 的 include 文件夹,记得配置好了之后记得保存。
假设路径为 E:/7/dpj/include
最后一个建议,开启 vscode 的自动保存功能。这样子就不需要每一次写完就 Ctrl + S 。那只要写完之后,在下方的 shell 编译成 hex 即可。(很容易没保存,然后生成的 hex 文件和上一次一样。
开启方法: 文件 - 自动保存
这样子就链接到了 avr 的头文件库了。这样子就可以在 vscode 愉快的写 avr 代码。
vscode and vcc 对比图
个人猜想:这个问题和 cookie 有关,谷歌账号的 cookie 被清。
Hello,
I have found this work-around
In the affected Chrome account, open a blank tab and type the following:
chrome://flags/#account-consistency
In the drop-down box on the right, choose "disable."
Now, relaunch the browser.
NOTE:
Chrome Flags are Experimental Features
Please check out Chrome's Flag disclaimer before continuing.
Kindly type the following in Chrome omnibox to view the disclaimer: chrome://flags/
Best,
Ms. Drasby谷歌论坛看到的,以上为原话
https://productforums.google.com/d/msg/chrome/s3v4yG1uAcY/J7UPRWHfAgAJ
意思也就是打开 chrome://flags/#account-consistency,把高亮的设置改为 disable,重启 Chrome 即可。
设置里面,把自己的谷歌账号关闭,并 将设置还原为原始模式设置。
重启 Chrome,再次登录自己的谷歌账号即可。
打开 chrome://settings/content/cookies ,仅将本地数据保留到您退出浏览器为止 取消勾选。重启 Chrome 即可。
表1: Person
+-------------+---------+
| 列名         | 类型     |
+-------------+---------+
| PersonId    | int     |
| FirstName   | varchar |
| LastName    | varchar |
+-------------+---------+
PersonId 是上表主键
表2: Address
+-------------+---------+
| 列名         | 类型    |
+-------------+---------+
| AddressId   | int     |
| PersonId    | int     |
| City        | varchar |
| State       | varchar |
+-------------+---------+
AddressId 是上表主键
编写一个 SQL 查询,满足条件:无论 person 是否有地址信息,都需要基于上述两表提供 person 的以下信息:
FirstName, LastName, City, State
这题目主要的一个点为 person 不管是否有地址信息,都要显示出来,其实这句话就有嗅到一点左右连接的味道。一个左连接搞定。
mysql
select FirstName, LastName, City, State

from Person p left join Address a

on p.PersonId = a.PersonId;记录一下最近使用 Git 踩过的坑。
将项目 clone 下来之后就直接在 master 分支上操作,忘记切换到 dev 分支去了,gg,还提交了几个分支。
拯救方法如下。
git cherry-pick af2279b git checkout devgit cherry-pick af2279b 6a498ecgit cherry-pick 后面可以带多个 commit,这样子就可以把提交到 master 的错误 commit,移到 dev 分支。
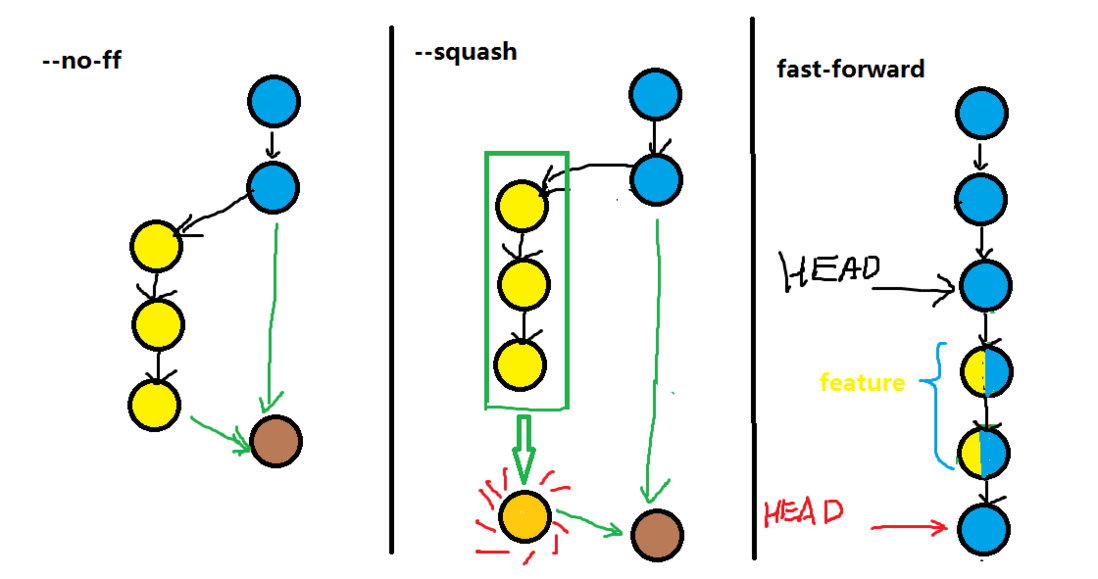
--no-ff指的是强行关闭fast-forward方式。fast-forward方式就是当条件允许的时候,git直接把HEAD指针指向合并分支的头,完成合并。属于“快进方式”,不过这种情况如果删除分支,则会丢失分支信息。因为在这个过程中没有创建commit
git merge --squash是用来把一些不必要commit进行压缩,比如说,你的feature在开发的时候写的commit很乱,那么我们合并的时候不希望把这些历史commit带过来,于是使用--squash进行合并,此时文件已经同合并后一样了,但不移动HEAD,不提交。需要进行一次额外的commit来“总结”一下,然后完成最终的合并。总结:
--no-ff:不使用fast-forward方式合并,保留分支的commit历史
--squash:使用squash方式合并,把多次分支commit历史压缩为一次
我感觉别人已经说的很好了,就不重复造轮子了。
Employee 表包含所有员工信息,每个员工有其对应的 Id, salary 和 department Id。
+----+-------+--------+--------------+
| Id | Name  | Salary | DepartmentId |
+----+-------+--------+--------------+
| 1  | Joe   | 70000  | 1            |
| 2  | Henry | 80000  | 2            |
| 3  | Sam   | 60000  | 2            |
| 4  | Max   | 90000  | 1            |
+----+-------+--------+--------------+
Department 表包含公司所有部门的信息。
+----+----------+
| Id | Name     |
+----+----------+
| 1  | IT       |
| 2  | Sales    |
+----+----------+
编写一个 SQL 查询,找出每个部门工资最高的员工。例如,根据上述给定的表格,Max 在 IT 部门有最高工资,Henry 在 Sales 部门有最高工资。
+------------+----------+--------+
| Department | Employee | Salary |
+------------+----------+--------+
| IT         | Max      | 90000  |
| Sales      | Henry    | 80000  |
+------------+----------+--------+
mysql
先用 group by 对 部门id 进行聚合,然后返回 最高的工资 和 对应的部门id。
select max(Salary) s, DepartmentId from Employee group by DepartmentId给这张表起个别名,如 tmp,然后使用表连接即可。
连接条件为 tmp 表中的最高工资等于 Employee 中的 salary,剩下的列项按要求列出即可。
select b.Name Department, e.Name Employee, e.Salary Salary

from Employee e, Department b, (select max(Salary) s, DepartmentId from Employee group by DepartmentId) c

where e.DepartmentId = b.Id and e.Salary = c.s and e.DepartmentId = c.DepartmentId; \ / : * ? " < > | 。\/\\\:\*\?\"\<\>\| 。- 。import re
def new_name(file_name):
return re.sub(r"[\/\\\:\*\?\"\<\>\|]", "-", file_name)function new_name(file_name) {
return file_name.replace(/[\|\/\\\:\?\"\<\>]/mg, "-");
}由于项目之前是使用 Nodejs 写的,数据存放在 Mongodb 中,为了保证切换到 Spring Boot 这边,数据保持一致性。而 Spring Data Mongo 在保存数据的过程中会加入 _class 字段。数据库中虽然没有这个字段还是可以正常读取的,但写入或者更新的时候,就默认给你添加这个字段。
去掉 Mongodb 写入时自动写入类名,写一个配置类即可。直接复制粘贴到项目中即可。已经过测试。
import org.springframework.context.annotation.Bean;
import org.springframework.context.annotation.Configuration;
import org.springframework.data.mongodb.MongoDbFactory;
import org.springframework.data.mongodb.core.convert.DbRefResolver;
import org.springframework.data.mongodb.core.convert.DefaultDbRefResolver;
import org.springframework.data.mongodb.core.convert.DefaultMongoTypeMapper;
import org.springframework.data.mongodb.core.convert.MappingMongoConverter;
import org.springframework.data.mongodb.core.mapping.MongoMappingContext;

/**
 * https://stackoverflow.com/questions/23517977/spring-boot-mongodb-how-to-remove-the-class-column
 */
@Configuration
public class MongoClassConverter {
    private final MongoDbFactory mongoDbFactory;
    private final MongoMappingContext mongoMappingContext;

    public MongoClassConverter(MongoDbFactory mongoDbFactory, MongoMappingContext mongoMappingContext) {
        this.mongoDbFactory = mongoDbFactory;
        this.mongoMappingContext = mongoMappingContext;
    }

    @Bean
    public MappingMongoConverter mappingMongoConverter() {
        DbRefResolver dbRefResolver = new DefaultDbRefResolver(mongoDbFactory);
        MappingMongoConverter converter = new MappingMongoConverter(dbRefResolver, mongoMappingContext);
        converter.setTypeMapper(new DefaultMongoTypeMapper(null));
        return converter;
    }

}
个人理解
利用 GitHub 的 api 接口,我们可以调用这个接口,访问所有人的 issue,返回的格式为 JSON。
https://api.github.com/repos/<your github name>/<your repositories>/issues<your github name> github 的用户名your repositories 要获取 issues 的仓库名-方式1
import requests
import json
import re


def new_name(file_name: str) -> str:
	"""
	将 [ \ / : * ? " < > | ] 替换成 [ - ]

	:param file_name: str
	:return: str
	"""
	return re.sub(r"[\/\\\:\*\?\"\<\>\|]", "-", file_name)


if __name__ == '__main__':
	# https://api.github.com/repos/<your github name>/<your repositories>/issues
	r = requests.get(
		url='https://api.github.com/repos/techial1042/blog/issues',
	)
	data = json.loads(r.text)
	for i in data:
		print(i['title'])
		with open(
			'%s.md' % new_name(file_name=i['title']),
			'w',
			encoding='utf-8'
		) as f:
f.write(i['body'])import requests
import json
import re
if __name__ == '__main__':
# https://api.github.com/repos/<your github name>/<your repositories>/issues
r = requests.get(url='https://api.github.com/repos/techial1042/blog/issues')
data = json.loads(r.text)
title = map(
lambda file_name: re.sub(r"[\/\\\:\*\?\"\<\>\|]", "-", file_name),
map(lambda this: this['title'], data)
)
body = map(lambda this: this['body'], data)
for (t, d) in zip(title, body):
with open('{}.md'.format(t), 'w', encoding='utf-8') as f:
f.write(d)
多台电脑同步 IDEA/PyCharm 配置。使用 ToolBox,然后登录 JetBrains 账号也是可以同步的。
GitHub 上创建一下新的仓库GitHub 的 setting 创建 token

把生成的值保存下来,等一下有用。

idea version 2018.3.2
+ 号。把刚才 Github 创建的仓库地址添加进去。
https://github.com/techial1042/ideaConfig.git 。点击 OK 退出 settings。仓库地址Overwrite Remotetoken 的值另一台电脑只需把仓库地址,和 token 填写好,点击 Overwrite Local/Merge 即可同步。


| 操作系统 | 换行符 |
|---|---|
| Unix 和 OS X | \n ,0x0A(LF) |
| Windows | \r\n,0x0D0A(CRLF) |
| 早期 Mac OS | \r,0x0D(CR) |
在 Git 中可以使用 AutoCRLF 和 SafeCRLF 对换行符进行设置。
以下是我个人使用配置。
# 拒绝提交包含混合换行符的文件
git config --global core.safecrlf true

# 提交时转换为LF,检出时不转换
git config --global core.autocrlf input
在多人团队协作中,我们可以使用添加 .gitattributes 文件来限定换行符。这个文件通常放在项目的根目录,也就是有 .git 文件夹的那个目录。
.gitattributes 每一行格式如下
要匹配的文件模式 属性1 属性2 ...
因此我们用如下格式来限定换行符
# 对于任意文件,当该文件的格式为 text,即文本时,在提交的时候,行尾自动转换成 lf。
* text eol=lf7z a <archive_name> [<file_name>...]
# fila_name 支持文件夹
# 将 后缀为 php 的文件压缩,压缩包的名称为 main.zip
7z a main.zip *.php
7z x <archive_name>

# 解压文件,逐层加压,目录结构不变
# 7z e 会改变目录结构。
7z x main.zip

7z x main.zip -o"test"
# 将文件解压出来,解压到 test 目录下
# -o 指定文件夹,和文件夹之间不能存在空格
7z t <archive_name>

# 测试 main.zip 压缩包
7z t main.zip7z d <archive_name> [<file_name>]
# 从 main.zip 中删除后缀名为 .php 的文件
7z t main.zip *.php7z l <archive_name>
# 查看 main.zip 包含的文件
7z l main.zip
大端模式,数据的高字节保存在内存的低地址中;
小端模式,数据的高字节保存在内存的高地址中。
首先,为什么会有小端字节序?
答案是,计算机电路先处理低位字节,效率比较高,因为计算都是从低位开始的。所以,计算机的内部处理都是小端字节序。(也就是从低位开始处理数据的称之为小端模式
但是,人类还是习惯读写大端字节序。所以,除了计算机的内部处理,其他的场合几乎都是大端字节序,比如网络传输和文件储存。
/*
 * 返回 1 / 0
 * 1 代表 小端
 * 0 代表 大端
 */
bool check()
{
	int value = 0x12345678;
	return (*((char *)&value) == 0x78);
}char *sz = "0123456789";
int *p = (int*)sz;
printf("%x\n",*++p);
// 字符'0'对应的十六进制是0x30,请问在x86环境下程序输出是多少?*++p 的运算顺序为:先 ++,后进行取值。int * 占四个字节*p 指向的是 sz 的首地址。计算机电路先处理低位字节,效率比较高,因为计算都是从低位开始的。所以,计算机的内部处理都是小端字节序。 。各字符对应地址如下:
0 1 2 3 4 5 6 7 8 9
0x30 0x31 0x32 0x33 0x34 0x35 0x36 0x37 0x38 0x39
因此打印 *++p 的地址,也就相当于打印 4567 的地址。也就是 0x37363534 。
------------ 2018.5.5 -----------------------
补充:该文章写得不够全面,只是一些简单的使用,我会抽时间继续写有关这个模块更加深入使用的文章。而这篇文章适合刚刚接触esp8266新人阅读。
#7
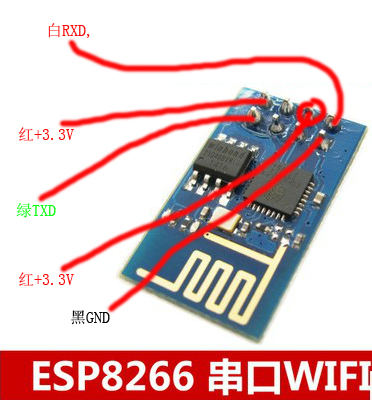
硬件
ESP8266 模块
USB_TLL 串口线
3.3V 电源(可以使用 Arduino 的 3.3V 接口进行供电,如果没有 3.3V 的电压接口,可以使用 3V 的进行供电,5V 的接口电压太高会烧坏模块。
软件
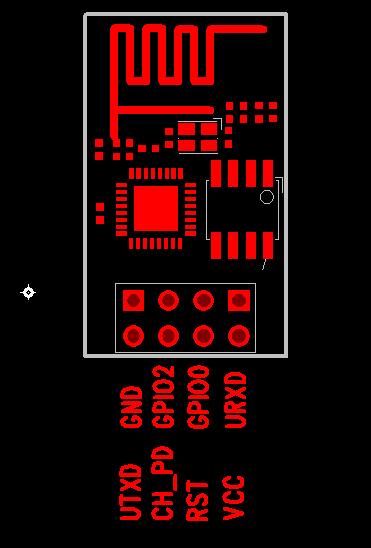
针脚分布图
USB_TLL 与 ESP8266 连接图
这里只列出项目过程中使用较为频繁的指令,更多指令参考 ESP8266 帮助文档。
// 模块重启
AT+RST

/*
工作模式设置
AT+CWMODE=1  ->  Station 客户端模式
AT+CWMODE=2  ->  AP 接入点模式
AT+CWMODE=3  ->  Station + AP 两种模式共存
*/
AT+CWMODE=3


// 连接到路由器,路由器名称 + 密码,路由器的名称不要使用中文
AT+CWJAP="123","0123456789"

// 连接到 TCP 服务器,地址 + 端口号
AT+CIPSTART="TCP","192.168.1.100",8080

// 发送数据,带上发送的字节长度,不要使用不带参数的发送指令
AT+CIPSEND=4如果以上没问题,也就说明 ESP8266 模块没问题了,可以接下来使用 Arduino UNO 板子连模块了。
线的问题会导致一直无法调试成功。
注意电脑兼容性问题,windows 10 连接调试模块表示躺枪,更新下驱动或者找兼容 windows 10 版本的驱动即可解决。
连接时,按照 WIFI 模块的工作模式来接线。

即 GND 接 Arduino 的 GND ,

VCC 和 CH_PD 接 Arduino 的 3.3V 输出。

UTXD 和 URXD分别接 Arduino 的 13和12引脚

(即程序中由 SoftwareSerial 定义的 RX 和 TX)。

作者:rollingstarky
链接:https://www.jianshu.com/p/64024d8c3773
來源:简书
著作权归作者所有。商业转载请联系作者获得授权,非商业转载请注明出处。
参考这份资料和 ESP8266 针脚的示意图,稍微修改了 Arduino 上连接的软串口,其实软串口选哪个没啥影响的。就是烧录程序的时候配置一下就可以了。
面包板是绝配,可以让线看起来不会那么乱,不然后期检查是否连错很麻烦……
下面是我的自己的连接方式
ESP8266 <---------> Arduino

GND <---------> GND

VCC, CH_PD <---------> 3.3V // 可以用 3.0V 电压

UTXD, URXD <---------> 11 和 10 引脚 // RX, TX 配置10、11为软串口

// Arduino UNO 上的 RX, TX  接口理论上可行,但我并未进行测试,自行可进行测试。
打开 Arduino IDE,板子型号和端口选好,然后上传即可。代码如下
#include <SoftwareSerial.h>
SoftwareSerial mySerial(10, 11); // RX, TX 配置10、11为软串口
void setup()
{
        Serial.begin(9600);
        while (!Serial);
        mySerial.begin(9600);
}

void loop()
{
        if (mySerial.available())
                Serial.write(mySerial.read());
        if (Serial.available())
                mySerial.write(Serial.read());
}如果以上都没问题,也就说明传输方面没问题了,剩下的可以和其他模块进行集成。如测电压模块,利用测电压的模块获得电压后,然后构造发送的数据报文,即可发送数据到服务器。
有了这个库,你就不用自己手动构造一个 AT 字符串了,都帮你封装好了,然后调用函数接口即可。
发送 HTTP 请求
#include <Wire.h>
#include "Adafruit_ADS1015.h"
#include <SoftwareSerial.h>
#include "ESP8266.h"

//Adafruit_ADS1015 ads;

Adafruit_ADS1015 ads1015;
Adafruit_ADS1115 ads1115(0x49);

SoftwareSerial mySerial(13, 12); // RX, TX 配置10、11为软串口
ESP8266 wifi(mySerial, 115200);

// 服务器地址,WiFi 名称,WiFi 密码
const char url[] = "192.168.1.200";
const uint32_t port = 80;
const char ssid[] = "123";
const char pwd[] = "0123456789";

const float multiplier = 3.0;

// init
void setup()
{

	ads1015.begin();
	ads1015.setGain(GAIN_ONE);
	pinMode(10, OUTPUT);
	//ads.begin();
	Serial.begin(115200);
	while (!Serial) {
		;
	}
	wifi.restart();
	delay(1000);
}

double get_voltage()
{
	uint16_t adc0 = ads1015.readADC_SingleEnded(0);
	double res = (adc0 * 2) / 1000.0;
	Serial.print(">>>> voltage = ");
	Serial.print(res);
	Serial.print("\r\n");
	return res;
}

const char str_post_1[] = "GET /index.php?content=";
const char str_post_2[] = " HTTP/1.1\n"
		"Host: 192.168.1.200\n"
		"Connection: close\n"
		"Accept: text/html\n\n\n\n";

void loop(void)
{
	// 连接 WiFi
	if (wifi.joinAP(ssid, pwd)) {
		Serial.print(">>>> wifi connection success\n");
	} else {
		Serial.print(">>>> wifi connection error\n");
		wifi.restart();
		delay(1000);
		return;
	}

	while (true) {
		// 与服务器进行 TCP 连接
		if (wifi.createTCP(url, port)) {
			Serial.print(">>>> creat tcp success\n");
		} else {
			Serial.print(">>>> creat tcp error\n");
			continue;
		}

		float voltage = get_voltage();
		String get = str_post_1;
		get += voltage;
		get += str_post_2;

		if (wifi.send(get.c_str(), get.length())) {
			Serial.println(">>>> send success");
		} else  {
			Serial.println(">>>> send error");
			break;
		}
		Serial.println(">>> get_string ------------");
		Serial.println(get.c_str());
		Serial.println("------------ <<<\n");

		char result[100];
		wifi.recv(result, 100);
		Serial.println(">>>> result >>> ------------");
		Serial.println(result);
		delay(10000);
	}
	delay(2000);
	// 断开 WiFi 连接
	Serial.print(">>>> leave wifi ");
	Serial.println(wifi.leaveAP() ? "success" : "error");
}给定一个整数,编写一个函数来判断它是否是 2 的幂次方。
示例 1:
输入: 1
输出: true
解释: 20 = 1
示例 2:
输入: 16
输出: true
解释: 2^4 = 16
示例 3:
输入: 218
输出: false
使用位运算。
我们对特殊情况先进行判断,小于等于 0 的肯定不是,等于 1 的肯定是 true 。
对于一般情况。如果该数为 2 的幂,最高位为 1,其他位为 0 。
8 -> 0000 1000
16 -> 0001 0000
32 -> 0010 0000
64 -> 0100 0000
...对于 2 ^ n - 1 的数。
7 -> 0000 0111
15 -> 0000 1111
31 -> 0001 1111
63 -> 0011 1111
...两者进行与运算(&)。
8 -> 0000 1000
7 -> 0000 0111
& -> 0000 0000
16 -> 0001 0000
15 -> 0000 1111
& -> 0000 0000
32 -> 0010 0000
31 -> 0001 1111
& -> 0000 0000
64 -> 0100 0000
63 -> 0011 1111
& -> 0000 0000
14 -> 0000 1110
13 -> 0000 1101
& -> 0000 1100
...因此,我们只需要把这个数和比他小 1 的数进行与运算
你会发现得出的结果是 0 的,都是 2 的幂次
与运算之后不是 0 的就不是 2 的幂次
class Solution {
    public boolean isPowerOfTwo(int n) {
        if (n <= 0) return false;
        if (n == 1) return true;
        return (n & (n - 1)) == 0;
    }
}python 中的 requests 是会跟着重定向,要想关闭自动重定向,需要在请求中关闭 allow_redirects=False 即可。
	r = requests.post(
		url=url,
		allow_redirects=False
	)
print(r.headers['Location'])headers 中获得 Location 的值即可。headers 中的 Referer 参数,如果不是从重定向来的地址,会请求失败。headers 只要把 Referer 加上即可。 r = requests.post(
url=url,
allow_redirects=False
)
print(r.headers['Location'])
r_new = requests.get(
url=new_url,
headers={
"Referer": "".format(r.headers['Location']),
"Host": host
}
)p q 是 素数,并且两者互质n 是两个素数的乘积 n = q * pe 是指数,并且小于 r 且与 r 互质r = (q - 1) * (p - 1)
φ(mn) = φ(m) * φ(n) = (m - 1) * (n - 1) m 和 n 都为质数才成立。d = (1 - r * i) / e 其中 i = 1, 2, 3 ...(n, e) 为公钥(n, d) 为私钥c 表示密文m 表示明文已知 p,q,e
def get_d(p: int, q: int, e: int) -> int:
	r = (p - 1) * (q - 1)
	i = 0
	while True:
		if (1 + r * i) % e == 0:
			return '%d' % (1 + r * i // e) # 除 和 取整除 两者有区别
		i += 1


if __name__ == '__main__':
	p = 473398607161
	q = 4511491
	e = 17
	x = get_d(p=p, q=q, e=e)
	print(x)
用了网上别人代码,里面有一个坑,愣是坑了很久。
别人是用 python2 版本,我用的是 python3,在最后的 除 和 整除 这里有区别。
除 得到的答案是 125631357777427552。
整除 得到的答案是 125631357777427553 。
使用 整除 得到的才是正确答案。
或者使用 decimal 模块
已知 公钥 和 密文,求明文
n 和 en 得到 p 和 qdif __name__ == '__main__':
c =
d =
n =
x = pow(c, d, n)
print(bytes().fromhex('%x' % x))要求超过17位的精度分析
python默认的是17位小数的精度,但是这里有一个问题,就是当我们的计算需要使用更高的精度(超过17位小数)的时候该怎么做呢?
使用格式化(不推荐)
高精度使用decimal模块,配合getcontext
默认的context的精度是28位,可以设置为50位甚至更高,都可以。这样在分析复杂的浮点数的时候,可以有更高的自己可以控制的精度。其实可以留意下context里面的这rounding=ROUND_HALF_EVEN 参数。ROUND_HALF_EVEN, 当half的时候,靠近even.
利用 decimal 模块,改良求 d 代码
from decimal import *

def get_d(p: int, q: int, e: int) -> str:
	r = Decimal((p - 1) * (q - 1))
	i = 0
	while True:
		if (1 + r * i) % e == 0:
			return '%d' % (1 + r * i / e)
		i += 1


if __name__ == '__main__':
	getcontext().prec = 100
	p = 473398607161
	q = 4511491
	e = 17
	x = get_d(p=p, q=q, e=e)
print(x)已知 p,q,e 和 密文 c,求明文
from decimal import *


def get_d(p: int, q: int, e: int) -> int:
	r = Decimal((p - 1) * (q - 1))
	i = 0
	while True:
		if (1 + r * i) % e == 0:
			return '%d' % (1 + r * i / e)
		i += 1


def get_n(p: int, q:int) -> int:
	return q * p


if __name__ == '__main__':
	getcontext().prec = 1000

	p = 9648423029010515676590551740010426534945737639235739800643989352039852507298491399561035009163427050370107570733633350911691280297777160200625281665378483
	q = 11874843837980297032092405848653656852760910154543380907650040190704283358909208578251063047732443992230647903887510065547947313543299303261986053486569407
	e = 65537
	c = 83208298995174604174773590298203639360540024871256126892889661345742403314929861939100492666605647316646576486526217457006376842280869728581726746401583705899941768214138742259689334840735633553053887641847651173776251820293087212885670180367406807406765923638973161375817392737747832762751690104423869019034
	d = get_d(p=p, q=q, e=e)
	n = get_n(p=p, q=q)
	print(d)
print(pow(c, Decimal(d), n))总结一下这几天折腾的东西
折腾了 wsl,awk,frp,前后端部署时跨域问题,nginx ...
wsl 用来开发 还是不怎么够用
很多资料网上都有,只要一查就有,我自己就不重复造轮子。
Windows 中的 子系统 中没有 systemd 相关命令,wsl 其实去掉了很多功能 ……
要想在 wsl 中使用 systemd 相关命令,需要配置一些东西,有点麻烦 ……
服务启动/停止只能用 service xxx start| stop | reload ...
网上好多关于 ubuntu 系统的配置方法都无法在 wsl 中使用。
wsl 适合练习 linux,不太适合用来开发。
以下是 systemd 相关命令
终于把 arduino 中断的坑给填了。
| 中断 | 描述 |
|---|---|
| 外部中断 | 外部设备导致的中断请求(如板子上的 reset 按钮 |
| 内部中断 | 程序中设置的中断指令 |
| 异常中断 | 程序或硬件出现异常或故障 |
触发中断。attachInterrupt(interrupt, ISR, mode)
将 引脚 转换成 中断信号。 digitalPinToInterrupt(pin)
| BOARD | INT.0 | INT.1 | INT.2 | INT.3 | INT.4 | INT.5 |
|---|---|---|---|---|---|---|
| Uno, Ethernet | 2 | 3 | ||||
| Mega2560 | 2 | 3 | 21 | 20 | 19 | 18 |
| 32u4 based (e.g Leonardo, Micro) | 3 | 2 | 0 | 1 | 7 |
关于 attachInterrupt() 和 digitalPinToInterrupt() 函数,官方给的参考代码。
const byte ledPin = 13;
const byte interruptPin = 2;
volatile byte state = LOW;

void setup() {
  pinMode(ledPin, OUTPUT);
  pinMode(interruptPin, INPUT_PULLUP);
  attachInterrupt(digitalPinToInterrupt(interruptPin), blink, CHANGE);
}

void loop() {
  digitalWrite(ledPin, state);
}

void blink() {
  state = !state;
}
说实话,这代码,我对于整段代码运行的前后顺序还是有点迷的。
因此下面将给出我自己的测试代码。
在官方代码的基础上修改,利用串口调试,将方便我们观察效果。
并将 interruptPin 引脚状态设置为 INPUT 。
利用一根杜邦线,一边接在程序设置好的 interruptPin 接口上,另一边接在 GND 引脚上。
#include <SoftwareSerial.h>

const byte ledPin = 13;
const byte interruptPin = 2;
volatile byte state = LOW;

void serial_init()
{
	Serial.begin(115200);
	while (!Serial) {}
}

void setup()
{
	serial_init();
	Serial.println("setup function begin");
	pinMode(ledPin, OUTPUT);
	pinMode(interruptPin, INPUT_PULLUP);
	attachInterrupt(digitalPinToInterrupt(interruptPin), blink, CHANGE);
	Serial.println("setup function end");
}

void loop()
{
	Serial.println("loop start");
	digitalWrite(ledPin, state);
	Serial.println("loop end");
}

void blink()
{
	Serial.println("blink function start");
	state = !state;
	Serial.println("blink function end");
}setup function begin
setup function end
loop start
loop end
loop start
loop end
...
loop start
loop end
loop start
loop endloop start
loop end
loop start
loop end
loop start
loop end
loop start
blink function start
blink function end
blink function start
blink function end
blink function start
blink function end
bliloop end
loop start
loop end
loop start
loop end
...
loop start
loop end
loop start
loop end
loop stblink function start
blink function end
blink function start
blink function end
blink function start
blink function end
blirt
loop end
loop start
loop end
loop start
loop end
loop start
loop end
...
loop start
loop end
looblink function start
blink function end
blink function start
blink function end
blink function start
blink function end
bli start
loop end
loop start
loop end
loop start
loop end
loop start
loop endGND 引脚,就会触发中断,中断触发结束后,该引脚的状态仍然为高电平。以 FlexiTimer2 为例。
#include "FlexiTimer2.h"

void Flash()
{
	digitalWrite(13, digitalRead(13) ^ 1);
}

void setup()
{
	pinMode(13, OUTPUT);

	FlexiTimer2::set(1000, 1.0 / 1000, Flash);
	FlexiTimer2::start();
}

void loop()
{
}
LED13 灯亮一秒,熄灭一秒。依次反复。
内部中断可以作为定时器使用。也就是隔一段设定好的时间执行某段程序。
利用该特性,我们可以定时发送数据来保持与服务器的通讯。如心跳包。
该文章的测试代码。test.zip
编写一个 SQL 查询,获取 Employee 表中第 n 高的薪水(Salary)。
+----+--------+
| Id | Salary |
+----+--------+
| 1  | 100    |
| 2  | 200    |
| 3  | 300    |
+----+--------+
例如上述 Employee 表,n = 2 时,应返回第二高的薪水 200。如果不存在第 n 高的薪水,那么查询应返回 null。
+------------------------+
| getNthHighestSalary(2) |
+------------------------+
| 200                    |
+------------------------+
第二高薪水还是第N高薪水,原理类似。注意一些细节。
使用子查询,比较任意的两份薪资,当 薪资 = N - 1 的时候,就是第 N 高薪水。注意使用 count 将薪资相同的聚合在一起(相同薪资的人可能有多个),并去重。
mysql
第二高的薪水
select max(e.Salary) SecondHighestSalary from Employee e

where (select count(distinct e1.Salary)

        from Employee e1 where e1.Salary > e.Salary) = 1
第 N 高的薪水
CREATE FUNCTION getNthHighestSalary(N INT) RETURNS INT

BEGIN

  RETURN (

      # Write your MySQL query statement below.

      select max(e.Salary) SecondHighestSalary

      from Employee e

      where (select count(distinct e1.Salary)

             from Employee e1

             where e1.Salary > e.Salary) = N - 1

  );

END何谓“持久化”
持久(Persistence),即把数据(如内存中的对象)保存到可永久保存的存储设备中(如磁盘)。持久化的主要应用是将内存中的数据存储在关系型的数据库中,当然也可以存储在磁盘文件中、XML数据文件中等等。何谓“持久层”
持久层(Persistence Layer),即专注于实现数据持久化应用领域的某个特定系统的一个逻辑层面,将数据使用者和数据实体相关联。何谓“对象数据映射(ORM)”
ORM-Object/Relational Mapper,即“对象-关系型数据映射组件”。对于O/R,即 Object(对象)和 Relational(关系型数据),表示必须同时使用面向对象和关系型数据进行开发。
Spring Data JPA 可以理解为 JPA 规范的再次封装抽象,底层还是使用了 Hibernate 的 JPA 技术实现。要说差异,主要是比较的是 MyBatis 和 Hibernate。
性能考虑
由于 Hibernate 比 MyBatis 抽象封装的程度更高,理论上单个语句之心的性能会低一点(所有的框架都是一样,排除算法上的差异,越是底层,执行效率越高)。
但 Hibernate 会设置缓存,对于重复查询有一定的优化,而且从编码效率来说,Hibernate 的编码效果肯定是会高一点的。所以,从整体的角度来看性能的话,其实两者不能完全说谁胜谁劣。
从 ORM 角度考虑
Hibernate 是完备的 ORM 框架,是符合 JPA 规范的,但 MyBatis 不是。MyBatis 比单纯写 JDBC 肯定是方便一点,但无可避免还是要写SQL,且无法做到跨数据库 。Hibernate 使用 JPA 就可以无需考虑数据库的兼容性问题。
使用 Hibernate 的一个难点是,如何来设计对象之间的关系。如果是关系型数据库的话,表和表是通过外键来进行关联的。而在 ORM 中,则需要从面向对象的角度出发,来设计对象之间的关联关系。这个是需要思路上做一个转变的。
与 Spring 的集成角度考虑
Spring 以及 Spring Boot 官方都没有针对 MyBatis 有具体的支持,但对 Hibernate 的集成一直是有的。
但这并不表明 MyBatis 无法与 Spring Boot 集成,毕竟现在互联网企业,还是很流行使用MyBatis 和 Spring 。MyBatis 官方社区自身也是有 对 Spring \ Spring boot 集成做支持的,所以在技术上,两者都不存在问题。相关框架可以见 https://github.com/mybatis/spring 和https://github.com/mybatis/spring-boot-starter 。
在类上加入 @Entity 注解,成员变量加入注解,如 @Column ,依情况而定。
在 application.yml 或者 application.properties 中添加以下配置。(建议使用 .yml,看起来更加清晰)
jpa.hibernate.ddl-auto 以更细粒度的方式控制行为。以下是各属性的作用
ddl-auto: create 创建架构,销毁以前的数据。ddl-auto: create-drop 当 SessionFactory 显式关闭时,通常在应用程序停止时删除模式。ddl-auto: update 更新架构。(最常用)ddl-auto: validate 验证架构,不对数据库进行任何更改。jpa.generate-dll 作用
spring.jpa.generate-ddl = false 打开和关闭该功能,默认是关闭。与供应商无关。 spring:
jpa:
show-sql: true
generate-ddl: true
hibernate:
ddl-auto: update
datasource:
url: jdbc:mysql://localhost:3306/<>?useSSL=false&createDatabaseIfNotExist=true&characterEncoding=utf8&serverTimezone=GMT
username: root
password: rootQueryDSL是一个Java语言编写的通用查询框架,专注于通过JavaAPI方式构建安全的SQL查询。QueryDSL可以应用到NoSQL数据库上,QueryDSL查询框架可以在任何支持的ORM框架或者SQL平台上以一种通用的API方式来构建SQL。目前QueryDSL支持的平台包扣JPA、JDO、SQL、Java Collections、RDF、Lucene、Hibernate Serch、MongoDB等。
maven 配置(添加依赖
        <dependency>
            <groupId>com.querydsl</groupId>
            <artifactId>querydsl-apt</artifactId>
            <scope>provided</scope>
        </dependency>

        <dependency>
            <groupId>com.querydsl</groupId>
            <artifactId>querydsl-jpa</artifactId>
        </dependency>
maven 配置(添加插件,生成查询实列,之后点击 compile 即可生成实列。
<plugin>
<groupId>com.mysema.maven</groupId>
<artifactId>apt-maven-plugin</artifactId>
<executions>
	<execution>
	<goals>
		<goal>process</goal>
	</goals>
	<configuration>
		<outputDirectory>target/generated-sources/java</outputDirectory>
		<processor>com.querydsl.apt.jpa.JPAAnnotationProcessor</processor>
	</configuration>
	</execution>
</executions>
</plugin>
Querydsl ,可以弥补 Spring Data JPA 不灵活,使用 Querydsl 查询只需要继承 QueryDslPredicateExecutor 即可
public interface UserRespiratory
        extends QuerydslPredicateExecutor<User>, JpaRepository<User, Integer> {
}感觉之前太小看 esp8266 这个模块了,只是把它当做单纯的 WiFi 模块,随着单片机的深入学习,还有师兄的提醒,发现这个模块太强大了。(我要把它吹爆
另外更正有点,其实说 esp8266,太笼统了,它分了好几种型号,我用的型号,准确的名称是 esp8266-01 ,因为在找 esp8266 的资料时,会因为型号不一样,因此引脚分布也不一样,导致方案并不是通用的。
以下的内容,是使用了 esp8266-01
esp8266-01 针脚分布图
最最重要的是阅读官方文档,我看了官方的 AT 指令集文档,发现里面有几个有趣的指令。可以将配置的 AT 指令保存到 Flash 内,断电重启之后也不会丢失。这样子就不需要每一次重启配置连接的 WiFi 等等。
 AT+CWMODE_DEF — 设置当前 Wi-Fi 模式并保存到 Flash

 AT+CWJAP_DEF — 连接 AP,保存到 Flash

 AT+CWAUTOCONN — 上电是否⾃自动连接 AP

 AT+SAVETRANSLINK — 保存透传到 Flash

...
互相配合使用这些 AT 指令,可以提高设备的稳定性。
windows 环境。
win + E,打开文件管理器
地址栏输入 %APPDATA%
找到 pip 文件夹,如果没有的话就创建一个并进入该目录
如果没有的 pip.ini 的话,就创建一个 pip.ini 文件
然后在 pip.ini 输入以下内容
[global]
index-url = https://mirrors.ustc.edu.cn/pypi/web/simple
format = columnswin + R 打开 cmd 窗口
复杂并粘贴一下几句命令即可
conda config --add channels https://mirrors.tuna.tsinghua.edu.cn/anaconda/pkgs/free/
conda config --add channels https://mirrors.tuna.tsinghua.edu.cn/anaconda/pkgs/main/
conda config --set show_channel_urls yes其他相关命令
conda update conda # 更新 Anaconda
conda update --all # 更新包

pip list --outdate # 列出可更新的包
pip install -U [pack] # 更新包

pip install package_name # 安装包
conda install package_name # 安装包
A declarative, efficient, and flexible JavaScript library for building user interfaces.
🖖 Vue.js is a progressive, incrementally-adoptable JavaScript framework for building UI on the web.
TypeScript is a superset of JavaScript that compiles to clean JavaScript output.
An Open Source Machine Learning Framework for Everyone
The Web framework for perfectionists with deadlines.
A PHP framework for web artisans
Bring data to life with SVG, Canvas and HTML. 📊📈🎉
JavaScript (JS) is a lightweight interpreted programming language with first-class functions.
Some thing interesting about web. New door for the world.
A server is a program made to process requests and deliver data to clients.
Machine learning is a way of modeling and interpreting data that allows a piece of software to respond intelligently.
Some thing interesting about visualization, use data art
Some thing interesting about game, make everyone happy.
We are working to build community through open source technology. NB: members must have two-factor auth.
Open source projects and samples from Microsoft.
Google ❤️ Open Source for everyone.
Alibaba Open Source for everyone
Data-Driven Documents codes.
China tencent open source team.