snapmaker / snapmakercuraplugin Goto Github PK
View Code? Open in Web Editor NEWSnapmaker plugin for Cura 5
License: MIT License
Snapmaker plugin for Cura 5
License: MIT License


I have an Ender 3 printer configured in my Cura 5.2.1. As soon as I installed the J1 plugin (for my printer to come) Cura started putting J1 data into the generated GCode for the Ender - see below. F.i. the Printer and Extruder Mode lines are spoiled.
Most noticeable the preview thumbnail data cannot be found any more by the Ender's firmware.
;Header Start
;Version:1
;Slicer:CuraEngine
;Printer:Snapmaker J1
;Estimated Print Time:7230
;Lines:51458
;Extruder Mode:IDEX Full Control
;Extruder 0 Nozzle Size:0.4
;Extruder 0 Material:PETG
;Extruder 0 Print Temperature:240.0
;Bed Temperature:80
;Extruder(s) Used:1
;Work Range - Min X:98.475
;Work Range - Min Y:77.475
;Work Range - Min Z:0.2
;Work Range - Max X:136.525
;Work Range - Max Y:157.525
;Work Range - Max Z:5.96
;Thumbnail:data:image/png;base64,... cut out base64 data  ...
;Header End
;FLAVOR:Marlin
;TIME:7229
;Filament used: 2.95554m
;Layer height: 0.16
;MINX:98.475
;MINY:77.475
;MINZ:0.2
;MAXX:136.525
;MAXY:157.525
;MAXZ:5.96
;POSTPROCESSED
;Generated with Cura_SteamEngine 5.2.1
;
; thumbnail begin 230x180 6280
; /9j/4AAQSkZJRgABAQEAYABgAAD/2wBDAAgGBgcGBQgHBwcJCQgKDBQNDAsLDBkSEw8UHRofHh0aHB
The Extruder change (left==>right or right==>left) always happens in the place where one layer is finished. this leads to material dripping out of the extruder onto the model. LUBAN does the change over the prime tower - the Cura settings should do the same.
I 'm running cura 5.6 and added the snapmaker plugin. I've selected the printer accordning to the description as a "Add a non-networked printer".
When I slice now I do not get any choice of sending the sliced file to the snapmaker directly.
What am I missing?
Many thanks for your help.
So I'm guessing there's no support for the first Snapmaker right? I wanted to use Cura but without settings it's impossible.
Hi one of the Cura devs here,
I started a review of the v0.9.0 plugin for the Cura Marketplace and I noticed that you store the Network token, as plaintext the Cura preferences. We used to do that for our cloud tokens as well, but found it a security risk, since a lot of users often share their configuration folders with each other.
I believe that security risk for your current use case is low, but I wanted to bring our KeyringAttribute to your attention. This should automatically store sensitive data (such as auth tokens) in the System keyring, while still being able to use it in the same way as you would any plain attribute. Implementing it would be fairly easy, so it might be worth considering.
https://github.com/Ultimaker/Cura/blob/main/cura/OAuth2/KeyringAttribute.py
from cura.OAuth2.KeyringAttribute import KeyringAttribute


class AuthResponse():
    token = KeyringAttribute()


    def __init__(self, token: str) -> None:
        self.token = token


    def use_example(self):
        if self.token == "12345qwerty":
            pass
Real life example:
https://github.com/Ultimaker/Cura/blob/6a704f48020deb5168e194b127dde83b0fd70579/cura/OAuth2/Models.py#L46
I have installed the cura plugin, added the snapmaker 2 printer and then restarted. added a project, sliced, but no option to send to the printer directly.
Do I need to find the printer in my network first somewhere?
Just recently bought a Snapmaker J1s and downloaded the J1s plugin for cura, as per the instructions. However, when trying to send to the printer/disk/export, the error " could not convert string to float: '4.30557m, 0' " repeatedly shows up no matter what I do. How can I fix it so I can at least export my file to my printer?

Machine width is set to 324
The left extruder cannot reach X=324.
Furthermore, the right extruder cannot reach X=0
The advertised build volume width of 300mm is not possible for an IDEX print as it stands
The available range of the left extruder is 0 to 310 (With a gap of ~9mm between it and the parked right extruder)
The available range of the right extruder is 11 to 325 (With a gap of ~7mm between it and the parked left extruder)
So if you moved the printable area ~11mm to the right within the moveable area, full-range IDEX prints should be possible
This appears to be a mixture of a Cura plugin issue (Machine width should be 300, not 324) and a Marlin issue (print area is incorrectly positioned in moveable area)
Hey, thank you very much for this plugin. I just assembled my Artisan yesterday and I'm looking at the different tooling available in the community. I got a few recommendations for Cura and wanted to check this out.
After installing the SnapmakerCuraPlugin (I tried 0.61.0 and the 0.7.0 pre-release) I can't find any Snapmaker Artisan (or J1 for that matter) in the list of non-networked printer.

I haven't tried the networked mode yet, as the printer is currently busy and I don't want to mess with the current job.
Any help would be greatly appreciated
In past Cura releases, I noticed the bed's edges in the profile would be off by a few mm, 1cm at most, but in the latest update the discrepancy seems huge and I am forced to center all my prints. I have not tried printing something ~280mm x ~180mm to see how this scales across the bed area, but my printer profile in Cura is set to 300x200 and my parts come out dimensionally accurate (<0.25mm max variance on a 100mm test part), so there's some offset appearing to happen in the G Code. I do not know enough about G Code to debug further.
G Code:
BikeStand Plus Mount.gcode.zip
Here's how I laid parts out in the latest Cura release:

Here's what happens:

During review of the plugin (v0.9.0) in noticed that the binary of a thumbnail was added to the gcode text file.
You might want to take a look at the ufp fileformat that we (UltiMaker) use to add such extra information.
It is basically zipped gcode with additional information. We use libCharon (Python module on our printers and in Cura) https://github.com/Ultimaker/libCharon
Currently when switching nozzles for dual extruder (Artisan) it starts printing before new nozzle gets to temp.
After downloading the latest plugin 0.4.0 release, and Cura version 5.2.1, Cura is unable to connect to printer and gives a "could not connect to device" description after trying to connect via entering the IP address in manually.
Operating on windows 10 pro, version 10.0.109044 Build 19044. The hardware is a dell precision M6800 workstation laptop
attempting to troubleshoot as it's apparently connected aromatically according to other users.
I've tried turning the wifi of the machine off and back on again. The firmware of the J1 is up to date.
I've also tried uninstalling Cura, and downloading both Cura and the plugin on the same day which also didn't work.
I've just tested the v0.6.0 pre-release version with Artisan. I want to print a model using the right extruder, and even though I've configured that in Cura (it painted the model with the correct color in the preview), once the gcode is exported and loaded on Artisan, the model was printed using the left extruder.
I have tried disabling the left extruder in Cura, but that made no difference. What else can I try?
When trying to use the 2nd extruder as a support dedicated extruder the gcode doesnt heat the 2nd extruder
I think this is similar to #25 (Probably same root cause) - basically it seems that a load of stuff is set in the printer profiles, and when this is done, you cannot override the setting in custom profiles
Repro:
Fast - 0.2mm profileCreate profile from current settings / overridesDefault 100mm/sPrint Speed is locked at 200)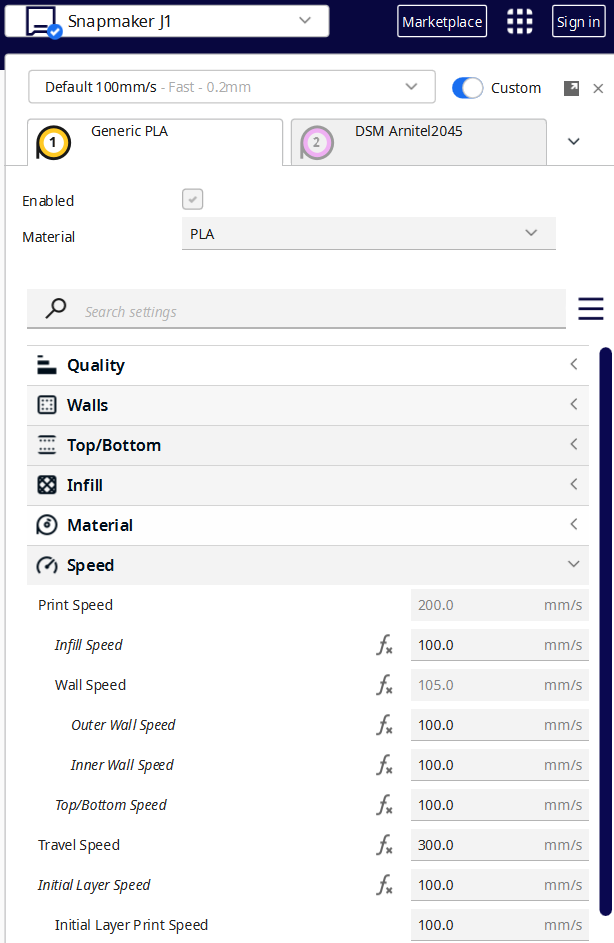
I am not 100% sure if this actually stops me from being able to do what I need, I can change infill speed and wall speed, it's just annoying. With my Ender 3 profile, this setting is not disabled, and when I edit Print Speed, it changes Infill Speed to the entered value, and Wall speed to 50% of the entered value.
With latest version of cura (5.3.1) the plugin is not giving me the option to send file via network and there is no thumbnail preview.
The temperature for PETG is only set to 215 which is really low. Also retraction distance is set to 6.5 which is really high for direct drive. These values are causing a lot of issues from the 0.2.1 build. This 0.5 build has made the quality mush worse on prints and I get a lot more skipping in the extruders.
You have several retraction settings which are incorrect. Look at any of the Polymaker materials.
The retraction distance is 6mm which is appropriate for a Bowden drive system, but not a direct drive unit like the J1. Please update these to match Polymaker's suggested settings.
Hello, as I see maximum package count is 255 (because of 1 byte packing) and package size is 60kB, so maximum gcode transferred over wifi is just 15667200 bytes? and I can't found any check and message about "file to big"
https://github.com/Snapmaker/SnapmakerJ1CuraPlugin/blob/482b05e80ecc70aded58c1458771f8a3846c6b24/network_plugin/SACPNetworkedPrinterOutputDevice.py#L215
I'm no expert, so not sure if this is a problem with the plugin, or with Cura itself, but when sending a job directly via wifi the first layer temps are being ignored and the job starts at the regular temps. When saving the file and transferring via USB stick, it works just fine.
This is with Cura 5.5, but not the most recent Snapmaker firmware. Still on the single extruder and don't really want to update firmware if I don't have to!
Plugin version: 0.3.0
The M104 T1 command is after the M190 S command, so the right extruder does not start heating up until the bed is at full temperature.
Temperatures set in Cura:
Left extruder (T0): Printing = 200, Initial = 190, Standby = 175
Right extruder (T1): Printing = 215, Initial = 205, Standby = 160
								;Generated with Cura_SteamEngine 5.2.1
								T0
								M82 ;absolute extrusion mode
								;--- Start G-code Begin ---
> Heat T0							M104 S200 ;Set Hotend Temperature
> Heat bed							M140 S60 ;Set Bed Temperature
								G28 ;Home
								G1 Z0.8
> Wait for T0 to heat up					M109 S200
> Wait for bed to heat up					M190 S60
								G1 Z0.8 F6000
								M201 X10000 Y10000 Z500 E5000
								M593 P1 F50
								M205 V5
								G92 E0
								G1 F200 E2
								G92 E0
								;--- Start G-code End ---

								G92 E0
								M2000 S200 V250 A6000
								G92 E0
								G1 F1500 E-6.5
								;LAYER_COUNT:784
								;LAYER:0
								M107
> Heat T1							M104 T1 S160
								M204 S1000
								G1 F600 Z1.28
								G0 F6000 X134.82 Y65.098 Z1.28
								;TYPE:SKIRT
								G1 F600 Z0.28
T1 should preheat to either Standby or Initial temperature while T0 and bed are heating
in the print profile settings for Snapmaker Artisan , the print speed fields are disabled and set with 100 mm/s.
Which is too fast for several materials.
Plugin version: 0.4.0
Whilst #25 is now fixed, there are still issues.
If you have existing custom materials, when you add a J1 printer, it does not have the correct temperature for the custom materials.
Repro:
200240 temperature for the Ender 3It is worth noting, however, that if I add a different printer (eg a Creatiliy CR-10), then I see the same thing. So I am not 100% sure that this is a bug with the J1 plugin, it's maybe more a quirk of Cura?

When slicing the attached object for the Snapmkaer J1 which uses
the code created with the Cura plugin correctly shows the correct values in the header:
;Extruder 0 Nozzle Size:0.4 ;Extruder 0 Material:PETG J1 anthrazit ;Extruder 0 Print Temperature:240 ;Extruder 1 Nozzle Size:0.4 ;Extruder 1 Material:PLA J1 blaumetallic ;Extruder 1 Print Temperature:215
but the printer ends up mixing temperatures between hotends due to the gcode being wrong. It heats the right hotend (no.1) first to 240°C:
T1 M82 ;absolute extrusion mode ;--- Start G-code Begin --- M104 S240 ;Set Hotend Temperature M140 S75.0 ;Set Bed Temperature
and a little later then heats up the left hotend to 215°C, while the "layer 0" print temperature of 230°C is completely ignored:
;LAYER:0 M107 P1 M104 T0 S215
Please find the files attached - the Zip file contains the gcode and a 3MF Cura project that contains all the defined settings. If I did not overlook anything, the issue should be reproducible by simply opening the 3MF file as a project and slicing it in Cura.
Tested with Cura 5.3.0.
The build plate temperature is 80 when it has been set to 105 in Cura.
No matter what printer is selected it prints defaults from the J1 to the gcode when exported. Not sure if it's a real issue, but I imagine that if it thinks it's the wrong printer, it could send some wrong settings.
When adding a custom material for the J1, it does not use the correct printing temperature.
Repro:
Material Preferences (Ctrl-K)Create New1 to the end of custom material namePrint Settings tabDefault Printing Temperature to 234Material Preferences - new material is currently selectedPrinting Temperature reads 215 (Should be 234)Generic FFF Printer as current printerMaterial Preferences (Ctrl-K)Create New2 to the end of custom material namePrint Settings tabDefault Printing Temperature to 235Material Preferences - new material is currently selectedPrinting Temperature reads 235
As is obvious from the screen recording, no such problem exists with a Generic FFF printer profile, so I can only assume that the error is because of the Snapmaker plugin
Repro'd on:
A declarative, efficient, and flexible JavaScript library for building user interfaces.
🖖 Vue.js is a progressive, incrementally-adoptable JavaScript framework for building UI on the web.
TypeScript is a superset of JavaScript that compiles to clean JavaScript output.
An Open Source Machine Learning Framework for Everyone
The Web framework for perfectionists with deadlines.
A PHP framework for web artisans
Bring data to life with SVG, Canvas and HTML. 📊📈🎉
JavaScript (JS) is a lightweight interpreted programming language with first-class functions.
Some thing interesting about web. New door for the world.
A server is a program made to process requests and deliver data to clients.
Machine learning is a way of modeling and interpreting data that allows a piece of software to respond intelligently.
Some thing interesting about visualization, use data art
Some thing interesting about game, make everyone happy.
We are working to build community through open source technology. NB: members must have two-factor auth.
Open source projects and samples from Microsoft.
Google ❤️ Open Source for everyone.
Alibaba Open Source for everyone
Data-Driven Documents codes.
China tencent open source team.