This accelerator provides a no code Studio for users to quickly build complex, multi-stage AI pipelines across multiple Azure AI and ML Services. Users can select, and stack, AI/ML Services from across Azure Cognitive Services (Speech, Language, Form Recognizer, ReadAPI), Azure Machine Learning, and even Hugging Face state-of-the-art models, into a single, fully integrated pipeline. Integration between services is automated by BPA, and once deployed, a web app is created. This customizable UI* provides and drag-n-drop interface for end users to build multi service pipelines. Finally, the user-created pipeline is triggered as soon as the first input file(s) are uploaded, storing the results in a CosmosDB.
And, optionally, the end-user can add a Cognitive Search Index, indexing each the output at each of stage of the pipeline, across all uploaded files. Index creation is handled entirely by the accelerator, where the end-user can access the index via their newly created Cognitive Search Index resource.
OpenAI has been integrated to be added to document pipelines and also to be exploited for enhanced search capabilities.
- Summarize a document
- Process document text with a customized prompt. Designed to easily migrate prompt configurations from the Playground to your document pipeline.
- Integration of OpenAI Completion API to search results to generate a more specific answer.

High-level architecture
*Note: Azure Static Web Apps allows you to easily build React apps in minutes. Use this repo with the React quickstart to build and customize a new static site and automate the deployment of a functional, and customizable, POC for text and language processing.
Ensure that you have accepted terms and conditions for Responsible AI:
You must initiate the creation of a "Cognitive services multi-service account" from the Azure portal to review and acknowledge the terms and conditions by checking the checkmark.
Once accepted, you can create subsequent resources using any deployment tool (SDK, CLI, or ARM template, etc) under the same Azure subscription.
- Get a Workflow Level Token: Create AND save personal access token
- Fork the repository to a git account of which you are the Admin.
- Click on the "Deploy to Azure" Button. If you do not have access to OpenAI, choose the first one.
- Only the Resource Group, Repo Token (from #2), and Forked Git Repo Url are needed. The remaining parameters are filled in for you.
Deploy instructions below are only if you are doing development!! If you are not adding features to BPA, use the "Deploy to Azure" buttons above.
- Overview
- Architecture
- Sample Pipeline
- Currently Inluded Algorithms
- Prerequisities
- Installation Steps
- Go to your React App
- Load Documents!
- View Your Results
- Further Customization
- Contacts
- Roadmap
- References
Once you've created a high-level Resource Group, you'll fork this repository and importing helper libraries, taking advantage of Github Actions to deploy the set of Azure Cognitive Services and manage all of the new Azure module credentials, in the background, within your newly created pipeline. After pipeline deployment, a static webapp will be created with your newly customizable POC UI for building and triggering pipelines.

High-level technical architecture
The UI provides and drag-n-drop interface for end users to build multi-service pipelines:
- Starting with specifying input file type(s), e.g. audio, texts, or emails
- Pipeline stages are added by selecting which Cognitive Services to add to the pipeline
- Once a new pipeline stage is added, if the data is transformed to a new format type (e.g. OCR’ing a PDF to text), the new pipeline stages will become available to be added based on the transformed format of the data at the latest stage of the pipeline
- Once the pipeline is specified, the user will upload files through the UI, triggering the pipeline, and saving the result in a CosmosDB
- Optionally, the end-user can add a Cognitive Search Index, indexing each the output at each of stage of the pipeline, across all uploaded files. Index creation is handled entirely by the accelerator, where the end-user can access the index via their newly created Cognitive Search Index resource

BPA UI
A simple example pipeline for a call center mining use case is below is illustrated below. For a general call center mining use case, the Business Process Accelerator could be used to deploy a pipeline ingesting, transcribing, (+optionally translating), summarizing, and analyzing the sentiment for each call. Resulting Pipeline Steps [AI Service Deployed]:
- Transcribe audio calls [Speech Service]
- Translate to another language (optional) [Speech Service]
- Store the transcribed and translated calls [CosmosDB]
- Apply suite of text analytics offerings (e.g. text summarization, sentiment analysis, call classification) [Language Service]
The resulting deployment pipeline leverages:
Azure Speech Service, Azure Language Service, Azure Cosmos DB, Azure Functions

Sample BPA pipeline for call center mining
Once the pipeline is completed – this process typically takes <1 min for smaller documents and simpler pipelines – the results are found in your newly created Azure Cosmos DB, where we can quickly inspect our results.

The current release of BPA allows you to build pipelines from multiple Cognitives Services, Azure Machine Learning Endpoints, and even Hugging Face models. New Services and Features are continuously being released. Please refer to each Service's documentation for the latest reference.
- Azure Cognitive Services
- Form Recognizer
- Language Service
- Speech Service
- Cognitive Search
- Azure Machine Learning Endpoints
- HuggingFace Tokenization Models
| Type | Model | Description |
|---|---|---|
| Prebuilt | Read (preview) | Extract printed and handwritten text lines, words, locations, and detected languages. |
| General document (preview) | Extract text, tables, structure, key-value pairs, and named entities. | |
| Layout | Extract text and layout information from documents. | |
| W-2 (preview) | Extract employee, employer, wage information, etc. from US W-2 forms. | |
| Invoice | Extract key information from English and Spanish invoices. | |
| Receipt | Extract key information from English receipts. | |
| ID document | Extract key information from US driver licenses and international passports. | |
| Business card | Extract key information from English business cards. | |
| Custom | Custom | Extract data from forms and documents specific to your business. Custom models are trained for your distinct data and use cases. |
| Custom | Composed | Compose a collection of custom models and assign them to a single model built from your form types. |
Form Recognizer Models Documentation
| Type | Model | Description |
|---|---|---|
| Prebuilt | Named Entity Recognition (NER) | This pre-configured feature identifies entities in text across several pre-defined categories. |
| Personally Identifiable Information (PII) detection | This pre-configured feature identifies entities in text across several pre-defined categories of sensitive | |
| Key phrase extraction | This pre-configured feature evaluates unstructured text, and for each input document, returns a list of key phrases and main points in the text. | |
| Entity linking | This pre-configured feature disambiguates the identity of an entity found in text and provides links to the entity on Wikipedia. | |
| Text Analytics for health | This pre-configured feature extracts information from unstructured medical texts, such as clinical notes and doctor's notes. | |
| Custom | Custom NER | Build an AI model to extract custom entity categories, using unstructured text that you provide. |
| Prebuilt | Analyze sentiment and opinions | This pre-configured feature provides sentiment labels (such as "negative", "neutral" and "positive") for sentences and documents. This feature can additionally provide granular information about the opinions related to words that appear in the text, such as the attributes of products or services. |
| Custom | Custom text classification (preview) | Build an AI model to classify unstructured text into custom classes that you define. |
| Prebuilt | Text Summarization (preview) | This pre-configured feature extracts key sentences that collectively convey the essence of a document. |
Language Service Models Documentation
The Speech service provides speech-to-text and text-to-speech capabilities with an Azure Speech resource. You can transcribe speech to text with high accuracy, produce natural-sounding text-to-speech voices, translate spoken audio, and use speaker recognition during conversations.
Speech Service Documentation
Cloud search over private heterogeneous content, with options for AI enrichment if your content is unstructured or unsearchable in raw form.
Cognitive Search Documentation
Many of the pretrained models from the Hugging Face library can be used, depending on the task selected! Find more information at https://huggingface.co/models?pipeline_tag=text-classification&sort=downloads
 Hugging Face model repository
- Github account
- Azure Command Line interface installed. The Azure Command-Line Interface (CLI) is a cross-platform command-line tool that can be installed locally on Windows computers. You can use the Azure CLI for Windows to connect to Azure and execute administrative commands on Azure resources. This accelerator uses Azure CLI to deploy a set of services provided by the templates within your cloned repo, in just a few lines of code.
(https://docs.microsoft.com/en-us/cli/azure/install-azure-cli) - Ensure your subscription has Microsoft.DocumentDB enabled
To confirm/enable:- Navigate to your subscription within portal.azure.com
- Select Resource Providers at bottom of left navigation pane
- Within the Filter by name menu, search for Microsoft.DocumentDB
- Once Microsoft.DocumentDB is found, check if the status is marked as "Registered". If marked as "NotRegistered", Select "Register"
Note: This process may take several seconds/minutes, be sure to refresh the entire browser periodically
- Ensure that you have accepted terms and conditions for Responsible AI:
You must initiate the creation of a "Cognitive services multi-service account" from the Azure portal to review and acknowledge the terms and conditions. You can do so here: Quickstart: Create a Cognitive Services resource using the Azure portal.
Once accepted, you can create subsequent resources using any deployment tool (SDK, CLI, or ARM template, etc) under the same Azure subscription.
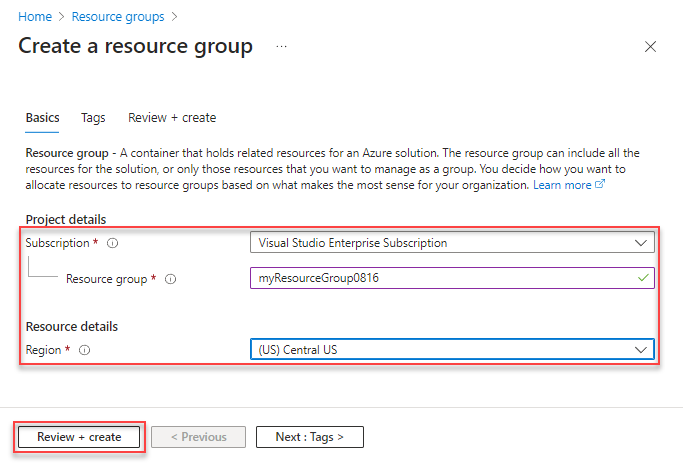
Create your Resource Group.
Note: When naming your Resource Group, please use lower case, alphanumeric characters only, as multiple Azure Services will be created later on, in the background, using your Resource Group name
Select your preferred Region
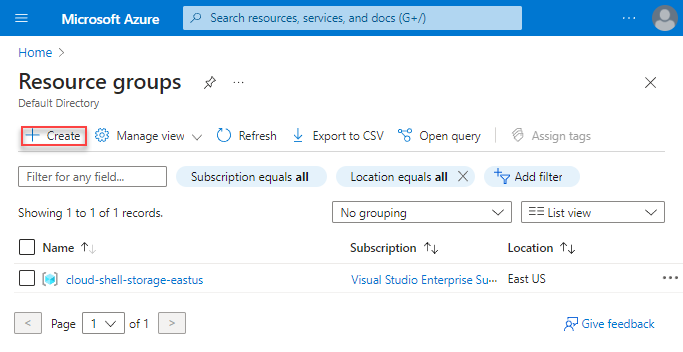
It will take several seconds for your Resource Group to be created.
For more help, refer to https://docs.microsoft.com/en-us/azure/azure-resource-manager/management/manage-resource-groups-portal
Fork https://github.com/Azure/business-process-automation to your github account.
For basic instructions for forking repos, please refer to https://docs.microsoft.com/en-us/azure/devops/repos/git/forks?view=azure-devops&tabs=visual-studio
Note: a Microsoft organization GitHub account is not required
- On your Git Hub repo page, click on your profile
- Select Settings (under your profile icon in the top right)

- Select Developer settings at bottom of left navigation pane

- Select Personal access tokens
- Select Generate new token
- Under Select scopes, select the checkbox for "workflow"

- Add your own note
- Select Generate token (at bottom of page)
- Copy your newly generated token
Note: Be sure to save this token for completing pipeline setup, else this token will need to be regenerated
For more help refer to https://docs.microsoft.com/en-us/azure/devops/organizations/accounts/use-personal-access-tokens-to-authenticate
In step 4, you'll clone your repo locally, and make small updates to two deployment template files, which will automate deployment of multiple Azure resources within your Resource group.
Navigate to and open for editing, templates/parameters.json.example in your local directory
- Open a local command window
- Clone the forked repo locally
git clone https://github.com/<your-account>/business-process-automation
- Navigate to your templates/parameters.json.example within your local repo
cd business-process-automation/templates
- Rename the file to "parameters.json"
Note: This is an important step to ensure successful deployment. The file can be renamed via the command line, a local File Explorer browser, or after opening via Visual Studio Code (see the below note)
ren parameters.json.example parameters.json
- Open parameters.json Note:*If you have Visual Studio Code installed, you can launch at the current directory by typing "code ."
C:\Users\<UserName>\business-process-automation\templates\code .
Update the three "value" fields below:

1. projectName: Must be a unique project name, only include lowercase, alphanumeric characters only, and keep length between ~10-16 characters. This name is used across multiple Azure resources, many with strict project naming conventions
2. repository token: Copy the personal access token you recently created
3. repository url: Paste the link of your forked repository - i.e., https://github.com/[your-account]/business-process-automation
Save updates
- Similarly, update your local deploy.yml file within the same directory
- Open the file C:\Users<UserName>\business-process-automation\templates\deploy.yml
- Update the field AZURE_FUNCTIONAPP_NAME with the name of your ResourceGroup
Note: You will later use this file to create a GitHub workflow, kicking off configuration of your Resource Group pipeline components
Save updates
- In your local repository, navigate to the 'templates' directory
- Run the below deployment code in your cmd window, after updating with your own project name and Resource Group
az deployment group create --name [yourProjectName] --resource-group <YourResourceGroup> --template-file main.json --parameters parameters.json
Note: Be sure to maintain spaces while updating the project name and resource group
Note: This may take several minutes to run
- When this has completed you should have the application infrastructure deployed to your resource group. You will see confirmation of numerous created Azure resources in your command window. Navigate to your Resource Group at your Azure Portal confirm to confirm your newly created resources.
azure.portal.com
In this sequence of steps you will retrieve credentials from your two newly created Azure Function Apps, and add them as Secrets in your GitHub repo.
- You will have two new function apps deployed within your Resource Group. Navigate to your Resource Group at your Azure Portal.
One will start with the name "huggingface".

Open the "huggingface" function app and in the "overview" tab there will be a button "Get publish profile" in the top center, which will then download a file. This will download as "[YourProjectName].PublishSettings.txt"
Note: It may take several seconds for the button to appear

2. Open the downloaded file, and copy the contents (to be pasted in upcoming steps)
3. Navigate back to your forked repo, go to Settings (local settings in the middle center) -> Secrets -> Actions

4. Select 'New Repository Secret'
- Paste the below name into the "Name" field
AZURE_HF_FUNCTIONAPP_PUBLISH_PROFILE
- Paste the contents of your recently downloaded "[YourProjectName].PublishSettings.txt" file into the "Value" field
- Repeat Steps 1-4 above the same process for the second newly created Azure Function App within your Resource Group, with the same name as your project name.
Note: For step 4 above, this second secret will be named
AZURE_FUNCTIONAPP_PUBLISH_PROFILE
- Navigate to "actions" tab
- Select "new workflow"
- Select set up workflow yourself

- This will take you to the editor for the main.yml file.
Delete all of the contents within the main.yml file. Copy all of the contents from your deploy.yml file from your local directory.
(C:\Users[UserName]\business-process-automation\templates\main.json) into the body.
 Finally, paste that selection into the editor window.
 - Run the workflow and select commit new file
Note: Once you've run your workflow once, you'll want to delete previous workflow runs to prevent buildup of old workflows.- Select "Start Commit"
- Select "Commit New File"
- View the progress of your actions under the "Actions" tab. This process will take several minutes to complete.
You can also view real-time logs from your Azure Function Apps:
- Navigate to your Azure Portal, and select your Function APP, named after your project name
- Select "Log Stream" in the left navigation pane (towards the bottom; may have to scroll down)
- Switch the stream from "File System Logs" to "App Insights Logs" via the drop down menu, directly above your log window
- Navigate to your Resource Group within your Azure Portal
- Select your static webapp
- Within the default Overview pane, Click on your URL, which will take you to your newly launced WebApp!

- Select Configure a New Pipeline
Important: When naming your pipeline, please choose a length greater then 5 characters to satisfy naming requirements of various Azure Services created through the pipeline

- Select your input file(s) type
Note: The .pdf input tile can accomodate several image input file format types (including, JPEG, PNG, BMP, TIFF) More information at https://docs.microsoft.com/en-us/azure/applied-ai-services/form-recognizer/faq
Generally, please refer to the supported file types required by the various Azure Cognitive Services (documentation sections linked in Reference). - Next, continue building your pipepline by selelecting which analytical service you would like to apply:
- Depending on your selection, new analytical services will appear. For example, if you start your pipeline with a .pdf document, your available Services within the pipeline builder will show Services compatible with .pdf inputs (e.g. Form Recognizer General Layout Pretrainted model). After adding a pipeline step, such as the aforementioned Layout Service, your data may be transformed to a different output (in this case text), and your pipeline builder will now show Services compatible with text inputs (e.g. Language Services such as text summarization).

Alternatively, you can first OCR the raw image to text, by selecting Form Recognizer's OCR Service, after which your app will show new options that are available to you for processing converted text

4. To complete your pipeline, select the tile "Export Last Stage to DB"
5. Navigate to "Home"

6. Select "Ingest Documents"
7. Upload your first document! Once your document upload is completed, You'll see a message indicating "Upload Successful". You can upload more than one document at a time here.
Note: The first document loaded may take several minutes. However, all subsequent documents should be processed much faster
When using a custom Hugging Face model, you'll be prompted select your desired model by specifiying the model name. To do so, you'll need to navigate to https://huggingface.co/models, filter on "Token Classification" (task), "PyTorch" (libraries), and "transformers" (libraries). Select your model from the filtered model list, and copy the modelID. See Images below for further guidance - if you're not using a HuggingFace model, skip to the next step.
Note: When pasting the model ID, be sure to paste without quotes - see below image

Specifying Hugging Face model name

Searching and filtering for BPA compatible Hugging Face models

Retreiving the Hugging Face model name
Your results will be stored in a Cosmos database within your Azure Resource Group.
- Navigate to your cosmosDB in your Azure Resource Portal (which will also have the same name as your project name)

- Navigtate to your Data Explorer
- For help on using Azure Cosmosmos DB explorer for the first time, please see Work with data using Azure Cosmos DB Explorer
- The "items" folder (image below) will contain your pipeline output
- You should see a container, named after your project name. Select that container
- You will see a SQL query, named after your project name. Select that query
- Within that query, Select Items. Here you should see multiple items
- The first item will be your pipeline metadata
- The second will be contain the output from your first document
- An additional item will be created for each uploaded document

If a Cognitive Search index was added to the pipeline, you will need to navigate to your newly created Cognitive Search Resource within that same Resource Group.

Generated Cognitive Search Index
All code for the front end React-based UI is provided for further customization (see references for designing and customizing React apps).
Generally, Services with text outputs (e.g. Azure Language Service, and many Services from Form Recognizer and Speech Service) will return a JSON response, where the key output is passed to the next stage of the pipeline for continued processing, or finally stored in a CosmosDB (see image below). Each of these intermediate outputs, will also be added to a Cognitive Search Index, if the feature is added to the end of the pipeline.
Leveraging this accelerator as part of a broader pipeline is encouraged! The AI Rangers / AI Specialist CSA teams would love to hear about future use cases. See references for more contact information.

Please reach out to the AI Rangers for more info or feedback aka.ms/AIRangers
| Priority | Item |
|---|---|
| Impending | Adding instructions on basic UI customizations (e.g. adding header graphics, changing title, etc..) |
| TBD | ... |
| Subject | Source (Link) |
|---|---|
| React source template | This project was bootstrapped with Create React App |
| Azure Form Recognizer | https://docs.microsoft.com/en-us/azure/applied-ai-services/form-recognizer/concept-model-overview |
| Azure Language Service | https://docs.microsoft.com/en-us/azure/cognitive-services/language-service/overview |
| Azure Speech Service | https://docs.microsoft.com/en-us/azure/cognitive-services/speech-service/overview |
| Azure Cognitive Search | https://azure.microsoft.com/en-us/services/search/ |
| HuggingFace | https://huggingface.co/models?pipeline_tag=text-classification&sort=downloads |
| Additional Model Documentation | tbd |


![dependabot[bot] avatar](https://avatars.githubusercontent.com/in/29110?v=4 "dependabot[bot]")

![microsoft-github-operations[bot] avatar](https://avatars.githubusercontent.com/in/41902?v=4 "microsoft-github-operations[bot]")
