Git Product home page Git Product logo

magspoof's Introduction

MagSpoof - credit card/magstripe spoofer

  • Allows you to store all of your credit cards and magstripes in one device
  • Works on traditional magstripe readers wirelessly (no NFC/RFID required)
  • Can disable Chip-and-PIN (code not included)
  • Correctly predicts Amex credit card numbers + expirations from previous card number (code not included)
  • Supports all three magnetic stripe tracks, and even supports Track 1+2 simultaneously
  • Easy to build using Arduino or other common parts

MagSpoof is a device that can spoof/emulate any magnetic stripe or credit card. It can work "wirelessly", even on standard magstripe/credit card readers, by generating a strong electromagnetic field that emulates a traditional magnetic stripe card.

Note: MagSpoof does not enable you to use credit cards that you are not legally authorized to use. The Chip-and-PIN and Amex information is not implemented and using MagSpoof requires you to have/own the magstripes that you wish to emulate. Simply having a credit card number and expiration is not enough to perform transactions. MagSpoof does allow you to perform research in other areas of magstripes, microcontrollers, and electromagnetism, as well as learn about and create your own devices similar to other existing, commercial technologies such as Samsung MST and Coin.

Visualizing magstripe data

MagSpoof can be used as a traditional credit card and simply store all of your credit cards (and with modification, can technically disable chip requirements) in various impressive and exciting form factors, or can be used for security research in any area that would traditionally require a magstripe, such as readers for credit cards, drivers licenses, hotel room keys, automated parking lot tickets, etc.

Live demonstration and more details available in the video: MagSpoof

Point of Contact: @SamyKamkar // [email protected] // http://samy.pl

Released: November 24, 2015

Source code / schematic: https://github.com/samyk/magspoof


How magnetic stripes work

Visualizing magstripe data

Magnetic stripes (magstripes) are in fact magnetic. What's so cool about magstripes is that while the magnetic strips inside are weak, they're still strong enough to attract small ferrous particles and wide enough that we can fully extract all data from a magstripe or credit card with the naked eye.

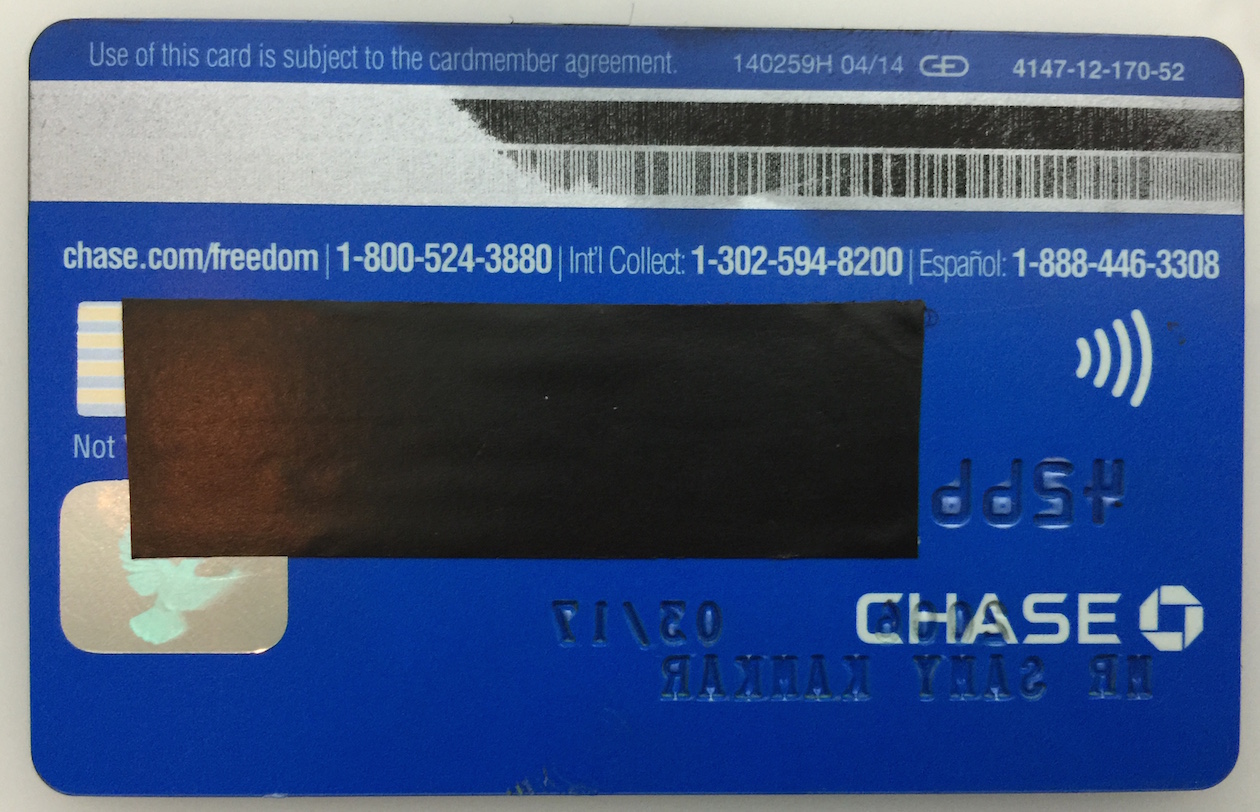
In the video, I actually dip my credit card into a bag of iron oxide. The magnetic elements in the magstripe attract the iron oxide and after pulling it out, you can actually see each bit in the tracks. Financial cards with magnetic strips can have up to three tracks, however credit cards only have two tracks (Tracks 1 and 2). Track 2 stores fewer bits than Track 1, so it has a lower linear density (bits per inch). This makes Track 2 much easier to see. Let's take a look:

Credit card magnetic stripe

Front of card:

Credit card magnetic stripe

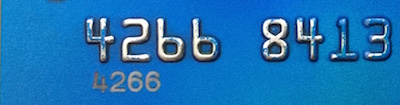
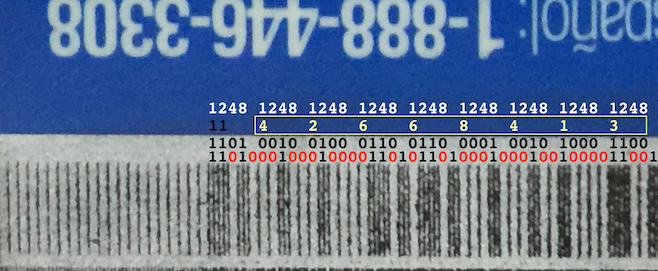
As you can see on my card, I've written out the bits above the strips. Two solid stripes is a 1 and a stripe followed by a space is a 0. First, let's flip the card 180 degrees (looking at it upside down), and read it as least significant bit first. We ignore all the initial 0's until the very first 1.

Track 2 is 5 bits per character, least significant bit first, and the 5th bit is an odd parity bit. By taking each 5 bits and reading the first 4 bits, we can now begin extracting the credit card number (and other data, such as expiration date, discretionary data, CVV/CVC/CSC/CID/CAV depending on card type).

Note that the CVV is different than the CVV2. The CVV is stored on the magstripe, while the CVV2 is printed on a card. (CVV is specific to Visa, and each issuer has their own name such as CSC, CVC, etc.)

Credit card magnetic stripe


How MagSpoof Works

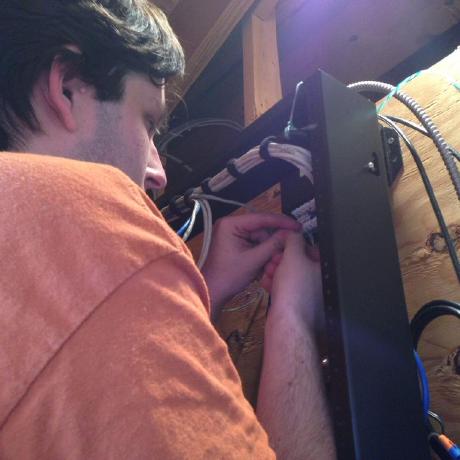
MagSpoof emulates a magnetic stripe by quickly changing the polarization of an electromagnet, producing a magnetic field similar to that of a normal magnetic stripe as if it's being swiped. What's incredible is that the magstripe reader requires no form of wireless receiver, NFC, or RFID -- MagSpoof works wirelessly, even with standard magstripe readers. The stronger the electromagnet, the further away you can use it (a few inches in its current iteration).

MagSpoof also uses inexpensive, off the shelf parts (described in the Hardware section), and can be built with almost nothing more than an Arduino, wire and a battery! I use a motor driver to provide a reasonable amount of power.

Normally electromagnets have an iron core, however we lose the core for the sake of space and portability. Also, while the iron core does make the electromagnet more efficient, we still produce more than enough power to work.

MagSpoof improves on new cards such as Coin. I'm a customer of Coin, and while I love their app and the card, the card actually works a very small percentage of the time. After looking over Coin's FCC docs, I noticed they use two coils to produce a (very small) electromagnetic field, however it's severely deficient and the card works less than 50% of the time for me, sadly.

I found that by emulating a card with MagSpoof, if I send Track 1 one way, and then send Track 2 reversed, every card reader will assume I simply swiped a card back and forth, use the data from both tracks and my strong electromagnet, and properly read all of the data. This is extremely effective, uses only a single coil, and works for both tracks simultaneously. This also allows MagSpoof to work on Track 3.

Additionally, if you're using a Chip card with Coin, you still need to bring your actual credit card to dip, however because MagSpoof can disable Chip-and-PIN (see below), it does not require you to bring your card with you.

I've removed the Chip-and-PIN disabling functionality from MagSpoof.


Security Issues

One of the primary issues I've found is that some of the new forms of security (well, new in the US) are set in the "service code" portion of the magstripe, most specifically Chip-and-PIN.

The service code within a credit card magstripe defines several attributes of the card, including whether the card can dispense cash, where it can work (nationally, internationally), and most interestingly, whether the card has a built in IC (Chip) and if it has a pin (Chip-and-PIN / EMV).

If your card has a chip inside and you go to a retailer that supports Chip but swipe just your magstripe, the point of sale (PoS) system will ask you to dip your card/chip for additional security if it supports it.

However, the bits stating the card has Chip-and-PIN can be turned off from the magstripe. This means if you take a card to a retailer that would normally request you to dip, you can actually get away with not dipping your chip at all while performing a successful transaction, evading the security measures altogether.

Credit Card Service Codes


American Express Card Number Prediction

What initially led me to investigate magnetic stripes was my Amex card. After losing a card and Amex quickly sending me a replacement, I noticed many of the digits were similar. I pulled up the numbers to several other Amex cards I had, and then compared against more than 20 other Amex cards and replacements and found a global pattern that allows me to accurately predict American Express card numbers by knowing a full card number, even if already reported lost or stolen.

This means if I were to obtain your Amex card and you called it in as lost or stolen, the moment you get a new card, I know your new credit card number.

I also know the new expiration date as the expiration date is fixed based on when the new card was requested, and you can determine if the new card has been requested by performing an auth on the existing card.

The CID (aka CVV2 on Visa) printed on the card is protected by a secret 3DES key that encrypts the PAN (Primary Account Number, aka credit card number), service code (see above), and expiration. The service code can be easily determined as most cards will contain the same service code.

I also determined that the CSC (essentially behaves like a CID or CVV2 on the magstripe) for a lost or stolen card continues to work for a newer, predicted card. An attacker would be able to use a stolen card's CSC with the predicted card number and expiration to make actual purchases.

To actually perform the transaction without arousing suspicion, an attacker would be able to use a magstripe writer (e.g., the well known MSR605), or a device like MagSpoof, to "load" the newly devised card information onto a card like Coin. Coin itself does not actually verify the CID (CVV2), thus allowing an attacker to load data, and then use the Coin card in person without knowing the CID and exploiting these various issues, as well as disabling Chip-and-PIN.

I notified American Express of the issue and I will not be releasing their algorithm.


Hardware

MagSpoof

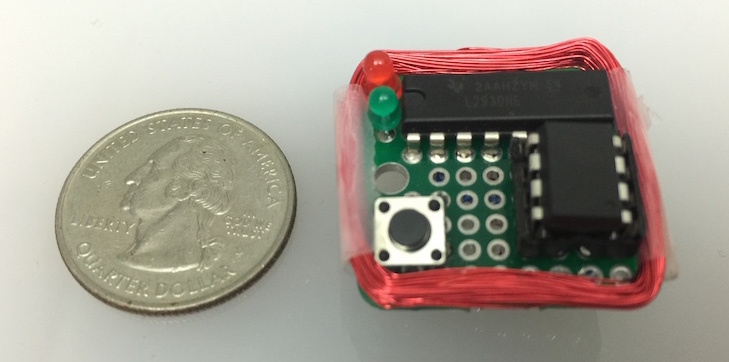
Atmel ATtiny85 (microcontroller)

An Atmel ATtiny85 is the microcontroller to drive the entire system. It stores all of the magnetic stripe / credit card data. In a thinner, credit-card sized (0.8mm thick!) version, I use an [ATtiny10].

L293D H-Bridge (motor driver)

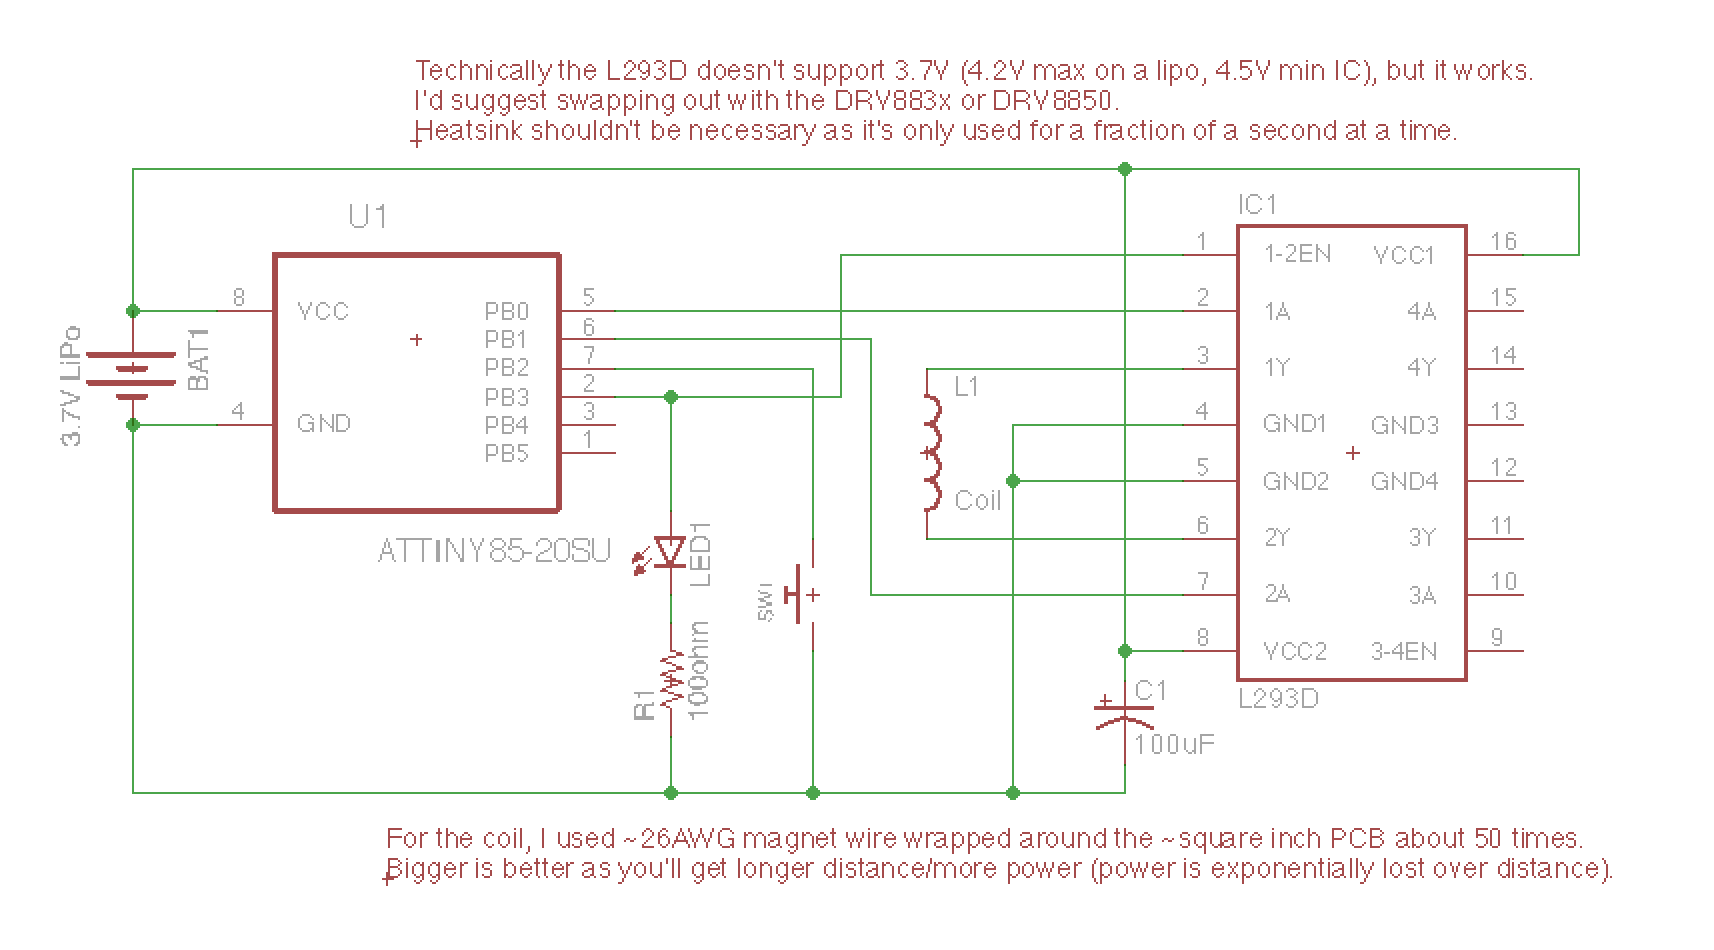
I use an L293D H-bridge to drive the electromagnet. The L293D is a motor driver, but motors are actually driven by the electromagnet(s) and magnets inside of them. Any standard driver should work here. Technically the L293D doesn't work down at 3.7V (voltage of the LiPo battery), but it works surprisingly well. In the credit-card size version, I suggest using a the TI DRV8835 or TI DRV8833.

I use somewhere around ~24AWG magnet wire to act as the coil to produce the electromagnetic field. This piece of wire incredibly produces an electromagnetic field that makes the card reader believe a card is being swiped. Incredible. By rapidly controlling the polarization of this field, the magstripe reader believes the flipped bits of a real card are being swiped through the reader.

A small 100mAh 3.7V lipo battery powers our contraption. For the credit card size version (not shown here), I use a battery from PowerStream.

Keep enough energy in this capacitor to provide the electromagnet with power when we need it, otherwise it will pull too much current and reset the microcontroller. This is the capacitor kit I use as it has all the standard values I'd need.

To signal to us when we transmit information. I use this LED kit as it has a nice variety of LEDs.

Don't burn out the LED.

Initiate the electromagnet.

For soldering everything together.

MagSpoof Schematic (DIP version)


Firmware

MagSpoof

MagSpoof's source code and schematic can be obtained in entirety from my github: https://github.com/samyk/magspoof

MagSpoof is compatible with the Arduino framework and can work on traditional Arduinos as well as ATtiny chips.


Resources

You can learn about magnetic stripes and credit cards from a few places, including:


Contact

Point of Contact: @SamyKamkar

You can see more of my projects at http://samy.pl or contact me at [email protected].


magspoof's People

Contributors

aowie1 avatar goofwear avatar sabas1080 avatar samyk avatar tablatronix avatar tamsky avatar xkey10x avatar

Stargazers

 avatar  avatar  avatar  avatar  avatar  avatar  avatar  avatar  avatar  avatar  avatar  avatar  avatar  avatar  avatar  avatar  avatar  avatar  avatar  avatar  avatar  avatar  avatar  avatar  avatar  avatar  avatar  avatar  avatar  avatar  avatar  avatar  avatar  avatar  avatar  avatar  avatar  avatar  avatar  avatar  avatar  avatar  avatar  avatar  avatar  avatar  avatar  avatar  avatar  avatar  avatar  avatar  avatar  avatar  avatar  avatar  avatar  avatar  avatar  avatar  avatar  avatar  avatar  avatar  avatar  avatar  avatar  avatar  avatar  avatar  avatar  avatar  avatar  avatar  avatar  avatar  avatar  avatar  avatar  avatar  avatar  avatar  avatar  avatar  avatar  avatar  avatar  avatar  avatar  avatar  avatar  avatar  avatar  avatar  avatar  avatar  avatar  avatar  avatar  avatar

Watchers

 avatar  avatar  avatar  avatar  avatar  avatar  avatar  avatar  avatar  avatar  avatar  avatar  avatar  avatar  avatar  avatar  avatar  avatar  avatar  avatar  avatar  avatar  avatar  avatar  avatar  avatar  avatar  avatar  avatar  avatar  avatar  avatar  avatar  avatar  avatar  avatar  avatar  avatar  avatar  avatar  avatar  avatar  avatar  avatar  avatar  avatar  avatar  avatar  avatar  avatar  avatar  avatar  avatar  avatar  avatar  avatar  avatar  avatar  avatar  avatar  avatar  avatar  avatar  avatar  avatar  avatar  avatar  avatar  avatar  avatar  avatar  avatar  avatar  avatar  avatar  avatar  avatar  avatar  avatar  avatar  avatar  avatar  avatar  avatar  avatar  avatar  avatar  avatar  avatar  avatar  avatar  avatar  avatar  avatar  avatar  avatar  avatar  avatar  avatar  avatar

magspoof's Issues

No signal with MSR605X

I'm testing magspoof with a reader and writer MSR605X but is just ignored. I tried to send data to both heads but nothing the reader detect no signal.
Is there a special technology in other readers or maybe my self build magspoof is bad?
Thank you for the support.

Question about track start sentinels

Hi,

Sorry if this isn't the appropriate place to ask questions. As I mentioned in a previous issue, I have successfully created a magspoof. I used a USB card reader to grab the tracks off of one of my cards. The Track 1 data begins with the usual '%' sentinel and Track 2 with a ';'. The track information was added to the magspoof code and uploaded to an Attiny85. However, when I attempt to use the magspoof on my card reader, everything comes back correctly, except the sentinels for both tracks. In both cases, they are replaced with a '+' symbol. Is this intentional? I'm wondering if I have some sort of timing glitch on the first characters. I have also, thus far, been unable to read both tracks simultaneously with the card reader, using magspoof. I am still digesting the code, and it is possible that these are separate issues, but I was wondering if you might have some helpful input.

Schematic or Code error on LED pin

Hi,

The schematic shows that the LED is hooked to physical pin 3 of the ATtiny85, however, the code intializes ENABLE_PIN (which is the LED) to PB3. According to my testing, and the ATtiny85 testing sheet, PB3 is on physical pin 2. So either the code is wrong or the schematic.

Not a big deal, but it would be nice to have it corrected.

emulate track1 and track2

Hello I tried to emulate track1 and track2 at a time. I know you have emulated same but you emulated it in back n forth fashion. I want to emulate it in a single one direction swipe. I did a minor tweak in code but it doesnt work.

`if (track == 0)
{

// zeros in between
for (int i = 0; i < BETWEEN_ZERO; i++)
  playBit(0);

track++;

for (int i = 0; tracks[track][i] != '\0'; i++)
{
crc = 1;
tmp = tracks[track][i] - sublen[track];

for (int j = 0; j < bitlen[track]-1; j++)
{
  crc ^= tmp & 1;
  lrc ^= (tmp & 1) << j;
  playBit(tmp & 1);
  tmp >>= 1;
}
playBit(crc);

}

// finish calculating and send last "byte" (LRC)
tmp = lrc;
crc = 1;
for (int j = 0; j < bitlen[track]-1; j++)
{
crc ^= tmp & 1;
playBit(tmp & 1);
tmp >>= 1;
}
playBit(crc);
}`

Hotel cards

Hi, I tested magspoof works nicely, but I have tried the hotel entrance cards but I do not get any data, probably the reader will not read the data that is not according to the standard. How do I get my hotel card data? Thanks

Powered by CR2032?

It seems as if all of the elements of the circuit (using the alternate motor driver, DRV8835) can run on 3V, and the button-cell has a significantly-higher mAh rating. Is there anything preventing the usage of a coin-cell battery to power this device? Would the field be so small, it'd be practically-unusable?

Consider L9110H

Hi,

I've successfully built a magspoof, but I substituted the L9110H H-Bridge drivr 8 pin DIP package for your L293D H-Bridge driver. My choice seems to work just fine, and seems to be a much better fit as it is considerably smaller, designed to function on 3.3v inputs, and contains exactly the number of pins needed for the magspoof. I'm submitting it as a suggestion. Here's the datasheet: http://www.elecrow.com/download/datasheet-l9110.pdf

"Error reading card" on some terminals

Hi Samy & GitHub community

For the most part, I have it working. This seems to work on about 70% of the terminals I have used it on. I have been using it for about 3 weeks now non stop (poor bank account).
But at some terminals, it just wont work. It says, "Error Reading Card". Do you know what might be causing this problem?
I think could be one of these:

  • Coil
  • Code
  • Motor Driver (DRV8833)
  • Power output

I have tested with the original card it has cloned and the card works fine on the specific terminal.
Have you or anyone else run into this issue before and would you have any ideas on what the issue could be and how to fix it?

Looking forward working past this issue so I can leave my credit card in my wallet.

If anyone has any questions, I would be happy to answer.

I also have videos of it working and a video of it failing if that would help anyone.

Having trouble sending ASCII control characters (windows key, alt key, function keys, etc.)

I've got my MagSpoof running perfectly, but...

I want to know how to send ASCII control characters, such as (Win+R) or (Ctrl+C) or (Ctrl+V) as data on one of my tracks.

This is the code for my track array:

const char* tracks[] = {
"%B123456781234567^LASTNAME/FIRST^YYMMSSSDDDDDDDDDDDDDDDDDDDDDDDDD?\0", // Track 1
";123456781234567=YYMMSSSDDDDDDDDDDDDDD?\0" // Track 2
};

What should I set track[3] equal to in order to transmit ASCII control characters from my MagSpoof?

legality

Is using something like this legal? (With your own cards ofc)

Missing Line from magspoof.c

Line 31 of magspoof.c starts of with a string and line 33 ends with an closing semicolon that doesn't pair with anything.

Looking into the file history, it appears that the first line in this statement got deleted:

const char* tracks[] = {
"%B123456781234567^LASTNAME/FIRST^YYMMSSSDDDDDDDDDDDDDDDDDDDDDDDDD?\0", // Track 1
";123456781234567=YYMMSSSDDDDDDDDDDDDDD?\0" // Track 2
 };

issue playing track 2+3 without track 1

hello, i am new to this and would like to understand what i am doing wrong. i just want to use track 2 and 3. the start sentinel of each are ";"
btw i am using the original magspoof.c of samyk.
// consts get stored in flash as we don't adjust them
const char* tracks[] = {
";672xxxxxxxxxxxxxxxxx=xxxxxxxxxxxxxxxxxx?\0", // Track 2
";01xxxxxxxxxx=xxxxxxxxxxxxxxx=xxxxxxxxxxxxxxxxxxxxxxxxxxxxxxxxxxxxxxxxxx==x=xxxxxxxxxxxxxxxx?\0", // Track 3
};

it will only use the 2nd row beginning with ";01 blabla when i press the button. row 1 is ignored.
when i use "%672 blabla it works without any issues. but "%" is the start sentinel of track 1 which i dont need.

how do i have to change code to accept track 2 and track 3 only?

thank you and best reagrds

Feature request: for dummies usage guide

It would be great to have a "for dummies" kind of guide teaching how to input your card data in the tracks variable. This would really help those who are only interested in using this as a personal gadget and not as a research/security testing tool.

Thanks =)

CR2032 and no motor driver?

I'd like to replicate this build / project but I have a few questions (so this is not really an "issue"):

First, I have found this web page http://www.idogendel.com/en/archives/507 which states that the motor driver is not really needed, because you don't necessarily have to switch the polarity of the magnetic field, turning it on and off with a transistor would be enough. Is that actually true?

Second, what about powering the circuit with a CR2032 cell? (I am aware of #17 ) The current project doesn't seem to have any discharge protection to protect the Lipo cell from over-discharge, does it?

A typical CR2032 has >200mAh, and the ATtiny needs almost nothing (0.3 µA = 0.0003 mA is what I've read, so, a battery standby time of basically infinity.

Can I just replace the Lipo battery cell with a CR2032 or does that not provide enough power for the coil? Does anyone happent to have schematics for that mod? Should / Do I need to increase the capacity of C1?

Having a license?

Hi @samyk

Nice job!

I would appreciate if you can define a license for all of this information; whatever you want, but it would be useful to know which one that leaving it under people and laws interpretations.

Thanks so much to release this information.

Magspoof sounds different than a card

I've constructed magspoof according to the schematic here with all the same parts as the video, except that it is on a breadboard and running at 5v. (I also tried 3.3v with the same results.) I acquired information from one of my cards with the Android app Rhombus and was able to place a zip tie in the Coin reader to get both tracks off my card. After programming my microcontroller with the card data I am unable to get it to function with the coin app or Rhombus which also accepts some partial data. After listening to the audio output of the coin in regular usage (swiping my card) and while held near my magspoof coil the difference in sound is apparent. The real card has a much softer quality and sounds a lot like sliding a card along a surface. In contrast holding the reader above my coil has greatly varying results depending on the position and orientation of the reader. If I hold the coin reader centered above the coil there is a relatively faint signal, while holding the center over the extreme edge of the coil produces a signal several times greater. Both have a harsh "digital" sound which is very unlike the normal card swipe. Also I believe the signal from magspoof was longer than the card swipe, but that may be only related to how quickly I moved the card. Hopefully I will be able to gain access to an oscilloscope for further testing in two weeks or so, but in the meantime I was wondering if anyone had any suggestions for how I might troubleshoot this further.

Second LED Missing From Schematic

Maybe this is a dumb question, but the photos (protoboard) show two LEDs but the diagram only has one? (Also, photos of the backside of the board would be awesome). I'm just trying to recreate it for fun.

It's sending the same track 3 times in a row

I reproduced the circuit on a breadboard and I uploaded the code provided. I am testing it with a Magtek card reader and when I try to have magspoof send a track of data my card reader says it is sending the data 3 times in a row. I had the arduino print the data being sent over serial and it seems to only be sending the data once. Am I making a mistake somewhere?

Thank you

Plays Track1+2, then ONLY Track 2 every other "press"

With the current implementation of the code, the first time you press the button, it will call playTrack(1), then next time you press the button, it will call playTrack(2) (because of how it keeps track and increments curTrack)

This doesn't make a lot of sense, because when calling playTrack(1), it will actually play BOTH tracks because of this if statement within the method:

  if (track == 0)
  {
    // if track 1, also play track 2 in reverse
    // zeros in between
    for (int i = 0; i < BETWEEN_ZERO; i++)
      playBit(0);

    // send second track in reverse
    reverseTrack(2);
  }

Then after playing both tracks, next time you press the button it will call playTrack(2) which will ONLY play the 2nd track because that if statement isn't satisfied.

Essentially this means that every other time you press the button, the magspoof will ONLY play track 2. All other times it will play both tracks.

This doesn't make a lot of sense, and it should probably be changed by either:

  1. Getting rid of curTrack entirely, and simply replace the line
    playTrack(1 + (curTrack++ % 2)); with playTrack(1)

OR

  1. Remove the reverse track implementation entirely, then simply call playTrack(1) and playTrack(2) sequentially.

Read error

HI,
I have built my magspoof but it steel doesn't word: every time my readers ( i have 2) say read error
even if the information of the track is correct. I don't understand why. A wrong coil can do this sort of errors?
Thanks for your answer

Emulation issues using DIY MagSpoof

Hi All

So I have just built my first magspoof and seem to be have a few issues.

I brought a magnetic card reader to dump my card details. When I swipe my card with the reader I get:
%B4548605864141234^JAMES SMITH ^2107205100000000000000208000000?;4548605864141234=21072051000000000208?
(I have altered the data, THIS IS NOT MY ACTUAL CARD DATA)

Now when I use my MagSpoof I have just created I get this:
Push button once:
%B4548605864141234^JAMES SMITH ^2107205100000000000000208000000?;E?+B4548605864141234^JAMES SMITH ^2107205100000000000000208000000?
Push button again (2nd time)
%E?;4548601577143445=21072051000000000208?+4548601577143445=21072051000000000208?

I would assume I just need to press the button once for it to print out just like it did when I originally swiped my card, but when I press the button the first time, it seems like it just prints Track 1 two times. once I press the button for a 2nd time, it seem to type Track 2 two times.

Does this seem like the correct behaviour, or have I done something wrong here?

Looking forward to getting this working 👍

An alternative to using iron oxide

I tried to extract card information using a card reader and free magstripper software. Apparently squareup card readers are now encrypted, but the encryption can still be disabled using the method described in this paper.
https://www.google.com/url?sa=t&source=web&rct=j&url=https://www.blackhat.com/docs/us-15/materials/us-15-Mellen-Mobile-Point-Of-Scam-Attacking-The-Square-Reader-wp.pdf&ved=0ahUKEwj3t-6d87_SAhVM6yYKHeSqBfAQFgglMAA&usg=AFQjCNFbDMjJWY5kEg5f2woOva9P5ZSdmQ&sig2=JkCWC4zcodQeX2Cg55w4Kg

makefile?

I wish to compile the archive magspoof.c

Recommend Projects

  • React photo React

    A declarative, efficient, and flexible JavaScript library for building user interfaces.

  • Vue.js photo Vue.js

    🖖 Vue.js is a progressive, incrementally-adoptable JavaScript framework for building UI on the web.

  • Typescript photo Typescript

    TypeScript is a superset of JavaScript that compiles to clean JavaScript output.

  • TensorFlow photo TensorFlow

    An Open Source Machine Learning Framework for Everyone

  • Django photo Django

    The Web framework for perfectionists with deadlines.

  • D3 photo D3

    Bring data to life with SVG, Canvas and HTML. 📊📈🎉

Recommend Topics

  • javascript

    JavaScript (JS) is a lightweight interpreted programming language with first-class functions.

  • web

    Some thing interesting about web. New door for the world.

  • server

    A server is a program made to process requests and deliver data to clients.

  • Machine learning

    Machine learning is a way of modeling and interpreting data that allows a piece of software to respond intelligently.

  • Game

    Some thing interesting about game, make everyone happy.

Recommend Org

  • Facebook photo Facebook

    We are working to build community through open source technology. NB: members must have two-factor auth.

  • Microsoft photo Microsoft

    Open source projects and samples from Microsoft.

  • Google photo Google

    Google ❤️ Open Source for everyone.

  • D3 photo D3

    Data-Driven Documents codes.