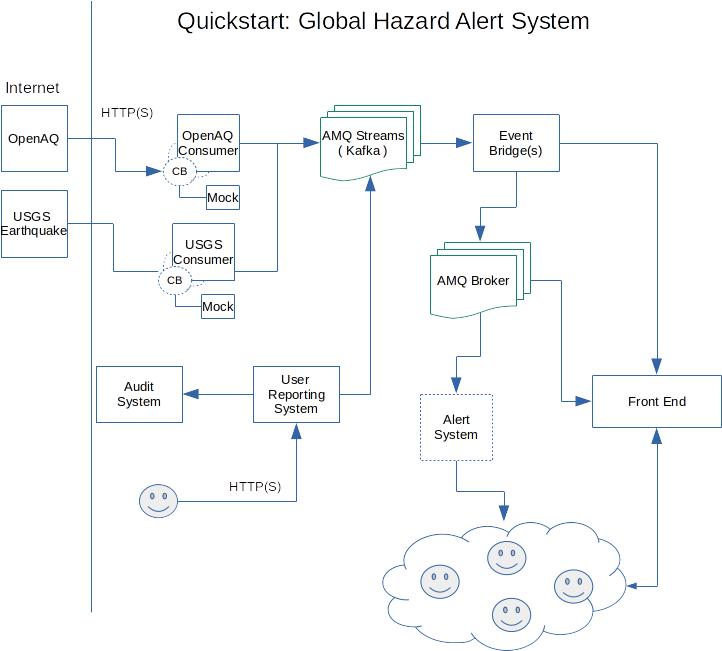
This demo shows how Camel K can be used as glue for connecting various eventing platforms together (Knative Eventing, Kafka and AMQ) to develop advanced real-life applications.
The scenario implemented here is a system that handles different types of hazards and alert information.
Make sure you check-out this repository from git and open it with VSCode.
Instructions are based on VSCode Didact, so make sure it's installed from the VSCode extensions marketplace.
From the VSCode UI, right-click on the readme.didact.md file and select "Didact: Start Didact tutorial from File". A new Didact tab will be opened in VS Code.
Make sure you've opened this readme file with Didact before jumping to the next section.
This example can be run on any OpenShift 4.3+ cluster or a local development instance (such as CRC). Ensure that you have a cluster available and login to it using the OpenShift oc command line tool.
You need to create a new project named camel-k-event-streaming for running this example. This can be done directly from the OpenShift web console or by executing the command oc new-project camel-k-event-streaming on a terminal window.
You need to install the Camel K operator in the camel-k-event-streaming project. To do so, go to the OpenShift 4.x web console, login with a cluster admin account and use the OperatorHub menu item on the left to find and install "Red Hat Integration - Camel K". You will be given the option to install it globally on the cluster or on a specific namespace.
If using a specific namespace, make sure you select the camel-k-event-streaming project from the dropdown list.
This completes the installation of the Camel K operator (it may take a couple of minutes).
When the operator is installed, from the OpenShift Help menu ("?") at the top of the WebConsole, you can access the "Command Line Tools" page, where you can download the "kamel" CLI, that is required for running this example. The CLI must be installed in your system path.
Refer to the "Red Hat Integration - Camel K" documentation for a more detailed explanation of the installation steps for the operator and the CLI.
This example uses AMQ Streams, Red Hat's data streaming platform based on Apache Kafka.
We want to install it on a new project named event-streaming-kafka-cluster.
You need to create the event-streaming-kafka-cluster project from the OpenShift web console or by executing the command oc new-project event-streaming-kafka-cluster on a terminal window.
Now, we can go to the OpenShift 4.x WebConsole page, use the OperatorHub menu item on the left hand side menu and use it to find and install "Red Hat Integration - AMQ Streams". This will install the operator and may take a couple minutes to install.
The installation of the AMQ Broker follows the same isolation pattern as the AMQ Streams one. We will deploy it in a separate project and will instruct the operator to deploy a broker according to the configuration.
You need to create the event-streaming-messaging-broker project from the OpenShift web console or by executing the command oc new-project event-streaming-messaging-broker on a terminal window.
Now, we can go to the OpenShift 4.x WebConsole page, use the OperatorHub menu item on the left hand side menu and use it to find and install "Red Hat Integration - AMQ Broker". This will install the operator and may take a couple minutes to install.
This demo also needs OpenShift Serverless (Knative) installed and working.
Go to the OpenShift 4.x WebConsole page, use the OperatorHub menu item on the left hand side then find and install "OpenShift Serverless" from a channel that best matches your OpenShift version.
The operator installation page reports links to the documentation where you can find information about additional steps that must be done in order to have OpenShift serverless completely installed into your cluster.
Make sure you follow all the steps in the documentation before continuing to the next section.
Validate all Requirements at Once!
OpenShift CLI ("oc")
The OpenShift CLI tool ("oc") will be used to interact with the OpenShift cluster.
Check if the OpenShift CLI ("oc") is installed{.didact}
Status: unknown{#oc-requirements-status}
Connection to an OpenShift cluster
In order to execute this demo, you will need to have an OpenShift cluster with the correct access level, the ability to create projects and install operators as well as the Apache Camel K CLI installed on your local system.
Check if you're connected to an OpenShift cluster{.didact}
Status: unknown{#cluster-requirements-status}
Apache Camel K CLI ("kamel")
Apart from the support provided by the VS Code extension, you also need the Apache Camel K CLI ("kamel") in order to access all Camel K features.
Check if the Apache Camel K CLI ("kamel") is installed{.didact}
Status: unknown{#kamel-requirements-status}
Knative installed on the OpenShift cluster
The cluster also needs to have Knative installed and working. Refer to steps above for information on how to install it in your cluster.
Check if the Knative is installed{.didact}
Status: unknown{#kservice-project-check}
The following requirements are optional. They don't prevent the execution of the demo, but may make it easier to follow.
VS Code Extension Pack for Apache Camel
The VS Code Extension Pack for Apache Camel by Red Hat provides a collection of useful tools for Apache Camel K developers, such as code completion and integrated lifecycle management. They are recommended for the tutorial, but they are not required.
You can install it from the VS Code Extensions marketplace.
Check if the VS Code Extension Pack for Apache Camel by Red Hat is installed{.didact}
Status: unknown{#extension-requirement-status}
This demo simulates a global hazard alert system. The simulator consumes data from multiple public APIs available on the internet as well as user-provided data that simulates different types of hazards (ie.: crime, viruses, natural hazards and others). The system consumes data from sources such as OpenAQ API (an open API that is used to query air pollution information), USGS Earthquake Hazards Program, etc to consume data about hazards and present information about them and warn the user when certain incidents happen.
We switch to the event-streaming-kafka-cluster project to create the Kafka cluster:
oc project event-streaming-kafka-cluster
(^ execute{.didact})
The next step is to use the operator to create an AMQ Streams cluster. This can be done with the command:
oc create -f infra/kafka/clusters/event-streaming-cluster.yaml
(^ execute{.didact})
Depending on how large your OpenShift cluster is, this may take a little while to complete. Let's run this command and wait until the cluster is up and running.
oc wait kafka/event-streaming-kafka-cluster --for=condition=Ready --timeout=600s
(^ execute{.didact})
You can can check the state of the cluster by running the following command:
oc get kafkas -n event-streaming-kafka-cluster event-streaming-kafka-cluster
(^ execute{.didact})
Once the AMQ Streams cluster is created. We can proceed to the creation of the AMQ Streams topics:
oc apply -f infra/kafka/clusters/topics/
(^ execute{.didact})
oc get kafkatopics
(^ execute{.didact})
At this point, if all goes well, we should our AMQ Streams cluster up and running with several topics.
To switch to the event-streaming-messaging-broker project, run the following command:
oc project event-streaming-messaging-broker
(^ execute{.didact})
Having already the operator installed and running on the project, we can proceed to create the broker instance:
oc create -f infra/messaging/broker/instances/amq-broker-instance.yaml
(^ execute{.didact})
We can use the oc get activemqartermis command to check if the AMQ Broker instance is created:
oc get activemqartemises
(^ execute{.didact})
If it was successfully created, then we can create the addresses and queues required for the demo to run:
oc apply -f infra/messaging/broker/instances/addresses
(^ execute{.didact})
Now that the infrastructure is ready, we can go ahead and deploy the demo project. First, lets switch to the main project:
oc project camel-k-event-streaming
(^ execute{.didact})
We should now check that the operator is installed. To do so, execute the following command on a terminal:
oc get csv
(^ execute{.didact})
When Camel K is installed, you should find an entry related to red-hat-camel-k-operator in phase Succeeded.
NOTE: We use Jitpack to package the model project into a shared JAR that will be used by all integrations in this project. This configuration is handy but experimental and it may change in future versions. In a production scenario, we suggest you to deploy the model JAR into your own Maven registry and reference it in the platform configuration.
Most of the components of the demo use use the ./application.properties{.didact} to read the configurations they need to run. This file already comes with expected defaults, so no action should be needed.
Note: you can skip this step if you don't want to adjust the configuration
In case you need to adjust the configuration, the following 2 commands present information that will be required to configure the deployment:
oc get services -n event-streaming-messaging-broker
(^ execute{.didact})
oc get services -n event-streaming-kafka-cluster
(^ execute{.didact})
They provide the addresses of the services running on the cluster and can be used to fill in the values on the properties file.
We start by opening the file ./application.properties{.didact} and editing the parameters. The content needs to be adjusted to point to the correct addresses of the brokers. It should be similar to this:
kafka.bootstrap.address=event-streaming-kafka-cluster-kafka-bootstrap.event-streaming-kafka-cluster:9092
messaging.broker.url=tcp://broker-hdls-svc.event-streaming-messaging-broker:61616
One of the components simulates receiving data from users and, in order to do so, authenticate the users. Because we normally don't want the credentials to be easily accessible, it simulates checking the access control by reading a secret.
We can push the secret to the cluster using the following command:
oc create secret generic example-event-streaming-user-reporting --from-file application.properties
(^ execute{.didact})
With this configuration secret created on the cluster, we have completed the initial steps to get the demo running.
Now we will deploy the first component of the demo: ./OpenAQConsumer.java{.didact}
kamel run OpenAQConsumer.java
(^ execute{.didact})
Details: this starts an integration that consumes data from the OpenAQ API, splits each record and sends them to
our AMQ Stream instance. The demo addresses for the AMQ Streams broker is stored in the example-event-streaming which is inject into the demo
code and used to reach the instance.
The second component on our demo is a consumer{.didact} for events from the USGS Earthquake Alert System.
kamel run EarthquakeConsumer.java
(^ execute{.didact})
Details: this works in a similar way to the OpenAQ consumer.
This service leverages knative eventing channels to operate. Therefore, we need to create them on the OpenShift cluster. To do so we can execute the following command:
oc apply -f infra/knative/channels/audit-channel.yaml
(^ execute{.didact})
The Gatekeeper service{.didact} simulates a service that is used to audit accesses to the system. It leverages knative support from Camel-K.
kamel run GateKeeper.java
(^ execute{.didact})
Details: this works in a similar way to the OpenAQ consumer.
The User Report System{.didact} simulates a service that is used to receive user-generated reports on the system. It receives events sent by the user and sends them to the AMQ Streams instance. To run this component execute the following command:
kamel run UserReportSystem.java
(^ execute{.didact})
The service bridges consume the event data and prepare them for consumption.
This service consumes the pollution events and sends it to the timeline topic for consumption.
kamel run PollutionBridge.java
(^ execute{.didact})
kamel run EarthquakeBridge.java
(^ execute{.didact})
kamel run HealthBridge.java
(^ execute{.didact})
kamel run CrimeBridge.java
(^ execute{.didact})
kamel run TimelineBridge.java
(^ execute{.didact})
Now that we launched all the services, let's check the state of our integrations. We can do so with the command:
kamel get
(^ execute{.didact})
This web front end queries the timeline bridge service and displays the events collected at the time. We will use OpenShift build services to build a container with the front-end and run it on the cluster.
The front-end image leverages the official Apache Httpd 2.4 image from Red Hat's container registry.
We can proceed to creating the build configuration and starting the build within the OpenShift cluster. The following command replaces the URL for the timeline API on the Javascript code and launches an image build.
URL=$(oc get ksvc timeline-bridge -o 'jsonpath={.status.url}') ; cat ./front-end/Dockerfile| oc new-build --docker-image="registry.access.redhat.com/rhscl/httpd-24-rhel7:latest" --to=front-end --build-arg="URL=$URL" -D -
(^ execute{.didact})
With the build complete, we can go ahead and create a deployment for the front-end:
oc apply -f front-end/front-end.yaml
(^ execute{.didact})
The last thing missing is finding the URL for the front-end so that we can open it on the browser.
To find the public API for the service, we can run the following command:
oc get routes front-end-external -o 'jsonpath={.spec.port.targetPort}://{.spec.host}'
(^ execute{.didact})
Open this URL on the browser and we can now access the front-end.
To cleanup everything, execute the following command:
oc delete project camel-k-event-streaming event-streaming-messaging-broker event-streaming-kafka-cluster
(^ execute{.didact})


