


The GoCV package provides Go language bindings for the OpenCV 3 computer vision library.
The GoCV package supports the latest releases of Go and OpenCV (v3.4) on Linux, OS X, and Windows. We intend to make the Go language a "first-class" client compatible with the latest developments in the OpenCV ecosystem.
GoCV also supports Intel OpenVINO. Check out the OpenVINO README for more info on how to use GoCV with the Intel OpenVINO toolkit.
This example opens a video capture device using device "0", reads frames, and shows the video in a GUI window:
package main

import (
	"gocv.io/x/gocv"
)

func main() {
	webcam, _ := gocv.VideoCaptureDevice(0)
	window := gocv.NewWindow("Hello")
	img := gocv.NewMat()

	for {
		webcam.Read(&img)
		window.IMShow(img)
		window.WaitKey(1)
	}
}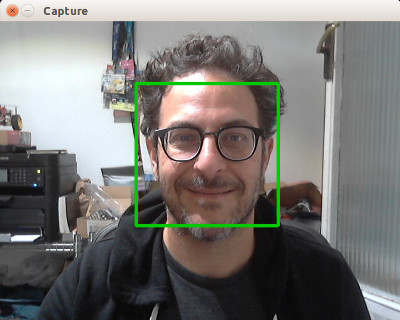
This is a more complete example that opens a video capture device using device "0". It also uses the CascadeClassifier class to load an external data file containing the classifier data. The program grabs each frame from the video, then uses the classifier to detect faces. If any faces are found, it draws a green rectangle around each one, then displays the video in an output window:
package main

import (
	"fmt"
	"image/color"

	"gocv.io/x/gocv"
)

func main() {
	deviceID := 0

	// open webcam
	webcam, err := gocv.VideoCaptureDevice(int(deviceID))
	if err != nil {
		fmt.Println(err)
		return
	}
	defer webcam.Close()

	// open display window
	window := gocv.NewWindow("Face Detect")
	defer window.Close()

	// prepare image matrix
	img := gocv.NewMat()
	defer img.Close()

	// color for the rect when faces detected
	blue := color.RGBA{0, 0, 255, 0}

	// load classifier to recognize faces
	classifier := gocv.NewCascadeClassifier()
	defer classifier.Close()

	if !classifier.Load("data/haarcascade_frontalface_default.xml") {
		fmt.Printf("Error reading cascade file: %v\n", xmlFile)
		return
	}

	fmt.Printf("start reading camera device: %v\n", deviceID)
	for {
		if ok := webcam.Read(&img); !ok {
			fmt.Printf("cannot read device %d\n", deviceID)
			return
		}
		if img.Empty() {
			continue
		}

		// detect faces
		rects := classifier.DetectMultiScale(img)
		fmt.Printf("found %d faces\n", len(rects))

		// draw a rectangle around each face on the original image
		for _, r := range rects {
			gocv.Rectangle(&img, r, blue, 3)
		}

		// show the image in the window, and wait 1 millisecond
		window.IMShow(img)
		window.WaitKey(1)
	}
}There are examples in the cmd directory of this repo in the form of various useful command line utilities, such as capturing an image file, streaming mjpeg video, counting objects that cross a line, and using OpenCV with Tensorflow for object classification.
To install GoCV, run the following command:
go get -u -d gocv.io/x/gocv
To run code that uses the GoCV package, you must also install OpenCV 3.4.1 on your system. Here are instructions for Ubuntu, OS X, and Windows.
You can use make to install OpenCV 3.4.1 with the handy Makefile included with this repo. If you already have installed OpenCV, you do not need to do so again. The installation performed by the Makefile is minimal, so it may remove OpenCV options such as Python or Java wrappers if you have already installed OpenCV some other way.
First, you need to change the current directory to the location of the GoCV repo, so you can access the Makefile:
cd $GOPATH/src/gocv.io/x/gocv
Next, you need to update the system, and install any required packages:
make deps
Now, download the OpenCV 3.4.1 and OpenCV Contrib source code:
make download
Build and install everything. This will take quite a while:
make build
After the installation is complete, you can remove the extra files and folders:
make clean
To verify your installation you can run one of the included examples.
First, change the current directory to the location of the GoCV repo:
cd $GOPATH/src/gocv.io/x/gocv
Now you should be able to build or run any of the examples:
go run ./cmd/version/main.go
The version program should output the following:
gocv version: 0.13.0
opencv lib version: 3.4.1
If you are not modifying gocv source, compile gocv to a static library, to significantly decrease your build times:
go install gocv.io/x/gocv
By default, pkg-config is used to determine the correct flags for compiling and linking OpenCV. This behavior can be disabled by supplying -tags customenv when building/running your application. When building with this tag you will need to supply the CGO environment variables yourself.
For example:
export CGO_CPPFLAGS="-I/usr/local/include"
export CGO_LDFLAGS="-L/usr/local/lib -lopencv_core -lopencv_face -lopencv_videoio -lopencv_imgproc -lopencv_highgui -lopencv_imgcodecs -lopencv_objdetect -lopencv_features2d -lopencv_video -lopencv_dnn -lopencv_xfeatures2d"
Please note that you will need to run these 2 lines of code one time in your current session in order to build or run the code, in order to setup the needed ENV variables. Once you have done so, you can execute code that uses GoCV with your custom environment like this:
go run -tags customenv ./cmd/version/main.go
You can install OpenCV 3.4.1 using Homebrew:
brew install opencv
If you already have an earlier version of OpenCV installed, you should probably upgrade it to the latest version, instead of installing:
brew upgrade opencv
To verify your installation you can run one of the included examples.
First, change the current directory to the location of the GoCV repo:
cd $GOPATH/src/gocv.io/x/gocv
Now you should be able to build or run any of the examples:
go run ./cmd/version/main.go
The version program should output the following:
gocv version: 0.13.0
opencv lib version: 3.4.1
If you are not modifying gocv source, compile gocv to a static library, to significantly decrease your build times:
go install gocv.io/x/gocv
By default, pkg-config is used to determine the correct flags for compiling and linking OpenCV. This behavior can be disabled by supplying -tags customenv when building/running your application. When building with this tag you will need to supply the CGO environment variables yourself.
For example:
export CGO_CXXFLAGS="--std=c++11"
export CGO_CPPFLAGS="-I/usr/local/Cellar/opencv/3.4.1_5/include"
export CGO_LDFLAGS="-L/usr/local/Cellar/opencv/3.4.1_5/lib -lopencv_stitching -lopencv_superres -lopencv_videostab -lopencv_aruco -lopencv_bgsegm -lopencv_bioinspired -lopencv_ccalib -lopencv_dnn_objdetect -lopencv_dpm -lopencv_face -lopencv_photo -lopencv_fuzzy -lopencv_hfs -lopencv_img_hash -lopencv_line_descriptor -lopencv_optflow -lopencv_reg -lopencv_rgbd -lopencv_saliency -lopencv_stereo -lopencv_structured_light -lopencv_phase_unwrapping -lopencv_surface_matching -lopencv_tracking -lopencv_datasets -lopencv_dnn -lopencv_plot -lopencv_xfeatures2d -lopencv_shape -lopencv_video -lopencv_ml -lopencv_ximgproc -lopencv_calib3d -lopencv_features2d -lopencv_highgui -lopencv_videoio -lopencv_flann -lopencv_xobjdetect -lopencv_imgcodecs -lopencv_objdetect -lopencv_xphoto -lopencv_imgproc -lopencv_core"
Please note that you will need to run these 3 lines of code one time in your current session in order to build or run the code, in order to setup the needed ENV variables. Once you have done so, you can execute code that uses GoCV with your custom environment like this:
go run -tags customenv ./cmd/version/main.go
The following assumes that you are running a 64-bit version of Windows 10.
In order to build and install OpenCV 3.4.1 on Windows, you must first download and install MinGW-W64 and CMake, as follows.
Download and run the MinGW-W64 compiler installer from https://sourceforge.net/projects/mingw-w64/?source=typ_redirect.
The latest version of the MinGW-W64 toolchain is 7.3.0, but any version from 7.X on should work.
Choose the options for "posix" threads, and for "seh" exceptions handling, then install to the default location c:\Program Files\mingw-w64\x86_64-7.3.0-posix-seh-rt_v5-rev2.
Add the C:\Program Files\mingw-w64\x86_64-7.3.0-posix-seh-rt_v5-rev2\mingw64\bin path to your System Path.
Download and install CMake https://cmake.org/download/ to the default location. CMake installer will add CMake to your system path.
Download the source code for the latest OpenCV release from https://github.com/opencv/opencv/archive/3.4.1.zip and extract it to the directory C:\opencv\opencv-3.4.1
Download the source code for the latest OpenCV Contrib release from https://github.com/opencv/opencv_contrib/archive/3.4.1.zip and extract it to the directory C:\opencv\opencv_contrib-3.4.1
Create the directory C:\opencv\build as the build directory.
Now launch the cmake-gui program, and set the "Where is the source code" to C:\opencv\opencv-3.4.1, and the "Where to build the binaries" to C:\opencv\build.
Click on "Configure" and select "MinGW MakeFile" from the window, then click on the "Next" button.
Click on the "Configure" button and wait for the configuration step.
Now, scroll down the list and change the following settings as follows:
BUILD_DOCSshould be unchecked (aka disabled).BUILD_TESTSshould be unchecked (aka disabled).BUILD_PERF_TESTSshould be unchecked (aka disabled).ENABLE_PRECOMPILED_HEADERSshould be unchecked.ENABLE_CXX11should be checked.OPENCV_EXTRA_MODULES_PATHshould be set toC:\opencv\opencv_contrib-3.4.1\modules
Click on the "Configure" button again, and wait for the configuration step.
Some new configuration options will have appeared. Scroll down the list and change the following settings as follows:
BUILD_opencv_saliencyshould be unchecked (aka disabled). OpenCV Contrib's "Saliency" module is unable to build on Windows with this toolchain at this time.
Click on the "Configure" button again, and wait for the configuration step.
Once it is complete, click on the "Generate" button, and wait for it to generate your make files.
Now run the following commands:
cd C:\opencv\build
mingw32-make
The build should start. It will probably take a very long time. When it is finished run:
mingw32-make install
Last, add C:\opencv\build\install\x64\mingw\bin to your System Path.
You should now have OpenCV 3.4 installed on your Windows 10 machine.
To verify your installation you can run one of the included examples.
First, change the current directory to the location of the GoCV repo:
cd %GOPATH%/src/gocv.io/x/gocv
Now you should be able to build or run any of the command examples:
go run .\cmd\version\main.go
The version program should output the following:
gocv version: 0.13.0
opencv lib version: 3.4.1
If you are not modifying gocv source, compile gocv to a static library, to significantly decrease your build times:
go install gocv.io/x/gocv
By default, OpenCV is expected to be in C:\opencv\build\install\include. This behavior can be disabled by supplying -tags customenv when building/running your application. When building with this tag you will need to supply the CGO environment variables yourself.
Due to the way OpenCV produces DLLs, including the version in the name, using this method is required if you're using a different version of OpenCV.
For example:
set CGO_CPPFLAGS=-IC:\opencv\build\install\include
set CGO_LDFLAGS=-LC:\opencv\build\install\x64\mingw\lib -lopencv_core341 -lopencv_face341 -lopencv_videoio341 -lopencv_imgproc341 -lopencv_highgui341 -lopencv_imgcodecs341 -lopencv_objdetect341 -lopencv_features2d341 -lopencv_video341 -lopencv_dnn341 -lopencv_xfeatures2d341 -lopencv_plot341 -lopencv_tracking341 -lopencv_img_hash341
Please note that you will need to run these 2 lines of code one time in your current session in order to build or run the code, in order to setup the needed ENV variables. Once you have done so, you can execute code that uses GoCV with your custom environment like this:
go run -tags customenv .\cmd\version\main.go
Please take a look at our CONTRIBUTING.md document to understand our contribution guidelines.
Then check out our ROADMAP.md document to know what to work on next.
The https://github.com/go-opencv/go-opencv package for Go and OpenCV does not support any version above OpenCV 2.x, and work on adding support for OpenCV 3 has stalled for over a year, mostly due to the complexity of SWIG.
The GoCV package uses a C-style wrapper around the OpenCV 3 C++ classes to avoid having to deal with applying SWIG to a huge existing codebase. The mappings are intended to match as closely as possible to the original OpenCV project structure, to make it easier to find things, and to be able to figure out where to add support to GoCV for additional OpenCV image filters, algorithms, and other features.
For example, the OpenCV videoio module wrappers can be found in the GoCV package in the videoio.* files.
This package was inspired by the original https://github.com/go-opencv/go-opencv project, the blog post https://medium.com/@peterleyssens/using-opencv-3-from-golang-5510c312a3c and the repo at https://github.com/sensorbee/opencv thank you all!
Licensed under the Apache 2.0 license. Copyright (c) 2017-2018 The Hybrid Group.
Logo generated by GopherizeMe - https://gopherize.me


