Git Product home page Git Product logo

e2's Introduction

Build Status

qmsk-e2

E2 Client, Tally system. Web UI with Presets.

Pre-built release packages can be found under the Releases.

Please refer to the Wiki for more detailed documentation, including development and feature guides.

You can also try submitting a GitHub Issue for support, which may or may not receive an answer.

Supported Devices

This implementation has been tested with the following device software versions:

  • E2 version 3.2
  • S3 version 3.2

This implementation supports the following device APIs:

  • TCP port 9876 XML (read-only, live streaming)
  • TCP port 9999 JSON-RPC (read-mostly, includes preset recall)
  • TCP port 9878 "telnet" (write-only, preset recalls and program cut/autotrans)
  • UDP port 40961 discovery

Install

Docker

Docker images for amd64 are available from Docker Hub: https://hub.docker.com/r/qmsk/e2/

docker pull qmsk/e2
docker run --rm --net=host --name=e2-test qmsk/e2 tally --discovery-interface=eth0 --http-listen=127.0.0.1:8001 --http-static=/opt/qmsk-e2/static

Raspberry PI

Pre-built debian packages for ARM are available from GitHub releases: https://github.com/qmsk/e2/releases

wget https://github.com/qmsk/e2/releases/download/v0.6.0-dev.5/qmsk-e2_0.6.0-dev.5_armhf.deb
sudo dpkg -i qmsk-e2_0.6.0-dev.5_armhf.deb
sudo edit /etc/default/qmsk-e2-tally
sudo systemctl restart qmsk-e2-tally

The package installs the binaries at /opt/qmsk-e2, creates a qmsk-e2 user and configures the systemd qmsk-e2-tally.service to run using /etc/default/qmsk-e2-tally for configuration.

Building

The project consists of a set Go applications, and a Javascript web frontend. Once built, the binary Go applications + Javascript assets can be distributed and executed without needing to install the development tools and instructions listed here.

Release binaries are built using the Docker-based setup under build

Backend

Load vendored dependencies using godep:

$ git clone github.com/qmsk/e2
e2 $ dep ensure

Building the backend code requires Go version 1.10.

The Go binaries can also be cross-compiled for different platforms, such as building Linux ARM binaries on your laptop for use on a RaspberryPI:

GOOS=linux GOARCH=arm go build -o bin/linux_arm/server -v github.com/qmsk/e2/cmd/server

Frontend

cd static && npm install

Building the frontend code requires:

Tally

Tally implementation for following the state of inputs on program, preview and active destinations.

Sources

Supports the following input sources:

  • E2
  • S3

Drivers

Supports the following output drivers:

Usage

Run the tally software using a network interface connected to the same network as the E2 device:

$GOPATH/bin/tally --discovery-interface=eth0

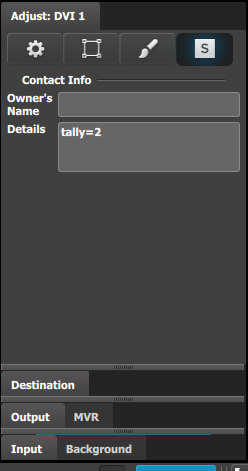
Tag the relevant inputs in EMTS with tally=ID in their Contact details field:

EMTS Contact field

Referr to the Wiki for further documentation.

Server

Web API + frontend for following the E2 state and controlling presets.

server --discovery-interface=eth0 --http-listen=:8284 --http-static=./static

The server will connect to the first discovered E2 system.

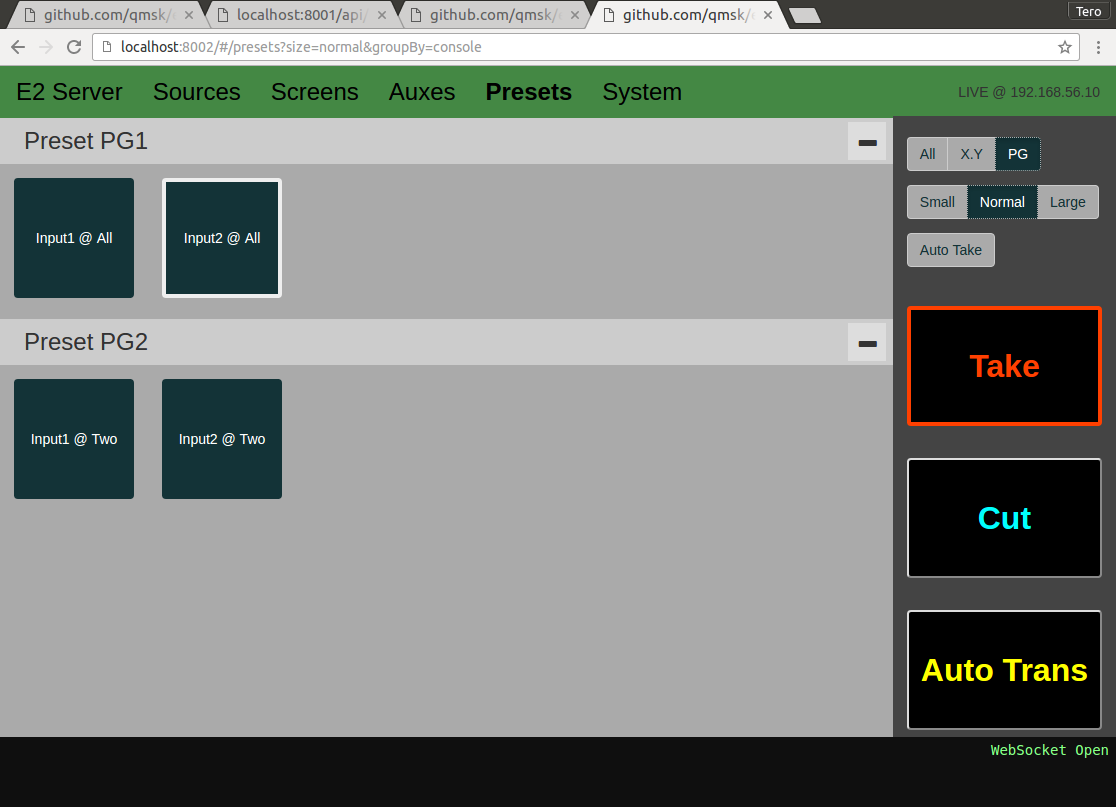
Server Presets UI

Using the server Web UI requires the static assets for the web frontend (see Building).

Referr to the Wiki for further documentation.

Client

go install ./cmd/client

Useful for testing the client library:

$GOPATH/bin/client --e2-address=192.168.0.100 listen

Usage:

  client [OPTIONS] <command>

E2 JSON-RPC:
	  --e2-address=HOST
	  --e2-jsonrpc-port=PORT
	  --e2-xml-port=PORT
	  --e2-timeout=

Help Options:
  -h, --help                    Show this help message

Available commands:
  aux-list           List Aux destinations
  config-dump        Dump XML config
  discover           Discover available E2 systems
  list-destinations  List destinations
  listen             Listen XML packets
  preset-list        List presets
  preset-show        Show preset destinations
  screen-list        List Screen destinations
  screen-show        Show screen content
  source-list        List sources

e2's People

Contributors

depili avatar spcomb avatar zarr avatar

Stargazers

 avatar  avatar  avatar  avatar  avatar  avatar  avatar  avatar  avatar  avatar  avatar  avatar  avatar  avatar  avatar  avatar  avatar  avatar  avatar  avatar  avatar  avatar  avatar  avatar  avatar  avatar

Watchers

 avatar  avatar  avatar  avatar  avatar  avatar  avatar  avatar  avatar  avatar  avatar  avatar  avatar  avatar

e2's Issues

setting up golang, npm and bower

I had some issues getting my environment set up. I'd like to see some form of these instructions included in the readme, as I believe the audience for this project are not typical developers, but video engineers. My hope is that by making this software more accessible, it will be adopted and extended to a greater degree by the community.

Installing golang and qmsk/e2

These instructions are assuming you are using a Raspberry Pi. As far as I know these instructions apply to all hardware revisions.

The following software is required to be installed and configured on a Raspberry Pi to use qmsk/e2:

  1. git - the version control software that qmsk/e2 is maintained with
  2. go - the go programming language, or golang, is the platform qmsk/e2 is written in
  3. bower - does all the web front end stuff
  4. npm - node package manager provides bower
  5. ssh - the secure shell provides remote access to configure your system from another device without having to attach a keyboard or mouse to your Pi
  6. PiBakery - A simple tool for creating customized boot disks for your raspberry pi. At some point most of these instructions could be included in a 'recipe' for PiBakery

Begin by downloading and installing PiBakery (or skip this step if you know what you're doing) from http://www.pibakery.org and create a boot image. You will need about seven gigabytes of disk space. Use PiBakery to enable ssh on boot, change the password or configure an IP address, although I wont describe that here.

Boot your Pi and connect to it over the network. There are a number of tools to discover the IP address of the new device if you did not use PiBakery to assign a static IP address. I will not describe that here. From the terminal of your laptop or desktop computer, connect to your Pi using ssh like this:

ssh [email protected]

The first time you connect to the Pi you will be asked to add the ssh 'fingerprint' to a list kept on your computer.
Type 'yes' and then enter the password you set with PiBakery or the default, which is 'raspberry'

The first step, which is not described in the qmsk/e2 readme file is to install go. You can use any version greater than 1.3, which is unfortunately what is included with the stock Raspberry Pi system. To install go (or golang, as it's referred to) visit https://golang.org/doc/install and read up. The short story is to download the precomplied binary for the ARM architecture that the Pi uses and make some directories and save some setting to your .profile file. This is the hardest part. Currently, version 1.7 is the latest, so grab the file at https://storage.googleapis.com/golang/go1.7.1.linux-armv6l.tar.gz by typing the following into your command line after logging in to the Pi:

pi@raspberrypi:~ $ wget https://storage.googleapis.com/golang/go1.7.1.linux-armv6l.tar.gz

which looks like this:

pi@raspberrypi:~ $ wget https://storage.googleapis.com/golang/go1.7.1.linux-armv6l.tar.gz
--2016-09-12 15:28:44-- https://storage.googleapis.com/golang/go1.7.1.linux-armv6l.tar.gz
Resolving storage.googleapis.com (storage.googleapis.com)... 216.58.192.16, 2607:f8b0:4005:805::2010
Connecting to storage.googleapis.com (storage.googleapis.com)|216.58.192.16|:443... connected.
HTTP request sent, awaiting response... 200 OK
Length: 69522921 (66M) [application/x-gzip]
Saving to: ‘go1.7.1.linux-armv6l.tar.gz’

.7.1.linux-armv6l.t 19%[===> ] 12.92M 2.47MB/s eta 23s

When this is done you will have to install this file to a system directory with the following command:

pi@raspberrypi:~ $ sudo tar -C /usr/local -xzf go1.7.1.linux-armv6l.tar.gz

Which extracts the files to where they belong. Now you have to tell the system that this stuff is there by editing some files. From the golang installation instructions:

(Typically these commands must be run as root or through sudo.)

Add /usr/local/go/bin to the PATH environment variable. You can do this by adding this line to your /etc/profile (for a system-wide installation) or $HOME/.profile:

export PATH=$PATH:/usr/local/go/bin

You will also need a local workspace to install the source files for qmsk/e2. Add the line:

export GOPATH=$HOME/work

Then save that file using your favorite text editor. After you edit and save this file, force the system to read it again by using the source command, i.e.

pi@raspberrypi:~ $ source .profile

Just type the part after the $ or whatever your shell's prompt is.

Be sure to actually create this folder:

pi@raspberrypi:~ $ mkdir work

I highly recommend following the golang tutorial and compiling the hello, world example before continuing.

Now move into the work directory and create another folder, src, and move into it like this:

pi@raspberrypi:~ $ cd work
pi@raspberrypi:/work $ mkdir src
pi@raspberrypi:
/work $ cd src
pi@raspberrypi:~/work/src $

Now we're back to the original readme file. Install qmsk/e2 with:

git clone https://github.com/qmsk/e2.git

and then cd into the e2 directory and run the go get command from the readme:

go get ./cmd/tally
go get ./cmd/server

which looks like:

pi@raspberrypi:/work/src $ git clone https://github.com/qmsk/e2.git
Cloning into 'e2'...
remote: Counting objects: 2608, done.
remote: Total 2608 (delta 0), reused 0 (delta 0), pack-reused 2608
Receiving objects: 100% (2608/2608), 2.07 MiB | 657.00 KiB/s, done.
Resolving deltas: 100% (1527/1527), done.
Checking connectivity... done.
pi@raspberrypi:
/work/src $ cd e2
pi@raspberrypi:/work/src/e2 $ go get ./cmd/tally
pi@raspberrypi:
/work/src/e2 $ go get ./cmd/server

Now lets install npm and then we'll install bower with npm. This will take a minute.

sudo apt-get install npm

Whose output looks like this:

pi@raspberrypi:~/work/src/e2 $ sudo apt-get install npm
Reading package lists... Done
Building dependency tree
Reading state information... Done
The following extra packages will be installed:
gyp libc-ares-dev libjs-node-uuid libjs-underscore libssl-dev libssl-doc
libv8-3.14-dev node-abbrev node-ansi node-ansi-color-table node-archy
node-async node-block-stream node-combined-stream node-cookie-jar
node-delayed-stream node-forever-agent node-form-data node-fstream
node-fstream-ignore node-github-url-from-git node-glob node-graceful-fs
node-gyp node-inherits node-ini node-json-stringify-safe node-lockfile
node-lru-cache node-mime node-minimatch node-mkdirp node-mute-stream
node-node-uuid node-nopt node-normalize-package-data node-npmlog node-once
node-osenv node-qs node-read node-read-package-json node-request node-retry
node-rimraf node-semver node-sha node-sigmund node-slide node-tar
node-tunnel-agent node-underscore node-which nodejs-dev
Suggested packages:
node-hawk node-aws-sign node-oauth-sign node-http-signature
The following NEW packages will be installed:
gyp libc-ares-dev libjs-node-uuid libjs-underscore libssl-dev libssl-doc
libv8-3.14-dev node-abbrev node-ansi node-ansi-color-table node-archy
node-async node-block-stream node-combined-stream node-cookie-jar
node-delayed-stream node-forever-agent node-form-data node-fstream
node-fstream-ignore node-github-url-from-git node-glob node-graceful-fs
node-gyp node-inherits node-ini node-json-stringify-safe node-lockfile
node-lru-cache node-mime node-minimatch node-mkdirp node-mute-stream
node-node-uuid node-nopt node-normalize-package-data node-npmlog node-once
node-osenv node-qs node-read node-read-package-json node-request node-retry
node-rimraf node-semver node-sha node-sigmund node-slide node-tar
node-tunnel-agent node-underscore node-which nodejs-dev npm
0 upgraded, 55 newly installed, 0 to remove and 0 not upgraded.
Need to get 3,709 kB of archives.
After this operation, 13.3 MB of additional disk space will be used.
Do you want to continue? [Y/n]

You should probably update your available packages with

sudo apt-get update

before running the above command.

After your coffee has cooled, install bower by typing

sudo npm install -g bower

which will look like:

pi@raspberrypi:/work/src/e2 $ sudo npm install -g bower
/usr/local/bin/bower -> /usr/local/lib/node_modules/bower/bin/bower
[email protected] /usr/local/lib/node_modules/bower
pi@raspberrypi:
/work/src/e2 $

Now change directory into static and install bower there like this:

cd static && bower install

Now go back to the original readme and continue from there, knowing you have everything installed!

Support for passing option defaults via environment variables

The various command-line options defined by the packages should use the go-flags env, env-delim support to allow passing options via environment variables.

This would make configuring the EnvironmentFile=/etc/default/qmsk-e2-tally options much easier in terms of syntax: #49

I do want to mention that the file for the designation of the Tally GPIO pins needs to be addressed. In the /etc/default qmsk-e2-tally file, not only do you have to remove the comments "#", but there is an extra blank line that needs to be removed as well.

The go-flags package that we use supports setting option default values from environment variables, so the tally gpio options could be improved to support separate environment variables like TALLY_GPIO_PIN_GREEN=23, TALLY_GPIO_PIN_RED=24, TALLY_GPIO_PINS=... etc, which would make the /etc/default/qmsk-e2-tally much easier to use.

Server (Web UI) not opening port 8002

Following the instructions to setting up the server, https://github.com/qmsk/e2#server-web-ui

Port 8002 does not open. Port 8284 is open, but none of the examples in the PNGs work. I did a port scan and only port 22 and 8284 are open.

I am unclear as to the meaning of the following line:

Using the server Web UI requires #Building the static assets for the web fronted.

Is this the same as the earlier step of running 'bower install' inside static?

Here is the output of running the example:

pi@raspberrypi:~/work/src/e2 $ $GOPATH/bin/server --discovery-interface=eth0 --http-listen=:8284 --http-static=./static
2016/09/12 19:32:34 Discovery: using interface eth0 broadcast address: 192.168.1.255
2016/09/12 19:32:34 Discovering systems on 192.168.1.255:40961...
2016/09/12 19:32:34 Discovered system: 192.168.1.27
2016/09/12 19:32:34 Client client.Options{Address:"192.168.1.27", JSONPort:"9999", XMLPort:"9876", TCPPort:"9878", Timeout:10000000000, Safe:false, ReadOnly:false, Debug:false, ReadKeepalive:false}: 192.168.1.27
2016/09/12 19:32:34 Discovery.receiver: read udp4 0.0.0.0:43285: use of closed network connection
2016/09/12 19:32:34 Discovery.run: stopped
2016/09/12 19:32:34 Client client.Options{Address:"192.168.1.27", JSONPort:"9999", XMLPort:"9876", TCPPort:"9878", Timeout:10000000000, Safe:false, ReadOnly:false, Debug:false, ReadKeepalive:false}: XMLClient: &{10000000000 0x10722740 0x10716570 0x10714dc0 0x10714d80 0x10714e00 false false}
2016/09/12 19:32:34 Client 192.168.1.27: TCPClient: 192.168.1.27
2016/09/12 19:32:34 Serve static /static/ from ./static
2016/09/12 19:32:34 client: System.Reset()
2016/09/12 19:32:34 XML new Source[0]
2016/09/12 19:32:34 XML new Source[1]
2016/09/12 19:32:34 XML new Source[2]
2016/09/12 19:32:34 XML new Source[3]
2016/09/12 19:32:34 XML new Source[4]
2016/09/12 19:32:34 XML new Source[5]
2016/09/12 19:32:34 XML new InputCfg[0]
2016/09/12 19:32:34 XML new InputCfg[1]
2016/09/12 19:32:34 XML new InputCfg[2]
2016/09/12 19:32:34 XML new InputCfg[3]
2016/09/12 19:32:35 XML new AuxDest[0]
2016/09/12 19:32:35 XML new ScreenDest[0]
2016/09/12 19:32:35 XML new BGLyr[0]
2016/09/12 19:32:35 XML new BGLyr[1]
2016/09/12 19:32:35 XML new Transition[0]
2016/09/12 19:32:35 XML new Transition[1]
2016/09/12 19:32:35 XML new Layer[0]
2016/09/12 19:32:35 XML new Layer[1]
2016/09/12 19:32:35 XML new Layer[2]
2016/09/12 19:32:35 XML new Layer[3]
2016/09/12 19:32:35 XML new ScreenDest[1]
2016/09/12 19:32:35 XML new BGLyr[0]
2016/09/12 19:32:35 XML new BGLyr[1]
2016/09/12 19:32:35 XML new Transition[0]
2016/09/12 19:32:35 XML new Transition[1]
2016/09/12 19:32:35 XML new Layer[0]
2016/09/12 19:32:35 XML new Layer[1]
2016/09/12 19:32:35 XML new Layer[2]
2016/09/12 19:32:35 XML new Layer[3]
2016/09/12 19:32:35 XML new Preset[0]
2016/09/12 19:32:35 XML new Preset[1]
2016/09/12 19:32:35 XML new Preset[2]
2016/09/12 19:32:35 XML new Preset[3]
2016/09/12 19:32:35 XML new Preset[4]
2016/09/12 19:32:35 XML new Frame[%!d(string=7c::c7::08::0c::cc::dc)]
2016/09/12 19:32:36 xmlClient.read: reset

Issue with tally code.

Running 0.6.1
Relatively new to the Raspberry Pi. Great work on the Tally software. After a couple of learning kicks to the head I was able to get it up and running. I do want to mention that the file for the designation of the Tally GPIO pins needs to be addressed. In the /etc/default qmsk-e2-tally file, not only do you have to remove the comments "#", but there is an extra blank line that needs to be removed as well.

On another note: Is there a way to get the software to ignore more than on destination? I can get it to ignore a single destination by placing it in the above file at the end. But if I try to add another destination to ignore, it will ignore the second destination and not the first. I'm sure it's just a configuration error on my part. Any help would be appreciated.

Distribution packaging, install guide

There are now automated binary builds (#6) in .tar.gz format, suitable for unpacking into /opt/qmsk-e2. This is a slightly lame distribution/packaging format, since it requires some manual work to setup the system user + systemd service etc. to actually run it.

This needs a better install guide on how to install and configure the binary build tarballs:

$ curl -vL https://github.com/qmsk/e2/releases/download/v0.2.2/qmsk-e2_0.2.2_linux-arm.tar.gz | sudo tar -C /opt -xzv
$ sudo ln -s qmsk-e2_0.2.2_linux-arm /opt/qmsk-e2
$ ls -la /opt/                              
total 4
drwxr-xr-x 1 root root   64 Sep 12 21:14 .
drwxr-xr-x 1 root root  152 Sep 12 21:11 ..
lrwxrwxrwx 1 root root   25 Sep 12 21:14 qmsk-e2 -> qmsk-e2_0.2.2_linux-arm
drwxr-xr-x 1 1000 users  24 Sep 12 21:06 qmsk-e2_0.2.2_linux-arm
$ /opt/qmsk-e2/bin/tally --http-listen=:8001 --http-static=/opt/qmsk-e2/static 
2016/09/12 21:15:19 Serve static /static/ from /opt/qmsk-e2/static
2016/09/12 21:15:19 tally: Update: sources=0 inputs=0 outputs=0 tallys=0

Ideally there would be something even easier to install like a raspian .deb, or an entire bootable buildroot image.

options.ClientOptions.Client undefined

After I posted the instructions for I realized I missed a step, and when I tried to run the command to install client I got:

pi@raspberrypi:~/work/src/e2 $ go install ./cmd/client

e2/cmd/client

cmd/client/aux_list.go:15: options.ClientOptions.Client undefined (type client.Options has no field or method Client)
cmd/client/list_destinations.go:15: options.ClientOptions.Client undefined (type client.Options has no field or method Client)
cmd/client/preset_list.go:15: options.ClientOptions.Client undefined (type client.Options has no field or method Client)
cmd/client/preset_show.go:17: options.ClientOptions.Client undefined (type client.Options has no field or method Client)
cmd/client/screen_list.go:15: options.ClientOptions.Client undefined (type client.Options has no field or method Client)
cmd/client/screen_show.go:17: options.ClientOptions.Client undefined (type client.Options has no field or method Client)
cmd/client/source_list.go:15: options.ClientOptions.Client undefined (type client.Options has no field or method Client)

Everything else compiled but client...

Tally Spi LED

Hi,
I'm trying to build the tally with apa102 SMD.
I guess I did all like described. Also enabled the spi out on Raspberry.
Maybe someone could give me a hint.
I already get universe tally (udp still not TCP) and the HTML static working.

Thanks

WebSocket timeouts to detect connection errors

Exiting the tally/server will close the WebSocket TCP connection and immediately trigger onClose. Killing the network connection will leave the angularjs client dead with no error indication.

Detecting a loss of network connection needs some kind of websocket ping/pong mechanism.

angular-websocket has a initialTimeout/maxTimeout options, but these only seem to apply to reconnect operations.

Ignore more than one destination

Is there a way to add more than one destination to the --tally-ignore-dest=REGEXP command ?
If I add a complete second argument :

--tally-ignore-dest=DEST1 --tally-ignore-dest=DEST2

only DEST2 is ignored. Dividing Destinations by "," or ";"

--tally-ignore-dest=DEST1,DEST2

does not work as well.

Best regards
Dirk

TSL 3.1 Protocol

If you implement TSL protocol as an output, this software could be used with a variety of UMD tally products and production monitors.

gpio stopped working after kernel upgrade to 4.9

After I upgraded my pi for other reason e2 tally v0.4.2 stopped working with --gpio option. I get this error:

2018/03/14 23:22:07 GPIO main: embd.InitGPIO: embd: your host ": ARMv7 Processor rev 5 (v7l)" is not supported at this moment. request support at https://github.com/kidoman/embd/issues

A further upgrade to 4.14 didn't fixed the issue. A downgrade to 4.4 made it working again but then other applications do not work correctly I'm tryin to use besides e2 tally.

Thanks in advance
Best regards
Dirk

Shutdown with discovery errors for new e2 v5.0 ec-200 discovery packet "N/A" integer syntax

It seems that since the v5 update for e2, tally is no longer working. I've narrowed it down to having an ec-200 on the system. Apparently, the discovery process (that query's the network with a '?') gets a response from the ec-200 that it does not like. The error is:

Tally.Run: discovery: expected integer

The responses from the frames:
hostname=EC-200:N/A:System1:0:N/A:N/A:5.0.35479.ip-address=192.168.0.180.mac-address=00:0b:ab:98:ba:cf.type=EC-200.
hostname=E2:9876:System1:0:1:00$13$95$15$e5$4f:5.0.1472.ip-address=192.168.0.175.mac-address=00:13:95:15:e5:4f.type=E2-32L.

If the ec-200 is removed from the network, Tally runs fine. As soon as the ec-200 is connected, tally fails.
I have dumps in hex if you want more detail.

Tutorials of qmsk-e2

Hi, everyone
i am a new guys for linux, i am a E2 Operator, because qmsk-e2 so i am learning RaspberryPi, can any guys share more detail guide for our new guys? like RaspberryPi video in youtube, i am trying to install qmsk/e2 according Development-Guide, but when i run "go get ./cmd/tally" and "go get ./cmd/server" alway show "connection timeout, and i don't know how to start qmsk-e2,i try to run "$GOPATH/bin/tally --discovery-interface=eth0" ,but it failed, or any kindly guys can tell me the easy way to install qmsk-e2

Autostart on boot? (RPi)

(apologies for being a total noob)
If I've read the readme right, installing the pre-built debian package should set the qmsk-e2-tally.service running using /etc/default/qmsk-e2-tally for configuration, and I infer from that that the program should run on boot using the gpio and http configurations outlined in the /etc/default/qmsk-e2-tally, but in order to get it to work I still have to ssh into the rpi and fire off a command line using sudo and outlining all the options. Am I misunderstanding or did I miss a step? (Do I have to set the auto-login to "qmsk-e2" user instead of pi? and if so, what's the default password for that user?)
.. as it is, after firing the command line, it works great, big thanks to the devs!

Support for blink1 usb lights

https://blink1.thingm.com

would be a very cool feature. Tally the API of blink1s can be awesome course they are easy to setup und handy tools.

Like triggering the SPI lights but only over the command line of the pi or the API network protocol.

Go 1.6 build broken: golang.org/x/sys/unix/ioctl.go:18: undefined: runtime.KeepAlive

See golang/go#26576, golang.org/x/sys/unix is a dependency of golang.org/x/net/websocket used by web/events.go

$ GOPATH=~/go /usr/bin/go version
go version go1.6.2 linux/amd64
$ GOPATH=~/go /usr/bin/go install ./cmd/...
# github.com/qmsk/e2/vendor/golang.org/x/sys/unix
vendor/golang.org/x/sys/unix/ioctl.go:18: undefined: runtime.KeepAlive
vendor/golang.org/x/sys/unix/ioctl.go:28: undefined: runtime.KeepAlive

Invert GPIO

Hi,
Firstly, great implementation. Thank you very much! Using it on a show as we speak. Just one request, would it be possible to have an option to invert the GPIO? I have used a standard off the shelf(amazon) relay unit that interfaces with the Pi really well, observing the 3.3v requirements of the Pi. But the relay unit is Active-low and so whilst I can connect the tallies to the normally closed terminals, it means the unit will 'Fail On' if the power is interrupted and all camera tallies come on. (I have found it best not to confuse cameraman!)

Thanks again,

Richard.

tally stop panics on source close

When shutting down the tally:

2017/02/03 23:54:18 Tally: stopping...
2017/02/03 23:54:18 tally: Update: sources=1 inputs=3 outputs=3 tallys=3
2017/02/03 23:54:18 xmlClient.writer: close
2017/02/03 23:54:18 xmlClient.read: read tcp4 192.168.56.1:39402->192.168.56.10:9876: use of closed network connection
2017/02/03 23:54:18 tally:Source 192.168.56.10: closed
panic: close of closed channel

goroutine 9 [running]:
panic(0x803c40, 0xc82023a080)
        /usr/lib/go-1.6/src/runtime/panic.go:481 +0x3e6
github.com/qmsk/e2/client.(*XMLClient).Close(0xc820114720)
        /home/build/go/src/github.com/qmsk/e2/client/xml.go:314 +0x30
github.com/qmsk/e2/tally.Source.run(0x0, 0x0, 0xa3f792, 0x4, 0xa3f80e, 0x4, 0xa3f7d1, 0x4, 0x2540be400, 0x100, ...)
        /home/build/go/src/github.com/qmsk/e2/tally/source.go:76 +0x2ae
created by github.com/qmsk/e2/tally.newSource
        /home/build/go/src/github.com/qmsk/e2/tally/source.go:35 +0x204

This is

  • tally:Tally.Stop() -> close(tally.closeChan)
  • tally:Tally.Run() -> tally:Source.close() -> client:XMLClient.Close()
  • tally:Source.run() -> client:XMLClient.Close() -> panic

GPIO red/green status should also work without any tally pins

Currently the GPIO driver defaults the statusGreen to low, and sets it high if it find any existing tally pin state: https://github.com/qmsk/e2/blob/v0.4.1/gpio/gpio.go#L134

However, this means that the green status pin remains low if the GPIO driver is only used for the red/green status pins, without any tally pins.

The GPIO driver should use the tally:State.Sources[...].Connected states to determine the status instead.

Depends on #16 to correctly set that status flag.

Tally UDP - syntax change

Talking about the work030 version which included UDP commands issues with every tally event.

Would it be possible to add a CR after each command?
I’m not sure about the encoding but my UV UDP properties are as following:

String Encoding: ASCII
Line Ending: CR (was NONE)
Start Byte: (I can only enter a 3 digit number here)
End Byte: (I can only enter a 3 digit number here)

Is this precise?
Alternatives would be:
LR
CR_LR
LR_CR

All the other commands / syntax can remain the way they are.
Thanks!

Raspberry Pi install issue qmsk-e2_0.6.0-dev.5

I used the prebuilt qmsk-e2_0.6.0-dev.5 version on raspberry pi with default raspian install and had some difficulties.
The /etc/systemd/system/qmsk-e2.service file was not installed with the package. I had to extract the file from the package and copy it separately.
The /etc/default qmsk-e2-tally file needed lines removed to load without errors for using the GPIO pins.

I also had issues with the web monitoring. It would not display any web pages except the default one. I didn't spend much time tinkering with it because I just needed the GPIO to work
Other than that it is now working great in 8 Tally boxes.
Thanks!

Tally-Timing

During my testing I found that the new tally is HIGH after the e2 transition (1000ms blend).
So during the blend only the old source is still live (that is being faded out)
but not the new one (although you can see a little bit from that source on program already).
The tally light for the new source will only become active when the transition is done.

So normally with tally if you have lets say a 1s dissolve between two sources
then for this one second BOTH tallys are on.

Is this currently a limitation from the barco protocol that you cannot get this information earlier or is there another reason?

Thanks, Tobi

Setup CI

Given the set of unit test cases in the code, and the automated release builds in #6, it would be cool to have a CI system hooked into github, to run tests on pushes/tags/PRs and automatically build binaries.

This could be a public Travis, or a private Drone service.

Automated release builds

Expecting users to build the Go binaries and web assets from the sources is not cool.

Building release binaries by hand is not cool.

Needs a CI with automated builds :)

Ideally including a ready-to-install stateless rpi image using buildroot.

Background Matte not recognized

When using Matte as background the tally information for the last used background source does not get updated. Tally works for background sources and stills, but does not switch off when using Matte. Using qmsk 0.6.0 EMT 6.2

TODO: Show still capture images

It looks like the still captures are available from the E2 via HTTP GET /uploads/still_0.png. These could be shown in the web UI as thumbnails.

WebSocket reconnects

If the backend encounters an connection error, it will crash, and if running as a systemd service, restart. Currently, the frontend UI will detect the websocket close, and freeze the UI into an error state.

It should instead reconnect once the server comes back up.

This is particularly important for the e2-server, as it does not manage any E2 connection state and will error out if disconnected from the E2. See #6 (comment)

I spoke too soon... after exactly five minutes the server crashed

2016/09/12 22:04:42 xmlClient.read: update
2016/09/12 22:04:42 client:TCPClient 192.168.1.27: recv: []string{"\x04ATRN", "-e", "0"}
2016/09/12 22:09:43 xmlClient.read: read tcp4 192.168.1.25:40214->192.168.1.27:9876: i/o timeout
2016/09/12 22:09:43 server.Run: xmlClient.Read: read tcp4 192.168.1.25:40214->192.168.1.27:9876: i/o timeout

That's a timeout error on the XML connection. Did your network connection between the rpi server and your E2 break?

The tally binary handles E2 client disconnects by waiting for it to reappear. The server code is far more simple and only handles a single E2 client, and it exits if the client disconnects.

ATM this "crash fast" behaviour is more or less intentional, and you should use something like systemd to restart the service. The server itself is stateless, so it's more or less the same end result as handling reconnects within the code. Just far simpler than implementing the reconnect code.

Bad tally program/preview state for Aux destinations

Aux destinations that are used for local monitoring should not cause inputs to be marked for program output.

E2 doesn't seem to have any Contact field for destinations, so this could be a --tally-ignore-dest=REGEX to ignore sources on matching destinations names.

Recommend Projects

  • React photo React

    A declarative, efficient, and flexible JavaScript library for building user interfaces.

  • Vue.js photo Vue.js

    🖖 Vue.js is a progressive, incrementally-adoptable JavaScript framework for building UI on the web.

  • Typescript photo Typescript

    TypeScript is a superset of JavaScript that compiles to clean JavaScript output.

  • TensorFlow photo TensorFlow

    An Open Source Machine Learning Framework for Everyone

  • Django photo Django

    The Web framework for perfectionists with deadlines.

  • D3 photo D3

    Bring data to life with SVG, Canvas and HTML. 📊📈🎉

Recommend Topics

  • javascript

    JavaScript (JS) is a lightweight interpreted programming language with first-class functions.

  • web

    Some thing interesting about web. New door for the world.

  • server

    A server is a program made to process requests and deliver data to clients.

  • Machine learning

    Machine learning is a way of modeling and interpreting data that allows a piece of software to respond intelligently.

  • Game

    Some thing interesting about game, make everyone happy.

Recommend Org

  • Facebook photo Facebook

    We are working to build community through open source technology. NB: members must have two-factor auth.

  • Microsoft photo Microsoft

    Open source projects and samples from Microsoft.

  • Google photo Google

    Google ❤️ Open Source for everyone.

  • D3 photo D3

    Data-Driven Documents codes.