The following is based on an in-person event, but has also been written in such a way that anyone could pick it up and code along! First, here's what we'll be building:
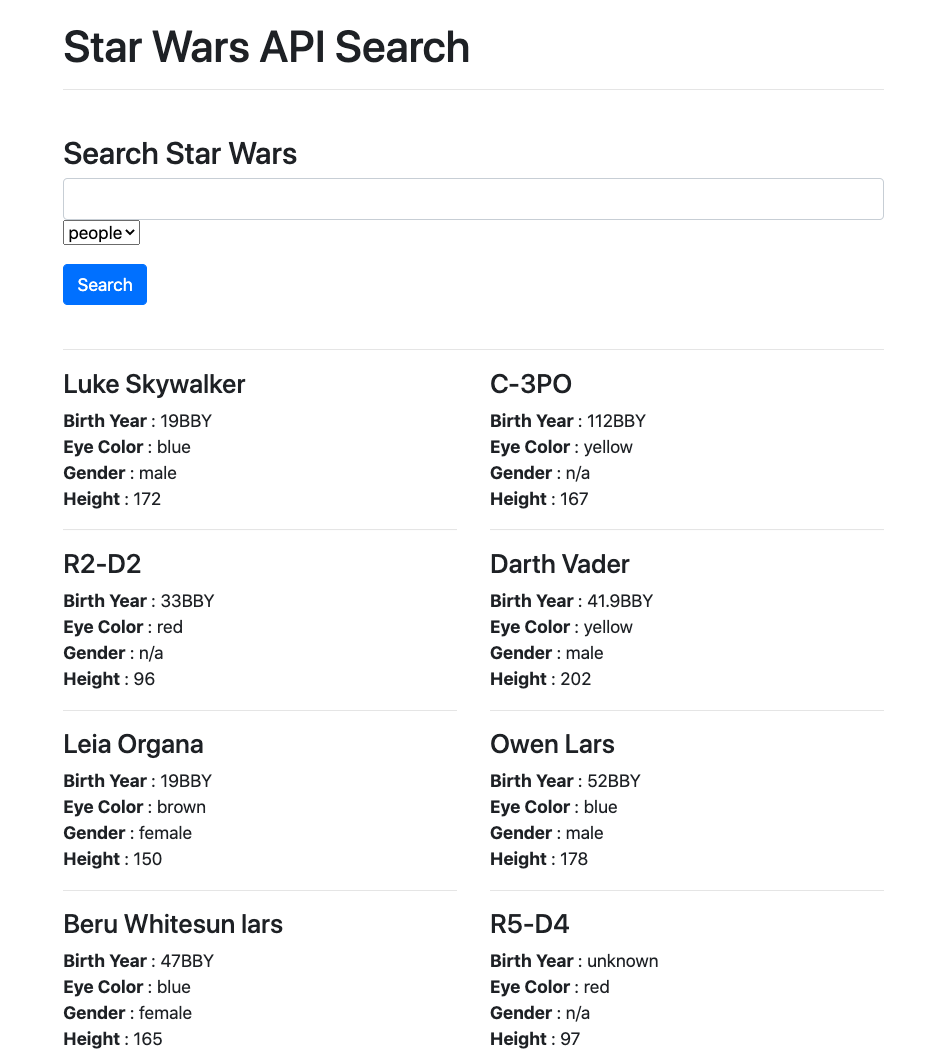
Essentially, it's a small web application built using the Star Wars API. This document will help you build a limited version of this application from scratch and will challenge you at the end to take it a couple steps further. For now, we'll be able to search SWAPI for people and starships to learn all kinds of useless and nerdy facts.
We're going to assume that you're a bit familiar with HTML, CSS and JavaScript, perhaps event Bootstrap and jQuery. If not, you may be a little lost, but we challenge you to give it a shot either way. At the very least, this code-along should give you an idea of things to learn next!
For simplicity sake, we're going to be using codepen.io. Navigate there now and click "Start Coding".
Notice that we have 3 different text windows and screen to show the results below:
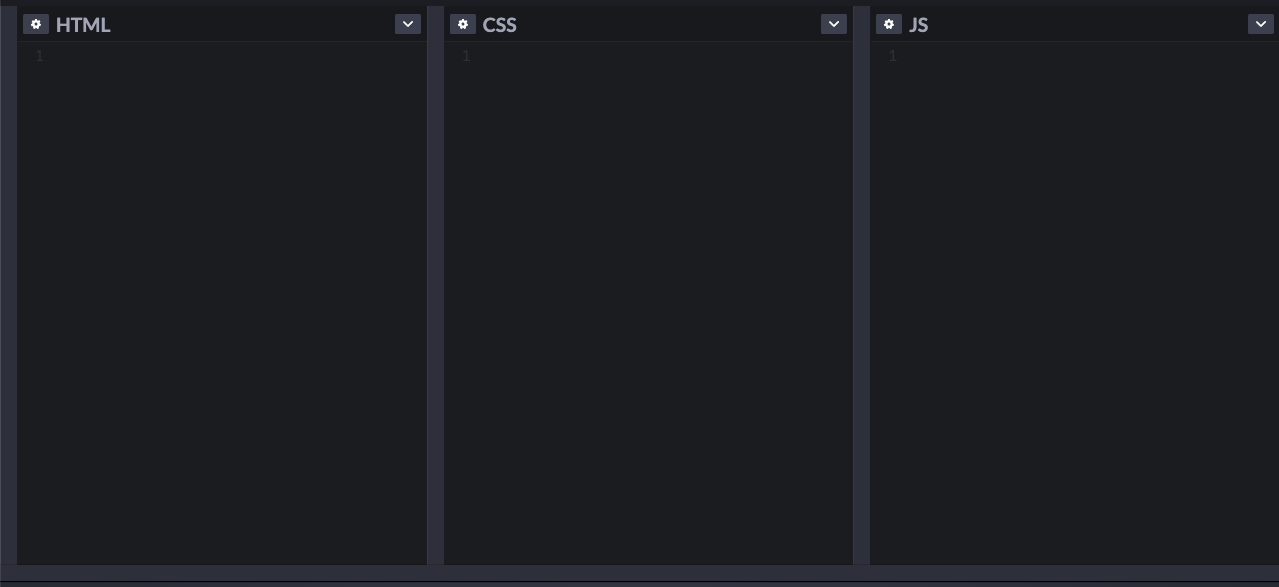
Inside these text windows we can write HTML, CSS and JavaScript and see the results (as we would in a browser), in the window at the bottom. Let's give it a shot.
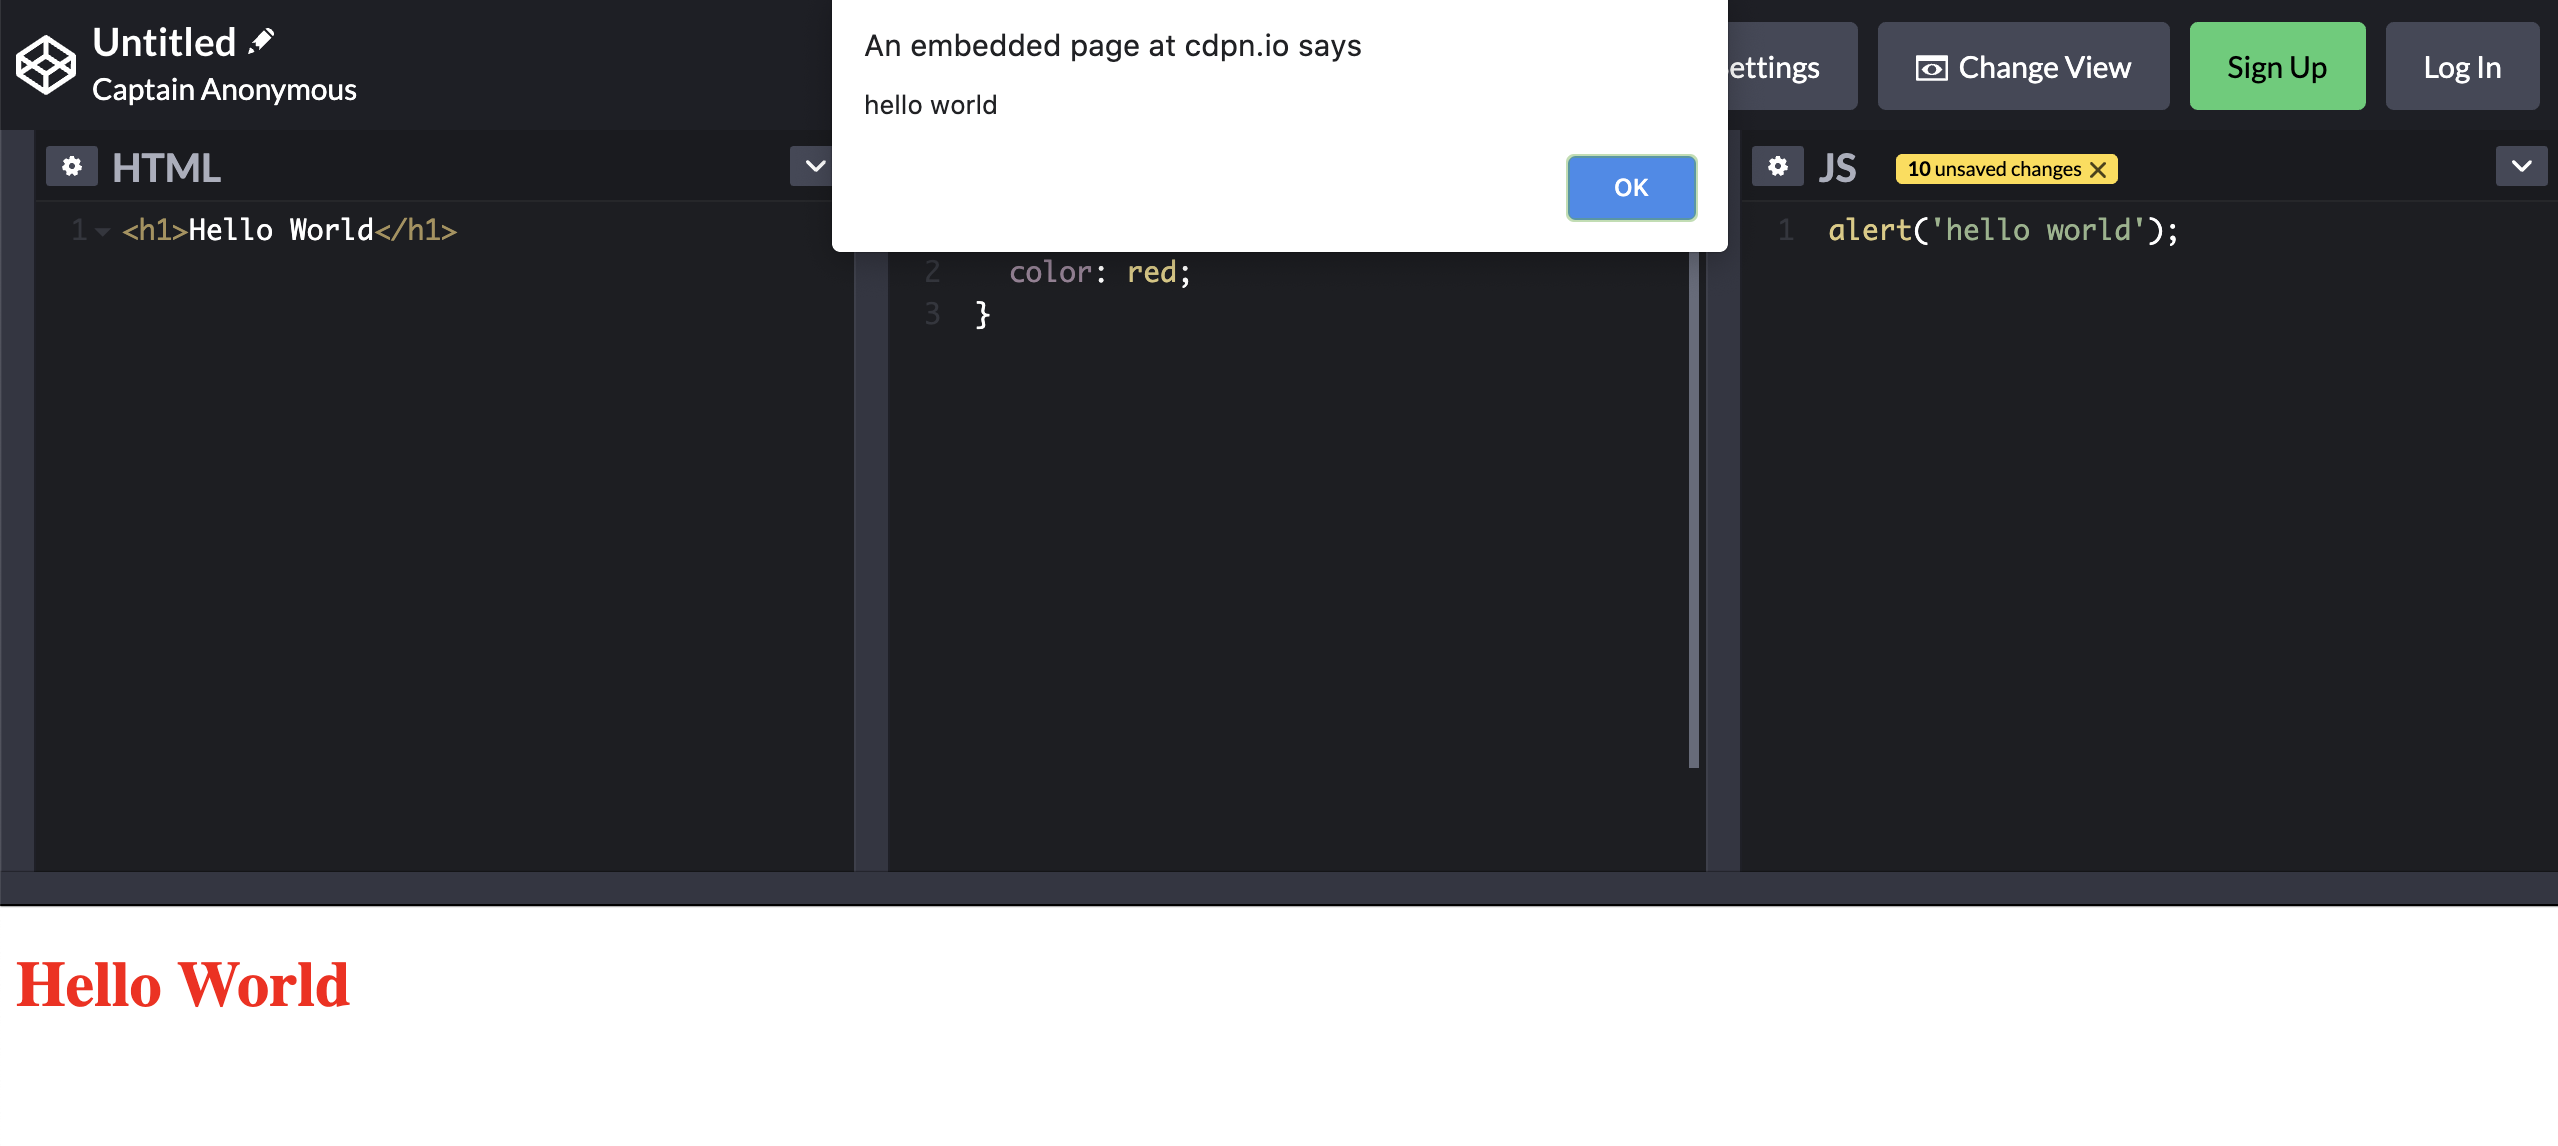
Inside the HTML window write:
<h1>Hello World!</h1>And you should see:

Now in the CSS window write:
h1 {
  color: red;
}
And you should see:

And finally in the JavaScript window write:
alert("hello world");And you should see:
Enough play. Let's get started.
If we revisit our final product screen shot...
...we'll recall the we'll want data from the API (Application Programming Interface) as it relates to people and starships. We can figure out how to access this data (as with most public API's) by visiting their website and reading their documentation.
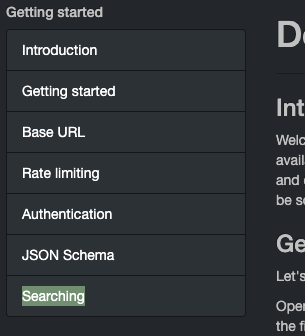
Navigate to this url: https://swapi.dev/documentation.
On the navigation, there is a menu item for "Searching", click it!
Right off the bat, we have an example how to get data with this URL:
https://swapi.dev/api/people/?search=r2
Copy that URL and past it inside of a new browser window. You should see this:

Without going too in depth with this, we just did a "GET" request to retrieve live data from the Star Wars API! Here is the code that we really care about:
{
  "count": 1,
  "next": null,
  "previous": null,
  "results": [
    {
      "name": "R2-D2",
      "height": "96",
      "mass": "32",
      "hair_color": "n/a",
      "skin_color": "white, blue",
      "eye_color": "red",
      "birth_year": "33BBY",
      "gender": "n/a",
      "homeworld": "https://swapi.dev/api/planets/8/",
      "films": [
        "https://swapi.dev/api/films/2/",
        "https://swapi.dev/api/films/5/",
        "https://swapi.dev/api/films/4/",
        "https://swapi.dev/api/films/6/",
        "https://swapi.dev/api/films/3/",
        "https://swapi.dev/api/films/1/",
        "https://swapi.dev/api/films/7/"
      ],
      "species": ["https://swapi.dev/api/species/2/"],
      "vehicles": [],
      "starships": [],
      "created": "2014-12-10T15:11:50.376000Z",
      "edited": "2014-12-20T21:17:50.311000Z",
      "url": "https://swapi.dev/api/people/3/"
    }
  ]
}
The code above is called, "JSON". JSON stands for "JavaScript Object Notation". All JSON is JavaScript, but not all JavaScript is JSON. JSON is essentially a universal format for how the web can send data. Most popular languages can convert their data into JSON so that we can send it back on forth on the web via HTTP (the protocol by which the web communicates).
Now that we have literally the shortest explanation on JSON and HTTP, let's dive into the data above! If you don't have JavaScript experience, this may go above your head a bit, but worry not.
The data above (this data):
{
  "count": 1,
  "next": null,
  "previous": null,
  "results": [
    {
      "name": "R2-D2",
      "height": "96",
      "mass": "32",
      "hair_color": "n/a",
      "skin_color": "white, blue",
      "eye_color": "red",
      "birth_year": "33BBY",
      "gender": "n/a",
      "homeworld": "https://swapi.dev/api/planets/8/",
      "films": [
        "https://swapi.dev/api/films/2/",
        "https://swapi.dev/api/films/5/",
        "https://swapi.dev/api/films/4/",
        "https://swapi.dev/api/films/6/",
        "https://swapi.dev/api/films/3/",
        "https://swapi.dev/api/films/1/",
        "https://swapi.dev/api/films/7/"
      ],
      "species": [
        "https://swapi.dev/api/species/2/"
      ],
      "vehicles": [],
      "starships": [],
      "created": "2014-12-10T15:11:50.376000Z",
      "edited": "2014-12-20T21:17:50.311000Z",
      "url": "https://swapi.dev/api/people/3/"
    }
  ]
}
... is made up of JavaScript data structures.
The two data-structures we care about are objects, and arrays. Objects are simply key/value pairs in JavaScript. For example, if we were to describe a car, we would want to describe it's attributes. Here is how we might represent a red Ferrari with 500 horsepower with a JavaScript object:
var car = {
  color: "red",
  make: "Ferrari",
  horsepower: 500,
};
Arrays on the other hand are just lists. We can put anything we want into a list, like strings (text). Here is an array of names:
var names = ["Aaron", "Morgan", "Edward", "Sean"];We can put anything we want into an array, even objects! Here is an array of car objects:
var cars = [
  {
    color: "blue",
    make: "Porsche",
    horsepower: 400,
  },
  {
    color: "red",
    make: "Ferrari",
    horsepower: 500,
  },
  {
    color: "pink",
    make: "Toyota",
    horsepower: 130,
  },
];
To take it up a notch, objects can contain arrays - objects can even contain arrays of objects! For example, if we wanted to model a dealership (in JavaScript/JSON) that had our 3 cars, it might look like this:
var dealership = {
  name: "My Cool Dealership!",
  location: "Durham, NC",
  cars: [
    {
      color: "blue",
      make: "Porsche",
      horsepower: 400,
    },
    {
      color: "red",
      make: "Ferrari",
      horsepower: 500,
    },
    {
      color: "pink",
      make: "Toyota",
      horsepower: 130,
    },
  ],
};
And that's about as complex as it gets!
Based on the world's shortest JavaScript lesson, we know have the tools we need to pick apart the Star Wars data. You can now see that the data we got back from the API is an object with 4 properties (count, next, previous and results).
The thing we really care about is results. Note that results is an array of objects! In this case, there is only one object in our array, and that object represents R2-D2. Note all the information we get back on R2!
For our purposes (according to our mock-up), we won't need all of this, but we'll just want: Birth Year, Eye Color, Gender, Height, as it relates to people.
Note, what you get if you type the following URL into a new browser tab:
https://swapi.dev/api/people/
A bunch of people!
Search for starships will be very similar to searching for people. We'll just change the URL to look like this:
https://swapi.dev/api/starships/
This will give us a bunch of Starships. If we want to search for something particular, we want change the URL to look like this:
https://swapi.dev/api/starships/?search=death
The text after ?search= is call a "query". We'll change this part of the URL based on what the user enters. In this case, we'll do a search for death and the "Death Star" will be our only result.
Now that we know how to get the data we need, let's get our codepen set up with the tools we'll be using.
Next the the HTML window, you'll see a gear icon:

Click it, then click "CSS" in the window that pops up. Scroll down to the search bar (Add External Stylesheets/Pens
) and type in "Bootstrap" and click twitter-bootstrap:
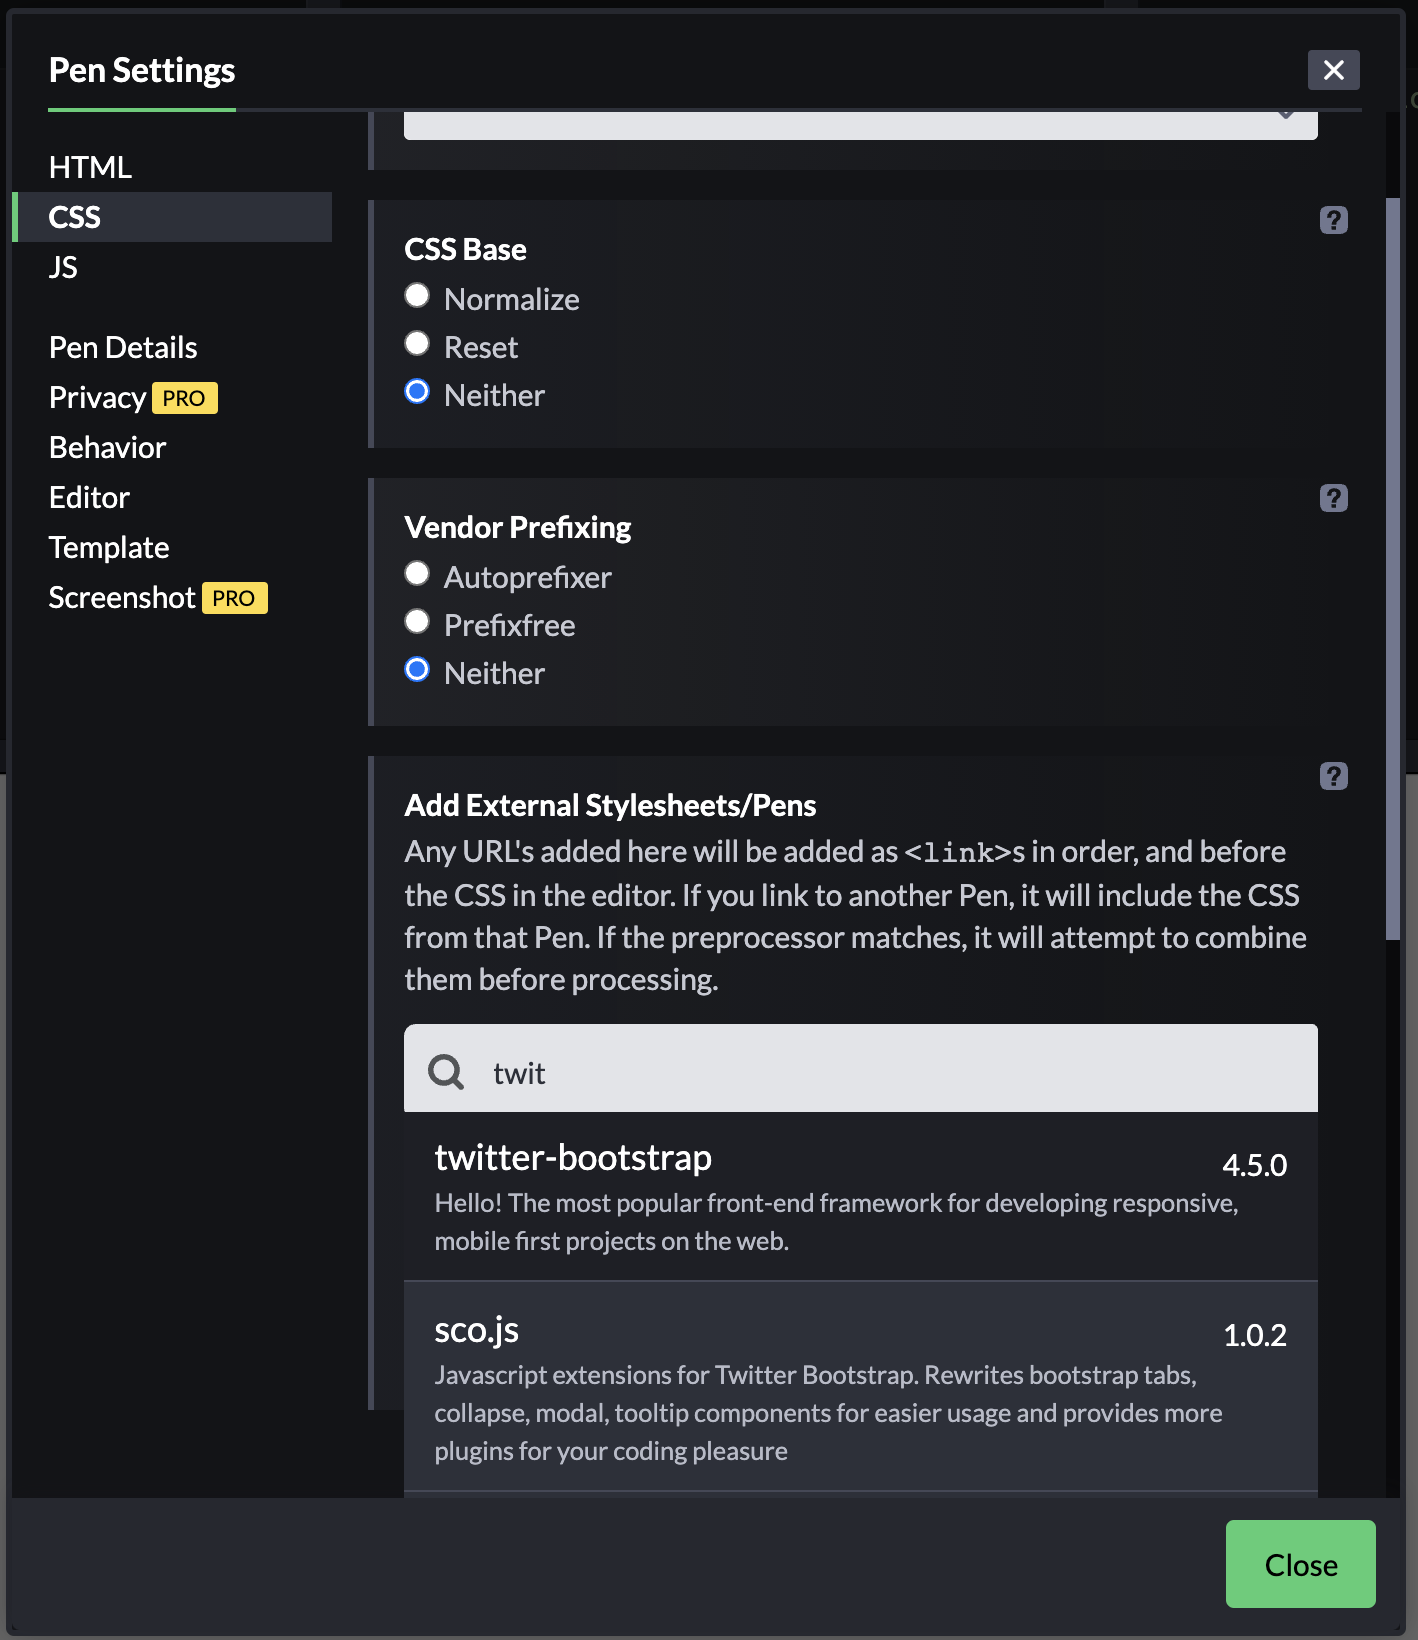
Bootstrap is a CSS framework that will help our page look pretty. Since this isn't a lesson on Bootstrap, we're not going to dive into it, but you can read more about it via it's docs here: Bootstrap.
We've not successfully added the Bootstrap CSS to our project.
Just as Bootstrap will help us with CSS, jQuery will help us with JavaScript. To add jQuery, again click the "gear" icon next to the HTML window and select the "JS" tab. Scroll down to the search bar (Add External Scripts/Pens) and type in "jQuery" and add it!

For the sake of time, we're going to copy/paste our HTML. This isn't ideal, but it's life. Add the following to your HTML section:
<div class="container-fluid">
  <div class="row">
    <div class="col-md-6 offset-md-3">
      <div class="page-header">
        <h1>Star Wars API Search</h1>
        <hr/>
      </div>


      <form class="search-form">
        <h3>Search Star Wars</h3>

        <div class="form-group">
          <input type="text" id="search-query" class="form-control">
          </input>

          <select id="search-category">
            <option value="people">people</option>
          </select>
        </div>

        <button class="btn btn-primary search">Search</button>
      </form>

      <hr/>

      <div class="results row">
      </div>
    </div>
  </div>
</div>
Many of these classes are Bootstrap classes (form-group, container-fluid, col-md-6, etc).
Take note of the following things:
- Our
page-headeris simply where we have the title of our page - Our
search-formis where the user will actually conduct the search resultsis where we'll append the results dynamically after they come back from the API.
Most of the CSS has been written for us, but add the following to make things a bit prettier:
.page-header {
  margin-top: 40px;
}

.search-form {
  margin-top: 40px;
  margin-bottom: 40px;
}This is where we'll do a majority of our work! For that reason, we'll need several headings!
To start, we'll just want to get data back from the API via our code. For that, we'll be using a function provided for us by jQuery call ajax. Ajax is both a technology and a specific function in jQuery that allows us to make HTTP requests from our code.
We'll start by defining a function called fetch (add to JavaScript window):
var fetch = function () {};

fetch();
We'll want this function to invoke right as the page loads, and make a request for our data. Now here comes the ajax method:
var fetch = function () {
  var url = "https://swapi.dev/api/people/?search=luke";

  $.ajax({
    method: "GET",
    url: url,
    dataType: "json",
    success: function (data) {
      console.log(data);
    },
    error: function (jqXHR, textStatus, errorThrown) {
      console.log(textStatus);
    },
  });
};

fetch();
If we now click "console" at the bottom of the pen:

You should see the following:
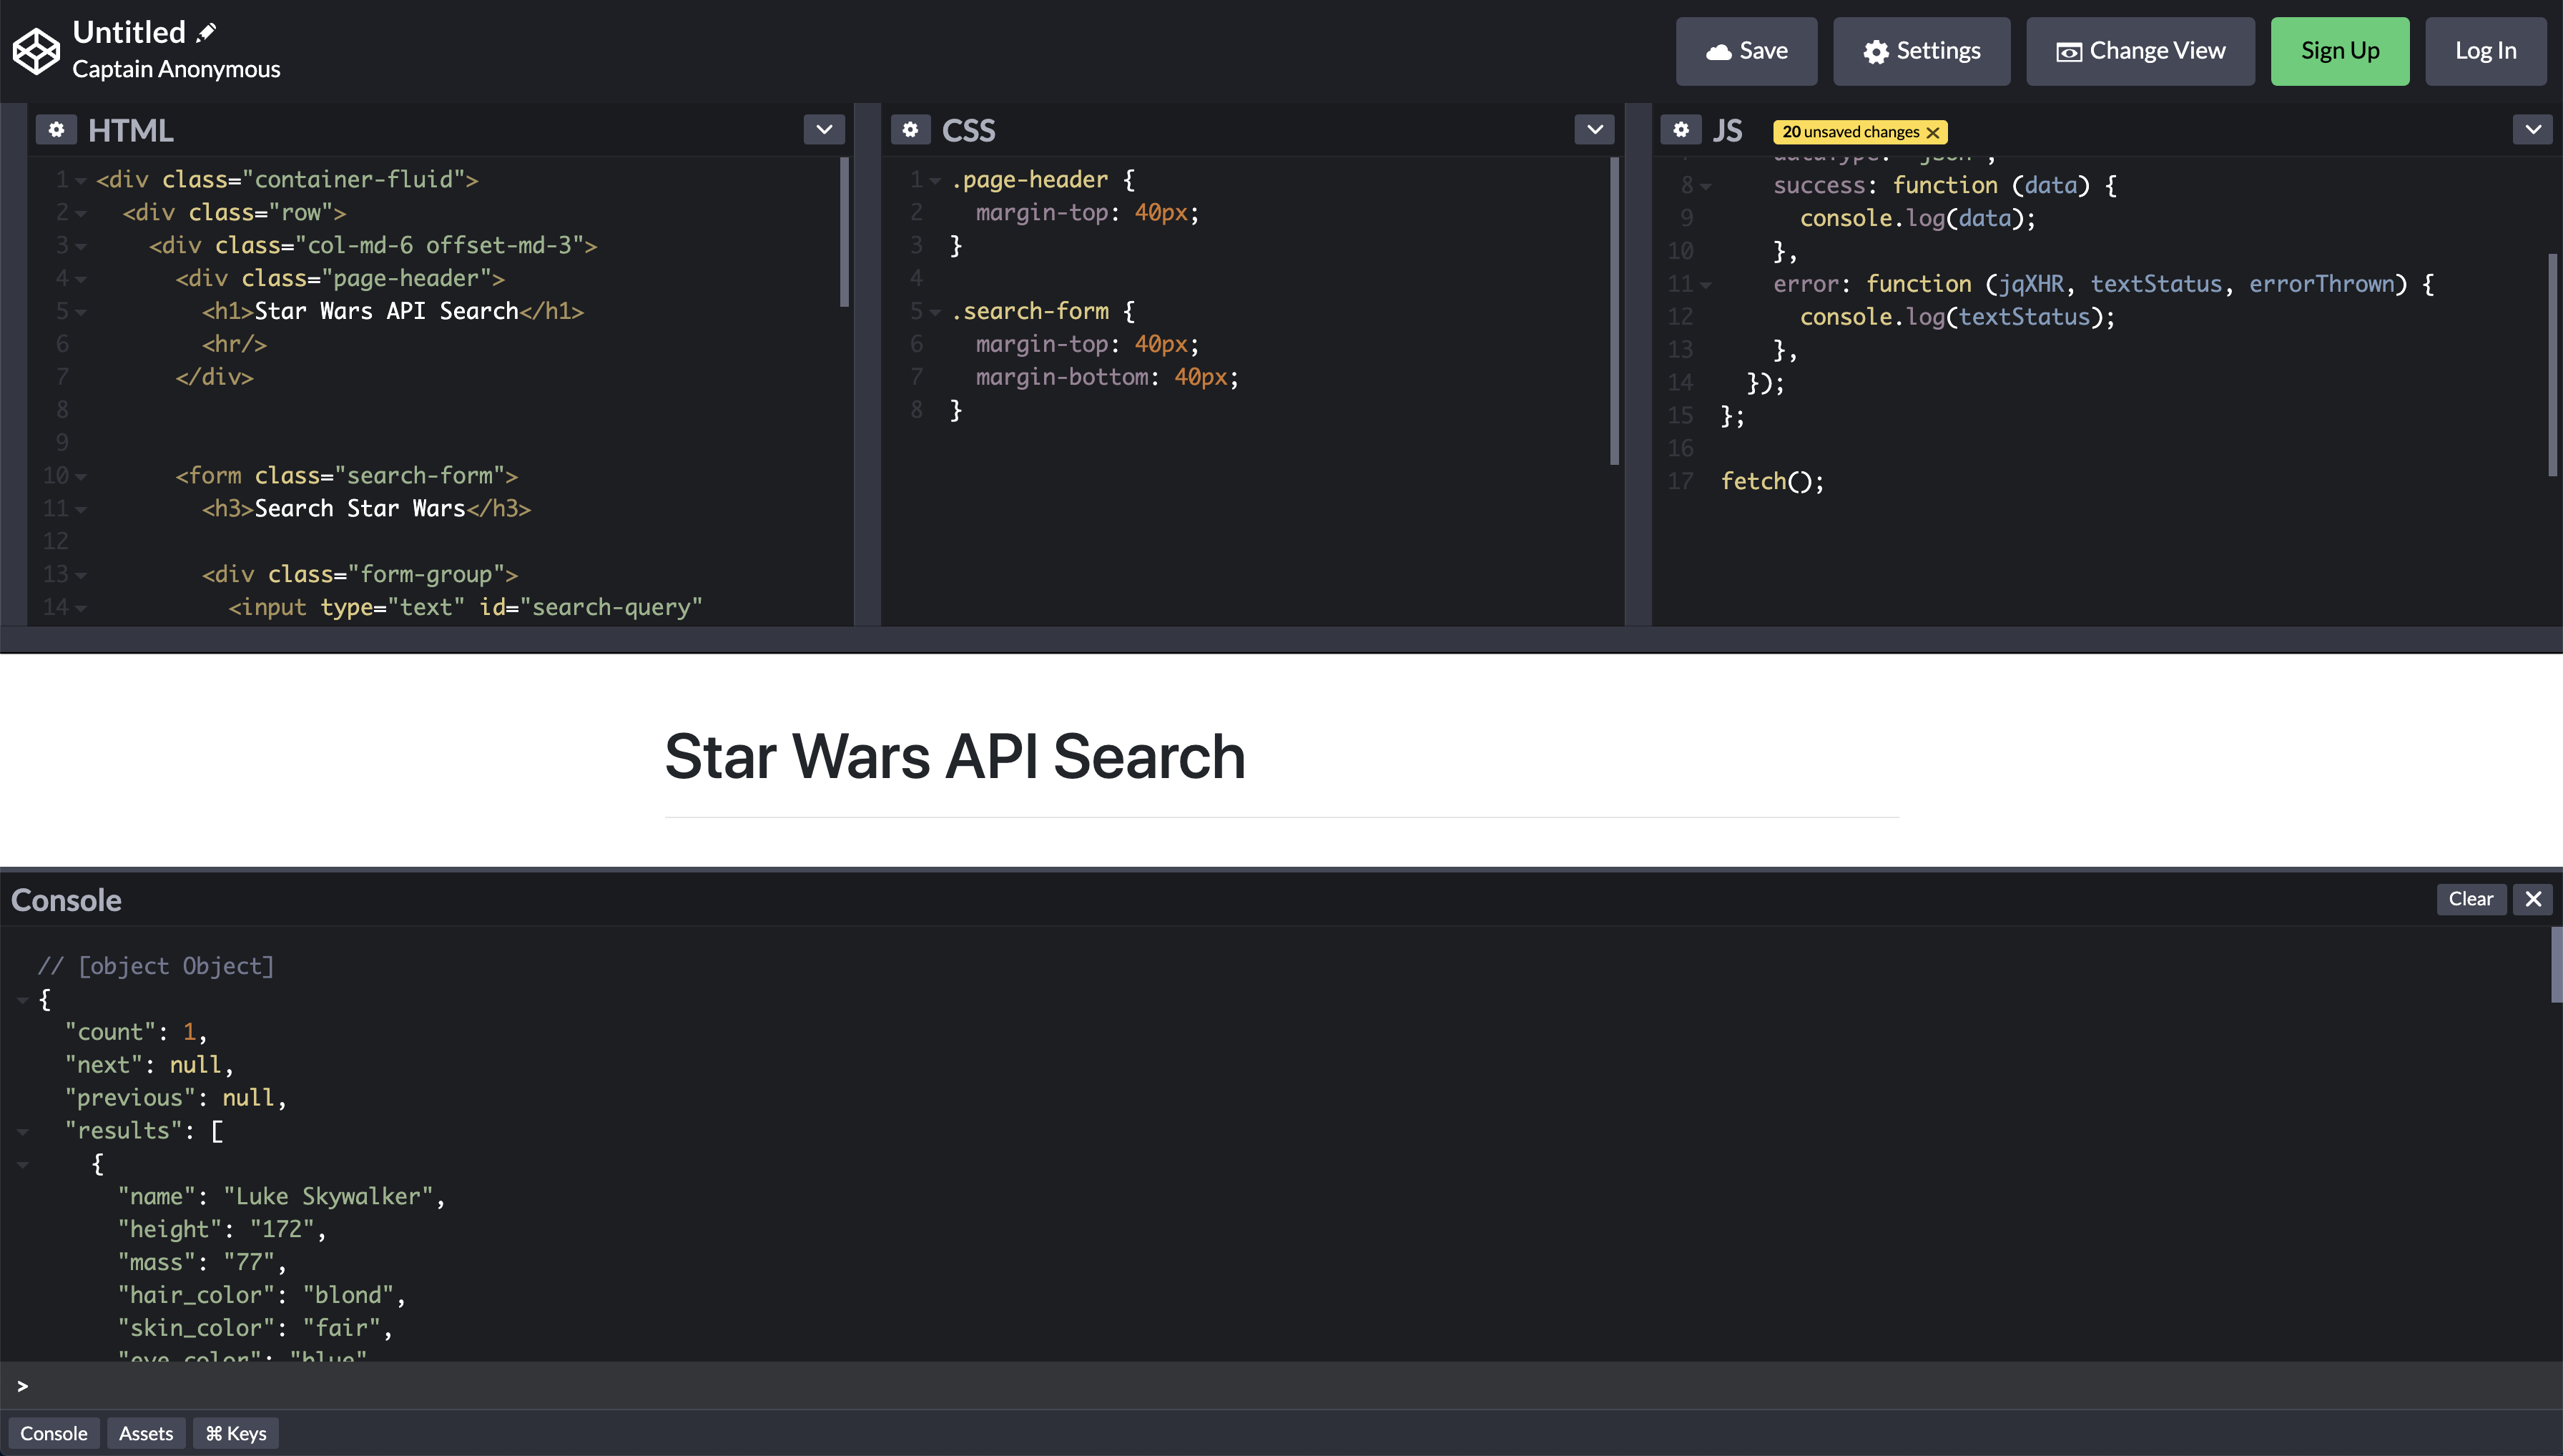
This is our data! Sweet!
Now that we're getting real data back (though we've hard-coded it an the user cannot yet search), we'll want to append the data to our page.
To do this, we'll create a function call renderResults and have that function do the leg work of turning our JSON into HTML. At first, it will look like this:
var fetch = function () {
  var url = "https://swapi.dev/api/people/?search=luke";

  $.ajax({
    method: "GET",
    url: url,
    dataType: "json",
    success: function (data) {
      renderResults(data);
    },
    error: function (jqXHR, textStatus, errorThrown) {
      console.log(textStatus);
    },
  });
};

var renderResults = function (data) {
  console.log(data.results);
};

fetch();
Notice that we're console logging data.results, which is our array! Now comes the trick part - we want to loop through that array and create HTML based off the data inside of it. It will look like this:
var fetch = function () {
  var url = "https://swapi.dev/api/people/?search=luke";

  $.ajax({
    method: "GET",
    url: url,
    dataType: "json",
    success: function (data) {
      renderResults(data);
    },
    error: function (jqXHR, textStatus, errorThrown) {
      console.log(textStatus);
    },
  });
};

var renderResults = function (data) {
  for (var i = 0; i < data.results.length; i++) {
    var result = data.results[i];

    var resultsHTML =
      '<div class="col-md-6">' +
      "<h4>" +
      result.name +
      "</h4>" +
      "<div> <strong> Birth Year </strong>: " +
      result.birth_year +
      "</div>" +
      "<div> <strong> Eye Color </strong>: " +
      result.eye_color +
      "</div>" +
      "<div> <strong> Gender </strong>: " +
      result.gender +
      "</div>" +
      "<div> <strong> Height </strong>: " +
      result.height +
      "</div>" +
      "<hr>" +
      "</div>";

    $(".results").append(resultsHTML);
  }
};

fetch();
So, what is happening here?
Essentially, we're using a for loop to loop through all the data (in this case, just one person) and for every item inside of the data.results array, we're create some HTML.
We're creating this HTML by interpolating strings with the data from the object.
Lastly, we're using jQuery's append method to add this new HTML to our .results div, which is why we're seeing it show up on the page!
This is great, but we have the same result every time. What if we want to see the deets on Han Solo?
For this, we're going to listen for the form to be submitted and call fetch then with the items the user wants to search for. We'll change our code to look like this:
var fetch = function () {
  var url = "https://swapi.dev/api/people/?search=luke";

  $.ajax({
    method: "GET",
    url: url,
    dataType: "json",
    success: function (data) {
      renderResults(data);
    },
    error: function (jqXHR, textStatus, errorThrown) {
      console.log(textStatus);
    },
  });
};

var renderResults = function (data) {
  for (var i = 0; i < data.results.length; i++) {
    var result = data.results[i];

    var resultsHTML =
      '<div class="col-md-6">' +
      "<h4>" +
      result.name +
      "</h4>" +
      "<div> <strong> Birth Year </strong>: " +
      result.birth_year +
      "</div>" +
      "<div> <strong> Eye Color </strong>: " +
      result.eye_color +
      "</div>" +
      "<div> <strong> Gender </strong>: " +
      result.gender +
      "</div>" +
      "<div> <strong> Height </strong>: " +
      result.height +
      "</div>" +
      "<hr>" +
      "</div>";

    $(".results").append(resultsHTML);
  }
};

$(".search-form").on("submit", function (e) {
  e.preventDefault();

  console.log("fetching!");
});

fetch();
A couple things happening here - this bit of code:
$(".search-form").on("submit", function (e) {});Is the jQuery way of listen for when a form is submitted.
Inside of that we have:
e.preventDefault();This is a trick that keeps the form from being submitted. Normally, the browser would try and submit a request and refresh the page in response to this submission. We don't want that to happen so we added that.
And for now we've logged fetching!, just to ensure this is working.
Now, we want to grab the values from the form and use those to change the url that we're searching with. First, let's change our event handler to look like this:
$(".search-form").on("submit", function (e) {
  e.preventDefault();

  var searchQuery = $("#search-query").val();
  var searchCategory = $("#search-category").val();

  fetch(searchQuery, searchCategory);
});
The .val function grabs the values of the inputs. Now we need to edit our fetch function:
var fetch = function (searchQuery, searchCategory) {
  var url =
    "https://swapi.dev/api/" + searchCategory + "/?search=" + searchQuery;

  $.ajax({
    method: "GET",
    url: url,
    dataType: "json",
    success: function (data) {
      renderResults(data);
    },
    error: function (jqXHR, textStatus, errorThrown) {
      console.log(textStatus);
    },
  });
};
The whole thing should look like this:
var fetch = function (searchQuery, searchCategory) {
  var url =
    "https://swapi.dev/api/" + searchCategory + "/?search=" + searchQuery;

  $.ajax({
    method: "GET",
    url: url,
    dataType: "json",
    success: function (data) {
      renderResults(data);
    },
    error: function (jqXHR, textStatus, errorThrown) {
      console.log(textStatus);
    },
  });
};

var renderResults = function (data) {
  $(".results").empty();

  for (var i = 0; i < data.results.length; i++) {
    var result = data.results[i];

    var resultsHTML =
      '<div class="col-md-6">' +
      "<h4>" +
      result.name +
      "</h4>" +
      "<div> <strong> Birth Year </strong>: " +
      result.birth_year +
      "</div>" +
      "<div> <strong> Eye Color </strong>: " +
      result.eye_color +
      "</div>" +
      "<div> <strong> Gender </strong>: " +
      result.gender +
      "</div>" +
      "<div> <strong> Height </strong>: " +
      result.height +
      "</div>" +
      "<hr>" +
      "</div>";

    $(".results").append(resultsHTML);
  }
};

$(".search-form").on("submit", function (e) {
  e.preventDefault();

  var searchQuery = $("#search-query").val();
  var searchCategory = $("#search-category").val();

  fetch(searchQuery, searchCategory);
});

fetch("", "people");
Note two things we added:
- By default, we're fetching an empty query with
peopleat the bottom of the file. - Inside of
renderResults, we're emptying the div out each time with$('.results').empty();so we have have a fresh results page.
You should now be able to search for people! If you submit a request that doesn't work, note that nothing will happen. We'll leave you to fix that on your own!
Add some error handling for when the request returns no data. For example, what if your search query is "Hans" instead of "Han?"
Enable our application to search for more categories, like Starships! To do that, you'd need to add another option the HTML search-category drop-down.
If you want to peek at what this might look like, you can copy the following JavaScript:
var searchCategory = "people";
var searchQuery = "";

var fetch = function () {
  var url =
    "https://swapi.dev/api/" + searchCategory + "/?search=" + searchQuery;

  $.ajax({
    method: "GET",
    url: url,
    dataType: "json",
    success: function (data) {
      renderResults(data);
    },
    error: function (jqXHR, textStatus, errorThrown) {
      console.log(textStatus);
      console.log(errorThrown);
      console.log(jqXHR);
    },
  });
};

$(".search-form").on("submit", function (e) {
  e.preventDefault();

  searchQuery = $("#search-query").val();
  searchCategory = $("#search-category").val();

  fetch();
});

var renderResults = function (data) {
  $(".results").empty();

  for (var i = 0; i < data.results.length; i++) {
    var resultsHTML;

    var result = data.results[i];

    if (searchCategory === "people") {
      resultsHTML =
        '<div class="col-md-6">' +
        "<h4>" +
        result.name +
        "</h4>" +
        "<div> <strong> Birth Year </strong>: " +
        result.birth_year +
        "</div>" +
        "<div> <strong> Eye Color </strong>: " +
        result.eye_color +
        "</div>" +
        "<div> <strong> Gender </strong>: " +
        result.gender +
        "</div>" +
        "<div> <strong> Height </strong>: " +
        result.height +
        "</div>" +
        "<hr>" +
        "</div>";
    } else if (searchCategory === "starships") {
      resultsHTML =
        '<div class="col-md-6">' +
        "<h4>" +
        result.name +
        "</h4>" +
        "<div> <strong> Model </strong>: " +
        result.model +
        "</div>" +
        "<div> <strong> Manufacturer </strong>: " +
        result.manufacturer +
        "</div>" +
        "<div> <strong> Cost in Credits </strong>: " +
        result.cost_in_credits +
        "</div>" +
        "<div> <strong> Cargo Capacity </strong>: " +
        result.cargo_capacity +
        "</div>" +
        "<div> <strong> Starship Class </strong>: " +
        result.starship_class +
        "</div>" +
        "<hr>" +
        "</div>";
    }

    $(".results").append(resultsHTML);
  }
};

fetch();


