A wrapper for the pigpio C library to enable fast GPIO, PWM, servo control, state change notification and interrupt handling with Node.js on the Raspberry Pi Zero, 1, 2 or 3.
pigpio supports Node.js versions 0.10, 0.12, 4, 5, 6, 7 and 8.
- Digital IO
- Up to 2.1 million digital reads per second *)
- Up to 2.3 million digital writes per second *)
- PWM on any of GPIOs 0 through 31
- Multiple frequencies and duty cycle ranges supported
- Servo control on any of GPIOs 0 through 31
- Jitter free
- Alerts when any of GPIOs 0 through 31 change state
- The time of the state change is available accurate to a few microseconds
- Notification streams for monitoring state changes on any of GPIOs 0 through 31 concurrently
- The time of the state changes are available accurate to a few microseconds
- Low latency interrupt handlers
- Handle up to 20000 interrupts per second *)
- Read or write up to 32 GPIOs as one operation with banked GPIO
- Trigger pulse generation
- Pull up/down resistor configuration
*) On a Raspberry Pi 3 Model B V1.2 running at 1.2 GHz (Performance)
This step can be skipped on Raspbian Jessie 2016-05-10 or newer as it includes the pigpio C library. The step can't be skipped on Raspbian Jessie Lite as it doesn't include the pigpio C library.
The pigpio package is based on the pigpio C library so the C library needs to be installed first. Version V41 or higher of the pigpio C library is required. It can be installed with the following commands:
wget abyz.co.uk/rpi/pigpio/pigpio.zip
unzip pigpio.zip
cd PIGPIO
make
sudo make install
The make command may take a while to complete so please be patient.
Installing the pigpio C library will also install a number of utilities. One of these utilities is pigpiod which launches the pigpio library as a daemon. This utility should not be used as the pigpio Node.js package uses the C library directly.
npm install pigpio
If you're using Node.js v4 or higher and seeing lots of compile errors when installing pigpio, it's very likely that gcc/g++ 4.8 or higher are not installed. See Node.js v4 and native addons for details.
If you're using Node.js v0.10.29 and seeing a compile error saying that
‘REPLACE_INVALID_UTF8’ is not a member of ‘v8::String’ see
Node.js v0.10.29 and native addons on the Raspberry Pi.
Assume there's an LED connected to GPIO17 (pin 11) and a momentary push button connected to GPIO4 (pin 7).

Use PWM to pulse the LED connected to GPIO17 from fully off to fully on continuously.
var Gpio = require('pigpio').Gpio,
  led = new Gpio(17, {mode: Gpio.OUTPUT}),
  dutyCycle = 0;

setInterval(function () {
  led.pwmWrite(dutyCycle);

  dutyCycle += 5;
  if (dutyCycle > 255) {
    dutyCycle = 0;
  }
}, 20);Turn the LED connected to GPIO17 on when the momentary push button connected to GPIO4 is pressed. Turn the LED off when the button is released.
var Gpio = require('pigpio').Gpio,
  button = new Gpio(4, {
    mode: Gpio.INPUT,
    pullUpDown: Gpio.PUD_DOWN,
    edge: Gpio.EITHER_EDGE
  }),
  led = new Gpio(17, {mode: Gpio.OUTPUT});

button.on('interrupt', function (level) {
  led.digitalWrite(level);
});Continuously move a servo connected to GPIO10 clockwise and anti-clockwise.
Simple servo control.
var Gpio = require('pigpio').Gpio,
  motor = new Gpio(10, {mode: Gpio.OUTPUT}),
  pulseWidth = 1000,
  increment = 100;

setInterval(function () {
  motor.servoWrite(pulseWidth);

  pulseWidth += increment;
  if (pulseWidth >= 2000) {
    increment = -100;
  } else if (pulseWidth <= 1000) {
    increment = 100;
  }
}, 1000);The trigger function can be used to generate a pulse on a GPIO and alerts can
be used to determine the time of a GPIO state change accurate to a few
microseconds. These two features can be combined to measure distance using a
HC-SR04 ultrasonic sensor.
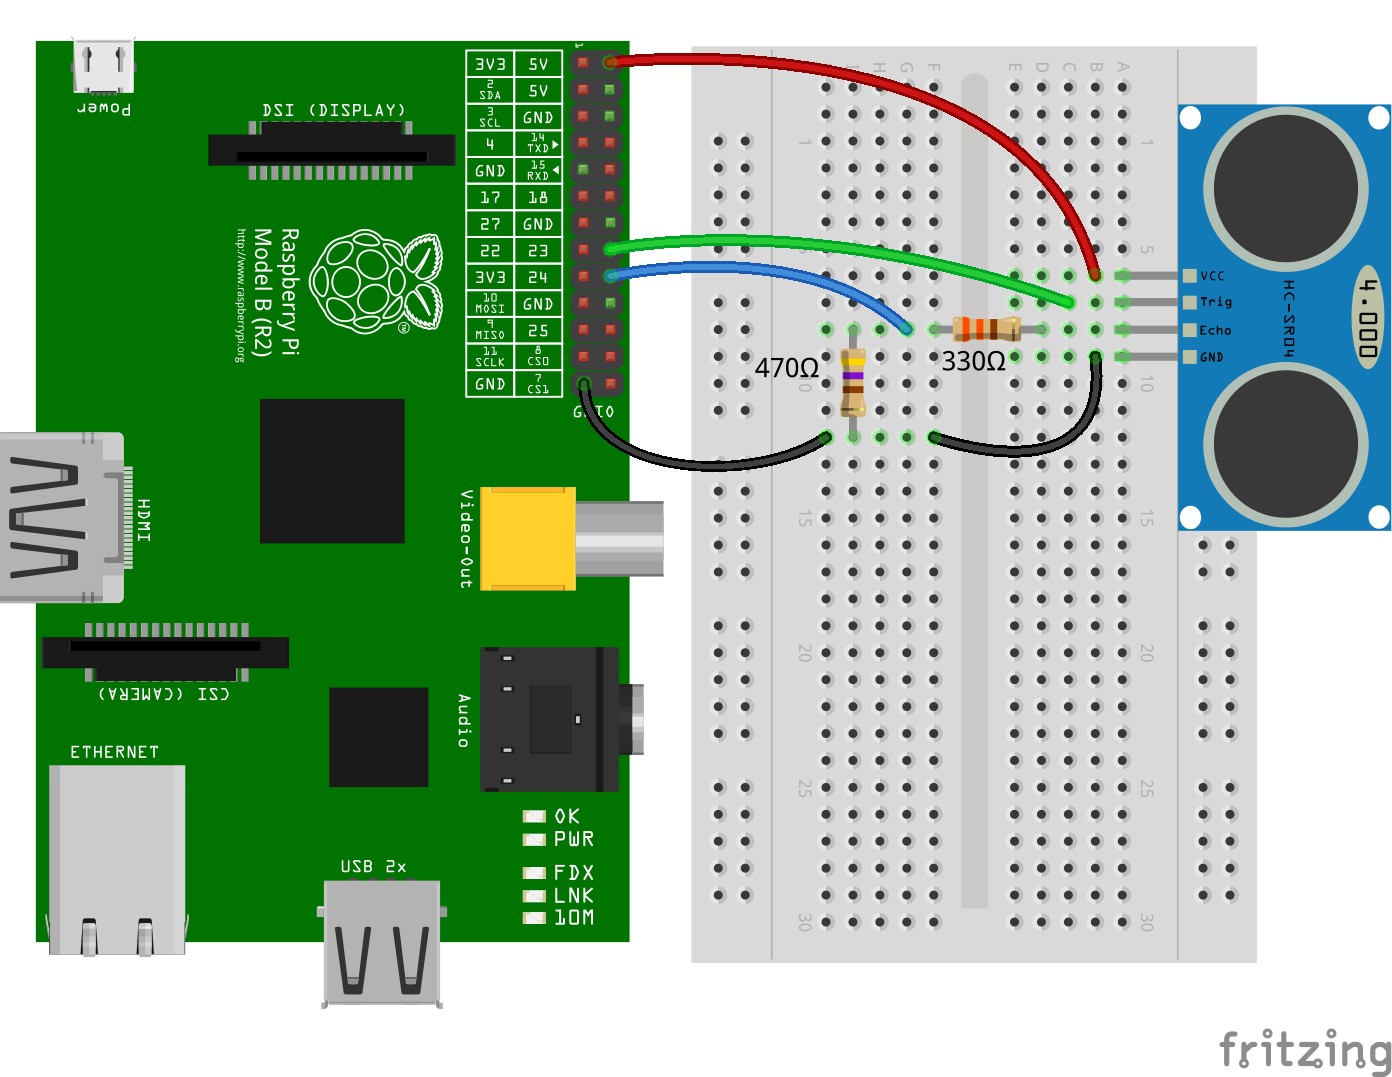
var Gpio = require('pigpio').Gpio,
  trigger = new Gpio(23, {mode: Gpio.OUTPUT}),
  echo = new Gpio(24, {mode: Gpio.INPUT, alert: true});

// The number of microseconds it takes sound to travel 1cm at 20 degrees celcius
var MICROSECDONDS_PER_CM = 1e6/34321;

trigger.digitalWrite(0); // Make sure trigger is low

(function () {
  var startTick;

  echo.on('alert', function (level, tick) {
    var endTick,
      diff;

    if (level == 1) {
      startTick = tick;
    } else {
      endTick = tick;
      diff = (endTick >> 0) - (startTick >> 0); // Unsigned 32 bit arithmetic
      console.log(diff / 2 / MICROSECDONDS_PER_CM);
    }
  });
}());

// Trigger a distance measurement once per second
setInterval(function () {
  trigger.trigger(10, 1); // Set trigger high for 10 microseconds
}, 1000);Alerts can be used to determine the time of a GPIO state change accurate to a
few microseconds. Typically, alerts will be used for GPIO inputs but they can
also be used for outputs. In this example, the trigger method is used to
pulse the LED connected to GPIO17 on for 15 microseconds once per second.
Alerts are used to measure the length of the pulse.
// Assumption: the LED is off when the program is started

var Gpio = require('pigpio').Gpio,
  led = new Gpio(17, {
    mode: Gpio.OUTPUT,
    alert: true
  });

(function () {
  var startTick;

  // Use alerts to determine how long the LED was turned on
  led.on('alert', function (level, tick) {
    var endTick,
      diff;

    if (level == 1) {
      startTick = tick;
    } else {
      endTick = tick;
      diff = (endTick >> 0) - (startTick >> 0); // Unsigned 32 bit arithmetic
      console.log(diff);
    }
  });
}());

// Turn the LED on for 15 microseconds once per second
setInterval(function () {
  led.trigger(15, 1);
}, 1000);
Here's an example of the typical output to the console:
15
15
15
15
15
15
20
15
15
15
15
Three of the pigpio tests are used to monitor performance:
- digital-read-performance.js - determine max. no. of digitalRead ops per second
- digital-write-performance.js - determine max. no. of digitalWrite ops per second
- isr-performance.js - determine max. no. of interrupts per second
The average of ten runs of these tests are shown in the table below.
| Name | Pi 2 | Pi 3 |
|---|---|---|
| Pi Model | Raspberry Pi 2 Model B V1.1 | Raspberry Pi 3 Model B V1.2 |
| OS | Raspbian Jessie 2016-02-09 | Raspbian Jessie 2016-02-26 |
| Kernel | 4.1.17-v7+ | 4.1.18-v7+ |
| Node.js | v5.6.0 armv7l | v5.7.0 armv7l |
| pigpio | v0.3.0 | v0.3.2 |
| pigpio C library | V45 | V47 |
| Reads per second | 1,232,588 | 2,129,221 |
| Writes per second | 1,323,039 | 2,336,157 |
| Interrupts per second | 8,881 | 20,533 |
- Gpio - General Purpose Input Output
- GpioBank - Banked General Purpose Input Output
- Notifier - Notification Stream
- Configuration - pigpio configuration
- onoff - GPIO access and interrupt detection
- i2c-bus - I2C serial bus access
- spi-device - SPI serial bus access
- mcp-spi-adc - Analog to digital conversion with the MCP3002/4/8, MCP3202/4/8 and MCP3304

