
Step by step guide to building a web scraper with Python and JavaScript
The first step to building a web scraper is getting the HTML of a page. We will be using the requests library to get the HTML. It allows us to send a request and get a response. This can be installed using pip or pip3, depending on your Python installation.
pip install requestsNow create a new file with extension .py in your favorite editor and open it. Alternatively, you can also use Jupyter Notebooks or even a Python console. This allows the execution of small code snippets and viewing of the result immediately.
If you are using Jupyter Notebooks, enter these lines in a cell, and execute the cell. If you are using a code editor, enter these lines, save the file, and execute it with Python.
import requests

url_to_parse = "https://en.wikipedia.org/wiki/Python_(programming_language)"
response = requests.get(url_to_parse)
print(response)
You will see the output like this:
<Response [200]>This means we received a response object with status code 200 (a successful response).
If we check the type of response object by calling the type(response), we will see that it is an instance of requests.models.Response.
This has many interesting properties, like status_code, encoding, and the most interesting of all — text.
Edit the code file so that response.text is printed
print(response.text)You will see that the output will be the entire HTML of the page. Here is the partial output:
<!DOCTYPE html><html class="client-nojs" lang="en" dir="ltr"><head><meta charset="UTF-8"/><title>Python (programming language) - Wikipedia</title>…Now that we have the HTML ready, it’s time to move on to the next step.
Now this HTML response, which currently is a string, needs to be parsed into an object. The most important thing here is that we should be able to easily query this object to get the desired data.
We can use parsing libraries directly. However, we will use another library called beautifulsoup4. This sits on top of the parser. The advantage is that we can easily write selectors so that we can query this HTML markup and look for the data that we need.
To install this library, run the following on your terminal:
pip install beautifulsoup4OR
pip install bs4Once the installation is complete, add the import statement and create an object of BeautifulSoup. Here is the updated code:
import requests
from bs4 import BeautifulSoup
url_to_parse = "https://en.wikipedia.org/wiki/Python_(programming_language)"
response = requests.get(url_to_parse)
soup = BeautifulSoup(response.text,'html.parser')
Note that we are specifying the parsers as html.parser. We can, however, use a different parser like lxml.
Now that we have the parsed object, we can now extract the data we need.
BeautifulSoup provides an easy way to navigate the data structure. Here are some examples and the output:
soup.title
# output <title>Python (programming language) - Wikipedia</title>
soup.title.name
# output 'title'
soup.title.text
# output 'Python (programming language) - Wikipedia'
soup.title.parent.name
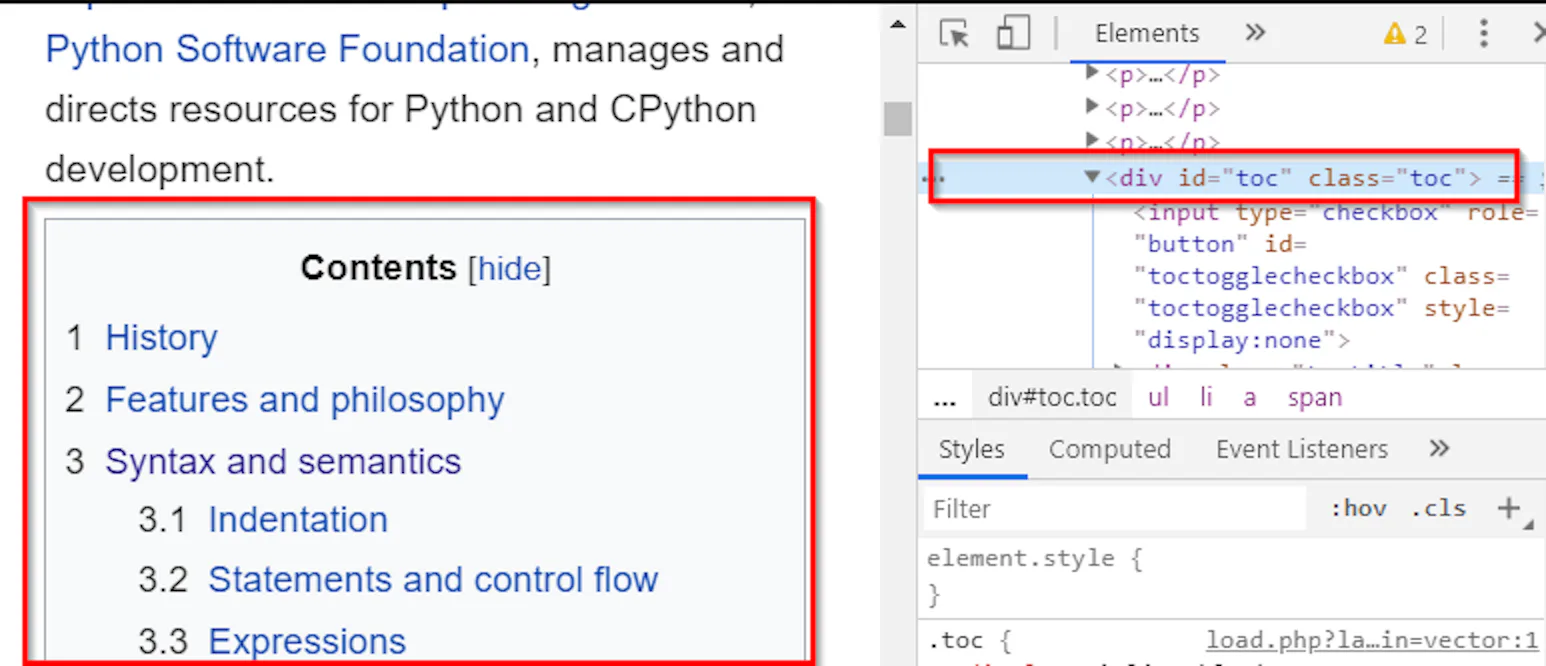
# output 'head'If you’re looking for a specific text, you first need to know where exactly that text is located in the HTML. In this example, we will try to extract the items from the table of contents of this Wikipedia page.
Open the url https://en.wikipedia.org/wiki/Python_(programming_language) in Chrome or Firefox, right click any item in the table of contents, and click Inspect. This will show that the text that we need is in <div id="toc" class="toc">
Once we know where the text is located, we have two options:
- We can use the
find()orfind_all()method. - Alternatively, we can use the
select()method.
The only difference between the find() and find_all() methods is that the find() method returns the first match, while find_all() returns them all.
Let’s look at a few examples.
If we simply run soup.find("div"), it will return the first div it finds, which is the same as running soup.div. This needs filtering as we need a specific div which contains the table of contents.
In this case, the whole table of contents is in the div that has it’s id set to toc. This information can be supplied to the find() method as the second argument.
soup.find("div",id="toc")This will return everything inside the first div which has its id set to toc. It also means that instead of div, this method can accept any tag.
Let’s take another example. In this page, there is a link with markup like this:
<a href="/wiki/End-of-life_(product)" class="mw-redirect" title="End-of-life (product)">end-of-life</a>This can be selected using any of these methods:
soup.find('a',title="End-of-life (product)")
soup.find('a',href="/wiki/End-of-life_(product)")
You can even use more than one attribute:
soup.find('a',title="End-of-life (product)",href="/wiki/End-of-life_(product)")NOTE. Be careful about class attributes. Class is a reserved keyword in Python. It means that you cannot use class in the same fashion:
soup.find('a',class="mw-redirect") # SyntaxError: invalid syntaxThe workaround is to suffix class with an underscore:
soup.find('a',class_="mw-redirect") # will return first a tag with this classBeautifulSoup also supports use of CSS selectors. This is arguably a better approach, because CSS selectors are generic and not specific to BeautifulSoup. Chances are that you already know how to build CSS selectors. Even if you don’t know CSS selectors, learning CSS selectors would be a good idea as it can help in the future. Even JavaScript scraping packages work well with CSS selectors.
Note that there are two options – select() and select_one(). The select() method is similar to find_all(). Both return a list of all the matching occurrences. The select_one() method is similar to the find() method, which returns the first matching occurrence.
Let’s look at the same examples. To extract this link:
<a href="/wiki/End-of-life_(product)" class="mw-redirect" title="End-of-life (product)">end-of-life</a>Either of these methods will work:
soup.select_one('a[title="End-of-life (product)"]')

soup.select_one('a[href="/wiki/End-of-life_(product)"]')
Again, you can use more than one attribute:
soup.select_one('a[title="End-of-life (product)"][href="/wiki/End-of-life_(product)"]')NOTE. When using more than one attribute, there should not be any space. This is standard CSS syntax and not specific to BeautifulSoup.
While using class, the syntax is much cleaner. A class is represented as a period. Similarly, id is presented by #.
soup.select_one('a.mw-redirect') # will return the first a tag with mw-redirect
soup.select_one('a#mw-redirect') # will return the first a tag with id mw-redirect
If you want to chain more than one class, write the classes separated with a period, but no space.
soup.select_one('a.mw-redirect.external') # will return the first a tag with classes mw-redirect and external.Coming back to the example of Wikipedia Table of contents, the following snippet will return all the span with class toctext.
toc = soup.select("span.toctext")
for item in toc:
print(item)
# OUTPUT
# <span class="toctext">History</span>
# <span class="toctext">Design philosophy and features</span>
# <span class="toctext">Syntax and semantics</span>
This code returns all elements. If we check the type of these elements, it will be bs4.element.Tag. Typically, we would need the text insides these elements. This is as simple as getting the .text of the elements.
toc = soup.select("span.toctext")
for item in toc:
print(item.text)
# OUTPUT
# History
# Design philosophy and features
# Syntax and semantics
# ...
Let’s get one more piece of information from the table of contents – the toc number. For example, the toc number of “Syntax and semantics” is 3, and the toc number for “Statements and control flow” is 3.1.
To get both of these, we can go through the parent elements, and again use the select method on the individual elements.
for item in soup.select('li.toclevel-1'):
toc_number = item.select_one('span.tocnumber').text
print(toc_number)
# OUTPUT
# 1
# 2
# 3
# …
The most important point here is that the select method works with beautifulsoup objects, as well as the elements extracted by select methods.
We can create dictionary inside the for loop and save everything in a list:
# Create empty list
data = []
# loop over outer elements
for item in soup.select('li.toclevel-1'):
# Get the toc number element and it’s text
toc_number = item.select_one('span.tocnumber').text
# Get the toc text element and it’s text
toc_text= item.select_one('span.toctext').text
# Create a dictionary and add to the list
data.append({
         'TOC Number': toc_number,
         'TOC Text': toc_text
})
Now we are ready to save this dictionary to a file or a database. To keep things simple, let’s begin with a file.
Exporting to CSV doesn’t need any installation. The csv module, which is bundled with Python installation, offers this functionality.
Here is the code snippet with each line explained:
# Import csv module
import csv
# open a new file in write mode
with open('wiki.csv', 'w', newline='') as csvfile:
# Specify the column names
fieldnames = ['TOC Number', 'TOC Text']
# create a dictionary writer object
writer = csv.DictWriter(csvfile, fieldnames=fieldnames)
# write the headers, this will write the fieldnames as column headings
writer.writeheaders()
# run a loop on the data
for item in data:
# Each item in the list is a dictionary
# this will be written in one row.
writer.writerow(item)
The data is exported to a CSV file. This is the last step of building a web scraper in Python.
Building a web scraper in JavaScript follows the same steps:
- Get the HTML.
- Parse the Response.
- Extract desired data.
- Save the data.
The only software required are node.js and npm. Once you have node.js setup, open terminal and create a new node project:
npm init -yAfter that, install these three packages:
npm install axios cheerio json2csvNow let’s move on to the first step.
The HTML page can be fetched by the package axios.
Create a new file and enter these lines:
// load axios
const axios = require("axios");
const wiki_python = "https://en.wikipedia.org/wiki/Python_(programming_language)";

//create an async function
(async function() {
// get the response
const response = await axios.get(wiki_python);
// prints 200 if response is successful
console.log(response.status)
})();
While most of the code is a standard node.js code, the important line in this code is:
const response = await axios.get(url);Once this line executes, the response will contain the HTML that we need.
For parsing, the package that can be used is cheerio.
Open the same file that we have been working on, and once the response is available, add the following line of code:
const $ = cheerio.load(response.data);Note here that the HTML is being accessed using the data attribute of the response object created by Axios.
It’s also important to mention that instead of using a variable name, we are using the $ sign. This simply means that we will be able to write jQuery-like syntax and use CSS selectors.
The desired data can be extracted using CSS selectors. For example, this line will select all the TOC elements:
const TOC = $("li.toclevel-1"); Now we can run a loop on all these elements, and select toc number and toc text. The extract data can then be pushed to a list to create a JSON.
const toc_data = []
TOC.each(function () {
        level = $(this).find("span.tocnumber").first().text();
        text = $(this).find("span.toctext").first().text();
        toc_data.push({ level, text });
    });
Now we are ready to save the data to a CSV.
For exporting data to CSV, we can simply use the package json2csv because we already have the data in JSON format. This will create the CSV in memory. To write this CSV to disk, we can use the fs package, which does not need to be installed separately.
const parser = new j2cp();
    const csv = parser.parse(toc_data);
    fs.writeFileSync("./wiki_toc.csv", csv);
Once everything is put together, this is how the entire code file would be:
const fs = require("fs");
const j2cp = require("json2csv").Parser;
const axios = require("axios");
const cheerio = require("cheerio");

const wiki_python =  "https://en.wikipedia.org/wiki/Python_(programming_language)";

async function getWikiTOC(url) {
  try {
    const response = await axios.get(url);
    const $ = cheerio.load(response.data);

    const TOC = $("li.toclevel-1");
    let toc_data = [];
    TOC.each(function () {
      level = $(this).find("span.tocnumber").first().text();
      text = $(this).find("span.toctext").first().text();
      toc_data.push({ level, text });
    });
    const parser = new j2cp();
    const csv = parser.parse(toc_data);
    fs.writeFileSync("./wiki_toc.csv", csv);
  } catch (err) {
    console.error(err);
  }
}

getWikiTOC(wiki_python);
Save the above code as wiki_toc.js, open the terminal, and run node wiki_toc.js. This will save the extracted data in wiki_toc.csv file.


