
This exercise allows you to practice and apply the concepts and techniques taught in class.
Upon completion of this exercise, you will be able to:
-
Use Mongoose in a Node.js project to connect to a MongoDB database and perform CRUD operations
-
Create Mongoose Schemas and Models for your MongoDB collections
-
Implement server routes in Express.js to handle
GET,POST,PUT, andDELETEHTTP requests -
Create dynamic routes in Express.js using route parameters

We've learned how to use Mongoose to create Schemas and Models and how to use it to interact with our MongoDB database. In the following exercise, we will practice creating an Express.js server that hosts a database full of awesome recipes.
- Fork this repo
- Clone this repo
-
Upon completion, run the following commands:
git add .
git commit -m "Completed lab"
git push origin master
-
Create a Pull Request and submit your assignment.
To help you get started quickly, the project comes with the basic setup and all the required files and folders. The app.js already includes a basic server setup and middleware.
To run the application, the first thing you have to do is install all of its dependencies. Run the following command:
npm installWe will use Mongoose to integrate a MongoDB database with our server. Run the following command to install it:
npm install mongooseAnd finally, run the app using the following command:
npm run devIn order to access and manipulate the data stored in the MongoDB database, we must first establish a connection to the database.
- Import
mongoosein theapp.jsfile:
const mongoose = require("mongoose");- Set up a
mongooseconnection in theapp.jsfile:
// app.js
//...

const MONGODB_URI = "mongodb://127.0.0.1:27017/express-mongoose-recipes-dev";

mongoose
  .connect(MONGODB_URI)
  .then((x) => console.log(`Connected to Mongo! Database name: "${x.connections[0].name}"`))
  .catch((err) => console.error("Error connecting to mongo", err));

// ...Create a Recipe model inside of the file /models/Recipe.model.js. The schema should have the following fields:
- title - Type
String. It should be required and unique. - instructions - Type
String. It should be required. - level - Type
String. It can be one of the following values: Easy Peasy - Amateur Chef - UltraPro Chef (use theenumvalidator 😉). - ingredients - Type
ArrayofStrings - represented as[ String ]. - image - Type
String. Default value: "https://images.media-allrecipes.com/images/75131.jpg". - duration - Type
Number. The minimum value should be 0. - isArchived - Type
Boolean. The default value should befalse. - created - Type
Date. By default, today.
Note: Remember to export the model from the file and require it in app.js to be able to use it.
Solution
// models/Recipe.model.js

const mongoose = require("mongoose");
const Schema = mongoose.Schema;

// CREATE A SCHEMA
const recipeSchema = new Schema({
  title: { type: String, required: true, unique: true },
  instructions: { type: String, required: true },
  level: { type: String, enum: ["Easy Peasy", "Amateur Chef", "UltraPro Chef"] },
  ingredients: { type: [String] },
  image: { type: String, default: "https://images.media-allrecipes.com/images/75131.jpg" },
  duration: { type: Number, min: 0 },
  isArchived: { type: Boolean, default: false },
  created: { type: Date, default: Date.now }
});

// CREATE A MODEL
const Recipe = mongoose.model("Recipe", recipeSchema);

// EXPORT THE MODEL
module.exports = Recipe;Now that you have established the database connection and created the models, it's time to create the routes. We will start with the routes for the recepies collection.
Create a new route POST /recipes that, upon request, creates a new recipe document in the database. See the instructions below on how to construct this route:
See Instructions
HTTP Request
- Method:
POST - Route:
/recipes
HTTP Response:
- Status code:
201(Created) if the document is successfully created. - Content-Type: JSON
Error Response:
-
Status code:
500(Internal Server Error) in case of an error.
Solution

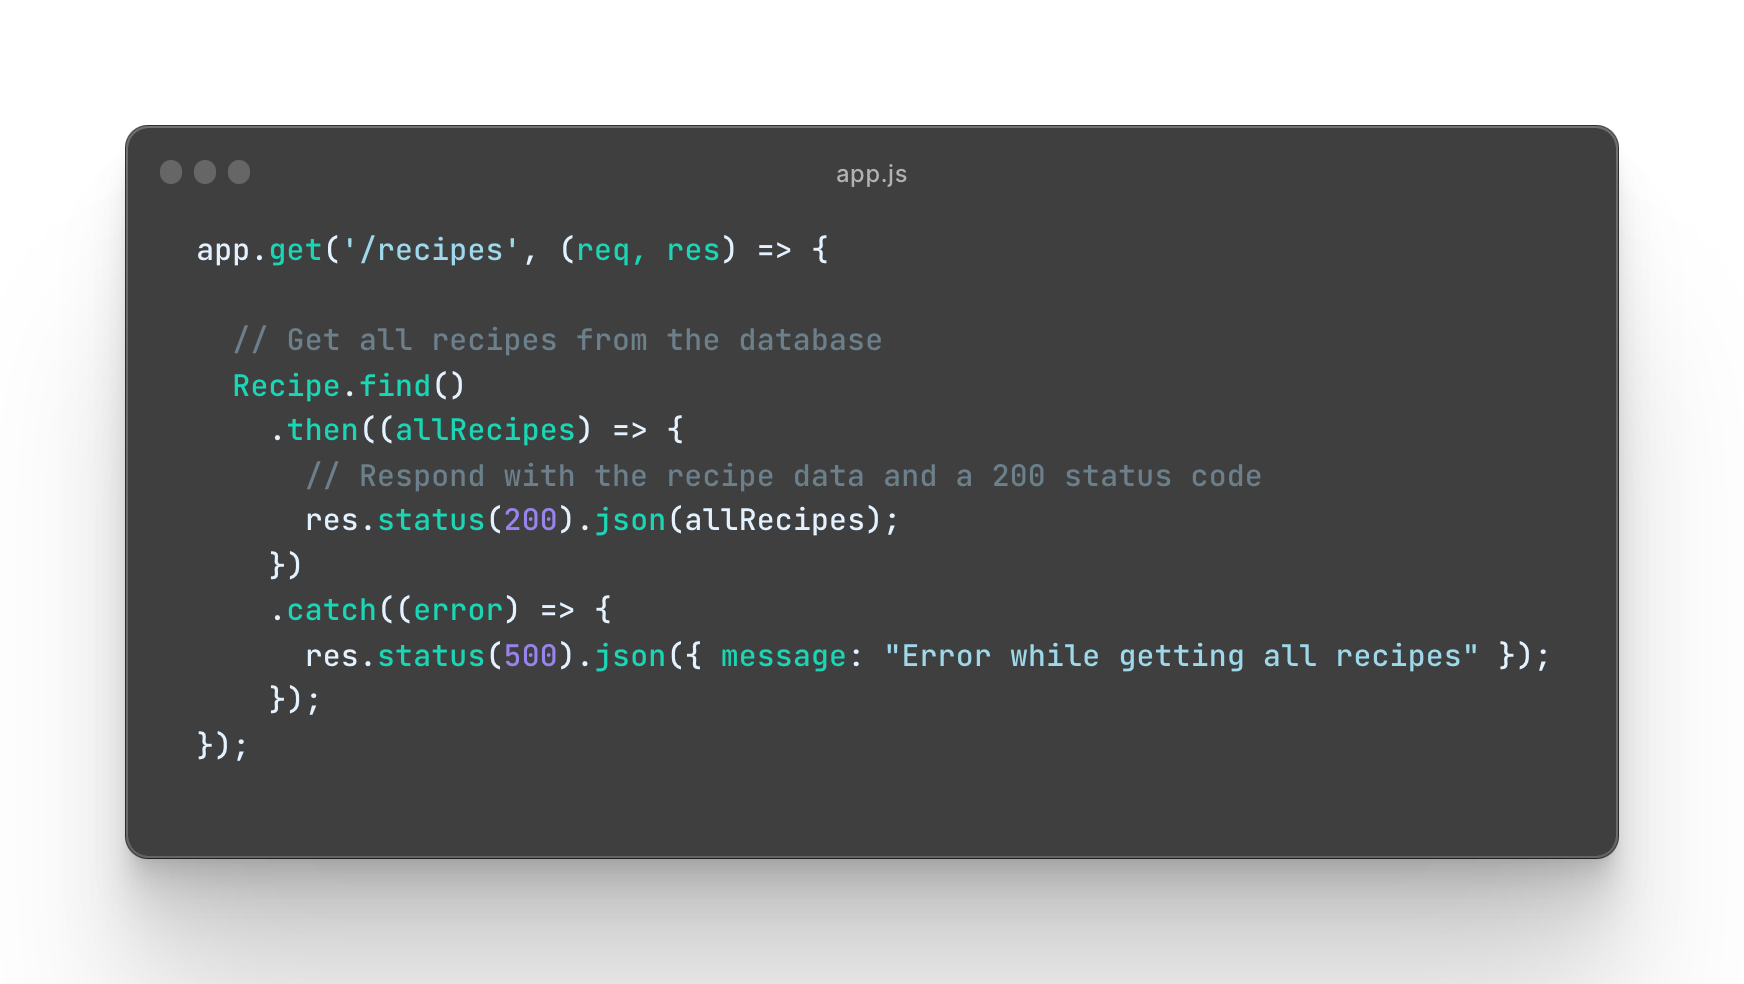
Create a new route GET /recipes that, upon request, retrieves all the recipe documents from the database. See instructions below for more details:
See Instructions
HTTP Request:
-
Method:
GET -
Route:
/recipes
HTTP Response:
-
Status code:
200(OK) -
Content-Type: JSON
Error response:
-
Status code:
500(Internal Server Error) in case of an error.
Solution
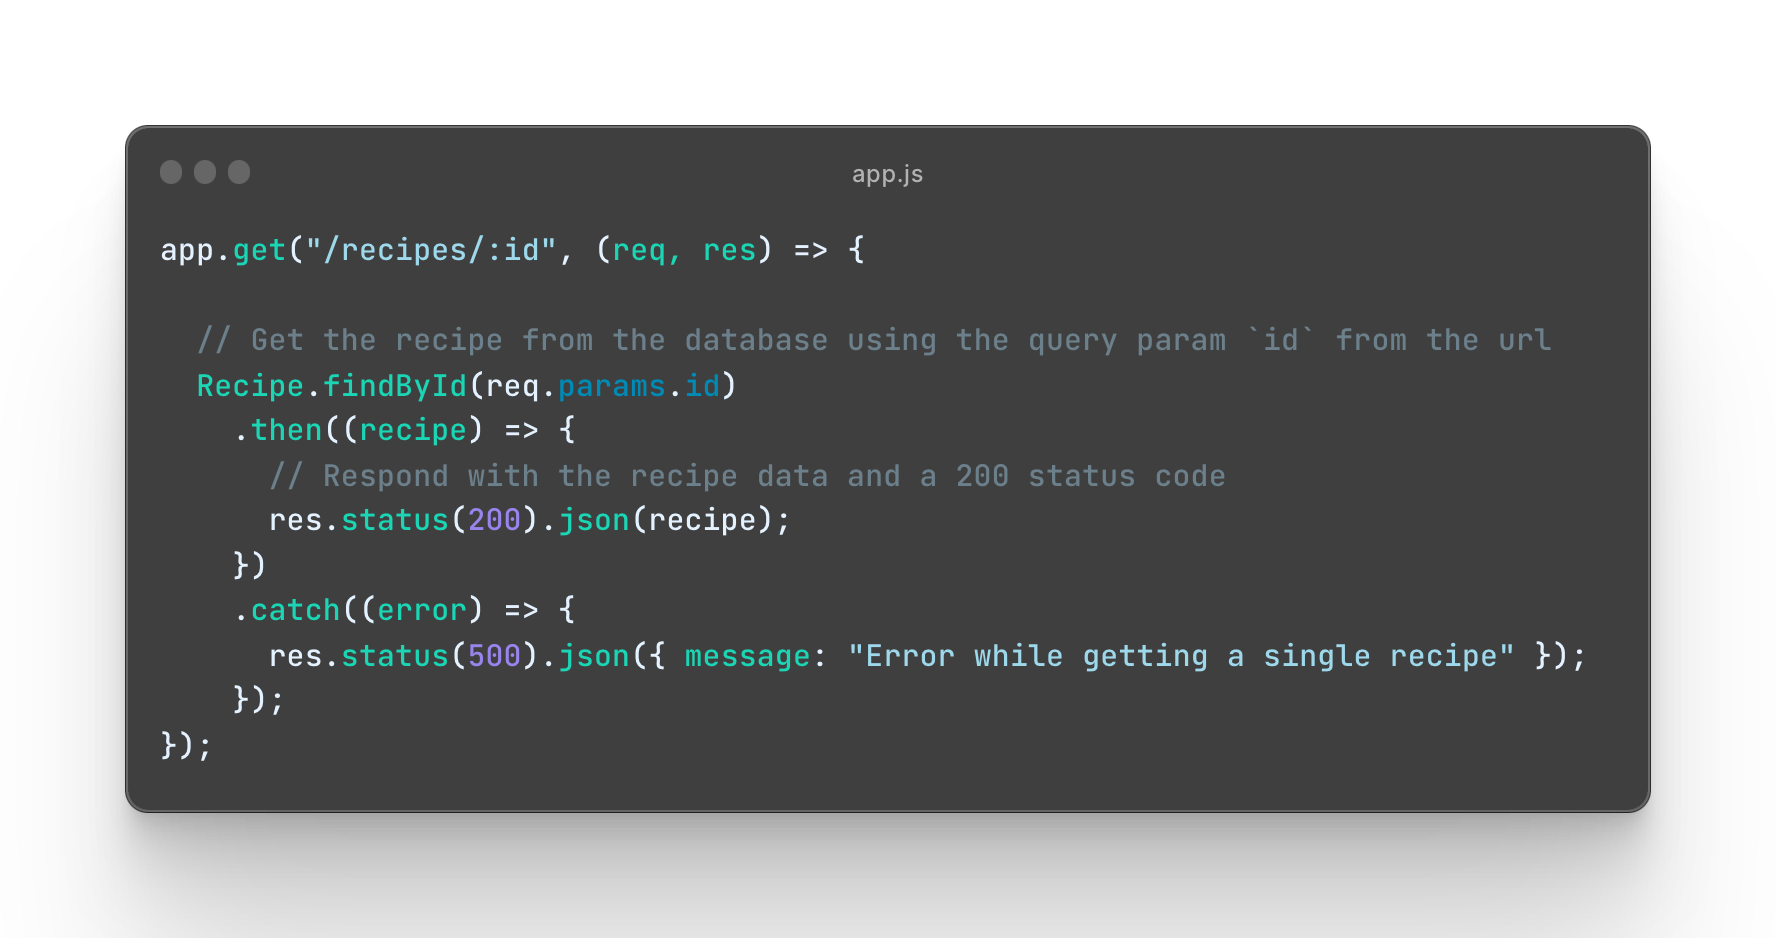
Create a new route GET /recipes/:id that, upon request, retrieves a specified recipe document by its _id from the database. You can find the instructions for the route below:
See Instructions
HTTP Request:
- Method:
GET - Route:
/recipes/:id
HTTP Response:
- Status code:
200(OK) - Content-Type: JSON
Error response:
-
Status code:
500(Internal Server Error) in case of an error.
Solution
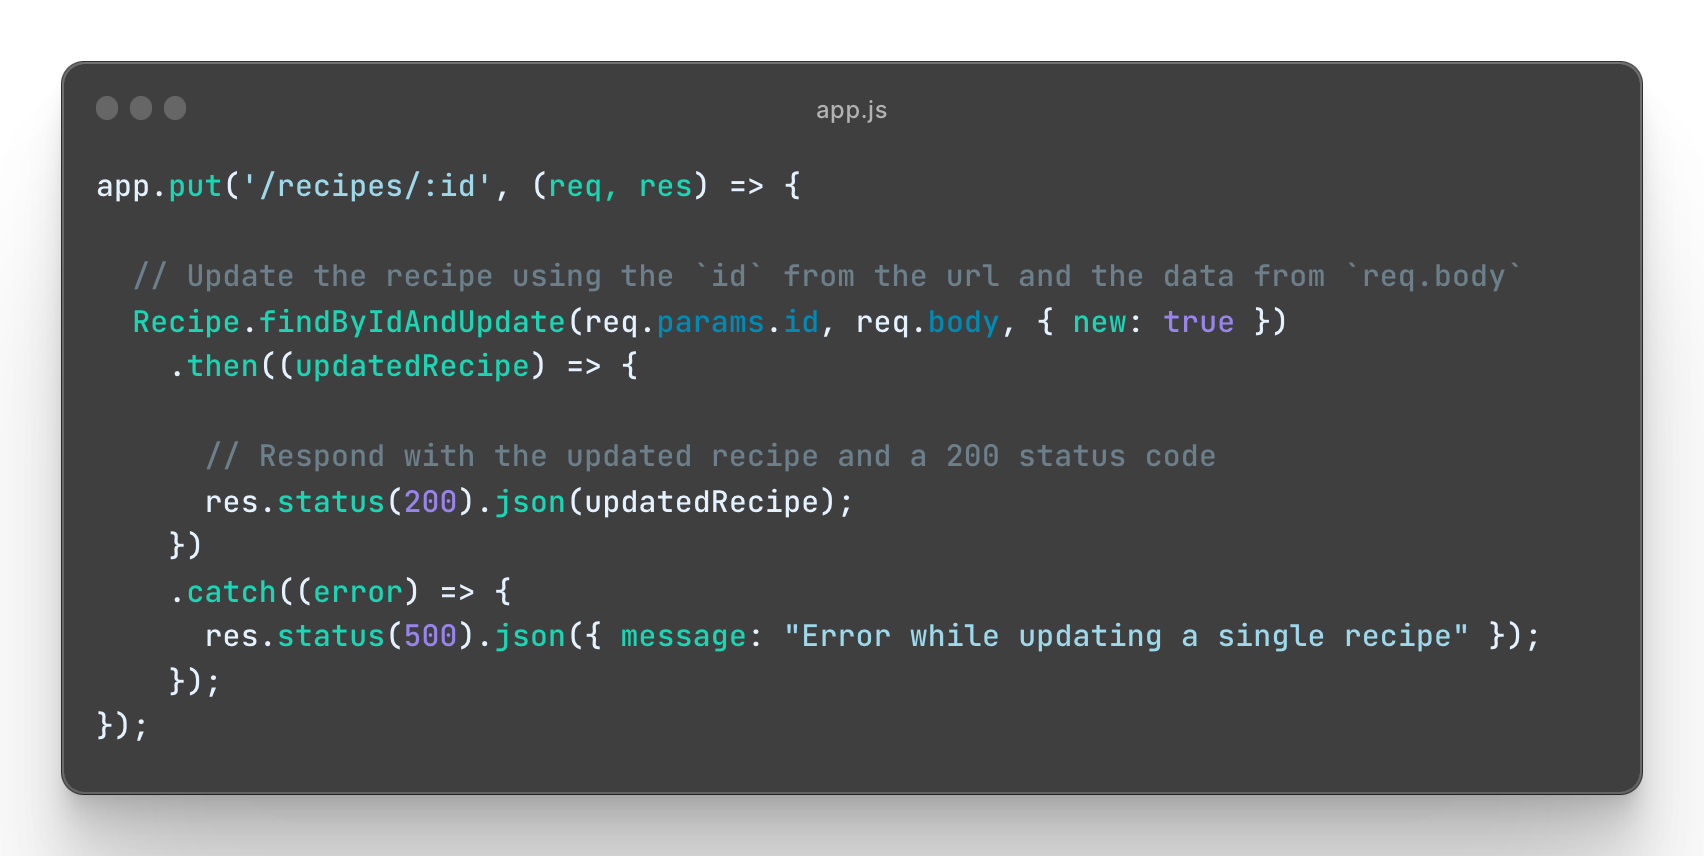
Create a new route PUT /recipes/:id that, upon request, updates a specified recipe document in the database. See the instructions below on how to construct this route:
See Instructions
HTTP Request:
- Method:
PUT - Route:
/recipes/:id
HTTP Response:
-
Status code:
200(OK) -
Content-Type: JSON
Error Response:
-
Status code:
500(Internal Server Error) in case of an error.
Solution
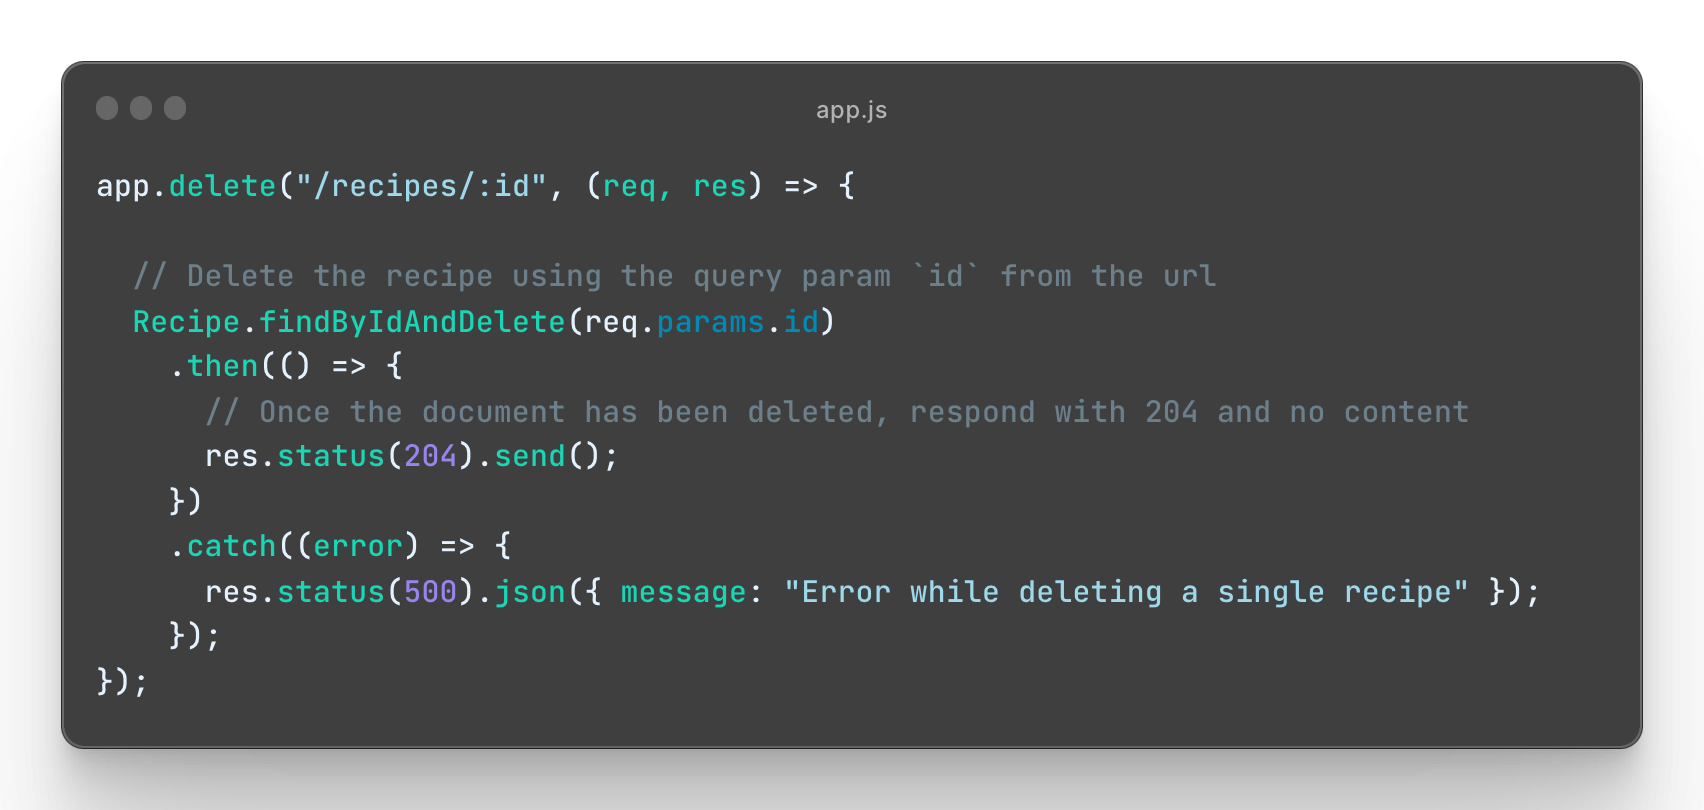
Create a new route DELETE /recipes/:id that, upon request, deletes a specified recipe document by its _id from the database. See the instructions below on how to construct this route:
See Instructions
HTTP Request:
- Method:
DELETE - Route:
/recipes/:id
HTTP Response:
- Status code:
204(No Content) if the document is successfully deleted.
Error Response:
-
Status code:
500(Internal Server Error) in case of an error.
Solution
Happy coding! ❤️
I am stuck and don't know how to solve the problem or where to start. What should I do?
If you are stuck in your code and don't know how to solve the problem or where to start, you should take a step back and try to form a clear question about the specific issue you are facing. This will help you narrow down the problem and come up with potential solutions.
For example, is it a concept that you don't understand, or are you receiving an error message that you don't know how to fix? It is usually helpful to try to state the problem as clearly as possible, including any error messages you are receiving. This can help you communicate the issue to others and potentially get help from classmates or online resources.
Once you have a clear understanding of the problem, you will be able to start working toward the solution.
I got the error: "Cannot find module" Node.js". How can I resolve it?
The error "Cannot find module" in a Node.js application means that the module you are trying to import or use does not exist in your project or cannot be found by Node.js.
There are a few things you can try to resolve the issue:
- Dependencies are not installed: Make sure that all dependencies are installed.
To do this, run the command
npm installin the root folder of your project. This will install all of the dependencies listed in the project'spackage.jsonfile, and ensure that all of the modules that your Node'js application requires are available. - Module is not installed: Make sure that the package you are trying to use is listed in the project's
package.jsonand that it is installed. To do this, run the commandnpm install <package_name>, replacing the<package_name>with the name of the package. This will add the package to the list of dependencies in thepackage.jsonfile, and install it in the project. - Module is not imported: Make sure that you've imported the module/package correctly and that the
requirestatement is spelled correctly and available in the correct place in your code. - Wrong file path: If you are importing another file as a module, make sure that the file you are trying to require is located in the correct folder and that you are using the correct file path.
- Wrong module/package name: Check the spelling of the package name you are trying to import.
I got the error "Error: listen EADDRINUSE: Address already in use". How do I fix it?
This error means that the port is taken by another process that is still running on that port. To fix the issue, you need to kill the process using the port and then run the command again. Here's how to do it:
To kill the process running on port 3000, run the following command in the terminal:
sudo kill -9 $(lsof -t -i:3000) Important: Replace the above example port 3000 with the port number of the process you are trying to kill.
To kill the running process on Windows using the Task Manager do the following:
- Open the Task Manager by pressing: Ctrl + Shift + Esc
- Find the Node process you want to terminate.
- Right-click and select End Task
To kill the running process on Windows using the Command Prompt do the following:
-
Open the windows Start menu
-
Search for CMD in the search bar
-
In the search results, right-click on Command Prompt and select Run as administrator. This will open the Command Prompt terminal.
-
In the Command Prompt terminal, run the following command to find the process ID:
netstat -ano|findstr "PID :3000"
If the process happens to be running on another port, simply replace
3000with the number the port number the process is running on.This will return the process id (PID). You should then run the following command using the process id (PID) you got in the previous step to terminate the process:
taskkill /PID 12345 /f
Important: Replace the above example PID 12345, with the process id (PID) you got in the previous step.
I got the error "Port is already in use". How do I fix it?
This error means that the port is taken by another process that is still running on that port. To fix the issue, you need to kill the process using the port and then run the command again. Here's how to do it:
To kill the process running on port 3000, run the following command in the terminal:
sudo kill -9 $(lsof -t -i:3000) Important: Replace the above example port 3000 with the port number of the process you are trying to kill.
To kill the running process on Windows using the Task Manager do the following:
- Open the Task Manager by pressing: Ctrl + Shift + Esc
- Find the Node process you want to terminate.
- Right-click and select End Task
To kill the running process on Windows using the Command Prompt do the following:
-
Open the windows Start menu
-
Search for CMD in the search bar
-
In the search results, right-click on Command Prompt and select Run as administrator. This will open the Command Prompt terminal.
-
In the Command Prompt terminal, run the following command to find the process ID:
netstat -ano|findstr "PID :3000"
If the process happens to be running on another port, simply replace
3000with the number the port number the process is running on.This will return the process id (PID). You should then run the following command using the process id (PID) you got in the previous step to terminate the process:
taskkill /PID 12345 /f
Important: Replace the above example PID 12345, with the process id (PID) you got in the previous step.
I got the error: "Error: connect ECONNREFUSED ::1:27017". What should I do?
This error means that the Node.js application is unable to connect to a MongoDB instance running on the local (same) machine.
There are a few things you should look at to troubleshoot this:
1. Check the database connection string: Check that the connection string is correct. The database connection string should be in the format:
mongodb://127.0.0.1:27017/databaseName2. Verify that MongoDB is running on your machine: Check that MongoDB is running on your machine. If it is not running, restart the service according to the following instructions:
On Mac:
Check if MongoDB is running on your machine, by running the command:
brew services listYou should see the service mongodb-community listed as started. If not, run the following command to start it:
brew services start mongodb-communityOn Ubuntu:
You can start the mongod process by issuing the following command:
sudo systemctl start mongodIf you receive an error similar to the following when starting mongod:
Failed to start mongod.service: Unit mongod.service not found.
Run the following command first:
sudo systemctl daemon-reloadThen run the start command above again.
On Windows:
To open the MongoDB process on Windows, you will need to do these steps:
-
Go to your Program Files in your C: drive - the local disk
-
In Program Files go to the MongoDB folder
-
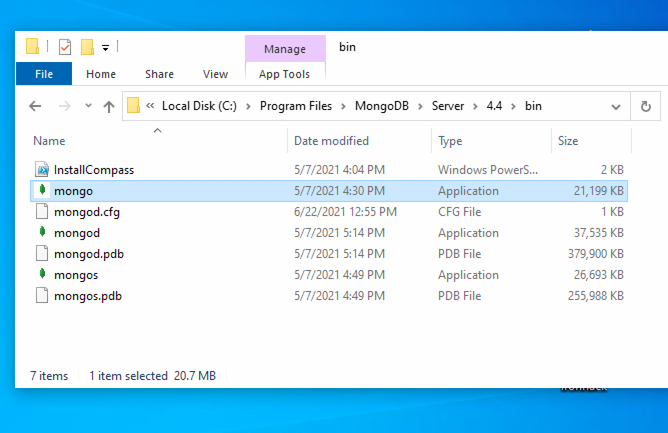
Inside the MongoDB folder, follow this path
Server/4.4/bin. The version number on your system (4.4) may be slightly different for the newer installations. -
Double-click on the file named mongod.exe.
Why is my database empty even though I am able to connect?
It is normal for the database to be empty if you have not inserted any data into it. If you want to confirm that your connection to the database is working correctly, you can try inserting a simple document into a collection and then querying the collection or checking the database to see if the document was added.
I get the error "MongoDB is not running on the provided host and port" when trying to connect with MongoDB Compass. What should I do?
If you are trying to connect to a MongoDB instance running locally, you should first check that MongoDB is running on your machine. If it is not running, restart the service according to the following instructions:
On Mac:
Check if MongoDB is running on your machine, by running the command:
brew services listYou should see the service mongodb-community listed as started. If not, run the following command to start it:
brew services start mongodb-communityOn Ubuntu:
You can start the mongod process by issuing the following command:
sudo systemctl start mongodIf you receive an error similar to the following when starting mongod:
Failed to start mongod.service: Unit mongod.service not found.
Run the following command first:
sudo systemctl daemon-reloadThen run the start command above again.
On Windows:
To open the MongoDB process on Windows, you will need to do these steps:
- Go to your Program Files in your C: drive - the local disk
- In Program Files go to the MongoDB folder
- Inside the MongoDB folder, follow this path
Server/4.4/bin. The version number on your system (4.4) may be slightly different for the newer installations. - Double-click on the file named mongod.exe.
How to create a Mongoose model?
The mongoose model serves as a blueprint for creating and managing documents within MongoDB collections. The mongoose model is an overlay on top of one MongoDB collection, that we use to query and interact with that database collection.
Here is an example of creating a User model to manage documents in the users collection:
// IMPORT MONGOOSE
const mongoose = require("mongoose");

// CREATE A SCHEMA - defines the shape of the documents
const userSchema = new mongoose.Schema({
  firstName: String,
  lastName: String
});

// CREATE THE MODEL
const User = mongoose.model("User", schema);

// EXPORT THE MODEL
module.exports = User;
In the above example, we created and exported a User model, so that it can be imported and used anywhere in the application for managing the database collection users.
Let's break down the above example and the steps in creating a mongoose model:
-
Import mongoose: The first step is to import the
mongooselibrary. -
Create a schema: The next step is to create a schema, which defines the shape of the documents that will be stored in the
userscollection. In the above example, the schema has two fieldsfirstNameandlastNamewhich are both strings. -
Create the model: The last step is to create the model. This is doe using the method
mongoose.model(), which takes two arguments: the name of the model, in this case'User'and the schema it should use. Mongoose automatically pluralizes and converts to lowercase the provided model name and uses it as the name of the collection. In this case, the string'User'is automatically converted into a collection name ->users. -
Export the model: After the model is created, it needs to be exported so it can be used in other parts of the application.
How do I resolve the Mongoose error "ValidationError: Path ... is required."?
This error occurs when you try to save a document to the database without a value for a field that is marked as required in the model. To fix this error, make sure that you are providing a value for all required fields when creating or updating a document. You can verify that you are providing the correct values by using the console.log to inspect the data before saving it to the database.
When I try to run the app, I get an error "command not found: nodemon"
Make sure you have nodemon installed globally:
npm install -g nodemonThis will install nodemon globally on your system, making it available to all of your projects.
I am unable to push changes to the repository. What should I do?
There are a couple of possible reasons why you may be unable to push changes to a Git repository:
-
You have not committed your changes: Before you can push your changes to the repository, you need to commit them using the
git commitcommand. Make sure you have committed your changes and try pushing again. To do this, run the following terminal commands from the project folder:git add . git commit -m "Your commit message" git push
-
You do not have permission to push to the repository: If you have cloned the repository directly from the main Ironhack repository without making a Fork first, you do not have write access to the repository. To check which remote repository you have cloned, run the following terminal command from the project folder:
git remote -v
If the link shown is the same as the main Ironhack repository, you will need to fork the repository to your GitHub account first, and then clone your fork to your local machine to be able to push the changes.
Note: You may want to make a copy of the code you have locally, to avoid losing it in the process.

