nullbitsco / docs Goto Github PK
View Code? Open in Web Editor NEWOnline documentation (build guides, user manuals, etc) for nullbits products.
Online documentation (build guides, user manuals, etc) for nullbits products.


Once the release build is created in firmware, update all links to nightly-rp2040 to release.
Inner for connecting halves, outer for connecting to a tidbit.
Add testing page + clarify that VIA + test matrix is the best way to go.
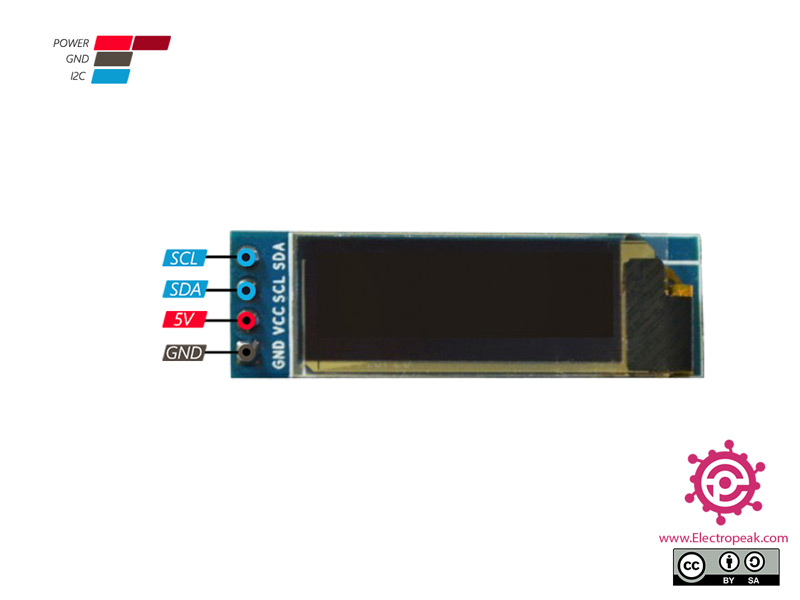
Current cap image is orange and has confused a few people. Change to blue. https://cdn.discordapp.com/attachments/620847073092435993/862803090628542464/image0.jpg
The build guide for the Nibble 65 doesn't provide instructions on how and where to solder the TRRS jack. There is no other information (such as limitations, warnings and disclaimers) regarding the use of the TRRS jack either and how to use it with the Tidbit macro/num pad.
From Discord: "also include in the step with the male header being in between the pcb and the bit-c. and i think adding in optional step of moving the oled screen since quite a few people ask for more info about it"
3 vs 5 pin switches
Copy from Discord
See below for more feedback:
"The grammar should be changed and made more precise. Instead of writing "...screw the M2x3 standoffs into the TOP PCB plate", write "...screw the M2x3 standoffs into the bottom side of the top PCB plate".
In addition, circling the diagram with red circles is ambiguous. It is unclear if the circles are used to denote the standoff or the screw. A caption on the diagram with "Place the standoffs on the red circles" would have clarified this.
There are various points in the guide where additional pictures are useful. Often, the pictures that are included are ambiguous or not helpful for that particular step. Additional annotations on the figures would be helpful.
The ordering of the material in the guide is confusing, at times, partly because the guide was not meant to orient towards e.g. plate installs vs. socket install vs other things.
In many cases, a CAD-like diagram would have simplified life enormously as well, rather than digitised pictures.
Even a hand-drawn image of the side view, showing the general layering (bottom plate, acrylic plate, screw, , standoff, midplate, top plate, etc.) is often more helpful than a page of text. "
Better to ask questions than to make a mistake!
Add to both build guides - copy info from Helperbot.
The build guide incorrectly states that the keycaps sizes required for the Nibble are 2.75U + 1U +2.25U
Change it to the correct sizes of 2.75U + 1.25U + 2.25U
Change directions on Rotary Encoder clipping to be clear that you do not need to solder the supports on the sides of the component. Issue present on nibble 65 and tidbit (to my knowledge).
My last 2 rows (3 & 4) are all being pressed in pairs with each other. Rows 1 & 2 work perfectly fine.

The entirety of the last 2 columns looks like this.
I tried updating firmware, restating my PC, and everything I could think of on the software side. I used this repo for setting up everything.
My soldering connections look like this:


Nuff wanks
For reference, on the Nibble, the OLED holes are GND, VCC, SCK, SDA from left to right.
It's very easy to read step 8 incorrectly and put screws in the bottom of the main board.
A caption on the picture or a change of phrasing or a pic of the top as well as the bottom?
Some way to make it clear which way things go. If it is done incorrectly you have to desolder every switch to fix.
Is it possible to mount the switches so they are hot-swappable?
Include an explainer of all parts on the board
There is no reset/prog button on the Bit-C PRO. To enter firmware update mode, short the PROG pin to GND during startup.
cmake -D"PICO_BOARD=nullbits_bit_c_pro" ..; makeUse BIT_C_PRO_LED_R_PIN, BIT_C_PRO_LED_G_PIN, BIT_C_PRO_LED_B_PIN to access the RGB LED channels
It's not needed
Add information on what to look for on completion and bootloader issues (driver installation etc)
Caught by CI link checker
A declarative, efficient, and flexible JavaScript library for building user interfaces.
🖖 Vue.js is a progressive, incrementally-adoptable JavaScript framework for building UI on the web.
TypeScript is a superset of JavaScript that compiles to clean JavaScript output.
An Open Source Machine Learning Framework for Everyone
The Web framework for perfectionists with deadlines.
A PHP framework for web artisans
Bring data to life with SVG, Canvas and HTML. 📊📈🎉
JavaScript (JS) is a lightweight interpreted programming language with first-class functions.
Some thing interesting about web. New door for the world.
A server is a program made to process requests and deliver data to clients.
Machine learning is a way of modeling and interpreting data that allows a piece of software to respond intelligently.
Some thing interesting about visualization, use data art
Some thing interesting about game, make everyone happy.
We are working to build community through open source technology. NB: members must have two-factor auth.
Open source projects and samples from Microsoft.
Google ❤️ Open Source for everyone.
Alibaba Open Source for everyone
Data-Driven Documents codes.
China tencent open source team.