Show easily how to create a new angular 4 app using angular-cli, including SASS, I18N, and fully optimized for production and IE9+
- NodeJS (I have 6.x version)
- NPM (I have 3.8.7 version)
- Typescript (I have 2.2.1)
- Install dotnet core sdk (https://www.microsoft.com/net/core#windowscmd) to run the server service
- Visual studio Code (or favorite editor)
- Visual studio code cool extensions (actually I have a lot installed, I don't know exactly who does the magic)
- language-vscode-javascript-angular2
- angular-cli
- Angular v4 TypeScript Snippets
- Auto Import
- Angular Support
- Angular 4 and TypeScript/HTML VS Code Snippets
- TypeScript Importer
- and more ...
- OPTIONAL CONEMU, nice CLI tool
- Google chrome or canary
- Download dotnet CORE SDK https://www.microsoft.com/net/core#windowscmd Note: I'm running 1.0.3 version
- Download and install Visual Studio Code https://code.visualstudio.com/Download
- Install C#, extension (Inside VSCodedotnet)
- Run in console dotnet new webapi dotnet restore (to download dependencies) dotnet build (to compile)
- Edit Controllers, in the way you want
- Run the app In this this case ... dotnet run browse http://localhost:5000/api/items
- Open a cmd window (With CONEMU)
- Clone the repository
git clone https://github.com/diegoparraleal/dojo4angular.git --branch dojo
- Install angular/cli (globally)
npm install -g @angular/clicd dojo4angularcd dojo4angular.serverdotnet restoredotnet run
- Navigate to service in chrome http://localhost:5000/api/items
- Open a new cmd window
- Go to repository
- Create a project
ng new dojo4angular.client --skip-git --skip-commit --style scss --routing
- Run the application
cd dojo4angular.clientng serve
- Add two components
ng g component itemsng g component users
- Modify app-routing.module.ts
...
import { ItemsComponent } from './items/items.component';
import { UsersComponent } from './users/users.component';

const routes: Routes = [
  {
    path: 'items',
    component: ItemsComponent
  },
  {
    path: 'users',
    component: UsersComponent
  }
];
...- Modify app.component.html
<h1>
  {{title}}
</h1>
<content>
  <router-outlet></router-outlet>
</content>
<footer>
  <a [routerLink]="[ '/items']">Items</a>
  <a [routerLink]="[ '/users']">Users</a>
</footer>- Add a single service
ng g service services/items
- Provide the service in app.module.ts
...
import { ItemsService } from './services/items.service';
...
providers: [*ItemsService*],
...- Implement the service using async/await (Dont'forgetto add toPromise operator import "rxjs/add/operator/toPromise";)
import { Http } from '@angular/http';
import { Injectable } from '@angular/core';
import "rxjs/add/operator/toPromise";

@Injectable()
export class ItemsService {

  constructor(private http: Http) { }

  public async getItems(){
      var response = await this.http.get("/api/items").toPromise();
      return response.json();
  }
}- Call the service in items.component.ts
import { ItemsService } from './../services/items.service';
import { Component, OnInit } from '@angular/core';

@Component({
  selector: 'app-items',
  templateUrl: './items.component.html',
  styleUrls: ['./items.component.scss']
})
export class ItemsComponent implements OnInit {
  private items = [];
  constructor(private itemsService: ItemsService) { }

  async ngOnInit() {
    this.items = await this.itemsService.getItems();
  }

}- Modify template items.component.html, in order ro render the items
<item *ngFor="let item of items">{{item}}</item>- There is an error, because we are using a custom tag, and angular chacks that HTML is well-formed, to disable this we can go to app.module.ts and modify
...
import { NgModule, NO_ERRORS_SCHEMA } from '@angular/core';
...
bootstrap: [AppComponent],
  schemas: [
    NO_ERRORS_SCHEMA
  ]
...- Right now the app is rendering, but the service does not exist, since we are using different ports; in a real environment we will deploy back and front to a single webapp (if we use Azure), to workaround this, we can create a file named proxy.conf.json, and add the following json
{
  "/api/*": {
     "target": "http://localhost:5000",
     "secure": false
  }
}- Restart the server, using the following command
ng serve --proxy-config proxy.conf.json
- Add a font (you can find the font in ./dependencies/fonts)
- Copy the fonts and images folder from ./dependencies to assets folder
- Modify styles.scss to add global styles, and import font stylesheet
/* You can add global styles to this file, and also import other style files */
@font-face {
  font-family: "nautilus";
  font-style: normal;
  font-weight: 600;
  src: url('~assets/fonts/nautilus/nautilus-webfont.woff2') format('woff2'),
       url('~assets/fonts/nautilus/nautilus-webfont.woff') format('woff'),
       url('~assets/fonts/nautilus/nautilus-webfont.ttf') format('truetype');
}

*{
    font-family: "nautilus";
}

html, body{
    position: relative;
    width: 100%;
    height: 100%;
    padding: 0;
    margin: 0;
}- Create a file under src, named variables.scss and add the following code
$color1: lightsteelblue;
$color2: steelblue;- Modify users.component.html to add an image
<p>
  This is Diego's Car
  <img class="usercar" />
</p>- Modify users.component.scss to add some styles
@import "~variables.scss";
:host{
    position: relative;
    width: 100%;
    height: 100%;

    p{
        width: 100%;
        height: 100%;
        font-size: 48px;
        text-align: center;
        color: $color2;
    }

    .usercar{
        width: 50%;
        height: 85%;
        background: url("~assets/images/renault4.jpg");
        background-repeat: no-repeat;
        background-size: cover;
        display: block;
        margin-left: 25%;
        border: 2px solid $color1;
        border-radius: 10px;
    }
}- Modify also app.component.scss to add some nice styles
@import "~variables.scss";
:host{
    position: relative;
    width: 100%;
    height: 100%;

    h1{
        text-align: center;
        font-size: 59px;
        margin: 0;
        color: $color2;
        background: $color1;
        padding: 10px;
    }

    content{
        position: relative;
        display: block;
        width: 100%;
        height: 70%;
    }

    footer{
        text-align: center;
        font-size: 25px;
        margin: 0;
        color: $color2;
        background: $color1;
        padding: 10px;
        display: block;

        a{
            margin-right: 20px;
        }
    }
}- Modify items.component.scss to add some nice styles
@import "~variables.scss";
:host{
    position: relative;
    width: 100%;
    height: 100%;
    padding: 50px;

    item{
        display: block;
        width: 20%;
        height: 200px;
        background-color: $color1;
        color: $color2;
        border-radius: 10px;
        display: inline-block;
        margin: 20px 50px 20px 0px;
        font-size: 35px;
        text-align: center;
        line-height: 200px;
    }
}- We will use this approach https://www.npmjs.com/package/ng2-translate
npm install ng2-translate --save
- Add to app.module
...
import { HttpModule, Http } from '@angular/http';
import {TranslateModule, TranslateLoader, TranslateStaticLoader} from 'ng2-translate';

export function createTranslateLoader(http: Http) {
    return new TranslateStaticLoader(http, './assets/i18n', '.json');
}

...
imports: [
    BrowserModule,
    FormsModule,
    HttpModule,
    AppRoutingModule,
    TranslateModule.forRoot({
        provide: TranslateLoader,
        useFactory: (createTranslateLoader),
        deps: [Http]
    })
  ],
...- Modify app.component.html (the links) and add some buttons
<a [routerLink]="[ '/items']">{{ 'app.items' | translate }}</a>
<a [routerLink]="[ '/users']">{{ 'app.users' | translate }}</a>
<br/>
<button (click)="switchLang('en')">EN</button>
<button (click)="switchLang('es')">ES</button>- Modify app.component.ts to start translate service, and to switch languages
...
import {TranslateService} from 'ng2-translate';
...
  constructor(private translate: TranslateService){
    translate.use('en');
  }

  switchLang(lang){
    this.translate.use(lang);
  }
...- Create a folder under assets named i18n, and create two files, en.json and es.json en.json
{
    "app": {
        "items": "items",
        "users": "users"
    }
}
es.json
{
    "app": {
        "items": "articulos",
        "users": "usuarios"
    }
}- Open a new cli window, and locate your dojo4angular.client folder
- Run the following instruction
ng build --output-path ../dojo4angular.server/wwwroot
- restart dotnet server and load http://localhost:5000/
- Check application size -> 2.7MB
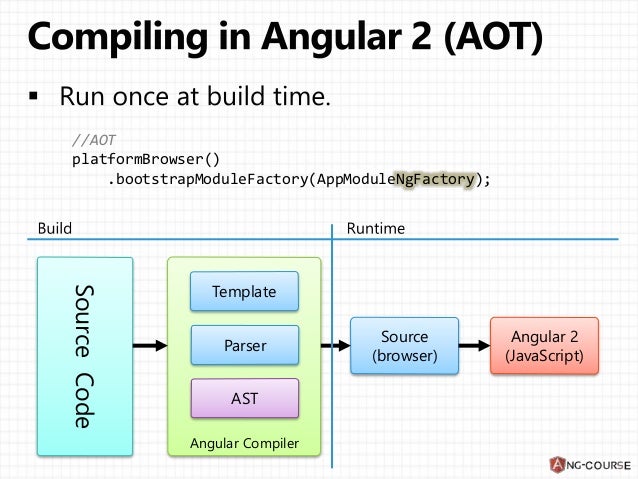
- We need to reduce the bundle size using AoT and Tree Shaking
- AoT https://image.slidesharecdn.com/ahead-of-timecompilation-161013061613/95/angular-2-ahead-oftime-compilation-4-638.jpg?cb=1476339406
- Tree Shaking https://image.slidesharecdn.com/fd9eibz6qbopsqjxpdxw-signature-a0f221d50696858fb688f0d98641f455dc4186839f4099b982e17204b9f17bec-poli-161205055358/95/senchacon-2016-the-modern-toolchain-ross-gerbasi-14-1024.jpg?cb=1482947006
- But with angular-cli is very easy, just run
ng build -prod --aot --output-path ../dojo4angular.server/wwwroot
- We have here an error, that's because AoT requires that the variables used in templates must be public, so we just change that in items.components.ts
ng build -prod --aot --output-path ../dojo4angular.server/wwwroot
- restart dotnet server and load http://localhost:5000/
- Now the app is 519k :)
- In order to make it work with IIS and ng serve at the same time, we need to perform a little change at index.html
...
<base href="./">
...- Compile angular application again
ng build -prod --aot --output-path ../dojo4angular.server/wwwroot
- Execute the following command
dotnet publish --output publish
- Create an IIS app pointing to that --output location
- Browse your IIS app :)
- Add bootstrap
npm install bootstrap --saveIf we want to use SASS version of bootstrap (so we can modify variables), we can use npm install bootstrap-sass --save
- Modify angular-cli.json in order to include bootstrap global styles
...
"styles": [
    "../node_modules/bootstrap/dist/css/bootstrap.min.css",
    "styles.scss"
],
...- Modify the language buttons at app.component.html
<button class="btn btn-primary" (click)="switchLang('en')">EN</button>
<button class="btn btn-primary" (click)="switchLang('es')">ES</button>- Restart server, because we modified angular-cli.json (ng serve) We will continue with development server from now on
- Add jquery (or lodash, the steps are the same)
npm install jquery --savenpm install @types/jquery --save-dev
- Modify scripts tag in angular-cli.json
...
"scripts": [
    "../node_modules/jquery/dist/jquery.min.js"
],
...- Modify app.component.ts to use jQuery (don't forget to add declare var $: any;)
...
declare var $: any;
...
ngOnInit(){
    let element = $(this.elementRef.nativeElement);
    element.append("<label class='multilabel'>I SHOULD NOT BE HERE</label>");
  }
...
```'
- Restart server, because we modified *angular-cli.json*

- Add a 3rd party non packaged jquery plugin http://letteringjs.com/
- Create a *lib* folder under *src*
- Copy the jquery plugin there (_you can find the font in ./dependencies/lib_)
- Modify scripts tag in angular-cli.json
``` javascript
...
"scripts": [
    "../node_modules/jquery/dist/jquery.min.js",
    "lib/jquery.lettering.js"
],
...- Use the jquery plugin in app.component.ts
...
declare var $: any;
...
ngOnInit(){
    let element = $(this.elementRef.nativeElement);
    element.append("<label class='megalabel'>I SHOULD NOT BE HERE</label>");
    var label = $("label", element);
    label.lettering();
  }
...
```'

- Add the following in app.component.ts
``` css
.megalabel{
    span {
            font-size: 55px;
            transform: rotate(-25deg);
            color: darkgoldenrod;
            text-transform: uppercase;
            display: inline-block;
            margin-left: 15px;
            font-weight: bold;
    }
}- restart server
- We can see here that styles are not working, that's because angular is using web components technology to avoid styles overlapping, that's the reason behind not using jquery to add html in angular
- Move those styles to styles.scss, in order to make them work
- Voilà!
- Just go to polyfills.ts and uncomment stuff (it will add some bits to the bundles)
- Note: For IIS, there is a problem with the url routes that needs to be fixed in the following way at index.html
<!--<base href="./">-->
<script>
            var isIE = !!navigator.userAgent.match(/Trident/g) || !!navigator.userAgent.match(/MSIE/g);
            if(isIE){
        var baseUrl  = window.location.href;
        if (baseUrl[baseUrl.length - 1] != "/"){
        baseUrl = baseUrl.substring(0, baseUrl.lastIndexOf("/") + 1);
        }
                document.write('<base href="' + baseUrl + '" />');
            } else {
                document.write('<base href="./" />');
            }
</script>