Sendbird UIKit for iOS
Sendbird UIKit for iOS is a development kit with an user interface that enables an easy and fast integration of standard chat features into new or existing client apps. From the overall theme to individual styles such as colors and fonts, components can be fully customized to create an in-app chat experience unique to your brand identity.
Note: Currently, UIKit for iOS now supports both group channels and open channels.
- Easy installation
- Fully-featured chat with a minimal amount of code
- Customizable components, events, and views
- Customizable user list to enable chat among specified users
Find out more about Sendbird UIKit for iOS on UIKit for iOS doc. If you have any comments or questions regarding bugs and feature requests, visit Sendbird community.
This section shows the prerequisites you need to check to use Sendbird UIKit for iOS.
The minimum requirements for Sendbird UIKit for iOS are:
- iOS 10.3+
- Swift 4.2+ / Objective-C
- Sendbird Chat SDK for iOS 3.0.216+
This section gives you information you need to get started with Sendbird UIKit for iOS.
Our sample app has all the core features of Sendbird UIKit for iOS. Download the app from our GitHub repository to get an idea of what you can build with the actual UIKit before building your own project.
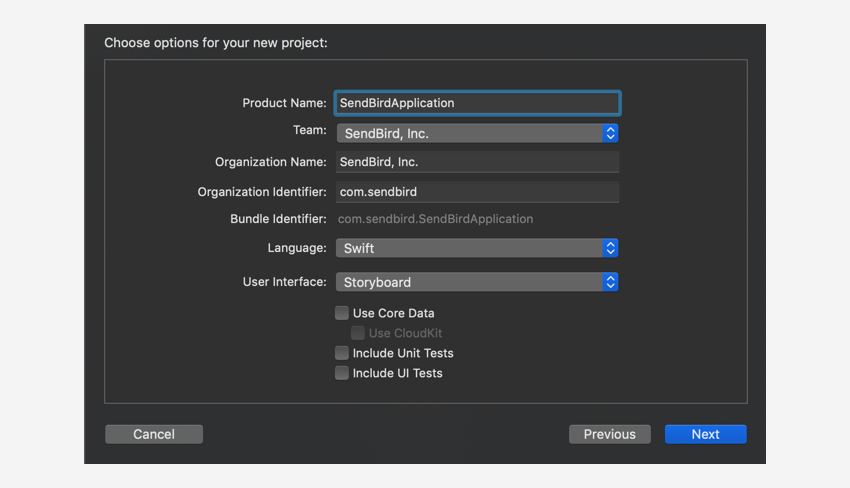
You can get started by creating a project. Sendbird UIKit supports both Objective-c and Swift, so you can create and work on a project in the language you want to develop with.
UIKit for iOS can be installed through either CocoaPods or Carthage:
Note: Sendbird UIKit for iOS is Sendbird Chat SDK-dependent. If you install the UIKit,
CocoaPodswill automatically install the Chat SDK for iOS as well. The minimum requirement of the Chat SDK for iOS is 3.0.216 or higher.
- Add
SendBirdUIKitinto yourPodfilein Xcode as below:
platform :ios, '10.3'
use_frameworks!

target YOUR_PROJECT_TARGET do
    pod 'SendBirdUIKit'
end- Install the
SendBirdUIKitframework throughCocoaPods.
$ pod install- Update the
SendBirdUIKitframework throughCocoaPods.
$ pod update - Add
SendBirdUIKitandSendBirdSDKinto yourCartfileas below:
github "sendbird/sendbird-uikit-ios"
github "sendbird/sendbird-ios-framework" == 3.0.216- Install the
SendBirdUIKitframework throughCarthage.
$ carthage update- Go to your Xcode project target’s General settings tab in the
Frameworks and Librariessection. Then drag and drop on the disk each framework from the<YOUR_XCODE_PROJECT_DIRECTORY>/Carthage/Build/iOSfolder. - Go to your Xcode project target’s Build Phases settings tab, click the + icon, and choose New Run Script Phase. Create a
Run Script, specify your shell (ex: /bin/sh), and add/usr/local/bin/carthage copy-frameworksto the script below the shell. Finally, add the paths to the frameworks (SendBirdUIKitandSendBirdSDK) under Input Files.
$(SRCROOT)/Carthage/Build/iOS/SendBirdUIKit.framework
$(SRCROOT)/Carthage/Build/iOS/SendBirdSDK.frameworkNote: The
SendBirdUIKitCarthage built created in the latestSwiftversion. So, if the latestSwiftenvironment is not configured, you need to copying the framework into the project manually.
If you are building with Xcode 11.3 or earlier version, you may face two following errors caused by Swift's new annotation processing applied on Swift 5.2 which is used in Xcode 11.4.
- Unknown attribute '_inheritsConvenienceInitializers'
- Unknown attribute '_hasMissingDesignatedInitializers'
When these errors happen, follow the steps below which remove the annotations by executing the necessary script in the build steps in advance.
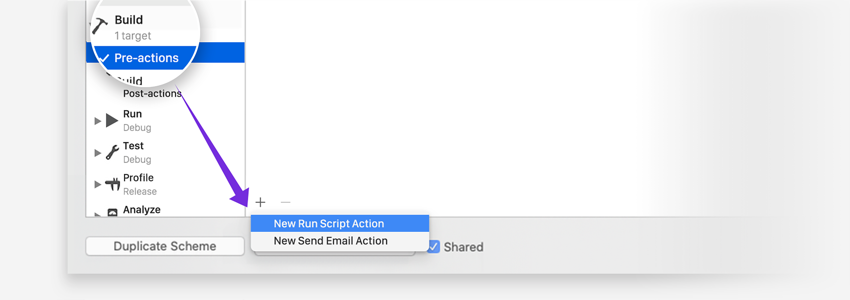
- Open the edit scheme menu of the project target.
- Select the Build > Pre-actions menu and add new run script action.
- After adding the script below, select the target to apply the script.

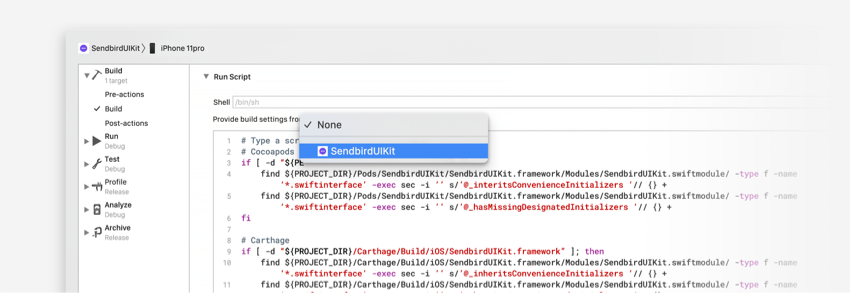
# Cocoapods
if [ -d "${PROJECT_DIR}/Pods/SendBirdUIKit" ]; then
    find ${PROJECT_DIR}/Pods/SendBirdUIKit/SendBirdUIKit.framework/Modules/SendBirdUIKit.swiftmodule/ -type f -name '*.swiftinterface' -exec sed -i '' s/'@_inheritsConvenienceInitializers '// {} +
    find ${PROJECT_DIR}/Pods/SendBirdUIKit/SendBirdUIKit.framework/Modules/SendBirdUIKit.swiftmodule/ -type f -name '*.swiftinterface' -exec sed -i '' s/'@_hasMissingDesignatedInitializers '// {} +
fi

# Carthage
if [ -d "${PROJECT_DIR}/Carthage/Build/iOS/SendBirdUIKit.framework" ]; then
    find ${PROJECT_DIR}/Carthage/Build/iOS/SendBirdUIKit.framework/Modules/SendBirdUIKit.swiftmodule/ -type f -name '*.swiftinterface' -exec sed -i '' s/'@_inheritsConvenienceInitializers '// {} +
    find ${PROJECT_DIR}/Carthage/Build/iOS/SendBirdUIKit.framework/Modules/SendBirdUIKit.swiftmodule/ -type f -name '*.swiftinterface' -exec sed -i '' s/'@_hasMissingDesignatedInitializers '// {} +
fi- Try to build and run.
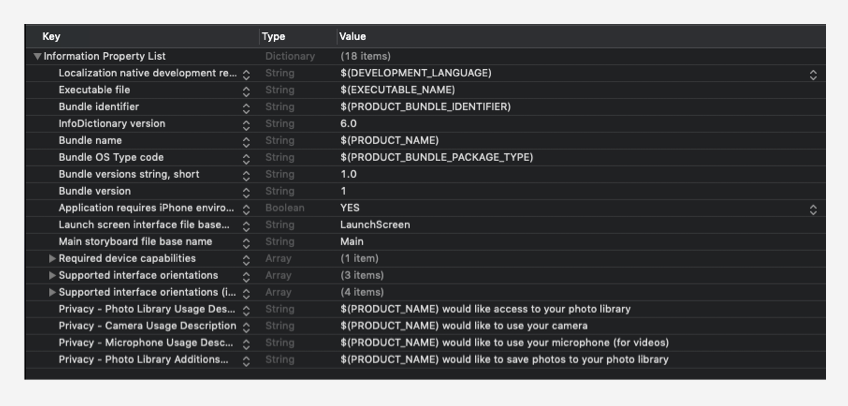
Sendbird UIKit offers features to attach or save files such as photos, videos, and documents. To use those features, you need to request permission from end users.
Applications must acquire permission from end users to use their photo assets or to save assets into their library. Once the permission is granted, users can send image or video messages and save media assets.
...
<key>NSPhotoLibraryUsageDescription</key>
	<string>$(PRODUCT_NAME) would like access to your photo library</string>
<key>NSCameraUsageDescription</key>
	<string>$(PRODUCT_NAME) would like to use your camera</string>
<key>NSMicrophoneUsageDescription</key>
	<string>$(PRODUCT_NAME) would like to use your microphone (for videos)</string>
<key>NSPhotoLibraryAddUsageDescription</key>
    <string>$(PRODUCT_NAME) would like to save photos to your photo library</string>
...
If you want to attach files from iCloud, you must activate the iCloud feature. Once it is activated, users can also send a message with files from iCloud.
Go to your Xcode project's Signing & Capabilities tab. Then, click + Capability button and select iCloud. Check iCloud Documents.

In order to use the Chat SDK's features, you must initialize the SendBirdUIKit instance with APP_ID. This step also initializes the Chat SDK for iOS.
Initialize the SendBirdUIKit instance through AppDelegate as below:
// AppDelegate.m
@import SendBirdUIKit;
...

- (BOOL)application:(UIApplication *)application didFinishLaunchingWithOptions:(NSDictionary *)launchOptions {
    ...
    NSString *APP_ID = @"2D7B4CDB-932F-4082-9B09-A1153792DC8D";	// The ID of the Sendbird application which UIKit sample app uses..
    [SBUMain initializeWithApplicationId:APP_ID];
    ...
// AppDelegate.swift

import SendBirdUIKit
...

func application(_ application: UIApplication, didFinishLaunchingWithOptions launchOptions: [UIApplication.LaunchOptionsKey: Any]?) -> Bool {
    ...

    let APP_ID = "2D7B4CDB-932F-4082-9B09-A1153792DC8D"	// The ID of the Sendbird application which UIKit sample app uses.
    SBUMain.initialize(applicationId: APP_ID)
    ...

}Note: In the above, you should specify the ID of your Sendbird application in place of the
APP_ID.
User information must be set as CurrentUser in the SBUGlobal prior to launching Sendbird UIKit. This information will be used within the kit for various tasks. The userId field must be specified whereas other fields such as nickname and profileUrl are optional and filled with default values if not specified.
Set the CurrentUser for UIKit through the AppDelegate as below:
Note: Even if you don’t use the
AppDelegate, you should register user information before launching a chat service.
// AppDelegate.m

@import SendBirdUIKit;
...

- (BOOL)application:(UIApplication *)application didFinishLaunchingWithOptions:(NSDictionary *)launchOptions {
    ...

    // Case 1: USER_ID only
    [SBUGlobals setCurrentUser:[[SBUUser alloc] initWithUserId:{USER_ID} nickname:nil profileUrl:nil]];

    // Case 2: Specify all fields
    [SBUGlobals setCurrentUser:[[SBUUser alloc] initWithUserId:{USER_ID} nickname:{(opt)NICKNAME} profileUrl:{(opt)PROFILE_URL}]];
    ...

}
// AppDelegate.swift
import SendBirdUIKit
...
func application(_ application: UIApplication, didFinishLaunchingWithOptions launchOptions: [UIApplication.LaunchOptionsKey: Any]?) -> Bool {
...
// Case 1: USER_ID only
SBUGlobals.CurrentUser = SBUUser(userId: {USER_ID})
// Case 2: Specify all fields
SBUGlobals.CurrentUser = SBUUser(userId: {USER_ID}, nickname:{(opt)NICKNAME} profileUrl:{(opt)PROFILE_URL})
...
}Note: If the
CurrentUseris not set in advance, there will be restrictions to your usage of UIKit.
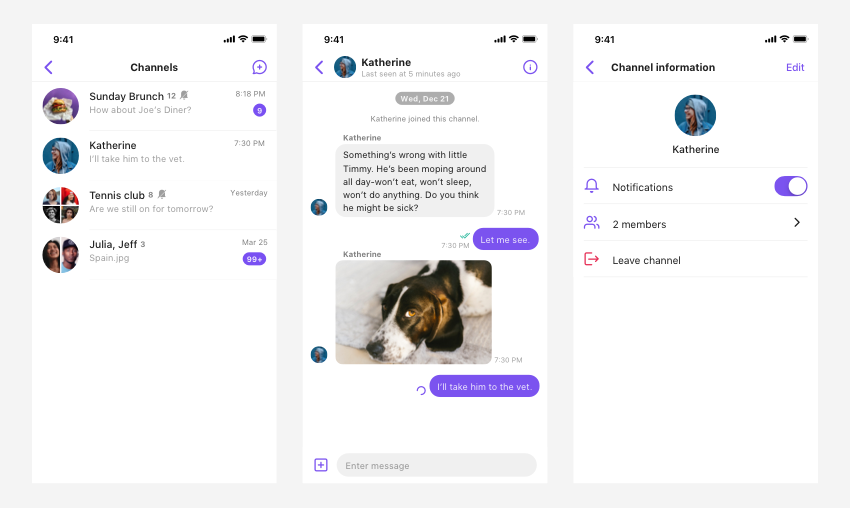
UIKit allows you to create a channel specifically for 1-on-1 chat and to list 1-on-1 chat channels so that you can easily view and manage them. With the SBUChannelListViewController class, you can provide end users a complete chat service featuring a channel list.
Use the following code for the SceneDelegate and AppDelegate.
// SceneDelegate.m

@import SendBirdUIKit;
...

- (void)scene:(UIScene *)scene willConnectToSession:(UISceneSession *)session options:(UISceneConnectionOptions *)connectionOptions {
    ...

    SBUChannelListViewController *channelListVC = [[SBUChannelListViewController alloc] init];
    UINavigationController *naviVC = [[UINavigationController alloc] initWithRootViewController:channelListVC];
    self.window.rootViewController = naviVC;
}
// SceneDelegate.swift
import SendBirdUIKit
...
func scene(_ scene: UIScene, willConnectTo session: UISceneSession, options connectionOptions: UIScene.ConnectionOptions) {
...
let channelListVC = SBUChannelListViewController()
let naviVC = UINavigationController(rootViewController: channelListVC)
self.window?.rootViewController = naviVC
}// AppDelegate.m
@import SendBirdUIKit;
...
- (BOOL)application:(UIApplication *)application didFinishLaunchingWithOptions:(NSDictionary *)launchOptions {
...
SBUChannelListViewController *channelListVC = [[SBUChannelListViewController alloc] init];
UINavigationController *naviVC = [[UINavigationController alloc] initWithRootViewController:channelListVC];
self.window.rootViewController = naviVC;
}// AppDelegate.swift
import SendBirdUIKit
...
func application(_ application: UIApplication, didFinishLaunchingWithOptions launchOptions: [UIApplication.LaunchOptionsKey: Any]?) -> Bool {
...
let channelListVC = SBUChannelListViewController()
let naviVC = UINavigationController(rootViewController: channelListVC)
self.window?.rootViewController = naviVC
}Note: At this point, you can confirm if the service is working by running your client app.
With the SBUChannelViewController class, you can build a channel-based chat service instead of a channel list-based one.
Note: You should have either a
SBDChannelobject or aChannelUrlin order to run a channel-based chat service.
Use the following code to implement the chat service.
@import SendBirdUIKit;
...

SBUChannelViewController *channelVC = [[SBUChannelViewController alloc] initWithChannelUrl:{CHANNEL_URL}];
UINavigationController *naviVC = [[UINavigationController alloc] initWithRootViewController:channelVC];
[self presentViewController:naviVC animated:YES completion:nil];
import SendBirdUIKit
...
let vc = SBUChannelViewController(channelUrl: {CHANNEL_URL})
let naviVC = UINavigationController(rootViewController: vc)
present(naviVC, animated: true)UIKit is a Swift-based framework. However, If your project is in Objective-C, configuring just a few additional steps allows you to run the kit in your client app. Go to your Xcode project target's Build settings tab and then set the ALWAYS_EMBED_SWIFT_STANDARD_LIBRARIES to YES.
UIKit is distributed in the form of a fat binary, which contains information on both Simulator and Device architectures. Add the script below if you are planning to distribute your application in the App Store and wish to remove unnecessary architectures in the application's build phase.
Go to your Xcode project target's Build Phases tab. Then, click + and select New Run Script Phase. Append this script.
APP_PATH="${TARGET_BUILD_DIR}/${WRAPPER_NAME}"

# This script loops through the frameworks embedded in the application and
# removes unused architectures.
find "$APP_PATH" -name '*.framework' -type d | while read -r FRAMEWORK
do
    FRAMEWORK_EXECUTABLE_NAME=$(defaults read "$FRAMEWORK/Info.plist" CFBundleExecutable)
    FRAMEWORK_EXECUTABLE_PATH="$FRAMEWORK/$FRAMEWORK_EXECUTABLE_NAME"
    echo "Executable is $FRAMEWORK_EXECUTABLE_PATH"

    EXTRACTED_ARCHS=()

    for ARCH in $ARCHS
    do
        echo "Extracting $ARCH from $FRAMEWORK_EXECUTABLE_NAME"
        lipo -extract "$ARCH" "$FRAMEWORK_EXECUTABLE_PATH" -o "$FRAMEWORK_EXECUTABLE_PATH-$ARCH"
        EXTRACTED_ARCHS+=("$FRAMEWORK_EXECUTABLE_PATH-$ARCH")
    done

    echo "Merging extracted architectures: ${ARCHS}"
    lipo -o "$FRAMEWORK_EXECUTABLE_PATH-merged" -create "${EXTRACTED_ARCHS[@]}"
    rm "${EXTRACTED_ARCHS[@]}"

    echo "Replacing original executable with thinned version"
    rm "$FRAMEWORK_EXECUTABLE_PATH"
    mv "$FRAMEWORK_EXECUTABLE_PATH-merged" "$FRAMEWORK_EXECUTABLE_PATH"
done
UIKit for iOS manages the lifecycle of its ViewController along with various views and data from the Chat SDK for iOS. UIKit Components are as follows:
| Component | Description |
|---|---|
| SBUChannelListViewController | A ViewController that manages a channel list. |
| SBUChannelViewController | A ViewController that manages a 1-on-1 chat channel. |
| SBUChannelSettingViewController | A ViewController that manages the channel settings. |
| SBUCreateChannelViewController | A ViewController that creates a channel. |
| SBUInviteUserViewController | A ViewController that invites a user to a channel. |
| SBUMemberListViewController | A ViewController that shows a list of members in a channel. |
| SBUTheme | A singleton that manages themes. |
| SBUColorSet | A singleton that manages color sets. |
| SBUFontSet | A singleton that manages font sets. |
| SBUMain | A class that contains static functions required when using Sendbird UIKit. |
| SBUGlobalSet | A class that contains static attributes required when using Sendbird UIKit. |


