Git Product home page Git Product logo

ml-tooling / opyrator Goto Github PK

View Code? Open in Web Editor NEW
3.0K 48.0 156.0 2.51 MB

πŸͺ„ Turns your machine learning code into microservices with web API, interactive GUI, and more.

Home Page: https://opyrator-playground.mltooling.org

License: MIT License

Dockerfile 9.52% Python 84.55% HTML 2.94% Shell 2.98%
fastapi streamlit pydantic python microservices serverless faas functions python-functions machine-learning deployment type-hints

opyrator's Introduction

Opyrator

Turns your Python functions into microservices with web API, interactive GUI, and more.

Getting Started β€’ Features β€’ Examples β€’ Support β€’ Report a Bug β€’ Contribution β€’ Changelog

Instantly turn your Python functions into production-ready microservices. Deploy and access your services via HTTP API or interactive UI. Seamlessly export your services into portable, shareable, and executable files or Docker images. Opyrator builds on open standards - OpenAPI, JSON Schema, and Python type hints - and is powered by FastAPI, Streamlit, and Pydantic. It cuts out all the pain for productizing and sharing your Python code - or anything you can wrap into a single Python function.

Alpha Version: Only suggested for experimental usage.


Try out and explore various examples in our playground here.


Highlights

  • πŸͺ„Β  Turn functions into production-ready services within seconds.
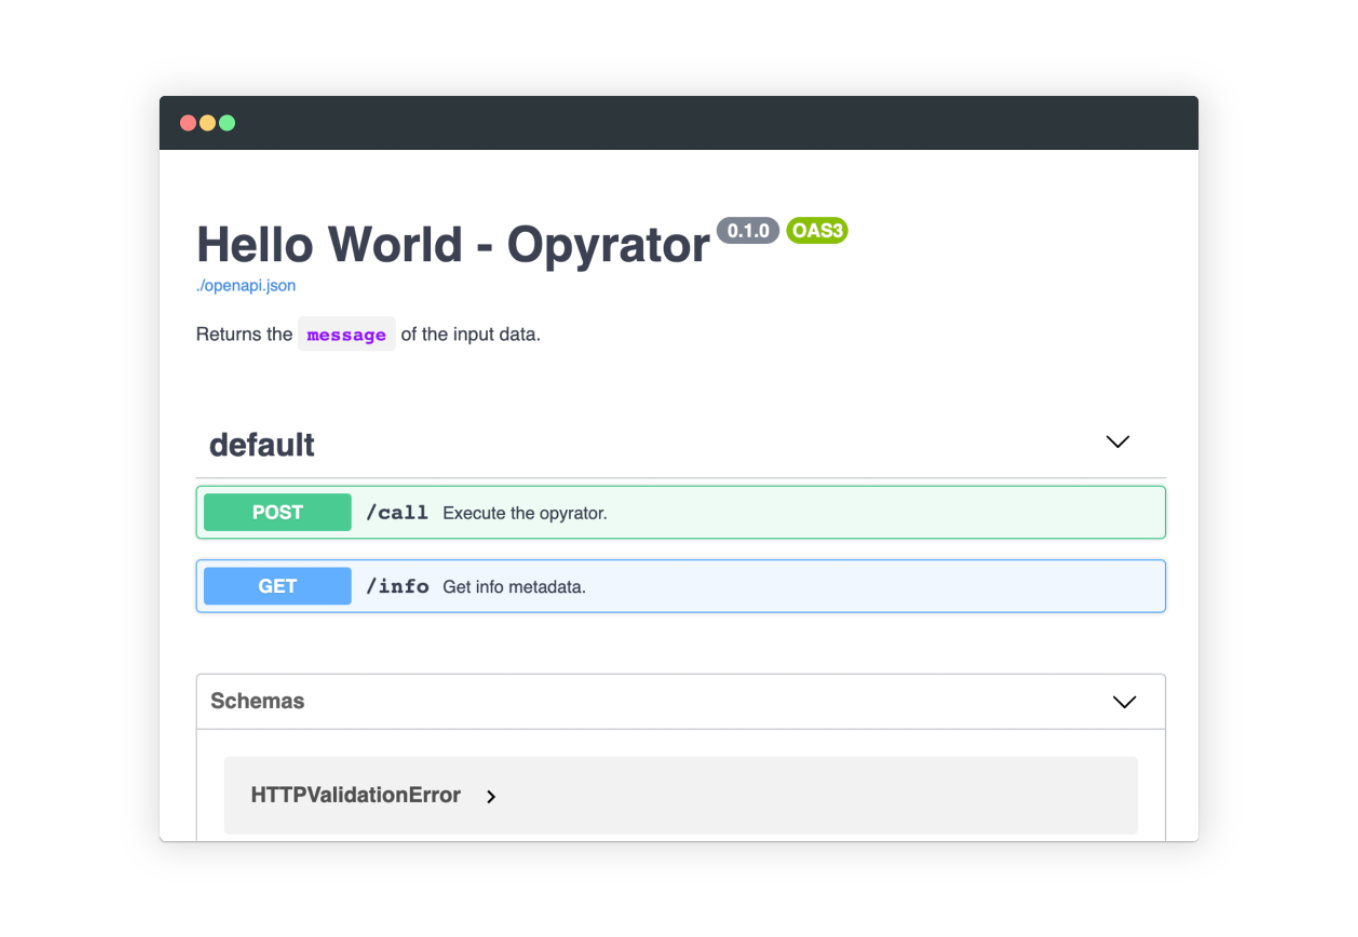
  • πŸ”ŒΒ  Auto-generated HTTP API based on FastAPI.
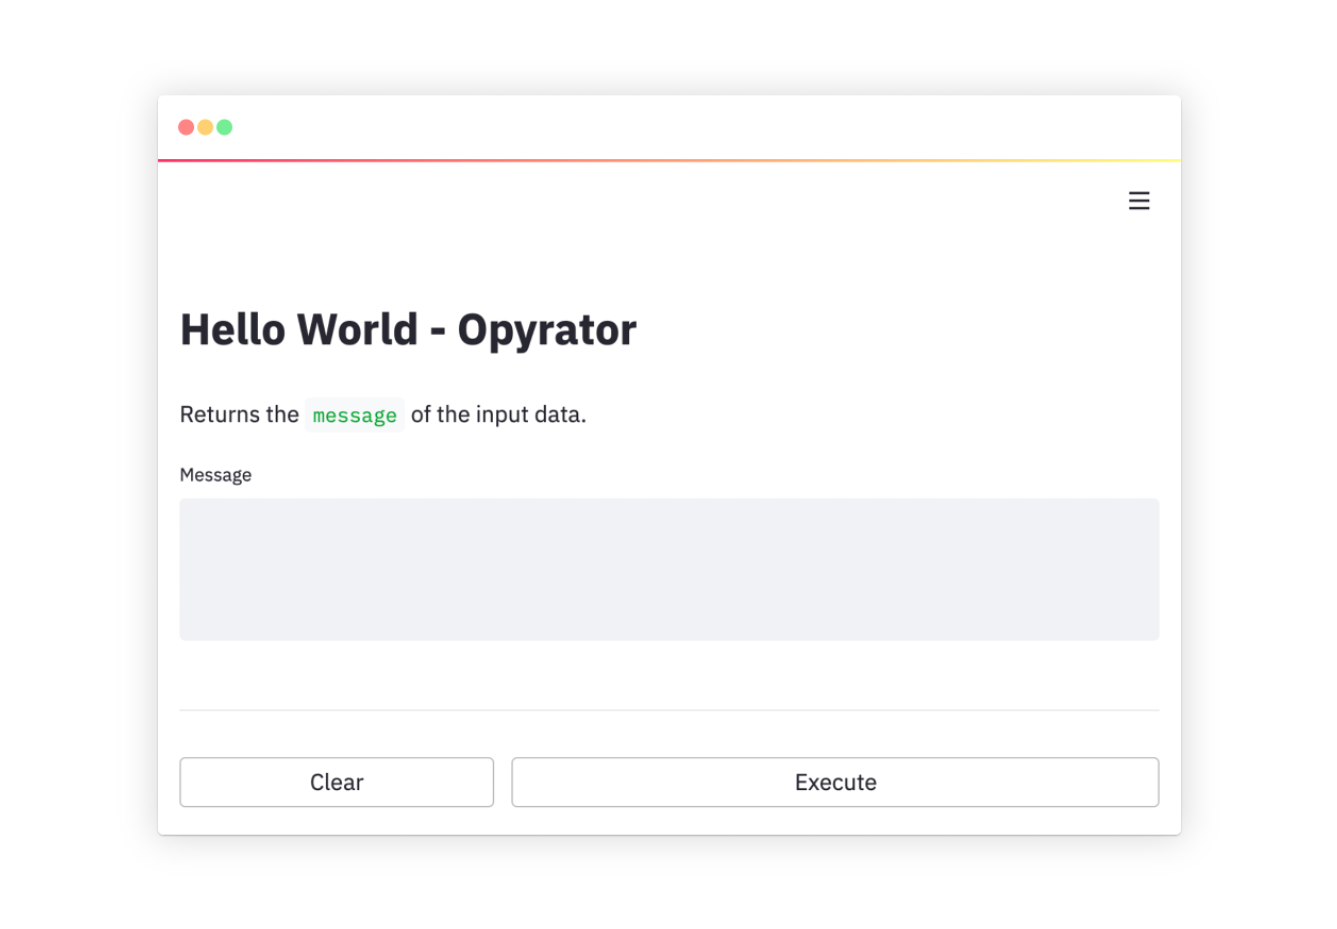
  • πŸŒ…Β  Auto-generated Web UI based on Streamlit.
  • πŸ“¦Β  Save and share as self-contained executable file or Docker image.
  • 🧩  Reuse pre-defined components & combine with existing Opyrators.
  • πŸ“ˆΒ  Instantly deploy and scale for production usage.

Getting Started

Installation

Requirements: Python 3.6+.

pip install opyrator

Usage

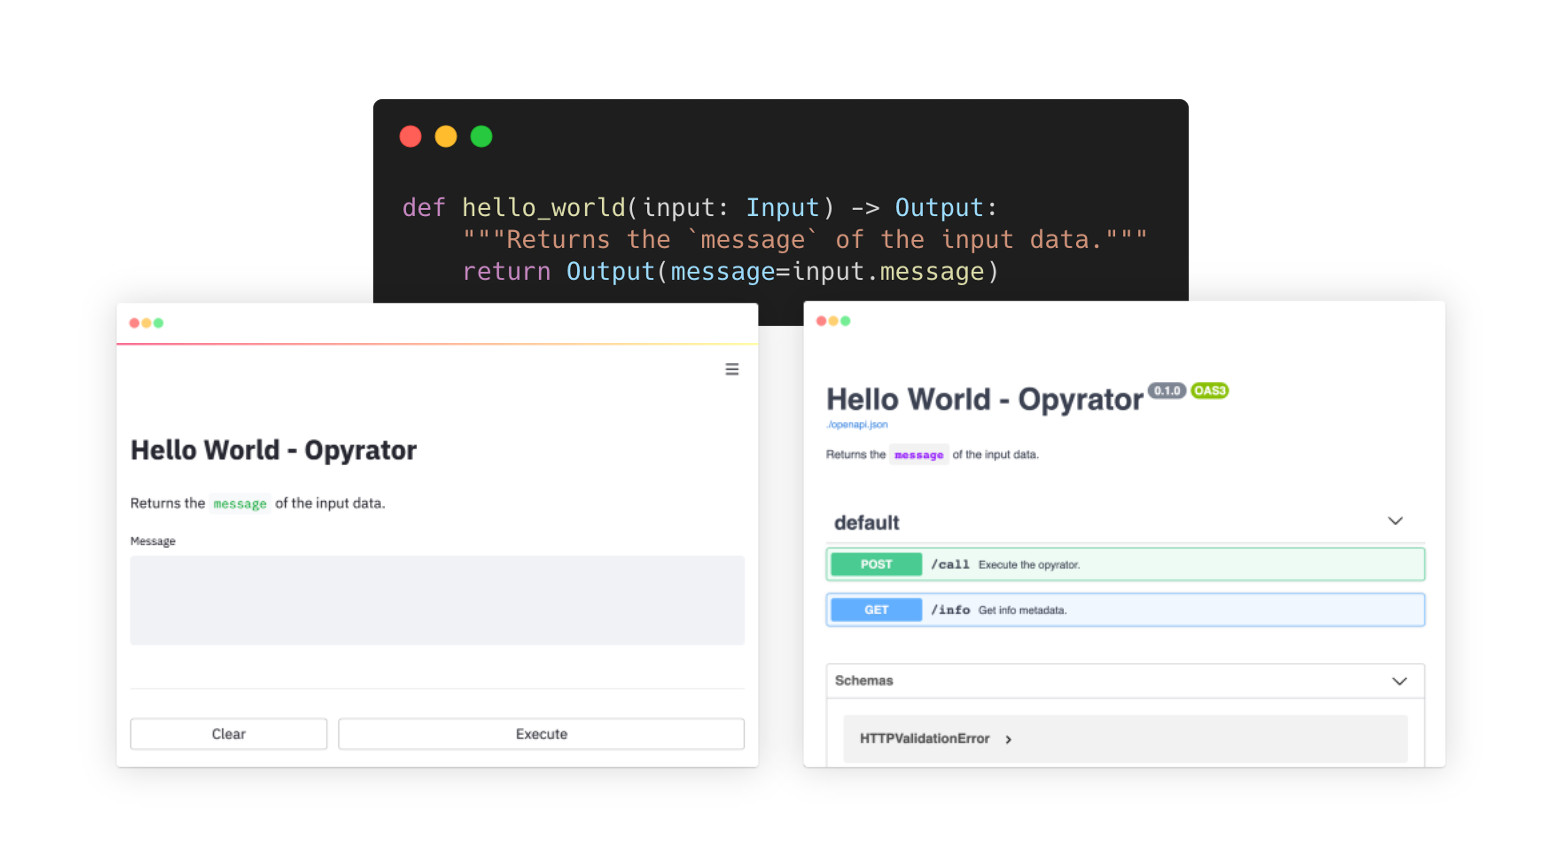
  1. A simple Opyrator-compatible function could look like this:

    from pydantic import BaseModel
    
    class Input(BaseModel):
        message: str
    
    class Output(BaseModel):
        message: str
    
    def hello_world(input: Input) -> Output:
        """Returns the `message` of the input data."""
        return Output(message=input.message)

    πŸ’‘ An Opyrator-compatible function is required to have an input parameter and return value based on Pydantic models. The input and output models are specified via type hints.

  2. Copy this code to a file, e.g. my_opyrator.py

  3. Run the UI server from command-line:

    opyrator launch-ui my_opyrator:hello_world

    In the output, there's a line that shows where your web app is being served, on your local machine.

  4. Run the HTTP API server from command-line:

    opyrator launch-api my_opyrator:hello_world

    In the output, there's a line that shows where your web service is being served, on your local machine.

  5. Find out more usage information in the Features section or get inspired by our examples.

Examples


πŸ‘‰Β  Try out and explore these examples in our playground here


The following collection of examples demonstrate how Opyrator can support a variety of different tasks and use-cases. All these examples are bundled into a demo playground which you can also deploy on your own machine via Docker:

docker run -p 8080:8080 mltooling/opyrator-playground:latest

Text Generation

Run this demo on your machine (click to expand...)

To run the demo on your local machine just execute the following commands:

git clone https://github.com/ml-tooling/opyrator
cd ./opyrator/examples/generate_text/
pip install -r requirements.txt
opyrator launch-ui app:generate_text --port 8051

Visit http://localhost:8051 in your browser to access the UI of the demo. Use launch-api instead of launch-ui to launch the HTTP API server.

Question Answering

Run this demo on your machine (click to expand...)

To run the demo on your local machine just execute the following commands:

git clone https://github.com/ml-tooling/opyrator
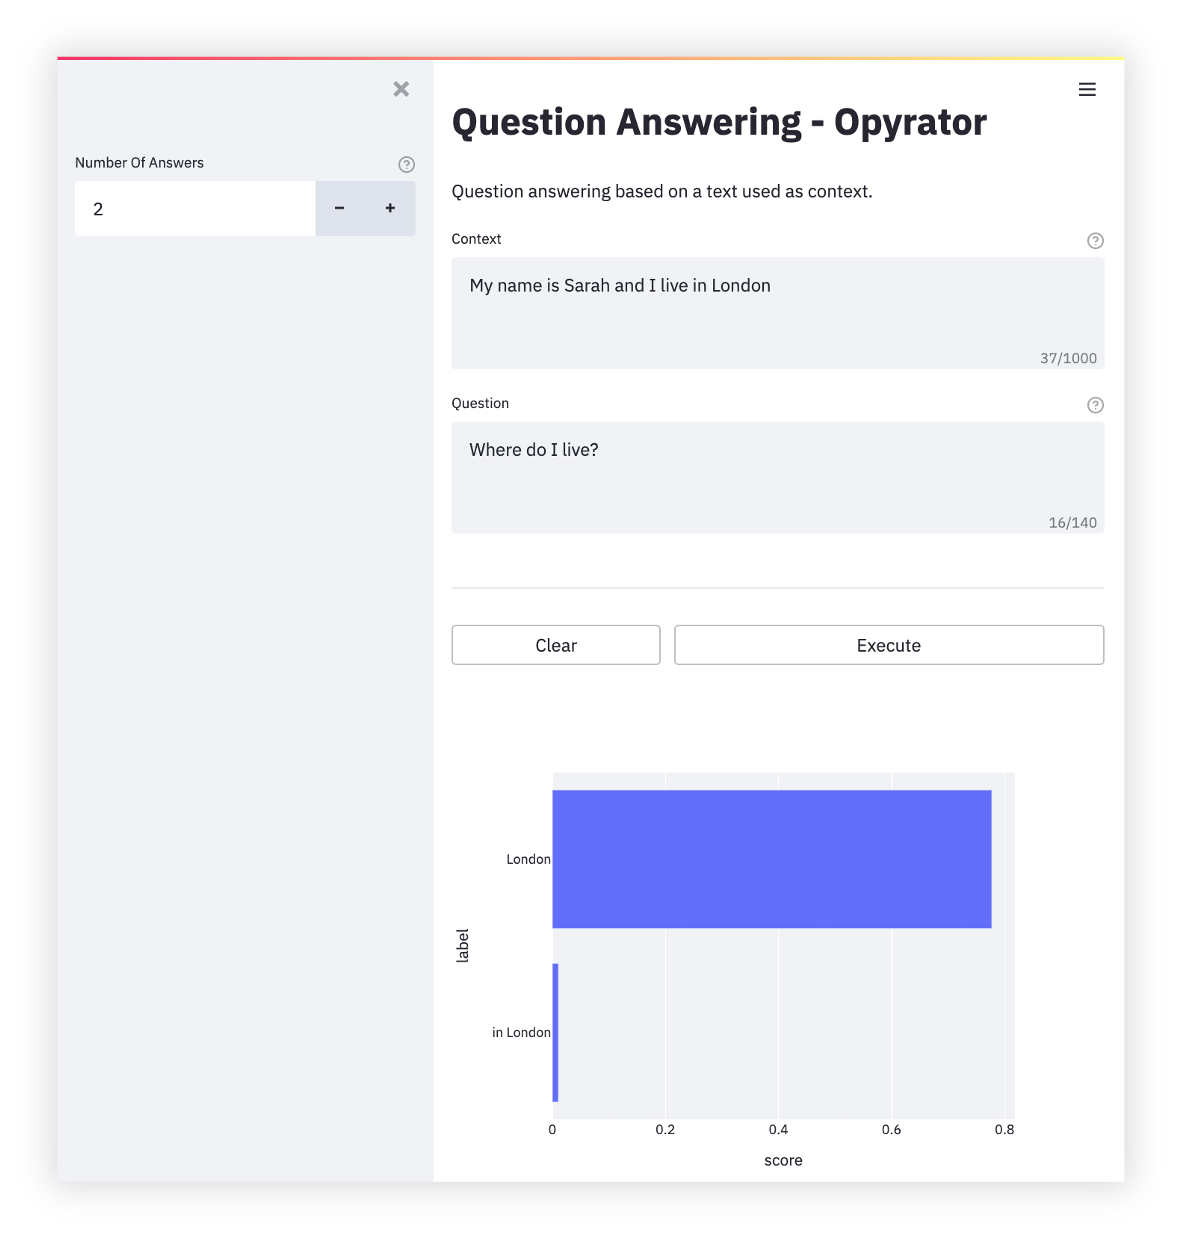
cd ./opyrator/examples/question_answering/
pip install -r requirements.txt
opyrator launch-ui app:question_answering --port 8051

Visit http://localhost:8051 in your browser to access the UI of the demo. Use launch-api instead of launch-ui to launch the HTTP API server.

Image Super Resolution

Run this demo on your machine (click to expand...)

To run the demo on your local machine just execute the following commands:

git clone https://github.com/ml-tooling/opyrator
cd ./opyrator/examples/image_super_resolution/
pip install -r requirements.txt
opyrator launch-ui app:image_super_resolution --port 8051

Visit http://localhost:8051 in your browser to access the UI of the demo. Use launch-api instead of launch-ui to launch the HTTP API server.

Text Preprocessing

Run this demo on your machine (click to expand...)

To run the demo on your local machine just execute the following commands:

git clone https://github.com/ml-tooling/opyrator
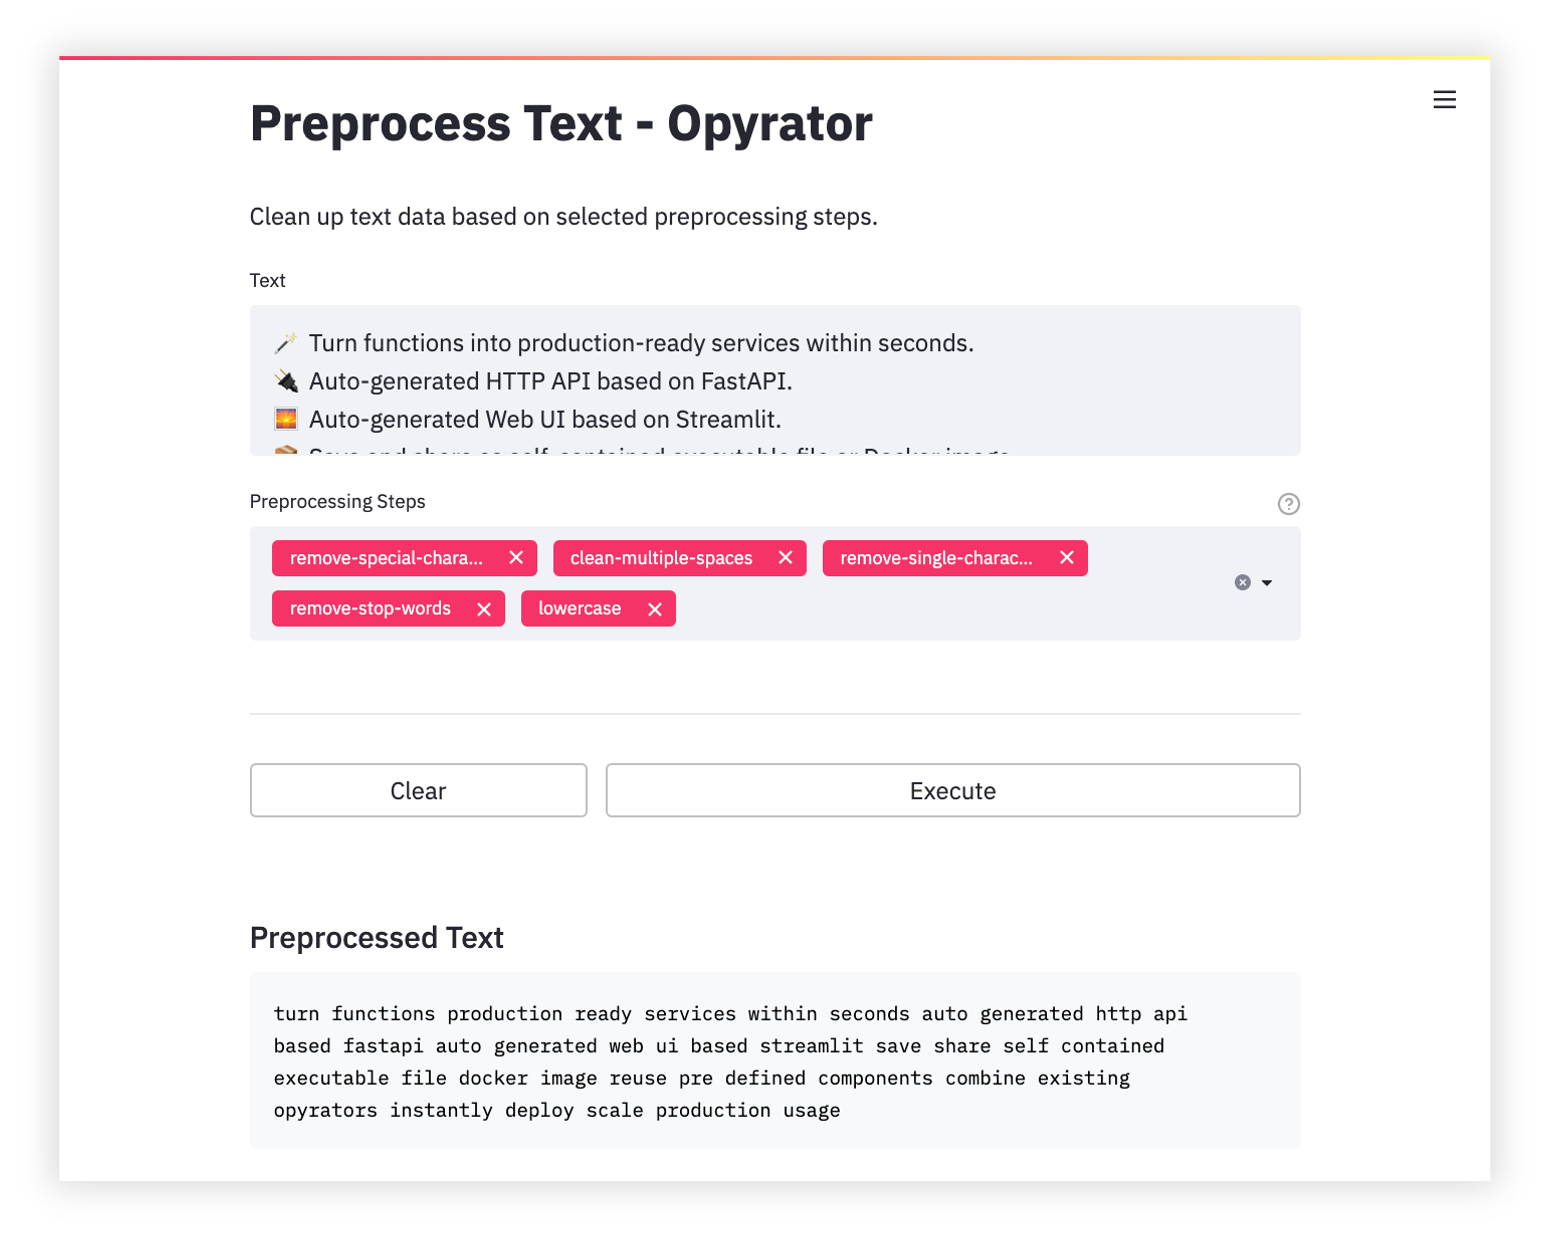
cd ./opyrator/examples/preprocess_text/
pip install -r requirements.txt
opyrator launch-ui app:preprocess_text --port 8051

Visit http://localhost:8051 in your browser to access the UI of the demo. Use launch-api instead of launch-ui to launch the HTTP API server.

Language Detection

Run this demo on your machine (click to expand...)

To run the demo on your local machine just execute the following commands:

git clone https://github.com/ml-tooling/opyrator
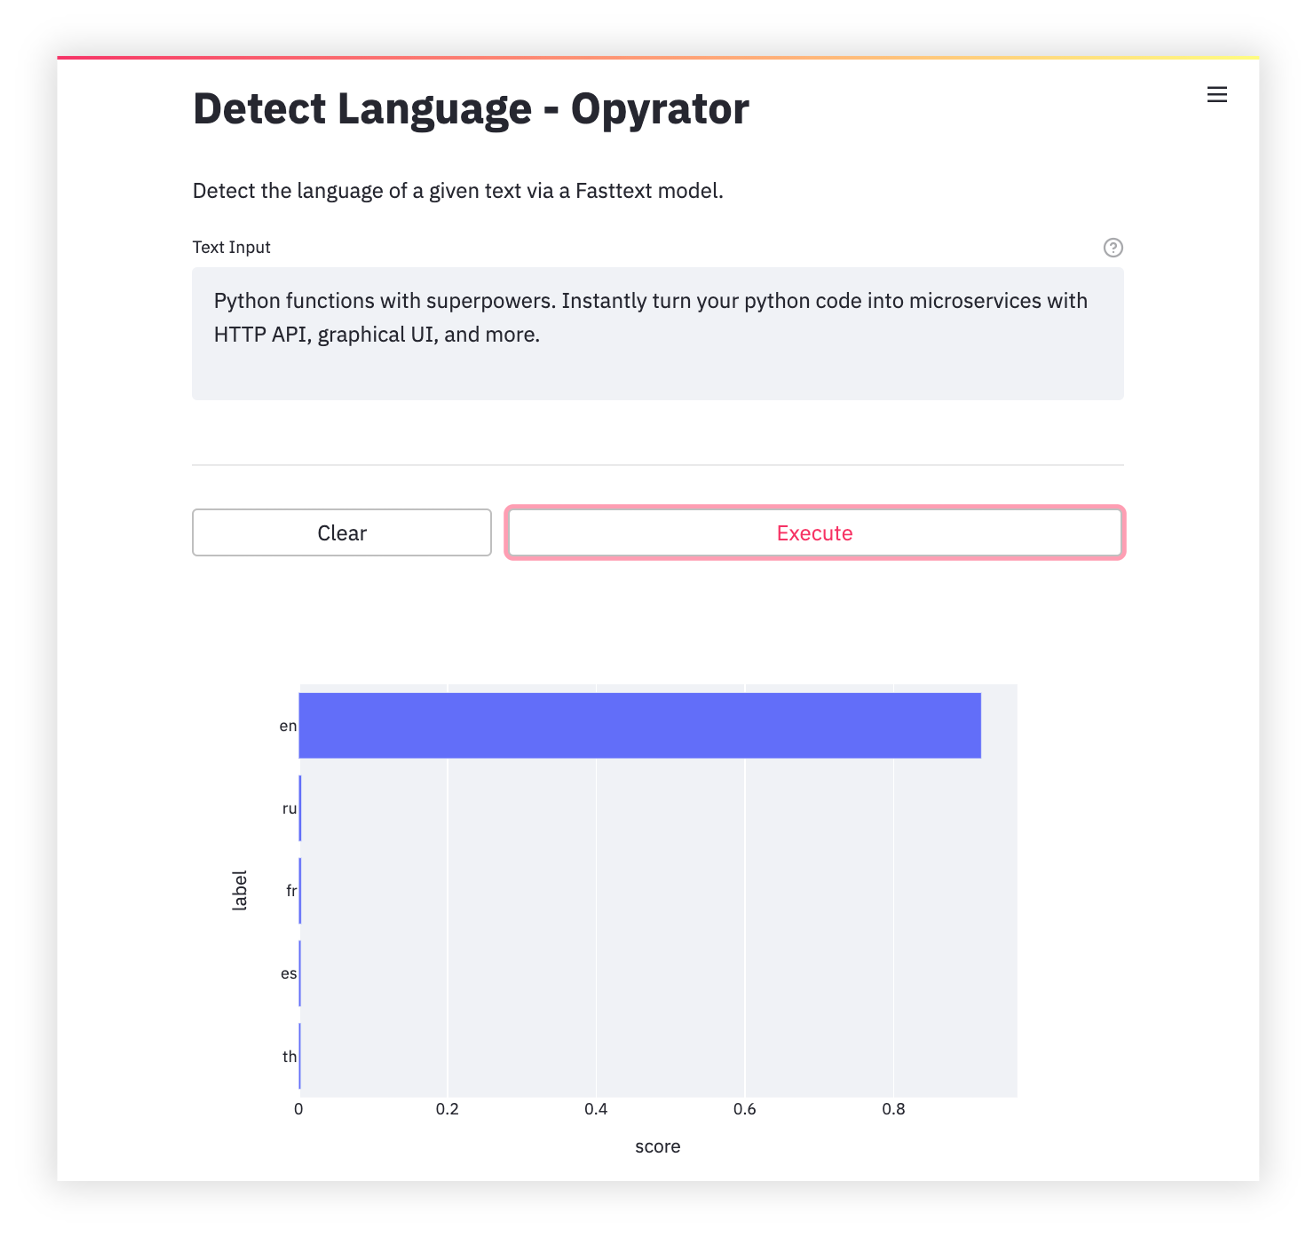
cd ./opyrator/examples/detect_language/
pip install -r requirements.txt
opyrator launch-ui app:detect_language --port 8051

Visit http://localhost:8051 in your browser to access the UI of the demo. Use launch-api instead of launch-ui to launch the HTTP API server.

Audio Separation

Run this demo on your machine (click to expand...)

To run the demo on your local machine just execute the following commands:

git clone https://github.com/ml-tooling/opyrator
cd ./opyrator/examples/separate_audio/
pip install -r requirements.txt
opyrator launch-ui app:separate_audio --port 8051

Visit http://localhost:8051 in your browser to access the UI of the demo. Use launch-api instead of launch-ui to launch the HTTP API server.

Word Vectors Training

Run this demo on your machine (click to expand...)

To run the demo on your local machine just execute the following commands:

git clone https://github.com/ml-tooling/opyrator
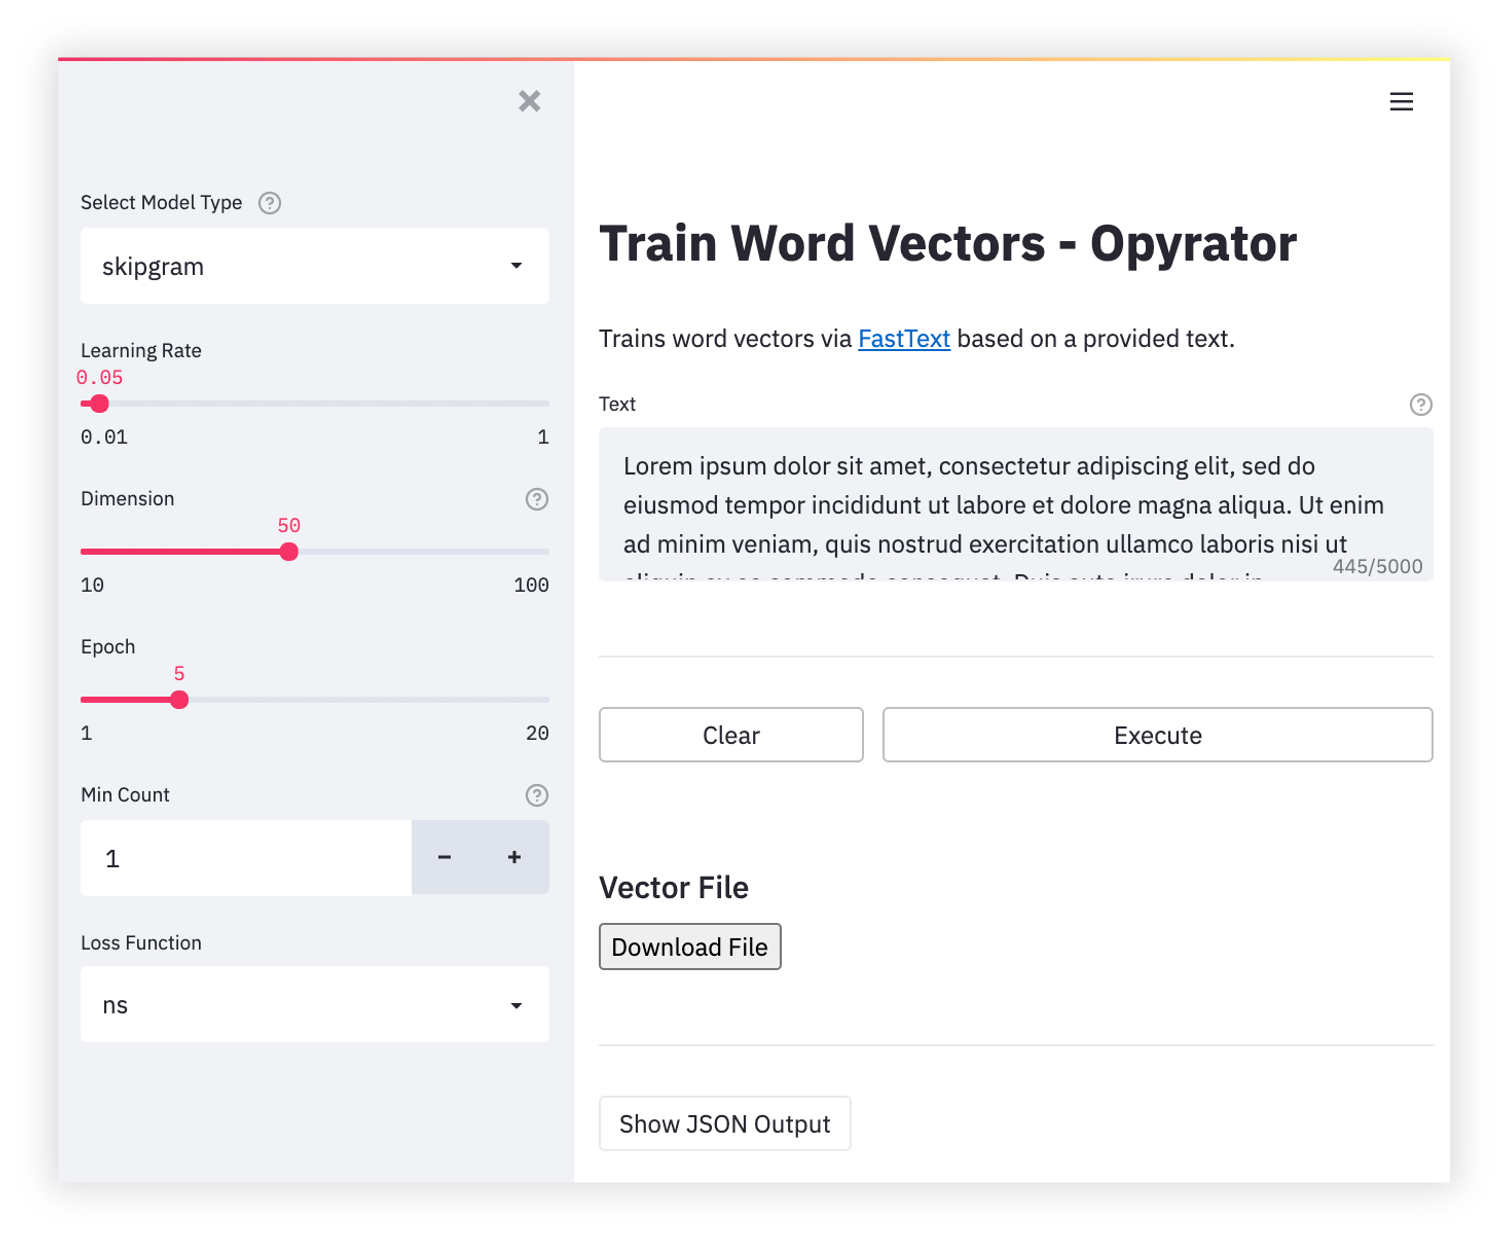
cd ./opyrator/examples/train_word_vectors/
pip install -r requirements.txt
opyrator launch-ui app:train_word_vectors --port 8051

Visit http://localhost:8051 in your browser to access the UI of the demo. Use launch-api instead of launch-ui to launch the HTTP API server.

Named Entity Recognition

Run this demo on your machine (click to expand...)

To run the demo on your local machine just execute the following commands:

git clone https://github.com/ml-tooling/opyrator
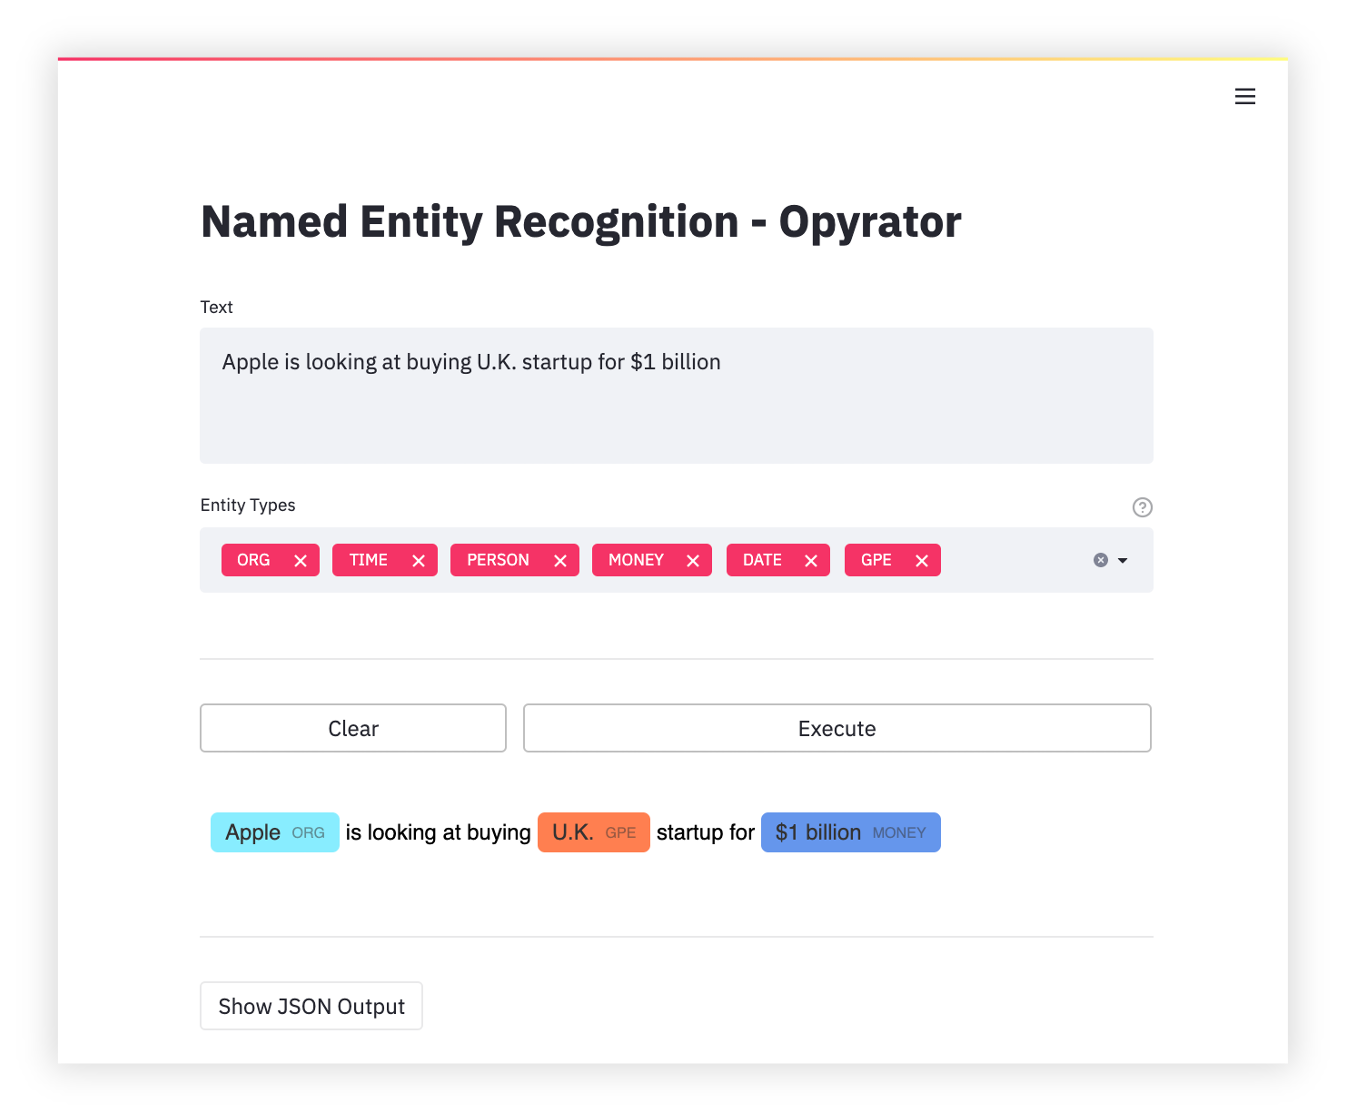
cd ./opyrator/examples/named_entity_recognition/
pip install -r requirements.txt
opyrator launch-ui app:named_entity_recognition --port 8051

Visit http://localhost:8051 in your browser to access the UI of the demo. Use launch-api instead of launch-ui to launch the HTTP API server.

Components Showcase

Run this demo on your machine (click to expand...)

To run the demo on your local machine just execute the following commands:

git clone https://github.com/ml-tooling/opyrator
cd ./opyrator/examples/showcase_components/
pip install -r requirements.txt
opyrator launch-ui app:showcase_components --port 8051

Visit http://localhost:8051 in your browser to access the UI of the demo. Use launch-api instead of launch-ui to launch the HTTP API server.

Support & Feedback

This project is maintained by Benjamin RΓ€thlein, Lukas Masuch, and Jan Kalkan. Please understand that we won't be able to provide individual support via email. We also believe that help is much more valuable if it's shared publicly so that more people can benefit from it.

Type Channel
🚨  Bug Reports
🎁  Feature Requests
πŸ‘©β€πŸ’»Β  Usage Questions
πŸ“’Β  Announcements
❓  Other Requests

Features

HTTP API β€’ Graphical UI β€’ CLI β€’ Zip Export β€’ Docker Export β€’ Pre-defined Components β€’ Production Deployment

HTTP API

With Opyrator, you can instantly launch a local HTTP (REST) API server for any compatible function:

opyrator launch-api my_opyrator:hello_world

This will launch a FastAPI server based on the OpenAPI standard and with an automatic interactive documentation.

πŸ’‘ Make sure that all requirements of your script are installed in the active Python enviornment.

The port used by the API server can be provided via CLI arguments:

opyrator launch-api my_opyrator:hello_world --port 8080

The API server can also be started via the exported zip-file format (see zip export section below).

opyrator launch-api my-opyrator.zip

Graphical UI

You can launch a graphical user interface - powered by Streamlit - for your compatible function. The UI is auto-generated from the input- and output-schema of the given function.

opyrator launch-ui my_opyrator:hello_world

πŸ’‘ Make sure that all requirements of your script are installed in the active Python environment.

You can influence most aspects of the UI just by changing and improving the input- and output-schema of your function. Furthermore, it is also possible to define custom UIs for the function's input and output. For more details, refer to the input- and output-schema section.

The port used by the UI server can be provided via CLI arguments:

opyrator launch-ui my_opyrator:hello_world --port 8080

The UI server can also be started via the exported zip-file format (see zip export section below).

opyrator launch-ui my-opyrator.zip

In addition, the UI server can be started by using an already running Opyrator API endpoint:

opyrator launch-ui http://my-opyrator:8080 

Thereby, all Opyrator calls from the UI will be executed via the configured HTTP endpoint instead of the Python function running inside the UI server.

Command-line Interface

An Opyrator can also be executed via command-line:

opyrator call my_opyrator:hello_world '{"message": "hello"}'

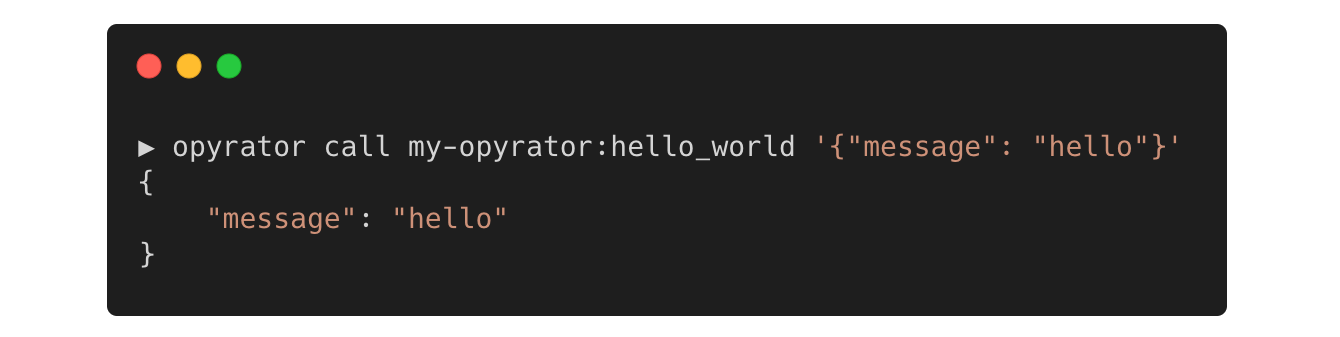
The CLI interface also works using the zip export format:

opyrator call my-opyrator.zip '{"message": "hello"}'

Or, by using an already running Opyrator API endpoint:

opyrator call http://my-opyrator:8080 '{"message": "hello"}'

Thereby, the function call is executed by the Opyrator API server, instead of locally using the Python function.

Zip Export

Opyrator allows you to package and export a compatible function into a self-contained zip-file:

opyrator export my_opyrator:hello_world my-opyrator.zip

This exported zip-file packages relevant source code and data artifacts into a single file which can be shared, stored, and used for launching the API or UI as shown above.

External requirements are automatically discovered from the working directory based on the following files: Pipfile (Pipenv environment), environment.yml (Conda environment), pyproject.toml (Poetry dependencies), requirements.txt (pip-requirements), setup.py (Python project requirements), packages.txt (apt-get packages), or discovered via pipreqs as fallback. However, external requirements are only included as instructions and are not packaged into the zip-file. If you want to export your Opyrator fully self-contained including all requirements or even the Python interpreter itself, please refer to the Docker or pex export options.

As a side note, Opyrators exported as zip-files are (mini) Python libraries that can be pip-installed, imported, and used from other Python code:

pip install my-opyrator.zip

WIP: This feature is not finalized yet. You can track the progress and vote for the feature here

Docker Export

In addition to the ZIP export, Opyrator also provides the capability to export to a Docker image:

opyrator export my_opyrator:hello_world --format=docker my-opyrator-image:latest

πŸ’‘ The Docker export requires that Docker is installed on your machine.

After the successful export, the Docker image can be run as shown below:

docker run -p 8080:8080 my-opyrator-image:latest

Running your Opyrator within this Docker image has the advantage that only a single port is required to be exposed. The separation between UI and API is done via URL paths: http://localhost:8080/api (API); http://localhost:8080/ui (UI). The UI is automatically configured to use the API for all function calls.

WIP: This feature is not finalized yet. You can track the progress and vote for the feature here.

Pex Export

Opyrator also provides the capability to export to a pex-file. Pex is a tool to create self-contained executable Python environments that contain all relevant python dependencies.

opyrator export my_opyrator:hello_world --format=pex my-opyrator.pex

WIP: This feature is not finalized yet. You can track the progress and vote for the feature here.

Python Client

Every deployed Opyrator provides a Python client library via an endpoint method which can be installed with pip:

pip install http://my-opyrator:8080/client

And used in your code, as shown below:

from my_opyrator import Client, Input
opyrator_client = Client("http://my-opyrator:8080")
result = opyrator_client.call(Input(text="hello", wait=1))

WIP: This feature is not finalized yet. You can track the progress and vote for the feature here.

Pre-defined Components

Opyrator provides a growing collection of pre-defined components (input- and output models) for common tasks. Some of these components also provide more advanced UIs and Visualizations. You can reuse these components to speed up your development and, thereby, keep your Opyrators compatible with other functionality improvements or other Opyrators.

You can find some of the available interfaces in the examples section or in this source code package.

WIP: This feature is not finalized yet. You can track the progress and vote for the feature here.

Production Deployment

Rolling out your Opyrators for production usage might require additional features such as SSL, authentication, API tokens, unlimited scalability, load balancing, and monitoring. Therefore, we provide capabilities to easily deploy your Opyrators directly on scalable and secure cloud platforms without any major overhead:

opyrator deploy my_opyrator:hello_world <deployment-provider> <deployment-provider-options>

WIP: This feature is not finalized yet. You can track the progress and vote for the feature here.

Documentation

Compatible Functions

A function is compatible with Opyrator if it fulfills the following requirements:

  • A single parameter called input which MUST be a subclass of the Pydantic BaseModel.
  • A single return value that MUST be a subclass of the Pydantic BaseModel.
  • The input parameter and return value MUST be annotated with Python typing hints.

Input- and Output-Schema

WIP

Command-line Interface

WIP

Contribution

Development

Refer to our contribution guides for information on our build scripts and development process.


Licensed MIT. Created and maintained with ❀️  by developers from Berlin.

opyrator's People

Contributors

adriangb avatar jopaxd avatar lukasmasuch avatar raethlein avatar

Stargazers

 avatar  avatar  avatar  avatar  avatar  avatar  avatar  avatar  avatar  avatar  avatar  avatar  avatar  avatar  avatar  avatar  avatar  avatar  avatar  avatar  avatar  avatar  avatar  avatar  avatar  avatar  avatar  avatar  avatar  avatar  avatar  avatar  avatar  avatar  avatar  avatar  avatar  avatar  avatar  avatar  avatar  avatar  avatar  avatar  avatar  avatar  avatar  avatar  avatar  avatar  avatar  avatar  avatar  avatar  avatar  avatar  avatar  avatar  avatar  avatar  avatar  avatar  avatar  avatar  avatar  avatar  avatar  avatar  avatar  avatar  avatar  avatar  avatar  avatar  avatar  avatar  avatar  avatar  avatar  avatar  avatar  avatar  avatar  avatar  avatar  avatar  avatar  avatar  avatar  avatar  avatar  avatar  avatar  avatar  avatar  avatar  avatar  avatar  avatar  avatar

Watchers

 avatar  avatar  avatar  avatar  avatar  avatar  avatar  avatar  avatar  avatar  avatar  avatar  avatar  avatar  avatar  avatar  avatar  avatar  avatar  avatar  avatar  avatar  avatar  avatar  avatar  avatar  avatar  avatar  avatar  avatar  avatar  avatar  avatar  avatar  avatar  avatar  avatar  avatar  avatar  avatar  avatar  avatar  avatar  avatar  avatar  avatar  avatar  avatar

opyrator's Issues

Error parsing Markdown or HTML in this string: SVG not showing bugs

Describe the bug:

Error parsing Markdown or HTML in this string:
the above error occurs when trying to show svg result image, and svg image not showing or downloading

I'm not used to be in web programming and pydantic models, so if I did something wrong,
you could just say "study more!" and ignore it

Thank you

Expected behaviour:

svg image should be shown

Steps to reproduce the issue:

Here is my code

from pydantic import BaseModel, Field
from opyrator.components.types import FileContent
import time

import time
import os, subprocess, shutil

from Bio import SeqIO

from ete3 import Tree, TreeStyle, NodeStyle, TextFace
import pandas as pd
import copy


class Input(BaseModel):
  tree: str = Field(
    ...,
    title="Tree Input",
    description="Copy your newick tree format"
  )
  
  percent_identity: float = Field(
    order = 0,
    description= "Percent identity, should be lower than 100, 99 ~ 99.6 recommended"
  )


class Output(BaseModel):
  image_file: FileContent = Field(..., mime_type="image/svg+xml")


def flatten(tree, accession, percent_identity=99):
	cutoff = float((100-percent_identity)/2)
	t = Tree(tree)
	ts = TreeStyle()
	#ts.scale = 100
	#ts.show_branch_length = True
	ts.allow_face_overlap = True

	name_list = []
	dict_trees = {}

	for leaf in t:
		name_list.append(leaf.name)
		dict_trees[leaf.name] = 0

	cnt = 1

	colors = ["#fbb4ae",
	"#b3cde3",
	"#ccebc5",
	"#decbe4",
	"#fed9a6",
	"#ffffcc",
	"#e5d8bd",
	]

	for node in t.traverse():
		node.img_style["size"]=2

	def go_down(node, dist):
		color = colors[cnt%len(colors)]
		for leaf in node:
			branch_sum = 0
			new_leaf = leaf
			while(new_leaf!=node):
				try:
					branch_sum += new_leaf.dist
					new_leaf = new_leaf.up
				except:
					break
			if branch_sum < cutoff:
				dict_trees[leaf.name] = cnt

	def go_up(node, dist):
		if not(node.is_root()):
			if dist+node.up.dist < cutoff: # more way to go up
				go_up(node.up, dist+node.up.dist)
			else:
				go_down(node.up, 0)

	for name in name_list:
		color = colors[cnt%len(colors)]
		if dict_trees[name] == 0: # if not node has already searched
			node = t.search_nodes(name=name)[0]
			dict_trees[name] = cnt
			go_up(node, node.dist)
			cnt += 1

	for name in name_list:
		#print(name)
		node = t.search_nodes(name=name)[0]
		cnt = dict_trees[name]
		color = colors[cnt%len(colors)]
		node.img_style["bgcolor"] = color
		back = TextFace(f"group {cnt}")
		blank = TextFace(f"       ")
		node.add_face(blank,column=1,position="branch-right")
		node.add_face(back,column=2,position="branch-right")

	t.render(f"{accession}.svg",tree_style=ts)
	dict_new = {"leaf":[],"group":[]}
	for key in dict_trees.keys():
		dict_new["leaf"].append(key)
		dict_new["group"].append(dict_trees[key]) 

	df = pd.DataFrame(dict_new)

	df.to_excel(f"{accession}.xlsx")

def Tree_grouper(input: Input,) -> Output:

	accession = time.time()
	flatten(input.tree, accession,input.percent_identity)
	print(f"{accession}.svg")
	with open(f"{accession}.svg") as f:
		svg = f.read()
	return Output(image_file=svg)

(for the libraries, use [pip install biopython], [pip install ete3] and [pip install PyQt5])

Input
Tree
(TM327_Metarhizium:0.15152639840759060674,(TM369_Metapochonia:0.04593148843963373862,TM330_Pochonia:0.02745325322091625442)45:0.00107340303595512832,TM328_Metarhizium:0.09865295544240419712);

Percent identity
99

Expected output
A phylogenetic tree image

Technical details:

  • Host Machine OS (Windows/Linux/Mac): Ubuntu 20.04
  • Browser (Chrome/Firefox/Safari): Chrome

Possible Fix:

Additional context:

After the problem happens, qobject starttimer problem also happens in serverside

Starting the server

Hello,

I tried to run the basic function,

  from pydantic import BaseModel
  
  class Input(BaseModel):
      message: str
  
  class Output(BaseModel):
      message: str
  
  def hello_world(input: Input) -> Output:
      """Returns the `message` of the input data."""
      return Output(message=input.message)

and got this error: 'PYTHONPATH' is not recognized as an internal command or external, an executable program or a batch file.

Take a picture / Record a video as an input

Feature description: Have a functionality to take a picture/record a video from bowser by accessing webcam

Problem and motivation: most AI services I work on depending on taking a picture/record a video as an input

Is this something you're interested in working on? Yes

Can't get hello_world to work

Hello World no go:

Technical details:
I have followed the instructions on the Getting Started page, no go
https://github.com/ml-tooling/opyrator#getting-started

Created the file and run as instructed but I get this...
2021-05-01 10:16:31.675 An update to the [server] config option section was detected. To have these changes be reflected, please restart streamlit.
image

I ran "streamlit hello"and that is working fine
image

  • Host Machine OS : Windows 10
  • python : 3.9.4

I wonder if it is the very new version of python?

I am open to being stupid, that's OK, but this looks pretty cool and I want it to work.

Integration with Lightning Flash Task

**Feature description:

Dear People from opyrator,

Absolutely awesome framework !

At Pytorch Lightning, we are working on a tasks based framework called LightningFlash: https://github.com/PytorchLightning/lightning-flash.
It would be great to collaborate and make them available throught opyrator.

So people can train, finetune, and predict from the UI, play with the transforms and visualise them etc ...

Best,
T.C

Problem and motivation:

Is this something you're interested in working on?

Finalize zip-file export capabilities

Feature description:

Finalize capabilities to package and export a compatible function into a self-contained zip-file.

The export can be executed via command line:

opyrator export my_opyrator:hello_world my-opyrator.zip

This exported zip-file packages relevant source code and data artifacts into a single file which can be shared, stored, and used for launching the API or UI.

External requirements are automatically discovered from the working directory based on the following files: Pipfile (Pipenv environment), environment.yml (Conda environment), pyproject.toml (Poetry dependencies), requirements.txt (PIP requirements), setup.py (Python project requirements), packages.txt (apt-get packages), or discovered via pipreqs as fallback. However, external requirements are only included as instructions and are not packaged into the ZIP file. If you want to export your Opyrator fully self-contained including all requirements or even the Python interpreter itself, please refer to the Docker or PEX export options.

As a side note, Opyrators exported as ZIP files are (mini) Python libraries that can be pip-installed, imported, and used from other Python code:

pip install my-opyrator.zip

Finalize pex export capabilities

Feature description:

Finalize capabilities to export an Opyrator to a PEX file.

PEX is a tool to create self-contained executable Python environments that contain all relevant python dependencies.

The export can be executed via command line:

opyrator export my_opyrator:hello_world --format=pex my-opyrator.pex

Provide and document collection of predefined components

Feature description:

Opyrator provides a growing collection of pre-defined components (input- and output models) for common tasks. Some of these components also provide more advanced UIs and Visualizations. You can reuse these components to speed up your development and, thereby, keep your Opyrators compatible to other functionality improvements or other Opyrators.

Upload timeseries as csv or excel files.

Dear guys,

I am interested in using opyrator. In our use case we would like to upload timeseries data in csv or excel files.

Is this supported?
And If not, can you recommend tools that are able to read generic csv files that can be added to opyrator?

Thanks a lot for discussing

Daniel

Cross-Origin Request

Hi,

I am getting the 405 Method not allowed error when trying to send data from a frontend app, is there any way or option to enable the Cross-Origin Request ?

image

Thanks,

Typo in README

Describe your request:

The README mentions "Audio Seperation" (also appears in the screenshot located below), but as I far as I understand it should be Audio Separation.

Anyway, just a tiny little issue for an otherwise great project :)

Cannot use with colab?

I had to change the port to 8070 as it said port 8080(default provided) is busy.
On this port in colab it shows that it is running but it doesn't open up in the browser. Firewall is off. I am using Google Colab on Chrome on Mac.

image
image

How to run ui and api on same port once?

Great framework, really user friendly! Have some suggestions during usage.
Now ui and api need to run with different ports,

opyrator launch-ui conversion:convert
opyrator launch-api conversion:convert

Is there a way to run them together

opyrator launch conversion:convert

So that I can access GET / for ui, GET /docs for docs, POST /call for apis.

Issue regarding determine uploaded file types on MIME

Hi, i played a bit with the project and noticed one potential issue. In this function, the mime type could be manipulated by remote user, hence he could upload any file with a manipulated MIME header. The description of such potential vulnerability is here. One could use magic code to check the uploaded file type rather than rely on the MIME or extension

launch-api does not support file upload

image
I've tested the launch-ui, everything works fine.
But when I go to use the api, and tried with postman, I encountered this problem:

{
    "detail": [
        {
            "loc": [
                "body"
            ],
            "msg": "value is not a valid dict",
            "type": "type_error.dict"
        }
    ]
}

I think the definition is not compatible with FastAPI? Should I change that into some Form format?

class Input(BaseModel):
    file: FileContent = Field(..., mime_type="application/x-sqlite3")
    calc_type: str = 'PF'

Append:
When change the api into http://127.0.0.1:8080/call/ the response goes into:

WARNING:  Invalid HTTP request received.
Traceback (most recent call last):
  File "/Users/dragonszy/miniconda3/lib/python3.9/site-packages/uvicorn/protocols/http/httptools_impl.py", line 132, in data_received
    self.parser.feed_data(data)
  File "httptools/parser/parser.pyx", line 212, in httptools.parser.parser.HttpParser.feed_data
httptools.parser.errors.HttpParserInvalidMethodError: Invalid method encountered
INFO:     127.0.0.1:54894 - "POST /call HTTP/1.1" 422 Unprocessable Entity
INFO:     127.0.0.1:54993 - "POST /call HTTP/1.1" 422 Unprocessable Entity

Finalize production deployment capabilities

Feature description:

Finalize capabilities to deploy an Opyrator to a cloud platform.

Rolling out your Opyrators for production usage might require additional features such as SSL, authentication, API tokens, unlimited scalability, load balancing, and monitoring. Therefore, we provide capabilities to easily deploy your Opyrators directly on scalable and secure cloud platforms without any major overhead.

The deployment can be executed via command line:

opyrator deploy my_opyrator:hello_world <deployment-provider> <deployment-provider-options>

How to add text input box to sidebar?

Hi, I am so happy to find very useful framework.
Now text input box is always on center. But I want to add text input box to sidebar like the picture below(Picture is from an one of the examples in README).

스크란샷 2021-08-26 23 36 45

multiple models

Can I run multiple models ?

opyrator launch-ui test:mul_models

Finalize auto-generation of python client

Feature description:

Finalize auto-generation of python client for Opyrator.

Every deployed Opyrator provides a Python client library via an endpoint method which can be installed with pip:

pip install http://my-opyrator:8080/client

And used in your code, as shown below:

from my_opyrator import Client, Input
opyrator_client = Client("http://my-opyrator:8080")
result = opyrator_client.call(Input(text="hello", wait=1))

features for production

This looks great and my first thought was, wow, this looks like a great alternative to Flask! but how would i implement things like authentication & connections to a database -- things that would likely be needed for any real "production" implementation?

Opyrator launch-ui and launch-api throwing errors

In the fresh environment, using Python 3.9.7 on macOS Monterey 12.2.1 (x86) (tested on M1 chip, same issues)
No extra packages were installed, only Opyrator and its dependencies

The code I'm trying to run:

from pydantic import BaseModel

class Input(BaseModel):
    message: str

class Output(BaseModel):
    message: str

def hello_world(input: Input) -> Output:
    """Returns the `message` of the input data."""
    return Output(message=input.message)

Issue #1

$ opyrator launch-ui my_opyrator:hello_world

ModuleNotFoundError: No module named 'streamlit.report_thread'

Issue #2

$ opyrator launch-api my_opyrator:hello_world

ImportError: cannot import name 'graphql' from 'starlette' (/Users/sean/python_envs/opyrator-env/lib/python3.9/site-packages/starlette/init.py)

Problem with streamlit (streamlit==1.6.0)

Some folks on the internet suggest downgrading streamlit, but it seems like the issue still persists.
I've looked into the package itself and didn't find either report_thread.py or "report_thread" in the python files

Finalize docker export capabilities

Feature description:

Finalize capabilities to export an opyrator to a Docker image.

The export can be executed via command line:

opyrator export my_opyrator:hello_world --format=docker my-opyrator-image:latest

πŸ’‘ The Docker export requires that Docker is installed on your machine.

After the successful export, the Docker image can be run as shown below:

docker run -p 8080:8080 my-opyrator-image:latest

Running your Opyrator within this Docker image has the advantage that only a single port is required to be exposed. The separation between UI and API is done via URL paths: http://localhost:8080/api (API); http://localhost:8080/ui (UI). The UI is automatically configured to use the API for all function calls.

how can we get the "generated fast api code" ?

Describe the issue:

I need to generate a FastAPI code from a simple python function. Its look like Opyrator do that.
But I do not know if we can access to the source code generated with FastAPI annotation ?
Is the underlying dynamic code generated is usable and where is it ?

Thank you

Trying to make the output download an excel file or display a dataframe

Hi,
I have been doodling with opyrator, I think it is awesome.
I got stuck in trying to make the output for the user is to download an excel file generated following the model you have in upscaling the image and spleeter example
`
class HelixPredictOutput(BaseModel):
upscaled_image_file: FileContent = Field(
...,
mime_type="application/excel",
description="excel file download",
)

def image_super_resolution(
input: HelixPredictInput,
) -> HelixPredictOutput:

with open("aa.xlsx", "rb") as f:
            excel_outfile = f.read()

return HelixPredictOutput(
            upscaled_image_file=excel_outfile)

`
But that gave me a weird zip file when I press on the download button that was unsupported. Is there anyway to make it download the excel file?

Allow custom h1 titles, page titles and favicons

Feature description:

Opyrator inserts its name to every project titles and does not allow a change. However, this is undesired and there should be an alternative place to give credits. Like on the footer, as streamlit does.

Problem and motivation:

The cause of behavior is on src/opyrator/ui/streamlit_ui.py file, line 27:

st.set_page_config(page_title="Opyrator", page_icon=":arrow_forward:")

and lines 828-830:

    title = opyrator.name
    if "opyrator" not in opyrator.name.lower():
        title += " - Opyrator"

Since streamlit allows page config to be set once, there is no way but altering the library code manually.

An example:

image

This over-branding behavior should change. A footer reference text along with uri is enough, as people are quite used to see credits at the end of the page.

Is this something you're interested in working on?

Yes

Thanks.

I want to know how to get response of POST request in running 'launch-ui'

Hi.
It is very useful to access Swagger UI by opyrator launch-api ~
But I need to use Swagger API when I'm running opyrator launch-ui. I edited the /openapi.json by indicating server url.
I tried a lot by adding /call behind the server url but it doesn't work..
403 Forbidden error just appears to me.
Could you let me how to get response of POST request in running 'launch-ui'?

Recommend Projects

  • React photo React

    A declarative, efficient, and flexible JavaScript library for building user interfaces.

  • Vue.js photo Vue.js

    πŸ–– Vue.js is a progressive, incrementally-adoptable JavaScript framework for building UI on the web.

  • Typescript photo Typescript

    TypeScript is a superset of JavaScript that compiles to clean JavaScript output.

  • TensorFlow photo TensorFlow

    An Open Source Machine Learning Framework for Everyone

  • Django photo Django

    The Web framework for perfectionists with deadlines.

  • D3 photo D3

    Bring data to life with SVG, Canvas and HTML. πŸ“ŠπŸ“ˆπŸŽ‰

Recommend Topics

  • javascript

    JavaScript (JS) is a lightweight interpreted programming language with first-class functions.

  • web

    Some thing interesting about web. New door for the world.

  • server

    A server is a program made to process requests and deliver data to clients.

  • Machine learning

    Machine learning is a way of modeling and interpreting data that allows a piece of software to respond intelligently.

  • Game

    Some thing interesting about game, make everyone happy.

Recommend Org

  • Facebook photo Facebook

    We are working to build community through open source technology. NB: members must have two-factor auth.

  • Microsoft photo Microsoft

    Open source projects and samples from Microsoft.

  • Google photo Google

    Google ❀️ Open Source for everyone.

  • D3 photo D3

    Data-Driven Documents codes.