
This exercise allows you to practice and apply the concepts and techniques taught in class.
Upon completion of this exercise, you will be able to:
- Display forms and inputs in your React apps
- Create controlled components that use state to manage the form inputs
- Get values from different types of inputs (
input,select, andcheckbox) in React - Set and handle events for forms and inputs (
onChange,onSubmit, etc.) in React
In this lab, you will practice how to create forms in React and how to handle the values coming from different types of form inputs. Your task will be to implement the logic for a form that has multiple inputs and store their values in the component's state.
- Fork this repo
- Clone this repo
cd lab-react-forms
npm install
npm run dev-
Upon completion, run the following commands:
git add . git commit -m "done" git push origin master -
Create a Pull Request and submit your assignment.
In this exercise, you will work on the Cohort Tools app - a simple React app used to manage students in a boot camp such as Ironhack. You may have seen this app before in a previous exercise. In this exercise, you will expand the app by implementing a form so that new students can be added to the boot camp directory.
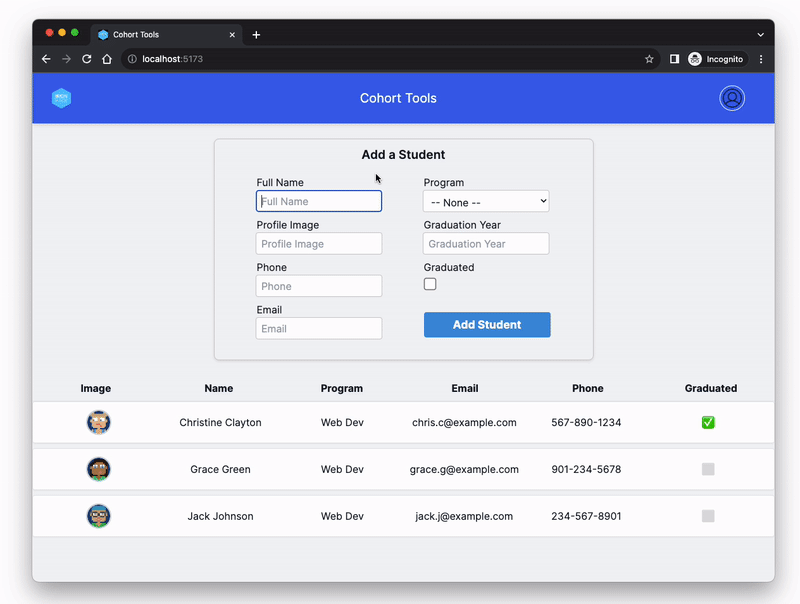
You will do most of your work in the App.jsx file, which already has some starter code. Once you start the app (npm run dev), you will see the following dashboard showing a form and a list of students:
The form you see on the page is meant for adding new students to the list shown on the page. Since forms are the main topic of our exercise today, let's take a closer look at the form displayed on the page.
If you open the App.jsx component, you will see that the form has the following input fields:
| HTML Element | Attribute name |
Attribute type |
Details |
|---|---|---|---|
input |
fullName |
text | Text input |
input |
image |
url | URL input |
input |
phone |
tel | Telephone number input |
input |
email |
Email input | |
select |
program |
A select element with options. |
|
input |
graduationYear |
number | The input has validation attributes (min, max, minLength, and maxLength) for limiting the input to 4 digits and a range of 2023 - 2030. |
input |
graduated |
checkbox | Checkbox input. Default value: false (unchecked). |
The form inputs are not yet linked to the component's state. In the following iterations, you will need to link the inputs to the state and implement the logic to handle the form submission so that when the Add Student button is clicked a new student gets added to the list of students.
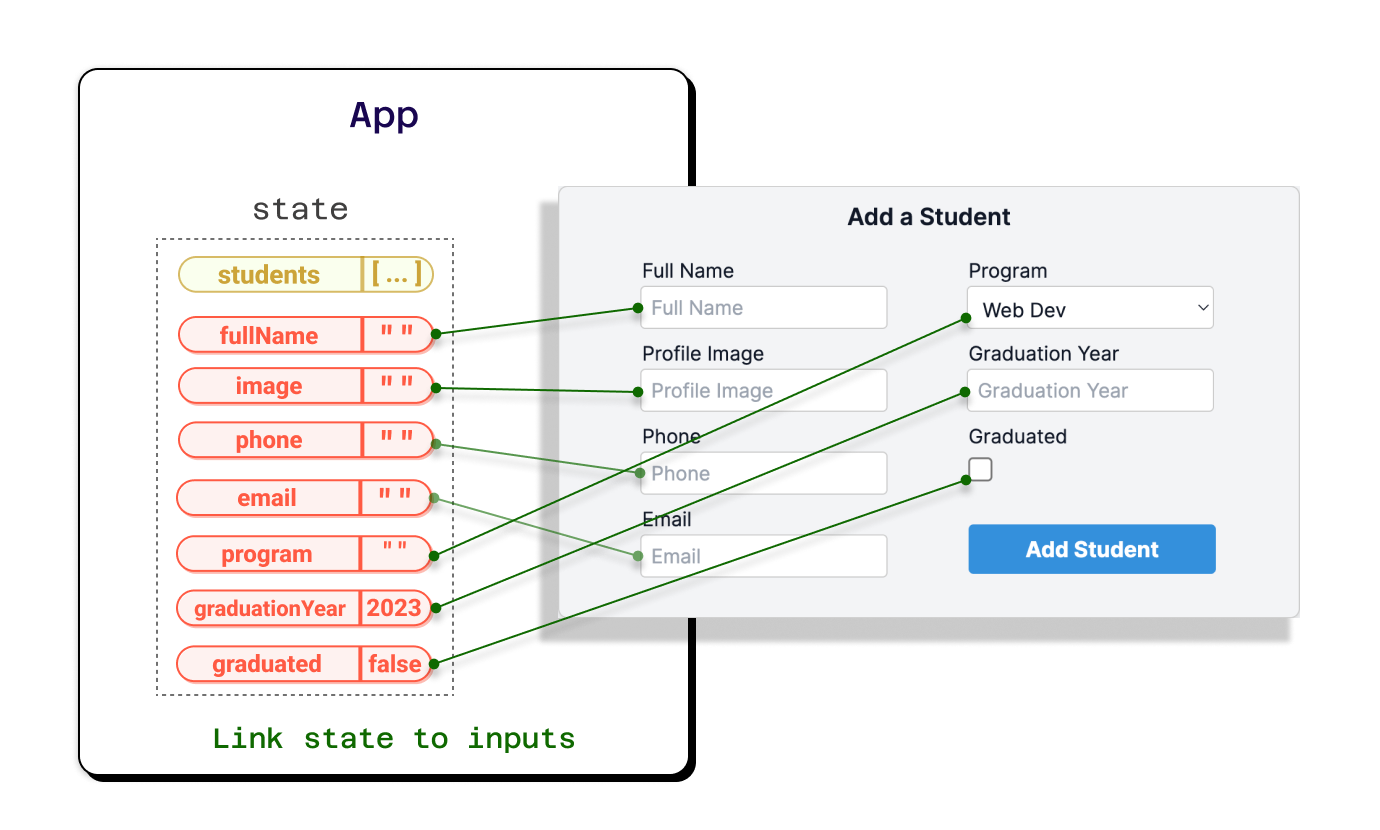
When working with forms in React, the first step is to create state variables that will store the values from the form inputs.
In the App.jsx component, create a state variable for each input. Each state variable should be named according to the name attribute of the corresponding input. For example, if the input is <input name="email" />, then the state variable for it should be named email.
Default value of the state variable should be set according to the type of the input:
text,url,tel,email, andpasswordinputs should have an empty string""as the default valuecheckboxinputs should havefalseas the default valueselectinputs should have the string value of the first option set as the default valuenumberinputs should always have a default value set, such as0or any other number depending on the use case.
In case the input has validation attributes (min,max), the default value can be set to theminvalue.

Now that you have created the state variables, the next step is to link each input to its state variable using either the value or checked attribute.
In addition to this, remember to add the onChange event to each input and create handler functions to update the corresponding state variables.
Note: If you need a refresher on how to do this, check the following lesson code example here.
Hint
To link the input to the state, you need to set the value attribute of the input to the corresponding state variable. For example, the value attribute of the fullName input should be set to the fullName state variable.
For the inputs with type="checkox" you should use the attribute checked instead of value, like <input checked={stateVariable} />.
The last step is implementing the form submission. When the Add Student button is clicked, the data from the inputs should be stored as a new object in the students array in the component's state. The new object should have the following structure:
{
  fullName: "example",
  email: "example",
  phone: "example",
  program: "example",
  image: "example",
  graduationYear: 2023,
  graduated: true
}
Once the button Add Student is clicked and the new student object is created, the form inputs should be cleared.
If you implement the logic correctly, you should see the new student added to the list of students.
See Expected Result
Hint
To handle the form submission, you need to link the onSubmit event of the form to a function that is responsible for handling the form submission. For example, the onSubmit event of the form should be linked to the handleFormSubmit function.
Another thing to keep in mind is that you need to prevent the default behaviour of the form submission. Otherwise, the page will refresh when the form is submitted. To prevent the default behaviour, you need to call the preventDefault() method at the beginning of the form submission handler function.
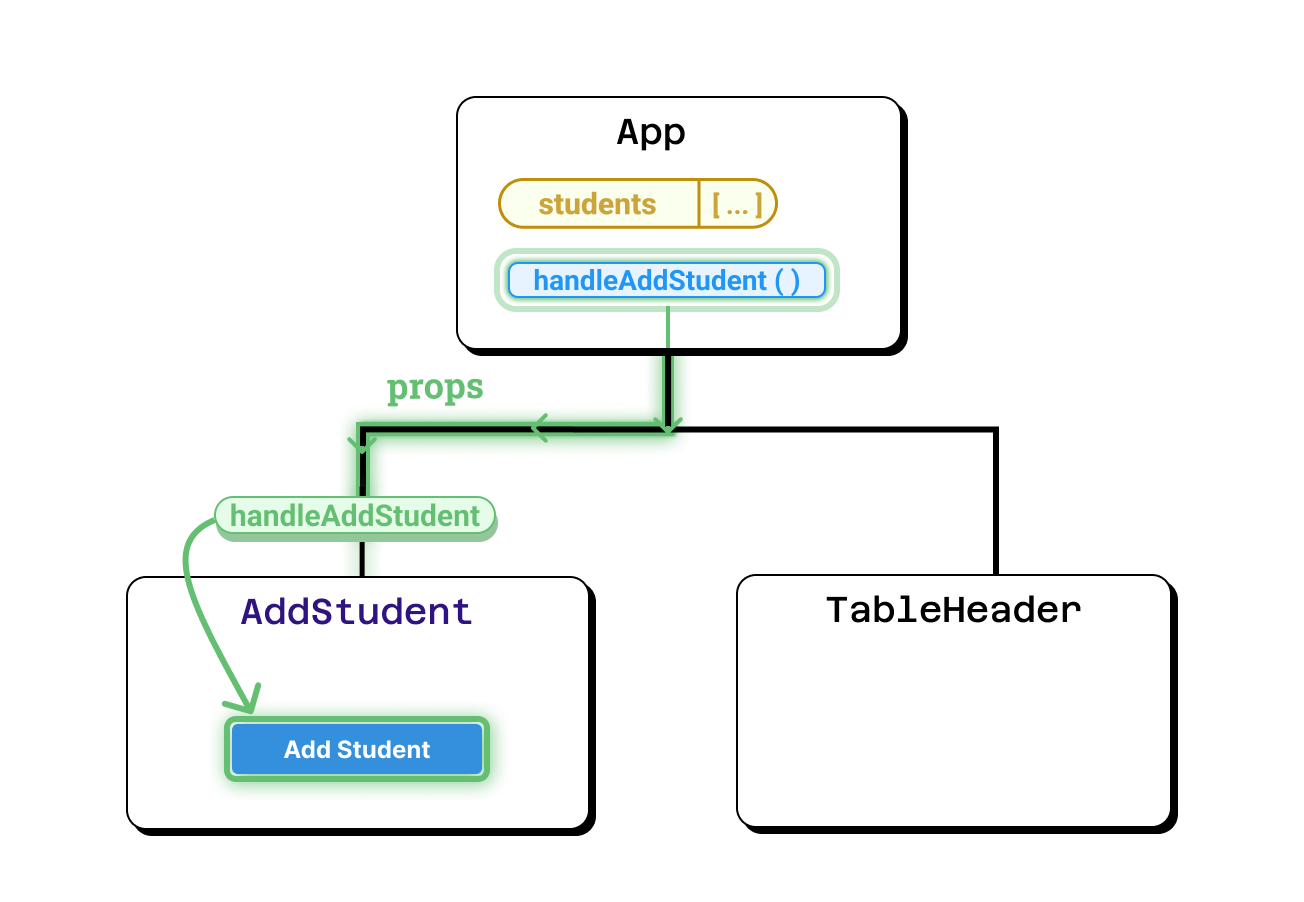
The form elements and the logic are currently located in the App.jsx component. Your task is to refactor the code and move the form, inputs, and logic to a separate component called <AddStudent />. The <AddStudent /> component should then be rendered in the App.jsx component.
The component should receive 1 prop:
handleAddStudent- a function that handles the form submission and adds the new student to the list of students. The function should be passed to the<AddStudent />component from theApp.jsxcomponent.
Refactor the handler functions for the form inputs so that they are not defined as separate functions. Instead, you should use the same function for all inputs. The function should be responsible for updating the state variable according to the input that triggered the function.
Hint
To get an idea of how to implement this, check out the following articles:
Happy coding! 💙
I am stuck and don't know how to solve the problem or where to start. What should I do?
If you are stuck in your code and don't know how to solve the problem or where to start, you should take a step back and try to form a clear question about the specific issue you are facing. This will help you narrow down the problem and come up with potential solutions.
For example, is it a concept that you don't understand, or are you receiving an error message that you don't know how to fix? It is usually helpful to try to state the problem as clearly as possible, including any error messages you are receiving. This can help you communicate the issue to others and potentially get help from classmates or online resources.
Once you have a clear understanding of the problem, you will be able to start working toward the solution.
I am getting an error: "not defined". How do I fix it?
The "ReferenceError: variable is not defined" error in JavaScript occurs when you try to access a variable or a function that has not been defined yet or is out of scope.
To fix the issue, check that you have defined the variable or function that you are trying to use and double-check the spelling to make sure you are using the correct name.
In case the variable or a function is defined in another file, make sure that the file has been imported or loaded correctly.
I am unable to push changes to the repository. What should I do?
There are a couple of possible reasons why you may be unable to push changes to a Git repository:
-
You have not committed your changes: Before you can push your changes to the repository, you need to commit them using the
git commitcommand. Make sure you have committed your changes and try pushing again. To do this, run the following terminal commands from the project folder:git add . git commit -m "Your commit message" git push
-
You do not have permission to push to the repository: If you have cloned the repository directly from the main Ironhack repository without making a Fork first, you do not have write access to the repository. To check which remote repository you have cloned, run the following terminal command from the project folder:
git remote -v
If the link shown is the same as the main Ironhack repository, you will need to fork the repository to your GitHub account first, and then clone your fork to your local machine to be able to push the changes.
Note: You may want to make a copy of the code you have locally, to avoid losing it in the process.

