Git Product home page Git Product logo

videoio's Introduction

MetalPetal

Swift
Platforms Version
Apple Silicon Mac Catalyst Simulator
CocoaPods Swift PM

An image processing framework based on Metal.

Design Overview

MetalPetal is an image processing framework based on Metal designed to provide real-time processing for still image and video with easy to use programming interfaces.

This chapter covers the key concepts of MetalPetal, and will help you to get a better understanding of its design, implementation, performance implications and best practices.

Goals

MetalPetal is designed with the following goals in mind.

  • Easy to use API

    Provides convenience APIs and avoids common pitfalls.

  • Performance

    Use CPU, GPU and memory efficiently.

  • Extensibility

    Easy to create custom filters as well as plugin your custom image processing unit.

  • Swifty

    Provides a fluid experience for Swift programmers.

Core Components

Some of the core concepts of MetalPetal are very similar to those in Apple's Core Image framework.

MTIContext

Provides an evaluation context for rendering MTIImages. It also stores a lot of caches and state information, so it's more efficient to reuse a context whenever possible.

MTIImage

A MTIImage object is a representation of an image to be processed or produced. It does directly represent image bitmap data instead it has all the information necessary to produce an image or more precisely a MTLTexture. It consists of two parts, a recipe of how to produce the texture (MTIImagePromise) and other information such as how a context caches the image (cachePolicy), and how the texture should be sampled (samplerDescriptor).

MTIFilter

A MTIFilter represents an image processing effect and any parameters that control that effect. It produces a MTIImage object as output. To use a filter, you create a filter object, set its input images and parameters, and then access its output image. Typically, a filter class owns a static kernel (MTIKernel), when you access its outputImage property, it asks the kernel with the input images and parameters to produce an output MTIImage.

MTIKernel

A MTIKernel represents an image processing routine. MTIKernel is responsible for creating the corresponding render or compute pipeline state for the filter, as well as building the MTIImagePromise for a MTIImage.

Optimizations

MetalPetal does a lot of optimizations for you under the hood.

It automatically caches functions, kernel states, sampler states, etc.

It utilizes Metal features like programmable blending, memoryless render targets, resource heaps and metal performance shaders to make the render fast and efficient. On macOS, MetalPetal can also take advantage of the TBDR architecture of Apple silicon.

Before rendering, MetalPetal can look into your image render graph and figure out the minimal number of intermediate textures needed to do the rendering, saving memory, energy and time.

It can also re-organize the image render graph if multiple “recipes” can be concatenated to eliminate redundant render passes. (MTIContext.isRenderGraphOptimizationEnabled)

Concurrency Considerations

MTIImage objects are immutable, which means they can be shared safely among threads.

However, MTIFilter objects are mutable and thus cannot be shared safely among threads.

A MTIContext contains a lot of states and caches. There's a thread-safe mechanism for MTIContext objects, making it safe to share a MTIContext object among threads.

Advantages over Core Image

  • Fully customizable vertex and fragment functions.

  • MRT (Multiple Render Targets) support.

  • Generally better performance. (Detailed benchmark data needed)

Builtin Filters

  • Color Matrix

  • Color Lookup

    Uses an color lookup table to remap the colors in an image.

  • Opacity

  • Exposure

  • Saturation

  • Brightness

  • Contrast

  • Color Invert

  • Vibrance

    Adjusts the saturation of an image while keeping pleasing skin tones.

  • RGB Tone Curve

  • Blend Modes

    • Normal
    • Multiply
    • Overlay
    • Screen
    • Hard Light
    • Soft Light
    • Darken
    • Lighten
    • Color Dodge
    • Add (Linear Dodge)
    • Color Burn
    • Linear Burn
    • Lighter Color
    • Darker Color
    • Vivid Light
    • Linear Light
    • Pin Light
    • Hard Mix
    • Difference
    • Exclusion
    • Subtract
    • Divide
    • Hue
    • Saturation
    • Color
    • Luminosity
    • ColorLookup512x512
    • Custom Blend Mode
  • Blend with Mask

  • Transform

  • Crop

  • Pixellate

  • Multilayer Composite

  • MPS Convolution

  • MPS Gaussian Blur

  • MPS Definition

  • MPS Sobel

  • MPS Unsharp Mask

  • MPS Box Blur

  • High Pass Skin Smoothing

  • CLAHE (Contrast-Limited Adaptive Histogram Equalization)

  • Lens Blur (Hexagonal Bokeh Blur)

  • Surface Blur

  • Bulge Distortion

  • Chroma Key Blend

  • Color Halftone

  • Dot Screen

  • Round Corner (Circular/Continuous Curve)

  • All Core Image Filters

Example Code

Create a MTIImage

You can create a MTIImage object from nearly any source of image data, including:

  • URLs referencing image files to be loaded
  • Metal textures
  • CoreVideo image or pixel buffers (CVImageBufferRef or CVPixelBufferRef)
  • Image bitmap data in memory
  • Texture data from a given texture or image asset name
  • Core Image CIImage objects
  • MDLTexture objects
  • SceneKit and SpriteKit scenes
let imageFromCGImage = MTIImage(cgImage: cgImage, isOpaque: true)

let imageFromCIImage = MTIImage(ciImage: ciImage)

let imageFromCoreVideoPixelBuffer = MTIImage(cvPixelBuffer: pixelBuffer, alphaType: .alphaIsOne)

let imageFromContentsOfURL = MTIImage(contentsOf: url)

// unpremultiply alpha if needed
let unpremultipliedAlphaImage = image.unpremultiplyingAlpha()

Apply a Filter

let inputImage = ...

let filter = MTISaturationFilter()
filter.saturation = 0
filter.inputImage = inputImage

let outputImage = filter.outputImage

Render a MTIImage

let options = MTIContextOptions()

guard let device = MTLCreateSystemDefaultDevice(), let context = try? MTIContext(device: device, options: options) else {
    return
}

let image: MTIImage = ...

do {
    try context.render(image, to: pixelBuffer) 
    
    //context.makeCIImage(from: image)
    
    //context.makeCGImage(from: image)
} catch {
    print(error)
}

Display a MTIImage

let imageView = MTIImageView(frame: self.view.bounds)

// You can optionally assign a `MTIContext` to the image view. If no context is assigned and `automaticallyCreatesContext` is set to `true` (the default value), a `MTIContext` is created automatically when the image view renders its content.
imageView.context = ...

imageView.image = image

If you'd like to move the GPU command encoding process out of the main thread, you can use a MTIThreadSafeImageView. You may assign a MTIImage to a MTIThreadSafeImageView in any thread.

Connect Filters (Swift)

MetalPetal has a type-safe Swift API for connecting filters. You can use => operator in FilterGraph.makeImage function to connect filters and get the output image.

Here are some examples:

let image = try? FilterGraph.makeImage { output in
    inputImage => saturationFilter => exposureFilter => output
}
let image = try? FilterGraph.makeImage { output in
    inputImage => saturationFilter => exposureFilter => contrastFilter => blendFilter.inputPorts.inputImage
    exposureFilter => blendFilter.inputPorts.inputBackgroundImage
    blendFilter => output
}
  • You can connect unary filters (MTIUnaryFilter) directly using =>.

  • For a filter with multiple inputs, you need to connect to one of its inputPorts.

  • => operator only works in FilterGraph.makeImage method.

  • One and only one filter's output can be connected to output.

Process Video Files

Working with AVPlayer:

let context = try MTIContext(device: device)
let asset = AVAsset(url: videoURL)
let composition = MTIVideoComposition(asset: asset, context: context, queue: DispatchQueue.main, filter: { request in
    return FilterGraph.makeImage { output in
        request.anySourceImage! => filterA => filterB => output
    }!
}

let playerItem = AVPlayerItem(asset: asset)
playerItem.videoComposition = composition.makeAVVideoComposition()
player.replaceCurrentItem(with: playerItem)
player.play()

Export a video:

VideoIO is required for the following examples.

import VideoIO

var configuration = AssetExportSession.Configuration(fileType: .mp4, videoSettings: .h264(videoSize: composition.renderSize), audioSettings: .aac(channels: 2, sampleRate: 44100, bitRate: 128 * 1000))
configuration.videoComposition = composition.makeAVVideoComposition()
self.exporter = try! AssetExportSession(asset: asset, outputURL: outputURL, configuration: configuration)
exporter.export(progress: { progress in
    
}, completion: { error in
    
})

Process Live Video (with VideoIO)

VideoIO is required for this example.

import VideoIO

// Setup Image View
let imageView = MTIImageView(frame: self.view.bounds)
...

// Setup Camera
let camera = Camera(captureSessionPreset: .hd1920x1080, configurator: .portraitFrontMirroredVideoOutput)
try camera.enableVideoDataOutput(on: DispatchQueue.main, delegate: self)
camera.videoDataOutput?.videoSettings = [kCVPixelBufferPixelFormatTypeKey as String: kCVPixelFormatType_420YpCbCr8BiPlanarFullRange]

...

// AVCaptureVideoDataOutputSampleBufferDelegate

let filter = MTIColorInvertFilter()

func captureOutput(_ output: AVCaptureOutput, didOutput sampleBuffer: CMSampleBuffer, from connection: AVCaptureConnection) {
    guard let pixelBuffer = CMSampleBufferGetImageBuffer(sampleBuffer) else {
        return
    }
    let inputImage = MTIImage(cvPixelBuffer: pixelBuffer, alphaType: .alphaIsOne)
    filter.inputImage = inputImage
    self.imageView.image = filter.outputImage
}

Please refer to the CameraFilterView.swift in the example project for more about previewing and recording filtered live video.

Best Practices

  • Reuse a MTIContext whenever possible.

    Contexts are heavyweight objects, so if you do create one, do so as early as possible, and reuse it each time you need to render an image.

  • Use MTIImage.cachePolicy wisely.

    Use MTIImageCachePolicyTransient when you do not want to preserve the render result of an image, for example when the image is just an intermediate result in a filter chain, so the underlying texture of the render result can be reused. It is the most memory efficient option. However, when you ask the context to render a previously rendered image, it may re-render that image since its underlying texture has been reused.

    By default, a filter's output image has the transient policy.

    Use MTIImageCachePolicyPersistent when you want to prevent the underlying texture from being reused.

    By default, images created from external sources have the persistent policy.

  • Understand that MTIFilter.outputImage is a compute property.

    Each time you ask a filter for its output image, the filter may give you a new output image object even if the inputs are identical with the previous call. So reuse output images whenever possible.

    For example,

    //          ╭→ filterB
    // filterA ─┤
    //          ╰→ filterC
    // 
    // filterB and filterC use filterA's output as their input.

    In this situation, the following solution:

    let filterOutputImage = filterA.outputImage
    filterB.inputImage = filterOutputImage
    filterC.inputImage = filterOutputImage

    is better than:

    filterB.inputImage = filterA.outputImage
    filterC.inputImage = filterA.outputImage

Build Custom Filter

If you want to include the MTIShaderLib.h in your .metal file, you need to add the path of MTIShaderLib.h file to the Metal Compiler - Header Search Paths (MTL_HEADER_SEARCH_PATHS) setting.

For example, if you use CocoaPods you can set the MTL_HEADER_SEARCH_PATHS to ${PODS_CONFIGURATION_BUILD_DIR}/MetalPetal/MetalPetal.framework/Headers or ${PODS_ROOT}/MetalPetal/Frameworks/MetalPetal/Shaders. If you use Swift Package Manager, set the MTL_HEADER_SEARCH_PATHS to $(HEADER_SEARCH_PATHS)

Shader Function Arguments Encoding

MetalPetal has a built-in mechanism to encode shader function arguments for you. You can pass the shader function arguments as name: value dictionaries to the MTIRenderPipelineKernel.apply(toInputImages:parameters:outputDescriptors:), MTIRenderCommand(kernel:geometry:images:parameters:), etc.

For example, the parameter dictionary for the metal function vibranceAdjust can be:

// Swift
let amount: Float = 1.0
let vibranceVector = float4(1, 1, 1, 1)
let parameters = ["amount": amount,
                  "vibranceVector": MTIVector(value: vibranceVector),
                  "avoidsSaturatingSkinTones": true,
                  "grayColorTransform": MTIVector(value: float3(0,0,0))]
// vibranceAdjust metal function
fragment float4 vibranceAdjust(...,
                constant float & amount [[ buffer(0) ]],
                constant float4 & vibranceVector [[ buffer(1) ]],
                constant bool & avoidsSaturatingSkinTones [[ buffer(2) ]],
                constant float3 & grayColorTransform [[ buffer(3) ]])
{
    ...
}

The shader function argument types and the corresponding types to use in a parameter dictionary is listed below.

Shader Function Argument Type Swift Objective-C
float Float float
int Int32 int
uint UInt32 uint
bool Bool bool
simd (float2,float4,float4x4,int4, etc.) simd (with MetalPetal/Swift) / MTIVector MTIVector
struct Data / MTIDataBuffer NSData / MTIDataBuffer
other (float *, struct *, etc.) immutable Data / MTIDataBuffer NSData / MTIDataBuffer
other (float *, struct *, etc.) mutable MTIDataBuffer MTIDataBuffer

Simple Single Input / Output Filters

To build a custom unary filter, you can subclass MTIUnaryImageRenderingFilter and override the methods in the SubclassingHooks category. Examples: MTIPixellateFilter, MTIVibranceFilter, MTIUnpremultiplyAlphaFilter, MTIPremultiplyAlphaFilter, etc.

//Objective-C

@interface MTIPixellateFilter : MTIUnaryImageRenderingFilter

@property (nonatomic) float fractionalWidthOfAPixel;

@end

@implementation MTIPixellateFilter

- (instancetype)init {
    if (self = [super init]) {
        _fractionalWidthOfAPixel = 0.05;
    }
    return self;
}

+ (MTIFunctionDescriptor *)fragmentFunctionDescriptor {
    return [[MTIFunctionDescriptor alloc] initWithName:@"pixellateEffect" libraryURL:[bundle URLForResource:@"default" withExtension:@"metallib"]];
}

- (NSDictionary<NSString *,id> *)parameters {
    return @{@"fractionalWidthOfAPixel": @(self.fractionalWidthOfAPixel)};
}

@end
//Swift

class MTIPixellateFilter: MTIUnaryImageRenderingFilter {
    
    var fractionalWidthOfAPixel: Float = 0.05

    override var parameters: [String : Any] {
        return ["fractionalWidthOfAPixel": fractionalWidthOfAPixel]
    }
    
    override class func fragmentFunctionDescriptor() -> MTIFunctionDescriptor {
        return MTIFunctionDescriptor(name: "pixellateEffect", libraryURL: MTIDefaultLibraryURLForBundle(Bundle.main))
    }
}

Fully Custom Filters

To build more complex filters, all you need to do is create a kernel (MTIRenderPipelineKernel/MTIComputePipelineKernel/MTIMPSKernel), then apply the kernel to the input image(s). Examples: MTIChromaKeyBlendFilter, MTIBlendWithMaskFilter, MTIColorLookupFilter, etc.

@interface MTIChromaKeyBlendFilter : NSObject <MTIFilter>

@property (nonatomic, strong, nullable) MTIImage *inputImage;

@property (nonatomic, strong, nullable) MTIImage *inputBackgroundImage;

@property (nonatomic) float thresholdSensitivity;

@property (nonatomic) float smoothing;

@property (nonatomic) MTIColor color;

@end

@implementation MTIChromaKeyBlendFilter

@synthesize outputPixelFormat = _outputPixelFormat;

+ (MTIRenderPipelineKernel *)kernel {
    static MTIRenderPipelineKernel *kernel;
    static dispatch_once_t onceToken;
    dispatch_once(&onceToken, ^{
        kernel = [[MTIRenderPipelineKernel alloc] initWithVertexFunctionDescriptor:[[MTIFunctionDescriptor alloc] initWithName:MTIFilterPassthroughVertexFunctionName] fragmentFunctionDescriptor:[[MTIFunctionDescriptor alloc] initWithName:@"chromaKeyBlend"]];
    });
    return kernel;
}

- (instancetype)init {
    if (self = [super init]) {
        _thresholdSensitivity = 0.4;
        _smoothing = 0.1;
        _color = MTIColorMake(0.0, 1.0, 0.0, 1.0);
    }
    return self;
}

- (MTIImage *)outputImage {
    if (!self.inputImage || !self.inputBackgroundImage) {
        return nil;
    }
    return [self.class.kernel applyToInputImages:@[self.inputImage, self.inputBackgroundImage]
                                      parameters:@{@"color": [MTIVector vectorWithFloat4:(simd_float4){self.color.red, self.color.green, self.color.blue,self.color.alpha}],
                                    @"thresholdSensitivity": @(self.thresholdSensitivity),
                                               @"smoothing": @(self.smoothing)}
                         outputTextureDimensions:MTITextureDimensionsMake2DFromCGSize(self.inputImage.size)
                               outputPixelFormat:self.outputPixelFormat];
}

@end

Multiple Draw Calls in One Render Pass

You can use MTIRenderCommand to issue multiple draw calls in one render pass.

// Create a draw call with kernelA, geometryA, and imageA.
let renderCommandA = MTIRenderCommand(kernel: self.kernelA, geometry: self.geometryA, images: [imageA], parameters: [:])

// Create a draw call with kernelB, geometryB, and imageB.
let renderCommandB = MTIRenderCommand(kernel: self.kernelB, geometry: self.geometryB, images: [imageB], parameters: [:])

// Create an output descriptor
let outputDescriptor = MTIRenderPassOutputDescriptor(dimensions: MTITextureDimensions(width: outputWidth, height: outputHeight, depth: 1), pixelFormat: .bgra8Unorm, loadAction: .clear, storeAction: .store)

// Get the output images, the output image count is equal to the output descriptor count.
let images = MTIRenderCommand.images(byPerforming: [renderCommandA, renderCommandB], outputDescriptors: [outputDescriptor])

You can also create multiple output descriptors to output multiple images in one render pass (MRT, See https://en.wikipedia.org/wiki/Multiple_Render_Targets).

Custom Vertex Data

When MTIVertex cannot fit your needs, you can implement the MTIGeometry protocol to provide your custom vertex data to the command encoder.

Use the MTIRenderCommand API to issue draw calls and pass your custom MTIGeometry.

Custom Processing Module

In rare scenarios, you may want to access the underlying texture directly, use multiple MPS kernels in one render pass, do 3D rendering, or encode the render commands yourself.

MTIImagePromise protocol provides direct access to the underlying texture and the render context for a step in MetalPetal.

You can create new input sources or fully custom processing units by implementing the MTIImagePromise protocol. You will need to import an additional module to do so.

Objective-C

@import MetalPetal.Extension;

Swift

// CocoaPods
import MetalPetal.Extension

// Swift Package Manager
import MetalPetalObjectiveC.Extension

See the implementation of MTIComputePipelineKernel, MTICLAHELUTRecipe or MTIImage for example.

Alpha Types

If an alpha channel is used in an image, there are two common representations that are available: unpremultiplied (straight/unassociated) alpha, and premultiplied (associated) alpha.

With unpremultiplied alpha, the RGB components represent the color of the pixel, disregarding its opacity.

With premultiplied alpha, the RGB components represent the color of the pixel, adjusted for its opacity by multiplication.

MetalPetal handles alpha type explicitly. You are responsible for providing the correct alpha type during image creation.

There are three alpha types in MetalPetal.

MTIAlphaType.nonPremultiplied: the alpha value in the image is not premultiplied.

MTIAlphaType.premultiplied: the alpha value in the image is premultiplied.

MTIAlphaType.alphaIsOne: there's no alpha channel in the image or the image is opaque.

Typically, CGImage, CVPixelBuffer and CIImage objects have premultiplied alpha channels. MTIAlphaType.alphaIsOne is strongly recommended if the image is opaque, e.g. a CVPixelBuffer from camera feed, or a CGImage loaded from a jpg file.

You can call unpremultiplyingAlpha() or premultiplyingAlpha() on a MTIImage to convert the alpha type of the image.

For performance reasons, alpha type validation only happens in debug build.

Alpha Handling of Built-in Filters

  • Most of the filters in MetalPetal accept unpremultiplied alpha and opaque images and output unpremultiplied alpha images.

  • Filters with outputAlphaType property accept inputs of all alpha types. And you can use outputAlphaType to specify the alpha type of the output image.

    e.g. MTIBlendFilter, MTIMultilayerCompositingFilter, MTICoreImageUnaryFilter, MTIRGBColorSpaceConversionFilter

  • Filters that do not actually modify colors have passthrough alpha handling rule, that means the alpha types of the output images are the same with the input images.

    e.g. MTITransformFilter, MTICropFilter, MTIPixellateFilter, MTIBulgeDistortionFilter

For more about alpha types and alpha compositing, please refer to this amazing interactive article by Bartosz Ciechanowski.

Color Spaces

Color spaces are vital for image processing. The numeric values of the red, green, and blue components have no meaning without a color space.

Before continuing on how MetalPetal handles color spaces, you may want to know what a color space is and how it affects the representation of color values. There are many articles on the web explaining color spaces, to get started, the suggestion is Color Spaces - by Bartosz Ciechanowski.

Different softwares and frameworks have different ways of handling color spaces. For example, Photoshop has a default sRGB IEC61966-2.1 working color space, while Core Image, by default, uses linear sRGB working color space.

Metal textures do not store any color space information with them. Most of the color space handling in MetalPetal happens during the input (MTIImage(...)) and the output (MTIContext.render...) of image data.

Color Spaces for Inputs

Specifying a color space for an input means that MetalPetal should convert the source color values to the specified color space during the creation of the texture.

  • When loading from URL or CGImage, you can specify which color space you'd like the texture data to be in, using MTICGImageLoadingOptions. If you do not specify any options when loading an image, the device RGB color space is used (MTICGImageLoadingOptions.default). A nil color space disables color matching, this is the equivalent of using the color space of the input image to create MTICGImageLoadingOptions. If the model of the specified color space is not RGB, the device RGB color space is used as a fallback.

  • When loading from CIImage, you can specify which color space you'd like the texture data to be in, using MTICIImageRenderingOptions. If you do not specify any options when loading a CIImage, the device RGB color space is used (MTICIImageRenderingOptions.default). A nil color space disables color matching, color values are loaded in the working color space of the CIContext.

Color Spaces for Outputs

When specifying a color space for an output, the color space serves more like a tag which is used to communicate with the rest of the system on how to represent the color values in the output. There is no actual color space conversion performed.

  • You can specify the color space of an output CGImage using MTIContext.makeCGImage... or MTIContext.startTaskTo... methods with a colorSpace parameter.

  • You can specify the color space of an output CIImage using MTICIImageCreationOptions.

MetalPetal assumes that the output color values are in device RGB color space when no output color space is specified.

Color Spaces for CVPixelBuffer

MetalPetal uses CVMetalTextureCache and IOSurface to directly map CVPixelBuffers to Metal textures. So you cannot specify a color space for loading from or rendering to a CVPixelBuffer. However you can specify whether to use a texture with a sRGB pixel format for the mapping.

In Metal, if the pixel format name has the _sRGB suffix, then sRGB gamma compression and decompression are applied during the reading and writing of color values in the pixel. That means a texture with the _sRGB pixel format assumes the color values it stores are sRGB gamma corrected, when the color values are read in a shader, sRGB to linear RGB conversions are performed. When the color values are written in a shader, linear RGB to sRGB conversions are performed.

Color Space Conversions

You can use MTIRGBColorSpaceConversionFilter to perform color space conversions. Color space conversion functions are also available in MTIShaderLib.h.

  • metalpetal::sRGBToLinear (sRGB IEC61966-2.1 to linear sRGB)
  • metalpetal::linearToSRGB (linear sRGB to sRGB IEC61966-2.1)
  • metalpetal::linearToITUR709 (linear sRGB to ITU-R 709)
  • metalpetal::ITUR709ToLinear (ITU-R 709 to linear sRGB)

Extensions

Working with SceneKit

You can use MTISCNSceneRenderer to generate MTIImages from a SCNScene. You may want to handle the SceneKit renderer's linear RGB color space, see issue #76 The image from SceneKit is darker than normal.

Working with SpriteKit

You can use MTISKSceneRenderer to generate MTIImages from a SKScene.

Working with Core Image

You can create MTIImages from CIImages.

You can render a MTIImage to a CIImage using a MTIContext.

You can use a CIFilter directly with MTICoreImageKernel or the MTICoreImageUnaryFilter class. (Swift Only)

Working with JavaScript

See MetalPetalJS

With MetalPetalJS you can create render pipelines and filters using JavaScript, making it possible to download your filters/renderers from "the cloud".

Texture Loader

It is recommended that you use APIs that accept MTICGImageLoadingOptions to load CGImages and images from URL, instead of using APIs that accept MTKTextureLoaderOption.

When you use APIs that accept MTKTextureLoaderOption, MetalPetal, by default, uses MTIDefaultTextureLoader to load CGImages, images from URL, and named images. MTIDefaultTextureLoader uses MTKTextureLoader internally and has some workarounds for MTKTextureLoader's inconsistencies and bugs at a small performance cost. You can also create your own texture loader by implementing the MTITextureLoader protocol. Then assign your texture loader class to MTIContextOptions.textureLoaderClass when creating a MTIContext.

Install

CocoaPods

You can use CocoaPods to install the latest version.

use_frameworks!

pod 'MetalPetal'

# Required if you are using Swift.
pod 'MetalPetal/Swift'

# Recommended if you'd like to run MetalPetal on Apple silicon Macs.
pod 'MetalPetal/AppleSilicon'

Sub-pod Swift

Provides Swift-specific additions and modifications to the Objective-C APIs to improve their mapping into Swift. Highly recommended if you are using Swift.

Sub-pod AppleSilicon

Provides the default shader library compiled in Metal Shading Language v2.3 which is required for enabling programmable blending support on Apple silicon Macs.

Swift Package Manager

Adding Package Dependencies to Your App

iOS Simulator Support

MetalPetal can run on Simulator with Xcode 11+ and macOS 10.15+.

MetalPerformanceShaders.framework is not available on Simulator, so filters that rely on MetalPerformanceShaders, such as MTIMPSGaussianBlurFilter, MTICLAHEFilter, do not work.

Simulator supports fewer features or different implementation limits than an actual Apple GPU. See Developing Metal Apps that Run in Simulator for detail.

Quick Look Debug Support

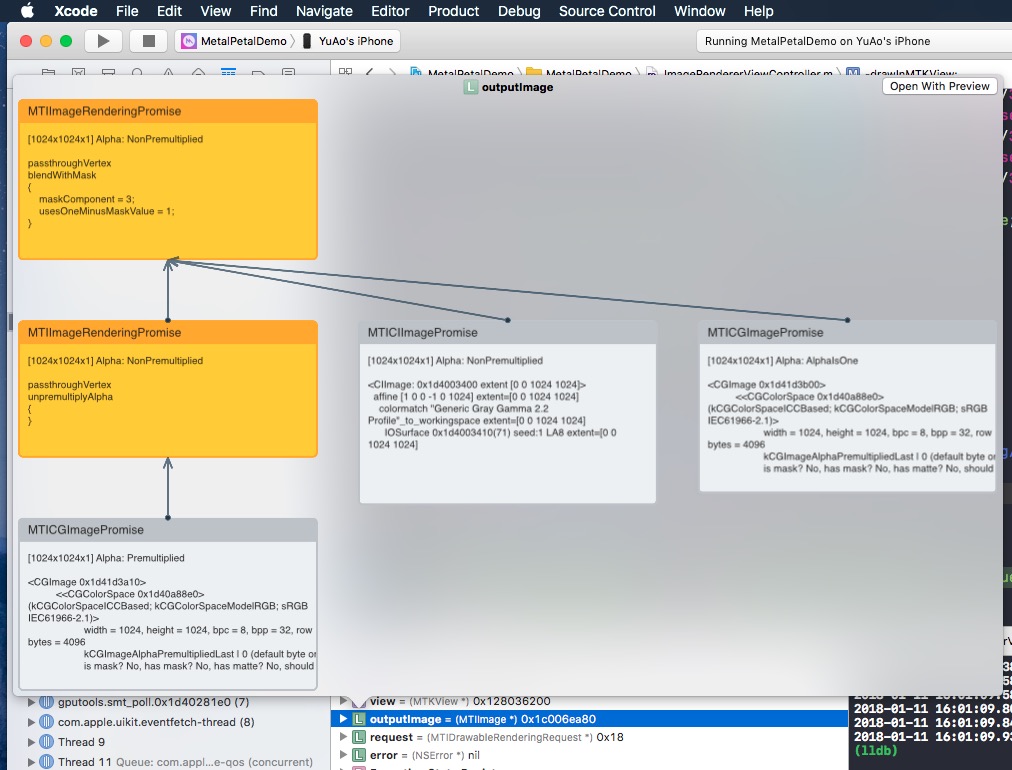
If you do a Quick Look on a MTIImage, it'll show you the image graph that you constructed to produce that image.

Quick Look Debug Preview

Trivia

Why Objective-C?

Contribute

Thank you for considering contributing to MetalPetal. Please read our Contributing Guidelines.

License

MetalPetal is MIT-licensed. LICENSE

The files in the /MetalPetalExamples directory are licensed under a separate license. LICENSE.md

Documentation is licensed CC-BY-4.0.

videoio's People

Contributors

askaradeniz avatar casper6479 avatar dsmurfin avatar jackyoustra avatar little2s avatar samuelhorwitz avatar yuao avatar

Stargazers

 avatar  avatar  avatar  avatar  avatar  avatar  avatar  avatar  avatar  avatar  avatar  avatar  avatar  avatar  avatar  avatar  avatar  avatar  avatar  avatar  avatar  avatar  avatar  avatar  avatar  avatar  avatar  avatar  avatar  avatar  avatar  avatar  avatar  avatar  avatar  avatar  avatar  avatar  avatar  avatar  avatar  avatar  avatar  avatar  avatar  avatar  avatar  avatar  avatar  avatar  avatar  avatar  avatar  avatar  avatar  avatar  avatar  avatar  avatar  avatar  avatar  avatar  avatar  avatar  avatar  avatar  avatar  avatar  avatar  avatar  avatar  avatar  avatar  avatar  avatar  avatar  avatar  avatar  avatar  avatar  avatar  avatar  avatar  avatar  avatar  avatar  avatar  avatar  avatar  avatar  avatar  avatar  avatar  avatar  avatar  avatar  avatar  avatar  avatar  avatar

Watchers

 avatar  avatar  avatar  avatar  avatar  avatar  avatar

videoio's Issues

Never ready for audio

I am trying to figure out what is going on with appending audio samples on macOS.

I have a few scenarios which seem to get different results.

If I add an internal Mac microphone alongside an external webcam video, then audio input is added successfully, and Line 440 of MultitrackMovieRecorder.swift is called to append the sample buffer.

If I add the microphone integrated into the webcam instead, then I fail at line 412 of MultitrackMovieRecorder.swift, and buffers are progressively added to pendingAudioSampleBuffers. Somehow though, audio is still recorded in this scenario which is confusing.

Lastly, if I add a non AVFoundation video and audio buffer then I get the same results as the webcam audio and video where both are recorded, but buffers are continually added to pendingAudioSampleBuffers.

Any thoughts much appreciated.

Focus hunting on .builtInWideAngleCamera on iPhone 12 pro

Hi Thanks again for the very useful VideoIO, I'm using this in conjunction with Metal Petal.
I'm having a problem with focus hunting currently only on the .builtInWideAngleCamera on an iPhone 12 pro on iOS 14.6.

I'm setting up the wide angle camera using

try self.camera.switchToVideoCaptureDevice(with: .back, preferredDeviceTypes: [.builtInWideAngleCamera])

and setting continuous auto focus with

queue.async{ let device = self.camera.videoDevice! do { try device.lockForConfiguration() if device.isFocusPointOfInterestSupported && device.isFocusModeSupported(.continuousAutoFocus) { device.focusPointOfInterest = focusPoint device.focusMode = .continuousAutoFocus } if device.isSmoothAutoFocusSupported { device.isSmoothAutoFocusEnabled = true } device.unlockForConfiguration() } catch { print(error) } }
using the same setup on the telephoto lens works perfectly but on the WideAngle camera I get the focus hunting. Any clues what might be causing this?

Create CocoaPod

I started using MetalPetal for Video, but has found that VideoComposition is an important part of video processing.

So what do you think about making this library as a part of CocoaPods. Or making subspec for MetalPetal?

Unable to set Frame rate to 60fps for 'vide'/'x420' 3840x2160

Hi
I'm Using VideoIO in conjunction with your terrific Metal Petal and I have a problem.
When I use Camera.Configurator() to setup the camera and then do a search for available formats using
print("Available device formats are (self.camera.videoDevice!.formats)")
it does not return the 'vide'/'x420' 3840x2160 { 1- 60 fps} option in the list of available formats.

I think this is due to the use of the AVCaptureDevice.DiscoverySession in VideoIO Camera.swift.

Is there a way to still use VideoIO to set up the camera device and get access to the other formats?

Thanks and sorry if this is an amateur beginner question.

Toggle front / back camera during capture session?

I'd like to provide functionality for toggling between the front and back camera during a capture session, and ideally, while recording as well. My current thinking is as follows, however the device hangs and the switch never occurs. This code was added directly to class CapturePipeline within the MetalPetal example project.

func toggleSelfie() {
		self.camera.disableVideoDataOutput()
		self.camera.disableAudioDataOutput()
		if !self.selfie {
			self.camera = {
				var configurator = Camera.Configurator()
				configurator.videoConnectionConfigurator = { camera, connection in
					connection.videoOrientation = .landscapeRight
				}
				return Camera(captureSessionPreset: .high, defaultCameraPosition: .front, configurator: configurator)
			}()
			self.toggleVideoMirrored()
		} else {
			self.camera = {
				var configurator = Camera.Configurator()
				configurator.videoConnectionConfigurator = { camera, connection in
					connection.videoOrientation = .landscapeRight
				}
				return Camera(captureSessionPreset: .high, defaultCameraPosition: .back, configurator: configurator)
			}()
			self.toggleVideoMirrored()
		}
		try? self.camera.enableVideoDataOutput(on: queue, delegate: self)
		try? self.camera.enableAudioDataOutput(on: queue, delegate: self)
		self.camera.videoDataOutput?.videoSettings = [kCVPixelBufferPixelFormatTypeKey as String: kCVPixelFormatType_420YpCbCr8BiPlanarFullRange]
	}

I could not find a method to do so within the readme or existing issues. Is this something that is easily attainable? Thanks!

How to switch microphone inputs to stereo?

Hi
Sorry for another beginner question but I'm try to set the microphone input to stereo,
I can see that self.camera.audioDevice returns the default microphone
[iPhone Microphone][com.apple.avfoundation.avcapturedevice.built-in_audio:0]
and that self.camera.audioCaptureConnection?.audioChannels.count is 1

At what point do I access the numberOfChannels and channelLayout? in AudioSettings? to set microphone to stereo?

Segment Duration Zero

Hi!

I'm using a MovieSegmentsRecorder, pretty much following the MetalPetal demo project's CameraViewController but replacing the MovieRecorder with MovieSegmentsRecorder, plus enabling audio recording. I noticed that even thugh func segmentsRecorder(_ recorder: MovieSegmentsRecorder, didUpdateWithDuration totalDuration: TimeInterval) is returning the correct segment duration, when the func segmentsRecorder(_ recorder: MovieSegmentsRecorder, didUpdateSegments segments: [MovieSegment]) callback is called, some Segments will have a duration of 0.0. It appears to be happening at random, and even though they have a duration of 0.0 in the segments array, they are all merged successfully with recorder.mergeAllSegments().

Adding some of the code below:

override func viewDidLoad() {
        super.viewDidLoad()
...
        let configuration = MovieRecorder.Configuration()
        segmentsRecorder = MovieSegmentsRecorder(configuration: configuration, delegate: self, delegateQueue: recorderQueue)
...
}
@IBAction func recordButtonTouchDown(_ sender: Any) {
        if isRecording {
            return
        }

	segmentsRecorder?.startRecording()
        
        self.isRecording = true
    }
@IBAction func recordButtonTouchUp(_ sender: Any) {
		self.segmentsRecorder?.stopRecording()
    }
DispatchQueue.main.async {
			if self.isRecording {
				if let pixelBuffer = try? self.pixelBufferPool?.makePixelBuffer(allocationThreshold: 30) {
					do {
						try self.context.render(outputImage, to: pixelBuffer)
						if let smbf = SampleBufferUtilities.makeSampleBufferByReplacingImageBuffer(of: sampleBuffer, with: pixelBuffer) {
							outputSampleBuffer = smbf
						}
					} catch {
						print("\(error)")
					}
				}
				self.segmentsRecorder?.append(sampleBuffer: outputSampleBuffer)
			}

I've added this extension to deal with audio capture:

extension CameraViewController: AVCaptureAudioDataOutputSampleBufferDelegate {
	func captureOutput(_ output: AVCaptureOutput, didOutput sampleBuffer: CMSampleBuffer, from connection: AVCaptureConnection) {
		DispatchQueue.main.async {
			if self.isRecording {
				self.segmentsRecorder?.append(sampleBuffer: sampleBuffer)
			}
		}
	}
}

And I've added the following MovieSegmentsRecorder delegate methods:

extension CameraViewController: MovieSegmentsRecorderDelegate {
	func segmentsRecorderDidStartRecording(_ recorder: MovieSegmentsRecorder) {

	}

	func segmentsRecorderDidCancelRecording(_ recorder: MovieSegmentsRecorder) {
		recordingStopped()
	}

	func segmentsRecorder(_ recorder: MovieSegmentsRecorder, didFailWithError error: Error) {
		recordingStopped()
	}

	func segmentsRecorderDidStopRecording(_ recorder: MovieSegmentsRecorder) {
		recordingStopped()
	}

	func segmentsRecorder(_ recorder: MovieSegmentsRecorder, didUpdateWithDuration totalDuration: TimeInterval) {
		print(totalDuration)
	}

	func segmentsRecorder(_ recorder: MovieSegmentsRecorder, didUpdateSegments segments: [MovieSegment]) {
		print("segments: \(segments)")
		self.movieSegments = segments

		if segments.count > 5 {
			recorder.mergeAllSegments()
		}
	}

	func segmentsRecorder(_ recorder: MovieSegmentsRecorder, didStopMergingWithURL url: URL) {
		print(url)
		DispatchQueue.main.async {
			self.showPlayerViewController(url: url)
		}
	}
}

Cannot Encode Media on AssetExportSession

Sometimes I'm facing with issue when for input .mp4/.mov file returns error "Cannot Encode Media".

Attaching video examples which cases such kind of error.
Also here it's my configs:
`
func getConfiguration(for asset: AVAsset) -> AssetExportSession.Configuration? {
guard let videoTrack = asset.tracks(withMediaType: .video).first else {
return nil
}

let estimatedSize = __CGSizeApplyAffineTransform(videoTrack.naturalSize, videoTrack.preferredTransform)
let size: CGSize
if abs(estimatedSize.width) > abs(videoTrack.naturalSize.height) {
    size = .init(width: 1280, height: 720)
} else {
    size = .init(width: 720, height: 1280)
}

if (asset as? AVURLAsset)?.url.pathExtension.lowercased() == GlobalConstants.Video.mediaFormatType,
   videoTrack.nominalFrameRate <= Float(GlobalConstants.Video.fps + 1),
   videoTrack.naturalSize == size,
   videoTrack.estimatedDataRate <= Float(GlobalConstants.Video.averageBitRate) {
    return nil
}

var audioSampleRate: Double = 44100
var audioBitrate = 128 * 1000
var numberOfChannels: Int = 2

if let audioTrack = asset.tracks(withMediaType: .audio).first,
   let formatDescription = audioTrack.formatDescriptions.first,
   let basic = CMAudioFormatDescriptionGetStreamBasicDescription(formatDescription as! CMAudioFormatDescription) {
    audioSampleRate = basic.pointee.mSampleRate
    audioBitrate = Int(audioTrack.estimatedDataRate)
    numberOfChannels = Int(basic.pointee.mChannelsPerFrame)
}

return .init(fileType: .mp4,
             videoSettings: .h264(videoSize: size, averageBitRate: min(GlobalConstants.Video.averageBitRate, Int(videoTrack.estimatedDataRate))),
             audioSettings: .aac(channels: numberOfChannels, sampleRate: audioSampleRate, bitRate: audioBitrate))

}
`

Testing device: iPhone Xs, iOS 14.5.1
Pod version: 2.2.0

Image.from.iOS.2.mp4
Image.from.iOS.2.mov

Crash [AVAssetReaderVideoCompositionOutput copyNextSampleBuffer]

I don't have exact steps yet. But I assume that it's when
export and cancel functions called trick and fast.

*** -[AVAssetReaderVideoCompositionOutput copyNextSampleBuffer] cannot copy next sample buffer before adding this output to an instance of AVAssetReader (using -addOutput:) and calling -startReading on that asset reader
AssetExportSession.encode(from:to:)

Please see stack trace below:

Fatal Exception: NSInternalInconsistencyException
0  CoreFoundation                 0x1bab3c300 __exceptionPreprocess
1  libobjc.A.dylib                0x1ba850c1c objc_exception_throw
2  AVFoundation                   0x1c5025430 -[AVAssetReaderOutput _figAssetReaderSampleBufferDidBecomeAvailableForExtractionID:]
3  VideoIO                        0x103738fa4 AssetExportSession.encode(from:to:) + 186 (AssetExportSession.swift:186)
4  VideoIO                        0x103739c34 closure #3 in AssetExportSession.export(progress:completion:) + 256 (AssetExportSession.swift:256)
5  VideoIO                        0x1037392ec thunk for @escaping @callee_guaranteed () -> () (<compiler-generated>)
6  libdispatch.dylib              0x1ba7daec4 _dispatch_call_block_and_release
7  libdispatch.dylib              0x1ba7dc33c _dispatch_client_callout
8  libdispatch.dylib              0x1ba7e285c _dispatch_lane_serial_drain
9  libdispatch.dylib              0x1ba7e3290 _dispatch_lane_invoke
10 libdispatch.dylib              0x1ba7ec928 _dispatch_workloop_worker_thread
11 libsystem_pthread.dylib        0x1ba843714 _pthread_wqthread
12 libsystem_pthread.dylib        0x1ba8499c8 start_wqthread

How to use multiple video assets in this code example.

let context = try! MTIContext(device: MTLCreateSystemDefaultDevice()!)
let handler = MTIAsyncVideoCompositionRequestHandler(context: context, tracks: asset.tracks(withMediaType: .video)) { request in
return FilterGraph.makeImage { output in
request.anySourceImage => filterA => filterB => output
}!
}
let composition = VideoComposition(propertiesOf: asset, compositionRequestHandler: handler.handle(request:))
let playerItem = AVPlayerItem(asset: asset)
playerItem.videoComposition = composition.makeAVVideoComposition()
player.replaceCurrentItem(with: playerItem)
player.play()

AssetExportSession still exist in memory after cancel

During debugging I've observed the following issue.

  1. AssetExportSession.export
  2. AssetExportSession.cancel
  3. maybe repeat 1 and 2 several times.

As result videoInput.requestMediaDataWhenReady(on: self.queue) { [weak self] in line 307 still running, but self = nil.

Timer Label Overlay

Hi!
Thanks for the awesome Utilities!

Could you clarify me please how I can add a timer-label (for ex.: UILabel with a special color and font) on top of the camera , update the text (for ex., every second), add UIImage and eventually record a video?

Synchronized Video, Depth, and Audio Data

Hi!

Am I missing something, or is there no way of adding a synchronized DataOutput with these three data types on the Camera object?

I've been using public func enableSynchronizedVideoAndDepthDataOutput(on queue: DispatchQueue, delegate: AVCaptureDataOutputSynchronizerDelegate), but would really like to add audio capture to it instead of handling it in a separate delegate method.

Is there a reason this isn't done? I'm pretty new to audio/video capture and processing, so I might be missing something.

Thanks!!

CIImage from MTIImage

Hello,
Excuse if this is a really dumb question. I'm trying to use a skin smoothing filter and our codebase use CIImages.
How would I get a CIImage back from the filter below ?

class MetalPetalSkinSmoothingFilter: Filter {

    var name: String = "MetalSkinSmoothing"
    private let filter = MTIHighPassSkinSmoothingFilter()

    func process(image: CIImage) -> CIImage {
        let mtimage = MTIImage(ciImage: image)
        filter.inputImage = mtimage
        return filter.outputImage! // Get a CIImage?
    }
}

Thanks a ton for pointing me to the right direction :)

Video artifacts and reduced video size after export

Hi!

After exporting videos using VideoIO, I am experiencing artifacts on the video, even without applying any filters. Additionally, when using the same codecs (in my case, .hevc), the video size is reduced by half. I am looking for suggestions on how to improve the video quality

Thanks and sorry if this is an amateur beginner question.

var configuration = AssetExportSession.Configuration(
      fileType: fileType,
      videoSettings: .hevc(
        videoSize: renderSize
      ),
      audioSettings: .aac(
        channels: 2,
        sampleRate: 44100,
        bitRate: 128 * 1000
      )
    )
    configuration.videoComposition = nil
    configuration.audioMix = audioMix

    self.exportSession = try AssetExportSession(
      asset: asset,
      outputURL: outputURL,
      configuration: configuration
    )

Xcode 15 Beta compile issues (macOS)

Camera.swift:403 Stored properties cannot be marked unavailable with '@available'
PlayerVideoOutput.swift:63 'CADisplayLink' is only available in macOS 14.0 or newer
PlayerVideoOutput.swift:208 'CADisplayLink' is only available in macOS 14.0 or newer

It is possible it may be desirable to support CADisplayLink on macOS 14 now it is available, but as a minimum we should resolve this in the short term so VideoIO can compile in Xcode 15 Beta.

Frames no longer being appended

Hi @YuAo

Thanks as ever for your thoughts. This is a little more of a question than an issue, although it's possible there does need to be some code changes.

I'm having some issues where a video will be recorded of the correct length, but after a certain amount of time frames stop changing. No errors seem to be thrown (or at least I'm not capturing them).

I'm wondering if this could be an issue with wrapping source time related to the following line in MultitrackMovieRecorder, as opposed to using CMTime.zero?

self.assetWriter.startSession(atSourceTime: presentationTime)

This is the text from the docs for this method:

In the case of the QuickTime movie file format, the first session begins at movie time 0, so a sample
you append with timestamp T plays at movie time (T-startTime). The writer adds samples with
timestamps earlier than the start time to the output file, but they don’t display during playback.

Thanks as ever!

Video overlay on top of live feed

Hi!
So what I'd like to is overlay a short looping video as a texture on top of the live feed previewImage (cgImage) from the CameraFilterView.swift example on MetalPetal, then export the recording later. I've noticed in other threads on here the mention of using PlayerVideoOutput to do so.

Is there a possible simple usage example on how this would work when the live feed is a cgImage rather than an AVPlayer?

Would this be a good way to do it? -

  • Setup the overlay video as a separate MTIImage on top of the previewImage feed so it constantly plays
  • Then after recording, add the overlay video as a track into MTIVideoComposition when showing the player?

I think I'm confused on the implementation methods here though. Just want to live record with a looping MP4 playing on top.

Each time video recording is initiated, there is an error `Video inputs: not ready for media data`

Replace this paragraph with a short description of the incorrect behavior.

Checklist

  • [ x] I've read the README
  • [ x] If possible, I've reproduced the issue using the master branch of this repo
  • [ x] I've searched for existing GitHub issues

Environment

Info Value
MetalPetal Version latest
Integration Method Pod install
Platform & Version iOS 14.7 / macOS 11.5
Device iPhone Xr

Steps to Reproduce

Each time the camera recording session is initiated with call to startRecording

    func startRecording() throws {
        let sessionID = UUID()
        let url = FileManager.default.temporaryDirectory.appendingPathComponent("\(sessionID.uuidString).mp4")
        // record audio when permission is given
        let hasAudio = self.camera.audioDataOutput != nil
        let recorder = try MovieRecorder(url: url, configuration: MovieRecorder.Configuration(hasAudio: hasAudio))
        state.isRecording = true
        queue.async {
            self.recorder = recorder
        }
    }  

I receive a sequence of errors:

Video inputs: not ready for media data, dropping sample buffer (t: 135065.272566061).
Video inputs: not ready for media data, dropping sample buffer (t: 135065.339290207).
Video inputs: not ready for media data, dropping sample buffer (t: 135065.572860042).
Video inputs: not ready for media data, dropping sample buffer (t: 135065.639584103).

The consequence is that the first second of the recorded video is "glitchy" as some of the frames have been dropped. This by itself is ok, but sometimes ( 1 out of 20 times), the error: Video inputs: not ready for media data, dropping sample buffer is repeated for the entire duration of the recording, the result is that no video has been recorded at all.

Expected behavior

Describe what you expect to happen.

Consistently no error on start recording.

Actual behavior

Describe or copy/paste the behavior you observe.

Behavior: fail to record all frames on first second on every record invocation. Moreover, once every 20 invocations or so, the camera fails to record at all.

The entirety of the class I use to record video is reproduced below. It's a loose refactor of CapturePipeline found in the sample project.


import Foundation
import SwiftUI
import MetalPetal
import VideoIO
import VideoToolbox
import AVKit


//MARK:- pipeline for rendering effect in video


class MetalPipeline: NSObject, ObservableObject, AVCaptureVideoDataOutputSampleBufferDelegate, AVCaptureAudioDataOutputSampleBufferDelegate  {
    
    // depth of cache
    var cacheDepth : Int = 3

    // the rendered image with effect layered in
    @Published var previewImage: CGImage?
    
    // buffer to store recent images
    private var imageBuffer : [CGImage] = []
    private var cachedImage : CGImage?
    
    // default backward facing camera pose
    private var cameraPose : AVCaptureDevice.Position = .back
    
    struct Face {
        var bounds: CGRect
    }
        
    struct State {
        var isRecording: Bool = false
        var isVideoMirrored: Bool = false
    }
    
    @Published private var _state: State = State()
    
    private let stateLock = MTILockCreate()
    
    
    private(set) var state: State {
        get {
            stateLock.lock()
            defer {
                stateLock.unlock()
            }
            return _state
        }
        set {
            stateLock.lock()
            defer {
                stateLock.unlock()
            }
            _state = newValue
        }
    }
    
    private let renderContext = try! MTIContext(device: MTLCreateSystemDefaultDevice()!)
    
    private let queue: DispatchQueue = DispatchQueue(label: "org.metalpetal.capture")
    
    private let camera: Camera = {

        var configurator = Camera.Configurator()
        
        configurator.videoConnectionConfigurator = { camera, connection in
            #if os(iOS)
            switch UIApplication.shared.windows.first(where: { $0.windowScene != nil })?.windowScene?.interfaceOrientation {
            case .landscapeLeft:
                connection.videoOrientation = .landscapeLeft
            case .landscapeRight:
                connection.videoOrientation = .landscapeRight
            case .portraitUpsideDown:
                connection.videoOrientation = .portraitUpsideDown
            default:
                connection.videoOrientation = .portrait
            }
            #else
            connection.videoOrientation = .portrait
            #endif
        }
                            
        // @TODO: make sure you're able to change session cam default cam position
        let session_cam = Camera(captureSessionPreset: .hd1280x720, defaultCameraPosition: .back, configurator: configurator)
        return session_cam
    }()
    
    private let imageRenderer = PixelBufferPoolBackedImageRenderer()
    
    
    private var isMetadataOutputEnabled: Bool = false
    
    private var recorder: MovieRecorder?
    
    //MARK:- effects
    
    // filter effects
    enum Effect: String, Identifiable, CaseIterable {

        case polaroidA = "polaroidA"
        
        var id: String { rawValue }
        
        typealias Filter = (MTIImage, [Face]) -> MTIImage
        
        func makeFilter() -> Filter {

            let filter = MTICoreImageUnaryFilter()
            filter.filter = CIFilter(name: "CIPhotoEffectInstant")
            return { image, faces in
                filter.inputImage = image
                return filter.outputImage!
            }
            
            // return { image, faces in image }
        }
    }

    private var filter: Effect.Filter = { image, faces in image }    

    @Published var effect: Effect = .polaroidA {
        didSet {
            let filter = effect.makeFilter()
            queue.async {
                self.filter = filter
            }
        }
    }
    
    private var faces: [Face] = []

    //MARK:- end effect
    
    override init() {
        super.init()
        try? self.camera.enableVideoDataOutput(on: queue, delegate: self)
        try? self.camera.enableAudioDataOutput(on: queue, delegate: self)
        self.camera.videoDataOutput?.videoSettings = [kCVPixelBufferPixelFormatTypeKey as String: kCVPixelFormatType_420YpCbCr8BiPlanarFullRange]

    }
    
    //MARK:- API
    
    func startRunningCaptureSession() {
        queue.async {
            self.camera.startRunningCaptureSession()
        }
    }
    
    func stopRunningCaptureSession() {
        queue.async {
            self.camera.stopRunningCaptureSession()
        }
    }
        
    func startRecording() throws {
        let sessionID = UUID()
        let url = FileManager.default.temporaryDirectory.appendingPathComponent("\(sessionID.uuidString).mp4")
        // record audio when permission is given
        let hasAudio = self.camera.audioDataOutput != nil
        let recorder = try MovieRecorder(url: url, configuration: MovieRecorder.Configuration(hasAudio: hasAudio))
        state.isRecording = true
        queue.async {
            self.recorder = recorder
        }
    }    
    
    func stopRecording(completion: @escaping (Result<URL, Error>) -> Void) {
        if let recorder = recorder {
            recorder.stopRecording(completion: { error in
                self.state.isRecording = false
                if let error = error {
                    completion(.failure(error))
                } else {
                    completion(.success(recorder.url))
                }
            })
            queue.async {
                self.recorder = nil
            }
        } 
    }
    
    // @use: flip the camera
    func flipCamera(){
        switch cameraPose {
        case .front:
            do {
                try self.camera.switchToVideoCaptureDevice(with: .back)
                self.cameraPose = .back
            } catch {
                return
            }

        default:
            do {
                try self.camera.switchToVideoCaptureDevice(with: .front)
                self.cameraPose = .front
            } catch {
                return
            }
        }
    }
    
    //@use: Take picture
    public func snapImage() -> CGImage? {
        if let im = self.previewImage {
            return im
        } else {
            return self.previewImage
        }
    }
    
    
    // @Use: cache the previous frame
    private func cachePreviousImg( _ img: CGImage? ){
        self.cachedImage = img;
    }
    
    //@use: cache multiple images in buffer
    private func cacheInBuffer(){
        if let m = self.previewImage {
            imageBuffer.append(m)
        }
    }
    
    //MARK:- render filtered image delegate

    // @note: this is a delegate fn that gets called. and is outputting rendered image
    func captureOutput(_ output: AVCaptureOutput, didOutput sampleBuffer: CMSampleBuffer, from connection: AVCaptureConnection) {

        guard let formatDescription = sampleBuffer.formatDescription else {
            return
        }
        
        switch formatDescription.mediaType {
        case .audio:
            do {
                try self.recorder?.appendSampleBuffer(sampleBuffer)
            } catch {
                print("captureOutput audio error: ", error)
            }
        case .video:
            guard let pixelBuffer = CMSampleBufferGetImageBuffer(sampleBuffer) else { return }
            do {
                let image = MTIImage(cvPixelBuffer: pixelBuffer, alphaType: .alphaIsOne)
                let filterOutputImage = self.filter(image, faces)
                let outputImage = self.state.isVideoMirrored ? filterOutputImage.oriented(.upMirrored) : filterOutputImage
                let renderOutput = try self.imageRenderer.render(outputImage, using: renderContext)
                try self.recorder?.appendSampleBuffer(SampleBufferUtilities.makeSampleBufferByReplacingImageBuffer(of: sampleBuffer, with: renderOutput.pixelBuffer)!)
                DispatchQueue.main.async {

                    // output rendered image and cache image in buffer
                    self.cachedImage = self.previewImage
                    self.previewImage = renderOutput.cgImage
                    
                }
            } catch {
                print("captureOutput video error: ", error)
            }
        default:
            break
        }
    }
    
}


//MARK:- ios delegates

#if os(iOS)

extension MetalPipeline: AVCaptureMetadataOutputObjectsDelegate {
    func metadataOutput(_ output: AVCaptureMetadataOutput, didOutput metadataObjects: [AVMetadataObject], from connection: AVCaptureConnection) {
        var faces = [Face]()
        for faceMetadataObject in metadataObjects.compactMap({ $0 as? AVMetadataFaceObject}) {
            if let rect = self.camera.videoDataOutput?.outputRectConverted(fromMetadataOutputRect: faceMetadataObject.bounds) {
                faces.append(Face(bounds: rect.insetBy(dx: -rect.width/4, dy: -rect.height/4)))
            }
        }
        self.faces = faces
    }
}

#endif


Recommend Projects

  • React photo React

    A declarative, efficient, and flexible JavaScript library for building user interfaces.

  • Vue.js photo Vue.js

    🖖 Vue.js is a progressive, incrementally-adoptable JavaScript framework for building UI on the web.

  • Typescript photo Typescript

    TypeScript is a superset of JavaScript that compiles to clean JavaScript output.

  • TensorFlow photo TensorFlow

    An Open Source Machine Learning Framework for Everyone

  • Django photo Django

    The Web framework for perfectionists with deadlines.

  • D3 photo D3

    Bring data to life with SVG, Canvas and HTML. 📊📈🎉

Recommend Topics

  • javascript

    JavaScript (JS) is a lightweight interpreted programming language with first-class functions.

  • web

    Some thing interesting about web. New door for the world.

  • server

    A server is a program made to process requests and deliver data to clients.

  • Machine learning

    Machine learning is a way of modeling and interpreting data that allows a piece of software to respond intelligently.

  • Game

    Some thing interesting about game, make everyone happy.

Recommend Org

  • Facebook photo Facebook

    We are working to build community through open source technology. NB: members must have two-factor auth.

  • Microsoft photo Microsoft

    Open source projects and samples from Microsoft.

  • Google photo Google

    Google ❤️ Open Source for everyone.

  • D3 photo D3

    Data-Driven Documents codes.