


![]()


![]()

Investment research for everyone.
≪ ROADMAP
·
FEATURES »
Report Bug
·
Suggest Improvement
·
Request Feature
How it started:
Gamestonk Terminal is an awesome stock and crypto market terminal that has been developed for fun, while I saw my GME shares tanking. But hey, I like the stock 💎🙌.
How it's going:
Gamestonk Terminal provides a modern Python-based integrated environment for investment research, that allows an average joe retail trader to leverage state-of-the-art Data Science and Machine Learning technologies.
As a modern Python-based environment, GamestonkTerminal opens access to numerous Python data libraries in Data Science (Pandas, Numpy, Scipy, Jupyter), Machine Learning (Pytorch, Tensorflow, Sklearn, Flair), and Data Acquisition (Beautiful Soup, and numerous third-party APIs).
There are currently two main options to install the terminal:
- using Docker: recommended if you just want to use the terminal
- using Python: recommended if you want to develop new features
- using the Docker web UI: recommended if you want to deploy the web UI for users to access over your LAN
First step in both options is to star the project

If you want to install the terminal using Python ignore the Docker section and jump to Local Install - Anaconda and Python section.
-
Make sure docker desktop is installed. Install links can be found here. To confirm that your docker desktop is downloaded and running, open a command prompt or terminal and enter
docker info. If you get the following you are not running the docker desktop:Server: ERROR: Cannot connect to the Docker daemon at unix:///var/run/docker.sock. Is the docker daemon running?Open the docker desktop app in this case.
-
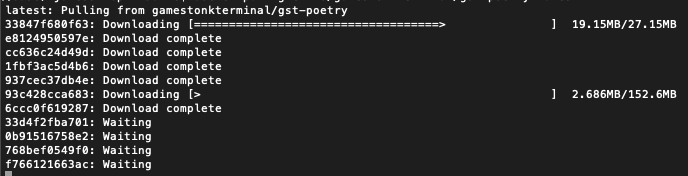
Download the latest docker image.
docker pull ghcr.io/gamestonkterminal/gst-poetry:latest
Upon running this the first time, you should see the various layers downloading (note the random series of letters numbers will vary). The first time this is run, it will take a few minutes. Subsequent updates will be much faster, as the changes will be in the MB instead of GB.
Once the download is complete, confirm that the image has been created by doing
docker images. You should see something similar toREPOSITORY TAG IMAGE ID CREATED SIZE ghcr.io/gamestonkterminal/gst-poetry latest e2bbeebcc73c 42 hours ago 2.02GB -
Run a container
You are now ready to run the terminal (every time you want to use the terminal you need to run this command):
docker run -it --rm ghcr.io/gamestonkterminal/gst-poetry:latestThis will open up the terminal in your command prompt or terminal. Note that this has provided now environment file, so you will not be able to view plots or use keys at this stage.
At this point, you should be able to use the majority of the features using Docker. To read more on adding the environment keys and how to configure your X-server to show plots, hop over to the Advanced Docker Setup.
This installation type supports both Windows and Unix systems (Linux + MacOS). However, on Windows it can become messy so it is easier to use Windows Subsystem Linux (WSL) on this operating system. WSL emulates a Linux machine inside your Windows system.
If you are using macOS or other Linux operating systems you can jump the next section Installing the terminal.
- Ensure Docker is installed.
- Navigate to the location of the Dockerfile in the repo (
cd gamestonk_terminal_web) - Ensure the launcher is executable with
chmod +x ./launch - Launch it with
./launch. If you get a permission denied error, dosudo ./launchinstead - Once it's launched, you will be able to access it by going to
http://host-ip:8080in a browser, orhttp://localhost:8080if you are running it on your local machine.
For API keys, create the setenv file if it doesn't already exist.
It will automatically get created on the first launch, and won't get committed to Git because it is on the .gitignore.
Set the API keys as explained here.
Once you've put the API keys in that file, re-run the launch script, and it will use your API keys.
There are a few things that still don't work, and you can see what works and what doesn't here.
If you are using Windows you first you need to install WSL. The process is simple and a tutorial can be found here. Once you reach the section Update Linux on that tutorial, you should have a linux machine installed and can proceed to the next steps.
Since WSL installation is headless by default (i.e., you have only access to a terminal running a linux distribution) you need some extra steps to be able to visualize the charts produced by the terminal (more detailed tutorial here):
-
Dynamically export the DISPLAY environment variable in WSL2:
# add to the end of ~/.bashrc file
export DISPLAY=$(cat /etc/resolv.conf | grep nameserver | awk '{print $2}'):0
# source the file
source ~/.bashrc
-
Download and install VcXsrv
-
When running the program is important to check "Disable access control"
After this, VcXsrv should be running successfully and we can proceed to terminal installation.
Although we extremely recommend using WSL to run the terminal on windows, if you don't want or can't for some reason, you can try install the terminal directly on Windows without WSL. If you'd like to see a video recording of the installation on Windows without WSL, @JohnnyDankseed has made one available here.
These steps are common in all operating systems (Windows with or without WSL, MacOS or Linux).
This project supports Python 3.7, 3.8 and 3.9.
Our current recommendation is to use this project with Anaconda's Python distribution - either full Anaconda3 Latest or Miniconda3 Latest. Several features in this project utilize Machine Learning. Machine Learning Python dependencies are optional. If you decided to add Machine Learning features at a later point, you will likely have better user experience with Anaconda's Python distribution.
-
Install Anaconda (It's on the AUR as anaconda or miniconda3!)
-
Follow the instructions specified on the website above:
- If you are using macOS click Installing on MacOS
- If you are using WSL or Linux click Installing on Linux
- If you are using Windows click Installing on Windows. ONLY REQUIRED IF NOT USING WSL, you also need to install/update Microsoft C++ Build Tools from here: https://visualstudio.microsoft.com/visual-cpp-build-tools/
-
After following the steps, confirm that you have it by opening a terminal and running:
conda -V. The output should be something along the lines of:conda 4.9.2
-
-
Install git
conda install -c anaconda git
-
Clone the Project
- Via HTTPS:
git clone https://github.com/GamestonkTerminal/GamestonkTerminal.git - via SSH:
git clone [email protected]:GamestonkTerminal/GamestonkTerminal.git
- Via HTTPS:
-
Navigate into the project's folder
cd GamestonkTerminal/ -
Create Environment
You can name the environment whatever you want. Although you could use names such as:
welikethestock,thisisthewayordiamondhands, we recommend something simple and intuitive likegst. This is because this name will be used from now onwards.conda env create -n gst --file build/conda/conda-3-8-env.yaml
-
Activate the virtual environment
conda activate gst
Note: At the end, you can deactivate it with:
conda deactivate. -
Install poetry dependencies
poetry install
If you are having trouble with Poetry (e.g. on a Windows system), simply install requirements.txt with pip
pip install -r requirements.txt
-
You're ready to Gamestonk it!
python terminal.py
-
(Windows - Optional and only if you are not using WSL) Speeding up opening process in the future
After you've installed Gamestonk Terminal, you'll find a file named "Gamestonk Terminal.bat". You can use this file to open Gamestonk Terminal quicker. This file can be moved to your desktop if you'd like. If you run into issues while trying to run the batch file. If you run into issues with the batch files, edit the file and check to see if the directories match up. This file assumes you used the default directories when installing.
-
Jupyter Lab (Optional. Early alpha). User the Terminal from Jupyter Lab
You can install Jupyter Lab extensions that help you manage settings and launch the terminal in a JL bash console using the commands in the jupyterlab/README.md
NOTE: When you close the terminal and re-open it, the only command you need to re-call is conda activate gst
before you call python terminal.py again.
TROUBLESHOOT: If you are having troubles to install, check our newest troubleshoot page. You can also reach for help on our discord.
If you are an advanced user and use other Python distributions, we have several requirements.txt documents that you can pick from to download project dependencies.
If you are using conda instead of build/conda/conda-3-8-env.yaml configuration file in Step 5, use build/conda/conda-3-8-env-full.
Note: The libraries specified in the requirements.txt file have been tested and work for the purpose of this project, however, these may be older versions. Hence, it is recommended for the user to set up a virtual python environment prior to installing these. This allows to keep dependencies required by different projects in separate places.
If you would like to use optional Machine Learning features:
- Update your feature_flags.py with:
ENABLE_PREDICT = os.getenv("GTFF_ENABLE_PREDICT") or True- Install optional ML features dependencies:
poetry install -E predictionThe terminal is constantly being updated with new features and bug fixes, hence, for your terminal to be update, you can run:
git pullto get the latest changes.
If this fails due to the fact that you had modified some python files, and there's a conflict with the updates, you can use:
git stashThen, re-run poetry install or pip install -r requirements.txt to get any new dependencies.
Once installation is finished, you're ready to gamestonk.
If you stashed your changes previously, you can un-stash them with:
git stash popThe project is build around several different API calls, whether it is to access historical data or financials. The table below shows the ones where a key is necessary. The environment variable names are shown explicitly, for the variable name in the code one just needs to remove the "GT_", this can be found in config_terminal.py.
| Website | Environment Variables |
|---|---|
| Alpha Vantage | GT_API_KEY_ALPHAVANTAGE |
| Binance | GT_API_BINANCE_KEY GT_API_BINANCE_SECRET |
| CoinMarketCap | GT_API_CMC_KEY |
| DEGIRO | GT_DG_USERNAME GT_DG_PASSWORD GT_DG_TOTP_SECRET |
| FRED | GT_API_FRED_KEY |
| Financial Modeling Prep | GT_API_KEY_FINANCIALMODELINGPREP |
| Finhub | GT_API_FINNHUB_KEY |
| News | GT_API_NEWS_TOKEN |
| Oanda | GT_OANDA_TOKEN GT_OANDA_ACCOUNT |
| Polygon | GT_API_POLYGON_KEY |
| Quandl | GT_API_KEY_QUANDL |
| GT_API_REDDIT_CLIENT_ID GT_API_REDDIT_CLIENT_SECRET GT_API_REDDIT_USERNAME GT_API_REDDIT_USER_AGENT GT_API_REDDIT_PASSWORD |
|
| SentimentInvestor | GT_API_SENTIMENTINVESTOR_TOKEN GT_API_SENTIMENTINVESTOR_KEY |
| Tradier | GT_TRADIER_TOKEN |
| GT_API_TWITTER_KEY GT_API_TWITTER_SECRET_KEY GT_API_TWITTER_BEARER_TOKEN |
|
| Coinbase | GT_API_COINBASE_KEY GT_API_COINBASE_SECRET GT_API_COINBASE_PASS_PHRASE |
| Whale Alert | GT_API_WHALE_ALERT_KEY |
| Ethplorer | GT_API_ETHPLORER_KEY |
| Cryptopanic | GT_API_CRYPTO_PANIC_KEY |
| Glassnode | GT_API_GLASSNODE_KEY |
| Coinglass | GT_API_COINGLASS_KEY |
| BitQuery | GT_API_BITQUERY_KEY |
Example:
export GT_API_REDDIT_USERNAME=SexyYearEnvironment variables can also be set in a .env file at the top of the repo. This file is ignored by git so your API
keys will stay secret. The above example stored in .env would be:
GT_API_REDDIT_USERNAME=SexyYearNote that the GT_API_REDDIT_USER_AGENT is the name of the script that you set when obtained the Reddit API key.
Note that it is not necessary to have a valid Alpha Vantage key to get daily OHLC values.
There are 3 main ways of contributing to this project.
For a 1h coding session where the architecture of the repo is explained while a new feature is added, check https://www.youtube.com/watch?v=9BMI9cleTTg.
Become a Contributor 🦍
Recommended if you bought the dip, and the share price keeps dipping. You may as well keep yourself busy while stonks go up.
- Fork the Project
- Create your Feature Branch (
git checkout -b feature/AmazingFeature) - Install the pre-commit hooks by running:
pre-commit install. Any time you commit a change, linters will be run automatically. On changes, you will have to re-commit. - Commit your Changes (
git commit -m 'Add some AmazingFeature') - Push to your Branch (
git push origin feature/AmazingFeature) - Open a Pull Request
Become a Karen 🤷
Recommended if you adopted a strategy of buying high and selling low.
We are interested in your view on what sort of features would make you buy even higher and selling even lower.
Also, if somehow you're sitting in several mils due to this terminal, don't forget to report a bug so that the team can fix, and keep the old ways.
Join the 🙌 💎 Gang
If red is your favorite color, and you never sell for a loss.
Welcome to the club, and feel free to support the developers behind this amazing open-source project.
Distributed under the MIT License. See LICENSE for more information.
"A few things I am not. I am not a cat. I am not an institutional investor, nor am I a hedge fund. I do not have clients and I do not provide personalized investment advice for fees or commissions." DFV
Trading in financial instruments involves high risks including the risk of losing some, or all, of your investment amount, and may not be suitable for all investors. Before deciding to trade in financial instrument you should be fully informed of the risks and costs associated with trading the financial markets, carefully consider your investment objectives, level of experience, and risk appetite, and seek professional advice where needed. The data contained in GST is not necessarily accurate. GST and any provider of the data contained in this website will not accept liability for any loss or damage as a result of your trading, or your reliance on the information displayed.
Didier Rodrigues Lopes - [email protected]
Artem Veremy - [email protected]
James Maslek - [email protected]
Feel free to share loss porn, memes or any questions at:
- Discord: https://discord.gg/Up2QGbMKHY
- Twitter: @gamestonkt
- VICE article - Gamestonk Terminal Is a DIY, Meme Stock Version of Bloomberg Terminal
- Daily Fintech article - Never underestimate Bloomberg, but here are 5 reasons why the Gamestonk Terminal is a contender
- HackerNews - Show HN: Can’t afford Bloomberg Terminal? No prob, I built the next best thing
- Reddit r/algotrading - Gamestonk Terminal: The next best thing after Bloomberg Terminal.
- Reddit r/Python - Gamestonk Terminal: The equivalent to an open-source python Bloomberg Terminal.
- Reddit r/Superstonk - Move over Bloomberg Terminal, here comes Gamestonk Terminal
- Spotlight: Didier Lopes. Creator of Gamestonk Terminal
- Reddit r/Superstonk - Gamestonk Terminal - We are very much alive
- Medium- Gamestonk Terminal. Can't Stop, Won't Stop
- Gamestonk Terminal: UX/UI >> Features


