这是 JPush REST API 的 Java 版本封装开发包,是由极光推送官方提供的,一般支持最新的 API 功能。
对应的 REST API 文档:REST API - Push, REST API - Report.
本开发包 Javadoc:API Docs
版本更新:Release页面。下载更新请到这里。
非常欢迎各位开发者提交代码,贡献一份力量,review过有效的代码将会合入本项目。
将下边的依赖条件放到你项目的 maven pom.xml 文件里。v3.3.10 为例,最新版本请看Release页面
<dependency>
    <groupId>cn.jpush.api</groupId>
    <artifactId>jpush-client</artifactId>
    <version>3.3.10</version>
</dependency>请到 Release页面下载相应版本的发布包。
- jiguang-java-client-common / 极光 Java client 的公共封装开发包,必须依赖,v1.1.4 为例,查看最新版本
- slf4j / log4j (Logger)
- gson (Google JSON Utils)
其中 slf4j 可以与 logback, log4j, commons-logging 等日志框架一起工作,可根据你的需要配置使用。
如果使用 Maven 构建项目,则需要在你的项目 pom.xml 里增加:
    <dependency>
        <groupId>cn.jpush.api</groupId>
        <artifactId>jiguang-common</artifactId>
        <version>1.1.4</version>
    </dependency>
    <dependency>
        <groupId>io.netty</groupId>
        <artifactId>netty-all</artifactId>
        <version>4.1.6.Final</version>
        <scope>compile</scope>
    </dependency>
    <dependency>
        <groupId>com.google.code.gson</groupId>
        <artifactId>gson</artifactId>
        <version>2.3</version>
    </dependency>
    <dependency>
        <groupId>org.slf4j</groupId>
        <artifactId>slf4j-api</artifactId>
        <version>1.7.7</version>
    </dependency>

    <!-- For log4j -->
    <dependency>
        <groupId>org.slf4j</groupId>
        <artifactId>slf4j-log4j12</artifactId>
        <version>1.7.7</version>
    </dependency>
    <dependency>
        <groupId>log4j</groupId>
        <artifactId>log4j</artifactId>
        <version>1.2.17</version>
    </dependency>
如果不使用 Maven 构建项目,则项目 libs/ 目录下有依赖的 jar 可复制到你的项目里去。
如果开发者想基于本项目做一些扩展的开发,或者想了解本项目源码,可以参考此章,否则可略过此章。
- 可以采用
git clone https://github.com/jpush/jpush-api-java-client.git jpush-api-src命令下载源码 - 如果不使用git,请到Release页面下载源码包并解压
- 采用eclipse导入下载的源码工程,推荐采用maven的方式,方便依赖包的管理
- 假如采用导入普通项目的方式,项目报错,检查Build Path,Libraries
- 依赖jar包都在libs目录下可以找到,没有加入的请添加到Build Path,Libraries
- 默认采用了log4j做日志框架,开发者可根据自己需求替换logback、commons-logging等日志框架
- 极个别情况下,如果test目录报错,请手动添加test的依赖jar包mockwebserver-2.0.0.jar、okhttp-2.0.0.jar、okio-1.0.0.jar
- 开发者需要注意,将本项目的编码格式设置为UTF-8
可以用 Eclipse 类 IDE 导出 jar 包。建议直接使用 maven,执行命令:
mvn package
在项目目录下执行命令:
mvn test
如果使用 NettyHttpClient(v3.2.15 版本新增),需要在响应返回后手动调用一下 NettyHttpClient 中的 close 方法,否则进程不会退出。代码示例:
...
try {
    PushResult result = jpushClient.sendPush(payload);
    LOG.info("Got result - " + result);
    Thread.sleep(5000);
    // 请求结束后,调用 NettyHttpClient 中的 close 方法,否则进程不会退出。
    jpushClient.close();
} catch(InterruptedException e) {
    e.printStackTrace();
}
3.2.17 版本后,在 PushClient 中添加了 setHttpClient(IHttpClient client) 方法,用户可以自由切换 ApacheHttpClient,NettyHttpClient 或是 NativeHttpClient。
以下片断来自项目代码里的文件:example / cn.jpush.api.examples.PushExample
    JPushClient jpushClient = new JPushClient(MASTER_SECRET, APP_KEY, null, ClientConfig.getInstance());

    // For push, all you need do is to build PushPayload object.
    PushPayload payload = buildPushObject_all_all_alert();

    try {
        PushResult result = jpushClient.sendPush(payload);
        LOG.info("Got result - " + result);

    } catch (APIConnectionException e) {
        // Connection error, should retry later
        LOG.error("Connection error, should retry later", e);

    } catch (APIRequestException e) {
        // Should review the error, and fix the request
        LOG.error("Should review the error, and fix the request", e);
        LOG.info("HTTP Status: " + e.getStatus());
        LOG.info("Error Code: " + e.getErrorCode());
        LOG.info("Error Message: " + e.getErrorMessage());
    }
进行推送的关键在于构建一个 PushPayload 对象。以下示例一般的构建对象的用法。
- 快捷地构建推送对象:所有平台,所有设备,内容为 ALERT 的通知。
	public static PushPayload buildPushObject_all_all_alert() {
	    return PushPayload.alertAll(ALERT);
}- 构建推送对象:所有平台,推送目标是别名为 "alias1",通知内容为 ALERT。
    public static PushPayload buildPushObject_all_alias_alert() {
        return PushPayload.newBuilder()
                .setPlatform(Platform.all())
                .setAudience(Audience.alias("alias1"))
                .setNotification(Notification.alert(ALERT))
                .build();
}- 构建推送对象:平台是 Android,目标是 tag 为 "tag1" 的设备,内容是 Android 通知 ALERT,并且标题为 TITLE。
    public static PushPayload buildPushObject_android_tag_alertWithTitle() {
        return PushPayload.newBuilder()
                .setPlatform(Platform.android())
                .setAudience(Audience.tag("tag1"))
                .setNotification(Notification.android(ALERT, TITLE, null))
                .build();
}- 构建推送对象:平台是 iOS,推送目标是 "tag1", "tag_all" 的交集,推送内容同时包括通知与消息 - 通知信息是 ALERT,角标数字为 5,通知声音为 "happy",并且附加字段 from = "JPush";消息内容是 MSG_CONTENT。通知是 APNs 推送通道的,消息是 JPush 应用内消息通道的。APNs 的推送环境是“生产”(如果不显式设置的话,Library 会默认指定为开发)
    public static PushPayload buildPushObject_ios_tagAnd_alertWithExtrasAndMessage() {
        return PushPayload.newBuilder()
                .setPlatform(Platform.ios())
                .setAudience(Audience.tag_and("tag1", "tag_all"))
                .setNotification(Notification.newBuilder()
                        .addPlatformNotification(IosNotification.newBuilder()
                                .setAlert(ALERT)
                                .setBadge(5)
                                .setSound("happy")
                                .addExtra("from", "JPush")
                                .build())
                        .build())
                 .setMessage(Message.content(MSG_CONTENT))
                 .setOptions(Options.newBuilder()
                         .setApnsProduction(true)
                         .build())
                 .build();
}- 构建推送对象:平台是 Andorid 与 iOS,推送目标是 ("tag1" 与 "tag2" 的并集)交("alias1" 与 "alias2" 的并集),推送内容是 - 内容为 MSG_CONTENT 的消息,并且附加字段 from = JPush。
    public static PushPayload buildPushObject_ios_audienceMore_messageWithExtras() {
        return PushPayload.newBuilder()
                .setPlatform(Platform.android_ios())
                .setAudience(Audience.newBuilder()
                        .addAudienceTarget(AudienceTarget.tag("tag1", "tag2"))
                        .addAudienceTarget(AudienceTarget.alias("alias1", "alias2"))
                        .build())
                .setMessage(Message.newBuilder()
                        .setMsgContent(MSG_CONTENT)
                        .addExtra("from", "JPush")
                        .build())
                .build();
}- 构建推送对象:推送内容包含SMS信息
    public static void testSendWithSMS() {
        JPushClient jpushClient = new JPushClient(masterSecret, appKey);
        try {
            SMS sms = SMS.newBuilder()
            		.setDelayTime(1000)
            		.setTempID(2000)
            		.addPara("Test", 1)
            		.build();
            PushResult result = jpushClient.sendAndroidMessageWithAlias("Test SMS", "test sms", sms, "alias1");
            LOG.info("Got result - " + result);
        } catch (APIConnectionException e) {
            LOG.error("Connection error. Should retry later. ", e);
        } catch (APIRequestException e) {
            LOG.error("Error response from JPush server. Should review and fix it. ", e);
            LOG.info("HTTP Status: " + e.getStatus());
            LOG.info("Error Code: " + e.getErrorCode());
            LOG.info("Error Message: " + e.getErrorMessage());
        }
}以下片断来自项目代码里的文件:example / cn.jpush.api.examples.ReportsExample
    JPushClient jpushClient = new JPushClient(masterSecret, appKey);
    try {
        ReceivedsResult result = jpushClient.getReportReceiveds("1942377665");
        LOG.debug("Got result - " + result);

    } catch (APIConnectionException e) {
        // Connection error, should retry later
        LOG.error("Connection error, should retry later", e);

    } catch (APIRequestException e) {
        // Should review the error, and fix the request
        LOG.error("Should review the error, and fix the request", e);
        LOG.info("HTTP Status: " + e.getStatus());
        LOG.info("Error Code: " + e.getErrorCode());
        LOG.info("Error Message: " + e.getErrorMessage());
}以下片断来自项目代码里的文件:example / cn.jpush.api.examples.DeviceExample
- 获取Tag Alias
    try {
        TagAliasResult result = jpushClient.getDeviceTagAlias(REGISTRATION_ID1);

        LOG.info(result.alias);
        LOG.info(result.tags.toString());
    } catch (APIConnectionException e) {
        LOG.error("Connection error. Should retry later. ", e);
    } catch (APIRequestException e) {
        LOG.error("Error response from JPush server. Should review and fix it. ", e);
        LOG.info("HTTP Status: " + e.getStatus());
        LOG.info("Error Code: " + e.getErrorCode());
        LOG.info("Error Message: " + e.getErrorMessage());
}- 绑定手机号
    try {
        DefaultResult result =  jpushClient.bindMobile(REGISTRATION_ID1, "13000000000");
        LOG.info("Got result " + result);
    } catch (APIConnectionException e) {
        LOG.error("Connection error. Should retry later. ", e);
    } catch (APIRequestException e) {
        LOG.error("Error response from JPush server. Should review and fix it. ", e);
        LOG.info("HTTP Status: " + e.getStatus());
        LOG.info("Error Code: " + e.getErrorCode());
        LOG.info("Error Message: " + e.getErrorMessage());
}以下片断来自项目代码里的文件:example / cn.jpush.api.examples.ScheduleExample
    JPushClient jpushClient = new JPushClient(masterSecret, appKey);
    String name = "test_schedule_example";
    String time = "2016-07-30 12:30:25";
    PushPayload push = PushPayload.alertAll("test schedule example.");
    try {
        ScheduleResult result = jpushClient.createSingleSchedule(name, time, push);
        LOG.info("schedule result is " + result);
    } catch (APIConnectionException e) {
        LOG.error("Connection error. Should retry later. ", e);
    } catch (APIRequestException e) {
        LOG.error("Error response from JPush server. Should review and fix it. ", e);
        LOG.info("HTTP Status: " + e.getStatus());
        LOG.info("Error Code: " + e.getErrorCode());
        LOG.info("Error Message: " + e.getErrorMessage());
}以下片断来自项目代码里面的文件:example / cn.jpush.api.examples.ClientExample
- 配置的SSLVersion表示指定至少支持的协议版本,也可能支持其他多个协议版本,最终支持的协议版本列表取决于JRE和运行环境
    public static void testCustomClient() {
		ClientConfig config = ClientConfig.getInstance();
        config.setMaxRetryTimes(5);
        config.setConnectionTimeout(10 * 1000);	// 10 seconds
        config.setSSLVersion("TLSv1.1");		// JPush server supports SSLv3, TLSv1, TLSv1.1, TLSv1.2

        JPushClient jPushClient = new JPushClient(masterSecret, appKey, null, config);
	}

    public static void testCustomPushClient() {
        ClientConfig config = ClientConfig.getInstance();
        config.setApnsProduction(false); 	// development env
        config.setTimeToLive(60 * 60 * 24); // one day

    //	config.setGlobalPushSetting(false, 60 * 60 * 24); // development env, one day

        JPushClient jPushClient = new JPushClient(masterSecret, appKey, null, config); 	// JPush client

    //	PushClient pushClient = new PushClient(masterSecret, appKey, null, config); 	// push client only

}Weblogic在使用jpush-api-java-client时需要注意的一些事项。
本文档基于weblogic 10.3.6 版本,12版本请自己对应配置路径。
极个别时候,证书会有版本升级等情况,所以一定要验证当前使用的证书和官方证书的指纹是否一致。
Weblogic console 设置
- 【主机名验证】设置为无,否则默认使用weblogic.security.SSL.HostnameVerifier进行主机名验证,导致Hostname验证失败
- 配置路径 Weblogic Console > 服务器设置 > SSL > 高级 > 主机名验证
- 选择【使用 JSSE SSL】,因为Weblogic默认的加密算法和Java标准的加密算法不一样
- 配置路径 Weblogic Console > 服务器设置 > SSL > 高级 > 使用 JSSE SSL
证书配置
- 检查Weblogic使用的信任密钥库的位置
- 默认使用的文件是 JRE目录下面的 jre\lib\security\cacerts 文件
- 有些开发者可能会改为自定义的信任密钥库
- 检查对应的信任库是否包含了Geo Trust的根证书或者Geo Trust SSL二级 证书
- 举例:keytool -list -keystore cacerts
- 此过程需要信任库的密码(默认changeit)
- 如果包含这两个证书中任意一个,调用JPush接口都可以调用通过
- 如果信任库不包含上述证书,需要导入公钥到对应的信任库
- 打开jpush.cn,导出公钥(可以是Geo Trust根证书、Geo Trust SSL 或者 *.jpush.cn 三个任意一个,具体导出方法请百度)
- 将导出的公钥证书导入到步骤1对应的信任库
- 举例:keytool -import -alias geotrustssl -keystore cacerts -file GeoTrustSSL.cer
- 此过程需要信任库的密码(默认changeit)
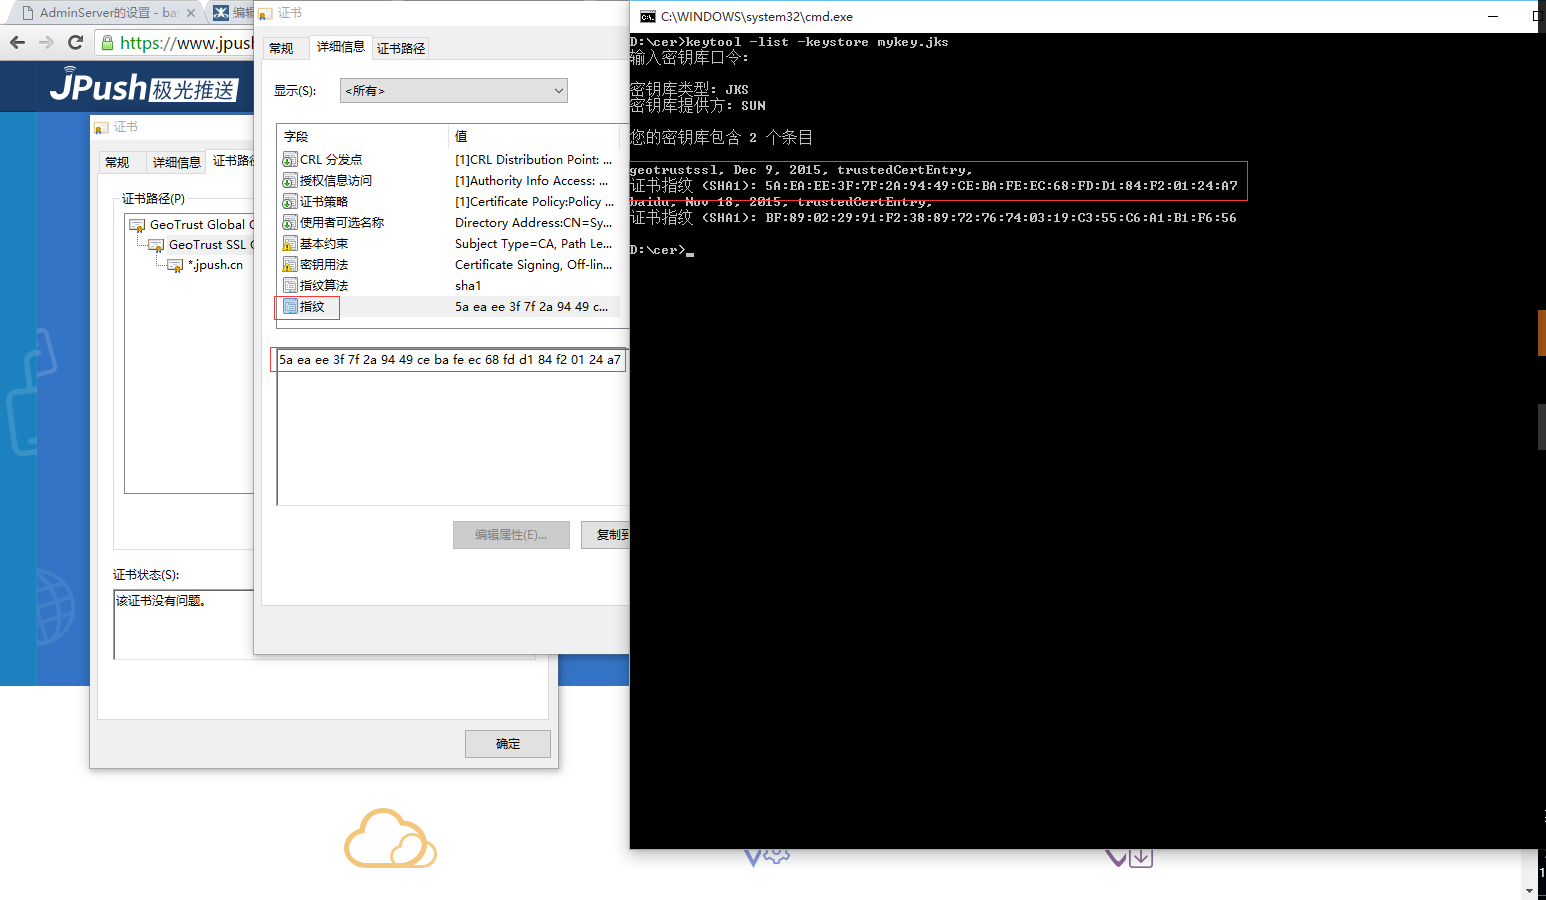
证书对比方式
- 执行 keytool -list -keystore mykey.jks 命令列出信任库里的所有公钥,观察对应证书的指纹
- 检查官网证书,观察对应证书的指纹
- 比较两个指纹是否一致,如下图所示