
A long, long time ago there was a hashtag trending on Instagram titled #ViewFroMyWindow. At a time when Instagram was all about showing your most polished side, #ViewFroMyWindow was all about showing just whatever you were looking at. Your view might be the beach, or it might be a car on blocks, it might be beautiful, it might be banal ... the point wasn't to impress with your amazing view, the point was to feel closer to people by seeing the world through their eyes.
When I started thinking about a project I could use in some online workshops, I somehow wandered back to #ViewFroMyWindow. I got to thinking about how people in this workshop would be spread across the world, in condos, in houses, in cities and in the countryside. Sometimes we'll know each other's names, sometimes they'll just be anon and a photo. But if we each share our view, we might end up feeling just a little bit closer.
My goal with this project is to teach the workshop multiple times, each time using the same code base so that our community of students grows and we each keep sharing our views.
I will continue hosting the UI on my site at https://myview.luke.gallery, however as the data exists in Bundlr and on Lens, anyone can build a new UI that pulls from the same dataset. Anyone can add new features, anyone can experiment and take it in new directions.
What follows is a mini-tutorial, a written guide designed to accompany my physical presentations. The guide is very focused and covers using Bundlr and using Lens. It intentionally skips over React basics, Tailwind basics, and all that jazz.
This project uses the Bundlr SDK to handle uploads to Bundlr and the React hooks for Lens to handle uploads to Lens. As we're using the React hooks, we don't have to write any GraphQL ourselves ... it's way easier this way. Way easier.
When working with React, the provider pattern allows you to easily share data between components. You wrap a parent component with a provider tag set and then that parent and any of its children can access the data exposed by the provider. In our case, we're going to use three providers:
- wagmi: To access the wagmi hooks
- RainbowKit: For wallet connect
- Lens: For lens functionality
All of our interactions with Lens will be via the React hooks, and by wrapping our main parent components with the Lens provider, all of those React hooks will have the right configuration options.
All three providers are configured using these values:
const { chains, provider, webSocketProvider } = configureChains(
	[polygonMumbai, polygon],
	[publicProvider()],
);

const { connectors } = getDefaultWallets({
	appName: "View From My Window",
	chains,
});

const wagmiClient = createClient({
	autoConnect: true,
	connectors,
	provider,
});

// By adding sources: ["viewfrommywindow"] to the config,
// I automatically restrict React hook queries to my app only
const lensConfig = {
	bindings: wagmiBindings(),
	environment: staging,
	sources: ["viewfrommywindow"],
	storage: localStorage(),
};
And then we wrap our components in the providers as follows:
export default function App() {
	return (
		<WagmiConfig client={wagmiClient}>
			<RainbowKitProvider chains={chains}>
				<LensProvider config={lensConfig}>
					...
					<MAIN-COMPONENTS />
					...
				</LensProvider>
			</RainbowKitProvider>
		</WagmiConfig>
	);
}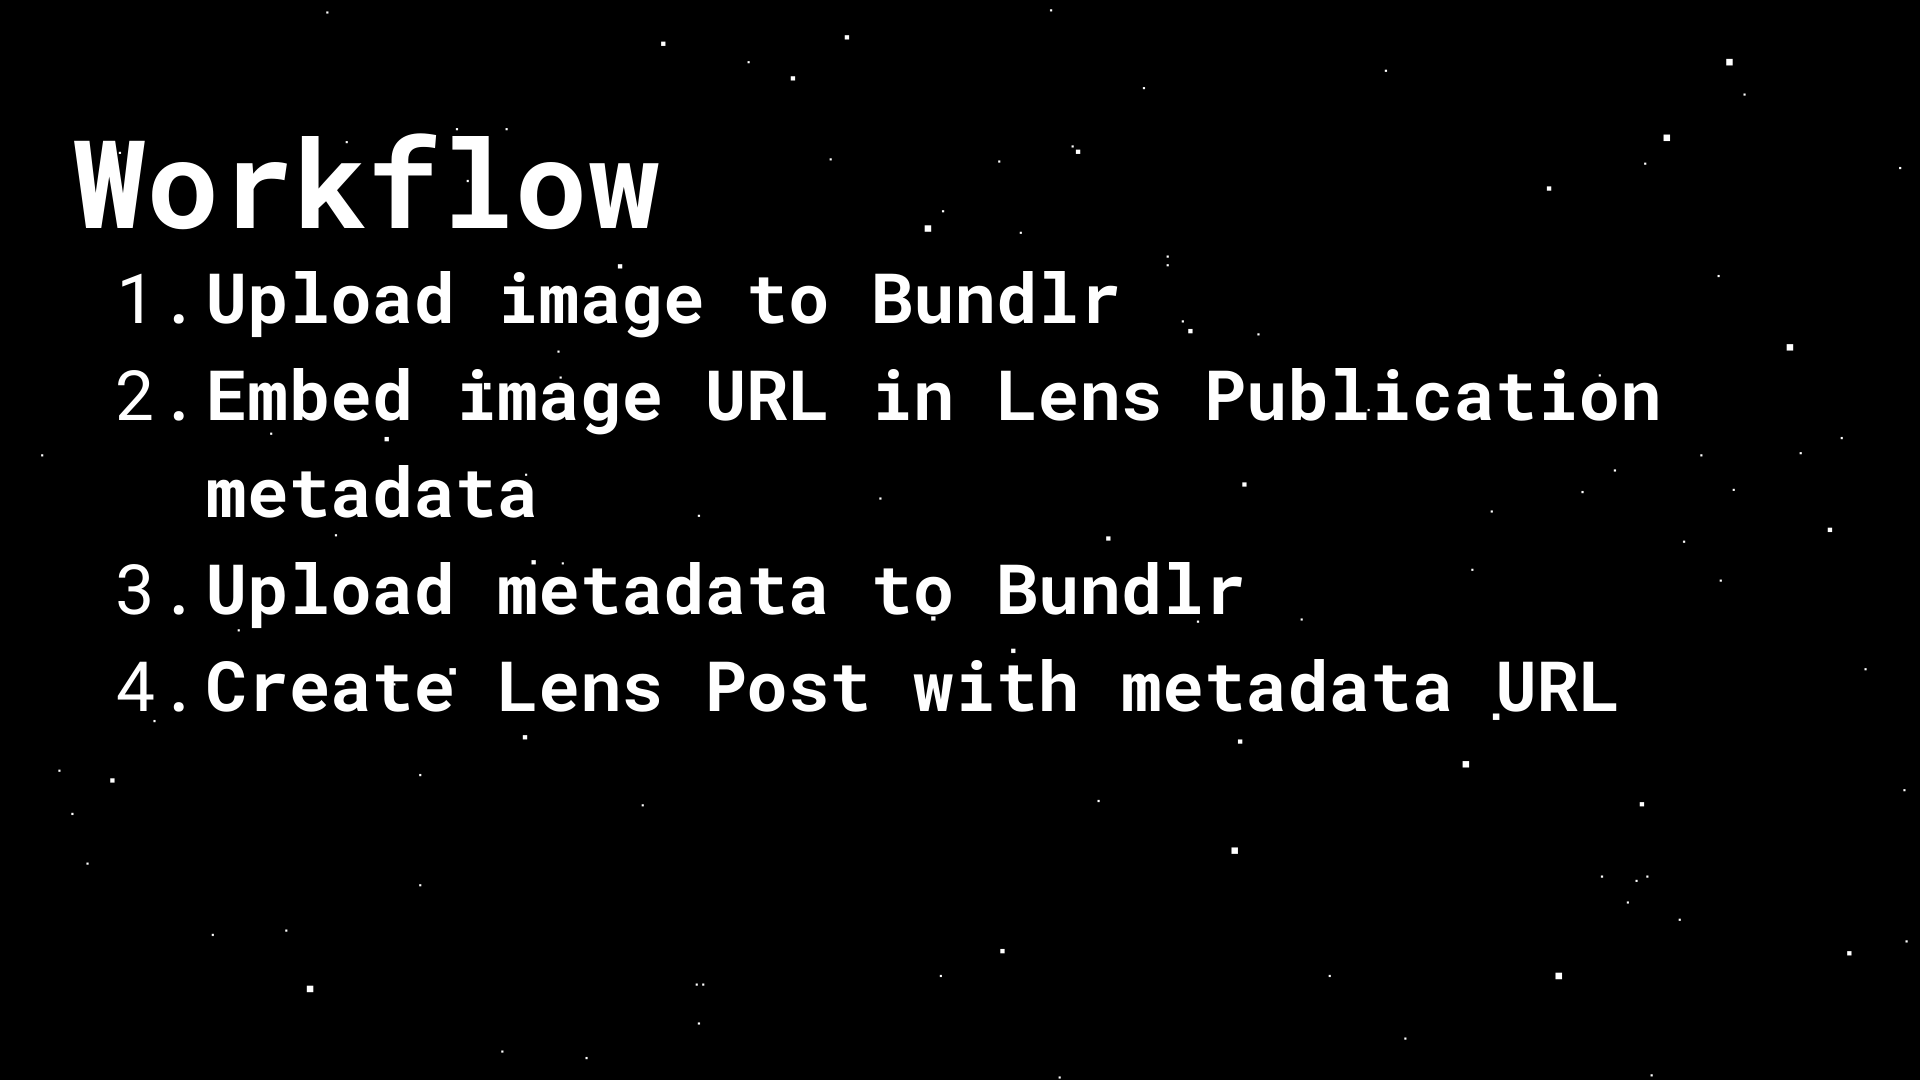 When working with Lens, social posts are called Publications. To create a Publication you create structured metadata describing the Publication, upload that metadata to Bundlr and then pass the URL of the metadata to a Lens React hook.
Since we're doing image posts, there's one extra step. Before uploading the metadata to Bundlr, you need to upload the image to Bundlr and then embed the image URL in the post metadata. So for image Publications (Posts), you'll require n+1 uploads to Bundlr, where n is the number of images used in the post.
Most of this code is in the file Pages/MyView.js.
Uploading to Bundlr is super easy, basically 3-4 lines of code.
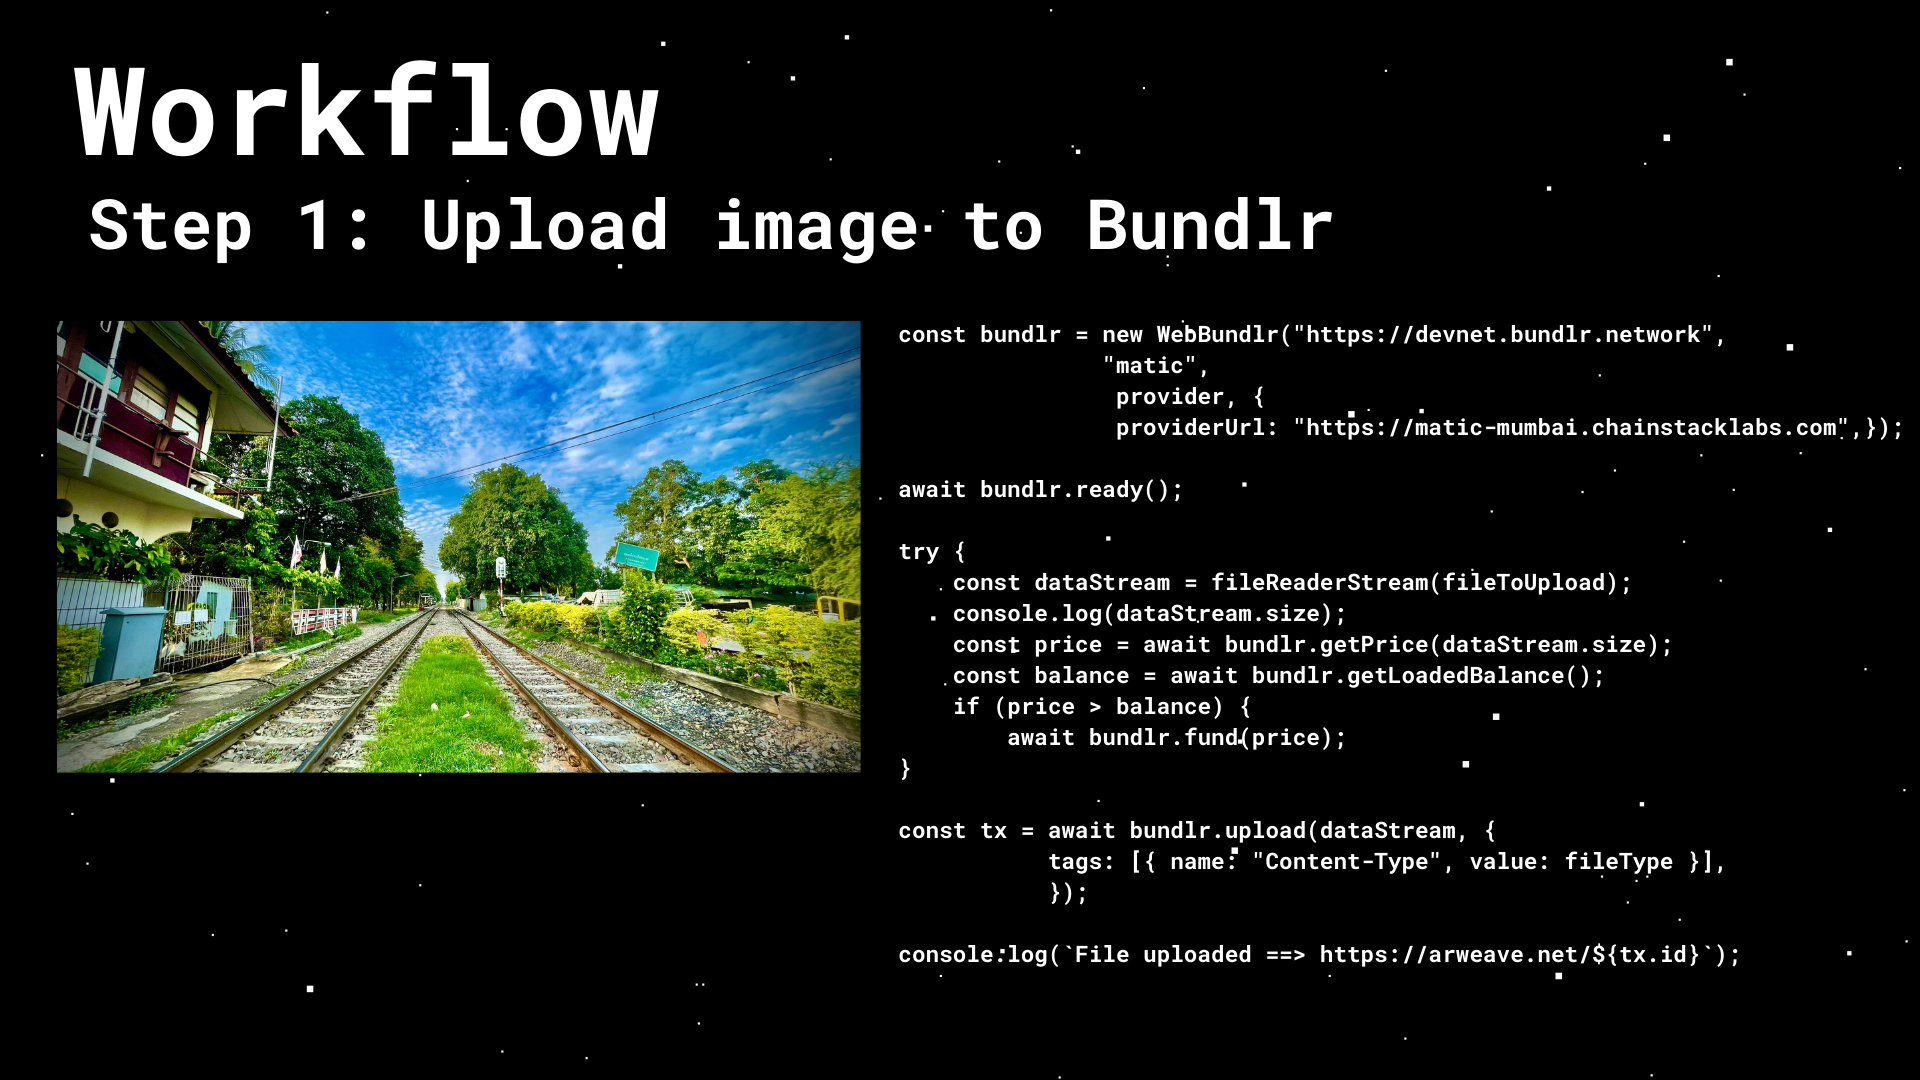
You start by connecting to a node. Specify a node address, a currency to pay, and a reference to an injected provider. If you're connecting to our Devnet (where you pay with free faucet currencies), you also need to provide a provider URL.
const bundlr = new WebBundlr("https://node1.bundlr.network", "matic", provider);

const bundlr = new WebBundlr("https://devnet.bundlr.network", "matic", provider, {
	providerUrl: "https://matic-mumbai.chainstacklabs.com",
});Next up, you fund the node to pay for the upload. When working with Bundlr, you pay once and store forever. So your file, once uploaded, is there forever. When working with our Devnet, it's stored for a shorter period, ~2 months.
In my code below, I first check the price of the upload and then see if I have enough funded balance to pay for the upload. I only fund if needed.
const price = await bundlr.getPrice(dataStream.size);
const balance = await bundlr.getLoadedBalance();
if (price > balance) {
	setMessage(`Funding Upload ....`);
	await bundlr.fund(price);
}Finally, we upload. Bundlr supports adding custom metadata to any upload, a feature that supports a variety of different use-cases. In the case of images you wanted to be rendered by a browser, you must to set the Content-Type MIME type tag.
const tx = await bundlr.upload(dataStream, {
	tags: [{ name: "Content-Type", value: fileType }],
});

console.log(`File uploaded ==> https://arweave.net/${tx.id}`);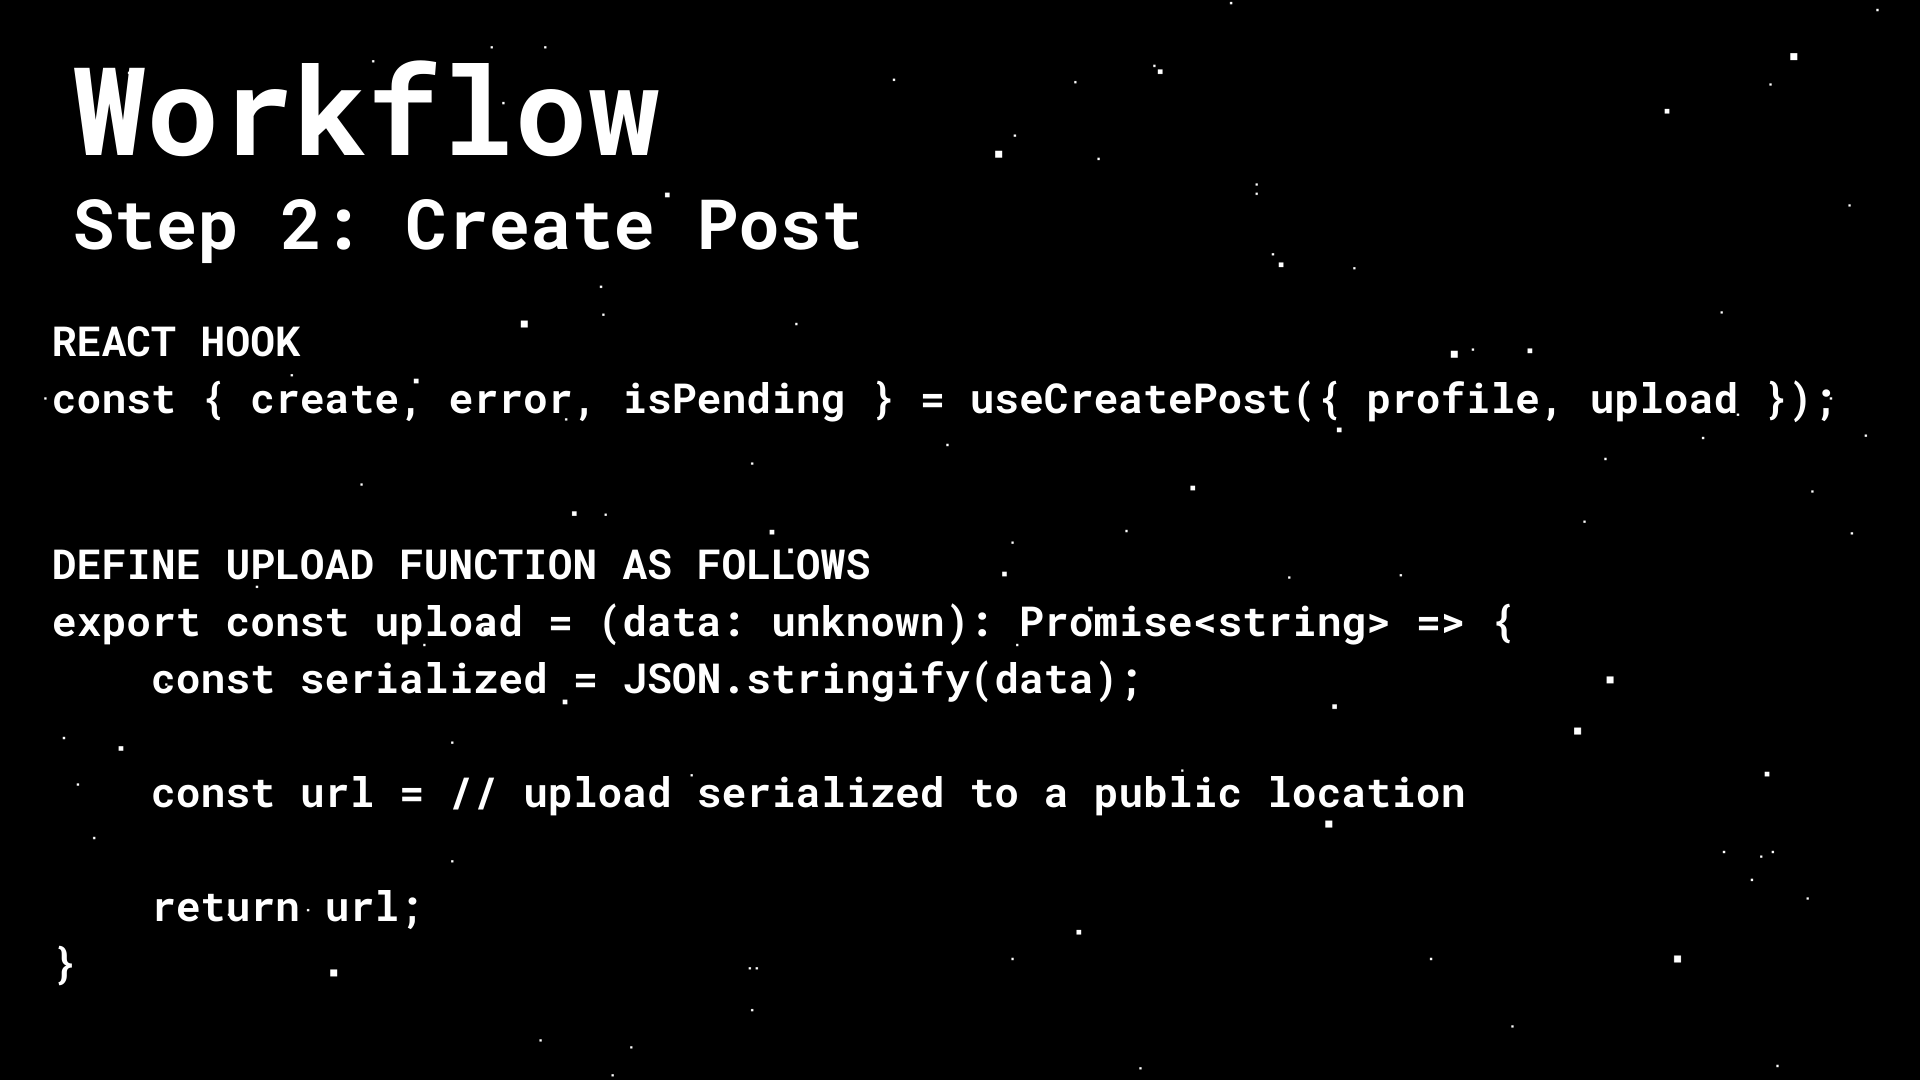
Once the image is uploaded, we need to create the post metadata and upload that to Bundlr. This is done using the useCreatePost() React hook. There's a couple of interesting things happening here.
It exposes a function called create() that handles creating the actual metadata for you. Also, it's passed another function called upload() that you have to implement.
const { create, error, isPending } = useCreatePost({ profile, upload });await create({
profileId: profile.id,
image: imageUrl,
imageMimeType: fileType,
contentFocus: ContentFocus.IMAGE,
locale: "en",
collect: {
type: CollectPolicyType.NO_COLLECT,
},
reference: ReferencePolicy.ANYBODY,
media: [
{
url: imageUrl,
mimeType: fileType,
},
],
});The upload() function (defined in /utils/upload.js) needs to match the following signature.
export const upload = (data: unknown): Promise<string> => {
    const serialized = JSON.stringify(data);

    const url = // upload serialized to a public location

    return url;
}
In my implementation, I do two things. First I modify the metadata to include my custom app id. This is a bit hacky, but it's needed right now as the create() function doesn't allow for passing an app id. (It's going to be added in a future release.)
The second thing I do is actually upload the metadata.
export const upload = async (data) => {
	// hack to add appid
	data.appId = "viewfrommywindow";
	const metadataUrl = await uploadMetadata(data);
	console.log("metadataUrl=", metadataUrl);
	return metadataUrl;
};
There's no need to show the whole uploadMetadata() function here, as it's basically the same as what I do when uploading the image, but it's worth calling out that you must use the Content-Type MIME type to specify that the file is json data. If you leave that out, things won't work right when passing the metadata URL to Lens.
const serialized = JSON.stringify(data);
const tx = await bundlr.upload(serialized, {
	tags: [{ name: "Content-Type", value: "application/json" }],
});
You'll notice on line 6 of the upload() function, I end by returning the URL to the post metadata. This return value is then picked up by the Lens React hook and used to create the post. It's one of the places these React hooks really shine and make your job much easier. When using the Lens SDK via GraphQL, you have to do much more work for this last step.

Before letting someone post a photo, they need to connect their wallet and login to Lens. When you log into Lens, you get back an authentication token that's used in subsequent transactions that involve saving data.
To test if someone has connected their wallet, we use the following hook from WAGMI.
const { isConnected } = useAccount();Then I test if the user has an active profile with useActiveProfile() and if they do, I know they are logged in and have an active profile. If they don't have an active profile, I use useWalletLogin() to log them in.
When working with Lens, a single wallet can have more than one profile ... but for the sake of simplicity, I haven't built a component that shows all profiles and allows a user to switch between them (but that's a great idea for a post tutorial challenge if you want to push your skills:)).
const { data: profile, loading: profileLoading } = useActiveProfile();
const { login, error, isPending } = useWalletLogin();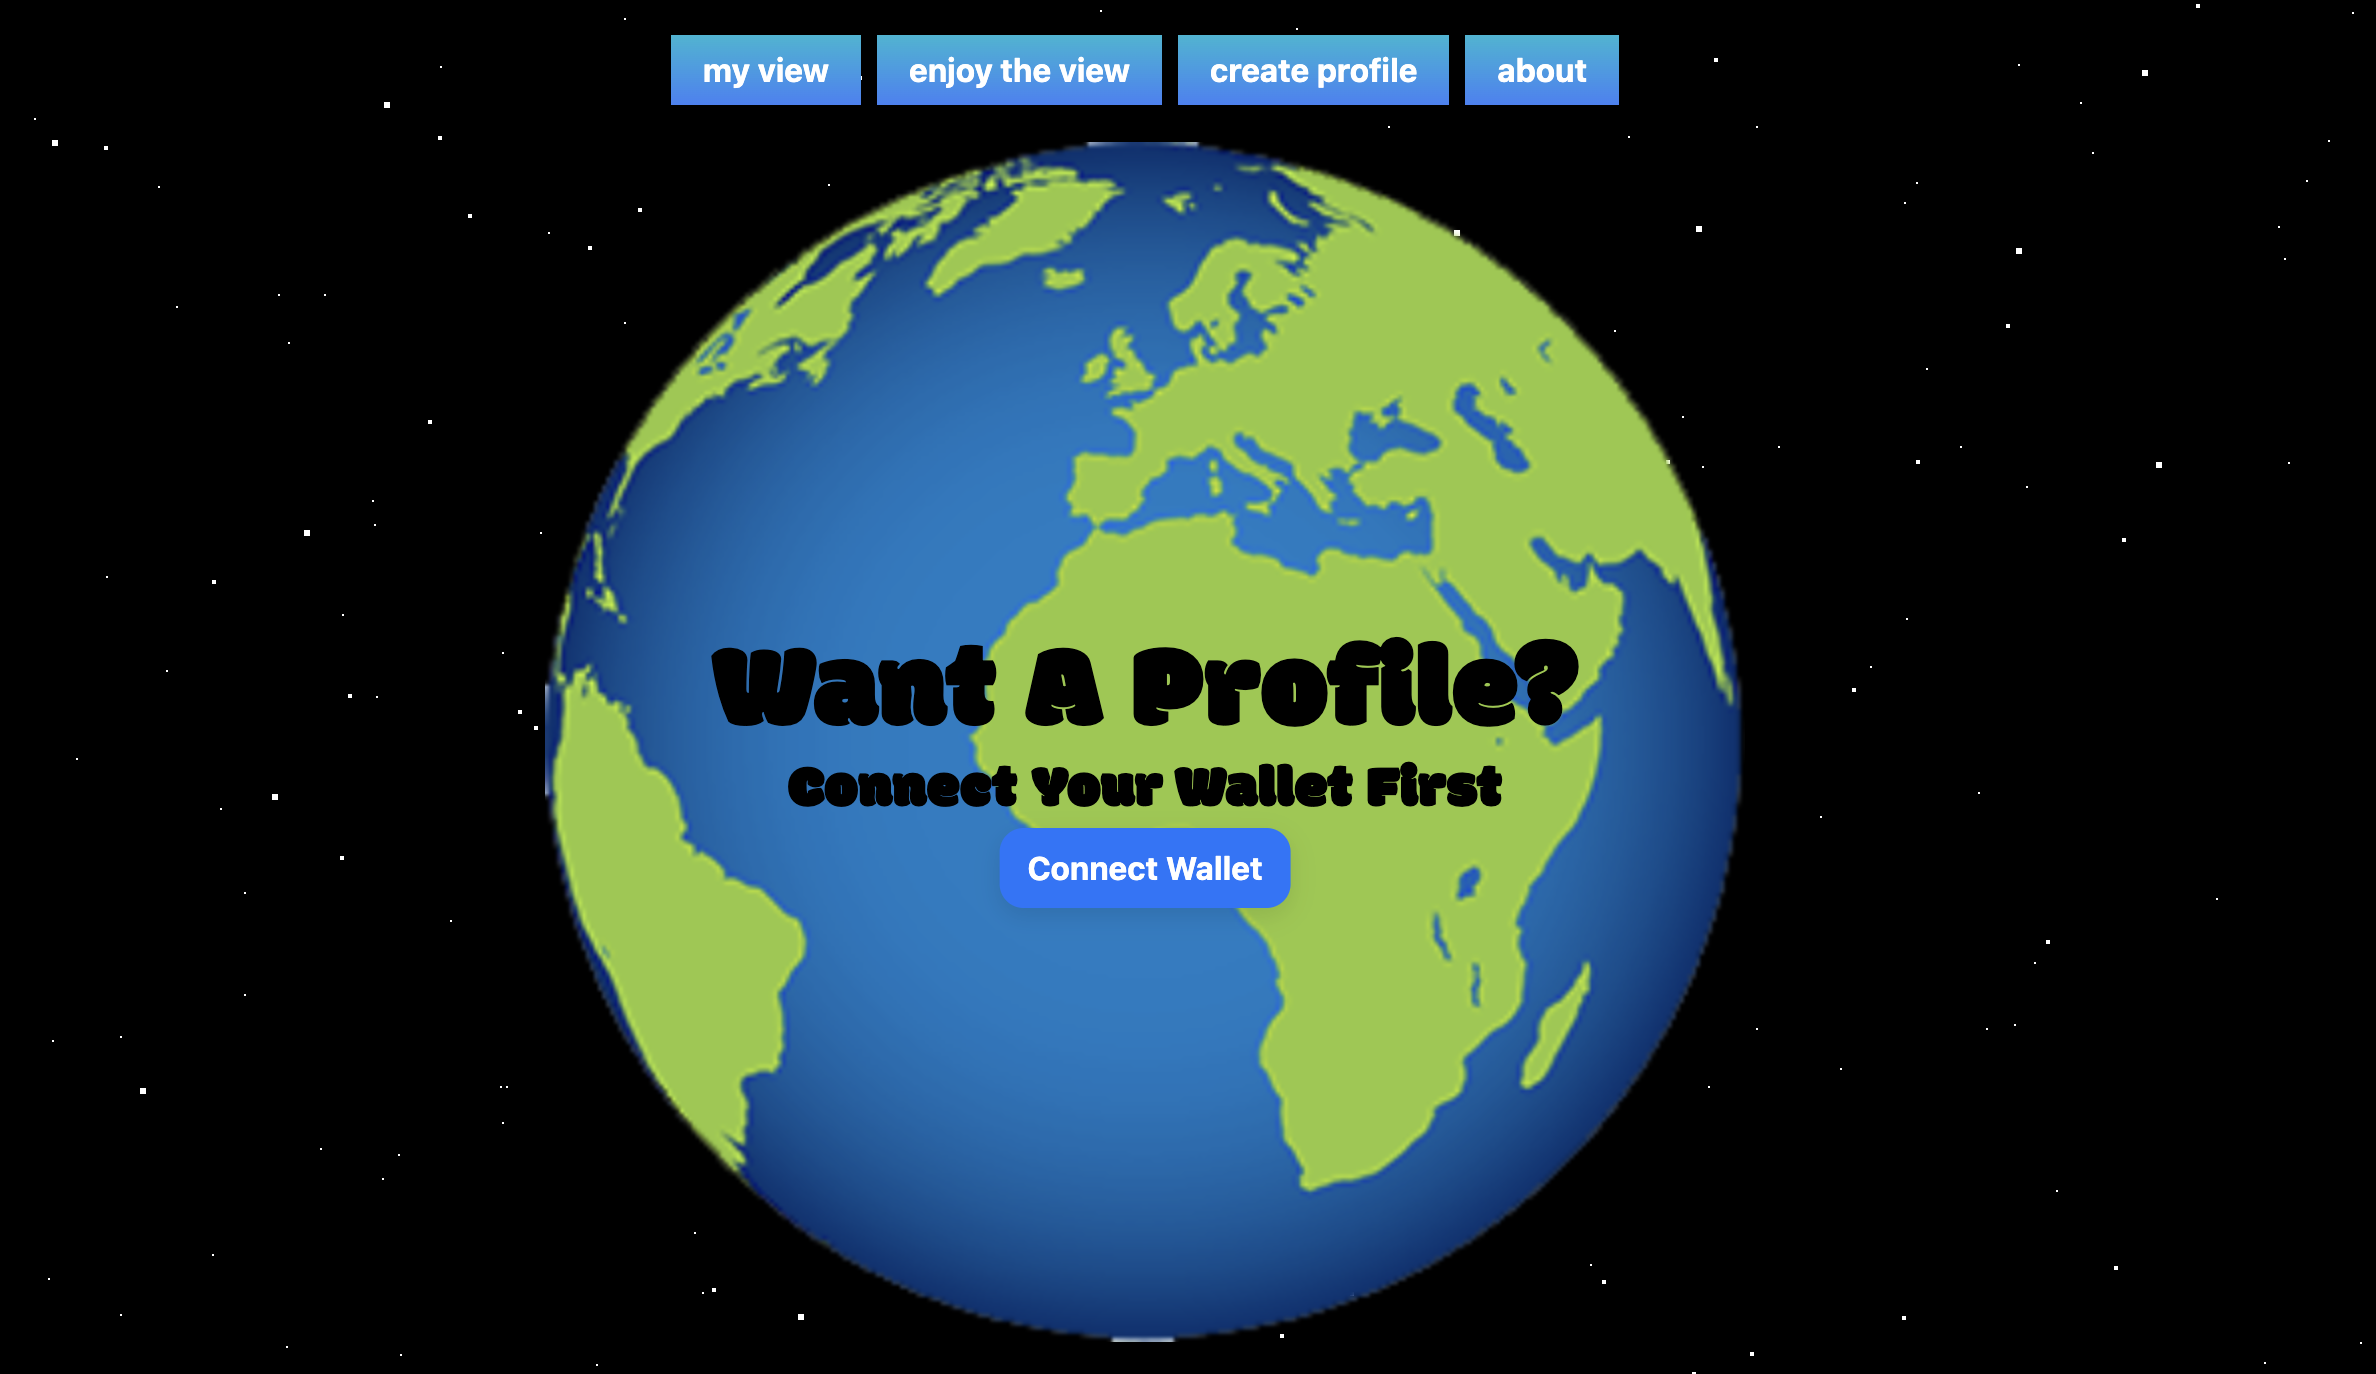
All of this code is contained in pages/CreateProfile.js.
Ok, you can post images, but only if you're logged in and you can only login if you have a profile ... so how to create a profile?
On the Lens Mainnet, you have to be whitelisted to create a new profile, so nothing we can do there. BUT on the Mumbai testnet where we're deploying this project, anyone can create as many accounts as they want.
Handles created on the testnet are in the form "foo.test", handles created on mainnet are in the form "foo.lens". When passing in a handle to check if valid or create new, only pass the "foo" part, do not include the ".lens" or ".test".
The isValidHandle() React hook returns true if the handle passed is valid.
To actually create a profile use the create() function exposed by the useCreateProfile() React hook. After calling create(), if error has a value of DuplicatedHandleError, we know the value passed wasn't unique. If error is null and isPending is false, the account has been created.
const { create, error, isPending } = useCreateProfile();This code is all in pages/EnjoyTheView.js.

For reading posts, we use the React hook useExplorePublications(), which allows you to "explore different publications on Lens Protocol from a variety of people that you may not yet follow". What's interesting is that since we used our app id as an optional parameter when setting up the Lens Provider, all publications exposed will be from our #ViewFromMyWindow app. This is similar to the "explore" tab in Instagram.
const { data: publications, loading, hasMore, next } = useExplorePublications();There's room here to challenge yourself further and build some more features. You could add the the ability to click through to a profile and see all view posts from that profile. You could add the ability to follow profiles. You could add a second feed page that shows only posts from profiles you follow.
There are two branches in this project
- main: Full source code
- framework: UI-only source code
As the goal of this project is to teach using Bundlr and Lens to create an image-based social network, there is very little coverage of how the UI was built. I recommend forking the "framework" branch and integrating Bundlr and Lens as you follow along.
If you do want to start from scratch, perhaps to challenge yourself to design a new UI, the following steps will guide you through setting up a new project.
mkdir view-from-my-window
cd view-from-my-window
npx create-react-app .
npm install react-router-dom
npm install filereader-streamhttps://tailwindcss.com/docs/guides/create-react-app
npm install -D tailwindcss
npx tailwindcss init
Change your tailwind.config.js to match:
/** @type {import('tailwindcss').Config} */
module.exports = {
	content: ["./src/**/*.{js,jsx,ts,tsx}"],
	theme: {
		extend: {},
	},
	plugins: [],
};
Change your index.css to match:
@tailwind base;
@tailwind components;
@tailwind utilities;npm install wagmi @lens-protocol/wagmihttps://docs.bundlr.network/recipes/bundlr-react
npm install @bundlr-network/client
npm install react-app-rewired
npm install --save-dev --force crypto-browserify stream-browserify assert stream-http https-browserify os-browserify url buffer process
npm install --force browserify-zlib path-browserify path
Create a file in your document root titled config-overrides.js and paste in the following.
const webpack = require("webpack");
module.exports = function override(config) {
	const fallback = config.resolve.fallback || {};
	Object.assign(fallback, {
		crypto: require.resolve("crypto-browserify"),
		stream: require.resolve("stream-browserify"),
		assert: require.resolve("assert"),
		http: require.resolve("stream-http"),
		https: require.resolve("https-browserify"),
		os: require.resolve("os-browserify"),
		url: require.resolve("url"),
		zlib: require.resolve("browserify-zlib"),
	});
	config.resolve.fallback = fallback;
	config.plugins = (config.plugins || []).concat([
		new webpack.ProvidePlugin({
			process: "process/browser",
			Buffer: ["buffer", "Buffer"],
		}),
	]);
	config.module.rules = [
		...config.module.rules,
		{
			test: /\.m?js/,
			resolve: {
				fullySpecified: false,
			},
		},
	];
	return config;
};
Open your package.json and change this
"scripts": {
   "start": "react-scripts start",
   "build": "react-scripts build",
   "test": "react-scripts test",
   "eject": "react-scripts eject"
 },
to this.
"scripts": {
   "start": "react-app-rewired start",
   "build": "react-app-rewired build",
   "test": "react-app-rewired test",
   "eject": "react-scripts eject"
},The following third-party assets and designs were used.
- Spinning Earth (purchased) https://www.istockphoto.com/vector/earth-globe-map-turning-set-gm864531708-143362339
- CSS stars https://www.youtube.com/watch?v=aywzn9cf-_U
Image resize
Wagmi hooks
Lens
RainbowKit


