Git Product home page Git Product logo

arduinotaikocontroller's Introduction

ArduinoTaikoController

Sketch for Arduino Leonardo/Micro based controller circuit for taiko games on PC and Nintendo Switch

Software Setup

Windows 10

If you are using windows 7, you are not able to upload the code for the second time, because of some driver issues. You have to edit the .ini file and add the details of this device in the Arduino driver file to fix this problem. If you have to use Nintendo Switch functions, please do the following steps on a Windows 10 computer.

Arduino IDE

Install the latest version of Arduino IDE from the official website: https://www.arduino.cc/en/Main/Software

Modifications to Arduino IDE

Before starting Arduino IDE, to enable nintendo switch functionality, replace the following files with the ones provided in "setup" folder:

  • <your arduino installation path>/hardware/arduino/avr/libraries/HID/src/HID.h
  • <your arduino installation path>/hardware/arduino/avr/libraries/HID/src/HID.cpp

Then copy the text in board.txt in "setup" folder and append it to the following file:

  • <your arduino installation path>/hardware/arduino/avr/boards.txt

If you've successfully done all the modifications above, you should be able to see the board called "Nintendo Switch Controller" next time you start Arduino IDE:

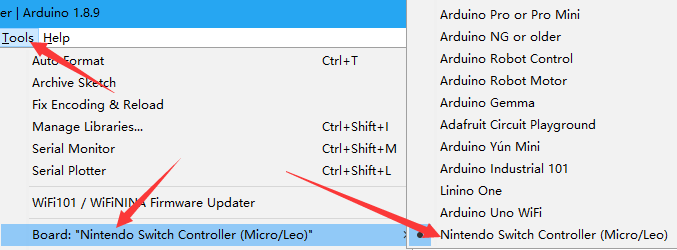
Please select this board before uploading the code as this is essential for your Arduino Leonardo to be recognized by Nintendo Switch.

Keyboard or Nintendo Switch Controller

To enable or disable keyboard or Nintendo Switch controller functionality, remove or add two characters "//" before these two lines in taiko_controller.ino:

  • To enable Switch controller only
//#define ENABLE_KEYBOARD
#define ENABLE_NS_JOYSTICK
  • To enable keyboard only (PC only, doesn't work on Switch)
#define ENABLE_KEYBOARD
//#define ENABLE_NS_JOYSTICK
  • To enable both (not tested)
#define ENABLE_KEYBOARD
#define ENABLE_NS_JOYSTICK

Circuit Setup

Materials

To set up the circuit, you need an Arduino Leonardo, a set of four piezo sensors, and four 1MΩ resistors for some special cases.

Connect the Circuit

Connect the sensors to the 3.3v pin and the analog pins according to the diagram below:

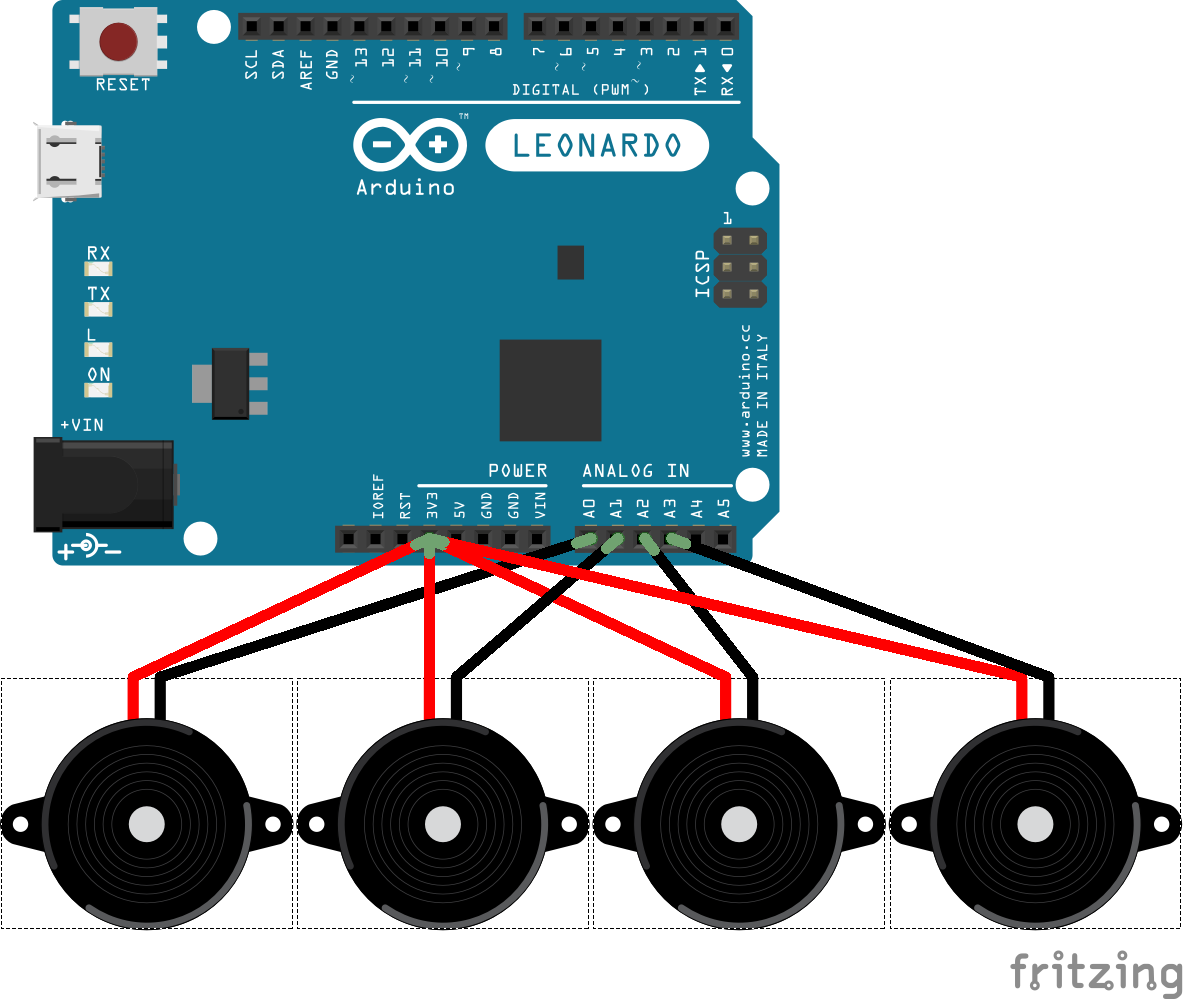
The mapping of the sensors by default should be:

  • Left Rim: A0
  • Left Surface: A3
  • Right Surface: A1
  • Right Rim: A2

To customize the mapping, checkout the parameter section.

For most of the times, plugging the sensors directly into Arduino's pins will work. If the controller seems to be generating random inputs, you can fix this by plugging some 1MΩ resistors in parallel:

Notes

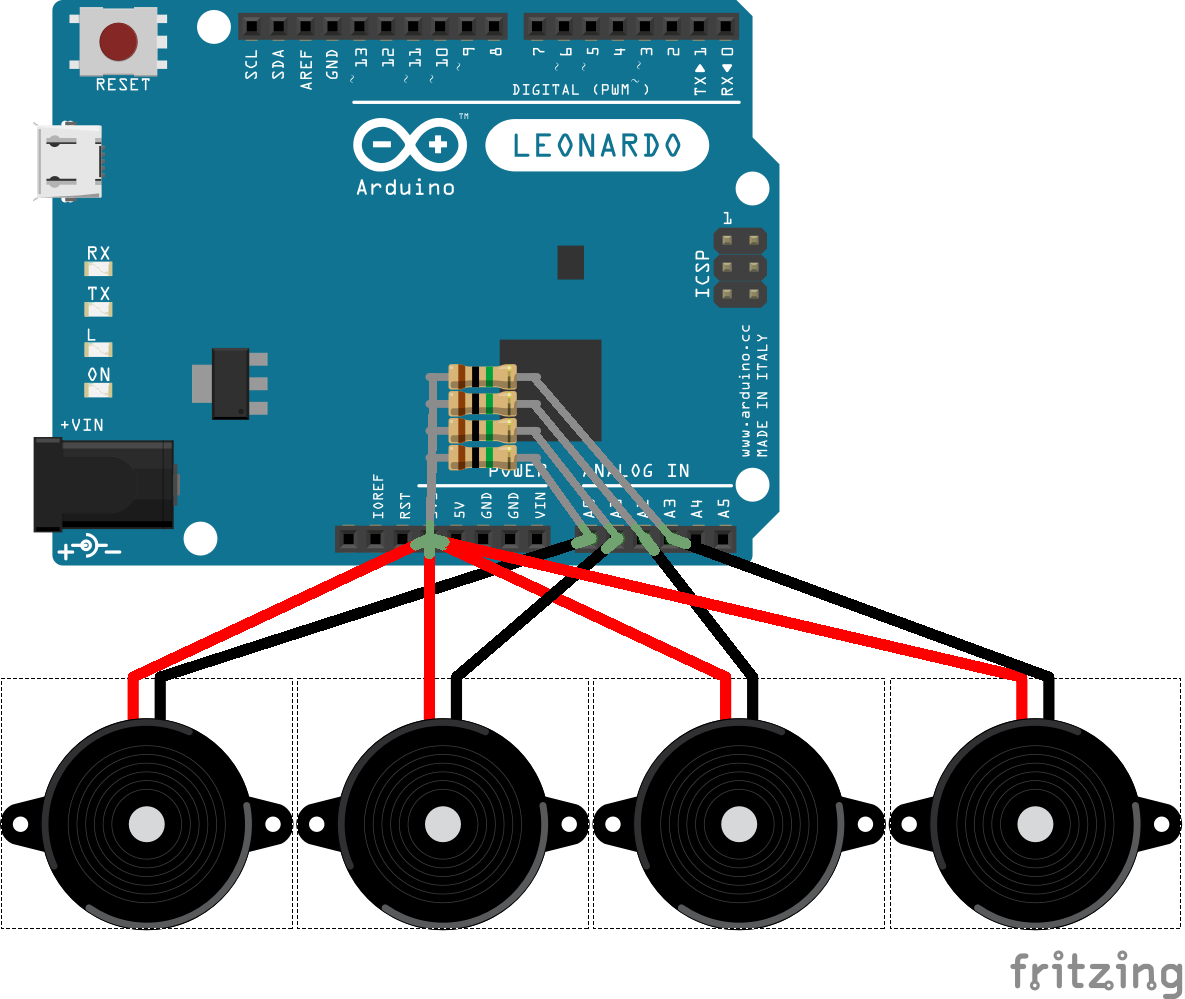
For best performance, the sensors must be piezo sensors (a.k.a. piezo speakers, contact microphones). No guarantee if other types of sensors will simply work, but if analog signals with voltage ranged 0-5V are fed into analog pins, this setup should be good to go.

For further improvements, you can use some diodes to limit the voltage of the piezo sensors, or use a 2.5v power supply, but this won't matter in most cases, at least on my side.

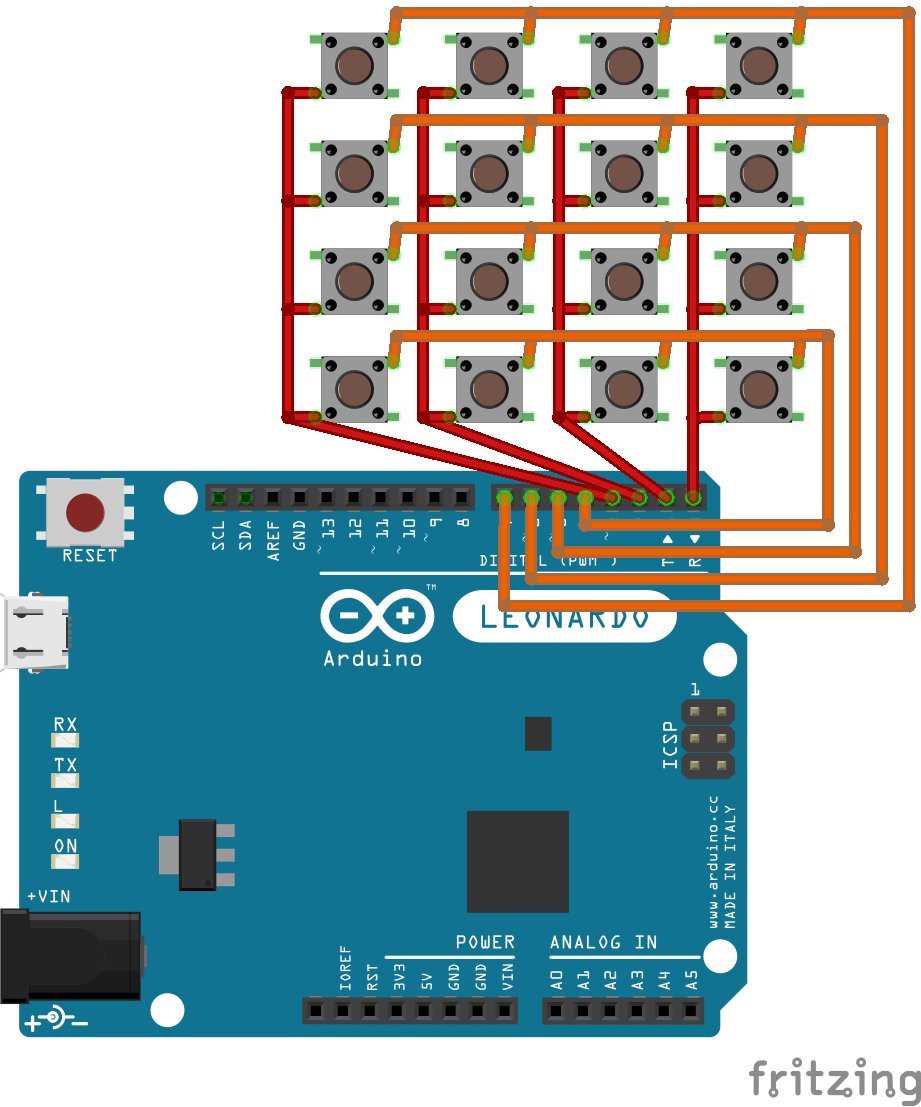
If you can somehow connect a 4x4 matrix keyboard (no pull-up resistors needed) to Arduino's digital pin 0-15, it will work as a controller along with the drum:

Algorithm

This sketch uses a dynamic threshold of sensor levels to trigger inputs. Whenever the sensor level from one sensor is higher than the threshold, a keyboard or Nintendo Switch controller input is generated, then the sensors will be put into a cooldown period. When an input is triggered or during cooldown period, the threshold will be raised to a ratio of current sensor levels, and after that the threshold will gradually decay by ratio, to hopefully be an envelope of the waves of sensor levels.

As the sensors should have biased input voltages, the sensor levels are the differential value of the analog value from analogRead.

To deal with four analog inputs, we read the sensor levels one at a time and only do the triggering mechanisms for this sensor. To compensate for the time difference, the sensor level for the current one will be a mix of values from previous read and current read. Also, a customized non-blocking version of analogRead is used to guarantee more stabilization time after a channel switch of Arduino's internal ADC chip.

To deal with Nintendo Switch, I used the HID descriptor for Hori's Pokken fightstick to let Switch trust Arduino as a valid controller device (see the credits section). The default buttons from the four sensors are the analog stick buttons (press the sticks down) and the trigger buttons (ZL and ZR).

As VID and PID of the controller have to be the specific value, the setup to boards.txt is essential. Also, Switch seems to be judging the device strictly by the first-come HID descriptor of the device, so Arduino's default HID behavior have to be altered to have our customized HID descriptor to work.

Parameters (with suggested values)

min_threshold = 15

The minimum value for sensor levels to trigger inputs for all sensors.

To determine an optimal value for this level, try enabling debug info. Usually, this value is only used to ignore sensor noises, but you can use this level as a sensitivity level.

cd_length = 10000

The cooldown length of sensors, in microseconds (=1x10^-6s).

While a sensor is in its cooldown period, no input will be triggered ignoring the sensor level. The threshold level would still be updated if the sensor levels go high. During the cooldown period, the corresponding key of the sensor is kept pressed. When it ended, the key is released.

k_threshold = 1.5

How much the threshold value is raised to, in ratio to the sensor level.

k_decay = 0.97

How fast every threshold level decays, in ratio per refresh (about 300ms).

For every refresh, the threshold value is multiplied by k_decay.

pin[4] = {A0, A3, A1, A2}

The analog input pins of four sensors.

key[4] = {'d', 'f', 'j', 'k'}

The key mapping of four sensors, if keyboard inputs are enabled.

sens[4] = {1.0, 1.0, 1.0, 1.0};

Sensitivity of every sensor. All sensor levels are scaled by these values respectively before use.

Debug Info

If the line #define DEBUG_OUTPUT is enabled, there will be debug information printed via serial. Take a look at your serial monitor.

The first 4 columns indicate the current vibration level of the four sensors, and the last column indicates the threshold level for a sensor to trigger an input; the symbols in the middle show the current status of the sensors, # for input triggered and * for cooldown state.

A typical output could be:

0  3  13 63 |         | 0
51 2  11 58 | * * * # | 53
83 5  9  24 | # * * # | 83

Credits

  • This sketch makes use of Arduino IDE and its useful library. A modified version of the Arduino library is used to allow us to make a valid Nintendo Switch controller.
  • The HID descriptor is from progmem's work of reverse engineering of Pokken Tournament Pro Pad: progmem/Switch-Fightstick
  • The HID descriptor is coded using many useful macros and functions from LUFA Library

arduinotaikocontroller's People

Contributors

luicat avatar

Stargazers

 avatar  avatar  avatar  avatar  avatar  avatar  avatar  avatar  avatar  avatar  avatar  avatar  avatar  avatar  avatar  avatar  avatar  avatar  avatar  avatar  avatar  avatar  avatar  avatar  avatar  avatar  avatar  avatar  avatar  avatar  avatar  avatar  avatar  avatar  avatar  avatar  avatar  avatar  avatar  avatar  avatar  avatar  avatar  avatar  avatar  avatar  avatar  avatar  avatar  avatar  avatar  avatar  avatar  avatar  avatar  avatar  avatar  avatar  avatar  avatar  avatar  avatar  avatar  avatar  avatar  avatar  avatar  avatar  avatar  avatar  avatar  avatar  avatar  avatar  avatar  avatar  avatar  avatar  avatar  avatar  avatar  avatar  avatar  avatar  avatar  avatar  avatar  avatar  avatar  avatar  avatar  avatar  avatar  avatar  avatar  avatar  avatar  avatar  avatar  avatar

Watchers

 avatar  avatar  avatar  avatar  avatar  avatar  avatar  avatar  avatar

arduinotaikocontroller's Issues

error when uploading sketch 'upload.tool.serial' undefined

Hi, so i tried uploading the sketch to the arduino leo and i encountered a problem that didn't let me upload it

0879A997-F1AB-4BD6-9DC3-ECD70C5FD278

i followed the steps of replacing the HID.h and HID.cpp and copy pasting the text in boards.txt (without the first 4 lines) and put it at the bottom of the already existing board.txt within the arduino data files, then i opened taiko.ino, activated the //joystick, chose the nintendo switch board, and then i was greeted by the undefined error

this is the first time i've done something like this as well as arduino stuff in general so i might be oblivious as to what is going on so i would really appreciate it if you could help me, thank you

Arduino TaikoController Compiler Error

Arduino:1.8.9 (Windows 7), Development board:"Arduino Leonardo"

Error reading file (D:\Arduino\hardware\arduino\avr\boards.txt:0): Invalid line format, should be 'key=value'

Arduino Leonardo Error compiling

Some questions about threshold

  1. Why do you use k-threshold and k_decay to increase and decrease threshold?
  2. In your code, use ''threshold'' to determine where tatacon is hit in and use ''min_threshold'' to determine the hit should be triggered or not. Why do you design this mechanism?

Arduino wiring with piezo sensor

I have a question about sensor connection
As far as I know, when connecting piezo sensor to arduino board, the red wire(+) should go to analog pin or digital pin, and the black wire(-) should connected to GND.
I might be wrong, I'm not an expert about arduino. just want to know if the drawing has some mistake or not.

"state" was not declared in this scope

In file included from sketch\Joystick.cpp:2:0:
sketch\HIDReportData.h:49:3: warning: #warning Modified LUFA header file. Remove the file if problematic. [-Wcpp]
#warning Modified LUFA header file. Remove the file if problematic.
^~~~~~~
C:\Users\alans\Downloads\ArduinoTaikoController-master\taiko_controller\taiko_controller.ino: In function 'void loop()':
taiko_controller:306:5: error: 'state' was not declared in this scope
state = 0;
^~~~~
C:\Users\alans\Downloads\ArduinoTaikoController-master\taiko_controller\taiko_controller.ino:306:5: note: suggested alternative: 'static'
state = 0;
^~~~~
static
taiko_controller:308:17: error: 'button_state' was not declared in this scope
state |= (button_state[i] ? 1 << i : 0);
^~~~~~~~~~~~
taiko_controller:310:20: error: 'hat_mapping' was not declared in this scope
Joystick.HAT = hat_mapping[state];
^~~~~~~~~~~
exit status 1
'state' was not declared in this scope

can't compile or upload

hey, i've some trouble i can't compile or uploading the script bacause of that:

Arduino : 1.8.19 (Windows 10), Carte : "Arduino Leonardo"

E:\telechargement\ArduinoTaikoController-master\ArduinoTaikoController-master\taiko_controller\Joystick.cpp: In constructor 'Joystick_::Joystick_()':

Joystick.cpp:78:8: error: 'class HID_' has no member named 'PrependDescriptor'; did you mean 'AppendDescriptor'?

HID().PrependDescriptor(&node); // This descriptor need to be the first one so that the device can be recognized by Switch

    ^~~~~~~~~~~~~~~~~

    AppendDescriptor

E:\telechargement\ArduinoTaikoController-master\ArduinoTaikoController-master\taiko_controller\Joystick.cpp: In member function 'void Joystick_::sendState()':

Joystick.cpp:83:8: error: 'class HID_' has no member named 'SendRaw'; did you mean 'SendReport'?

HID().SendRaw(this, 8); // No sending report ID. Switch doesn't deal with that properly.

    ^~~~~~~

    SendReport

exit status 1

'class HID_' has no member named 'PrependDescriptor'; did you mean 'AppendDescriptor'?

and when i don't have "Nintendo switch controller" choice on board menu

What to do with "taiko_controller" file / Where to put it

(doing the NS version)
While I tried to upload the code that I copypasted from taiko_controller file named "taiko_controller.ino" in arduino IDE into my Leonardo, I got a compilation error where it said "AnalogReadNow.h: No such file or directory"
Output
I then looked around the taiko_controller file on github and found the files that I assume that I needed to download
taiko_controller file
Now the real question is... now that I downloaded the 5 files, where do I like put these files? Or do I just copypaste the code contents from inside each of the .cpp and .h files and put them into arduino IDE where the .ino code is already in?

(This is my first project that includes any arduino or any electrical hardward stuff so sorry if this question is like beginner questions)

'ct' was not declared in this scope

The keyboard function is working with no problem, but when i enable the nintendo switch, i cant verify in arduino, i saw the other post that has the same problem, and i believe that is something in the code that is in the github, i did not change anything in the code, can you help me please

ct not declared error.

I keep getting this error code:

Arduino: 1.8.13 (Windows 10), Board: "Nintendo Switch Controller (Micro/Leo)"


In file included from sketch\Joystick.cpp:2:0:

sketch\HIDReportData.h:49:3: warning: #warning Modified LUFA header file. Remove the file if problematic. [-Wcpp]

  #warning Modified LUFA header file. Remove the file if problematic.

   ^~~~~~~

C:\Users\dalla\Documents\Arduino\ArduinoTaikoController-master\taiko_controller\taiko_controller.ino: In function 'void loop()':

taiko_controller:302:7: error: 'ct' was not declared in this scope

   if (ct > 32000 || (ct > 8000 && (down_count[0] || down_count[1] || down_count[2] || down_count[3]))) {

       ^~

C:\Users\dalla\Documents\Arduino\ArduinoTaikoController-master\taiko_controller\taiko_controller.ino:302:7: note: suggested alternative: 'dt'

   if (ct > 32000 || (ct > 8000 && (down_count[0] || down_count[1] || down_count[2] || down_count[3]))) {

       ^~

       dt

taiko_controller:309:5: error: 'state' was not declared in this scope

     state = 0;

     ^~~~~

C:\Users\dalla\Documents\Arduino\ArduinoTaikoController-master\taiko_controller\taiko_controller.ino:309:5: note: suggested alternative: 'static'

     state = 0;

     ^~~~~

     static

taiko_controller:311:17: error: 'button_state' was not declared in this scope

       state |= (button_state[i] ? 1 << i : 0);

                 ^~~~~~~~~~~~

taiko_controller:313:20: error: 'hat_mapping' was not declared in this scope

     Joystick.HAT = hat_mapping[state];

                    ^~~~~~~~~~~

taiko_controller:321:5: error: 'cc' was not declared in this scope

     cc = 0;

     ^~

C:\Users\dalla\Documents\Arduino\ArduinoTaikoController-master\taiko_controller\taiko_controller.ino:321:5: note: suggested alternative: 'cd'

     cc = 0;

     ^~

     cd

exit status 1

'ct' was not declared in this scope


This report would have more information with
"Show verbose output during compilation"
option enabled in File -> Preferences.

have I just installed something incorrectly?

hat_mapping was not declared in this scope

Hello again, sorry I do not know how to code.

Arduino: 1.8.13 (Windows 10), Board: "Nintendo Switch Controller (Micro/Leo)"

In file included from sketch\Joystick.cpp:2:0:

sketch\HIDReportData.h:49:3: warning: #warning Modified LUFA header file. Remove the file if problematic. [-Wcpp]

#warning Modified LUFA header file. Remove the file if problematic.

^~~~~~~

C:\Users\alans\Downloads\ArduinoTaikoController-master\taiko_controller\taiko_controller.ino: In function 'void loop()':

taiko_controller:312:20: error: 'hat_mapping' was not declared in this scope

 Joystick.HAT = hat_mapping[state];

                ^~~~~~~~~~~

taiko_controller:312:32: error: 'state' was not declared in this scope

 Joystick.HAT = hat_mapping[state];

                            ^~~~~

C:\Users\alans\Downloads\ArduinoTaikoController-master\taiko_controller\taiko_controller.ino:312:32: note: suggested alternative: 'static'

 Joystick.HAT = hat_mapping[state];

                            ^~~~~

                            static

exit status 1

'hat_mapping' was not declared in this scope

This report would have more information with
"Show verbose output during compilation"
option enabled in File -> Preferences.

Recommend Projects

  • React photo React

    A declarative, efficient, and flexible JavaScript library for building user interfaces.

  • Vue.js photo Vue.js

    🖖 Vue.js is a progressive, incrementally-adoptable JavaScript framework for building UI on the web.

  • Typescript photo Typescript

    TypeScript is a superset of JavaScript that compiles to clean JavaScript output.

  • TensorFlow photo TensorFlow

    An Open Source Machine Learning Framework for Everyone

  • Django photo Django

    The Web framework for perfectionists with deadlines.

  • D3 photo D3

    Bring data to life with SVG, Canvas and HTML. 📊📈🎉

Recommend Topics

  • javascript

    JavaScript (JS) is a lightweight interpreted programming language with first-class functions.

  • web

    Some thing interesting about web. New door for the world.

  • server

    A server is a program made to process requests and deliver data to clients.

  • Machine learning

    Machine learning is a way of modeling and interpreting data that allows a piece of software to respond intelligently.

  • Game

    Some thing interesting about game, make everyone happy.

Recommend Org

  • Facebook photo Facebook

    We are working to build community through open source technology. NB: members must have two-factor auth.

  • Microsoft photo Microsoft

    Open source projects and samples from Microsoft.

  • Google photo Google

    Google ❤️ Open Source for everyone.

  • D3 photo D3

    Data-Driven Documents codes.