TableView Lab- Bringing It All Together

If you want to live a happy life, tie it to a goal, not to people or things. -Albert Einstein
Overview
In this lab, you'll create a complete iOS app from scratch.
Instructions
The app that you'll create will be backed by a table view. Tapping on a cell in the main table view will slide in a view that gives more details about the cell you tapped. The main view will show a list of planets, and tapping a cell will show some facts about that planet.
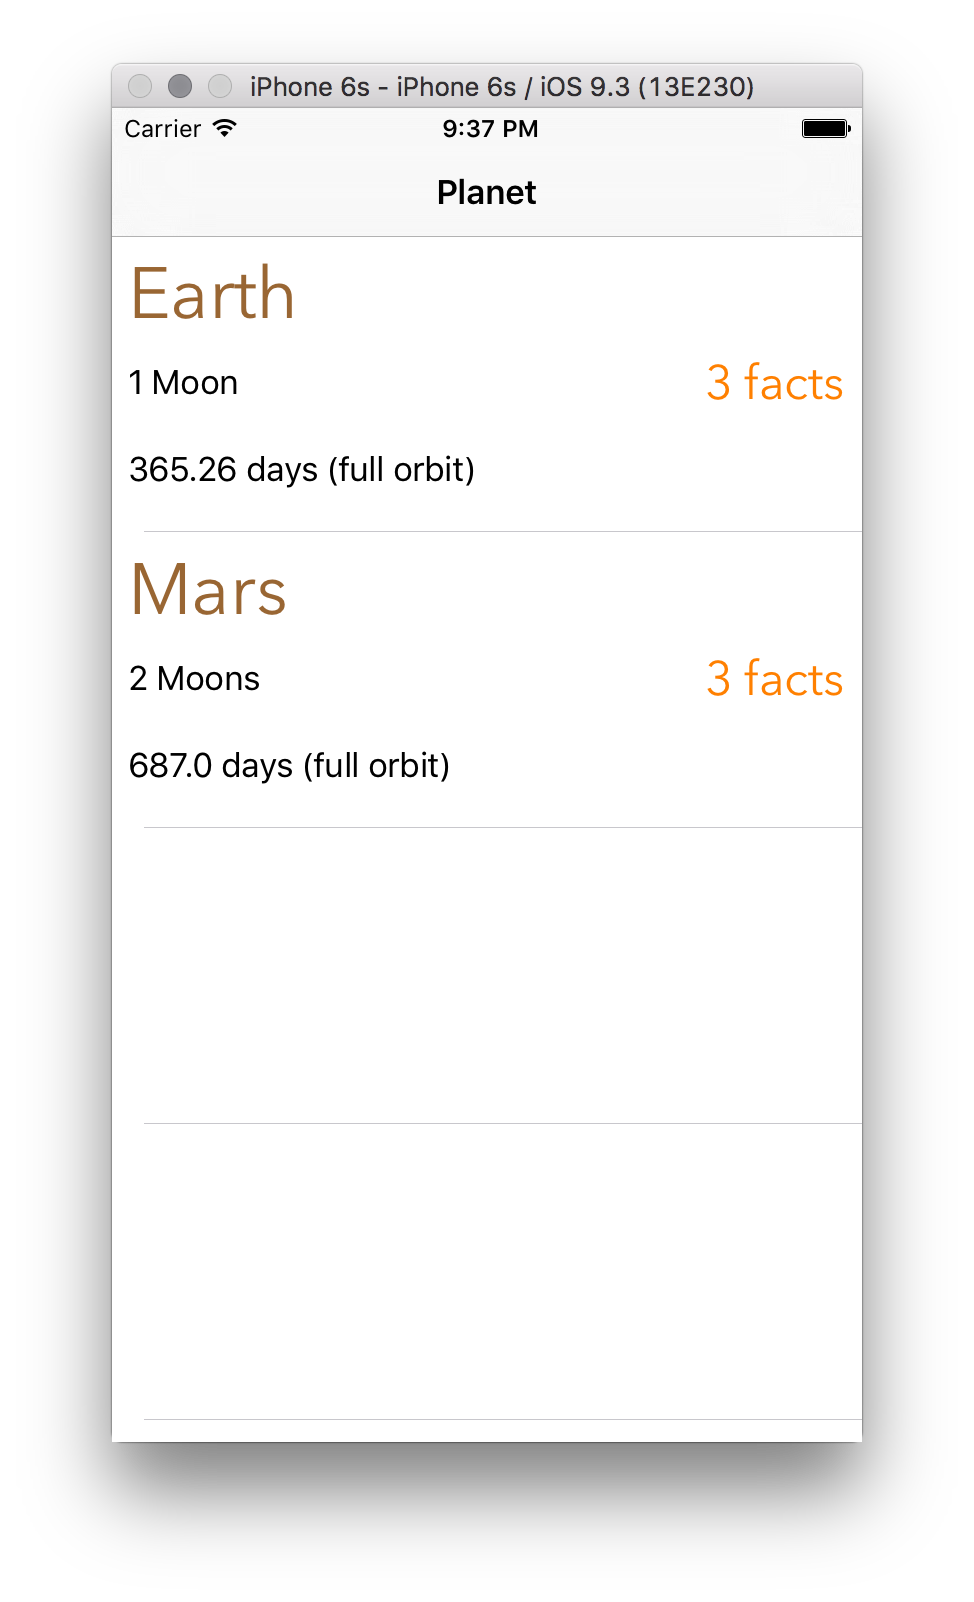
When you're done, the main view will look like this:
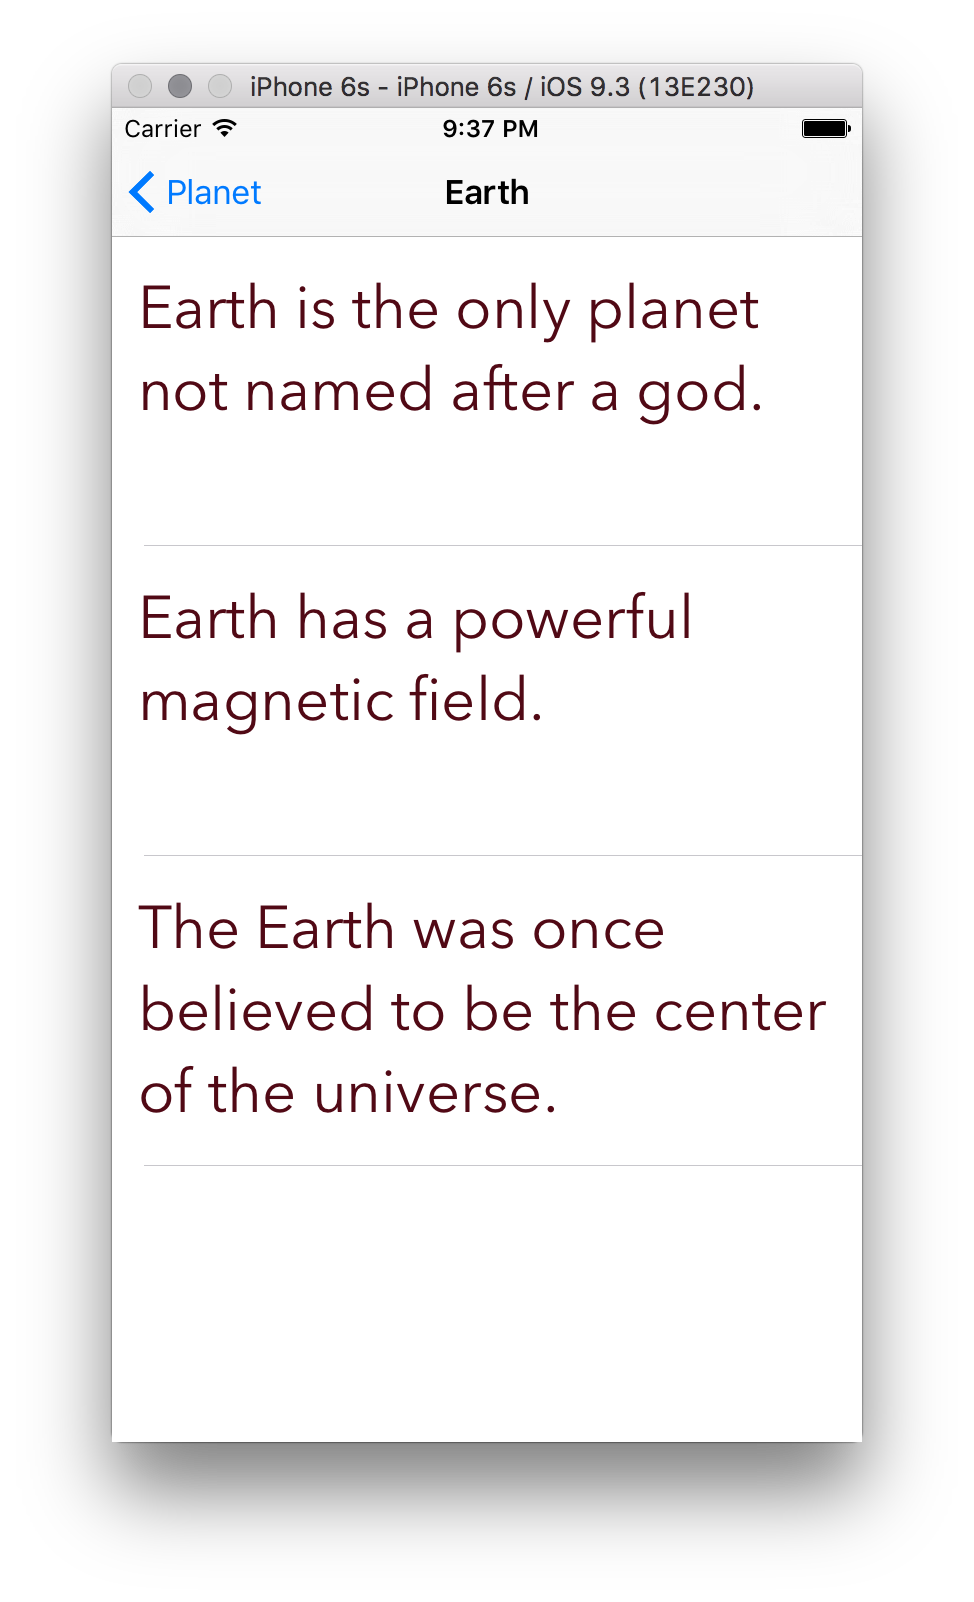
Tapping on a cell will bring up this view:
A basic Xcode project has already been configured for you, but it is up to you to lay out the views and write the code that will power this app. Open up TableViewFinal.xcworkspace, included in this repository, to get started.
This lab has a lot of parts to it, so let's break it down piece-by-piece.
Planet class
The data for this app will be stored in instances of a simple class called Planet, which is implemented in Planet.swift. This class has no behavior other than storing the attributes of a planet. It will be used by the table view controller to store data about planets. Completing this class is easy:
-
Add four properties to the
Planetclass:name,numberOfMoons,fullOrbit, andfacts.nameshould obviously be aString, andnumberOfMoonsshould be anInt.fullOrbitis the length of the planet's orbits in days. Can you guess what data type this should be? A planet's orbit can be a fraction of an Earth day, so this should be aDouble.Each fact is a
String, and a planet can have a number of facts, so this should be anArrayofStrings ([String]). -
Implement an initializer (an
initmethod) that accepts these four properties as parameters and sets the properties to the relevant parameter.
That's it! The Planet class is done. On to the next class.
FactTableViewController
Next we'll finish the implementation of FactTableViewController, the table view controller that manages the detailed planet view. Open up FactTableViewController.swift in Xcode's code editor to get started on this class.
- First, add a constant
StringcalledfactCellIdentifier. This is the reuse identifier for the cells managed by this table view controller, so it will be used to dequeue a reusable cell for this table. Assign to this variable the string "FactCell". - Create a property
planetof typePlanet!. This will store the planet whose facts are displayed in this table. - Override
viewDidLoad()to change thetitleof the table view to the name of the planet stored in theplanetproperty. This title will be displayed in the nav bar. Don't forget to callsuper.viewDidLoad(), too! - Override
numberOfSections(in:)to return the number of sections in this table view (just one). - Override
tableView(_:numberOfRowsInSection:)to return the number of rows in the table. This is equal to the number of facts you have for the planet being displayed in this view. Remember, the planet is stored in theplanetproperty, andPlanets have afactsarray that stores all their facts.
We'll save the implementation of the final table view controller method, tableView(_:cellForRowAt:) for later, after we've completed the implementation of FactTableViewCell, which requires some work in Interface Builder.
PlanetTableViewController
Let's implement the code for PlanetTableViewController next. This is the class that will power the main table view.
Open up PlanetTableViewController.swift in Xcode's code editor. Right now, this class is completely empty, but adding code to make it work is pretty easy.
Here's what you need to do to complete this class:
- Add a property called
planetCellIdentifier. This is aStringwhich will identify the type of cell you want to dequeue from the table view. Assign this the string "PlanetCell". - You will also need to create a property called
planetsto store the facts for a list of planets. You already have aPlanetclass that will store the data, and a table view will show multiple planets, so what should the type of this property be? (If you guessed[Planet], you're right!) - Next, you should create a method called
generatePlanetInfo()that will fill in theplanetsproperty you just created. This method takes no parameters and returns no value (it sets theplanetsproperty directly). To keep this simple, you only need to generate facts for two planets, Earth and Mars. Here are the planets and their relevant facts:- Earth
- Number of Moons: 1
- Full Orbit: 365.26
- Facts:
- Earth is the only planet not named after a god.
- Earth has a powerful magnetic field.
- Earth was once believed to be the center of the universe.
- Mars
- Number of Moons: 2
- Full Orbit: 687.0
- Facts:
- Mars and Earth have approximately the same landmass.
- Mars is home to the tallest mountain in the solar system.
- Pieces of Mars have fallen to Earth.
- Earth
- You will need to call
generatePlanetInfo()to fill in theplanetsproperty. You can call this from an overridenviewDidLoad()method. Don't forget to call `super.viewDidLoad() first! - Implement
numberOfSections(in:). There is only one section in this table view. - Implement
tableView(_:numberOfRowsInSection:). The number of rows is equal to the number of planets tracked by this class. - Implement
prepare(for:sender:). This method first needs to get the destination view controller usingsegue.destinationViewControllerand cast it to a view controller of typeFactTableViewController. It then needs to get the index path for the selected row, and grab the correct planet from theplanetsproperty. Finally, it should set theplanetproperty of the destination view controller to the selected planet. (If you need help, take a look at the previous labs and lessons for hints on how to implement this method properly.)
For now, we'll skip the implementations of the remaining table view source method, tableView(_:cellForRowAt:), since that requires PlanetTableViewCell to be implemented, which, in turn, requires some work in Interface Builder. We'll come back to this method later.
Interface Builder
Now we'll tackle the design of the interface in Interface Builder.
Main View
The first scene you need to lay out is the scene for the main view.
- Drag a new table view controller from the object library to the storyboard. Make sure you set this view controller to be the initial view controller. Change its class to
PlanetTableViewController. - Embed a navigation controller in this scene.
- Set the title of this view controller (its Navigation Item) to "Planets".
- Set the reuse identifier of this table's cells to "PlanetCell".
Table Cells
Next we're going to work on the main view's table cells. These cells are more complicated that ones you've designed before, but we'll walk through it step by step.
- First, make sure you have selected the prototype cell!
- Change the cell's class to
PlanetTableViewCell. - Set the prototype cell's height to 148 using the Size inspector.
- Drag three labels onto the prototype cell. These correspond to the planet name, number of moons, and orbital length. (Refer to the screenshot at the beginning of this README if you forget what the cells are supposed to look like.)
- Using the Attributes Inspector, change the first label's font to Avenir Next Regular 36, and its text color to brown. Change the height of the label to 35 using the Size Inspector.
- Change the second and third labels' fonts to Body using the Attributes Inspector.
- Add all three of these labels to a stacked view. Select all three labels, then press the Stack button at the bottom of Interface Builder. In the Attributes Inspector, make sure Alignment is set to Leading and Distribution is set to Fill Equally.
- You will have to add some constraints to the stack view. Click the Constraints button and add constraints to the top, bottom, and left side by clicking the red lines, as shown below:
- Add another label to the cell. Drop it so it is aligned along the right-hand side and centered vertically. Change the font to Avenir Next Regular 24 and the text color to orange using the Attributes Inspector. Change its height to 35 using the Size inspector.
- Open up
PlanetTableViewCell.swiftin an assistant editor. Create an IB outlet for each label you added to the cell. The names of these outlets should beplanetNameLabel,numberOfMoonsLabel,numberOfDaysFullOrbitLabel, andnumberOfFactslabel.

Detail View
Next, we'll work on the detail view. This is the view that appears when you tap on a cell. It shows all the facts for the tapped planet.
- Drag a new table view controller onto the storyboard.
- Change the new table view controller's class to
FactTableViewController. - Set the reuse identifier of this table's cells to "FactCell".
Table Cells
The cells for the detail table view are a lot easier to lay out. First, make sure you have this table view controller's prototype cell selected. Then:
- Change the class of the prototype cell to
FactTableViewCell. - Change the height of the cell to 155 using the Size Inspector.
- Drag a new text view onto the prototype cell. Drag its resize handles so it fills the entire cell. Change the font to Avenir Next Regular 30. Set the text color to a maroon color. Set its alignment to left.
- Click the Constraints button at the bottom of the Interface Builder window. Click all four red arrows and then click Add 4 Constraints.
- Add an IB outlet for the label you just created. Open up
FactTableViewCell.swiftin an assistant editor pane, then Control-drag an outlet from the text view toFactTableViewCell. Name this outletfactTextView. - Finally, create a segue from the cells in the main table view to this detail view.
Finishing Up
Time to put the finishing touches on this app and ship it.
- Open up
PlanetTableViewController.swiftin Xcode's code editor. You need to overridetableView(_:cellForRowAt:). This method should dequeue a reusable cell using the reuse identifier specified in the table view controller'splanetCellIdentifierproperty, then initialize its labels and return the cell. - You also need to implement the same method in
FactTableViewController. Open upFactTableViewController.swiftin Xcode's code editor. You need to overridetableView(_:cellForRowAt:). Again, this should dequeue a reusable cell identified by thefactCellIdentifierproperty, initialize itsfactTextViewtext view with the appropriate fact, and return the cell.
That's it! If you've followed all these directions, you'll now have an app that works as described and shows the views in the screenshots above.


