In this lesson, we will walk through the process of setting up your Windows 10 local environment. To do this, we will be using the Windows Subsystem for Linux to set up a Linux environment on your computer.
The Windows Subsystem for Linux (WSL) lets developers run a Linux environment directly on Windows 10 without the overhead of a virtual machine. It’s an unmodified OS, but highly integrated into Windows.
WSL1 was groundbreaking and translated Linux system calls to Windows equivalents. This could be slow and several features weren’t available. WSL2 uses Hyper-V virtual machine technology so Linux compatibility is excellent and file access is up to 20x faster than before.
WSL2 is compatible with the Home, Pro, or Server editions of Windows but not Windows' 10 S (although you can often upgrade to the Home edition for free).
The Windows May 2020 update is essential — that’s version 2004 or above. Choose the Settings cog from the Start menu, then select System followed by About. The Windows specifications are shown at the bottom of the panel:

Some PCs report that version 2004 is currently unavailable in the Windows Update panel. Alternatively, you can try downloading the Windows Update Assistant. If this does not work, you may not be able to upgrade until Microsoft has released a fix for your device. If you are on Windows 10, but cannot upgrade, follow these instructions for setting up WSL1.
WARNING: Fiddling with your BIOS settings can trash your PC! Be careful when making changes. Consult your manufacturer’s help pages or search for online advice about your specific make and model.
That warning out of the way, hardware virtualization will be active on most devices, but you can check by rebooting, and opening the BIOS panels — typically by hitting the DEL, F2, or F10 key as the system starts. Look for Virtualization Technology, VTx or similar options. Ensure they are enabled, save, and reboot the device.
Finally, ensure your C: drive has at least 1GB of spare disk space — ideally more. You may be able to free up some space in Settings, System, Storage or using the Disk clean-up tool in Windows Administrative Tools.
-
Make sure to run: Windows Update Assistant. When the update is complete, your system build should be greater than 19000. Please verify this is true before continuing.

Windows Subsystem Linux (WSL) is not automatically enabled on windows. So, to start off, we need to enable it!
-
Go to your Windows Search bar and type in
Turn Windows Features On or Off. Click on the result that matches your query. It will be in your Control Panel. You should see something like this: -
Scroll down until you see "Windows Subsystem for Linux" - ensure its box is checked!
-
Scroll up a bit until you see "Virtual Machine Platform." Turn this feature on as well.
When that's complete, it should look like this:

-
Click
ok. This will prompt Windows to completely restart. Do so, grab some water, and let's continue!


-
Open up Microsoft Store. Search for "Ubuntu"
-
Choose "Ubuntu" (do NOT choose 16.04 LTS, 18.04 LTS, or 20.04LTS)

-
Search for, and open the newly installed Ubuntu application.
-
Choose a username -- I suggest picking a really simple username (like a short nickname).
NOTE:
- Ubuntu will not accept capital letters in a username
- Ubuntu will not accept numbers at the start of a username
-
Choose a password -- I suggest picking a really really simple password.
NOTE:
- When you start typing a password, it will look as though nothing is happening. Thats totally normal, it's just a security feature.
- Type whatever password you would like, and press enter.
- It will prompt you to confirm your password, retype the same password and hit enter.
Once you have set up a username and password, you should return to a normal bash prompt (what does that even mean!?). It should look something like this:

At this point, you've already installed WSL1, we just need to run a few commands to update it to WSL2. The next few commands are a little quirky, but, extremely important.
-
Click this link -- it will download the necessary msi package. The package's name should be something along the lines of:
wsl_update_x64.msi. -
Double click on the package and follow the necessary prompts to install. (It should take approx 30 seconds to install.)
-
Now, in your Windows Search bar, search for an application named
Command Prompt. click Run as Administrator.
-
Inside Command Prompt (running as administrator), copy and paste the code below:
wsl --set-default-version 2

-
The following command will change your version of Ubuntu from 1, to 2. Run:
wsl.exe --set-version Ubuntu 2
Annnddd That's it for WSL2 you should be good to go on your WSL2 installation. Let's move on to our Learn Local Environment installation.
Okay, so now we can start setting up our Ubuntu system with Flatiron tools! First, let's close and reopen Ubuntu. Then run the commands below.
-
Run the following command in your Ubuntu terminal. This will make sure your currently installed packages in your Ubuntu system are up to date:
sudo apt-get update
-
Then run the following command to install a few important packages. (copy the entire block of code)
sudo apt-get install git-core curl zlib1g-dev build-essential libssl-dev libreadline-dev libyaml-dev libsqlite3-dev sqlite3 libxml2-dev libxslt1-dev libcurl4-openssl-dev software-properties-common libffi-dev libpq-dev libgdbm-dev libncurses5-dev automake libtool bison gnupg postgresql postgresql-contrib
Next, we'll install RVM, also known as RVM. I've purposefully listed commands 3 through 7 separately. Do not run them all at the same time -- run them in succession. The combined 5 commands will install RVM.
-
Run:
sudo apt-get install software-properties-common
-
Run:
sudo apt-add-repository -y ppa:rael-gc/rvm
-
Run:
sudo apt-get update
-
Run:
sudo apt-get install rvm
-
Run:
source ~/.bashrc
For all intents and purposes, RVM is now installed. However, to start using it, you must SHUT DOWN YOUR UBUNTU TERMINAL AND REOPEN IT AGAIN.
Moving right along, let's install the Ruby version compatible with Flatiron labs, we want to download ruby 2.6.1 and set it as our default:
-
This following will install Ruby version 2.6.1, which is what Flatiron uses for its curriculum. Run:
rvm install 2.6.1
-
The following will set Ruby version
2.6.1to be our default Ruby. Run:rvm use 2.6.1 --default
-
The following will install a Ruby gem named Bundler. (follow the hyperlink if you are curious as to what Bundler does) Run:
gem install bundler
-
The following will allow you to use commands like "learn open", "learn test", and "learn submit". For more information on the Learn gem, follow that hyperlink! Run:
gem install learn-co -v 3.9.6
NOTE: After installing the Learn gem, you will get a weird error that looks something like:
  RDoc is not a full Ruby parser and will fail when fed invalid ruby programs.

  The internal error was:
      (NoMethodError) undefined method `[]' for nil:NilClass
      ERROR:  While executing gem ... (NoMethodError)
      undefined method `[]' for nil:NilClass
This error is okay; it is the only error I will suggest ignoring!
Before we continue, let's configure our new installed learn-co gem. We'll do part of the configuration now, and another part later!
-
First run:
cd ~ -
Next run:
learn whoami
That last command will ask you to to retrieve some information and bring it back to terminal. That information can be found on your [Flatiron School][poral] profile page. So, head to portal.flatironschool.com, click on your profile picture in the top right, then click on the "Your Profile" link. On your profile page, scroll to the bottom and copy your OAuth token. YOU ONLY NEED TO COPY EVERYTHING AFTER "OAuth token:". For example, mine looks like this:9cd7da7faf8d978cb613008bdb56e4fc2notrealf642sdfds91eb70b5d8d3b2820fd91
-
Copy your token and paste it into terminal.
If all goes well, your terminal should display some information about you, similar to this:➜ learn whoami Connecting to Learn... Authenticating... Name: Dwayne 👾 Username: dwyn Email: [email protected] Learn Dir: /Users/dharmon/Development/code
-
The following will install the lovely debugging tool [Pry][]. Seriously ask yourself, where would you be without [Pry][]!? Run:
gem install pry
-
As if Rails needs an introduction! (but just incase, follow the hyperlink!) Run:
```sh
gem install rails
```
-
Nokogiri has many uses -- You will primarily use it to scrape websites so definitely install it and check out the documentation. Run:
gem install nokogiri
That should be all for necessary gems. Let's move on to configuring our version control!
-
This (and the next 2 commands) will set up git in your system. When you enter these commands, your terminal will not say anything -- don't worry, it definitely worked! Run:
git config --global color.ui true
For the next few commands, make sure to input your specific information:
-
Please please please replace your YOUR_GITHUB_USER_NAME, with your actual github username. For example, mine would look something like: git config --global user.name "dwyn" Run:
git config --global user.name YOUR_GITHUB_USER_NAME
Alternatively, you could just put your first and last name, like so:
git config --global user.name "First_Name Last_Name" -
The following is essentially repeating the same process, but with the email address tied to your github account. Run
git config --global user.email YOUR_GITHUB_EMAIL_ADDRESS
Node Version Manager is a tool that allows programmers to seamlessly switch between different versions of Node. I would say it's akin to Ruby Version Manager, but for Node. Node allows developers to write JavaScript code that runs directly in a computer process itself instead of in a browser.
-
The following will install NVM, baby! Run:
curl -o- https://raw.githubusercontent.com/nvm-sh/nvm/v0.35.1/install.sh | bash -
Let's refresh your terminal! Run:
source ~/.bashrc
-
The following will install Node.JS! Run:
nvm install node
Water Break!
Take a moment to close your eyes, focus on your breathing, maybe even hydrate a bit.
There are plenty of text editors out there. As of today 8.1.2020, do yourself a favor and just use Visual Studio Code.
- Follow this link to download VSCode. Choose the Windows download, not the Linux download.
NOTE:
As VSCode is installing, make sure to check all check boxes so that it installs for your entire system.
-
To configure your Ubuntu terminal to be available in VSCode:
- Open VSCode
- Open the Command Palette via
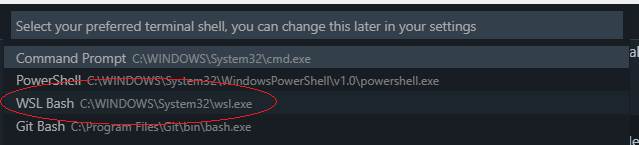
F1orCtrl+Shift+p - Begin typing the following:
Terminal: Select Default Shelluntil you see it. Select that option.

◦ Once you select it, a few options will pop up. You want to select WSL Bash C:\WINDOWS\System32\wsl.exe.
-
Now, you can use your Ubuntu terminal in VSCode. Select "New Terminal" in the "Terminal" drop-down, or type
Ctrl+Shift+ ` (ctrl + shift + backtick) in order to use it! -
Install the Remote - WSL extension for VSCode. The Remote - WSL extension extension lets you use WSL as your full-time development environment right from VS Code!
You can either communicate with your remote repositories via HTTPS or SSH.
Let's use SSH so you will not have to authenticate with your GitHub username
and password everytime you run learn save , learn submit ,
or any other commands push code to GitHub.
-
Run:
ssh-keygen
-
You will be asked where to save the new ssh file. Just press enter to save it in the default location.
-
You will be asked for a passphrase -- DO NOT ENTER A PASSPHRASE! Simply press enter, twice.
You will know the process is complete once you have some randomly generated ASCII art in your terminal. Now, let's retrieve the contents of that file.
-
Run:
cat ~/.ssh/id_rsa.pub
This should print out a really long string of characters starting with ssh. It will look something like this:
```
ssh-rsa AAAAB3NzaC1yc2EAAAADAQABAAABgQDI0n1zGPzhpwJRCwn0KeI8BybeyZP1XJWaGnv
BMJNfzvXVhRGX5TxZ6Aq2hvHtDVE0ST9O1L2PU802fakesshpwCWoeJx9HXKoI3KW1nAYMJH8Lj
R1I2nbm7cSZjg732CdElc3uwTMf0cU7S2oocH5vTYpBT20NsdfsdsdfsdQaHdfAlop6VVckZKNZ
bPLNiW1MO2rk7Hw1j6r6bDM1nFwV+uDzxJ7+uEBXpl6bsxVn7X8AmwZdLSYz6wTq1lXWTy46tfk
kFPNFyu5akkYoTym3jnQpKdW6AOVl89dXfRira4+DF7mQt3+kcfqHVsC7nN4s5T2Ju2KrVYiKF4
yo89CXd7Yu6EQx7JeRlw+kxtzgYo1enMnp4hAawgxCkWlEqWyJQkNVZ6Wq+/gcHezJr2PoUc3lT
X61TUcoCXV3QkjJDmnsSiwVDUqypCEBtNZyKMX5ZjSESPaj24C3F/yOdWIQu40iUR8oOT86Xo9+
waR/nIobxaqWLJ4I8vfVqXsrh0ZTU= [email protected]
```

Just keep in mind, yours will look similar... not the same!
-
Copy whatever your ssh key is, and follow this link: Github New SSH.
-
In the top input field, enter something meaningful. Such as, computer name, purpose for the key and date are solid options.
-
Paste your ssh key in the lower box. After you've completed both, your page should look similar to this:

- Click "Add SSH key", and that's all! Your ssh key has been generated on your computer, and linked to Github! Yeth!
First things first, let's completely close VSCode, and Ubuntu. Then, let's re-open only Ubuntu.
-
Reopen Ubuntu and run:
code ~/.learn-configThis command should open a
.learn-configconfig file in VSCode. -
You want to update this file so that it looks similar to the text below: (With your username slightly different)
---
:learn_directory: "/Users/YOUR-UBUNTU-USERNAME/development/flatiron/labs"
:editor: code
- Save this file, and close it.
You'll notice that we set up our .learn-config file with a path destination of /Users/YOUR-UBUNTU-USERNAME/Development/Flatiron/labs. For this to actually work, we have to make sure those folders exist in your Linux operating system. To do this, run the following command in Ubuntu:
- Run:
cd ~ && mkdir development/flatiron && mkdir development/flatiron/labs && rm -rf ~/development/code
Now you have the directories you need! learn open should work seamlessly by adding your most current lab to the
labs directory we just made.
-
Start out by making a backup for your
.bashrcmv .bashrc .bashrc.bak
-
We will want a tool for converting Windows endings to Unix endings for our new
.bashrcsudo apt-get install dos2unix -
download the new
.bashrccurl -R "https://raw.githubusercontent.com/flatiron-school/dotfiles/blob/master/.bashrc-windows" >> $HOME/.bashrc
-
We'll use our converter to convert our bashrc to use the right unix endings:
dos2unix .bashrc
And you're all set! Try running learn open in your terminal. If you are currently on a lab that requires coding, learn open will find that lab, fork it, clone it, and open it in Visual Studio Code for you!


