- Use Ruby gems (external libraries) in your applications
- Use Bundler and a Gemfile to manage gems and their dependencies
Nothing you ever write will be 100% your code. While you probably haven't noticed it, every day you use somebody else's code. You didn't write your text editor, you didn't write Ruby, you didn't write your operating system. Those are the types of things that regular users interact with.
As a developer, you have a whole world of outside code to work with: libraries. Libraries (or "gems" in Ruby parlance) are just bundles of code that someone else wrote for you to integrate into your codebase. For example, remember RSpec? That's a gem. Instead of everyone having to re-invent a way to do testing for Ruby, initially one person (and now hundreds of people) have worked together to make a single amazing library that everyone can use. What a time saver for us! We don't need to create our own testing framework.
RSpec is open source, and you integrate it into a Ruby application using the RubyGems tool. There are thousands of gems like RSpec that are incredibly helpful to us and are free to use and incorporate into your projects. That is the power of open source. Together we can create something no single person could make! In this lesson, we're going to take a look at gems and how to use them in your applications.
Gems are primarily hosted by RubyGems (https://rubygems.org), a free service provided for the Ruby community. You can install gems via the terminal:
gem install rspecWhen you run this command, Ruby locates the gem, looking in RubyGems by default, and if found, downloads and installs the latest version to your computer.
The key, really, is knowing the correct name so that you install the gem that you want.
To find gems, Google is often a good starting place. Often, you may find a GitHub repository that maintains the gem files this way, and if the gem is well maintained, this repository's README should contain info about how to install it.
Alternatively, you can also search for gems directly using https://rubygems.org/.
So, for instance, let's imagine we are looking for a gem to improve how Ruby
prints data to the terminal. We could google something like
ruby gem print output. Another option is to go to
https://rubygems.org/search/advanced and enter print in the search bar.
Let's assume we decided to search https://rubygems.org for the right gem.
Let's head to their advanced search interface
https://rubygems.org/search/advanced and search for print using the
description field. The advanced search interface will give us more flexibility
in the way we search for the ideal gem.
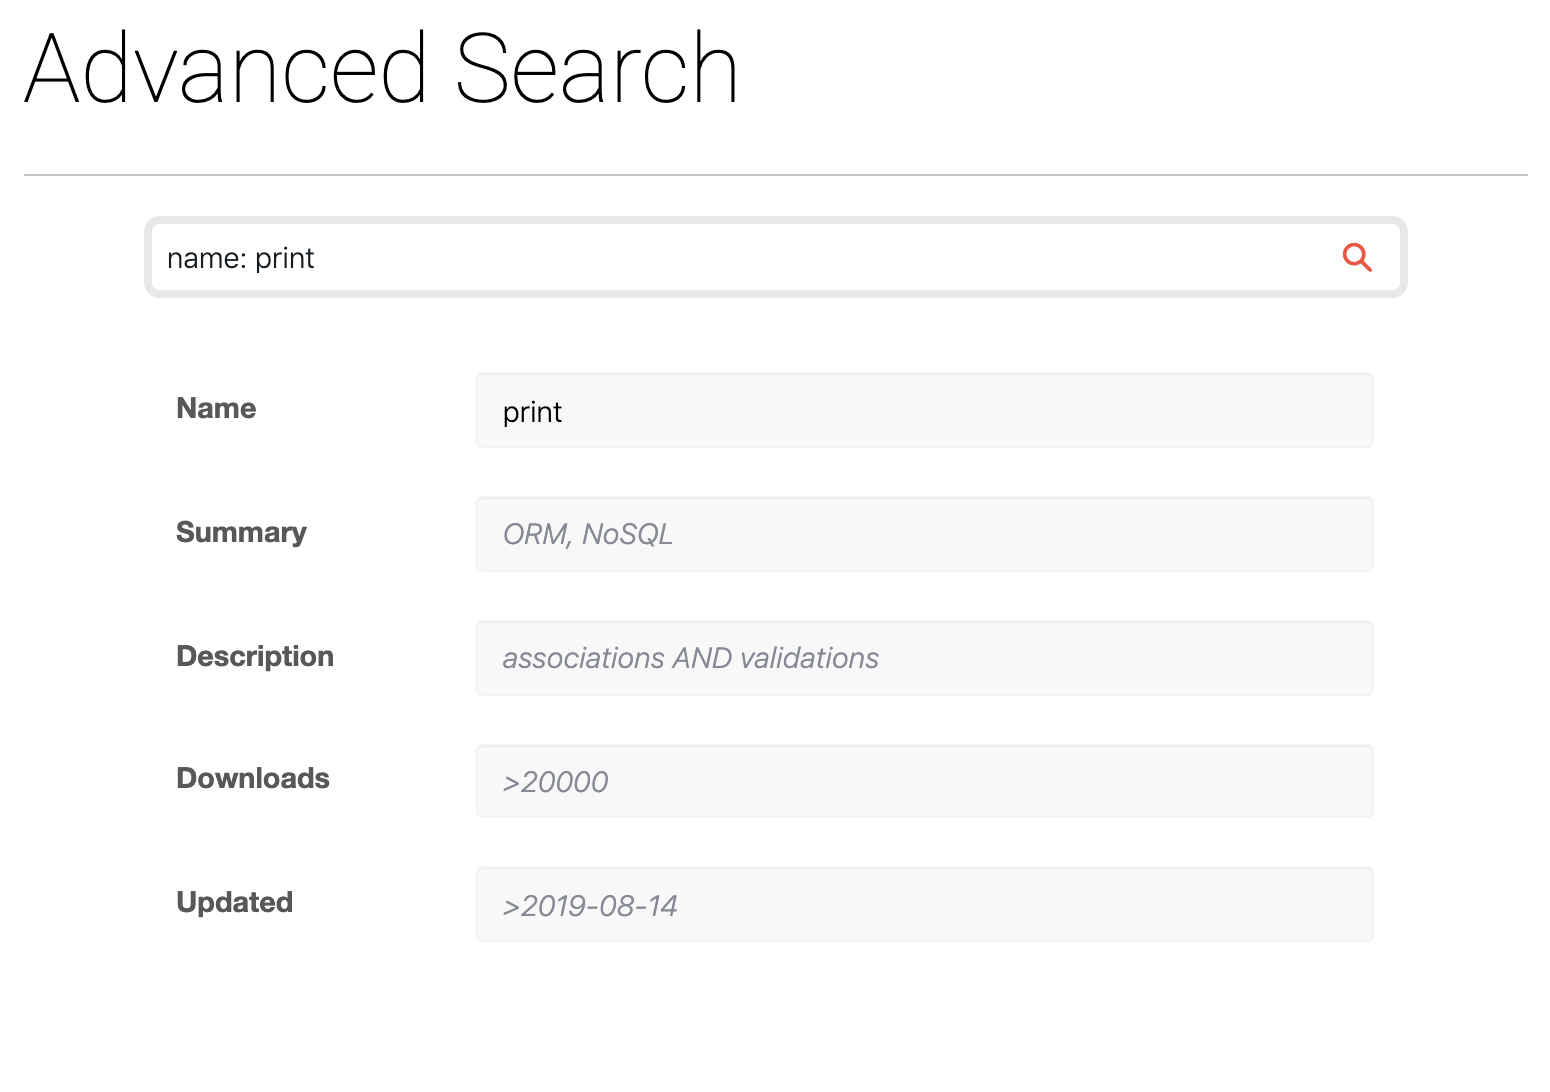
Searching by entering print into the name field yields the following results:

You might be asking which one is the best? How to choose from those many options? Which one should I use for my application?
There are a few indicators that should help:
- How many people have downloaded the gem?
- Does the description match what we're looking for?
In this example, one gem stand way out from the rest — awesome_print, and the
description sounds pretty close to what we're looking for. The second contender,
table_print might also be an option, though it has fewer downloads.
Continuing down the list, the third option is clearly not what we want — it
seems to be a gem specific to a certain API and has few downloads.
If you are in a situation where it isn't clear what gem to use, there are additional things to consider. For one, most gems will have homepages and files maintained on GitHub (linked as the gem's 'Homepage' on RubyGems). Looking at GitHub directly, we can ask additional questions to help us find the right gem. For instance:
- Does the README indicate this gem is what you are looking for? At a minimum, scan over the README to see if the gem fits what you are looking for. A well-developed README may also be a good indicator of a more professionally developed gem.
- Looking at the repository in general, has it been updated fairly recently? Sometimes great gems can become abandoned and a lack of updates might indicate this.
- How many people have contributed to the repo? Many contributors is a good indicator that the gem has been well maintained and updated. A single contributor, while not disqualifying, could indicate the gem is a personal project rather than a professionally built tool.
- How many open issues does the repo have? Real, professional tools have issues. Looking at issues can give you a sense of how well maintained the tool is.
- Does the repo have a test suite? A well-developed set of tests is an indicator that the gem was built with a thought out process.
- How many people have forked the repository? More forks is an indicator of a more popular gem.
Seems like awesome_print is a good gem to try for our printing example.
While table_print has some cool specific features, awesome_print seems
to be widely used and is well maintained.
From the instructions, looks like we can install awesome_print by typing
gem install awesome_print. We can test out the gem in IRB by requiring it:
require 'awesome_print'From the gem instructions, this gem will print out arrays and hashes nicely, so let's try the following in IRB:
array = [1,2,3,4]
hash = {:a => 1, :b => 5}
ap array
ap hash
Instead of the normal output, awesome_print should print array and hash
with each value or key/value separated on a new line:
[
    [0] 1,
    [1] 2,
    [2] 3,
    [3] 4
]
{
:a => 1,
:b => 5
}Neat! With the gem installed locally, all we need to do is include the require
statement in our own code and we will be able to use the gem.
When it comes to building applications that others will use, if a Ruby application relies on a gem, anyone using that app will need to install the gem to get the application to function correctly.
To make this process easy, we use a Gemfile. A Gemfile is where you list all
the gem dependencies for your application, as well as the source where they can
be downloaded, allowing other users to quickly install all the gems at once.
We do this using Bundler, typing bundle install in the terminal while in a
Ruby application directory. Bundler will install any gems listed.
Bundler itself is a Ruby gem, which should already be installed on your system. You can make sure you have the latest version by running:
gem install bundlerA typical Gemfile has two parts — a source at the top and a list of gems. A minimal Gemfile could look like the following:
source "https://rubygems.org"

gem 'awesome_print'
Any gems your application relies on should be listed out in the Gemfile with
gem preceding them. This line of code says that we're using the
awesome_print gem in this application.
In addition to listing the gem, we can also specify which versions this application works with. For instance, we could add the following:
gem 'awesome_print', '~> 1.8'Why specify version? Sometimes, a gem developer makes a major change to their gem. If you've built an app to work using one version of a gem, a future version might require a different code implementation, causing your app to break until you fix it!
All gems go through several types of updates: major version changes, minor version changes and patches.
A major version change is reflected by the first number (reading from left to right). Major version changes don't have to be backward compatible. This means that if your app is built using version 1, and the gem updates to version 2, the new version can potentially break your app.
A minor version change is reflected by the number after the first decimal point. All minor version changes should be backward compatible. This means that while version 1.2 has more functionality than version 1.0, all the features in 1.0 are supported in 1.2.
Sometimes, a third number will be listed after a decimal point (i.e. 1.8.0).
This number reflects a patch, which is a change to a gem to fix a bug but not
introduce new functionality. 1.8.3 means major version 1, minor version 8, and
a patch version 3.
The '~> 1.8' listed after awesome_print means this application should use
version 1.8 or the latest minor version up to 1.x, but not 2.0.
Note: Writing '~> 1.8.0' will result in different behavior — rather than
using the last minor version, our application will use the latest patch, so
our application would use version 1.8.0 up to 1.8.x, but not 1.9.0!
Aside: For some reason lost to history, Rubyists have decided to call this
~>"Twiddle-Wakka."'~> 2.6'means any minor version above 2.6. 2.7, 2.8, and 2.9 would work (including patches); but version 3.0 wouldn't work because it indicates a new major version.
You can read more about controlling gem versions and additional options in the documentation on RubyGems.
At the top of a Gemfile, we include the default source where our gems are
located (typically source "https://rubygems.org"). By default, Bundler will
try to find gems at the default source that you specified in the top of your
Gemfile. But sometimes you might be working with a gem whose developer(s)
haven't yet pushed the code to RubyGems.org. Maybe you're one of those
developers yourself! In that case, Bundler provides a few options.
You can refer to the gem via its GitHub repository:
gem 'rack', git: 'https://github.com/rack/rack'Provided that the GitHub repository is for the gem only, this simple invocation should work. If the gem code is in a subdirectory of the repository, several options are available to help you help Bundler find the gem. Consult the Bundler documentation for options.
Or, perhaps the gem is private and needs to be accessed via SSH. No problem.
gem 'nokogiri', :git => '[email protected]:some-user-account/some-private-gem.git'The Gemfile lets you set up groups, so gems are only loaded under specific
circumstances. For example, you might have a gem like Pry in your development
group because you only need to use Pry to debug when you are in the development
phase. Your code in production, i.e. when your app is being used by a user,
doesn't need to use the Pry gem.
Here's an example Gemfile with a group specified:
source "https://rubygems.org"

gem "rest-client"

group :development do
  gem "pry"
end
This is similar to the distinction between dependencies and devDependencies
in a package.json file.
To quickly review, once you've got gems listed in the Gemfile, Bundler will handle the process of installing them when other users download the application.
Including gem followed by the name of the gem will make sure that gem is
installed for the project. Listing a gem without a version will cause Bundler to
download the newest version of that gem.
Including a specific version, like gem 'rest-client', '2.1.0' will lock the version
so your app only uses that version.
Including ~> before the version number will limit your app to using either the
version you list or a version with only minor updates (or patches, depending on your
syntax).
Read more about the Gemfile here
With this, you can make sure everyone working on your app is using the right version. Now, let's try practicing what we've learned.
To get started with Bundler, we'll first create a Gemfile. To create a Gemfile,
make sure you're in the lab directory, and type bundle init in your terminal.
There's only one file Bundler requires you have (Gemfile). The other files are conventional for a typical Ruby application, but not required by the use of Bundler for gem management.
Gemfile— This file is required by Bundler and contains a source and a list of file requirements. That's all.config/environment.rb— The environment file is where we'll be loading all of our app's dependencies, from gems to database connections.bin/run.rb— This file will start our application. This file will require the environment file we created earlier to provide our app with access to our gems.
We'll be using these files in the test suite, so don't rename them.
Add this code to your Gemfile
source "https://rubygems.org"
gem "rspec"
gem "rest-client"

group :development do
  gem "pry"
end
Run your test suite with learn test to see what gems you'll be adding to
your gem file. Add the appropriate gems, specifying their version when
necessary, to get the tests passing.
After getting all of your gems in your Gemfile, run bundle install from your
terminal. This will install the listed gems for you. They won't show up in the
directory, but they are in your system, and available.
Running bundle install also creates a new file: Gemfile.lock. This file
notes which specific gem versions were installed. If this file is committed and
included in a project, Bundler will default to using the exact versions
listed in this file when installing gems.
When you start up an app, your app needs to know the order in which to load
files. If your app uses gems, your code will depend on these external libraries.
This means we'd want the gems to be loaded in our app before our own code. If
we loaded our code first, we'd get uninitialized constant errors or undefined
variable or method errors. Load order matters. We can specify load information
in config/environment.rb to configure our load order so that nothing breaks.
In config/environment.rb, we can specify which Bundler groups we want to load.
The following code is used to load the default group (anything not explicitly
in a group) and the development group.
Place the following code in config/environment.rb:
require 'bundler/setup'
Bundler.require(:default, :development)
Important: The two arguments that you are passing into the #require method
must be passed in the correct order, shown above. The test you are trying to
pass is testing for order.
This code first requires in code from the Bundler gem, then uses
Bundler.require to require all the gems listed in our Gemfile! That saves
us from needing to require each gem individually:
# this code
require 'bundler/setup'
Bundler.require(:default, :development)

# is equivalent to this code
require 'rspec'
require 'rest-client'
require 'pry'This is where the action is. This is where our app logic goes, and where we make our millions.
To take advantage of all of the work we did in the environment file, let's require it here.
Place the following code in bin/run:
require_relative '../config/environment'That's it! Now we can access all of our gems from our bin/run file.
With a Gemfile, you can augment your own applications and bring in many gems. Some gems, like Rails and Sinatra, are complex enough that they are used to build major websites. Some gems are extremely simple and serve a single purpose.
The installation of gems from the Gemfile is handled by Bundler. We can actually
make sure these gems get loaded by using an environment file and Bundler, then
requiring the environment file in our run file. Whenever the run file is
executed, Bundler requires the appropriate gems for us or prompts us to run
bundle install if it hasn't been run.
From here, we can add whatever application logic we'd like — we have a way to include gems, a place to configure and load them and a file that starts everything!


