Session-based Rails API Auth
Today we're going to take a look at using Rails sessions as a way of authenticating requests to our API from a separate frontend service. There are many different auth strategies out there, and they all come with some tradeoffs; this approach will hopefully feel similar to your experience learning Auth in Rails in Phase 2.
The motivation:
- Rails has a great mechanism for session-based auth that's built-in and battle-tested
- HTTPOnly cookies are secure from cross-site scripting (XSS) attacks, while
localstorageis not
Disclaimer 1: This readme only covers the basics and there are still some additional security concerns to be aware of with this approach. Consider implementing CSRF tokens and enabling secure cookies if you deploy your app to a secure domain.
Disclaimer 2: Using this strategy means your API will only be accessible from browser-based clients, since we're relying on cookies as the authentication mechanism. That means if you're planning on making a React Native client or other mobile frontend, this strategy won't work. It also will make testing your API using Postman more challenging. You could also consider using JWT tokens and storing them in cookies, which would give you the added protection of using HTTPOnly cookie storage in browsers - have a look at this terrific blog for more details on that.
Finished code for this project is in session-auth-api (Rails) and
session-auth-client (React).
If you want to code along, create a new Rails app:
rails new project-name-backend --api --database=postgresqlIf you'd rather use the pre-built app, cd into session-auth-api and run:
bundle
rails db:create db:migrate
rails s
There's also a pre-build React client app - to get that running, cd into
session-auth-client and run:
npm install
npm start
Rails
Gems
Time to get our app up and running! Let's take care of setting up our Gemfile for this project with all the necessary dependencies.
First, uncomment the rack-cors and bcrypt gems.
Then, run:
bundle add active_model_serializers
bundle install
Config
We'll need to configure a couple of things right off the bat, since the default
configuration for Rails with the --api flag doesn't enable cookies or
sessions.
First, we need to add in middleware for cookies and sessions in our config:
  # in config/application.rb
module SessionAuthApi
  class Application < Rails::Application
    # keep all the default configuration, which should look like this:
    config.load_defaults 6.0
    config.api_only = true

    # add this at the end
    config.middleware.use ActionDispatch::Cookies
    config.middleware.use ActionDispatch::Session::CookieStore
  end
end
We also need to setup CORS. In config/initializers/cors.rb file, the *
(wildcard) origin isn't an option if you want to send cookies in a CORS request
- we need to specify the origins we're allowing. We also need to include
credentials: truehere to set theAccess-Control-Allow-Credentialsheader totrue.
Rails.application.config.middleware.insert_before 0, Rack::Cors do
  allow do
    # origins '*' won't work!
    origins 'localhost:3001' # Make sure to change this when you deploy!

    resource '*',
      headers: :any,
      credentials: true,
      methods: [:get, :post, :put, :patch, :delete, :options, :head]
  end
end
Finally, we also have to setup our controllers to send cookies.
class ApplicationController < ActionController::API
  include ActionController::Cookies
end
Authenticating
With that configuration done, let's make a User model and a few resources to test our session auth:
rails g resource User username password_digestLet's make sure our User class is set up to use BCrypt and has some validations:
# app/models/user.rb
class User < ApplicationRecord
  has_secure_password

  validates :username, presence: true, uniqueness: { case_sensitive: false }
end
Let's also configure the serializer so it only sends the username:
# app/serializers/user_serializer.rb
class UserSerializer < ActiveModel::Serializer
  attributes :username
end
Then let's configure some routes for authentication:
# config/routes.rb
Rails.application.routes.draw do
  namespace :api do
    namespace :v1 do
      post "/signup", to: "users#signup"
      post "/login", to: "users#login"
      post "/logout", to: "users#logout"
      get "/autologin", to: "users#autologin"
    end
  end
end
Now for some controller setup. First, let's setup our ApplicationController to handle some authorization logic:
# app/controllers/application_controller.rb
class ApplicationController < ActionController::API
  include ActionController::Cookies

  before_action :authorized

  private

  def current_user
    @current_user = User.find_by(id: session[:user_id])
  end

  def logged_in?
    !!current_user
  end

  def authorized
    render json: { message: 'Please log in' }, status: :unauthorized unless logged_in?
  end

end
Then let's set up our UsersController to enable our auth actions:
# app/controllers/api/v1/user_controller.rb
class Api::V1::UsersController < ApplicationController
  # authorized (from ApplicationController) will run before EVERY action except login and signup
  skip_before_action :authorized, only: [:login, :signup]

  def login
    # login looks for an existing user by their username
    user = User.find_by(username: params[:username])

    # it uses the authenticate method from BCrypt to check their hashed password
    if user && user.authenticate(params[:password])
      # if they are authenticated, set the user_id in the session cookie
      session[:user_id] = user.id
      render json: user
    else
      # otherwise, they're not authenticated
      render json: { errors: "Invalid username or password" }, status: :unauthorized
    end
  end

  # signup creates a new user
  def signup
    user = User.create(username: params[:username], password: params[:password])

    if user.valid?
      # if the user is created successfully, set the user_id in the session cookie
      session[:user_id] = user.id
      render json: user, status: :created
    else
      # otherwise, let them try signing up again
      render json: { errors: user.errors.full_messages }, status: :bad_request
    end
  end

  # this action can be used to authenticate a user when the client app first loads (in componentDidMount in App, for example)
  # make sure the authenticate before_action runs before this (since we need the @current_user instance variable set)
  def autologin
    render json: @current_user
  end

  def logout
    session.delete(:user_id)

    render json: { message: "Logged out" }
  end

end
With our API set up, let's have a look at our frontend.
React
We're still going to be communicating between our frontend and backend using
fetch, but now in addition to sending what we've typically been (headers,
method, body), we also need to make fetch include our cookies as part of all
requests. To do this, all we need to do is use the credentials: "include"
option in our fetch request:
fetch("http://localhost:3000/api/v1/autologin/", {
  credentials: "include",
});
This will ensure that cookies are included as part of the fetch request for cross-origin requests - MDN Request.credentials. Since our frontend and backend are on separate origins, this option is necessary for all requests that need our session cookie.
To test our sessions, try making a signup request in your frontend (you can do this from the browser console, but make sure you're on localhost:3001):
fetch("http://localhost:3000/api/v1/signup", {
  method: "POST",
  credentials: "include",
  headers: {
    "Content-Type": "application/json",
  },
  body: JSON.stringify({ username: "test_user", password: "123" }),
});
In the network tab, the response should look something like this:
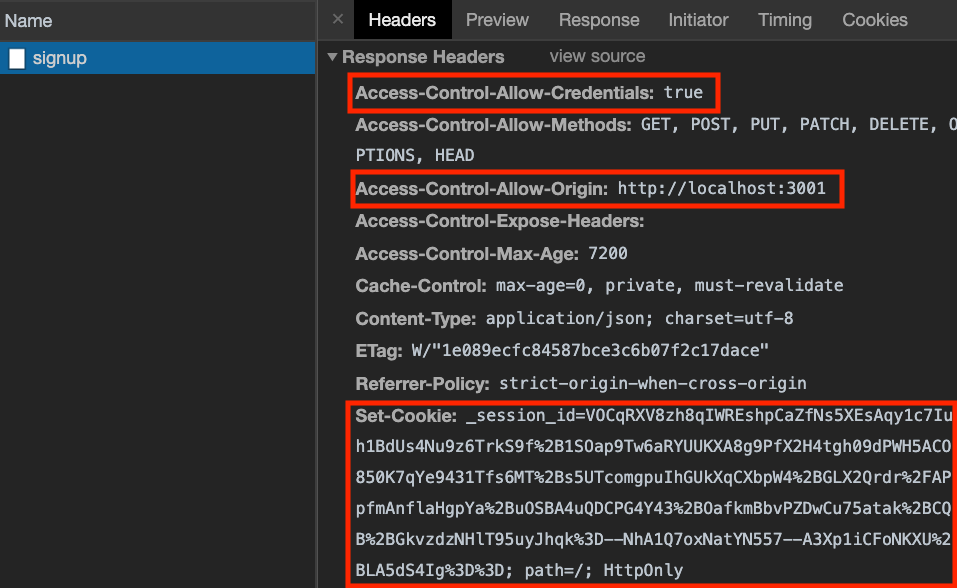
If the Access-Control headers look different, check your CORS config file on the
server. Also, make sure you have credentials: "include" in your fetch options.
After signing up, try using the /autologin route to check if your requests are
authenticated:
fetch("http://localhost:3000/api/v1/autologin/", {
  credentials: "include",
});
In the network tab, the request should look something like this:
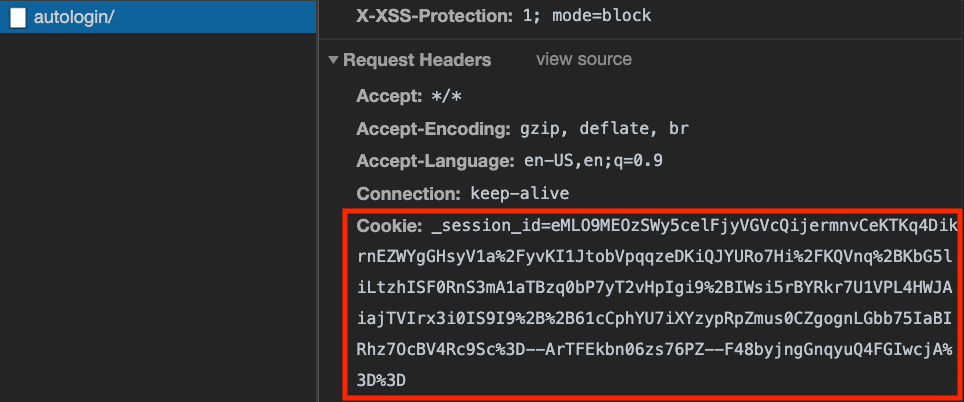
Check that the cookie is being sent as part of the request headers; if not,
double-check that all your fetch requests have credentials: "include".
Play around with the sample app and drop some byebugs in your backend when the
fetches come through to get a sense of how the auth flow works! Pay close
attention in particular to the actions in the ApplicationController.
Resources
- Rails API Auth with Session Cookies
- this also shows how to enable CSRF protection for added security
- JWT Storage in Rails + React
- this advocates for using JWT tokens instead of Rails sessions as an auth mechanism, but it's a useful resource for seeing how to use HTTPOnly cookies
Bonus: Google Sign In
Resources:
- Google Sign-in Basics
- Backend Authentication
- React Google Login package
- dotenv-rails gem
- google-id-token gem
Google Setup
Follow the steps to create your authorization credentials (just up to step 4 under "Create authorization credentials" - skip the sections below that).
Take note of the client ID - you'll need that later for React and Rails.
Frontend Setup
First let's save the client ID in a .env file so we can access that later. In
the root of your React application, create a file called .env and add your
Google client ID, like so:
REACT_APP_GOOGLE_CLIENT_ID=739034625712-ads90ik8978gyahbbdf7823asd8213as.apps.googleusercontent.comNext, install this package:
npm install react-google-loginWe'll use this to display a Google sign in button and handle logic for
authenticating the user with Google. Update the <Login> component like this:
import React from "react";
import { GoogleLogin } from "react-google-login";

function Login() {
  const [formData, setFormData] = useState({
    username: "",
    password: "",
  });

  // new code!
  function handleGoogleLogin(response) {
    // we'll get a tokenId back from Google on successful login that we'll send to our server to find/create a user
    if (response.tokenId) {
      fetch("http://localhost:3000/google_login", {
        method: "POST",
        credentials: "include",
        headers: {
          "Content-Type": "application/json",
          Authorization: `Bearer ${response.tokenId}`,
        },
      })
        .then((r) => r.json())
        .then((user) => onUpdateUser(user));
    }
  }

  // old code
  function handleChange(e) {
    setFormData({ ...formData, [e.target.name]: e.target.value });
  }

  // old code
  function handleSubmit(e) {
    e.preventDefault();
    // TODO: make a fetch request to login the current user
    // then set that user in state in our App component
    fetch("http://localhost:3000/login", {
      method: "POST",
      credentials: "include",
      headers: {
        "Content-Type": "application/json",
      },
      body: JSON.stringify(formData),
    })
      .then((r) => r.json())
      .then((user) => onUpdateUser(user));
  }

  return (
    <div>
      <form onSubmit={handleSubmit}>
        <h1>Login</h1>
        <label>Username</label>
        <input
          type="text"
          name="username"
          autoComplete="off"
          value={formData.username}
          onChange={handleChange}
        />
        <label>Password</label>
        <input
          type="password"
          name="password"
          value={formData.password}
          onChange={handleChange}
          autoComplete="current-password"
        />
        <input type="submit" value="Login" />
      </form>
      <hr />
      <div>
        <GoogleLogin
          clientId={process.env.REACT_APP_GOOGLE_OAUTH_CLIENT_ID}
          buttonText="Login"
          onSuccess={handleGoogleLogin}
          onFailure={handleGoogleLogin}
          cookiePolicy={"single_host_origin"}
        />
      </div>
    </div>
  );
}

export default Login;
That's it for the frontend! The backend will take more work to set up.
Backend Setup
First, we'll need to install a couple gems:
bundle add google-id-token
bundle add dotenv-rails
Next, create a .env file in the root of your project directory and add the
Google client ID:
GOOGLE_OAUTH_CLIENT_ID=739034625712-ads90ik8978gyahbbdf7823asd8213as.apps.googleusercontent.comYou should also update your .gitignore file so that your .env file isn't
checked into Github:
# add this at the bottom of the .gitignore file

.env*
Next, add a route for handling the Google login request:
# config/routes.rb
post "/google_login", to: "users#google_login"
Then, update your UserController to handle this request:
# app/controllers/user_controller.rb
class UsersController < ApplicationController
  # don't run authorize before google_login, remember - authorized should only run for methods where we expect the user is *already* logged in
  skip_before_action :authorized, only: [:create, :login, :google_login]

  # other methods here...

  def google_login
    # use a helper method to extract the payload from the google token
    payload = get_google_token_payload
    if payload
      # find/create user from payload (this will be a new method in the User model)
      user = User.from_google_signin(payload)

      if user
        # if the user exists or was successfully created
        # save user_id in session so we can use it in future requests
        session[:user_id] = user.id
        # return the user in the response
        render json: user
        return
      end
    end

    # for invalid requests, send error messages to the front end
    render json: { message: "Could not log in" }, status: :unauthorized
  end

  private

  # helper function to validate the user's token from Google and extract their info
  def get_google_token_payload
    if request.headers["Authorization"]
      # extract the token from the Authorization header
      token_id = request.headers["Authorization"].split(" ")[1]

      # this is the code from the Google auth gem
      validator = GoogleIDToken::Validator.new
      begin

        # check the token_id and return the payload
        # make sure your .env file has a matching key
        validator.check(token_id, ENV["GOOGLE_OAUTH_CLIENT_ID"])
      rescue GoogleIDToken::ValidationError => e
        p "Cannot validate: #{e}"
      end
    end
  end
We'll also add a helper method for creating a new user from the Google payload:
# app/models/user.rb
class User < ApplicationRecord
  has_secure_password

  validates :username, presence: true, uniqueness: { case_sensitive: false }

  def self.from_google_signin(payload)
    # find or create a user based on the email address from the Google payload
    User.where(username: payload["email"]).first_or_create do |new_user|
      new_user.username = payload["email"]
      new_user.image = payload["picture"]
      # we need to assign a password to satisfy bcrypt, so generate a random one...
      new_user.password = SecureRandom.base64(15)
    end
  end

end
Now, test it out! You should be able to login with your Google account and create a new User instance in the backend with that information.


