Orchestration of the analytics workflow in IBM Data Science Experience(DSX) using a custom web user-interface built with Node-RED
IBM Data Science Experience can be used to analyze data using Jupyter notebooks. There is no mechanism exposed by Data Science Experience to trigger execution of the notebook cells from outside. If this capability is added, we can build a complete end to end analytics solution using IBM Data Science Experience.
This journey addresses two requirements:
- Trigger the execution of Python code in a Jupyter Notebook on IBM Data Science Experience from a custom web user interface
- Visualize the response from the Python code execution in a Jupyter Notebook on IBM Data Science Experience on the custom web user interface
In this developer journey we will demonstrate the use of Node-RED to invoke the analytics workflows in Jupyter notebooks on IBM Data Science experience and also to render a custom web user-interface with minimal programming.
Node-RED is a tool for wiring together APIs and online services on Bluemix. The APIs and online services are configured as nodes that can be wired to orchestrate a workflow. It is also a web server where the UI solution can be deployed. It has nodes that support integration with many database services, watson services and analytics services.
When the reader has completed this journey, they will understand how to:
- Create and run a Jupyter notebook in DSX.
- Use DSX Object Storage to access data files.
- Use Python Pandas to derive insights on the data.
- Develop a custom web user interface using Node-RED.
- Triggering an analytics workflow on DSX from the UI using Node-RED.
The intended audience for this journey are developers who want to develop a complete analytics solution on DSX with a custom web user interface.

- The Object storage stores the data.
- Data is utilized as csv files.
- The Jupyter notebook processes the data and generates insights.
- The Jypyter notebook is powered by Spark.
- The Node-RED hosts a websocket server that is a medium of communication between the Jupyter notebook on IBM DSX and Web UI.
- The Node-RED hosts a web server that renders the Web UI.
-
Node-RED: Node-RED is a programming tool for wiring together APIs and online services.
-
IBM Data Science Experience: Analyze data using RStudio, Jupyter, and Python in a configured, collaborative environment that includes IBM value-adds, such as managed Spark.
-
Bluemix Object Storage: A Bluemix service that provides an unstructured cloud data store to build and deliver cost effective apps and services with high reliability and fast speed to market.
-
Jupyter Notebooks: An open-source web application that allows you to create and share documents that contain live code, equations, visualizations and explanatory text.
- Data Science: Systems and scientific methods to analyze structured and unstructured data in order to extract knowledge and insights.
Follow these steps to setup and run this developer journey. The steps are described in detail below.
- Sign up for the Data Science Experience
- Create Bluemix services
- Import the Node-RED flow
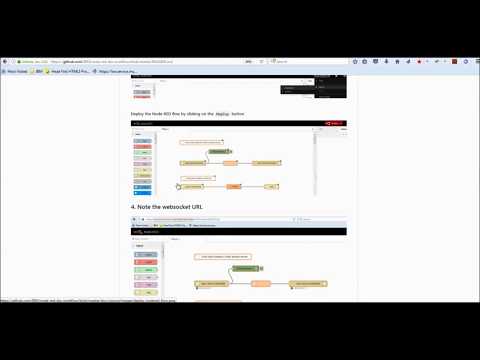
- Note the websocket URL
- Update the websocket URL
- Create the notebook
- Add the data
- Update the notebook with service credentials
- Run the notebook
- Analyze the results
Sign up for IBM's Data Science Experience. By signing up for the Data Science Experience, two services: DSX-Spark and DSX-ObjectStore will be created in your Bluemix account.
-
Create the Node-RED Starter application.
-
Choose an appropriate name for the Node-RED application -
App name:. -
Click on
Create.
- On the newly created Node-RED application page, Click on
Visit App URLto launch the Node-RED editor once the application is inRunningstate. - On the
Welcome to your new Node-RED instance on IBM Bluemixscreen, Click onNext. - On the
Secure your Node-RED editorscreen, enter a username and password to secure the Node-RED editor and click onNext. - On the
Browse available IBM Bluemix nodesscreen, click onNext. - On the
Finish the installscreen, click on Finish. - Click on
Go to your Node-RED flow editor.
- On the newly created Node-RED application page, Click on
- Clone this repo.
- Navigate to the orchestrate_dsx_workflow.json.
- Open the file with a text editor and copy the contents to Clipboard.
- On the Node-RED flow editor, click the Menu and select
Import -> Clipboardand paste the contents.


The websocket URL is ws://<NODERED_BASE_URL>/ws/orchestrate where the NODERED_BASE_URL is the marked portion of the URL in the above image.
An example websocket URL for a Node-RED app with name myApp is ws://myApp.mybluemix.net/ws/orchestrate, where myApp.mybluemix.net is the NODERED_BASE_URL.
The NODERED_BASE_URL may have additional region information i.e. eu-gb for the UK region. In this case NODERED_BASE_URL would be: myApp.eu-gb.mybluemix.net.
Click on the node named HTML.

Click on the HTML area and search for ws: to locate the line where the websocket URL is specified.
Update the websocket URL with the base URL that was noted in the Section 4:
var websocketURL = "ws://NODERED_BASE_URL/ws/orchestrate";

Click on Done and re-deploy the flow.
- Open IBM Data Science Experience.
- Use the menu on the top to select
Projectsand thenDefault Project. - Click on
Add notebooks(upper right) to create a notebook. - Select the
From URLtab. - Enter a name for the notebook.
- Optionally, enter a description for the notebook.
- Enter this Notebook URL: https://github.com/IBM/node-red-dsx-workflow/blob/master/notebooks/node_red_dsx_workflow.ipynb
- Click the
Create Notebookbutton.

- Please download the files - summer.csv and dictionary.csv from : https://www.kaggle.com/the-guardian/olympic-games.
- Rename the file
summer.csvtoolympics.csv - From your project page in DSX, click
Find and Add Data(look for the10/01icon) and itsFilestab. - Click
browseand navigate to where you downloadedolympics.csvanddictionary.csvon your computer. - Add the files to Object storage.

- Select the cell below
2.1 Add your service credentials for Object Storagesection in the notebook to update the credentials for Object Store. - Use
Find and Add Data(look for the10/01icon) and itsFilestab. You should see the file names uploaded earlier. Make sure your active cell is the empty one created earlier. - Select
Insert to codebelow olympics.csv. - Click
Insert Crendentialsfrom the drop down menu. - If the credentials are written as
credential_2change them tocredentials_1.

- In the cell below
6. Expose integration point with a websocket client, update the websocket url noted in section 4 in thestart_websocket_listenerfunction.

When a notebook is executed, what is actually happening is that each code cell in the notebook is executed, in order, from top to bottom.
Each code cell is selectable and is preceded by a tag in the left margin. The tag
format is In [x]:. Depending on the state of the notebook, the x can be:
- A blank, this indicates that the cell has never been executed.
- A number, this number represents the relative order this code step was executed.
- A
*, this indicates that the cell is currently executing.
There are several ways to execute the code cells in your notebook:
- One cell at a time.
- Select the cell, and then press the
Playbutton in the toolbar.
- Select the cell, and then press the
- Batch mode, in sequential order.
- From the
Cellmenu bar, there are several options available. For example, you canRun Allcells in your notebook, or you canRun All Below, that will start executing from the first cell under the currently selected cell, and then continue executing all cells that follow.
- From the
- At a scheduled time.
- Press the
Schedulebutton located in the top right section of your notebook panel. Here you can schedule your notebook to be executed once at some future time, or repeatedly at your specified interval.
- Press the
For this Notebook, you can simply Run All cells.
The websocket client will be started when you run the cell under 7. Start websocket client. This will start the communication between the UI and the Notebook.
The UI can be accessed at the URL: http://<NODERED_BASE_URL>/dsxinsights.
The <NODERED_BASE_URL> is the base URL noted in section Note the websocket URL.


