Tindie Store - Order the device here https://bit.ly/2L2vBSy
If you would like to see further enhancement of this whole iot platform kindly donate to my BTC account

Nothing spells security than being notified or alerted if somebody has entered your premises without your permission. It also helps when even before someone can gain entry, you already know who he or she is. The main idea of this door/window sensor is to simply provide you information if someone has gone through any of your property entry points.
The door/window sensor is primarily used to detect people or objects that have passed through the doors, but it’s also compatible to windows and any enclosures that could be opened.
The door/window sensor is a very unassuming device so it blends well with the rest of the commonly found items or appliances in your home. It is also quite small you can easily hide it well, away from the prying eyes of potential intruders, and it doesn’t get in the way with the actual functions of the entry points.
The device is a magnetic switch that allows it to accurately determine location and direction. In other words, there are no false alarms and leads.
As a magnetic device, it doesn’t require any intricate tools to install. In fact, you simply need to snap it into any metal part of your entryway, and you can already properly and quickly configure the door sensor. If not, you can conveniently attached even a small piece of metal at any part of the door and window.
A connected home brings devices and services together for an integrated, autonomous experience that improves a consumer’s life. Connected home experiences include everything from window/door sensor , voice-controlled lights, house-cleaning robots, machine learning-enabled security cameras, and WiFi routers that troubleshoot for you. Thanks to decreasing costs and increasing options for connectivity, these smart home devices, sensors, and tools can be interlinked to create real-time, contextual, and smart experiences for consumers.
IoT powers the connected home by bringing new features and capabilities to smart devices, like interconnectivity, security, offline communication, predictive maintenance, analytics for consumer insights, and machine learning. Each of these capabilities play a different role in key connected home use cases such as home automation, home security and monitoring, and home networking.
- Wifi version
- Sigfox version
- Lorawan version require an existing lorawan gateway (Prototype, too expensive)
- Use the raspi-config tool (with sudo raspi-config) to enable SPI on the Raspberry Pi
- Install wiringpi (sudo apt-get install wiringpi)
- Adafruit Huzzah ESP8266/TTGO ESP32 Wifi/Arduino UNO
- 2-way connector
- LED
- 47k Ohm Resistor
- 10k Ohm Resistor
- 220 Ohm Resistor
- Magnetic Door Sensor
- Jumper
- Custom made PCB by kenken64
- Lipo Battery/ 18650 battery
- Headers
- UnaShield Sigfox for Arduino UNO
- ESP8266/ESP32 STL 3d Design
- Sigfox STL 3d Design
- WIFI Version 1 (Custom made PCB)

- WIFI Version 2 (Custom made PCB)


- Sigfox version (Shield from UnaBiz)
- Microsoft Visual Studio Code
- Node JS
- Ubuntu/Windows 10 ( 2 CPU and 2GB ram )
- Angular 7 Cli
- Arduino IDE
- ESPBattery
- ESP 8266/32 Arduino library
- Unashield Sigfox library
- Twilio (require your own credit to send out SMS/WhatsApp)
- Gmail https://mail.google.com/mail/u/0/
- Google Firebase Realtime Database https://console.firebase.google.com/u/0/?pli=1
- Blynk Cloud Service ( Mobile App)
- Create a twilio account and top up with the credits.
- Note down the twilio SSID and AUTH TOKEN.
- Purchase a number from Twilio
- Also note down the WhatsApp from number

- Create gmail account. Please do not use personal gmail account for this.
- Enable unsecure access to this account Gmail API setting
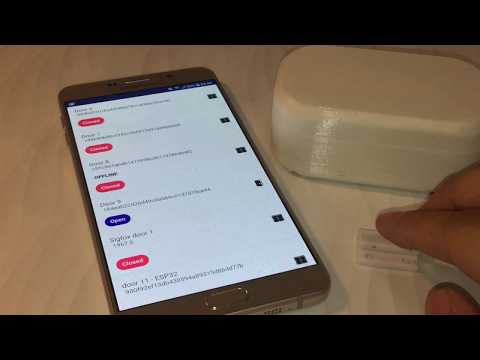
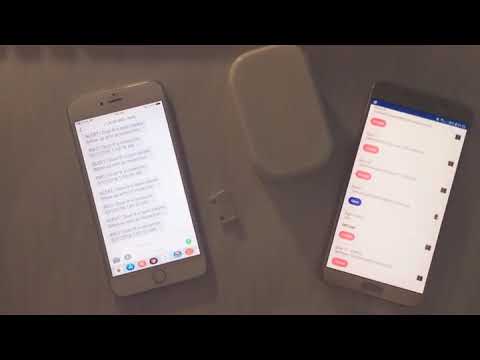
- Detect door is open and closed.
- Send SMS using twilio to the configure recipient mobile number
- Send notification email to the configure recipient email address
- Detect battery is low send notification via SMS and email
- Log all events to the door's device
- Provide exportable reporting of all doors
| Env variables | Description |
|---|---|
| SMTP_GMAIL_ACC | Gmail SMTP account that use to send email to security guard |
| SMTP_GMAIL_PASSWORD | Password for the above email account |
| TWILIO_SSID | SSID for the twilio sms APIs |
| TWILIO_AUTH_TOKEN | Security token for the twilio sms APIs |
| TWILIO_NUMBER | You need a twilio phone number in order to send SMS to the receipient |
| FIREBASE_DB_URL | NoSQL Database url |
| JOB_INTERVAL | Interval period where the job poll for the changes from firebase and the blynk APIs |
| JOB_TIMEOUT | Tiemout period where the job poll for the changes from firebase and the blynk APIs |
| NOTIFICATION_ENABLE | Disable and enable notification when door is open and closed |
| FIREBASE_SVC_ACC_FILE | Firebase credential file to perform admin operations e.g. https://door-sensor-proj.firebaseio.com |
| CLEAN_UP_SCHEDULE | Schedule timing to cleanup events logs |
| BLYNK_API_URL | Blynk IOT API URL e.g. http://blynk-cloud.com/ |
| SIGFOX_SERVER_PORT | Sigfox callback backend server port number |
| TWILIO_WHATSAPP_NO | Twilio WhatsApp from number |


Kindly create a Azure/AWS/Google Cloud account to deploy all this component on a Ubuntu 18.04 distribution
After creating a cloud instance, ssh/login into the instance install git software and node js. Please follow the links below with all the installation steps
https://www.digitalocean.com/community/tutorials/how-to-install-git-on-ubuntu-18-04-quickstart
https://www.digitalocean.com/community/tutorials/how-to-install-node-js-on-ubuntu-18-04
This project was generated with Angular CLI version 7.1.4.
Logon to the newly created cloud server and pull down the github source codes using the below linux command
cd ~
git clone https://github.com/kenken64/iot-door-sensor.git
Run ng serve for a dev server. Navigate to http://localhost:4200/. The app will automatically reload if you change any of the source files.
Run ng generate component component-name to generate a new component. You can also use ng generate directive|pipe|service|class|guard|interface|enum|module.
Run ng build to build the project. The build artifacts will be stored in the dist/ directory. Use the --prod flag for a production build.
Run ng test to execute the unit tests via Karma.
Run ng e2e to execute the end-to-end tests via Protractor.
To get more help on the Angular CLI use ng help or go check out the Angular CLI README.
Use the link below for the nginx installation
https://www.digitalocean.com/community/tutorials/how-to-install-nginx-on-ubuntu-18-04
Right after the web server is installed, install free SSL certificate using Let's Encrypt
Lastly, copy all the files from the angular app /dist directory to the nginx web server root directory e.g. /var/www/html
It is must to have Google account in order to create a firebase account for this project
- Create a firebase real time database project following this link https://firebase.google.com/
- Install redis server
sudo apt-get update
sudo apt-get install redis
- Start Redis server
sudo service redis-server start
- Check redis server status
sudo service redis-server status
- if only there is a crash on the worker process then run flush
redis-cli FLUSHALL
How to start the sms and email backend server that poll the devices.
$ cd server/
$ npm i
$ pm2 start server.js --name server --max-memory-restart 1G --restart-delay 10000 --node-args="--expose-gc --max-old-space-size=4096"
Worker consumes the job from the delegator to check the door sensors and send out notification via SMS/WhatsApp/Email.
Each worker is configured with its own designated door sensor's blynk auth key. Refer to the server/worker-config.json
[
    {
        "workerName": "worker1",
        "doors": ["b40605f4f5d5484bbe7b9a3cb78f1376",
                "962d1f57311e47c7bb71697b8051de30",
                "980f92ef13db430594a89315d86dd37b"


        ]
    },
    {
        "workerName": "worker2",
        "doors": [ "185333bfb0d14a2a9365fdc3bd37966a",
                "953b351b1ba4428bb781c40bec29a300",
                "194eab22d2bd49c0a580c01d7d19ce34"
        ]
    },
    {
        "workerName": "worker3",
        "doors": [ "166fff24ab4f4a52a31a936369d3a1cc",
                "2dde80b00cf342c1b6977e91dd9b6039"
        ]
    },
    {
        "workerName": "worker4",
        "doors": [ "c56c9a1ab4b1415998c06173786354f2",
                "2f0b7bd399a54a839e976a09bee2463a"
        ]
    }
]
$ cd server/
$ pm2 start worker.js --name worker --max-memory-restart 500M -- --workername=worker1 --node-args="--expose-gc
$ pm2 start worker.js --name worker2 --max-memory-restart 500M -- --workername=worker2 --node-args="--expose-gc
$ pm2 start worker.js --name worker3 --max-memory-restart 500M -- --workername=worker3 --node-args="--expose-gc
$ pm2 start worker.js --name worker4 --max-memory-restart 500M -- --workername=worker4 --node-args="--expose-gc
Go to your Google App Store/Apple store search for Blynk, install it
Register an account with Blynk
Create a new project, choose device as ESP8266 WIFI send the auth key to your email address


Below is the link to test out the API using your REST client https://blynkapi.docs.apiary.io/#


- Plug the ESP8266 to your computer
- Launch Arduino IDE , open up the Arduino sketch from the directory /firmware/door_sensor/door_sensor.ino
- Search for the codes, replace the double quote values according to the auth code from the blynk email from your mailbox
char blynk_token[33] = "166fff24ab4f4a52a31a936369d0a1cc";
- Make sure ESP8266 board are installed using the board manager.

- Select the configuration properly before compiling and flashing the ESP8266. Take note the flash size and port.

- The following libraries is amust to be installed before sync the firmware to the ESP8266 board
-
ArduinoJson (Take note do not use the latest version)

-
FS


-
ESPBattery (https://github.com/LennartHennigs/ESPBattery)
-
Blynk

-
WifiManager

- Compile and sync the firmware to the microcontroller board

Last thing to do is to power up the door sensor using a micro usb cable, at first if there isn't any wifi setting being configure. the device will act as an wireless access point with the SSID stated as "AutoAPDoorSensor" Access the portal via the following web address htttp://192.168.244.1
Configure the door sensor device to connect to your own wifi router with credential. Do not change the blynk auth key.


pm2 list

- Use ChromeDev Tools
- Dynatrace (https://www.dynatrace.com/)
- Sentry io (https://sentry.io/welcome/)
Most of the EM lock in the market uses 12v AC likely need to enhance the PCB board


