Coursework and assignments for the WPI computer science class CS 3516 - Computer Networks.
The purpose of lab 1 is to get students familiar with the Wireshark packet capture tool. I used this program to capture and analyze internet packets from my home network. With Wireshark running I visited a website in a browser, then looked at the types of packets that were sent to and from my computer. "lab1-get.pdf" and "lab1-ok.pdf" show the two main HTML packets involved, a GET request from my computer and a 200 OK response from the server. The folder also includes a "pcapng" file that shows the results of Wireshark during the lab.
Lab 2 is designed to give students an understanding of DNS servers, DNS queries, and responses. The screenshots and pcapng files show details of Wireshark captures of DNS queries and responses, and the writeup (lab2.pdf) goes into more detail about these messages.
Lab 3 involves the Address Resolution Protocol, and uses Wireshark packet captures to examine the specifics of ARP requests and responses. The writeup (lab3.pdf) has more details.
The goal of project 1 is to implement a HTTP client and server using a simplified version of the HTTP/1.1 protocol in C using the Unix socket commands.
To compile the project, simply type the command make. This will compile the
two source files, client.c and server.c, into executable files http_client
and http_server respectively. To run the server, use the command
./http_server port_num, where port_num is the port you want the server to
listen on. To run the client, use the command ./http_client [-p] server_url port_num, where server_url is the address you want to connect to and
port_num is the port you want to connect on. Include the -p switch to print
out the RTT for accessing the URL. To run the server, use the command
'./http_server port_num', where 'port_num' is the port you want the server to
listen on.
The HTTP client is run with the command ./http_client [-options] server_url port_number. It constructs and sends a valid HTTP/1.1 GET request to the
specified server_url on the specified port_number (the default HTTP port is
80). It reads the server's response into a dynamically allocated buffer, then
prints it onto the terminal. If the -p switch is included, it also measures
the round trip time to connect to the server and prints that on the terminal as
well.
The HTTP server is run with the command ./http_server port_number. The server
starts listening on the given port number in an infinite loop (it must be
interrupted with a termination signal to stop it). When a client connects on the
given port number, the server reads the HTTP request and extracts the requested
filename from it. If no file is requested the default is "index.html". If the
file exists in the server's root directory is returns an HTTP 200 OK response to
the client, followed by the file. A sample "index.html" file has been included
for testing purposes. If the requested file doesn't exist the server sends a 404
Not Found response to the client.
After it's done sending the file the server closes the client connection and loops back to wait for another client to connect. When the server is terminated it shuts down gracefully, closing any open sockets and freeing allocated memory.
The server is also multi-threaded, meaning it can handle multiple clients at the same time by forking off child processes every time a client connects.
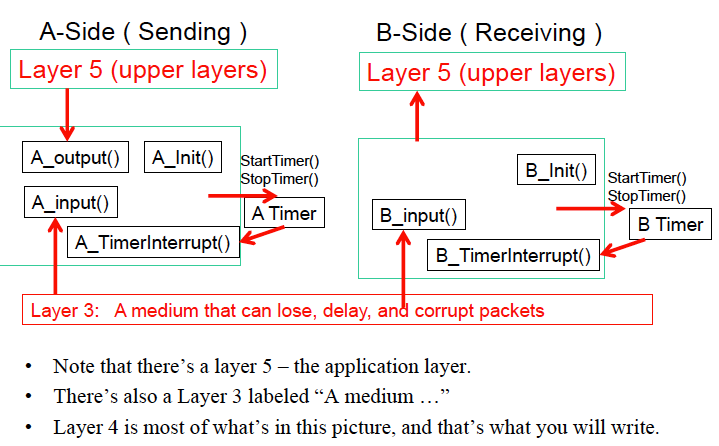
Project 2 is a sending and receiving transport-level code for implementing a
simple reliable data transfer protocol, i.e. the Alternating-Bit-Protocol (ABP).
project2.c simulates the underlying hardware/software environment, while
student2.c has the ABP code (written by me). The following picture shows how
ABP is implemented in this assignment:
To compile the project on GNU/Linux, simply use make. Then, run it with
./p2. The program will prompt for several variables, including:
- The number of messages to simulate
- The probability that each packet will be lost by the network
- The probability that each packet will be corrupted
- The probability that each packet will arrive out of order
- The average amount of time between messages
- The tracing level: A value of 1 or 2 will print out useful information about what is going on inside the emulation. A tracing value of 0 will turn this off. A tracing value of 5 will display all sorts of odd messages that are for emulator-debugging purposes.
- Randomization: 0 means the same events will happen each time the program is run, 1 means events will be randomized.
- Bidirectional: set this to 0, bidirection sending is not supported.
Each of these variables can also be supplied on the command line, for example:
% ./p2 1000 .5 .5 .7 10 1 1 0
test.txt shows a the result of running the program with 1000 packets, a 90%
chance of packet loss, a 90% chance of packet corruption, a 90% chance of
packets being out of order, 10 ms of time between messages from sender's layer
5, level 1 tracing, and actions randomized.
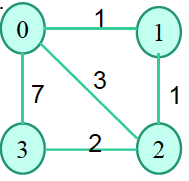
Project 3 is an implementation of a distributed asynchronous distance vector routing protocol in C. For the assignment I was provided with a network emulator and wrote the functions for each node to implement a distance vector routing algorithm to find shortest paths to all other nodes.
The implementation works for any number of nodes (up to MAX_NODES = 10) in any configuration. The default configuration is shown below, but this can be changed in the "NodeConfigurationFile".
To compile the project on GNU/Linux systems, use the make command. Then run it
with ./project3. The program will prompt for a trace level. Higher trace
levels print more debugging information, while a trace level of 1 will only
print the essential information.
Each node initializes a table of shortest routes when the program begins, then sends its information to each of its directly connected neighbors. When a node receives a routing packet it updates its own information if it can find a new shortest path with the new information, then send its updated information to each of its immediate neighbors again. After some time the entire network should know the shortest paths between any two hosts.
This assignment required duplicating essentially exactly the same code for each
node's source file. This made testing very tedious, so I wrote a script
(update.sh) that copies node0.c to each of the other node source files and
replaces any specific function or variable names with the other node's
equivalent. This is a bad way to write code, but it was required for the
assignment.


