To carry out the tasks, a UniFi Controller is necessary. You can find an installer for the Proxmox UniFi Controller LXC in our Homelab repository.
The hardware in this recipe uses:
- UniFi Controller v8 or later
- 1x PiHole server
- 1x Ubiquiti UniFi Security Gateway 3P (USG)
- 1x Ubiquiti UniFi Switch 24
- 1x Ubiquiti UniFi Switch 8 POE-150W
- 1x Ubiquiti UniFi AP-AC-Pro
- 1x Ubiquiti UniFi AP-Lite
- 1x pfSense with 4 NICs
- Proxmox cluster (for UniFi Controller LXC)
Network prerequisites are:
- Layer 2 Network Switches
- Network Gateway is
192.168.1.5 - PiHole CT DNS server. Configured with Conditional Forwarding addresses:
- Router DNS server (i.e 192.168.1.5 - UniFi DNS)
- New LAN-vpngate-world DNS Server (i.e 192.168.30.5 - pfSense VLAN30)
- New LAN-vpngate-local DNS Server (i.e 192.168.40.5 - pfSense VLAN40)
Other Prerequisites are:
- Installation of UniFi Controller on your PC or Proxmox UniFi Controller LXC
Before proceeding, we strongly advise that you familiarize yourself with network Local DNS and the importance of having a PiHole server. To learn more, click here.
It is essential to set your network's Local Domain or Search domain. For residential and small networks, we recommend using only top-level domain (spTLD) names because they cannot be resolved across the internet. Routers and DNS servers understand that ARPA requests they do not recognize should not be forwarded onto the public internet. It is best to select one of the following names: local, home.arpa, localdomain, or lan only. We strongly advise against using made-up names.
- 1. UniFi Controller
- 2. UniFi System Settings
- 3. UniFi Networks
- 4. UniFi Wireless Networks
- 5. UniFi Profiles - IP Groups
- 6. UniFi Routing - Static Routes
- 7. UniFi Security
- 7.1. General
- 7.2. Firewall - Internet Out
- 7.3. Firewall - LAN IN
- 7.3.1. Firewall LAN IN - Allow All Established and Related Sessions
- 7.3.2. Firewall LAN IN - Accept all NTP Requests
- 7.3.3. Firewall LAN IN - Allow Home interlan connectivity
- 7.3.4. Firewall LAN IN - Allow NoT to MQTT
- 7.3.5. Firewall LAN IN - Allow IoT to Home Assistant
- 7.3.6. Firewall LAN IN - Allow LAN-smart to Media Server
- 7.3.7. Firewall LAN IN - Block IoT from LAN
- 7.3.8. Firewall LAN IN - Block IoT from NoT
- 7.3.9. Firewall LAN IN - Block all NoT
- 7.4. Firewall - Guest IN
- 7.5. Port Forwarding
A Proxmox UniFi-Controller LXC installer is available in our Homelab repository.
Set your basic UniFi site (i.e home, location of site etc) preferences.
- Navigate to
Settings>System>General: -- Device Name: Unifi Controller -- Country: Select your nation -- Language: Select your language -- Timezone: Select your Timezone -- Time format: 24hrs - Navigate to
Settings>System>Updates: -- Network Application Release Channel: official -- Device Firmware Release Channel: official -- Automate Device Updates: Daily at 03:00 - Navigate to
Settings>System>Advanced: -- Interface: new -- Network Time Protocol (NTP): Auto -- Email Services: SSO email -- Network Discovery: Enable -- Device Authentication: enable (set username and password)
We use VLANs to separate networks for easier management and to apply security policies.
- Navigate to
Settings>Networks>Default: -- Network name: default -- Gateway IP/Subnet: Host address192.168.1.5, Netmask24, 254 Usable hosts -- Advanced: Manual -- IGMP Snooping: enable -- Multicast DNS: disable -- DHCP Mode: DHCP Server -- DHCP Range: 192.168.1.150 - 192.168.1.250 -- Default Gateway: Auto -- DNS Server: 192.168.1.6, 1.1.1.1 (Note 192.168.1.6 is PiHole. If no PiHole use 192.168.1.5) -- Lease Time: 86400 -- Domain Name: local
Create the following new networks. Navigate to Settings > Networks > New Virtual Network and set the values as follows, remembering to click Save at the end of each new network. There is an OpenOffice calc file 'unifi_network_configuration.ods' in the repository for easy viewing.

- Navigate to
Settings>Networks: -- Global Network Settings -- IPv6 Support: disabled -- Multicast DNS: LAN-open, LAN-smart, LAN-medialab, LAN-homelab, LAN-IoT -- IGMP Snooping: Default, LAN-open, LAN-smart, LAN_guest, LAN-medialab, LAN-vpnserver, LAN-homelab, LAN-IoT, LAN-NoT, VPN-egress, LAN-transit-pfsense -- DHCP Snooping: enabled
- Navigate to
Settings>Networks: -- IPv6 Support: disable -- Multicast DNS: LAN-Open, LAN-smart, LAN-medialab, LAN-homelab, LAN-IoT -- IGMP Snooping: Default, LAN-open, LAN-smart, LAN-guest, LAN-medialab, LAN-vpnserver, LAN-homelab, LAN-IoT, VPN-egress, LAN-transit-pfsense
- Navigate to
Settings>Networks: -- DHCP Snooping: enable -- Spanning Tree Protocol: RSTP
Here we create wireless networks in VLAN increments of 10 (i.e VLAN10, VLAN20) which correspond to our Network settings.
- Navigate to
Settings>WiFi>+Create Newand set the values as follows, remembering to clickApply Changeswhen done: -- Name/SSID:name-open(Choose your own SSID such asbanana-open) -- Password: Common passphrase (Between 8 and 63 ASCII-encoded characters) -- Network: LAN-open -- Broadcasting APs: Group, All -- Advanced: Manual -- WiFi Band: 2.4 GHZ, 5 GHz -- BSS Transition: enabled -- Multicast enhancement: enabled -- 802.11 DTIM Period: Auto enabled -- Security Protocol: WPA2 -- Group rekey interval: 3600 Sec -- WiFi Scheduler: Off
Now repeat the procedure, using the above values except where shown (i.e Guest/IoT/NoT passphrase(s), Name/SSID, Guest Policy), creating new wireless networks on the following VLAN's:
| Create New Wireless Network | VLAN10 | VLAN20 | VLAN30 | VLAN40 | VLAN70 | VLAN110 | VLAN120 |
|---|---|---|---|---|---|---|---|
| Name/SSID | name-open |
name-smart |
name-vpngate-world |
name-vpngate-local |
name-guest |
name-iot |
name-not |
| Password | Common Passphrase | Common Passphrase | Common Passphrase | Common Passphrase | Guest Passphrase | IoT Passphrase | IoT Passphrase |
| Network | ☑ Use VLAN 10 |
☑ Use VLAN 20 |
☑ Use VLAN 30 |
☑ Use VLAN 40 |
☑ Use VLAN 70 |
☑ Use VLAN 110 |
☑ Use VLAN 120 |
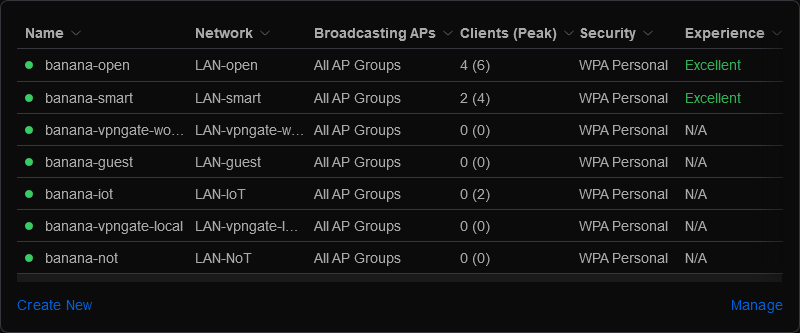
Your finished configuration should resemble the image below:
You should create all your Profile Groups before creating firewall rules.
- Navigate to
Settings>Profiles>IP Groups>+Create New-- Profile Name: All DNS ports -- Type: Port Group -- Port: 53,853 - Navigate to
Settings>Profiles>IP Groups>+Create New-- Profile Name: All Home App/Nest/Chromecast/Netflix ports -- Type: Port Group -- Port: 1900,5353,5556,5558,8008,8009 - Navigate to
Settings>Profiles>IP Groups>+Create New-- Profile Name: All printer host IP addresses -- Type: IPv4 Address/Subnet -- Address: 192.168.1.91 - Navigate to
Settings>Profiles>IP Groups>+Create New-- Profile Name: All printer ports -- Type: Port Group -- Port: 137 Default generic SMB (works with Brother laser) -- Port: 138 Default generic SMB -- Port: 139 Default generic SMB -- Port: 631 ASCII laser printer (works with Brother laser) -- Port: 6310 ASCII laser printer -- Port: 9100 ASCII laser printer - IBM, Ricoh, HP, Lexmark -- Port: 9101 ASCII laser printer - Jetdirect, Marknet server - Navigate to
Settings>Profiles>IP Groups>+Create New-- Profile Name: All Home host IP addresses -- Type: IPv4 Address/Subnet -- Address: 192.168.110.0/24, 192.168.80.0/24, 192.168.50.0/24, 192.168.20.0/24, 192.168.10.0/24 - Navigate to
Settings>Profiles>IP Groups>+Create New-- Profile Name: All IP addresses -- Type: IPv4 Address/Subnet -- Address: 0.0.0.0/1, 128.0.0.0/2, 192.0.0.0/3, 224.0.0.0/4 - Navigate to
Settings>Profiles>IP Groups>+Create New-- Profile Name: All local addresses -- Type: IPv4 Address/Subnet -- Address: 192.168.1.0/24, 192.168.10.0/24, 192.168.20.0/24, 192.168.50.0/24, 192.168.60.0/24, 192.168.80.0/24 - Navigate to
Settings>Profiles>IP Groups>+Create New-- Profile Name: All not LAN-smart local addresses -- Type: IPv4 Address/Subnet -- Address: 192.168.1.0/24, 192.168.10.0/24, 192.168.30.0/24, 192.168.40.0/24, 192.168.50.0/24, 192.168.3.0/28 - Navigate to
Settings>Profiles>IP Groups>+Create New-- Profile Name: All PiHole IP addresses -- Type: IPv4 Address/Subnet -- Address: 192.168.1.6 - Navigate to
Settings>Profiles>IP Groups>+Create New-- Profile Name: Block DNS IP addresses -- Type: IPv4 Address/Subnet -- Address: 8.8.4.4, 8.8.8.8 - Navigate to
Settings>Profiles>IP Groups>+Create New-- Profile Name: CCTV host IP addresses -- Type: IPv4 Address/Subnet -- Address: 127.0.0.1 - Navigate to
Settings>Profiles>IP Groups>+Create New-- Profile Name: CCTV ports -- Type: Port Group -- Port: - Navigate to
Settings>Profiles>IP Groups>+Create New-- Profile Name: Home Assistant host IP addresses -- Type: IPv4 Address/Subnet -- Address: 192.168.110.131 - Navigate to
Settings>Profiles>IP Groups>+Create New-- Profile Name: LAN-vpngate-local addresses -- Type: IPv4 Address/Subnet -- Address: 192.168.40.0/24 - Navigate to
Settings>Profiles>IP Groups>+Create New-- Profile Name: LAN-vpngate-world addresses -- Type: IPv4 Address/Subnet -- Address: 192.168.30.0/24 - Navigate to
Settings>Profiles>IP Groups>+Create New-- Profile Name: Media server IP addresses -- Type: IPv4 Address/Subnet -- Address: 192.168.50.111 (or whatever your Jellyfin/Emby server IP is) - Navigate to
Settings>Profiles>IP Groups>+Create New-- Profile Name: Media server ports -- Type: Port Group -- Port: 8096,8097,8920,32400,32410-32414, 32469 (these are Jellyfin, Emby and Plex ports) - Navigate to
Settings>Profiles>IP Groups>+Create New-- Profile Name: MQTT ports -- Type: Port Group -- Port: 1883,8883 - Navigate to
Settings>Profiles>IP Groups>+Create New-- Profile Name: SSDP ports -- Type: Port Group -- Port: 1900
Set the values as follows, remembering to click Save at the end.
-
Navigate to
Settings>Routing>+Create Entry-- Name: Route access to VLAN30 -- Distance: 1 -- Destination Network: 192.168.30.0/24 -- Type: Next Hop -- Next Hop: 192.168.3.1 -
Navigate to
Settings>Routing>+Create Entry-- Name: Route access to VLAN40 -- Distance: 1 -- Destination Network: 192.168.40.0/24 -- Type: Next Hop -- Next Hop: 192.168.3.1
Here we create our Firewall rules, Port Forwarding and general security. Set the values as follows, remembering to click Save at the end.
- Navigate to
Settings>Security>General: -- Traffic Identification: enable -- Suspicious Activity: Advanced -- Network: Default, LAN-open, LAN-smart, LAN-guest, LAN-medialab, LAN-vpnserver, LAN-homelab, LAN-IoT, VPN-egress, LAN-transit-pfsense -- Filtering Action: No Action
Here we create most of our firewall rules under the Internet Tab. Navigate to Settings > Security > Firewall Rules > Internet and create the entries as follows, remembering to click Save at the end.
| Create New Rule | Value | Notes |
|---|---|---|
| Type | Internet Out |
|
| Name | Block DNS list from all local LAN (excluding LAN-smart) |
|
| Action | ☐ Accept ☐ Reject ☑ Drop |
|
| Protocol | ☑ All ☑ Before predefined rules |
|
| Source | ||
| Source Type | Port/IP Group |
|
| Address Group | All not LAN-smart local addresses |
|
| Port Group | Any |
|
| Mac address | Leave blank | |
| Destination | ||
| Destination Type | Port/IP Group |
|
| Address Group | Block DNS IP addresses |
|
| Port Group | Any |
|
| Advanced | ||
| Auto |
Here we create most of our firewall rules under the LAN Tab. Navigate to Settings > Security > Firewall Rules > LAN and create the entries as follows, remembering to click Save at the end.
| Create New Rule | Value | Notes |
|---|---|---|
| Type | LAN In |
|
| Name | Allow All Established and Related Sessions |
|
| Action | ☑ Accept ☐ Reject ☐ Drop |
|
| Protocol | ☑ All ☑ Before predefined rules |
|
| Source | ||
| Source Type | Port/IP Group |
|
| Address Group | All local addresses |
|
| Port Group | Any |
|
| Mac address | Leave blank | |
| Destination | ||
| Destination Type | Port/IP Group |
|
| Address Group | All local addresses |
|
| Port Group | Any |
|
| Advanced | ||
| Manual | ||
| Match States | ☐ New ☐ Invalid ☑ Established ☑ Related |
|
| Match IPsec | ☑ Do not match ☐ IPsec ☐ non-IPsec |
|
| Logging | ☐ |
| Create New Rule | Value | Notes |
|---|---|---|
| Type | LAN In |
|
| Name | Accept All NTP Requests |
|
| Action | ☑ Accept ☐ Reject ☐ Drop |
|
| Protocol | ☑ All ☑ Before predefined rules |
|
| Source | ||
| Source Type | Port/IP Group |
|
| Address Group | All local addresses |
|
| Port Group | Any |
|
| Mac address | Leave blank | |
| Destination | ||
| Destination Type | Port/IP Group |
|
| Address Group | ANTP ports |
|
| Port Group | Any |
|
| Advanced | ||
| Auto |
| Create New Rule | Value | Notes |
|---|---|---|
| Type | LAN In |
|
| Name | Allow Home interlan connectivity |
|
| Action | ☑ Accept ☐ Reject ☐ Drop |
|
| Protocol | ☑ All ☑ Before predefined rules |
|
| Source | ||
| Source Type | Port/IP Group |
|
| Address Group | All Home host IP addresses |
|
| Port Group | All Home App/Nest/Chromecast/Netflix ports |
|
| Mac address | Leave blank | |
| Destination | ||
| Destination Type | Port/IP Group |
|
| Address Group | All Home host IP addresses |
|
| Port Group | All Home App/Nest/Chromecast/Netflix ports |
|
| Auto |
| Create New Rule | Value | Notes |
|---|---|---|
| Type | LAN In |
|
| Name | Allow NoT to MQTT |
|
| Action | ☑ Accept ☐ Reject ☐ Drop |
|
| Protocol | ☑ All ☑ Before predefined rules |
|
| Source | ||
| Source Type | Network |
|
| Network | LAN-NoT |
|
| Network Type | IPv4 Subnet |
|
| Mac address | Leave blank | |
| Destination | ||
| Destination Type | Port/IP Group |
|
| Address Group | Home Assistant host IP addresses |
|
| Port Group | MQTT ports |
|
| Advanced | ||
| Auto |
| Create New Rule | Value | Notes |
|---|---|---|
| Type | LAN In |
|
| Name | Allow IoT to Home Assistant |
|
| Action | ☑ Accept ☐ Reject ☐ Drop |
|
| Protocol | ☑ All ☑ Before predefined rules |
|
| Source | ||
| Source Type | Network |
|
| Network | LAN-IoT |
|
| Network Type | IPv4 Subnet |
|
| Mac address | Leave blank | |
| Destination | ||
| Destination Type | Port/IP Group |
|
| Address Group | Home Assistant host IP addresses |
|
| Port Group | Any |
|
| Advanced | ||
| Auto |
| Create New Rule | Value | Notes |
|---|---|---|
| Type | LAN In |
|
| Name | Allow LAN-smart to Media Server |
|
| Action | ☑ Accept ☐ Reject ☐ Drop |
|
| Protocol | ☑ All ☑ Before predefined rules |
|
| Source | ||
| Source Type | Network |
|
| Network | LAN-smart |
|
| Network Type | IPv4 Subnet |
|
| Mac address | Leave blank | |
| Destination | ||
| Destination Type | Port/IP Group |
|
| Address Group | Media server IP addresses |
|
| Port Group | Media server ports |
|
| Advanced | ||
| Auto |
| Create New Rule | Value | Notes |
|---|---|---|
| Type | LAN In |
|
| Name | Block IoT from LAN |
|
| Action | ☐ Accept ☐ Reject ☑ Drop |
|
| Protocol | ☑ All ☑ Before predefined rules |
|
| Source | ||
| Source Type | Network |
|
| Network | LAN-IoT |
|
| Network Type | IPv4 Subnet |
|
| Mac address | Leave blank | |
| Destination | ||
| Destination Type | Network |
|
| Network | Default |
|
| Network Type | IPv4 Subnet |
|
| Advanced | ||
| Auto |
| Create New Rule | Value | Notes |
|---|---|---|
| Type | LAN In |
|
| Name | Block IoT from NoT |
|
| Action | ☐ Accept ☐ Reject ☑ Drop |
|
| Protocol | ☑ All ☑ Before predefined rules |
|
| Source | ||
| Source Type | Network |
|
| Network | LAN-IoT |
|
| Network Type | IPv4 Subnet |
|
| Mac address | Leave blank | |
| Destination | ||
| Destination Type | Network |
|
| Network | LAN-NoT |
|
| Network Type | IPv4 Subnet |
|
| Advanced | ||
| Auto |
| Create New Rule | Value | Notes |
|---|---|---|
| Type | LAN In |
|
| Name | Block all NoT |
|
| Action | ☐ Accept ☐ Reject ☑ Drop |
|
| Protocol | ☑ All ☑ Before predefined rules |
|
| Source | ||
| Source Type | Network |
|
| Network | LAN-NoT |
|
| Network Type | IPv4 Subnet |
|
| Mac address | Leave blank | |
| Destination | ||
| Destination Type | Port/IP Group |
|
| Address Group | All IP addresses |
|
| Port Group | Any |
|
| Advanced | ||
| Auto |
Here we create most of our firewall rules under the Guest Tab. Navigate to Settings > Security > Firewall Rules > Guest and create the entries as follows, remembering to click Save at the end.
| Create New Rule | Value | Notes |
|---|---|---|
| Type | Guest In |
|
| Name | Allow PiHole DNS in |
|
| Action | ☑ Accept ☐ Reject ☐ Drop |
|
| Protocol | ☑ UDP ☑ Before predefined rules |
|
| Source | ||
| Source Type | Port/IP Group |
|
| Address Group | Any |
|
| Port Group | Any |
|
| Mac address | Leave blank | |
| Destination | ||
| Destination Type | Port/IP Group |
|
| Address Group | All PiHole IP addresses |
|
| Port Group | Any |
|
| Advanced | ||
| Auto |
Here we create our port forwarding rules. Navigate to Settings > Security > Port Forwarding and set the values as follows, remembering to click Save at the end.
| Create New Port Forward Rule | Value | Notes |
|---|---|---|
| Name | HAProxy |
|
| Forward Rule | ☑ Enable |
|
| From | Any |
|
| Port | 80 |
|
| Forward IP | 192.168.2.1 |
|
| Forward Port | 80 |
|
| Protocol | TCP |
|
| Logs | ☐ Enable |
| Create New Port Forward Rule | Value | Notes |
|---|---|---|
| Name | HAProxy |
|
| Forward Rule | ☑ Enable |
|
| From | Any |
|
| Port | 443 |
|
| Forward IP | 192.168.2.1 |
|
| Forward Port | 443 |
|
| Protocol | TCP |
|
| Logs | ☐ Enable |
| Create New Port Forward Rule | Value | Notes |
|---|---|---|
| Name | HAProxy |
|
| Forward Rule | ☑ Enable |
|
| From | Any |
|
| Port | 8443 |
|
| Forward IP | 192.168.2.1 |
|
| Forward Port | 8443 |
|
| Protocol | TCP |
|
| Logs | ☐ Enable |
