This repo provides a template for a Python/Flask app that streams images from the users webcam to a video player on an HTML page. Then when the use clicks a button, it will capture the image and POST it to a route in the Flask app. This route will send the image to the Azure Face API for face detection
-
Select the Use this template button at the top of the page. This will create a new GitHub repo in your account using the code from here as the basic template.
-
Clone the new repo
-
Open it in Visual Studio Code. You will need the Python extension installed in Visual Studio Code.
-
Open the terminal and install the pip packages from the
requirements.txtfile:pip3 install requirements.txt
THe app will contain configuration to allow you to debug it as a Flask app from inside Visual Studio Code.
app.py- this file contains the Flask app. It has two routes:/- this loads thehome.htmltemplate, passing in an empty dictionary of data/process_image- this receives the image as a JSON document containing the image as Base64 encoded data.
-
If you don't already have an Azure account, you will need to create one:
-
Students can sign up at aka.ms/FreeStudentAzure using a valid higher education email address. You won't need a credit card and will get US$100 to use for 12 months, as well as 12 months of free services. After 12 months if you are still a student you can renew for another 12 months and get another $100 and free services, and so on each year you are still a student.
-
If you are not a student you can sign up at aka.ms/FreeAz. You will need a credit card to verify you are not a bot (you won't be charged anything), and wil get US$200 for 30 days, as well as 12 months of free services.
-
You can create a Face API resource from either the Azure portal, or the Azure CLI.
-
Open the Azure Portal from portal.azure.com. Log in if required.
-
Select Create a resource or select the green plus button.
-
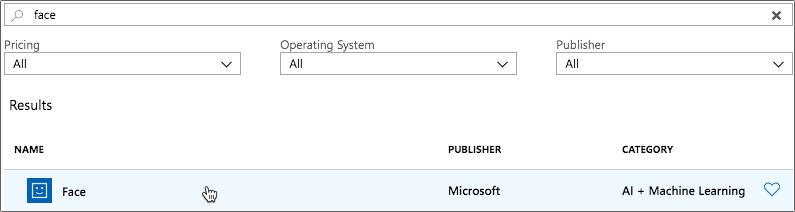
Search for Face
-
Select Face, then select the Create button.
-
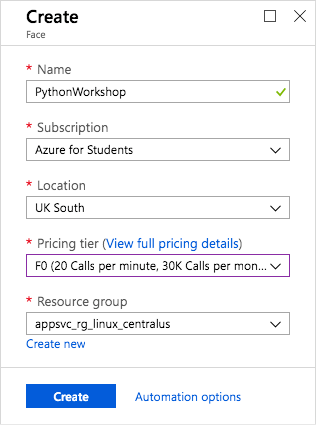
Enter the required details:
-
Give this a name. This needs to be globally unique as this will become part of a URL you need to call to find faces in the image.
-
Select the Azure Subscription you want to use.
-
Choose a location to run this code. Azure has 'regions' all around the world, a region being a group of data centers full of computers and other cloud hardware. Choose a region closest to you.
-
Select the pricing tier. With this app, you will make less than 20 calls a minute, and less than 5,000 calls a month, so select F0, the free tier. There is a paid tier for apps that need to use the service more often.
You can only have one free tier of each Azure Service, so if you have already created a free tier Face API resource before you will either need to use a paid tier, or connect to the existing resource.
-
Select the resource group you want to run the code in. If you don't have one you want to use, create a new one.
-
Select the Create button.
-
-
The face resource will be created. You will be notified when done. Select Go to resource from the popup, or the notification pane.

-
From the resource, head to the Quick Start tab. Take a note of the Key1 and Endpoint as you will need these later.
-
Ensure you have the Azure CLI installed
-
Log in to your azure account
az login
-
Get a list of all Azure regions to find the one closest to you
az account list-locations \ --query "[].{Region:name}" \ --out table -
If you don't already have a resource group to create the resource in, create one
az group create \
  --name <resource-group-name> \
  --location <location>
Replace
<resource-group-name>with the name for your resource group, and<location>with the closest location to you from the list output by the last command -
Create the Face API resource
az cognitiveservices account create \
  --name <face-name> \
  --resource-group <resource-group-name> \
  --kind Face \
  --sku F0 \
  --location <location> \
  --yes
Replace
<face-name>with a name for your face resource. This will form part of the URL, so needs to be globally unique. Replace<resource-group-name>with the name for your resource group, and<location>with the closest location to you.This creates a free tier resource, which gives you 20 calls per minute and 5,000 per month. If you want to use a different tier, replace
--sku F0with a different sku, such asS0. See the pricing docs for more details. -
The output of this command will contain and endpoint, so take a note of this value as you will need it later.
-
Get the key
az cognitiveservices account keys list \
  --resource-group <resource-group-name> \
  --name <face-name>
Replace
<face-name>with a name for your face resource, and<resource-group-name>with the name for your resource group.This will return two keys. You will only need one of these keys later, so take a note of one value.
-
Add a file called
.envto the app to store application keys. Add key/value pairs for the endpoint and API keyface_api_endpoint=<endpoint> face_api_key=<key>
Replace
<endpoint>with the endpoint you noted down earlier. Replace<key>with the key you noted down earlier. These values will be used to create the Face client in the code -
There is code in the
/process_imageroute to send the captured image to the Face API and return the detected faces. Add code to this file to use these faces. Replace the following comment with your code:#################################################### # # # Add your code here to process the detected faces # # # ####################################################
To see a range of capabilities of the Face API, check out the QuickStarts in the Cognitive Services docs.
You can see an example of a similar app that uses the Face API to identify emotions and create a game in this GitHub repo.
Once your app is complete, you can deploy it to an Azure App Service. There is an Azure App Service extension for Visual Studio Code that you can use to allow you to deploy from inside Visual Studio Code.
Deploying apps from VS Code is not recommended for production apps, but is great for development or a hackathon
-
Open the command palette:
- On Windows, press Ctrl+Shift+P
- On MacOS, press Cmd+Shift+P
-
Select Azure App Service: Deploy to Web App...

-
You will be asked what code you want to deploy. This option will automatically select the folder with your code in it, so select that.

-
If you have never signed into Azure from Visual Studio Code before, you will be asked to sign in.
- Select Sign in to Azure...
- Your browser will be launched, and you can sign in with your Azure account.
- Once signed in from the browser, you can close the web page that was launched.
-
Select the Azure subscription you want to use.

-
Select + Create New Web App
There are 2 Create New Web App options, one marked as Advanced. You want the normal one, not the Advanced one.

-
Give your web app a name. This will be part of the public web site address, so needs to be unique across the world. For example, I might use
jimspythonwebapp2019.
-
Select the runtime for your App Service App. This is a Python app, so select the latest version of the Python runtime, such as Python 3.7

-
The App Service will start being created. You will see a progress bar on the bottom right, and this will show you once it is complete. You can monitor the progress from the Output window by selecting View -> Output and selecting Azure App Service from the window selector..

-
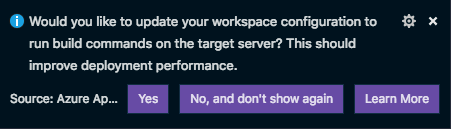
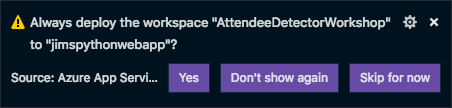
Some popups wil appear asking if you want to make configuration changes to speed up deployment and always deploy this web app. Select Yes for both.
-
A popup will appear showing the deployment progress. You can monitor the progress from the Output window by selecting View -> Output and selecting Azure App Service from the window selector.

-
Once the code has been deployed, you will be able to view the code over the internet. Launch your browser and open your web site. The address will be
https://<web app name>.azurewebsites.net/. For example, for my web site this ishttps://jimspythonwebapp2019.azurewebsites.net/.
These steps will create a Free tier App Service and deploy your app to it. You can only have one Free tier per subscription, so if you have already got a free app service running, use the Create New Wep App Advanced option, and create using a paid tier.