This lab will teach you how to use Hortonworks Data Platform and NiFi to monitor stock prices and display them on a dashboard. We will go through the following steps in order:
- download and install HDP 2.3 Sandbox
- install NiFi and Solr on the HDP Sandbox
- use NiFi to query stock prices of AAPL, HDP, etc. from Google Finance by making a HTTP call
- do text processing to extract price on the returned HTTP response, in NiFi
- store the stock symbol and price in HBase and Solr
- create a Banana dashboard to query Solr and display the stock prices
This is a typical Internet of Anything (IoAT) end-to-end application. The goal is to get you familiar with the components of HDP and HDF and show how easy it is to create such beautiful apps with hardly any code.
Note: this lab will only work during US Stock market's operating hours: 9.30 AM to 4.30 PM Eastern Time.
Download and install the HDP 2.3 Sandbox on your laptop by following these instructions:
http://hortonworks.com/products/hortonworks-sandbox/#install
The Sandbox requires 8GB or RAM and 50GB of hard disk space. If your laptop doesn’t have sufficient RAM, you can launch it on Microsoft Azure cloud for free. Azure gives a free 30-day trial. Sign up for the free Azure trial and follow these instructions to install the Sandbox:
You’ll be asked to specify the VM size while creating the Sandbox on Azure. Please make sure to use A4 or higher VM sizes as the Sandbox is quite resource-intensive. Note down the VM username and password as you'll need it to log in to the Sandbox later.
You'll need root priveleges to finish this lab. There are different ways to log into the Sandbox as the root user, depending on whether it's running locally on your laptop or if it's running on Azure.
Start the sandbox, and note its IP address shown on the VBox/VMware screen. Add the IP address into your laptop's "hosts" file so you don't need to type the Sandbox's IP address and can reach it much more conveniently at "sandbox.hortonworks.com". You will need to add a line similar to this in your hosts file:
192.168.191.241 sandbox.hortonworks.com sandbox
Note: The IP address will likely be different for you, use that.
The hosts file is located at /etc/hosts for Mac and Linux computers. For Windows it's normally at \WINDOWS\system32\drivers\etc. If it's not there, create one and add the entry as shown above.
The username for SSH is "root", and the password is "hadoop". You'll be the root user once logged in. Mac and Linux users can log in by:
$ ssh [email protected]
Windows users can use the Putty client to SSH using "root" and "hadoop" as the username and password respectively. The hostname is "sandbox.hortonworks.com"
Note down the public IP address of the Sandbox VM from the Azure Portal UI. Add the IP address into your laptop's "hosts" file so you don't need to type the Sandbox's IP address and can reach it much more conveniently at "sandbox.hortonworks.com". You will need to add a line similar to this in your hosts file:
10.144.39.48 sandbox.hortonworks.com sandbox
Note: The IP address will likely be different for you, use that.
The hosts file is located at /etc/hosts for Mac and Linux computers. For Windows it's normally at \WINDOWS\system32\drivers\etc. If it's not there, create one and add the entry as shown above.
Now we can log in to the sandbox.
Using the username which you entered while deploying the Sandbox on Azure, Mac and Linux users can log in by:
$ ssh <your_vm_username>@sandbox.hortonworks.com
The password is the VM password you specified while deploying the VM.
Windows users can use the Putty client to SSH and log in to "sandbox.hortonworks.com". Use the username and password you specified while creating the VM for SSH credentials. Once logged in, you need to assume the root user identity. Do this:
sudo su
Again, enter the same password you used to SSH in. Now you should be the root user.
Do the following on your Sandbox's shell prompt (make sure you're the root user!):
VERSION=`hdp-select status hadoop-client | sed 's/hadoop-client - \([0-9]\.[0-9]\).*/\1/'`
Note: From now on, type all code fragments like the one shown above on your Sandbox's shell prompt.
The command above checks for the HDP version number and stores it as a temporary environment variable. Next, download the Ambari NiFi service:
git clone https://github.com/abajwa-hw/ambari-nifi-service.git /var/lib/ambari-server/resources/stacks/HDP/$VERSION/services/NIFI
Restart Ambari:
service ambari restart
Log in to Ambari UI, using "admin" as username and "admin" as password by opening the following URL in your Laptop's browser:
http://sandbox.hortonworks.com:8080
Click on "Add Service" from the "Actions" dropdown menu in the bottom left of the Ambari dashboard:
On bottom left -> Actions -> Add service -> check NiFi server -> Next -> Next -> Next -> Deploy. By default NiFi port is set to 9090 and JVM memory size is 512MB. On successful deployment, you can log in to NiFi UI by going to:
http://sandbox.hortonworks.com:9090/nifi
Next, let's install Solr and configure the Banana dashboard.
Set JAVA_HOME:
export JAVA_HOME=/usr/lib/jvm/java-1.7.0-openjdk.x86_64
We'll use Banana as the dashboard and we've created its definition for you. Download it:
wget https://raw.githubusercontent.com/vzlatkin/Stocks2HBaseAndSolr/master/Solr%20Dashboard.json -O /opt/lucidworks-hdpsearch/solr/server/solr-webapp/webapp/banana/app/dashboards/default.json
Start Solr:
/opt/lucidworks-hdpsearch/solr/bin/solr start -c -z localhost:2181
Create Solr collection:
/opt/lucidworks-hdpsearch/solr/bin/solr create -c stocks -d data_driven_schema_configs -s 1 -rf 1
We're now ready to use NiFi and create the flow.
We will use Google's Finance API to pull stock quotes. While the API has been officially deprecated, you can still issue a http call to Google Finance with stock symbols as query arguments and get the info back. Our http call will be for GOOG, AAPL, GS, HDP, RHT and SBUX quotes:
http://finance.google.com/finance/info?client=ig&q=NASDAQ:GOOG,NASDAQ:AAPL,NYSE:GS,NASDAQ:HDP,NASDAQ:RHT,NASDAQ:SBUX
Try to copy-paste this in your browser and you should get (invalid) JSON back:
// [ { "id": "304466804484872" ,"t" : "GOOG" ,"e" : "NASDAQ" ,"l" : "694.45" ,"l_fix" : "694.45" ,"l_cur" : "694.45" ,"s": "0" ,"ltt":"4:00PM EST" ,"lt" : "Jan 15, 4:00PM EST" ,"lt_dts" : "2016-01-15T16:00:02Z" ,"c" : "-20.27" ,"c_fix" : "-20.27" ,"cp" : "-2.84" ,"cp_fix" : "-2.84" ,"ccol" : "chr" ,"pcls_fix" : "714.72" } ,{ "id": "22144" ,"t" : "AAPL" ,"e" : "NASDAQ" ,"l" : "97.05" ,"l_fix" : "97.05" ,"l_cur" : "97.05" ,"s": "0" ,"ltt":"4:00PM EST" ,"lt" : "Jan 15, 4:00PM EST" ,"lt_dts" : "2016-01-15T16:00:01Z" ,"c" : "-2.47" ,"c_fix" : "-2.47" ,"cp" : "-2.48" ,"cp_fix" : "-2.48" ,"ccol" : "chr" ,"pcls_fix" : "99.52" } ,{ "id": "663137" ,"t" : "GS" ,"e" : "NYSE" ,"l" : "155.64" ,"l_fix" : "155.64" ,"l_cur" : "155.64" ,"s": "0" ,"ltt":"7:53PM EST" ,"lt" : "Jan 15, 7:53PM EST" ,"lt_dts" : "2016-01-15T19:53:40Z" ,"c" : "-5.75" ,"c_fix" : "-5.75" ,"cp" : "-3.56" ,"cp_fix" : "-3.56" ,"ccol" : "chr" ,"pcls_fix" : "161.39" } ,{ "id": "542031669134556" ,"t" : "HDP" ,"e" : "NASDAQ" ,"l" : "16.57" ,"l_fix" : "16.57" ,"l_cur" : "16.57" ,"s": "0" ,"ltt":"4:00PM EST" ,"lt" : "Jan 15, 4:00PM EST" ,"lt_dts" : "2016-01-15T16:00:01Z" ,"c" : "-0.64" ,"c_fix" : "-0.64" ,"cp" : "-3.72" ,"cp_fix" : "-3.72" ,"ccol" : "chr" ,"pcls_fix" : "17.21" } ,{ "id": "655693" ,"t" : "SBUX" ,"e" : "NASDAQ" ,"l" : "58.00" ,"l_fix" : "58.00" ,"l_cur" : "58.00" ,"s": "0" ,"ltt":"4:00PM EST" ,"lt" : "Jan 15, 4:00PM EST" ,"lt_dts" : "2016-01-15T16:00:01Z" ,"c" : "-0.98" ,"c_fix" : "-0.98" ,"cp" : "-1.66" ,"cp_fix" : "-1.66" ,"ccol" : "chr" ,"pcls_fix" : "58.98" } ]
After a little clean up and converting it to valid JSON by hand (why was it invalid and what was the cleanup?), it looks like:
{
  "data": [
    {
      "id": "304466804484872",
      "t": "GOOG",
      "e": "NASDAQ",
      "l": "694.45",
      "l_fix": "694.45",
      "l_cur": "694.45",
      "s": "0",
      "ltt": "4:00PM EST",
      "lt": "Jan 15, 4:00PM EST",
      "lt_dts": "2016-01-15T16:00:02Z",
      "c": "-20.27",
      "c_fix": "-20.27",
      "cp": "-2.84",
      "cp_fix": "-2.84",
      "ccol": "chr",
      "pcls_fix": "714.72"
    },
    {
      "id": "22144",
      "t": "AAPL",
      "e": "NASDAQ",
      "l": "97.05",
      "l_fix": "97.05",
      "l_cur": "97.05",
      "s": "0",
      "ltt": "4:00PM EST",
      "lt": "Jan 15, 4:00PM EST",
      "lt_dts": "2016-01-15T16:00:01Z",
      "c": "-2.47",
      "c_fix": "-2.47",
      "cp": "-2.48",
      "cp_fix": "-2.48",
      "ccol": "chr",
      "pcls_fix": "99.52"
    },
    {
      "id": "663137",
      "t": "GS",
      "e": "NYSE",
      "l": "155.64",
      "l_fix": "155.64",
      "l_cur": "155.64",
      "s": "0",
      "ltt": "7:53PM EST",
      "lt": "Jan 15, 7:53PM EST",
      "lt_dts": "2016-01-15T19:53:40Z",
      "c": "-5.75",
      "c_fix": "-5.75",
      "cp": "-3.56",
      "cp_fix": "-3.56",
      "ccol": "chr",
      "pcls_fix": "161.39"
    },
    {
      "id": "542031669134556",
      "t": "HDP",
      "e": "NASDAQ",
      "l": "16.57",
      "l_fix": "16.57",
      "l_cur": "16.57",
      "s": "0",
      "ltt": "4:00PM EST",
      "lt": "Jan 15, 4:00PM EST",
      "lt_dts": "2016-01-15T16:00:01Z",
      "c": "-0.64",
      "c_fix": "-0.64",
      "cp": "-3.72",
      "cp_fix": "-3.72",
      "ccol": "chr",
      "pcls_fix": "17.21"
    },
    {
      "id": "655693",
      "t": "SBUX",
      "e": "NASDAQ",
      "l": "58.00",
      "l_fix": "58.00",
      "l_cur": "58.00",
      "s": "0",
      "ltt": "4:00PM EST",
      "lt": "Jan 15, 4:00PM EST",
      "lt_dts": "2016-01-15T16:00:01Z",
      "c": "-0.98",
      "c_fix": "-0.98",
      "cp": "-1.66",
      "cp_fix": "-1.66",
      "ccol": "chr",
      "pcls_fix": "58.98"
    }
  ]
}
For each symbol, we get its real time value, percent change, etc. The fields of our interest are:
| Attribute | Description |
|---|---|
| t | symbol |
| l_fix | price |
| c_fix | absolute price change |
| cp_fix | percent price change |
| lt | timestamp |
Our goal is to extract these attribute values from a http response, index them into Solr and visualize them in Banana. Let's begin.
Go to NiFi UI at http://sandbox.hortonworks.com:9090/nifi
Create a new process group by dragging the Process Group icon to the UI:

Give it some name, eg: Stocks-Dashboard

Find the Processor Icon present in the top toolbar. It is the first icon in the toolbar. Drag and drop the processor icon to the workspace and search for "GetHTTP" processor:
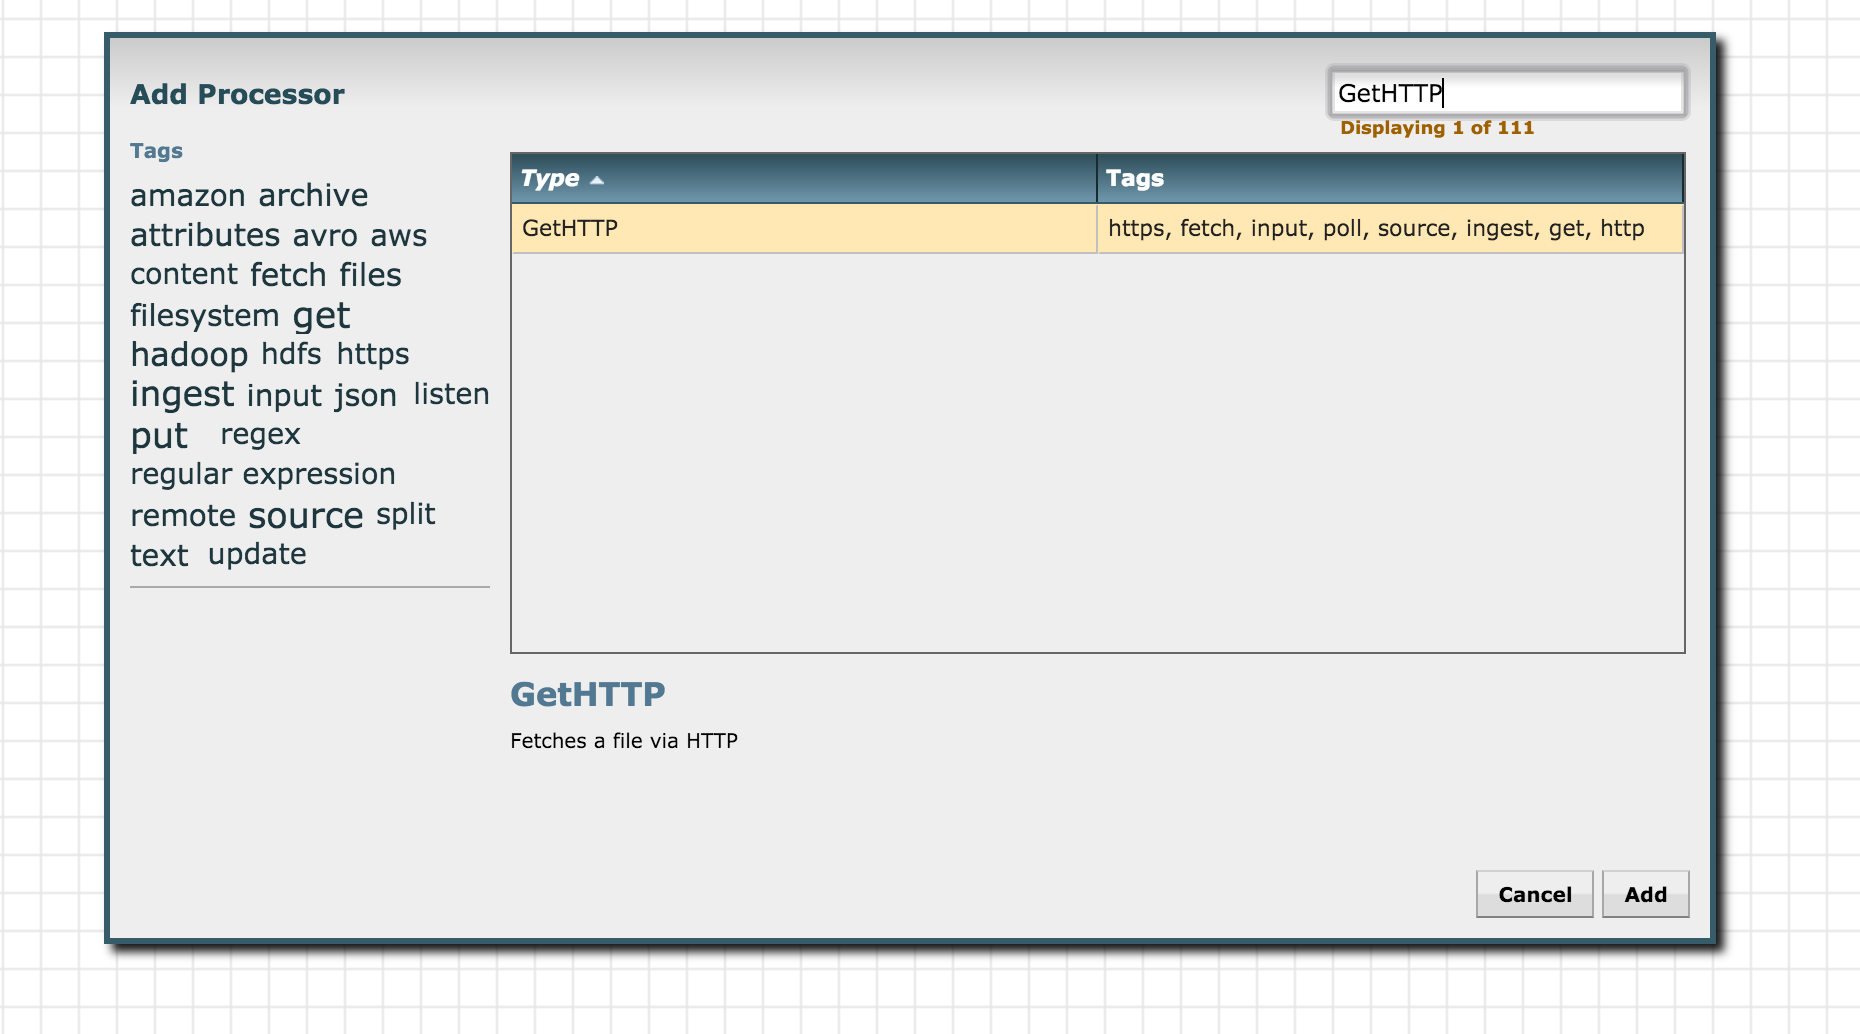
Click add to add it to the Process Group. Next, right click on the GetHTTP processor just added and go to "configure":
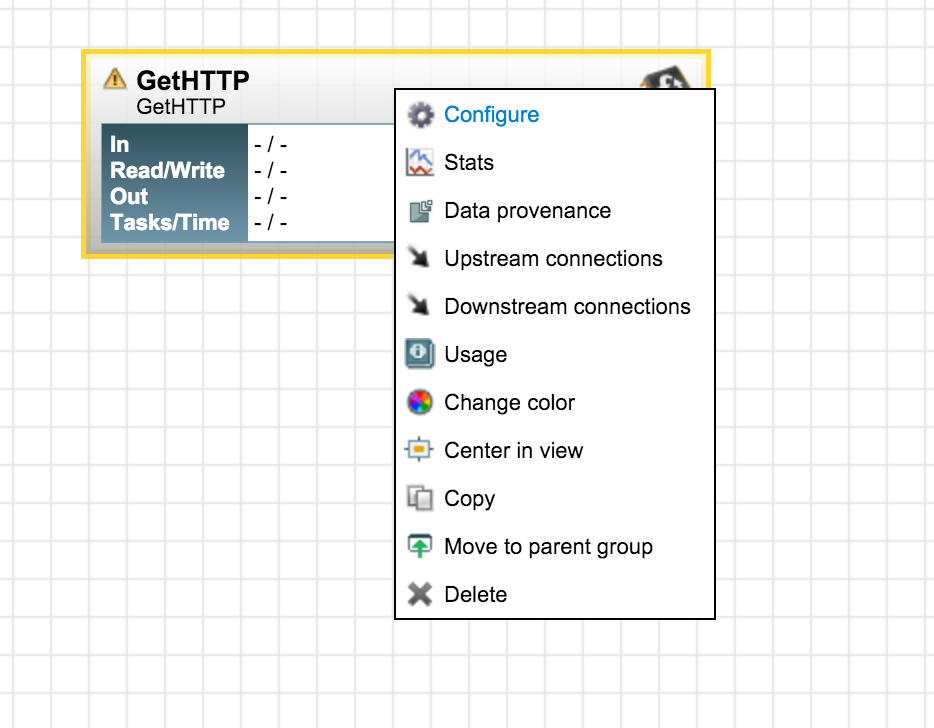
Here, you can customize the processor for fetching data from Google Finance. Go to the "properties" section and edit the URL to point to:
http://finance.google.com/finance/info?client=ig&q=NASDAQ:GOOG,NASDAQ:AAPL,NYSE:GS,NASDAQ:HDP,NASDAQ:RHT,NASDAQ:SBUX
Set the Filename property to ${UUID()} This will cause each downloaded file to be named by a UUID.
Next, let's clean up the json.
The http call to Google finance returns JSON text like this:
// [ { "id": "304466804484872" ,"t" : "GOOG" ,"e" : "NASDAQ" ,"l" : ....
Let's remove the leading comment marker // from the returned response using the ReplaceText processor. Add the processor and configure it to search for the comment and replace it by an empty string like this:

Now let's connect the GetHTTP processor you to the ReplaceText processor. For creating connections in NiFi, hover the mouse on the leading processor's center until you see a circle-arrow icon. Next, click and drag the line to the following processor you wish to connect. Once connected, configure the connection. In this case, we want the FlowFile emanating from GetHTTP to go to ReplaceText only on successful download. Hence, we configure the connection for "success":

Now we have the raw JSON without the leading comment. Let's split it into its attributes so we can do downstream processing easily. Use the SplitJSON processor for it. The API docs of SplitJSON clearly mention what is going on (you can see the documentation for any processor by right-clicking the processor and selecting "usage" from the pop-up menu):
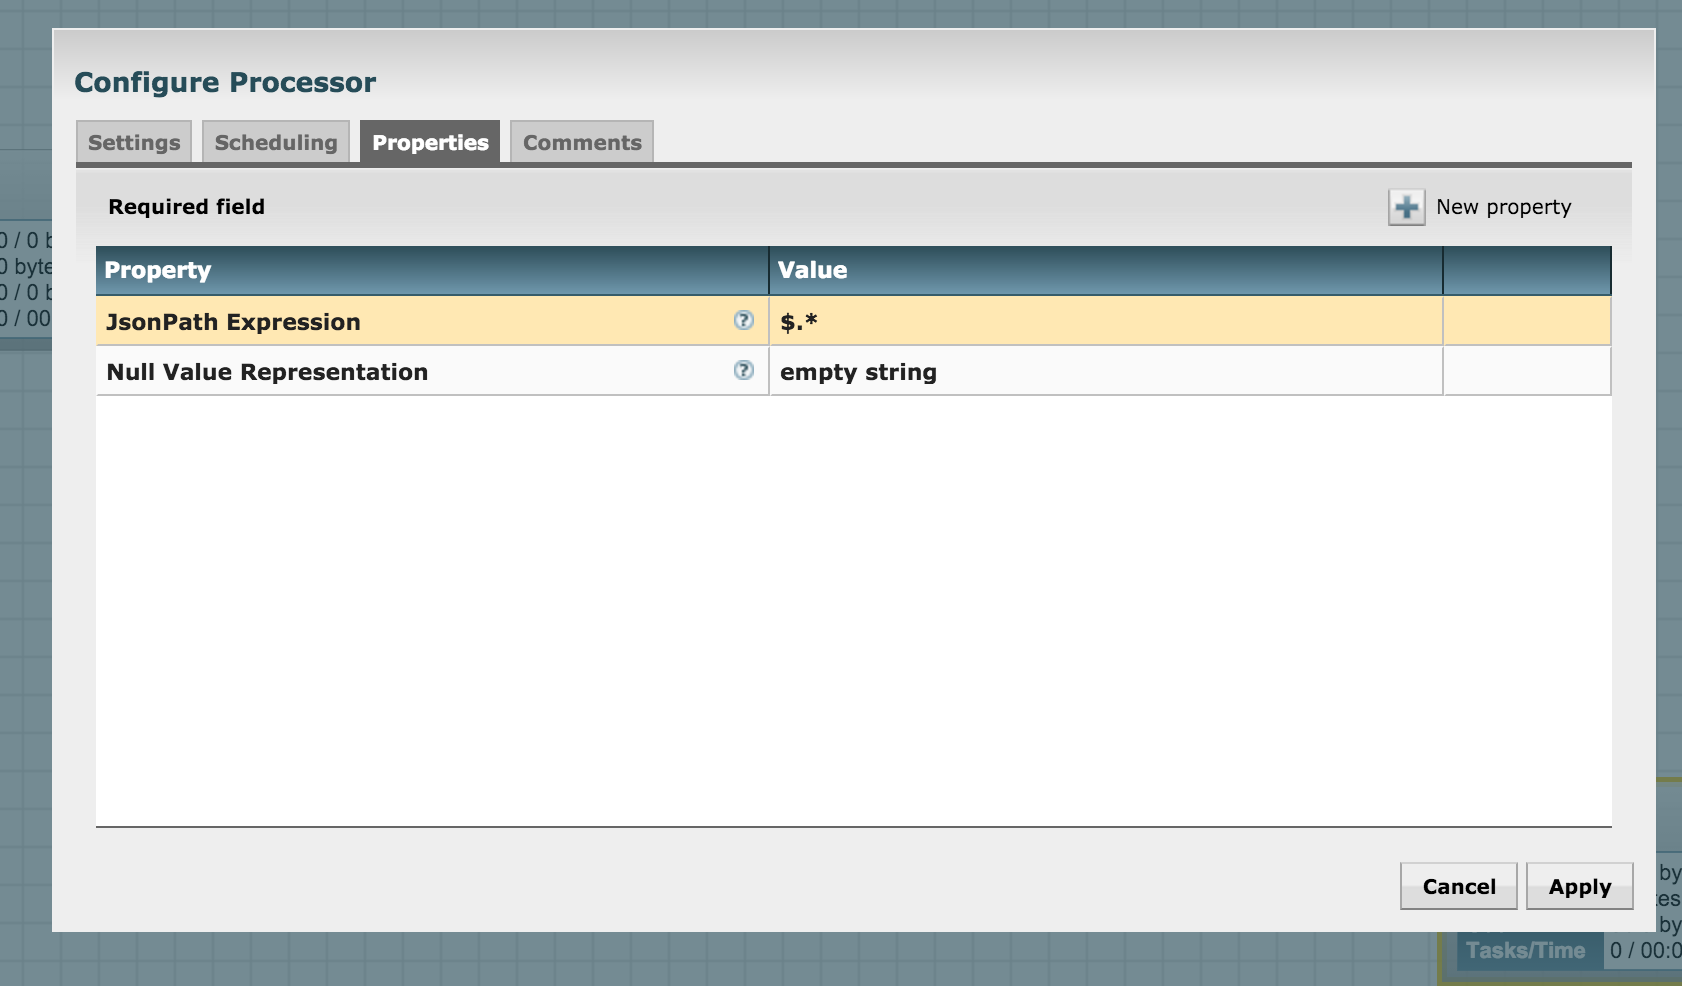
Splits a JSON File into multiple, separate FlowFiles for an array element specified by a JsonPath expression. Each generated FlowFile is comprised of an element of the specified array and transferred to relationship 'split,' with the original file transferred to the 'original' relationship. If the specified JsonPath is not found or does not evaluate to an array element, the original file is routed to 'failure' and no files are generated.
Hence we see that this processor uses JsonPath expressions to define the parsing criteria. For us, the job is simple -- we need to split the array of JSON returned by Google into its individual elements. Hence, let's match the entire array using the expression $.* and configure it as follows:
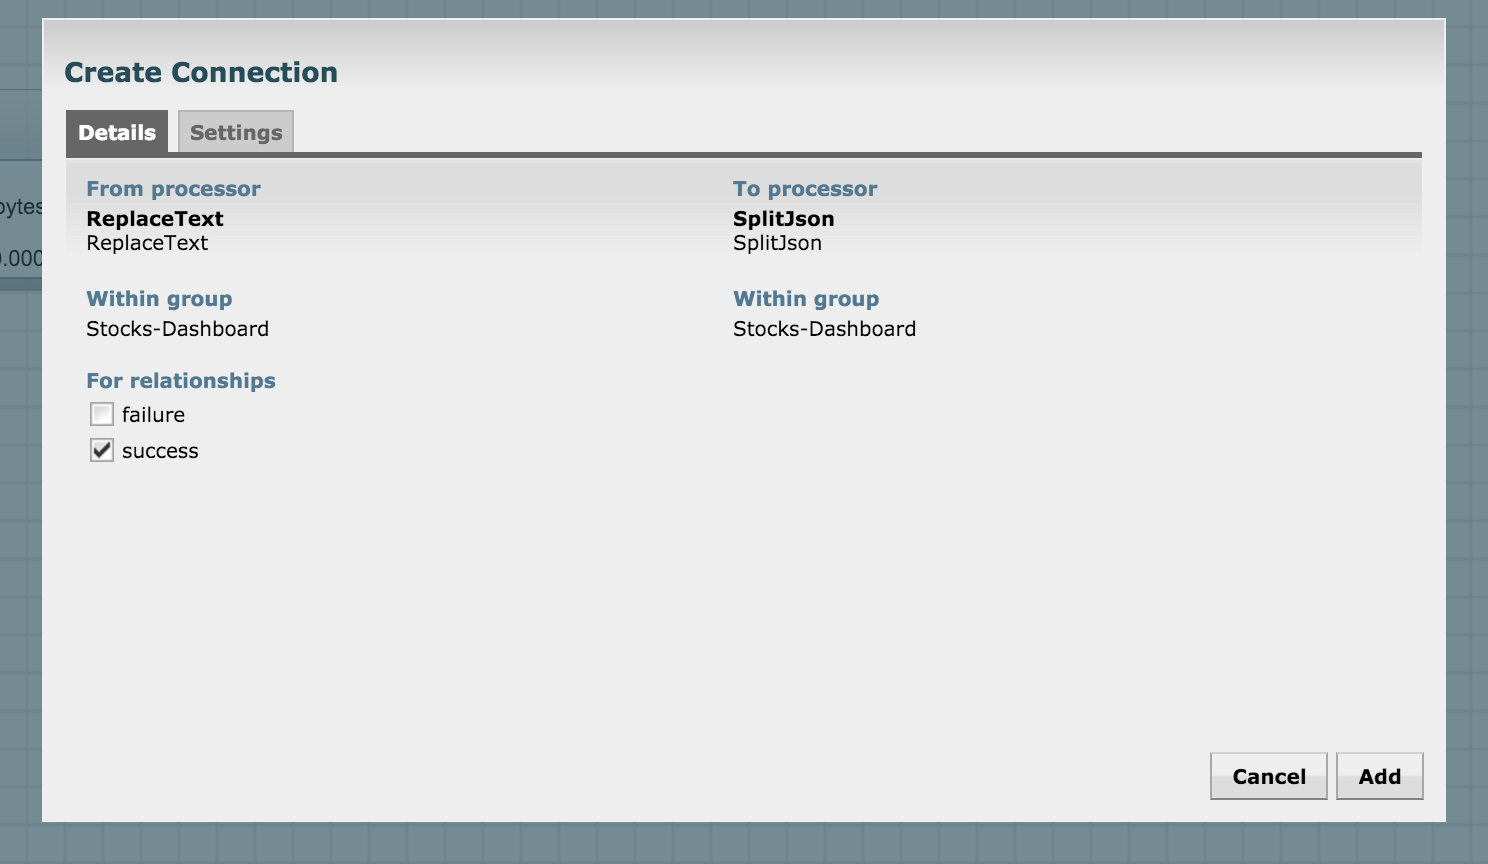
Connect the ReplaceText processor with SplitJSON for a successful match:
We have the split JSON with us, but we need to extract the attributes of interest to us. Recall that we want to index the following attributes:
| Attribute | Description |
|---|---|
| t | symbol |
| l_fix | price |
| c_fix | absolute price change |
| cp_fix | percent price change |
| lt | timestamp |
In order to do this, use the EvaluateJsonPath processor and configure it as shown in the picture below. You'll need to add new properties in the config pop-up and assign them these key-value pairs:
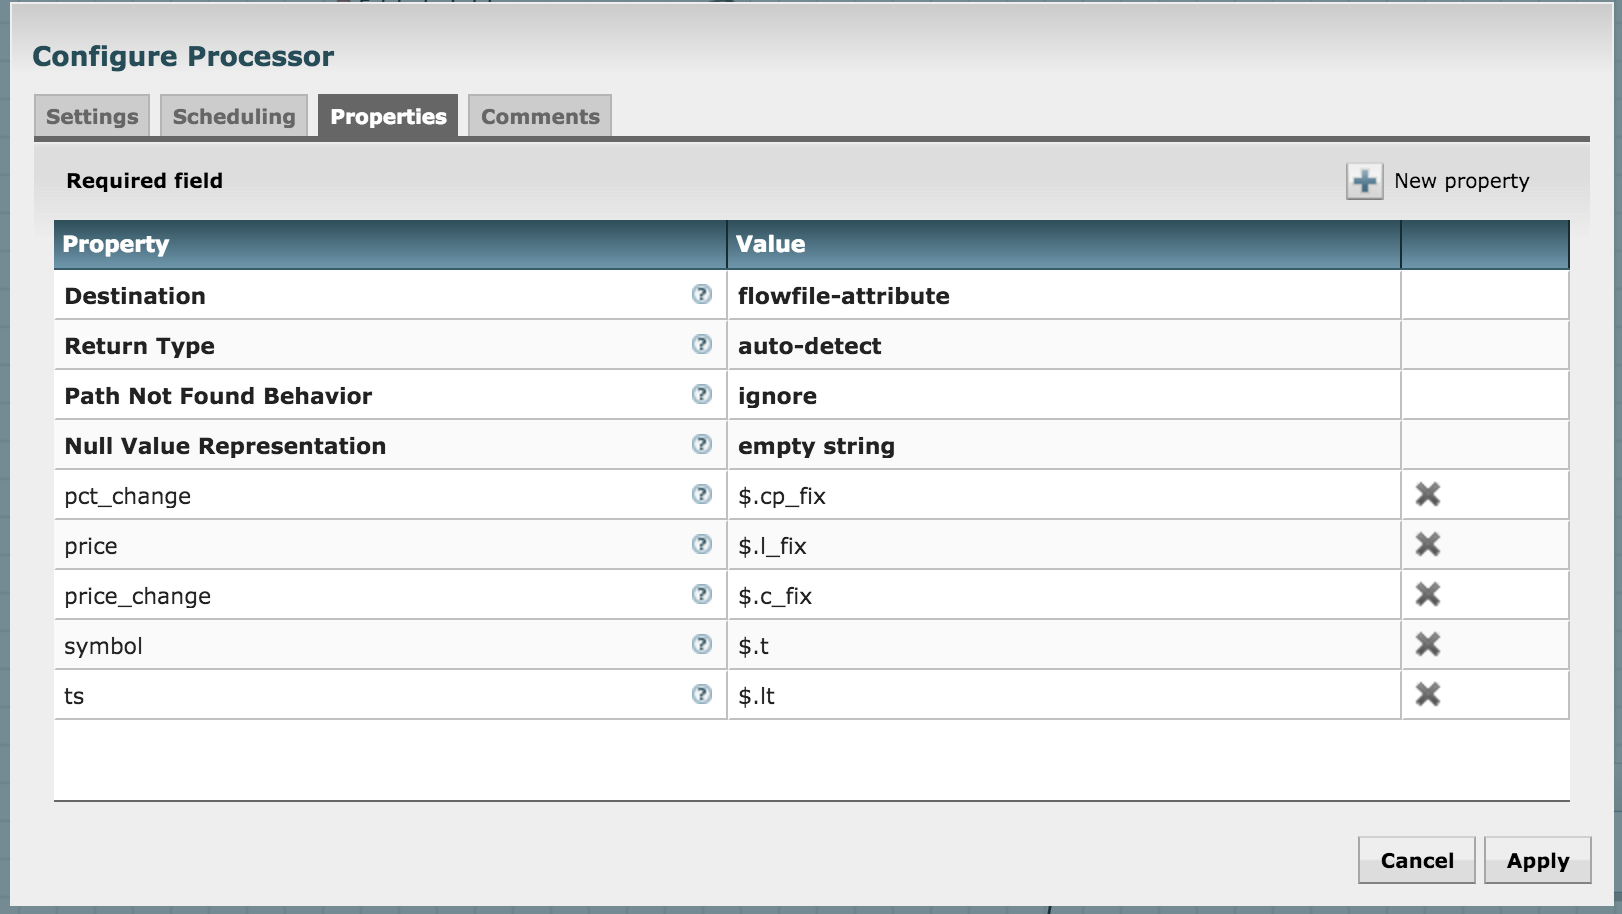
Connect the SplitJSON with this processor:

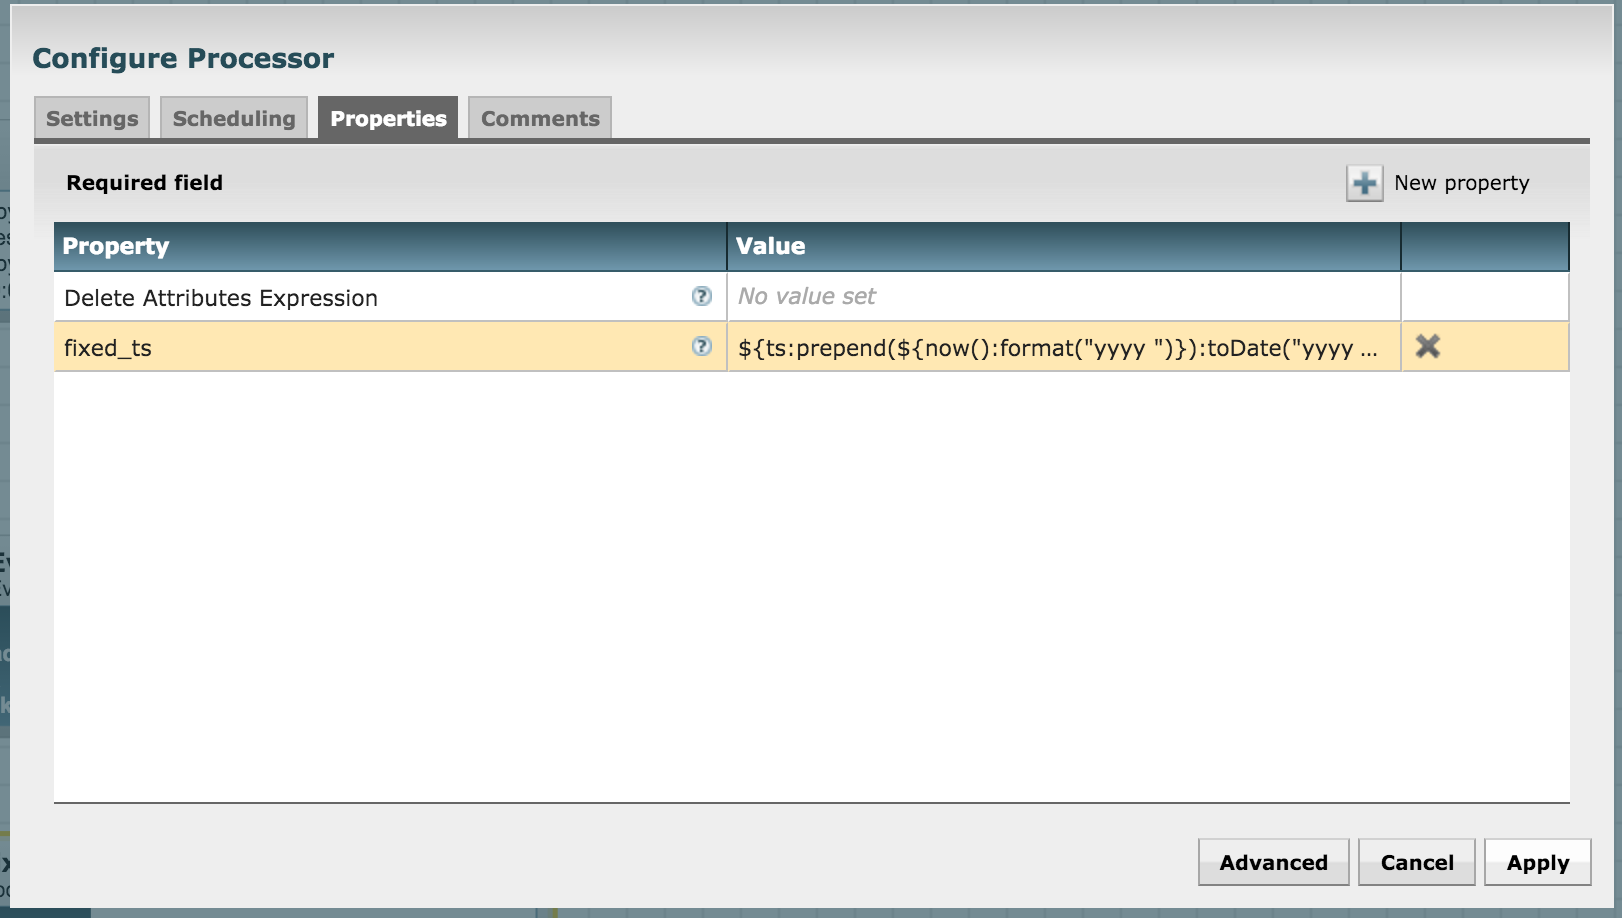
In order to work with Banana dashboard and Solr, we need to massage the date-time a little bit. Use the UpdateAttribute processor for this. In the processor's configuration, add a new property called "fixed_ts"
${ts:prepend(${now():format("yyyy ")}):toDate("yyyy MMM dd',' hh:mma z"):format("yyyy-MM-dd HH:mm:ssZ")}
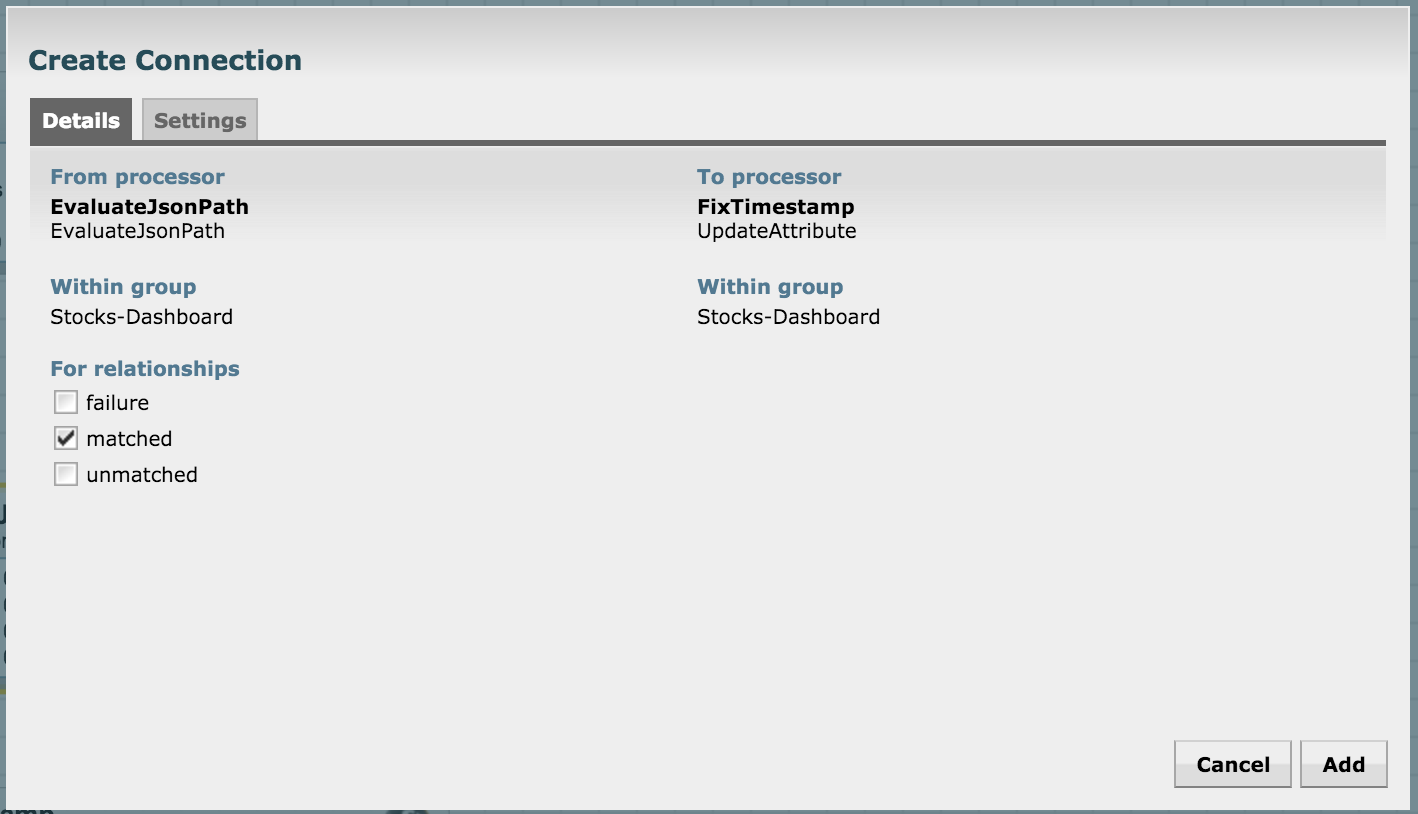
Create a connection between EvaluateJsonPath and this processor for a "matched" relationship:
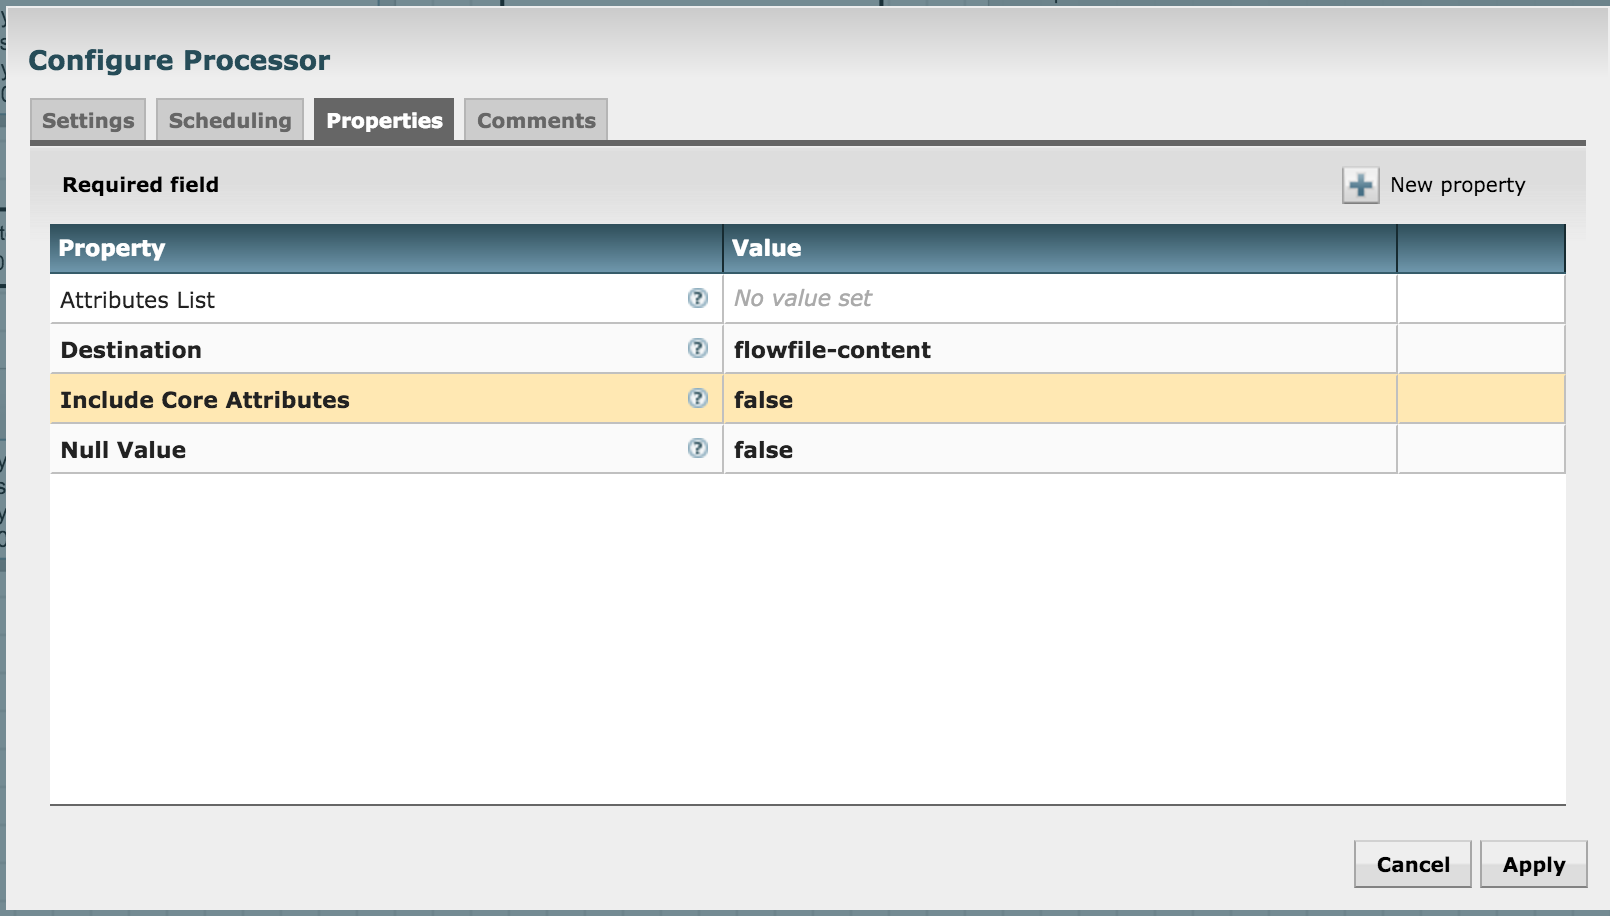
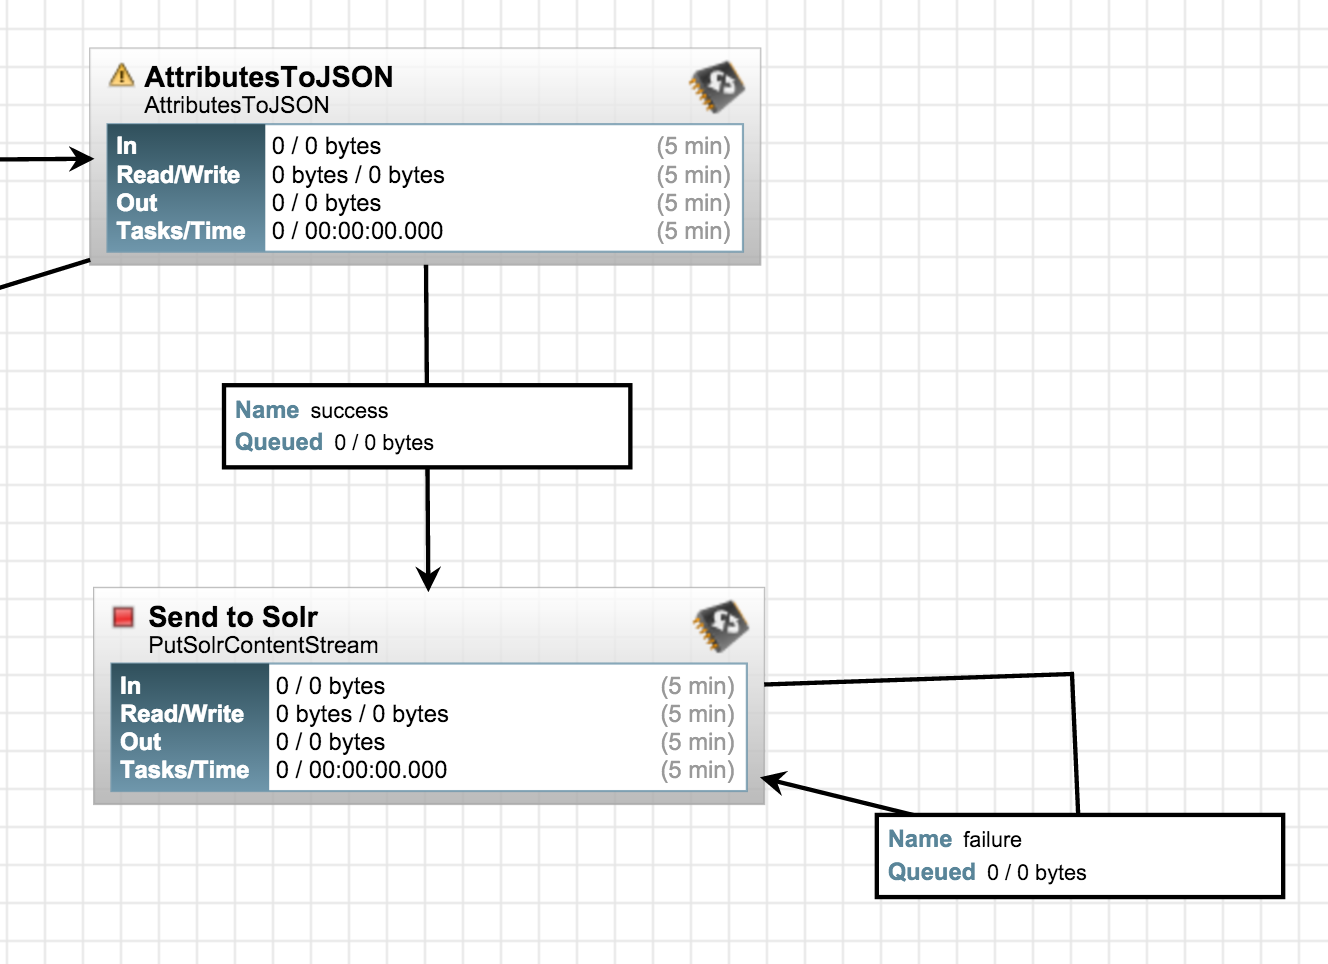
We're now almost ready to push the flow into Solr. But before we do that, we need to convert the attributes into JSON as Solr accepts JSON via REST. Let's use the AttributesToJson processor for it. Keep the "Attributes List" property empty in its configuration so that it converts all attribute-value pairs to JSON (we're only using the fields of interest at this stage and have discarded others):
Let's push to Solr by using the SendToSolr processor. Configure it as shown in the next three diagrams:
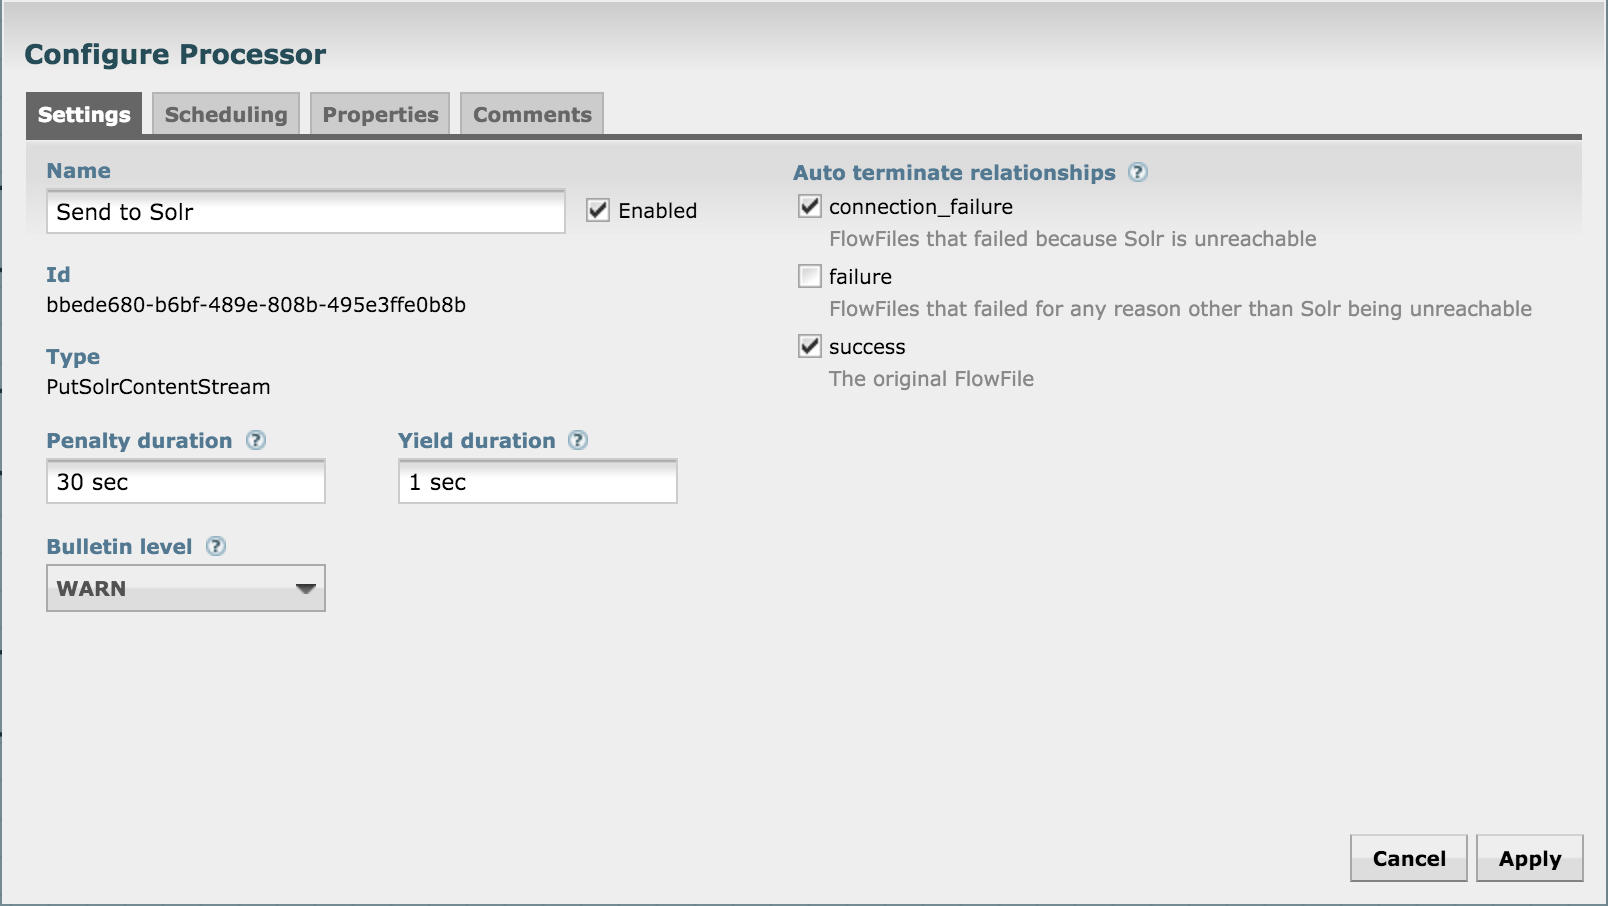
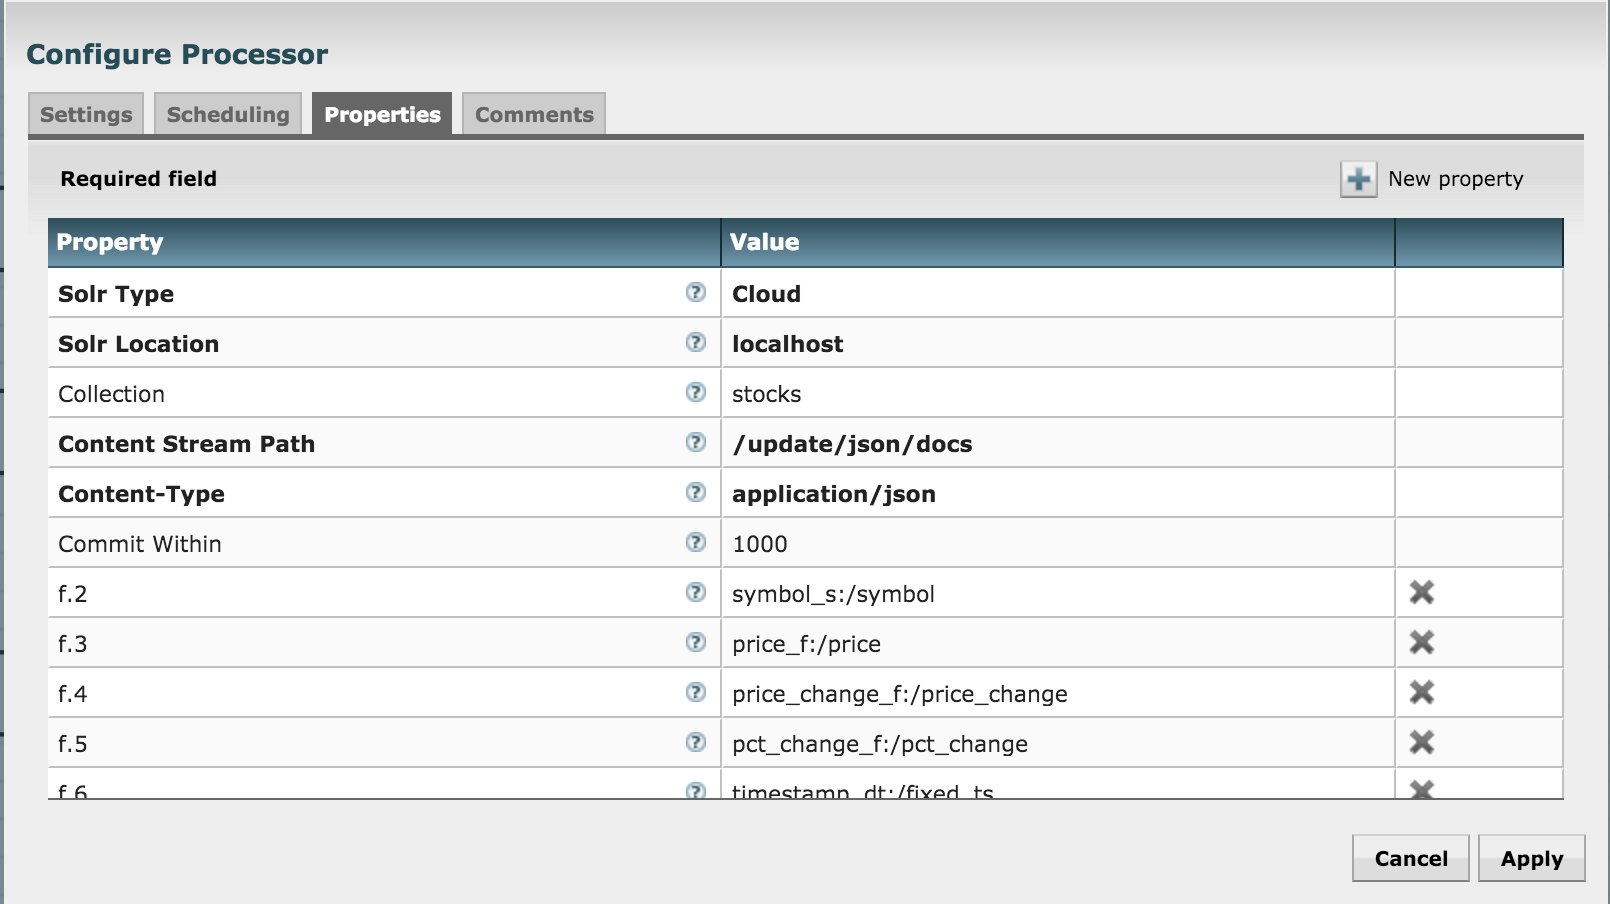
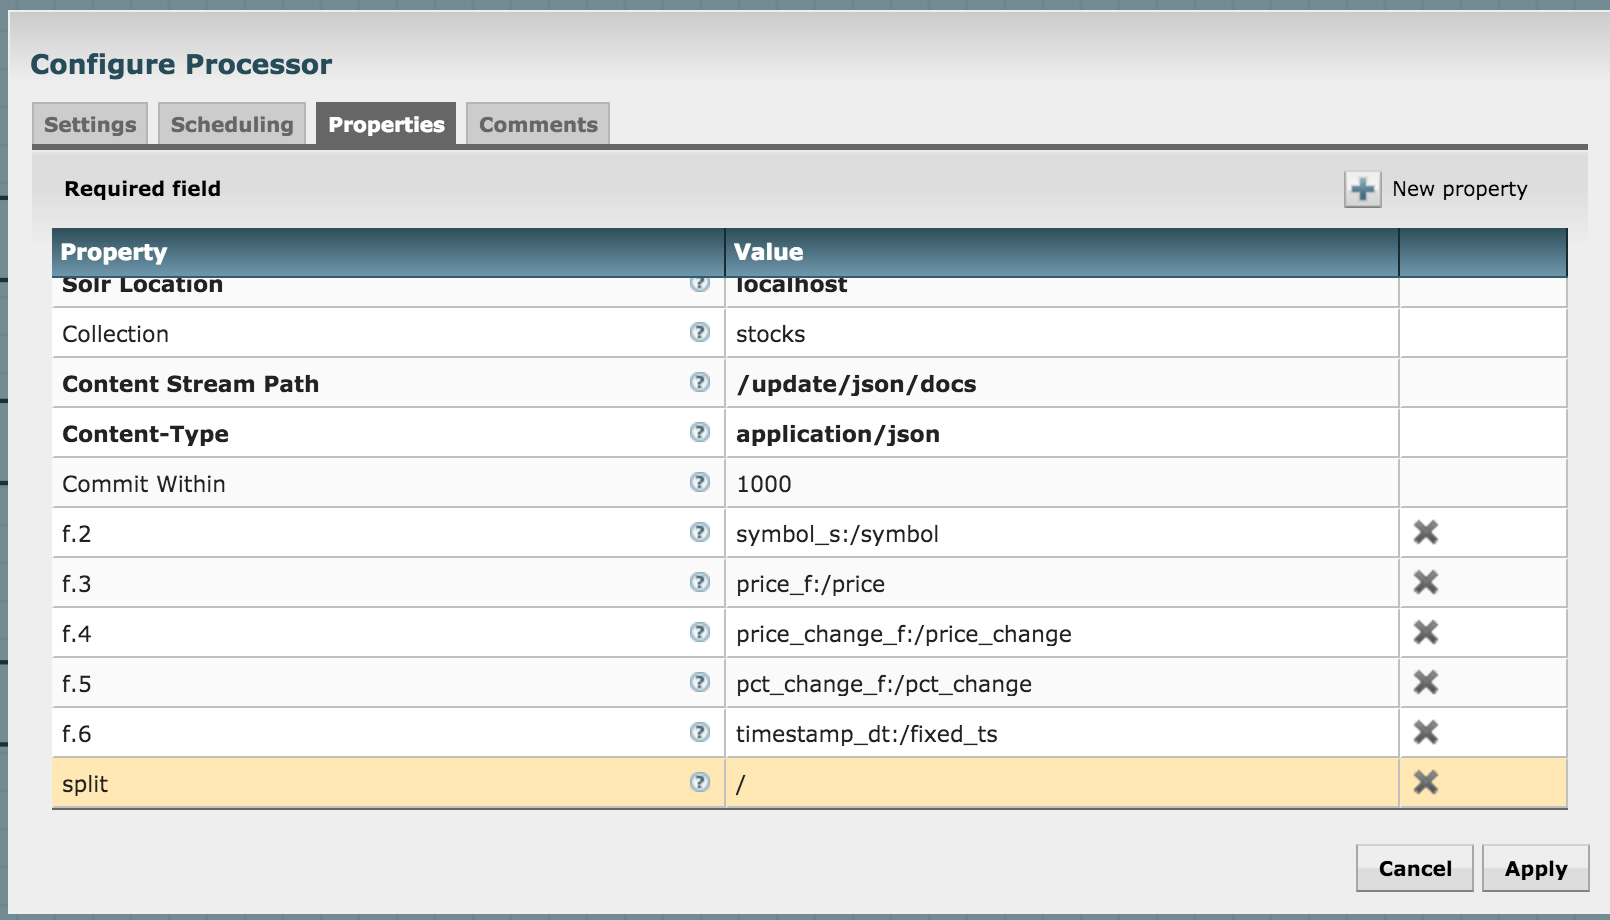
What have we done? We've already created a collection in Solr before, and we're now configuring the processor to send the attributes to their matching fields in the Solr collection.
Connect the processors, and also self-connect SendToSolr processor for "failure" relationship:
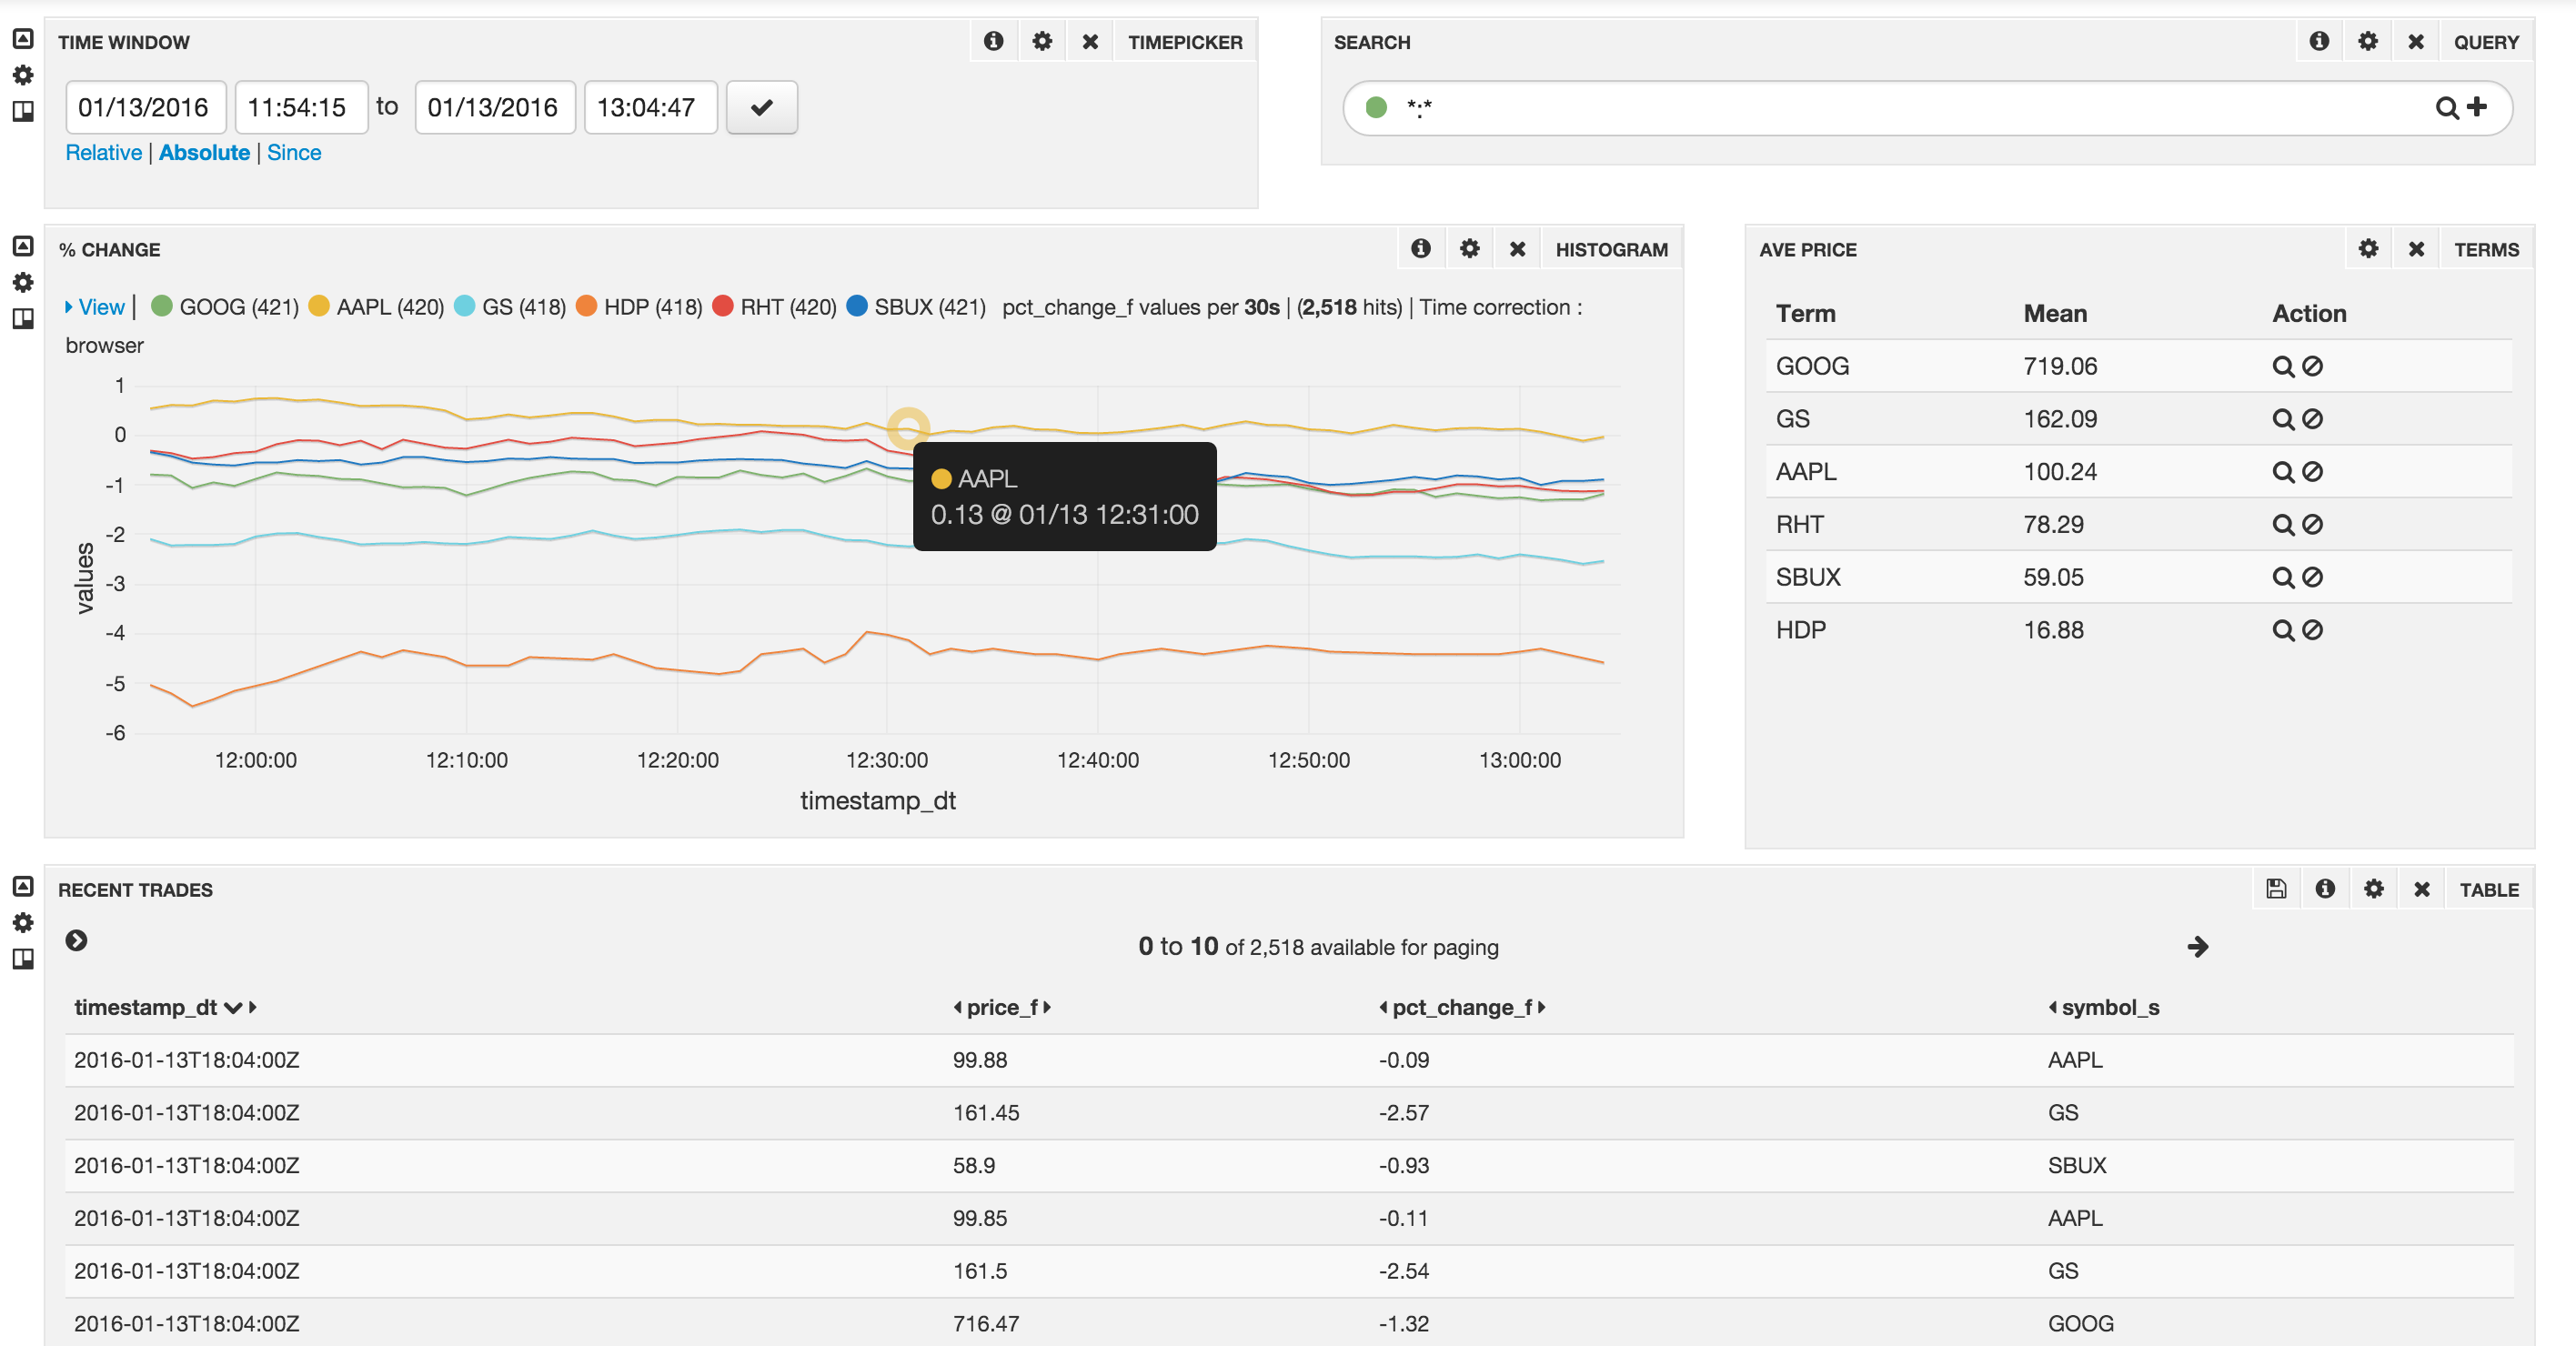
We're all set now. Click on "play" icon on the toolbar (it should be a green arrow), and wait for a few minutes. Go to the Banana UI to visualize the flow:
http://sandbox.hortonworks.com:8983/solr/banana/index.html#/dashboard
You should see something like this: (play around with the time scale to view the chart in greater detail)
This completes the lab. For any feedback/questions, email me at:
Email: dkumar[at]hortonworks[dot]com
- Ali Bajwa for the NiFi service
- Vladimir Zatkin for coming up with the original NiFi flow

