![]()
pip install grad-cam
Documentation with advanced tutorials: https://jacobgil.github.io/pytorch-gradcam-book
This is a package with state of the art methods for Explainable AI for computer vision. This can be used for diagnosing model predictions, either in production or while developing models. The aim is also to serve as a benchmark of algorithms and metrics for research of new explainability methods.
⭐ Comprehensive collection of Pixel Attribution methods for Computer Vision.
⭐ Tested on many Common CNN Networks and Vision Transformers.
⭐ Advanced use cases: Works with Classification, Object Detection, Semantic Segmentation, Embedding-similarity and more.
⭐ Includes smoothing methods to make the CAMs look nice.
⭐ High performance: full support for batches of images in all methods.
⭐ Includes metrics for checking if you can trust the explanations, and tuning them for best performance.
| Method | What it does |
|---|---|
| GradCAM | Weight the 2D activations by the average gradient |
| HiResCAM | Like GradCAM but element-wise multiply the activations with the gradients; provably guaranteed faithfulness for certain models |
| GradCAMElementWise | Like GradCAM but element-wise multiply the activations with the gradients then apply a ReLU operation before summing |
| GradCAM++ | Like GradCAM but uses second order gradients |
| XGradCAM | Like GradCAM but scale the gradients by the normalized activations |
| AblationCAM | Zero out activations and measure how the output drops (this repository includes a fast batched implementation) |
| ScoreCAM | Perbutate the image by the scaled activations and measure how the output drops |
| EigenCAM | Takes the first principle component of the 2D Activations (no class discrimination, but seems to give great results) |
| EigenGradCAM | Like EigenCAM but with class discrimination: First principle component of Activations*Grad. Looks like GradCAM, but cleaner |
| LayerCAM | Spatially weight the activations by positive gradients. Works better especially in lower layers |
| FullGrad | Computes the gradients of the biases from all over the network, and then sums them |
| Deep Feature Factorizations | Non Negative Matrix Factorization on the 2D activations |
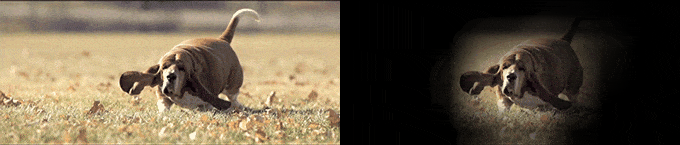
| What makes the network think the image label is 'pug, pug-dog' | What makes the network think the image label is 'tabby, tabby cat' | Combining Grad-CAM with Guided Backpropagation for the 'pug, pug-dog' class |
|---|---|---|
 |
 |
 |
| Object Detection | Semantic Segmentation |
|---|---|
 |
 |


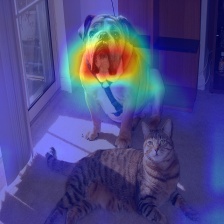
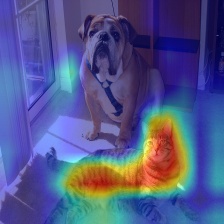
| Category | Image | GradCAM | AblationCAM | ScoreCAM |
|---|---|---|---|---|
| Dog |  |
 |
 |
|
| Cat |  |
 |
 |
| Category | Image | GradCAM | AblationCAM | ScoreCAM |
|---|---|---|---|---|
| Dog |  |
 |
 |
|
| Cat |  |
 |
 |
| Category | Image | GradCAM | AblationCAM | ScoreCAM |
|---|---|---|---|---|
| Dog |  |
 |
 |
|
| Cat |  |
 |
 |


You need to choose the target layer to compute CAM for. Some common choices are:
- FasterRCNN: model.backbone
- Resnet18 and 50: model.layer4[-1]
- VGG and densenet161: model.features[-1]
- mnasnet1_0: model.layers[-1]
- ViT: model.blocks[-1].norm1
- SwinT: model.layers[-1].blocks[-1].norm1
If you pass a list with several layers, the CAM will be averaged accross them. This can be useful if you're not sure what layer will perform best.
from pytorch_grad_cam import GradCAM, HiResCAM, ScoreCAM, GradCAMPlusPlus, AblationCAM, XGradCAM, EigenCAM, FullGrad
from pytorch_grad_cam.utils.model_targets import ClassifierOutputTarget
from pytorch_grad_cam.utils.image import show_cam_on_image
from torchvision.models import resnet50

model = resnet50(pretrained=True)
target_layers = [model.layer4[-1]]
input_tensor = # Create an input tensor image for your model..
# Note: input_tensor can be a batch tensor with several images!

# Construct the CAM object once, and then re-use it on many images:
cam = GradCAM(model=model, target_layers=target_layers)

# You can also use it within a with statement, to make sure it is freed,
# In case you need to re-create it inside an outer loop:
# with GradCAM(model=model, target_layers=target_layers) as cam:
#   ...

# We have to specify the target we want to generate
# the Class Activation Maps for.
# If targets is None, the highest scoring category
# will be used for every image in the batch.
# Here we use ClassifierOutputTarget, but you can define your own custom targets
# That are, for example, combinations of categories, or specific outputs in a non standard model.

targets = [ClassifierOutputTarget(281)]

# You can also pass aug_smooth=True and eigen_smooth=True, to apply smoothing.
grayscale_cam = cam(input_tensor=input_tensor, targets=targets)

# In this example grayscale_cam has only one image in the batch:
grayscale_cam = grayscale_cam[0, :]
visualization = show_cam_on_image(rgb_img, grayscale_cam, use_rgb=True)

# You can also get the model outputs without having to re-inference
model_outputs = cam.outputsfrom pytorch_grad_cam.utils.model_targets import ClassifierOutputSoftmaxTarget
from pytorch_grad_cam.metrics.cam_mult_image import CamMultImageConfidenceChange
# Create the metric target, often the confidence drop in a score of some category
metric_target = ClassifierOutputSoftmaxTarget(281)
scores, batch_visualizations = CamMultImageConfidenceChange()(input_tensor,
inverse_cams, targets, model, return_visualization=True)
visualization = deprocess_image(batch_visualizations[0, :])
# State of the art metric: Remove and Debias
from pytorch_grad_cam.metrics.road import ROADMostRelevantFirst, ROADLeastRelevantFirst
cam_metric = ROADMostRelevantFirst(percentile=75)
scores, perturbation_visualizations = cam_metric(input_tensor,
grayscale_cams, targets, model, return_visualization=True)
# You can also average accross different percentiles, and combine
# (LeastRelevantFirst - MostRelevantFirst) / 2
from pytorch_grad_cam.metrics.road import ROADMostRelevantFirstAverage,
ROADLeastRelevantFirstAverage,
ROADCombined
cam_metric = ROADCombined(percentiles=[20, 40, 60, 80])
scores = cam_metric(input_tensor, grayscale_cams, targets, model)You can use this package for "custom" deep learning models, for example Object Detection or Semantic Segmentation.
You will have to define objects that you can then pass to the CAM algorithms:
- A reshape_transform, that aggregates the layer outputs into 2D tensors that will be displayed.
- Model Targets, that define what target do you want to compute the visualizations for, for example a specific category, or a list of bounding boxes.
Here you can find detailed examples of how to use this for various custom use cases like object detection:
These point to the new documentation jupter-book for fast rendering. The jupyter notebooks themselves can be found under the tutorials folder in the git repository.
-
Notebook tutorial: XAI Recipes for the HuggingFace 🤗 Image Classification Models
-
Notebook tutorial: Deep Feature Factorizations for better model explainability
-
Notebook tutorial: Class Activation Maps for Object Detection with Faster-RCNN
-
Notebook tutorial: Class Activation Maps for Semantic Segmentation
-
Notebook tutorial: Adapting pixel attribution methods for embedding outputs from models
-
Notebook tutorial: May the best explanation win. CAM Metrics and Tuning
To reduce noise in the CAMs, and make it fit better on the objects, two smoothing methods are supported:
-
aug_smooth=TrueTest time augmentation: increases the run time by x6.
Applies a combination of horizontal flips, and mutiplying the image by [1.0, 1.1, 0.9].
This has the effect of better centering the CAM around the objects.
-
eigen_smooth=TrueFirst principle component of
activations*weightsThis has the effect of removing a lot of noise.
| AblationCAM | aug smooth | eigen smooth | aug+eigen smooth |
|---|---|---|---|
 |
 |
 |
 |
Usage: python cam.py --image-path <path_to_image> --method <method> --output-dir <output_dir_path>
To use with a specific device, like cpu, cuda, cuda:0 or mps:
python cam.py --image-path <path_to_image> --device cuda --output-dir <output_dir_path>
You can choose between:
GradCAM , HiResCAM, ScoreCAM, GradCAMPlusPlus, AblationCAM, XGradCAM , LayerCAM, FullGrad and EigenCAM.
Some methods like ScoreCAM and AblationCAM require a large number of forward passes, and have a batched implementation.
You can control the batch size with
cam.batch_size =
If you use this for research, please cite. Here is an example BibTeX entry:
@misc{jacobgilpytorchcam,
  title={PyTorch library for CAM methods},
  author={Jacob Gildenblat and contributors},
  year={2021},
  publisher={GitHub},
  howpublished={\url{https://github.com/jacobgil/pytorch-grad-cam}},
}
https://arxiv.org/abs/1610.02391
Grad-CAM: Visual Explanations from Deep Networks via Gradient-based Localization Ramprasaath R. Selvaraju, Michael Cogswell, Abhishek Das, Ramakrishna Vedantam, Devi Parikh, Dhruv Batra
https://arxiv.org/abs/2011.08891
Use HiResCAM instead of Grad-CAM for faithful explanations of convolutional neural networks Rachel L. Draelos, Lawrence Carin
https://arxiv.org/abs/1710.11063
Grad-CAM++: Improved Visual Explanations for Deep Convolutional Networks Aditya Chattopadhyay, Anirban Sarkar, Prantik Howlader, Vineeth N Balasubramanian
https://arxiv.org/abs/1910.01279
Score-CAM: Score-Weighted Visual Explanations for Convolutional Neural Networks Haofan Wang, Zifan Wang, Mengnan Du, Fan Yang, Zijian Zhang, Sirui Ding, Piotr Mardziel, Xia Hu
https://ieeexplore.ieee.org/abstract/document/9093360/
Ablation-cam: Visual explanations for deep convolutional network via gradient-free localization. Saurabh Desai and Harish G Ramaswamy. In WACV, pages 972–980, 2020
https://arxiv.org/abs/2008.02312
Axiom-based Grad-CAM: Towards Accurate Visualization and Explanation of CNNs Ruigang Fu, Qingyong Hu, Xiaohu Dong, Yulan Guo, Yinghui Gao, Biao Li
https://arxiv.org/abs/2008.00299
Eigen-CAM: Class Activation Map using Principal Components Mohammed Bany Muhammad, Mohammed Yeasin
http://mftp.mmcheng.net/Papers/21TIP_LayerCAM.pdf
LayerCAM: Exploring Hierarchical Class Activation Maps for Localization Peng-Tao Jiang; Chang-Bin Zhang; Qibin Hou; Ming-Ming Cheng; Yunchao Wei
https://arxiv.org/abs/1905.00780
Full-Gradient Representation for Neural Network Visualization Suraj Srinivas, Francois Fleuret
https://arxiv.org/abs/1806.10206
Deep Feature Factorization For Concept Discovery Edo Collins, Radhakrishna Achanta, Sabine Süsstrunk


