Working on:Happy-Coding-Clans
huangshuwei / blog Goto Github PK
View Code? Open in Web Editor NEW🈲黄书伟的个人博客
🈲黄书伟的个人博客
Working on:Happy-Coding-Clans


单元测试已经成为前端开发必备技能,下面使用vue-test-utils进行 vue 单元测试。
├─build
├─src
├─package.json
├─.babelrc
├─.eslintrc
├─jest.config.js
└─test
      └─unit
          │
          ├─coverage
          │
          └─specs
               *.spec.js
vue-test-utils
Vue Test Utils 是 Vue.js 官方的单元测试实用工具库
安装:
$ npm install --save-dev @vue/test-utils
测试运行器
官方推荐两种测试机运行器。第一个是 jest,第二个是 mocha-webpack,考虑到配置的复杂度。我倾向选择 jest 作为测试运行时器。
安装:
$ npm install --save-dev jest
处理单文件组件
为了告诉 Jest 如何处理 *.vue 文件,我们需要安装和配置 vue-jest 预处理器:
$ npm install --save-dev vue-jest
为 Jest 配置 Babel
尽管最新版本的 Node 已经支持绝大多数的 ES2015 特性,你可能仍然想要在你的测试中使用 ES modules 语法和 stage-x 的特性。为此我们需要安装
babel-jest
$ npm install --save-dev babel-jest
.babelrc 文件示例:
{
  "presets": [["env", { "modules": false }]],
  "env": {
    "test": {
      "presets": [["env", { "targets": { "node": "current" } }]]
    }
  }
}
eslint 支持 jest
使用 jest eslint 插件
$ npm install --save-dev eslint-plugin-jest
.eslintrc 配置支持 jest
...
"extends": [
    "plugin:jest/recommended"
  ],
...
快照格式化
默认快照测试,输出文件包含大量转义符号"/",我们可以通过jest-serializer-vue插件解决
$ npm install --save-dev jest-serializer-vue
然后修改 jest config
// jest.config.js
...
snapshotSerializers: ["<rootDir>/node_modules/jest-serializer-vue"],
...
创建 jest.config.js 作为jest配置文件
// jest config

module.exports = {
    "verbose": true,
    /*
    * 1、显示代码覆盖率详细信息
    * 2、将测试用例结果输出到终端
    * */
    "collectCoverage": true,
    // 生成测试覆盖报告时检测的覆盖文件
    "collectCoverageFrom": [
        "src/**/*.{js,vue}",
        "!**/node_modules/**"
    ],
    // 覆盖率输出的目录
    "coverageDirectory":"test/unit/coverage",
    "moduleFileExtensions": [
        "js",
        "json",
        "vue"
    ],
    "transform": {
        // vue-jest 处理 vue 文件
        ".*\\.(vue)$": "vue-jest",
        // babel-jest 处理 js 文件
        "^.+\\.js$": "./node_modules/babel-jest"
    },
    // 测试套件文件的位置以及规则
    "testRegex": "(/test/unit/spec/.*|\\.(test|spec))\\.js$"
}
scripts 启动执行 npm run test 读取 jest配置并执行测试程序
// package.json
...
"scripts":{
    "test":"jest --config ./jest.config.js"
}
...
普通测试命令:
npm run test
交互式命令,添加 --watch命令标识即可。这种方式会允许键盘操作,当有测试过程有报错时,方便你去筛选和处理
键盘操作有几种选项:
› Press f to run only failed tests.
› Press o to only run tests related to changed files.
› Press p to filter by a filename regex pattern.
› Press t to filter by a test name regex pattern.
› Press q to quit watch mode.
› Press Enter to trigger a test run.
npm run test --watch
完
执行scoop bucket add extras
然后一直就在Checking repo... ok。这句话卡着,请问您知道是怎么回事吗
修改了路由模式为 BrowserRouter,站点服务器也做好了配置。开发模式一切正常,发布后发现页面无法正常访问。这时候你就要想是否是资源路径配置的问题了。
看似是小问题,但常常会忽略,导致折腾了数个小时才排查到,具体细节不说了
如果是使用 create-react-app 这个打包奇慢无比的脚手架,你只需要在“官方文档”的帮助下,修改配置即可。在 package.json 文件中添加一个节点,具体为:
"homepage": "/"
--完--
现有个场景需要使用 动态组件,但是传参问题无法很好的解决。今天尝试了一种方案还不错,特此记录下
启发
思路来自以下等价方式
<component
        :is="currentComp"
        v-bind="{name:'abc',address:'xxx'}"/>
等价于
<component
        :is="currentComp"
        :name="abc"
        :address="xxx"/>
动态组件封装
约定将所有组件的传参都通过对象的形式
// dynamic-comp.vue
<template>
    <component
        :is="currentComp"
        v-bind="propsOption"/>
</template>

<script>
    export default {
        name: "DynamicComp",
        props: {
            currentComp: {
                type: String,
                required: true
            },
            // props 以对象方式传递
            propsOption: {
                type: Object,
                required: false,
                validator:function (val) {

                    return Object.prototype.toString.apply(val) === "[object Object]"
                }
            }
        }
    }
</script>
使用
// any.vue
<template>
    <dynamic-comp
        :props-option="propsOption"
        current-comp="testComp"/>
</template>
<script>
    import dynamicComp from './dynamic-comp'

    export default {
        components: {dynamicComp},
        data() {

            return {
                propsOption: {
                    prop1: "tome",
                    prop2: 123
                }
            }
        }
    }
</script>
完
先做笔记,后面整理:
不同浏览器,同一个域名处理请求的最大数:
Firefox 2: 2
Firefox 3+: 6
Opera 9.26: 4
Opera 12: 6
Safari 3: 4
Safari 5: 6
IE 7: 2
IE 8: 6
IE 10: 8
Chrome: 6
以chrome 为例
如果一个页面请求等待大于等于6个,后面的请求(和6个请求同一个域的)将被阻塞。
优化方案,将请求分发到不同的域名
如题,这篇文章记录 react 路由在开发阶段的 history 模式配置
1、项目以 create-react-app 生成为例
2、路由使用的是 react-router-dom
将 hash 模式 改为 history 模式,即:
import {HashRouter as Router} from 'react-router-dom'
替换成
import {BrowserRouter as Router} from 'react-router-dom'
调试模式运行后,url 地址将由 ‘#’变为了‘/’。且刷新回退一切正常,开发模式没有任何问题,但是如果将项目发布后放到站点服务器上,那么页面刷新后将无法正常显示。所以除了在开发阶段配置 history 模式外,在站点服务器上也要增加额外的配置。详情见下篇文章。
完--
刚通过sinopia 去搭建私有包管理器,并记录了过程:通过sinopia搭建私有的包管理器,就发现了verdaccio,有更好的当然去尝试,下面我将记录自己的配置过程。
官方的介绍(不翻译了):
他是从sinopia fork 过来,并在此基础上进行完善的。文档也非常的齐全。下面开始踩坑。
准备工作
如果需要安装最新版本,那么node >= 6.12.0,npm >=3.x,浏览器需要使用Chrome, Firefox, Edge, 或者IE9
安装
使用 npm
$ npm install -g verdaccio
或者使用yarn
$ yarn global add verdaccio
启动 verdaccio
$ verdaccio
将会看到
 warn --- config file  - C:\Users\shuwei\AppData\Roaming\verdaccio\config.yaml
 warn --- Plugin successfully loaded: htpasswd
 warn --- Plugin successfully loaded: audit
 warn --- http address - http://localhost:4873/ - verdaccio/3.2.0
打开目录到(你的和我的不一样) C:\Users\shuwei\AppData\Roaming\verdaccio 会看到一个 storage目录,这里将来会放置私有的包。还有一个config.yaml配置文件,这是一个很重要的文件,后面会说。
启动verdaccio 也支持传入参数,如
verdaccio --listen 4001 --config C:\Users\shuwei\AppData\Roaming\verdaccio\config.yaml
将会看到
warn --- config file  - C:\Users\shuwei\AppData\Roaming\verdaccio\config.yaml
 warn --- Plugin successfully loaded: htpasswd
 warn --- Plugin successfully loaded: audit
 warn --- http address - http://localhost:4001/ - verdaccio/3.2.0
当然访问地址也可以直接在 config.yaml文件中添加
# listen
listen:127.0.0.1:4001
打开地址http://localhost:4001/ 将会看到包管理的页面(不截图了),并且所有的操作终端里都会详细的记录:
http <-- 200, user: undefined(127.0.0.1), req: 'GET /', bytes: 0/1021
 http <-- 200, user: undefined(127.0.0.1), req: 'GET /-/static/7.style.539cab9c31ffba25da18.css', bytes: 0/1068
 http <-- 200, user: undefined(127.0.0.1), req: 'GET /-/static/manifest.d3c41f9bbed51d4d9491.js', bytes: 0/1470
 http <-- 200, user: undefined(127.0.0.1), req: 'GET /-/static/0.style.b86c5878ee2935af83e9.css', bytes: 0/41336
 http <-- 200, user: undefined(127.0.0.1), req: 'GET /-/static/main.d3c41f9bbed51d4d9491.js', bytes: 0/13897
config.yaml 配置文件
结构如下
storage: ./storage
auth:
  htpasswd:
    file: ./htpasswd
uplinks:
  npmjs:
    url: https://registry.npmjs.org/
packages:
  '@*/*':
    access: $all
    publish: $authenticated
    proxy: npmjs
  '**':
    proxy: npmjs
logs:
  - {type: stdout, format: pretty, level: http}
每一项代表什么看官网介绍吧
https
如果对外暴露的是https的访问地址,那么需要配置ca 证书,详细介绍
安装 nrm 进行 包管理器的切换(切换 npm 和 verdaccio)
$ npm install -g nrm
此时我们执行 $ nrm ls查看所有的仓库配置,是看不到verdaccio的:
* npm ---- https://registry.npmjs.org/
  cnpm --- http://r.cnpmjs.org/
  taobao - https://registry.npm.taobao.org/
  nj ----- https://registry.nodejitsu.com/
  rednpm - http://registry.mirror.cqupt.edu.cn/
  npmMirror  https://skimdb.npmjs.com/registry/
  edunpm - http://registry.enpmjs.org/
  sinopia  http://127.0.0.1:4875/
添加注册表到nrm
这样就可以方便的选择安装或卸载本地或者公共的包了(名字可以自己定义)
nrm add verdaccio http://127.0.0.1:4001
添加成功会提示:'add registry verdaccio success'
首先保证 http://127.0.0.1:4001 可访问,否则会报错。如果需要修改新增的注册表,比如注册的地址发生了变更,可以先删除注册
nrm del verdaccio详情参考 nrm
此时再执行$ nrm ls可以看到 verdaccio 了
* npm ---- https://registry.npmjs.org/
  cnpm --- http://r.cnpmjs.org/
  taobao - https://registry.npm.taobao.org/
  nj ----- https://registry.nodejitsu.com/
  rednpm - http://registry.mirror.cqupt.edu.cn/
  npmMirror  https://skimdb.npmjs.com/registry/
  edunpm - http://registry.enpmjs.org/
  sinopia  http://127.0.0.1:4875/
  verdaccio  http://127.0.0.1:4001/
切换到 verdaccio 包服务
nrm use verdaccio
成功后会提示
verb config Skipping project config: C:\Users\shuwei/.npmrc. (matches userconfig)
Registry has been set to: http://127.0.0.1:4001/
添加可访问的用户(访问、发布权限用户)
可以通过客户端添加,也可以在服务端手动添加(修改htpasswd文件)
npm adduser --registry http://127.0.0.1:4001
按照提示输入用户名、密码、邮箱
添加成功后,客户端的变化:
会在客户端的目录 C:\Users\shuwei\.npmrc (可以通过 npm config list查看.npmrc的地址)中可以看到新增了一行
//127.0.0.1:4001/:_authToken="7/UcJFBzhDqvOkifY/32CA==
服务端的变化:
并且此时服务端的htpasswd文件中也会新增一行
shuwei:$65I6KH/.1F1w:autocreated 2018-07-14T09:42:33.433Z
更多关于 npm adduser 可以查看官方介绍
发布私有包
假设已经存在了一个包 local-mod ,我们发布一个包试试。cd到包目录,执行发布命令:
npm publish
发布成功后的信息:
npm notice
npm notice package: [email protected]
npm notice === Tarball Contents ===
npm notice 272B  package.json
npm notice 566B  index.js
npm notice 75B   readme.md
npm notice 155B  .idea/inspectionProfiles/Project_Default.xml
npm notice 458B  .idea/local-mod.iml
npm notice 174B  .idea/misc.xml
npm notice 270B  .idea/modules.xml
npm notice 8.4kB .idea/workspace.xml
npm notice === Tarball Details ===
npm notice name:          local-mod
npm notice version:       1.0.0
npm notice package size:  3.2 kB
npm notice unpacked size: 10.4 kB
npm notice shasum:        7c3e8c623ee0ce9527a872069767c8c97e30b3d0
npm notice integrity:     sha512-6in/3sB7lQnzk[...]f6qNbMw/4v+ow==
npm notice total files:   8
npm notice
+ [email protected]
打开 storage目录,的确存在local-mod 目录。打开http://127.0.0.1:4001 也出现了包的信息了。
需要注意的是如果发布私有包一定要先切换到verdaccio 服务模式,否则会发布到npm (https://registry.npmjs.org/)去。
安装私有包
把刚才发布的私有包 local-mod ,安装试试
$ npm install local-mod --save-dev
安装成功,并且也能在 package.json 看到包的信息。在verdaccio 包服务下,除了可以正常安装私有包,公共的包也是可以安装的。verdaccio包模式下首先会安装本地的包,没找到则会安装公共包。但是如果当前不是verdaccio包模式,则只能安装公共的包。
这一块是需要服务端和客户端同时配合的,所以单独拿出来讲。
假定我们已经通过 npm adduser --registry http://127.0.0.1:4001 添加了用户 shuwei 的权限,我们发布私有包以及浏览地址 http://127.0.0.1:4001 都没有问题。这时我们在服务端的配置文件 config.yaml中去配置权限,将 packages:属性下的配置改成如下:
packages:
  '@*/*':
    # scoped packages

    # defalut $all
    access: $authenticated
    publish: $authenticated
    proxy: npmjs

  'local-*':
    # allow all users (including non-authenticated users) to read and
    # publish all packages
    #
    # you can specify usernames/groupnames (depending on your auth plugin)
    # and three keywords: "$all", "$anonymous", "$authenticated"

    # defalut $authenticated
    access: $authenticated

    # allow all known users to publish packages
    # (anyone can register by default, remember?)
    publish: shuwei1

    # if package is not available locally, proxy requests to 'npmjs' registry
    proxy: npmjs
即:我们新增了一个以安装包前缀为权限组的配置,所有的访问权限只要登录即可,但是所有的发布权限必须是shuwei1(我们通过 npm adduser 的用户是 shuwei),这时再去发布包终端提示:
error: user shuwei1 is not allowed to publish package local-mod
我们还可以再验证一把,就是通过 npm adduser 命令在客户端新增一个用户 shuwei1:
npm adduser --registry http://127.0.0.1:4001
这时候,新增的用户会将.npmrc 中的验证信息覆盖掉,即以最后一个新增的用户为主。同时服务器端的htpasswd中也会新增一个 shuwei1的账号信息。
这时我们再去发布,终端提示发布成功。
更多权限配置参考官网
1、node_modules 缓存问题
webpack 每次打包后都会在 node_modules/.cache 中缓存记录,那么私有包安装新版本时,webpack 打包依旧使用的上次的包文件。需要将 .cache 文件删除才会生效。
已经在公司范围使用,体验还不错。
记录样式相关的问题
electron-react-boilerplate 项目使用的是 css-modules
使用后缀 .global.(css,scss,sass)的样式可以作用到全局范围,其他后缀为非全局样式。
如使用 ant 组件,那么需要在后缀为.global.(css,scss,sass)引入。引入规则需要添加前缀~。如:
~符号会从node_modules查找
@import '~antd/dist/antd.css';
scss直接创建后缀为 .scss文件即可
先记录,后整理
1、使用代码分割技术,使一个路由对应一个js文件,按需加载
2、每个路由对应的请求,尽可能的少,按照chrome 的标准,每个域下最多同时处理6个请求。那么最多5个耗时较长的请求(留一个给页面切换用),否则会出现页面卡顿的情况
3、页面节点较多,渲染耗时较长的页面,使首屏优先渲染,其他组件延时渲染
4、适当的时机清除vuex 中不用的状态,否则大型单页面应用路由多次切换以后内存将持续上升
记录自己摸索小程序的过程
设置启动页面
在入口app.json文件中,在pages节点中把要启动的页面地址的顺序放到第一位即可
jest moduleNameMapper 配置,允许将模块路径映射到其他模块。如果通过 webpack 配置了 externals 项,那么需要通过 jest moduleNameMapper 和 webpack externals 做一层映射关系。
缺示例,待完善
本文记录脚手架开发中的注意事项。关于脚手架开发可以参考官方文档
这个命令,在开发脚手架调试阶段中非常有用,可以对开发中的脚手架进行调试。用法是先定位到当前脚手架目录,再执行命令。如:
$ cd /path/my-cli
$ npm link
npm link 相当于在全局安装了此脚手架,你可以在你的全局包中找到此脚手架。
一旦链接到全局,就非常方便了,你只要按照计划调用自己脚手架即可。
注意1:
如果测试项目已经安装了此脚手架的某个版本,并且执行脚手架命令是通过 package.json 下的 scripts节点,那么你的调试不会生效,因为优先是先找 node_modules下的脚手架。此时也有办法调试,你只需要不通过package.json 下的 scripts节点调用即可,也就是通过命令行去执行。
注意2:
虽然通过npm link 链接到了全局,但是当你链接结束的那一刻,当前脚手架的版本也就确定了,脚手架代码调整,调试也不会跟着生效,你需要重新执行npm link 。
当你脚手架开发完成,进入调试阶段时,可能会出现脚本编译错误信息。windows 环境的错误弹框:

此错误信息通过 npm link 后就能重现,而不是等发布到npm 才发现。不出意外应该是入口文件缺少这句 #!/usr/bin/env node。而它的作用是解决了不同的用户node路径不同的问题,可以让系统动态的去查找node来执行你的脚本文件
待续
负载均衡也是Nginx常用的一个功能,负载均衡其意思就是分摊到多个操作单元上进行执行,例如Web服务器、FTP服务器、企业关键应用服务器和其它关键任务服务器等,从而共同完成工作任务。简单而言就是当有2台或以上服务器时,根据规则随机的将请求分发到指定的服务器上处理,负载均衡配置一般都需要同时配置反向代理,通过反向代理跳转到负载均衡。而Nginx目前支持自带3种负载均衡策略,还有2种常用的第三方策略。
每个请求按时间顺序逐一分配到不同的后端服务器,如果后端服务器down掉,能自动剔除。
  upstream test {
        server localhost:8080; // 不能包含协议
        server localhost:8081;
    }
    server {
        listen       81;
        server_name  localhost;
        client_max_body_size 1024M;

        location / {
            proxy_pass http://test; // 配置的名字要和upstream  后面的名字一致
            proxy_set_header Host $host:$server_port;
        }
    }
注意:
1、负载均衡配置的地址不能包含协议
2、反向代理配置的地址要和负载均衡的标识一致
负载均衡的核心代码为 -
 upstream test {
        server localhost:8080;
        server localhost:8081;
    }
这里配置了2台服务器,当然实际上是一台,只是端口不一样而已,而8081的服务器是不存在的,也就是说访问不到,但是我们访问 http://localhost 的时候,也不会有问题,会默认跳转到 http://localhost:8080 具体是因为Nginx会自动判断服务器的状态,如果服务器处于不能访问(服务器挂了),就不会跳转到这台服务器,所以也避免了一台服务器挂了影响使用的情况,由于Nginx默认是RR策略,所以我们不需要其他更多的设置。
指定轮询几率,weight和访问比率成正比,用于后端服务器性能不均的情况。 例如
 upstream test {
        server localhost:8080 weight=9;
        server localhost:8081 weight=1;
    }
那么10次一般只会有1次会访问到8081,而有9次会访问到8080
上面的2种方式都有一个问题,那就是下一个请求来的时候请求可能分发到另外一个服务器,当我们的程序不是无状态的时候(采用了session保存数据),这时候就有一个很大的很问题了,比如把登录信息保存到了session中,那么跳转到另外一台服务器的时候就需要重新登录了,所以很多时候我们需要一个客户只访问一个服务器,那么就需要用iphash了,iphash的每个请求按访问ip的hash结果分配,这样每个访客固定访问一个后端服务器,可以解决session的问题。
  upstream test {
        ip_hash;
        server localhost:8080;
        server localhost:8081;
    }
按后端服务器的响应时间来分配请求,响应时间短的优先分配。
 upstream backend {
        fair;
        server localhost:8080;
        server localhost:8081;
    }
按访问url的hash结果来分配请求,使每个url定向到同一个后端服务器,后端服务器为缓存时比较有效。 在upstream中加入hash语句,server语句中不能写入weight等其他的参数,hash_method是使用的hash算法
    upstream backend {
        hash $request_uri;
        hash_method crc32;
        server localhost:8080;
        server localhost:8081;
    }
以上5种负载均衡各自适用不同情况下使用,所以可以根据实际情况选择使用哪种策略模式,不过fair和url_hash需要安装第三方模块才能使用,由于本文主要介绍Nginx能做的事情,所以Nginx安装第三方模块不会再本文介绍
转载自:http://www.yiibai.com/nginx/nginx-main-use-scenes.html
参考:http://www.cnblogs.com/xiaogangqq123/archive/2011/03/04/1971002.html
--完--
项目中安装oracledb 包
npm i oracledb
安装 oracle 驱动
1、安装包位数(32、64)必须和当前系统相同
2、安装时选择安装类型为“管理员”
设置系统环境变量(具体根据安装目录而定):
D:\oracle\app\shuwei\product\11.2.0\client_1\BIN
设置数据库连接字符串
在目录 D:\oracle\app\shuwei\product\11.2.0\client_1\network\admin 下 新增 “tnsnames.ora”文件。内容形如:
EMVST =
  (DESCRIPTION =
    (ADDRESS = (PROTOCOL = TCP)(HOST = 172.16.xx.xxx)(PORT = xxxx))
    (CONNECT_DATA =
      (SERVER = DEDICATED)
      (SERVICE_NAME = xxxxx)
    )
  )
很多情况下,我们还是需要支持 IE 的。vue-cli 3 打包支持IE 和 vue-cli 稍有差异。
babel 配置
// babel.config.js
module.exports = {
    presets: [
        ["@vue/app",
            {
                "useBuiltIns": "entry"
            }
        ],
    ]
...
}
修改入口文件
安装 @babel/polyfill
yarn add @babel/polyfill
在入口文件引入
import '@babel/polyfill'
设置浏览器兼容
根据实际情况设计你的浏览器兼容方案
"browserslist": [
    "> 1%",
    "last 2 versions",
    "not ie <= 8"
  ]
babel 配置
// babel.config.js
module.exports = {
    presets: [
        [
            "@vue/app",
            {
                useBuiltIns: "entry",
                corejs: 3,
                targets: {
                    ie: "11"
                },
                jsx: {
                    injectH: false
                }
            }
        ]
    ]
...
}
修改入口文件
安装 core-js 和 regenerator-runtime
yarn add core-js regenerator-runtime
在入口文件引入
import "core-js/stable";
import "regenerator-runtime/runtime";
设置浏览器兼容
根据实际情况设计你的浏览器兼容方案
"browserslist": [
    "> 1%",
    "last 2 versions",
    "not ie <= 8"
  ]
transpileDependencies
默认打包时不会检查依赖包,上述的配置只会检查项目本身代码,并做兼容处理。如果发现上述配置还是不支持IE,那么你要排除是否是以来包引起。如highlight.js就是不支持IE 的第三方包,配置如下
// vue.config.js
module.exports = {
  transpileDependencies: ["highlight.js"];
  ...

}
完
看到标题,你的第一反应应该是“这不是很简单吗?官网说的很清楚!”。没错,的确很简单,但是你如果想让你的组件上手更简单,还是需要做些小手脚的。
<template>
  <div class="v-table">
    this is a table comp.
  </div>
</template>

<script>
export default {
  name: "VTable"
};
</script>
Vue.component(id,Object|Function) 接收2个参数。第一个参数为公共组件的id,此处可以使用公共组件名称。第二个参数为构造器类型数据,此处可以为组件。
注册上述 table 组件
import VTable from "v-table.vue";

Vue.component("VTable",VTable);
或者
import VTable from "v-table.vue";

Vue.component(VTable.name,VTable);
上述的方式还是不够简单,我们还可以让用户使用更简单点。
Vue.use(Object | Function) 原本是用作安装插件的,如果“插件”是一个对象,必须提供install方法。那么我们就可以利用这一点,实现组件的注册。我们在封装 table 公共组件时,不直接暴露 table 组件的实例,而是在组件实例上挂在一个 install 方法。大致如下:
// index.js
import VTable from "./v-table.vue";

VTable.install = function(Vue) {
  Vue.component(VTable.name, VTable);
};

export default VTable;
这时就可以通过下面方式注册全局组件了
import VTable from "index.js";
Vue.use(VTable );
目前主流的组件库都是通过Vue.use注册并使用组件
完
从 webstorm 转到 vs code 一阵子了。期间vuejs、react+ts、electron 项目不断切换,还没有领略到vs code 给我极致体验,问题倒是不少,毕竟只是个编译器,孰能生巧吧。在此记录一些折腾的过程,方便后面自己查看。
没太明白为什么 .js 文件会被识别为 .ts 文件,有一大推修改建议和报错,干脆关上。
具体步骤,设置->输入“typescript”->勾掉“启用/禁用 JavaScript 验证”
默认情况我们打开了几个页面,我们想切换最近的两个页面,通常使用
ctrl+tab键切换后发现并不是最近的两个文件。下面配置可以解决这个问题
"workbench.editor.enablePreview": false
"workbench.editor.enablePreviewFromQuickOpen": false
可以将我们常用的代码设置为代码片段,方便我们重复使用。下面以快速创建
vue模板为例
路径:文件 -> 偏好 -> 用户代码片段 ->找到 vue.json 。输入你的代码片段即可(参考样例)
{
  "create vue template": {
    "prefix": "vue",
    "body": [
      "<template>",
      "\t<div class='$2'></div>",
      "</template>",
      "",
      "<script>",
      "",
      "export default {",
      "\tname: '$1',",
      "\tcomponents: {},",
      "\tprops: {},",
      "\tdata() {",
      "\t\treturn {",
      "",
      "\t\t};",
      "\t},",
      "\tcomputed: {},",
      "\twatch: {},",
      "\tmethods: {",
      "",
      "\t},",
      "\tcreated() {",
      "",
      "\t},",
      "\tmounted() {",
      "",
      "\t},",
      "}",
      "</script>",
      "<style lang='$3'>",

      "</style>"
    ],
    "description": "自定义 vue 模板"
  }
}
这样当我们在空白的vue 文件中输入 vue时就会有提示,按回车键即可看到效果
继续补充...
编写单元测试用例时,难免频繁的执行单元测试命令。正所谓“工欲善其事,必先利其器”,这里推荐一块 vs code jest 单元测试插件
1、通过浏览器点击安装 安装地址
2、vs code 插件市场搜索。插件名称: “Jest Runner” ,插件id:"firsttris.vscode-jest-runner"
使用非常简单,随便打开一个你在编写的用例文件。
方法1:
每个用例上面都会有 “Run | Debug”提示。“Run”代表只运行用例,但不测试;“Debug”代表运行并且测试用例。
效果如下:

方法2:
在用例代码区域右键菜单,能够看到 “Debug Jest”、“Run Jest”、“Run Jest File” 三个选项,按照你自己的需求选择即可测试。
效果如下:

完
总结下在vue 中使用 jsx 的技巧。
默认jsx 中绑定事件的语法为 onXx。如:
// child comp
...
name:"child-comp"
mounted:{
    this.emit("valueChange",args)
}
...
绑定子组件的事件
// parent comp
...
methods:{
   change(){}
},
render(){
    return <child-comp onValueChange={()=>this.change()} />
}
...
如果子组件抛出的事件名本身就是以 on 开头,则需要换种方法绑定子组件事件。如:
// child comp
...
name:"child-comp"
mounted:{
    this.emit("onValueChange",args)
}
...
使用propsXx绑定子组件的事件
// parent comp
...
methods:{
   change(){}
},
render(){
    return <child-comp propsOnValueChange={()=>this.change()} />
}
...
或者使用展开绑定子组件的事件
// parent comp
...
methods:{
   change(){}
},
render(){
    return <child-comp {
        ...{
            props:{
                 onValueChange={()=>this.change()}
               }
          }
    } />
}
...
更新中...
列举下,一个组件库需要具备的特点。
选择做一个桌面应用还是网页应用,那么你要知道他们的区别在哪里
这篇文章介绍 react-router-dom路由的几种跳转方式
示例中版本要求:react-router-dom 5.x
Link组件方式跳转适用场景:点击菜单跳转
使用 Link 组件方式跳转相当于点击 <a />标签方式跳转,因为Link 组件会渲染成<a href="/home">首页</a>
代码示例:
import { BrowserRouter as Router,Link} from 'react-router-dom';

...
render(){
   return (
      <Router>
        <ul>
          <li>
             <Link to="/home">首页</Link>
          </li>
          <li>
            <Link to="/order">订单</Link>
          </li>
        </ul>
      </Router>
    )
}
...
Redirect组件方式跳转适用场景:重定向跳转,如登录后跳转
代码示例:
import { Redirect } from 'react-router-dom';

...
render(){
   if (isLogin){

       return <Redirect to='/home' />;
    }else{

          return <Redirect to='/login' />;
    }
}
...
withRouter 高级组件方式跳转适用场景:通过 js 手动跳转
withRouter 能够将路由信息的match、location、history通过 props的方式传递给当前包装的组件
代码示例:
import { withRouter } from 'react-router-dom';

class demoComp extends React.Component{

    constructor(props) {
        super(props);

    }

    goToHomePage = ()=>{

        this.props.history.push('/home')
    }

    render() {

        return (

            <button onClick={this.goToHomePage}>跳转首页</button>
        )
    }
}

export default withRouter(demoComp)
--完--
如题 就是windows 下安装使用 nginx
下载地址,找一个windows 的稳定版本,然后下载。下载完实际是一个压缩包,解压到C盘(其他盘也行),然后运行nginx.exe 一个窗口一闪而过,还以为是幻觉,此时防火墙可能会提示是否允许,只要不是病毒就允许。此时你已经把nginx 运行起来了。。。
验证下,直接在浏览器输入http://localhost/ 然后出来这个界面就证明nginx 成功运行了:

命令要定位
nginx目录下
nginx.exetaskkill /F /IM nginx.exe > nul nginx -s reload。这个命令有时不会生效,建议先关闭 nginx 服务再启动即可nginx 配置文件在你解压的目录里 ‘~/config/nginx.conf’
在这个配置文件里可以修改端口、反向代理、负载均衡...
--完--
下面以windows 系统下为例
根据你要发布的系统,选择下载对应的版本。
以 windows x64 为例。选择对应的版本。如 electron-v5.0.1-win32-x64.zip,解析文件
将源文件放到刚才解析的 electron/resources/app目录下,大致路径如下
electron/resources/app
├── package.json
├── main.js
└── index.html
双击 electron.exe启动
.asar文件方式发布打包成
.asar文件可以避免源代码泄漏
全局安装 asar
$ npm install -g asar
打包你的项目
定位到你的应用程序,如文件夹名称为 your-app,执行打包命令
$ asar pack your-app app.asar
打包成功会生成 app.asar 文件,然后将此文件放到~electron/resources/app目录下。
双击 electron.exe启动
通过程序自动打包方式发布
未完...
使用npm 首先你要先安装nodejs,如果要安装nodejs 请移步 nodejs官网。
安装和更新npm 都是使用如下命令:
$ npm install npm -g
npm 安装完成后,除了会在nodejs 安装目录中多出一个 npm 目录外,还有两个文件夹比较特别,这两个文件夹不在nodejs 的安装目录下(我的是在C:/Users/Administrator/AppData/Roaming/下)。这两个文件夹分别是:
随着通过npm 安装的包的增加 npm-cache、npm 中的文件将不断地增大(我本地已经几百兆),有必要将这两个文件夹转移到非C盘的磁盘中。
获取 npm-cache 目录路径
$ npm config get cache
通过命令修改npm-cache 的目录地址(以D盘为例,按需求自行修改)
$ npm config set cache "D:\Program Files\npm-cache"
我们可以通过命令获取 npm 目录的路径
$ npm config get prefix
修改 npm 的目录地址
$ npm config set prefix "D:\Program Files\npm-global"
修改完成后,我们是无法正常使用已经安装的全局包的。
需要修改‘PATH’环境变量:“电脑>属性>高级>环境变量”,环境变量需要增加npm 目录的地址。如:D:/Program Files/npm-global
如果要使修改立即生效,你需要重启电脑,如果你不想重启你可参考这里,或者自行搜索。
检查本地有哪些本地包,首先你要cd 到你想要检查的目录下,然后
$ npm outdated
那么会列出需要更新的包的信息,需要更新的包的名称、当前版本号、最新的版本号等。

$ npm update
然后通过命令验证是否更新
$ npm outdated
如果你只是想更新某一个包到指定的版本,那么你可以直接通过命令修改。如果这个包在package.json 的dependencies 节点下,使用:
$ npm install [email protected] --save
如果在package.json 的devDependencies下使用:
$ npm install [email protected] --save-dev
然后通过命令验证是否更新
$ npm outdated
检查全局包是否有更新
$ npm outdated -g --depth=0
如果有会呈现如下的信息(以我的为例)

$ npm update -g
npm install -g webpack
$ npm audit
$ npm view react versions
推荐使用 nrm
$ npm i -g nrm
查看有哪些镜像可以切换
通常有这些:
npm -------- https://registry.npmjs.org/
yarn ------- https://registry.yarnpkg.com/
cnpm ------- http://r.cnpmjs.org/
taobao ----- https://registry.npm.taobao.org/
nj --------- https://registry.nodejitsu.com/
npmMirror -- https://skimdb.npmjs.com/registry/
$ nrm ls
切换到你需要使用的镜像
切换后的结果一般存储在 C:\Users\Administrator.npmrc 文件中
$ nrm use taobao
npm publish
此时要注意的是,如果你用的是镜像,那么你需要切回到 npm才可以发布
$ nrm use npm
但是问题来了,你切回来之后可能就无法正常发布,因为网络可能会不通。还好npm 提供了代理功能:
如果你此时没有代理服务,那么你可能需要梯子了
$ npm config set proxy=你的代理服务
查看当前设置的代理
$ npm config get proxy
npm get [<key>]也可查看其他配置
删除代理
如果你发现你的代理设置错了,或者不想用代理了。可以删除掉
$ npm config delete proxy
未完待续(会继续补充)......
项目中使用状态管理器操作数组是很频繁的,找到最优的方案会让操作数组更便捷高效
简单的往数组中新增。使用 push 插入
...
  state: {
             arr: [
                {name: 'a', id: 0}
            ]
        },
   mutations: {

       addArrayItem(state, {arrItem}) {

           state.arr.push(arrItem)
        }
   }
...
往数组中指定位置插入。使用 splice
...
  state: {
             arr: [
                {name: 'a', id: 0}
            ]
        },
   mutations: {

       addArrayItem(state, {index, arrItem}) {

             state.arr.splice(index, 0, arrItem)
       }
   }
...
修改数组的某一项,splice 方案
...
  state: {
             arr: [
                {name: 'a', id: 0}
            ]
        },
   mutations: {

       updateArrayItem(state, {arrItem}) {

                const index = state.arr.findIndex(item => item.id === arrItem.id);
                state.arr.splice(index,1,arrItem)
          }
   }
...
修改数组的某一项,Vue.set 方案
...
  state: {
             arr: [
                {name: 'a', id: 0}
            ]
        },
   mutations: {

       updateArrayItem(state, {arrItem}) {

                const index = state.arr.findIndex(item => item.id === arrItem.id);
                Vue.set(state.arr, index, arrItem);
          }
   }
...
修改数组的某一项,Object.assign 方案
...
  state: {
             arr: [
                {name: 'a', id: 0}
            ]
        },
   mutations: {

       updateArrayItem(state, {arrItem}) {

                const item = state.arr.find(item=> item.id === arrItem.id);
                Object.assign(item, arrItem);
          }
   }
...
删除数组的某一项,使用splice
...
  state: {
             arr: [
                {name: 'a', id: 0}
            ]
        },
   mutations: {

       removeArrayItem(state, {arrItem}) {

                const index = state.arr.findIndex(item => item.id === arrItem.id);
                state.arr.splice(index, 1)
          }
   }
...
vs code 中 git 相关插件很丰富,对于 svn 插件却不是那么友好。找了个勉强能用的 svn 插件,特此记录。
通过搜索关键字 “svn”,试了几个,最终选择了这个插件(作者为:Chris Johnston):

插件配置文件中填入此节点,告知vs code svn 的路径:
"svn.path": "C:\\Program Files\\TortoiseSVN\\bin\\svn.exe"
除此之外 vs code 的侧边栏会出现这个插件的 tab,如果不喜欢禁用即可。我是觉得用处不大
效果不尽人意,无论选中了文件或者文件夹功能并不丰富。目前有两个功能算是满意,一是可以实时显示当前文件或文件夹的状态(是否被修改),另一个可以还原修改
用了一段时间,体验非常差,svn 代码修改,但编译器中无法体现变化。不推荐使用,已卸载
--完--
最近在家办公,发现访问外网效果极差。多次通过 yarn 安装 electron 失败后,探索新的方案。特此记录。
步骤1-通过yarn 或者 npm安装 electron
yarn add [email protected]
这个目的不是为了安装成功(能成功后面的步骤就不用看了),而是生成目录结构和基础文件。如 electron 目录、index.js 等
步骤2-下载 electron 压缩包
首先找到 electron github 上发布的包地址。如windows 64位环境可用这个模板地址:
https://github.com/electron/electron/releases/download/v版本号/electron-v版本号-win32-x64.zip,那么对应的 v8.0.0 版本地址就是:
https://github.com/electron/electron/releases/download/v8.0.0/electron-v8.0.0-win32-x64.zip
浏览器地址栏输入地址即可下载压缩文件
步骤3-*/node_modules/electron/ 目录下创建dist 目录
在*/node_modules/electron/ 目录下创建dist 目录,然后将上一步下载的文件解压到 dist 目录中
步骤4-创建 path.txt 文件
创建 path.txt 文件,并写入文本内容为:electron.exe
步骤5-运行项目即可
以上步骤完成后,运行项目即可。
--完--
现在都流行匿名类,很少创建实体对象。当 DataTable 数据需要进行分组查询时,还是比较繁琐的。
| id | name | type |
|---|---|---|
| 1 | abc | 分组1 |
| 2 | dsad | 分组1 |
| 3 | 121 | 分组1 |
| 4 | das | 分组1 |
| 5 | afdfbc | 分组2 |
| 6 | rgrfdsad | 分组3 |
IEnumerable<IGrouping<string, DataRow>> groupResult = dt.Rows.Cast<DataRow>().OrderBy<DataRow, string>(dr => dr["type"].ToString()).GroupBy<DataRow, string>(dr => dr["type"].ToString());

            var groupList = new List<object>();

            foreach (IGrouping<string, DataRow> gr in groupResult)
            {
                // 获取当前分组数据
                var groupType = gr.Key;

                var groupListItem = new List<object>();
                foreach (var dr in gr)
                {
                    var row = new
                    {
                        id = dr["id"].ToString(),
                        name = dr["name"].ToString()
                    };

                    groupListItem.Add(row);
                }
                groupList.Add(new
                {
                    groupType,
                    groupListItem
                });
}我们在开发H5 页面时,经常会遇到在chrome 模拟器上运行正常,到了真机上偶尔出现问题的情况。这篇文章介绍在windows10 chrome 调试 iOS Safari 页面方案。特此记录
原理是利用
remotedebug-ios-webkit-adapter插件
利用 scoop 安装插件,后面会涉及到
1、打开 powershell
2、输入命令:
Set-ExecutionPolicy RemoteSigned -scope CurrentUser
此步骤目的是允许当前用户运行来自远程源的脚本
3、下载 scoop
输入命令:
iex (new-object net.webclient).downloadstring('https://get.scoop.sh')
安装成功后提示:

验证 scoop 是否安装成功
scoop help
npm install remotedebug-ios-webkit-adapter -g
1、安装 iTunes
调试 iOS 设备基本都是要安装iTunes
下载地址,找一个最新版
2、用USB连接你的 iOS 设备
此处我用的 iPhone,iPad 应该也是可以的
直到你的iTunes 左下角出现连接的设备才算连接完成
3、在你的iOS 设备上开启web 检查
你的iOS 设备->Settings->Safari->高级->网页检查器->开启
4、启动 webkit adapter 插件
remotedebug_ios_webkit_adapter --port=9000
如果提示'scoop install ios-webkit-debug-proxy' ,那么按照提示安装即可。此处就用到了 scoop
scoop install ios-webkit-debug-proxy
如果提示’ Couldn't find manifest for 'ios-webkit-debug-proxy'.’此处是一个bug,可以通过下面的命令解决
scoop bucket add extras
具体解决方案参考这里: ScoopInstaller/Extras#2504
5、设置chrome 调试设备
chrome 地址栏输入地址 chrome://inspect/#devices
如下界面

定位到 Devies->点击 Configure 按钮
输入 localhost:9000
9000 是刚才启动的端口

这是在你的iOS 设备上 Safari 浏览器打开想要调试的页面。这时chrome 调试设备界面会出现“远程目标”信息
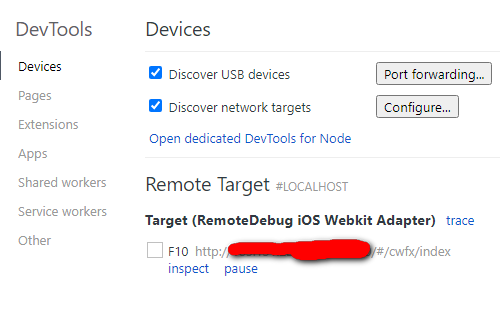
如果没有出现,尝试刷新这个页面
点击“inspect”即可看到iOS 设备界面,剩下的就可以真机调试了
https://washamdev.com/debug-a-website-in-ios-safari-on-windows/
https://www.onmsft.com/how-to/how-to-install-the-scoop-package-manager-in-windows-10
错误的loader配置:
// webpack.config.js
     {
                test: /\.(css|postcss|sass|scss)$/,
                use: [
                    'style-loader',
                    'css-loader',
                    'postcss-loader',
                    'sass-loader'
                ]
            },
正确的配置:
// webpack.config.js
       {
                test: /\.(postcss)$/,
                use: [
                    'style-loader',
                    'css-loader',
                    'postcss-loader'
                ]
            },
            {
                test: /\.(css|sass|scss)$/,
                use: [
                    'style-loader',
                    'css-loader',
                    'sass-loader',
                    'resolve-url-loader'
                ]
            }
参考官网
初始化项目
yarn init
安装搜索依赖包
yarn
或者
yarn install
安装项目依赖包
在项目中安装
yarn add [package]
yarn add [package]@[version]
yarn add [package]@[tag]
安装全局包
如添加create-react-app全局依赖包
yarn 安装全局依赖包开头必须 yarn global,没有简写方式,这是和
npm有区别的
yarn global add create-react-app
添加到不同分类依赖项
分别添加到 devDependencies、 peerDependencies 和 optionalDependencies:
yarn add [package] --dev
yarn add [package] --peer
yarn add [package] --optional
升级依赖包
yarn upgrade [package]
yarn upgrade [package]@[version]
yarn upgrade [package]@[tag]
删除依赖包
yarn remove [package]
查看全局安装路径
yarn global dir
修改全局安装路径
手动创建全局安装的目录,如在 D 盘的目录下创建yarn-global目录
yarn config set global-folder "D:\yarn-global" ~~
此时如果想要全局安装的包生效,需要添加系统环境变量,路径为“全局安装路径\node_modules.bin”
即:
“D:\yarn-global\node_modules.bin”
不建议修改 yarn 的全局安装目录,会引起很多问题
查看缓存路径
yarn cache dir
修改全局安装缓存路径
手动创建安装缓存的目录,如在 D 盘的目录下创建yarn-cache目录
yarn config set cache-folder "D:\yarn-cache"
这篇文章将介绍如何利用 webpack 进行单页面应用的开发,算是我在实际开发中的一些心得和体会,在这里给大家做一个分享。
关于这个单页面应用大家可以结合这个实例去看。下面介绍的内容如果大家觉得这篇文章有不妥的地方,还请指出😂。
这篇文章的目的是解决我们在开发中会遇到的问题,不是一篇基础教程,还请谅解。
我将根据这个目录结构进行讲解

建议先运行一下这个项目,有一个大致的了解,再往下阅读。使用说明:
首先克隆一份到你的本地
$ git clone https://github.com/huangshuwei/webpackForSPA.git

然后 cd 到 ‘webpackForSPA’目录下
$ cd webpackForSPA

接着你可以运行不同的命令查看结果

发布模式:
$ npm run build

开发模式:
$ npm run dev

热更新模式
$ npm run dev-hrm

如果使用了热更新模式,并且想要结合后端服务形式运行,那么cd 到‘mockServer’目录下,并执行node 服务:
$ cd mockServer

$ node server.js
一般开发时和发布时是不同的,比如开发时文件的访问目录包含‘dist’目录,但是发布上线时,一般会把‘dist’文件夹去掉。
当然还有其他的一些细节不同。
开发模式:
热更新模式:
发布模式:
我区分开发、热更新、发布模式是通过配置‘package.json’文件的运行命令,有些人是通过创建多个不同的webpack的配置文件来达到想要的效果。
像这个项目就是使用了多个webpack的配置文件。
这是在 package.json 文件中配置的
// package.json 文件
...
"scripts": {
    "build": "webpack  --profile --progress --colors --display-error-details",
    "dev": "webpack  --display-modules --profile --progress --colors --display-error-details",
    "dev-hrm": "webpack-dev-server --config"
  },
...
配置好了package.json文件,我们就可以这样运行
// 开发模式
npm run dev

// 热更新模式
npm run dev-hrm

// 发布模式
npm run build
配置完了命令,当我们运行不同的命令时,我们可以通过‘process.env.npm_lifecycle_event’去获取当前运行的命令,根据不同的命令,我们可以按照自己的需要做相应的处理。比如开发模式时,允许开启调试,静态资源不要压缩;发布模式时,不允许调试,静态资源要压缩。具体如下:
// webpack.config.js

// 获取当前运行的模式
var currentTarget = process.env.npm_lifecycle_event;

var debug,          // 是否是调试
    devServer,      // 是否是热更新模式
    minimize;       // 是否需要压缩

if (currentTarget == "build") { // 发布模式

    debug = false, devServer = false, minimize = true;

} else if (currentTarget == "dev") { // 开发模式

    debug = true, devServer = false, minimize = false;

} else if (currentTarget == "dev-hrm") { // 热更新模式

    debug = true, devServer = true, minimize = false;
}
为了方便我们频繁使用路径,如下配置
// webpack.config.js
var PATHS = {
    // 发布目录
    publicPath: debug ? '/webpackForSPA/dist/' : '/webpackForSPA/',

    // 公共资源目录
    libsPath: path.resolve(process.cwd(), './libs'),

    // src 资源目录
    srcPath: path.resolve(process.cwd(), 'src'),
}webpack的别名的目的就是简化我们的操作,引用资源时直接使用别名即可(和 seajs 里的别名用法一样)。配置如下:
// webpack.config.js
...
resolve:{
     alias: {
        // js
        jquery: path.join(PATHS.libsPath, "js/jquery/jquery"),
        underscore: path.join(PATHS.libsPath, "js/underscore/underscore.js"),

        // css
        bootstrapcss: path.join(PATHS.libsPath, "css/bootstrap/bootstrap-3.3.5.css"),
        indexcss: path.join(PATHS.srcPath, "css/index.css"),
    }
}
...// webpack.config.js
...
entry:{
// 入口 js
index: './src/js/index.js',
// 公共js包含的文件
common: [
path.join(PATHS.libsPath, "js/jquery/jquery.js"),
path.join(PATHS.libsPath, "js/underscore/underscore.js")
],
}
...// webpack.config.js
...
output:{
// 输出目录
path: path.join(__dirname, 'dist'),
// 发布后,资源的引用目录
publicPath: PATHS.publicPath,
// 文件名称
filename: 'js/[name].js',
// 按需加载模块时输出的文件名称
chunkFilename: 'js/[name].js'
}
...当我们在js文件中通过require('')引用js时,webpack 默认会将css文件与当前js文件打包一起,但是这种方式会阻塞页面的加载,因为css的执行要等待js文件加载进来。所以我们会把css从js文件中提取出来,放到一个单独的css文件中。这时我们要使用webpack的插件:extract-text-webpack-plugin,配置如下:
引入插件
// webpack.config.js
var ExtractTextPlugin = require("extract-text-webpack-plugin");
配置 loader
// webpack.config.js
...
loaders: [
    {
        test: /\.css$/,
        loader: ExtractTextPlugin.extract("style-loader", "css-loader!postcss-loader")
    },
    ...
]
...
配置 plugins
// webpack.config.js
...
plugins:[
    new ExtractTextPlugin("css/[name].css", {allChunks: true}),
    ...
]
...项目中,我们通常会有公共的js,比如 jquery、bootstrap、underscore 等,那么这时候我们需要将这些公共的js单独打包。这时我们需要用webpack自带的插件:
// webpack.config.js
...
plugins:[
    // 会把 ‘entry’ 定义的 common 对应的两个js 打包为 ‘common.js’
    new webpack.optimize.CommonsChunkPlugin("common", 'js/[name].js', Infinity),
]
...项目上线后,资源的版本号十分重要。资源没有版本号,即使重新发布,客户端浏览器可能会把老的资源缓存下来,导致无法下载最新的资源。webpack 支持给资源添加版本号,不仅仅是js、css,甚至font、img都可以添加版本号。我们可以通过webpack中的‘chunkhash’来解决。
首先要了解下webpack 中 [hash]、[chunkhash]、[chunkhash:8]的区别。
推荐发布模式使用版本号,其他模式无需使用,热更新模式不支持‘chunkhash’,但是支持‘hash’
资源加版本号,那么我们的输出的部分都要做改动,并且要区分当前的命令模式,如下:
// webpack.config.js
...
output:{
    // 输出目录
    path: path.join(__dirname, 'dist'),

    // 发布后,资源的引用目录
    publicPath: PATHS.publicPath,

    // 文件名称
    filename: devServer ? 'js/[name].js' : 'js/[name]-[chunkhash:8].js',

    // 按需加载模块时输出的文件名称
    chunkFilename: devServer ? 'js/[name].js' : 'js/[name]-[chunkhash:8].js'
}
...
输出公共js的地方也要改动:
// webpack.config.js
...
plugins:[
    // 会把 ‘entry’ 定义的 common 对应的两个js 打包为 ‘common.js’
    new webpack.optimize.CommonsChunkPlugin("common", "" + (devServer ? 'js/[name].js' : "js/[name]-[chunkhash:8].js"), Infinity),
]
...有个版本号后,我们考虑如何通过html引用这些含有版本号的js、css、font、img。webpack每次编译后的资源 chunkhash 会随着内容的变化而变化,所以我们不可能每次都手动的更改html这些资源的引用路径。这时我们要用到webpack的插件:html-webpack-plugin。这个插件的目的是生成html,也可以根据模板生成html,当然还有其他的功能,具体看插件介绍。下面是的配置:
引入插件
// webpack.config.js
var HtmlWebpackPlugin = require('html-webpack-plugin');
配置 plugins,生成需要的html
// webpack.config.js
...
plugins:[
    new HtmlWebpackPlugin({
        filename: 'index.html',
        template: __dirname + '/src/index.html',
        inject: 'true'
    }),
    new HtmlWebpackPlugin({
        filename: 'html/hrm.html',
        template: __dirname + '/src/html/hrm.html',
        inject: false,
    }),
    new HtmlWebpackPlugin({
        filename: 'html/home.html',
        template: __dirname + '/src/html/home.html',
        inject: false,
    }),
]
...
我们前面说过,webpack 默认只识别 js 文件,所以对于html也要使用对应的loader:
// webpack.config.js
...
loaders:[
     {test: /\.html$/,loader: "html"},
]
...引用图片和字体,需要对应的loader,并且可以设置这些资源大小的临界值,当小于临界值的时候,字体或者图片文件会以base64的形式在html引用,否则则是以资源路径的形式引用。如下:
// webpack.config.js

// 图片 loader
{
    test: /\.(png|gif|jpe?g)$/,
    loader: 'url-loader',
    query: {
        /*
         *  limit=10000 : 10kb
         *  图片大小小于10kb 采用内联的形式,否则输出图片
         * */
        limit: 10000,
        name: '/img/[name]-[hash:8].[ext]'
    }
},

// 字体loader
{
    test: /\.(eot|woff|woff2|ttf|svg)$/,
    loader: 'url-loader',
    query: {
        limit: 5000,
        name: '/font/[name]-[hash:8].[ext]'
    }
},js、css、html的压缩是少不了的,webpack 自带了压缩插件,如果某些对象名称不想被压缩,可以排除不想要压缩的对象名称。配置如下:
// webpack.config.js
...
plugins:[
    new webpack.optimize.UglifyJsPlugin({
            mangle: { // 排除不想要压缩的对象名称
                except: ['$super', '$', 'exports', 'require', 'module', '_']
            },
            compress: {
                warnings: false
            },
            output: {
                comments: false,
            }
        })
]
...通过webpack编译输出后的项目中,虽然页面已经引用了jquery、underscore,但是还是无法直接使用‘$’、‘_’对象,我们可以这样:
var $ = require('jquery');
var _ =  require('underscore');
但是这样实在不方便,如果我们就是要使用‘$’、‘_’对象直接操作,webpack 内置的插件可以帮我们解决。具体如下:
// webpack.config.js
new webpack.ProvidePlugin({
        $: "jquery",
        jQuery: "jquery",
        "window.jQuery": "jquery",
        "_": "underscore",
}),在单页面应用中,当我们加载其他的模板文件时,想要引用这个模板文件对应的js。如果我们通过这种方式require(),那么webpack会将这个模板文件对应的js也会和当前js打包成一个js。如果项目比较大,那么js文件也将越来越大。我们希望的是加载模板文件的时候动态的引用这个模板文件对应的js。那么我们可以通过 require.ensure()的方式。
比如现在有两个导航菜单:
<ul>
<li><a href="#home">home</a></li>
<li><a href="#hrm">HRM</a></li>
</ul>
我们给这两个菜单绑定点击事件,当点击‘home’时引用对应的‘home.js’;当点击‘HRM’时引用对应的‘hrm.js’,那么大致可以这样:
function loadJs(jsPath) {
    var currentMod;
    if (jsPath === './home') {
        require.ensure([], function (require) {
            currentMod = require('./home');
        }, 'home');
    }
    else if (jsPath === './hrm') {
        require.ensure([], function (require) {
            currentMod = require('./hrm');
        }, 'hrm');
    }
}有时我们只有在开发过程中,才想输出log日志。可以用以下webpack内置的插件解决:
// webpack.config.js
...
plugins:[
      new webpack.DefinePlugin({
        // 全局debug标识
        __DEV__: debug,
    }),

]
...
这时代码中就可以这么写了:
if (__DEV__) {
    console.log('debug 模式');
}发布前清空发布目录是有必要的,我们可以通过‘clean-webpack-plugin’插件解决:
引入插件:
// webpack.config.js
var CleanWebpackPlugin = require('clean-webpack-plugin');
配置plugins:
// webpack.config.js
...
plugins:[
    new CleanWebpackPlugin(['dist'], {
        root: '', // An absolute path for the root  of webpack.config.js
        verbose: true,// Write logs to console.
        dry: false // Do not delete anything, good for testing.
    }),
]
...热更新可以在你代码改变的时候即时编译输出,不用每次都要从都重新编译一遍,并且除了第一次编译比较慢,后面的编译都是增量编译,速度很快。有了这个功能,我们就不需要,每次都从头编译一次了。配置如下:
// webpack.config.js
...
plugins: [
        // Enable multi-pass compilation for enhanced performance
        // in larger projects. Good default.
        new webpack.HotModuleReplacementPlugin({
            multiStep: true
        }),
],
devServer: {
        // Enable history API fallback so HTML5 History API based
        // routing works. This is a good default that will come
        // in handy in more complicated setups.
        historyApiFallback: true,

        // Unlike the cli flag, this doesn't set
        // HotModuleReplacementPlugin!
        hot: true,
        inline: true,

        // Display only errors to reduce the amount of output.
        stats: 'errors-only',

        host: "localhost", // Defaults to `localhost`   process.env.HOST
        port: "8080",  // Defaults to 8080   process.env.PORT
}
...
这时我们只要打开浏览器,输入:localhost:8080/ 就能看到结果,并且在你修改某些源文件后,浏览器会自动刷新,就能看到webpack 即时编译输出的结果,而不需要重新编译。
我们在使用webpack开发时难免要结合后端服务开发,比如我们用webstorm 编译器开发项目,需要调用java的服务,由于有同源策略问题,这时我们会收到相关报错信息。这时我们可以通过代理的方式绕过同源策略。
这里我用nodejs 模拟一个后端服务,如下:
// ~/mockServer/server.js

var http = require('http');

var content = '▍if you see that,It means you have get the correct data by backend server(mock data by nodejs server)!';

var srv = http.createServer(function (req, res) {
    res.writeHead(200, {'Content-Type': 'application/text'});
    res.end(content);
});

srv.listen(8888, function() {
    console.log('listening on localhost:8888');
});
接下来我们需要这样配置去调用这个nodejs 的服务。
首先将热更新配置的代码修改为:
// webpack.config.js
...
plugins: [
        // Enable multi-pass compilation for enhanced performance
        // in larger projects. Good default.
        new webpack.HotModuleReplacementPlugin({
            multiStep: true
        }),
],
devServer: {
        // Enable history API fallback so HTML5 History API based
        // routing works. This is a good default that will come
        // in handy in more complicated setups.
        historyApiFallback: true,

        // Unlike the cli flag, this doesn't set
        // HotModuleReplacementPlugin!
        hot: true,
        inline: true,

        // Display only errors to reduce the amount of output.
        stats: 'errors-only',

        host: "localhost", // Defaults to `localhost`   process.env.HOST
        port: "8080",  // Defaults to 8080   process.env.PORT
        proxy: {
                '/devApi/*': {
                    target: 'http://localhost:8888/',
                    secure: true,
                    /*
                     * rewrite 的方式扩展性更强,不限制服务的名称
                     * */
                    rewrite: function (req) {
                        req.url = req.url.replace(/^\/devApi/, '');
                    }
                }
        }
}
...然后配置一个全局的环境变量,通过DefinePlugin:
// webpack.config.js
...
plugins: [
 new webpack.DefinePlugin({
        __DEVAPI__: devServer ? "/devApi/" : "''",
    }),
]
...
最后在调用服务的地方,只需要在调用地址前添加 __DEVAPI__全局环境变量即可,如:
$.ajax({
        url: __DEVAPI__ + 'http://localhost:8888/',
        data: {},
        type: 'get',
        dataType: 'text',
        success: function (text) {}
})这样在热更新的模式下,当有__DEVAPI__ 的地方就会自动识别为/devApi/,而这里会通过代理处理帮你重写掉,绕过同源策略。
虽然以上的工作几乎已经满足我们对webpack的要求了,但是我们还想懒一点,想在热更新模式下,编译完成后自动打开浏览器。那么我们可以通过这个插件open-browser-webpack-plugin解决:
引用插件
// webpack.config.js
var OpenBrowserPlugin = require('open-browser-webpack-plugin');
配置插件,这个配置要根据项目的具体情况去配置:
// webpack.config.js
...
plugins: [
 new OpenBrowserPlugin({url: 'http://localhost:8080' + PATHS.publicPath + 'index.html'})
]
...以上就是这篇文章的主要内容,希望通过这篇文章能够给大家带来一些启发。如果有觉得哪里不对,或者不合理的地方,欢迎指出。
出于安全原因,不敢私自将公司代码放到github 或者 npm 等开源平台。又因为急切需要管理开发的公共组件,所以决定自己搭建一套私有的包管理器。下面是通过sinopia搭建私有包管理器的。
推荐使用 verdaccio搭建私有的包管理器,参考:通过verdaccio搭建私有的包管理器
需要已经配置好nodejs及npm环境
全局安装 sinopia
$ npm install -g sinopia
启动
$ sinopia
将会看到

config file - sinopia 配置文件
http address - sinopia 的包管理地址(默认localhost:4873/)
验证是否安装成功,打开localhost:4873/,如果可以正常访问代表启动成功。
config.yaml默认配置
#
# This is the default config file. It allows all users to do anything,
# so don't use it on production systems.
#
# Look here for more config file examples:
# https://github.com/rlidwka/sinopia/tree/master/conf
#

# path to a directory with all packages
storage: ./storage // npm包存放的路径

auth:
  htpasswd:
    file: ./htpasswd // 保存用户的账号密码等信息
    # Maximum amount of users allowed to register, defaults to "+inf".
    # You can set this to -1 to disable registration.
    #max_users: 1000

# a list of other known repositories we can talk to
uplinks:
  npmjs:
    url: https://registry.npmjs.org/ //拉取公共包的地址源,默认为npm的官网,可以使用淘宝的npm镜像地址

packages: // 配置权限管理
  '@*/*':
    # scoped packages
    access: $all
    publish: $authenticated

  '*':
    # allow all users (including non-authenticated users) to read and
    # publish all packages
    #
    # you can specify usernames/groupnames (depending on your auth plugin)
    # and three keywords: "$all", "$anonymous", "$authenticated"
    access: $all

    # allow all known users to publish packages
    # (anyone can register by default, remember?)
    publish: $authenticated

    # if package is not available locally, proxy requests to 'npmjs' registry
    proxy: npmjs

# log settings
logs:
  - {type: stdout, format: pretty, level: http}
  #- {type: file, path: sinopia.log, level: info}
外放访问配置
默认访问地址是 http://localhost:4873/,我们在搭建完后需要对外暴露一个可访问的地址(通常是局域网)。那么我们可以在 config.yaml文件中配置,需要在文件中加入
# listen
listen: xxx.xxx.xxx.xxx:4873
账号配置
账号配置对应的是config.yaml文件中的auth部分,默认可以通过客户端?npm adduser添加账号。
$ npm adduser --registry http://localhost:4873/
会提示输入用户名和密码,密码信息将会保存到 htpasswd文件中。
安装 nrm 进行 包管理器的切换(切换 npm 和 sinopia)
$ npm install -g nrm
此时我们执行 $ nrm ls查看所有的仓库配置,是看不到sinopia的:
 npm ---- https://registry.npmjs.org/
  cnpm --- http://r.cnpmjs.org/
  taobao - https://registry.npm.taobao.org/
  nj ----- https://registry.nodejitsu.com/
  rednpm - http://registry.mirror.cqupt.edu.cn/
  npmMirror  https://skimdb.npmjs.com/registry/
  edunpm - http://registry.enpmjs.org/
添加sinopia仓库地址
nrm add sinopia http://xxx.xxx.xxx.xxx:4873
如果觉得单词sinopia不好记,可以改成其他的好记的名字,下面是以sinopia为例。
添加成功后会提示
add registry sinopia success
切换到私有仓库
$ nrm use sinopia
会提示
verb config Skipping project config: C:\Users\shuwei/.npmrc. (matches userconfig)
Registry has been set to: http:// xxx.xxx.xxx.xxx:4873/
这时我们再去执行$ nrm ls可以看到 sinopia
  npm ---- https://registry.npmjs.org/
  cnpm --- http://r.cnpmjs.org/
  taobao - https://registry.npm.taobao.org/
  nj ----- https://registry.nodejitsu.com/
  rednpm - http://registry.mirror.cqupt.edu.cn/
  npmMirror  https://skimdb.npmjs.com/registry/
  edunpm - http://registry.enpmjs.org/
* sinopia  http://xxx.xxx.xxx.xxx:4873/
发布私有包(和 npm 发布包模式一样)
首先假设我们已经准备好了一个要上传的私有包叫 test-private-mod。
我们cd到包所在的目录,执行npm publish,此时会报错,这是我们需要配置账号信息。
可以执行命令
$ npm adduser
需要注意的是,确保当前包管理服务是sinopia (通过nrm ls查看)。如果当前的包管理服务是npm,那么你通过命令 $ npm adduser将会添加到 npm包管理服务中,此时发布的也是发到了https://registry.npmjs.org/
再次执行发布命令:
$ npm publish
发布成功后我们可以看到storage文件夹下的确有了这个包。
并且可以通过访问http:// xxx.xxx.xxx.xxx:4873/看到已经发布的包了。
但是当发布了多个版本后,并没有列出所有的包的版本,所以建议每个包的readme一定要把每次发布的包给记录进去。
安装私有包
如果当前的包管理服务是npm那么你安装不到私有的安装包的,需要切换到sinopia服务($ nrm use sinopia)。但是如果当前是sinopia包服务,既可以安装到私有的包也能安装到公共包。
If some package doesn't exist in the storage, server will try to fetch it from npmjs.org. If npmjs.org is down, it serves packages from cache pretending that no other packages exist. Sinopia will download only what's needed (= requested by clients), and this information will be cached, so if client will ask the same thing second time, it can be served without asking npmjs.org for it.
当然安装包的方式也是和npm一样。我们安装一把之前发布的私有包:
$ npm install test-private-mod --save-dev
结果:
npm notice
npm notice package: test-private-mod
npm notice === Tarball Contents ===
npm notice 282B  package.json
npm notice 566B  index.js
npm notice 50B   readme.md
npm notice 155B  .idea/inspectionProfiles/Project_Default.xml
npm notice 174B  .idea/misc.xml
npm notice 280B  .idea/modules.xml
npm notice 458B  .idea/private-module.iml
npm notice 8.5kB .idea/workspace.xml
npm notice 732B  test-mod/url/parseQueryString.js
npm notice 648B  test-mod/url/stringfyQueryString.js
npm notice === Tarball Details ===
npm notice name:          test-private-mod
npm notice version:       1.0.0
npm notice package size:  3.8 kB
npm notice unpacked size: 11.8 kB
npm notice shasum:        fe1d72fb344483f6c04093d11bc25d221ab97f57
npm notice integrity:     sha512-4KMWOQbgOIfaP[...]dazor3nQdKxxQ==
npm notice total files:   10
npm notice
+ test-private-mod
并且已安装的包也会体现在 package.json文件中,这里有一点要注意的是,如果发布的包没有规范命名是很难区分公共包和私有包的,所以在发布包的时候包名可以加上前缀‘local-’,或者其他可以区分的前缀。
npm tag上次发布还是2015年,所以这个项目已经停止维护了,如果后面发现不能满足需求会选择其他的方案。
刚配置好,就发现一个更好的替代方案:verdaccio,由于sinopia已经很久没更新了,而且文档不全,也不太敢用。verdaccio有详细的文档。当然我还是会记录自己的采坑过程,详见通过verdaccio搭建私有的包管理器
截止到 2019年,创建 react 应用大家第一反应就是通过 create-react-app脚手架去创建,这种方式的确也是最简单、最高效的方式。通过脚手架创建的应用,内置了大量需要配置和扩展的功能,让开发者更专注于业务实现。
如果仅仅是满足日常项目开发是足够的,但是如果需要创建 react 组件库、工具路等应用还需要自己手动的创建。
这篇文章将会介绍如何通过手动的配置 webpack、babel、react创建 react应用
细节略...
$ yarn init
使用目前最流行的打包工具 webpack,发展到现在官方文档也是非常详细了。
安装 webpack
yarn add webpack --dev
安装webpack-cli命令包
yarn add webpack-cli --dev
未完,待续。。。
这里我记录下搭建基于 karma+mocha+webpack3+vue2 的测试环境。因为之前折腾了一段时间,发现的坑挺深的,防止后面再次掉进坑里,留个笔记。如果这边文章能解决大家遇到的问题那就更好了😉
以下列出来的包安装在项目中即可,还有几个包需要全局安装:
babel、mocha、karma
babel 相关的:
babel-core
babel-plugin-syntax-jsx // 支持 jsx 语法
babel-plugin-transform-runtime // 描述太晦涩, 官方文档: https://github.com/babel/babel/tree/master/packages/babel-plugin-transform-runtime
babel-plugin-transform-vue-jsx // 支持 vue2.x jsx 语法
babel-preset-env // 可以根据您所支持的环境自动确定您需要的Babel插件和polyfills(.babelrc 配置)
babel-preset-es2015
babel-preset-stage-2
babel-runtime
babel-polyfill // 支持老版本浏览器
karma、mocha、断言 包
karma
mocha
chai // BDD 、TDD 断言框架
chalk // 终端里可以给输出内容添加颜色
karma-mocha
karma-coverage // 生成代码覆盖率
karma-phantomjs-launcher // phantomjs 启动器
karma-phantomjs-shim // 可以支持 phantomjs 默认不支持的功能,如 Object.assign 等...
karma-sinon-chai
karma-spec-reporter // 终端里输出测试结果
karma-webpack // karma 支持 webpack 插件,有了它就不会报 找不到requirejs的错误信息了
phantomjs-prebuilt // phantomjs 通过 npm 安装的版本
sinon // 测试辅助工具,提供 spy、stub、mock 三种测试手段,模拟特定场景
sinon-chai
webpack 相关
webpack
babel-loader
css-loader
istanbul-instrumenter-loader // 代码覆盖率统计工具
karma-sourcemap-loader
style-loader
url-loader
vue-loader
vue-style-loader
extract-text-webpack-plugin
vue 核心包
上面那么一大坨包安装好了,接下来该配置。配置主要是两个,一是 karma 的配置文件,另一个是 karma 需要的webpack 配置文件。webpack 的配置文件是为了解析那些需要测试的源文件的,说白了就是 vue 相关的文件,然后再给karma 的单元测试用例去识别。
webpack3 配置文件
我是手动创建一个webpack.test.config.js 文件,然后内容配置如下
webpack 相关知识可以参考我之前写的一篇
var path = require("path")
var webpack = require("webpack")
var ExtractTextPlugin = require('extract-text-webpack-plugin')

function resolve(dir) {

    return path.join(__dirname, '..', dir)
}

var webpackConfig = {

    module: {

        rules: [

            // babel-loader
            {
                test: /\.js$/,
                use: 'babel-loader',
                include: [resolve('src'), resolve('test')]
            },

            // 为了统计代码覆盖率,对 js 文件加入 istanbul-instrumenter-loader
            {
                test: /\.(js)$/,
                exclude: /node_modules/,
                include: /src|packages/,
                enforce: 'post',
                use: [{
                    loader: "istanbul-instrumenter-loader",
                    options: {
                        esModules: true
                    },
                }]
            },

            // vue loader
            {
                test: /\.vue$/,
                use: [{
                    loader: 'vue-loader',
                    options: {
                        // 为了统计代码覆盖率,对 vue 文件加入 istanbul-instrumenter-loader
                        preLoaders: {
                            js: 'istanbul-instrumenter-loader?esModules=true'
                        }
                    }
                }]
            },

            // css loader
            {
                test: /\.css$/,
                use: ExtractTextPlugin.extract({
                    use: 'css-loader',
                    fallback: 'vue-style-loader'
                })
            },

            // img loader
            {
                test: /\.(png|gif|jpe?g)(\?\S*)?$/,
                use: [{loader: 'url-loader'}]
            },

            // font loader
            {
                test: /\.(eot|woff|woff2|ttf|svg)(\?\S*)?$/,
                use: [{loader: 'url-loader'}]
            },
        ]
    },

    resolve: {
        extensions: ['.js', '.vue', '.json'],
        alias: {
            'vue$': 'vue/dist/vue.esm.js',
            '@': resolve('src'), // 调用组件的时候方便点
        }
    },

    plugins: [
        new webpack.DefinePlugin({
            'process.env': {
                NODE_ENV: '"production"'
            }
        })
    ]
}

module.exports = webpackConfig
karma配置文件
直接 cd 到你的项目,然后执行下面命令,会提示你是否使用 require.js、浏览器环境、测试脚本存放位置等等。
$ karma init
之后就会生成一个karma.config.js 文件,配置形式我是直接仿照vue-cli 官方的例子:
var webpackConfig = require('../../build/webpack.test.config');

module.exports = function (config) {
    config.set({
        // to run in additional browsers:
        // 1. install corresponding karma launcher
        //    http://karma-runner.github.io/0.13/config/browsers.html
        // 2. add it to the `browsers` array below.
        browsers: ['PhantomJS'],
        frameworks: ['mocha', 'sinon-chai', 'phantomjs-shim'],
        reporters: ['spec', 'coverage'],
        files: ['index.js'],
        preprocessors: {
            './index.js': ['webpack', 'sourcemap']
        },

        webpackMiddleware: {
            noInfo: true
        },
        // 不显示 `webpack` 打包日志信息
        webpackServer: {
            noInfo: true
        },
        webpack: webpackConfig,
        coverageReporter: {
            dir: './coverage',
            reporters: [
                { type: 'lcov', subdir: '.' },
                { type: 'text-summary' }
            ]
        }
    })
}├─build
│ webpack.test.config.js
│
├─src
│
├─package.json
│
└─test
└─unit
│ index.js
│ karma.config.js
│
├─coverage
│
└─specs
*.spec.js
测试文件相关都放置在 test/unit 下,入口文件为 index.js,每个vue 组件对应的测试用例名为组件名称.spec.js,根据 istanbul-instrumenter-loader 文档的说明,测试总入口文件 index.js 内容如下:
import Vue from 'vue'

Vue.config.productionTip = false

// 测试所有以 .spec.js 名称结尾的文件
// require all test files (files that ends with .spec.js)
const testsContext = require.context('./specs', true, /\.spec$/)
testsContext.keys().forEach(testsContext)

// 要求除main.js之外的所有src文件进行覆盖
// require all src files except main.js for coverage.
// you can also change this to match only the subset of files that
// you want coverage for.
const srcContext = require.context('../../src', true, /^\.\/(?!main(\.js)?$)/)
srcContext.keys().forEach(srcContext)我们在 src 目录下创建一个 Hello.vue 组件
<template>
   <div>msg</div>
</template>
<script>
export default {
  name: 'hello',
  data () {
    return {
      msg: 'Welcome to Your Vue.js App'
    }
  }
}
</script>
然后在 test/unit/specs 下创建一个 Hello.spec.js 文件,再写个简单的单元测试用例:
import Vue from 'vue'
import Hello from '@/components/Hello'

describe('Hello.vue', () => {
  it('should render correct contents', () => {
    const Constructor = Vue.extend(Hello)
    const vm = new Constructor().$mount()
    expect(vm.$el.querySelector('.hello h1').textContent)
      .to.equal('Welcome to Your Vue.js App')
  })
})在 package.json 中配置命令:
 // package.json
 "scripts": {
    "test": "karma start test/unit/karma.config.js --single-run"
  }
输出结果:

同时在 test/unit/coverage 生成测试报告。以上就是一个简单的 vue 单元测试实例。最后奉上源代码
大型单页应用(后面都是指spa),我们往往会通过使用状态管理器 vuex 去解决组件间状态共享与状态传递等问题。这种应用少则几十个单页,多则上百个单页。随着路由的频繁切换,每个路由对应的 vuex 中的状态将越来越多。为了做到页面的极致优化,我们需要将那些闲置的状态重置,以减小占用的内存空间。
vuex 强调采用集中式存储管理应用的所有组件的状态,但是我们真把所有的状态都放到 store 中去处理,你会发现开发起来非常痛苦。这里如果想很好的把控哪些数据需要放到 store 中去管理,首先要理解 vuex 是用来解决什么问题的。vuex 官网指出是为了解决多个组件共享状态的,那么我们就可以把多个组件的共享状态放到 store 中去管理,这里的多组件共享对于单页应用很多情况是跨路由的组件。如果 store只存储多组件共享的状态,那么我们就没必要去清理 vuex 中的状态了,因为这些状态随时会被用到。
而随着业务场景越来越复杂,很多与后台交互的逻辑也都放到了组件中,这样代码就变得很凌乱,vuex 也没有被充分利用。这时我们可以把与后台 api 交互的逻辑放到 vuex 中的action 去处理,后台返回的状态自然也就放到了 store 管理。这样处理后,组件就只负责对数据进行渲染,逻辑非常清晰。而此时,组件对应的 store 中的状态随着路由的切换将会越来越多,而这些状态就需要我们手动的去清理了。
很多方案都有取舍,如果将与后台 api 交互的数据放到组件中,就没必要去清理了,但是代码逻辑将变得比较乱。另外诸如 vuex 的插件 vue-devtools 将无法监控到每次请求数据的变化...
我们想要的效果是在路由切换的时候,把上一个路由对应的 vuex 中的状态重置掉,但是路由和vuex 并没有一一对应的关系,如果要做到这种效果,那么我们需要维护一个路由与vuex 模块的对应关系,这样会很繁琐。不如当路由改变时去重置 vuex 中的所有状态。
下面将结合我的github实例去说明,这个实例创建了一个单页应用,我们通过切换路由的时候将闲置的状态清除。
实例中采用拆分 store 为多个 module 的方式,将路由对应的组件状态放到对应的 module 中,多组件共享的状态放到顶级的 store 中管理。大致如下:
// store/index.js
import page1 from "./modules/page1.js";
import page2 from "./modules/page2.js";
import page3 from "./modules/page3.js";
import page4 from "./modules/page4.js";
import page5 from "./modules/page5.js";

export default new Vuex.Store({
    state,
    getters,
    actions,
    mutations,
    modules: { // 每个路由对应的 module
        page1,
        page2,
        page3,
        page4,
        page5
    },
    plugins: __DEV__ ? [createLogger()] : [],
    strict: __DEV__ ? true : false
});
路由 page1 对应的 module 的 state 形如:
// store/modules/page1.js
const state = {
     // 列表数据
     page1Data: [],
     // 标题数据
     page1Title: ''
}
这些数据是通过调用后端 api 返回并复制的数据,如果我们在路由改变的时候重置这些数据,那么需要将初始化数据提取出来,并且暴露一个需要重置的标识方法 initState(),代表路由改变的时候需要重置,当然这个方法名称是个约定,你也可以定义为其他名称。改造后为:
// store/modules/page1.js

// 放置你要重置的数据
const initState = {

    page1Data: [],
}

// state
const state = {
    // 参数解构
    ...initState,

    // 路由改变不想重置的数据
    page1Title: '',

    initState(){

        return initState
    }
}
定义全局 mutation 事件类型
// store/types.js
export const RESET_STATES = 'resetStates'
定义全局 mutation
// store/mutation.js

import * as types from './types'

// 检测所有的 state 并把 `initState()` 中的属性重置
function resetState(state, moduleState) {

    const mState = state[moduleState];

    if (mState.initState && typeof mState.initState === 'function') {

        const initState = mState.initState();

        for (const key in initState) {

            mState[key] = initState[key];
        }
    }

}

export default {

    [types.RESET_STATES](state, payload) {

        for (const moduleState in state) {

            resetState(state, moduleState);
        }
    },

}
定义全局 action
// store/action.js
import * as types from './types'

export default {
    // rest state action
    resetStates:function (context, payLoad) {

        context.commit(types.RESET_STATES, payLoad);
    }
}
至此一切准备就绪,只需要在路由改变时触发重置的方法即可,在入口 vue 文件中处理
// components/app.vue
<script>
    import {mapState, mapActions} from "vuex"
    export default{

        methods: {

            ...mapActions({
                resetStates: "resetStates"
            })
        },

        watch: {

            $route(to, from) {
                // 路由改变发起重置
                this.resetStates();
            }
        }
    }
</script>
如果你的 chrome 浏览器安装了 vuejs-devtools 在路由切换的时候就能够很清晰的看到上一个路由数据的的重置过程。
实例点这里。我们这里的 vuex 状态重置,是每次路由切换遍历所有的 store 中的状态,并把initState() 中的属性重置,如果能做到把当前的路由对应的 state 重置就更好了,但是路由和 store 中的 module 并没有关联关系。这里只是提供一种重置 vuex 状态的一种方案,如果有更好方案还请各位看官留言。如有不妥的地方也欢迎拍砖留言。
--完--
打包组件库或者工具库时,我们会将 vue、react、angular 排除打包文件外,而是希望用户使用时自己安装。这时就需要 peerDependencies了。
只有在发布库文件时才会用到
externals排除在打包库文件之外的依赖。比如 vue、react、angular作用
告诉用户,你使用我的库,还需要具备 vue、react、angular 等环境。在peerDependencies 里的依赖,用户在安装的时候会自动安装
添加 peerDependencies 依赖命令
yarn add <package...> [--peer/-P]
完
前言
当使用 powerDesigner 作为数据库设计时,默认是 sqlServer 的(也可能记错了)。下面以 powerDesigner16.5.0.3982 版本为例。
创建数据库模型
如果需要设置数据库连接,可以先创建模型,创建完后会出现
Database选项
创建模型路径:
File->New Model->Model types->Physical Diagram
配置连接oracle数据库链接信息
路径:
Database->Configure Connections->Add Data Source(图标)->系统数据源->Oracle in oraClient11g_home1
输入数据库链接信息,如:

保存之前可以点击Test Connection 输入数据信息测试是否链接成功
链接oracle数据库
路径:
Database->Connection->ODBC machine data source
选择刚才设置的数据路链接配置db-test(Oracle in oraClient1g_home1)
输入数据库账号、密码
如果配置失败会有错误信息弹出
从数据库更新模型
路径:
Database->Update Model from Database
选择要更新的表
什么是反向代理呢,维基百科里原话是这么说的“反向代理是代理服务器的一种。它根据客户端的请求,从后端的服务器(如Web服务器)上获取资源,然后再将这些资源返回给客户端”
而正向代理相反,典型用途是为在防火墙内的局域网客户端提供访问Internet的途径。
server {
        listen       80;
        server_name  localhost;

        location / {
            proxy_pass http://localhost:8080;
            proxy_set_header Host $host:$server_port;
        }
}
然后执行命令nginx -s reload 使配置生效。
这是访问 localhost 实质上回返回 localhost:8080 内容,当然为了看效果,最好本地搭建 localhost:8080 的站点。
--完--
token 的组成
token 的生成包含‘密钥+用户名+Mac 地址+时间戳’,然后通过可逆或者非可逆的加密方式生成token。 其中密钥是由服务端配置的特殊字符串。
token 的生成
前端携带用户名和密码发起登录,服务端验证有效后返回给前端 token。
token 的存储
1、如果token 通过可逆方式生成
不需要存储
2、如果token 通过不可逆的方式生成
需要存储,可以存储到 redis 等缓存服务器或者数据库(不推荐)。如果需要设置有效期还需要存储当前服务器时间。
token 的验证过程
1、如果token 通过可逆方式生成
前端携带token 请求后端服务器,服务器将token 结合密钥进行解密,解密后判断Mac 地址是否一致,不一致则有可能cookie 被盗用,那么返回前端token验证失败;如果Mac 地址符合则将时间戳和服务器时间比较,如果时间没有过期则token 验证成功,继续执行下面的业务逻辑。
2、如果token 通过不可逆的方式生成
前端携带token 请求后端服务器,通过 token 到 redis 等缓存服务器或者数据库中读取 token 和token的存储时间,如果没有获取到 token 信息则返回前端token验证失败;如果获取到了token 信息,则判断token 的存储时间是否过期,如果时间没有过期则token 验证成功。继续执行下面的业务逻辑。
token滑动失效策略
1、如果用户正在提交表单,突然提示‘登录信息已过去,请重新登录!’这种体验肯定是不好的。但是也没办法完全避免,比如token 有效期是1天时间,而用户表单2天后才提交。不过可以减少重新登录的概率,比如token 有效期是1天时间,用户在1天时间内操作去更新用户的最后登录时间,使token 的有效期往后顺延。但是用户的每次操作都去修改用户的最后登录时间也不合适,这里可以做一个策略,比如用户操作大于1小时间隔了再去修改最后登录时间(滑动失效时间修改时间间隔由token的过期时间决定)。
2、这个策略对于token 存储在redis 缓存服务器中的情况很好操作,但是对于token 不存储的方式(可逆的加密方式生成)有一定的困难,因为token 的生成是包含生成时间的,修改了用户的操作时间token 就会改变,这时如果也要做到token滑动失效,需要前端做响应结果处理,即数据的请求的响应结果被统一的处理,如果判断token 验证成功并且token 被修改则前端也对应的去修改token 的存储。
疑问:
客户端Mac 地址获取不到?
这里记录下 vue 路由配置成 history 模式的过程。
vue 路由默认是 hash 模式。使用这种模式url 地址上模式会有一个路由标识 ‘#’,乍一看以为是锚点。
这种模式存在以下缺点:
1、本身与锚点冲突,导致页面需要用到锚点定位时比较困难
2、路由切换滚动行为还原困难,当然可以通过其他方式实现,参考这里
3、不利于 SEO
4、url 丑(哈哈,别当真)
既然用hash 模式不爽,那我们就改成 history 模式。
就是在这里改下
const router = new VueRouter({
  mode: 'history',
  routes: [...]
})
这时候我们重启将项目运行起来,不错,就是这个效果。对比下url地址
hash 模式: 协议://域名:端口/index.html#/home
history 模式: 协议://域名:端口/home
会看到将 index.html# 省略掉了。
我们通过webpack 热启动(webpack-dev-server)路由切换正常访问,但是当刷新页面,或者点击浏览器回退的时候提示找不到了,这是因为使用了 history 模式,webpack 热启动也需要对应的配置。
怎么配置呢,有两种方式,也可参考webpack官网配置
方式1 通过命令行的方式,形如 webpack-dev-server --history-api-fallback,不过一般都是放到 'scripts'节点下,如:
// package.json
 "scripts": {
    "dev": "webpack-dev-server  --env.dev --history-api-fallback"
  }
方式2 在 webpack 配置文件的devServer配置:
// webpack.config.js
devServer:{
  ...
 historyApiFallback: true
}
如果是使用了 webpack 的 ‘webpack-dev-middleware’,你可能需要配合connect-history-api-fallback插件达到页面刷新回退不报错的目的,这里不多说了(因为我用的不是这种方式😂)
通过history 模式发布后,也是刷新以及页面回退都会出现找不到的问题,这时候需要对应的站点服务器处理了。
因为我们的站点放到IIS 上的,下面以IIS 环境为例。
其他平台 history 模式的设置官网有说明
1、安装 IIS UrlRewrite
2、安装完成后,在你的网站根目录中创建一个 web.config 文件,然后进行以下配置
<?xml version="1.0" encoding="UTF-8"?>
<configuration>
  <system.webServer>
    <rewrite>
      <rules>
        <rule name="Handle History Mode and custom 404/500" stopProcessing="true">
            <match url="(.*)" />
            <conditions logicalGrouping="MatchAll">
              <add input="{REQUEST_FILENAME}" matchType="IsFile" negate="true" />
              <add input="{REQUEST_FILENAME}" matchType="IsDirectory" negate="true" />
            </conditions>
          <action type="Rewrite" url="/" />
        </rule>
      </rules>
    </rewrite>
  </system.webServer>
</configuration>
这里配置的目的就是把包含 .*的路径名称 替换成 '/'。
这时候再去打开部署好的站点,无论是页面刷新还是回退操作一切正常。
注意:单页应用的入口命名一定要是 index.html 否则页面刷新后会报错
单页应用的入口文件必须是index.html 吗?
如果入口文件不是index.html, 调试模式(webpack-dev-server) , 刷新会报错,回退可以。
发布后部署在iis 上也是一样的问题,不能刷新。所以入口文件必须是index.html
单页应用与多页应用通过webpack 统一管理的项目会有问题吗?
我已经在项目中使用过,history 模式 只会作用在单页应用上,对多页应用无影响,访问多页应用依旧通过 ~*.html 方式
我用 nginx 作为负载均衡,还需 nginx 配置后端url 重写规则吗?
不需要,只有nginx 作为 http 服务器的时候才需要。nginx 作为负载均衡时只要每个站点配置即可。
https://docs.microsoft.com/zh-cn/iis/extensions/url-rewrite-module/using-the-url-rewrite-module
--完?--
上一篇已经介绍了如何在开发环境配置 react 路由 history 模式。这篇文章将介绍react 路由 history 模式应用发布后的配置。下面以 IIS站点服务器配置为例,其他站点服务器类似
react 路由 history 模式发布在web 站点服务器上需要额外的配置,否则无法正常访问
下载安装成功,需要在站点根目录创建 web.config 文件
配置如下
<?xml version="1.0" encoding="UTF-8"?>
<configuration>
  <system.webServer>
    <rewrite>
      <rules>

        <rule name="single app rule" stopProcessing="true">
          <match url="(.*)" />
          <conditions logicalGrouping="MatchAll">
            <add input="{REQUEST_FILENAME}" matchType="IsFile" negate="true" />
            <add input="{REQUEST_FILENAME}" matchType="IsDirectory" negate="true" />
          </conditions>
          <action type="Rewrite" url="/" />
        </rule>

      </rules>
    </rewrite>
  </system.webServer>
</configuration>
如果单页应用的名称不是 index.html 需要修改 action 节点的 url 属性。假设单页应用名称为home.html,那么 action节点配置修改为:
如果后缀为 index.html 浏览器上可以不用体现,否则需要全称
<action type="Rewrite" url="/home.html" />
如果发布的文件放到站点的子文件夹中,需要修改以下配置
react 路由增加 basename 属性
属性值需要和站点下的子文件夹名称相同,假设站点下有一个 folder1 文件夹,那么react 路由配置改动为:
<Router basename='/folder1'>
修改 web.config 配置
<?xml version="1.0" encoding="UTF-8"?>
<configuration>
  <system.webServer>
    <rewrite>
      <rules>

      <!--文件夹1-重写-->
        <rule name="folder1 rule" stopProcessing="true">
          <match url="folder1/" />
          <conditions logicalGrouping="MatchAll">
            <add input="{REQUEST_FILENAME}" matchType="IsFile" negate="true" />
            <add input="{REQUEST_FILENAME}" matchType="IsDirectory" negate="true" />
          </conditions>
          <action type="Rewrite" url="/folder1/index.html" />
        </rule>

      </rules>
    </rewrite>
  </system.webServer>
</configuration>
一个站点服务器可以放多个单页应用,假设和 folder1 文件同级还有一个 folder2 文件夹,folder2 里面放着另外一个应用。那么需要修改以下配置
第二个应用的 react 路由增加 basename 属性
属性值需要和站点下的子文件夹名称相同,那么react 路由配置改动为:
<Router basename='/folder2'>
修改 web.config 配置
<?xml version="1.0" encoding="UTF-8"?>
<configuration>
  <system.webServer>
    <rewrite>
      <rules>

        <!--文件夹1-重写-->
        <rule name="folder1 rule" stopProcessing="true">
          <match url="folder1/" />
          <conditions logicalGrouping="MatchAll">
            <add input="{REQUEST_FILENAME}" matchType="IsFile" negate="true" />
            <add input="{REQUEST_FILENAME}" matchType="IsDirectory" negate="true" />
          </conditions>
          <action type="Rewrite" url="/folder1/index.html" />
        </rule>

        <!--文件夹2-重写-->
        <rule name="folder2 rule" stopProcessing="true">
          <match url="folder2/" />
          <conditions logicalGrouping="MatchAll">
            <add input="{REQUEST_FILENAME}" matchType="IsFile" negate="true" />
            <add input="{REQUEST_FILENAME}" matchType="IsDirectory" negate="true" />
          </conditions>
          <action type="Rewrite" url="/folder2/index.html" />
        </rule>

      </rules>
    </rewrite>
  </system.webServer>
</configuration>
如想通过以下url 地址 http://mysite.com/ 达到访问 http://mysite.com/folder1 的目的,需要重写站点地址配置。如站点里有两个应用,分别存放在 folder1 和 folder2 中,此时想把默认站点定位到 folder1 中的应用,可以改为:
<?xml version="1.0" encoding="UTF-8"?>
<configuration>
  <system.webServer>
    <rewrite>
      <rules>

        <!--文件夹1-重写-->
        <rule name="folder1 rule" stopProcessing="true">
          <match url="folder1/" />
          <conditions logicalGrouping="MatchAll">
            <add input="{REQUEST_FILENAME}" matchType="IsFile" negate="true" />
            <add input="{REQUEST_FILENAME}" matchType="IsDirectory" negate="true" />
          </conditions>
          <action type="Rewrite" url="/folder1/index.html" />
        </rule>

        <!--文件夹2-重写-->
        <rule name="folder2 rule" stopProcessing="true">
          <match url="folder2/" />
          <conditions logicalGrouping="MatchAll">
            <add input="{REQUEST_FILENAME}" matchType="IsFile" negate="true" />
            <add input="{REQUEST_FILENAME}" matchType="IsDirectory" negate="true" />
          </conditions>
          <action type="Rewrite" url="/folder2/index.html" />
        </rule>

        <!--默认站点-跳转-规则(跳转到‘文件夹1’的地址)-->
        <rule name="root" stopProcessing="true">
          <match url="^$" />
          <action type="Redirect" url="/folder1" />
        </rule>
      </rules>
    </rewrite>
  </system.webServer>
</configuration>
假设在文件夹 folder1 中的应用已经发布上线,此时需要迁移到到文件夹 folder-new 中,那么如果需要让之前用户正常访问老的地址,需要做到兼容处理(页面是嵌在上线的app 中的或者用户量比较大)。我们希望用户访问 http://mysite.com/folder1 自动跳转到 http://mysite.com/folder1-new 。我们可以通过配置重定向规则来解决。
首先修改路由的basename属性
<Router basename='folder1-new'>
修改 web.config 文件
新增文件夹 folder1-new 的重写规则
...
 <!--folder1-new-重写-规则-->
        <rule name="folder1-new rewrite rule" stopProcessing="true">
          <match url="folder1-new/" />
          <conditions logicalGrouping="MatchAll">
            <add input="{REQUEST_FILENAME}" matchType="IsFile" negate="true" />
            <add input="{REQUEST_FILENAME}" matchType="IsDirectory" negate="true" />
          </conditions>
          <action type="Rewrite" url="/folder1-new/index.html" />
        </rule>
...
新增文件夹 folder1的跳转规则
  <!--folder1-跳转-规则(跳转到folder1的新地址)-->
        <rule name="folder1 rewrite rule" stopProcessing="true">
           <match url="folder1/" />
           <action type="Redirect" url="/folder1-new" />
        </rule>
web.config 完整的配置
<?xml version="1.0" encoding="UTF-8"?>
<configuration>
  <system.webServer>
    <rewrite>
      <rules>

        <!--folder1-new-重写-规则-->
        <rule name="folder1-new rewrite rule" stopProcessing="true">
          <match url="folder1-new/" />
          <conditions logicalGrouping="MatchAll">
            <add input="{REQUEST_FILENAME}" matchType="IsFile" negate="true" />
            <add input="{REQUEST_FILENAME}" matchType="IsDirectory" negate="true" />
          </conditions>
          <action type="Rewrite" url="/folder1-new/index.html" />
        </rule>

         <!--文件夹2-重写-->
        <rule name="folder2 rule" stopProcessing="true">
          <match url="folder2/" />
          <conditions logicalGrouping="MatchAll">
            <add input="{REQUEST_FILENAME}" matchType="IsFile" negate="true" />
            <add input="{REQUEST_FILENAME}" matchType="IsDirectory" negate="true" />
          </conditions>
          <action type="Rewrite" url="/folder2/index.html" />
        </rule>

        <!--folder1-跳转-规则(跳转到folder1的新地址)-->
        <rule name="folder1 rewrite rule" stopProcessing="true">
           <match url="folder1/" />
           <action type="Redirect" url="/folder1-new" />
        </rule>

        <!--默认站点-跳转-规则(跳转到‘文件夹1’的地址)-->
        <rule name="root" stopProcessing="true">
          <match url="^$" />
          <action type="Redirect" url="/folder1" />
        </rule>
      </rules>
    </rewrite>
  </system.webServer>
</configuration>
basename 属性值硬编码?basename 属性值配置化--完--
上一篇介绍了使用 electron-react-boilerplate模板基本的样式使用问题。现在咱们看下项目中使用了 ant.design 如何进行主题定制
这个问题本质是如何引入
less文件,具体看下文
这是官方主题定制文章,其中最简单的方式是覆盖ant.design主题的less 文件。然而 electron-react-boilerplate模板并没有less文件的配置,下面我们要进行改造
yarn add less less-loader
配置开发环境loader。这里特别要注意的事,我们要让less 文件也遵循 electron-react-boilerplate模板的css module方式。
即:.global.less可以作为全局的样式使用,而.less文件要遵循css module方式。
明白规则后配置如下:
// webpack.config.renderer.dev.babel.js
// [custome] Add LESS support-当是 .global.less 文件时,作为全局样式引入
            {
                test: /\.global\.less$/,
                use: [
                    {
                        loader: 'style-loader'
                    },
                    {
                        loader: 'css-loader',
                        options: {
                            sourceMap: true,
                            importLoaders: 1
                        }
                    },
                    {
                        loader: 'less-loader',
                        options: {
                            sourceMap: true,
                            javascriptEnabled: true
                        }
                    }
                ]
            },
            // [custome] Add LESS support-当是非 .global.less 文件时,作为css module样式引入
            {
                test: /^((?!\.global).)*\.less$/,
                use: [
                    {
                        loader: 'style-loader'
                    },
                    {
                        loader: 'css-loader',
                        options: {
                            modules: {
                                localIdentName:
                                    '[name]__[local]__[hash:base64:5]'
                            },
                            sourceMap: true,
                            importLoaders: 1
                        }
                    },
                    {
                        loader: 'less-loader',
                        options: {
                            sourceMap: true,
                            javascriptEnabled: true
                        }
                    }
                ]
            },
生产发布模式基本同理,只不过样式要进行压缩配置:
// [custome] Add LESS support-当是 .global.less 文件时,作为全局样式引入
            {
                test: /\.global\.less$/,
                use: [
                    {
                        loader: MiniCssExtractPlugin.loader
                    },
                    {
                        loader: 'css-loader',
                        options: {
                            sourceMap: true,
                            importLoaders: 1
                        }
                    },
                    {
                        loader: 'less-loader',
                        options: {
                            sourceMap: true,
                            javascriptEnabled: true
                        }
                    }
                ]
            },
            // [custome] Add LESS support-当是非 .global.less 文件时,作为css module样式引入
            {
                test: /^((?!\.global).)*\.less$/,
                use: [
                    {
                        loader: MiniCssExtractPlugin.loader
                    },
                    {
                        loader: 'css-loader',
                        options: {
                            modules: {
                                localIdentName:
                                    '[name]__[local]__[hash:base64:5]'
                            },
                            sourceMap: true,
                            importLoaders: 1
                        }
                    },
                    {
                        loader: 'less-loader',
                        options: {
                            sourceMap: true,
                            javascriptEnabled: true
                        }
                    }
                ]
            }
less文件我们暂且命名为antd-theme-reset.global.less,大致形式如下,具体请参考ant.design官网:
// antd-theme-reset.global.less
@import '~antd/dist/antd.less';
@primary-color: #ea5404; // 全局主色
@link-color: orange; // 链接色
@success-color: #52c41a; // 成功色
@warning-color: #faad14; // 警告色
@error-color: #f5222d; // 错误色
@font-size-base: 14px; // 主字号
在入口文件引入此样式重置文件:
// index.tsx
import '你的目录/antd-theme-reset.global.less'
webpack 相关文件修改,需要重新运行
-完-
前言
最近在用element ui做一个后台系统,发现当菜单数据变更后,菜单显示异常的问题,通过 vue 的devtool 发现,element ui 的菜单组件并没有很好的处理数据变化的渲染重置问题,比如默认菜单属性值变更后并不生效,当然还有其他的问题。
方案一
我想到的方案是当菜单数据变更后,通过watch 监听,先去销毁当前的菜单组件,然后再重现渲染。使用 v-if 可以解决这个问题
<template>
   <third-comp v-if="reFresh"/>
</template>

<script>
   export default{
       data(){
          return {
                reFresh:true,
                menuTree:[]
            }
       },
       watch:{
             menuTree(){

                  this.reFresh= false
                  this.$nextTick(()=>{

                    this.reFresh = true
                })
            }
       }
}
</script>
这种方式虽然可以实现,太不优雅
方案二
通过vue key 实现,原理官方文档。所以当key 值变更时,会自动的重新渲染。
<template>
   <third-comp :key="menuKey"/>
</template>

<script>
   export default{
       data(){
          return {
                menuKey:1
            }
       },
       watch:{
             menuTree(){

                ++this.menuKey
            }
       }
}
</script>
完...
externals 对于封装组件库,或者工具库非常有用。它可以防止将某些需要import的资源打包到输出文件中,而是在运行时再去从外部获取扩展依赖。具体参考官方文档
打包体积小很多
假设我们封装基于 vue 的组件库,很难避免使用vue 的原型对象(prototype)。但是这样会将 vue 源码打包进去,如果配置了 externals,打包后的体积将会小很多。
externals 的条件外部 library 可以下是下面任何一种形式:
module.exports.default支持 字符串、对象、字符串数组、函数、正则配置。如:
module.exports = {
  //...
  externals: [
    {
      // 字符串
      react: 'react',
      // 对象
      lodash : {
        commonjs: 'lodash',
        amd: 'lodash',
        root: '_' // indicates global variable
      },
      // 字符串数组
      subtract: ['./math', 'subtract']
    },
    // 函数
    function(context, request, callback) {
      if (/^yourregex$/.test(request)){
        return callback(null, 'commonjs ' + request);
      }
      callback();
    },
    // 正则表达式
    /^(jquery|\$)$/i
  ]
};
完
当前环境
chrome 版本62.0.3202.94
win10
1、Press Command+Shift+P (Mac) or Control+Shift+P (Windows, Linux) to open the Command Menu.
2、Start typing Rendering in the Command Menu and select Show Rendering.
3、In the Rendering tab, enable FPS Meter. A new overlay appears in the top-right of your viewport.
vue 项目陆续上线了几个,也暴露了不少问题。今天记录的是如何在路由切换的时候,滚动条回到顶部。
首先简单分析下,为什么路由切换会导致滚动条不会自动到顶部。多页应用每次点击菜单导航都会重新刷新整个页面,自然有滚动条时,也会回到顶部。而单页应用不同,每次点击菜单导航都会触发对应的路由局部更新,这样就可能出现了滚动条就无法回到顶部(内容高度不够也不会滚动条)。
路由是通过 hash 方式,没有太好的办法,目前我想到的办法简单粗暴,就是在路由改变的时候去让可能存在滚动条的内容强制回到顶部。
一般是路由改变对应的内容切换的区域会出现滚动条,我们给会出现滚动条的区域设置一个class 样式为scroll-content:
<div class="scroll-content">
      <router-view></router-view>
</div>
也有可能存在双滚动条,即页面结构是左右结构,左侧的菜单高度没有进行设置,会导致body 存在滚动条,路由改变对应的内容区域也会出现滚动条。这一般是你要优化的,这样页面毕竟不好看。
方案1:
我们在 vue 项目的入口文件的路由改变中做处理
watch:{

    $route(to, from) {

                let scrollContent = document.querySelector('.scroll-content');

                if (scrollContent){

                    scrollContent.scrollTop = 0;
                    scrollContent.scrollLeft = 0;
                }
            }
}
方案2:
在路由的全局后置钩子中做处理也是一样的
router.afterEach((to, from) => {

   let scrollContent = document.querySelector('.scroll-content');

    if (scrollContent){

        scrollContent.scrollTop = 0;
        scrollContent.scrollLeft = 0;
    }
})
vue 路由如何配置 history 模式请参考这篇文章
既然已经配置好了history 模式,vue-router 官网提供了滚动行为
配置如下:
const router = new VueRouter({
  routes: [...],
  scrollBehavior (to, from, savedPosition) {
    // 路由切换,简单的让页面滚动到顶部
   return { x: 0, y: 0 }
  }
})
我们还可以利用路由元信息更细颗粒度地控制滚动。查看完整例子请移步这里。
--完--
A declarative, efficient, and flexible JavaScript library for building user interfaces.
🖖 Vue.js is a progressive, incrementally-adoptable JavaScript framework for building UI on the web.
TypeScript is a superset of JavaScript that compiles to clean JavaScript output.
An Open Source Machine Learning Framework for Everyone
The Web framework for perfectionists with deadlines.
A PHP framework for web artisans
Bring data to life with SVG, Canvas and HTML. 📊📈🎉
JavaScript (JS) is a lightweight interpreted programming language with first-class functions.
Some thing interesting about web. New door for the world.
A server is a program made to process requests and deliver data to clients.
Machine learning is a way of modeling and interpreting data that allows a piece of software to respond intelligently.
Some thing interesting about visualization, use data art
Some thing interesting about game, make everyone happy.
We are working to build community through open source technology. NB: members must have two-factor auth.
Open source projects and samples from Microsoft.
Google ❤️ Open Source for everyone.
Alibaba Open Source for everyone
Data-Driven Documents codes.
China tencent open source team.
