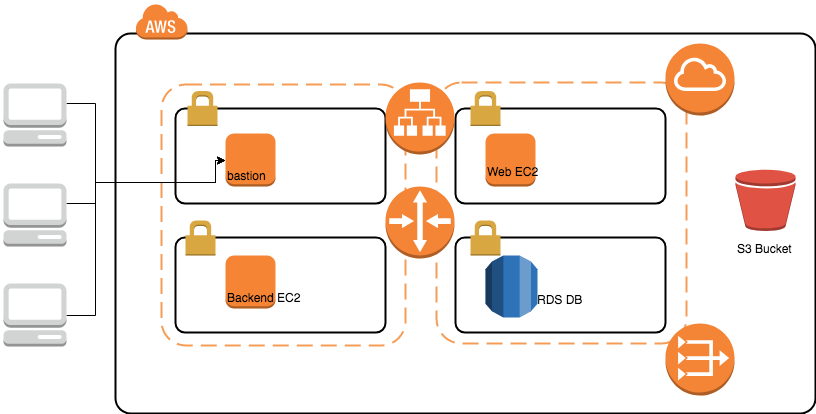
Today we are going to practice a very simple scenario, create a VPC with different network topology, include public subnet and private subnet. And we will create bastion machine, Application Load Balancer with Web server, a backend machine inside the private subnet, a RDS server and also a S3 bucket.
Looks complicated, but it is designed to be a very wide usage sample for most general scenario.
For this workshop, we support 3 different region:
- N. Viginia(us-east-1)
- N. California(us-west-1)
- Tokyo(ap-northeast-1)
- Sydney(ap-southeast-2)
- Frankfurt(eu-central-1)
- London(eu-west-2)
Switch Region on the AWS console, a drag down menu near right-up corner. For example, we pick N. Viginia(us-east-1) for our lab practice.
- Start up a AWS Cloud9 and install mysql.
- To set up AWS Cloud9 go to the AWS console, in the top right click Services and search/click Cloud9.
- Click Create Environment.
- Give it this environment a name and change nothing else.
- Install mysql on this AWS Cloud9 by typing
sudo yum install mysqlin the terminal at the bottom portion of the screen.
- Check if you already have a EC2 Key pair in your selected region.
- If not, create one through AWS Console > EC2 > Key Pairs > Create Key Pair.
- Remember to download the private key(.pem) and well saved.
- We will copy this PEM file into our AWS Cloud9 IDE created in step 1. In your AWS Cloud9 IDE top menu bar go to
File > Upload Local Files... - Once uploaded, in the AWS Cloud9 IDE console (bottom) find this PEM file and run
chmod 0400 XXXXX.pem
- Create cloudformation stack: AWS Console > Cloudformation > Create Stack > from S3 template > https://s3-ap-northeast-1.amazonaws.com/workshop-data-public/cloudformation-workshop-20180731-vpc-bastion-rds.cfn.yml
- For the stack configuration:
- Stack Name: Whatever you want to name
- Environment: dev
- Availability Zone 1: Pick 1 AZ
- Availability Zone 2: Pick a different AZ
- EC2 Key Pair: Select the Key Pair Name you setup in Step 2.
- DB Engine: mySql
- DB User/DB Password/DB Name: Please remember what you input. Your password must contain letters AND numbers
- Wait till the stack creation ready, the status will change to
CREATE_COMPLETE
- Check your VPC
- Check the CloudFormation Stack, there will be a nested stack name as "VPC"
- You can find a new VPC is created
- You will find different subnet, with different property and setting.
- You will find public subnet and private subnet.
- For example:
<YOUR STACK NAME>-PrivateSubnet1
- Find your Bastion
- Check the CloudFormation Stack, there will be a nested stack name as "bastion"
- Inside your VPC created in Step 4, there is new EC2 in public subnet.
- You can try to remote into that instance from the AWS Cloud9's terminal we created in step 1.
- use SSH
ssh -i XXXX.pem ec2-user@YOUR_BASTION_IP
- Find your RDS
- Check the CloudFormation Stack, there will be a nested stack name as "rds"
- Did you remember the account and password you set in the cloudformation?
- try to login into your database with following command
- Install mysql on this Bastion by typing
sudo yum install mysqlin the terminal at the bottom portion of the screen. mysql -h <RDS ENDPOINT> -P 3306 -u DBUSER -p
- Try to create a web server and backend server
- Create cloudformation stack: AWS Console > Cloudformation > Create Stack > from S3 template > https://s3-ap-southeast-1.amazonaws.com/workshop-data-public-2019/AWSWorkshop-20180731-VPC-EC2-S3-RDS/cloudformation-workshop-20190116-alb-ec2.cfn.yml
- For the stack configuration:
- Stack Name: Whatever you want to name, suggest we have "EC2" within the Name
- Key Name: Pick the same name from Step 2.
- VPC: Pick the new VPC we created at Step 3.
- SSHAllowCIDR: Follow the VPC CIDR
- Public Subnet 1: Pick one subnet with "public" in name
- Public Subnet 2: Pick another one with "public" in name
- Private Subnet: Pick one subnet with "private" in name
- Wait till the stack creation ready, the status will change to
CREATE_COMPLETE
- Check your web service stack
- You will find an Application Load Balancer, A web server and a backend server, and also a S3 bucket.
- In this practice, you can see how to create resource for our basic practice. You can try to understand how we design the network topology, how we devide AZ and subnet.
- Also, we talked about the security group.
- By default, all the network routing rule has been pre-defined, you don't need to do anything.
- In this empty stack, you can see what we showed in the first diagram.
- Go to Cloudformation, select you stack from step 3 and delete it by selecting > Actions > Delete Stack.
- Remember to delete the main stack for the first CloudFormation template we ran (description is VPC + Bastion + EC2 + Database)
- Delete the Web Server and Backend Server CloudFormation stack from step 7.


