
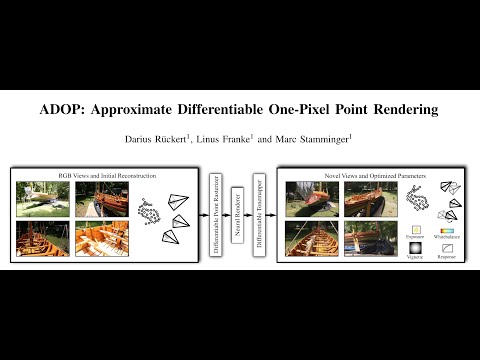
Abstract: We present a novel point-based, differentiable neural rendering pipeline for scene refinement and novel view synthesis. The input are an initial estimate of the point cloud and the camera parameters. The output are synthesized images from arbitrary camera poses. The point cloud rendering is performed by a differentiable renderer using multi-resolution one-pixel point rasterization. Spatial gradients of the discrete rasterization are approximated by the novel concept of ghost geometry. After rendering, the neural image pyramid is passed through a deep neural network for shading calculations and hole-filling. A differentiable, physically-based tonemapper then converts the intermediate output to the target image. Since all stages of the pipeline are differentiable, we optimize all of the scene's parameters i.e. camera model, camera pose, point position, point color, environment map, rendering network weights, vignetting, camera response function, per image exposure, and per image white balance. We show that our system is able to synthesize sharper and more consistent novel views than existing approaches because the initial reconstruction is refined during training. The efficient one-pixel point rasterization allows us to use arbitrary camera models and display scenes with well over 100M points in real time.
- The source code will be published after the paper has been accepted to a conference.
- ADOP is implemented in C++/CUDA using libTorch.
- A python wrapper for pyTorch is currently not available. Feel free to submit a pull-request on that issue.
- The detailed compile instructions can be found here: src/README.md
After a successful compilation, the best way to get started is to run adop_viewer on the tanks and temples scenes using our pretrained models.
First, download the scenes and extract them into ADOP/scenes.
Now, download the model checkpoints and extract them into ADOP/experiments.
Your folder structure should look like this:
ADOP/
    build/
        ...
    scenes/
        tt_train/
        tt_playground/
        ...
    experiments/
        2021-10-15_08:26:49_multi_scene/
...The adop_viewer can now be run by passing a scene and the experiment directory.
For example:
cd ADOP
./build/bin/adop_viewer scenes/tt_playground experiments/- The working dir of
adop_viewermust be the ADOP root directory. - Pass the parent experiment directory and not a specific experiment. You can switch between experiments inside the viewer.
- The most important keyboard shortcuts are:
- F1: Switch to 3DView
- F2: Switch to neural view
- F3: Switch to split view (default)
- WASD: Move camera
- Center Mouse + Drag: Rotate around camera center
- Left Mouse + Drag: Rotate around world center
- Right click in 3DView: Select camera
- Q: Move camera to selected camera


- ADOP uses a simple, text-based scene description format.
- To run ADOP on your scenes you have to convert them into this format.
- After that you run adop_scene_preprocess to precompute various parameters.
- If you have created your scene with COLMAP (like us) you can use the colmap2adop converter.
- More infos on this topic can be found here: scenes/README.md

