


This tutorial uses introduces the use of the MQTT protocol across IoT devices connecting to FIWARE. The UltraLight 2.0 IoT Agent created in the previous tutorial is reconfigured to communicate with a set of dummy IoT devices using MQTT via a Mosquitto message broker
The tutorial uses cUrl commands throughout, but is also available as Postman documentation

- このチュートリアルは日本語でもご覧いただけます。
- What is MQTT?
- Architecture
- Prerequisites
- Start Up
- Provisioning an IoT Agent (UltraLight over MQTT)
- Next Steps
"With the technology at our disposal, the possibilities are unbounded. All we need to do is make sure we keep talking."
— Stephen Hawking
MQTT is a publish-subscribe-based messaging protocol used in the internet of Things. It works on top of the TCP/IP protocol, and is designed for connections with remote locations where a "small code footprint" is required or the network bandwidth is limited. The goal is to provide a protocol, which is bandwidth-efficient and uses little battery power.
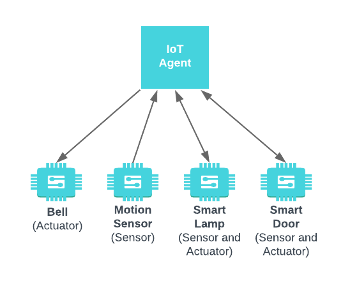
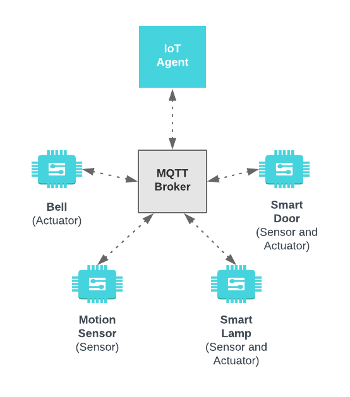
The previous tutorial used HTTP as its transport mechanism between the devices and the IoT Agent. HTTP uses a request/response paradigm where each device connects directly to the IoT Agent. MQTT is different in that publish-subscribe is event-driven and pushes messages to clients. It requires an additional central communication point (known as the MQTT broker) which it is in charge of dispatching all messages between the senders and the rightful receivers. Each client that publishes a message to the broker, includes a topic into the message. The topic is the routing information for the broker. Each client that wants to receive messages subscribes to a certain topic and the broker delivers all messages with the matching topic to the client. Therefore the clients don’t have to know each other, they only communicate over the topic. This architecture enables highly scalable solutions without dependencies between the data producers and the data consumers.
A summary of the differences between the two transport protocols can be seen below:
| HTTP Transport | MQTT Transport |
|---|---|
 |
 |
| IoT Agent communicates with IoT devices directly | IoT Agent communicates with IoT devices indirectly via an MQTT Broker |
| Request-Response Paradigm | Publish-Subscribe Paradigm |
| IoT Devices must always be ready to receive communication | IoT Devices choose when to receive communication |
| Higher Power Requirement | Low Power Requirement |
The UltraLight 2.0 IoT Agent will only send or interpret messages using the UltraLight 2.0 syntax, however it can be used to send and receive messages over multiple transport mechanisms. Therefore we are able to use the same FIWARE generic enabler to connect to a wider range of IoT devices.
Mosquitto is a readily available, open source MQTT broker which will be used during this tutorial. It is available licensed under EPL/EDL. More information can be found at https://mosquitto.org/
For the purpose of this tutorial, a series of dummy IoT devices have been
created, which will be attached to the context broker. Details of the
architecture and protocol used can be found in the
IoT Sensors tutorial The
state of each device can be seen on the UltraLight device monitor web page found
at: http://localhost:3000/device/monitor
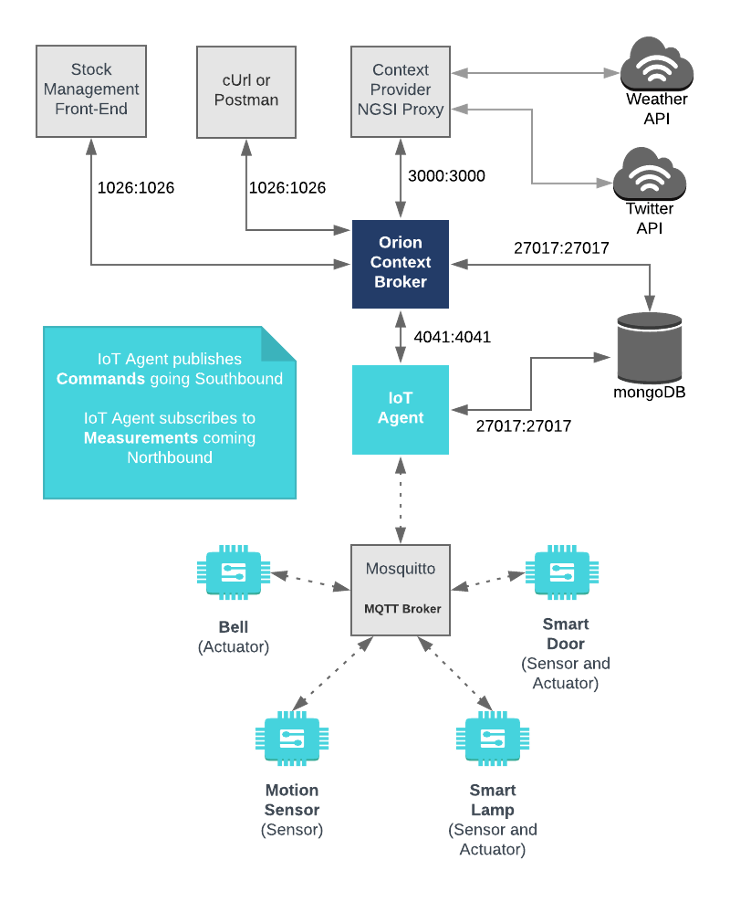
This application builds on the components created in previous tutorials. It will make use of two FIWARE components - the Orion Context Broker and the IoT Agent for UltraLight 2.0. Usage of the Orion Context Broker is sufficient for an application to qualify as “Powered by FIWARE”. Both the Orion Context Broker and the IoT Agent rely on open source MongoDB technology to keep persistence of the information they hold. We will also be using the dummy IoT devices created in the previous tutorial Additionally we will add an instance of the Mosquitto MQTT broker which is open source and available under the EPL/EDL.
Therefore the overall architecture will consist of the following elements:
- The FIWARE Orion Context Broker which will receive requests using NGSI
- The FIWARE
IoT Agent for UltraLight 2.0
which will:
- receive southbound requests using NGSI and convert them to UltraLight 2.0 MQTT topics for the MQTT Broker
- listen to the MQTT Broker on registered topics to send measurements northbound
- The Mosquitto MQTT Broker which acts as a central communication point, passing MQTT topics between the IoT Agent and IoT devices as necessary.
- The underlying MongoDB database :
- Used by the Orion Context Broker to hold context data information such as data entities, subscriptions and registrations
- Used by the IoT Agent to hold device information such as device URLs and Keys
- A webserver acting as set of dummy IoT devices using the UltraLight 2.0 protocol running over MQTT.
- The Context Provider NGSI proxy is not used in this tutorial. It does the following:
- The Stock Management Frontend is not used in this tutorial will it does
the following:
- Display store information
- Show which products can be bought at each store
- Allow users to "buy" products and reduce the stock count.
Since all interactions between the elements are initiated by HTTP or MQTT requests over TCP, the entities can be containerized and run from exposed ports.
The necessary configuration information for wiring up the Mosquitto MQTT Broker,
the IoT devices and the IoT Agent can be seen in the services section of the
associated docker-compose.yml file:
mosquitto:
    image: eclipse-mosquitto
    hostname: mosquitto
    container_name: mosquitto
    networks:
        - default
    expose:
        - "1883"
        - "9001"
    ports:
        - "1883:1883"
        - "9001:9001"
    volumes:
        - ./mosquitto/mosquitto.conf:/mosquitto/config/mosquitto.conf
The mosquitto container is listening on two ports:
- Port
1883is exposed so we can post MQTT topics - Port
9001is the standard port for HTTP/Websocket communications
The attached volume is a configuration file used to increase the debug level of the MQTT Message Broker.
tutorial:
    image: fiware/tutorials.context-provider
    hostname: iot-sensors
    container_name: fiware-tutorial
    networks:
        - default
    expose:
        - "3000"
        - "3001"
    ports:
        - "3000:3000"
        - "3001:3001"
    environment:
        - "DEBUG=tutorial:*"
        - "WEB_APP_PORT=3000"
        - "DUMMY_DEVICES_PORT=3001"
        - "DUMMY_DEVICES_API_KEY=4jggokgpepnvsb2uv4s40d59ov"
        - "DUMMY_DEVICES_TRANSPORT=MQTT"
The tutorial container is listening on two ports:
- Port
3000is exposed so we can see the web page displaying the Dummy IoT devices. - Port
3001is exposed purely for tutorial access - so that cUrl or Postman can make UltraLight commands without being part of the same network.
The tutorial container is driven by environment variables as shown:
| Key | Value | Description |
|---|---|---|
| DEBUG | tutorial:* |
Debug flag used for logging |
| WEB_APP_PORT | 3000 |
Port used by web-app which displays the dummy device data |
| DUMMY_DEVICES_PORT | 3001 |
Port used by the dummy IoT devices to receive commands |
| DUMMY_DEVICES_API_KEY | 4jggokgpepnvsb2uv4s40d59ov |
Random security key used for UltraLight interactions - used to ensure the integrity of interactions between the devices and the IoT Agent |
| DUMMY_DEVICES_TRANSPORT | MQTT |
The transport protocol used by the dummy IoT devices |
The other tutorial container configuration values described in the YAML file
are not used in this tutorial.
The
IoT Agent for UltraLight 2.0
can be instantiated within a Docker container. An official Docker image is
available from Docker Hub tagged
fiware/iotagent-ul. The necessary configuration can be seen below:
iot-agent:
    image: fiware/iotagent-ul:latest
    hostname: iot-agent
    container_name: fiware-iot-agent
    depends_on:
        - mongo-db
    networks:
        - default
    expose:
        - "4041"
    ports:
        - "4041:4041"
    environment:
        - "IOTA_CB_HOST=orion"
        - "IOTA_CB_PORT=1026"
        - "IOTA_NORTH_PORT=4041"
        - "IOTA_REGISTRY_TYPE=mongodb"
        - "IOTA_LOG_LEVEL=DEBUG"
        - "IOTA_TIMESTAMP=true"
        - "IOTA_MONGO_HOST=mongo-db"
        - "IOTA_MONGO_PORT=27017"
        - "IOTA_MONGO_DB=iotagentul"
        - "IOTA_PROVIDER_URL=http://iot-agent:4041"
        - "IOTA_MQTT_HOST=mosquitto"
        - "IOTA_MQTT_PORT=1883"
The iot-agent container relies on the presence of the Orion Context Broker and
uses a MongoDB database to hold device information such as device URLs and Keys.
The container is listening on a single port:
- Port
4041is exposed purely for tutorial access - so that cUrl or Postman can make provisioning commands without being part of the same network.
The iot-agent container is driven by environment variables as shown:
| Key | Value | Description |
|---|---|---|
| IOTA_CB_HOST | orion |
Hostname of the context broker to update context |
| IOTA_CB_PORT | 1026 |
Port that context broker listens on to update context |
| IOTA_NORTH_PORT | 4041 |
Port used for Configuring the IoT Agent and receiving context updates from the context broker |
| IOTA_REGISTRY_TYPE | mongodb |
Whether to hold IoT device info in memory or in a database |
| IOTA_LOG_LEVEL | DEBUG |
The log level of the IoT Agent |
| IOTA_TIMESTAMP | true |
Whether to supply timestamp information with each measurement received from attached devices |
| IOTA_MONGO_HOST | context-db |
The hostname of mongoDB - used for holding device information |
| IOTA_MONGO_PORT | 27017 |
The port mongoDB is listening on |
| IOTA_MONGO_DB | iotagentul |
The name of the database used in mongoDB |
| IOTA_PROVIDER_URL | http://iot-agent:4041 |
URL passed to the Context Broker when commands are registered, used as a forwarding URL location when the Context Broker issues a command to a device |
| IOTA_MQTT_HOST | mosquitto |
The hostname of the MQTT Broker |
| IOTA_MQTT_PORT | 1883 |
The port the MQTT Broker is listening on to receive topics |
As you can see, use of the MQTT transport is driven by only two environment
variables IOTA_MQTT_HOST and IOTA_MQTT_PORT
To keep things simple all components will be run using Docker. Docker is a container technology which allows to different components isolated into their respective environments.
- To install Docker on Windows follow the instructions here
- To install Docker on Mac follow the instructions here
- To install Docker on Linux follow the instructions here
Docker Compose is a tool for defining and running multi-container Docker applications. A YAML file is used configure the required services for the application. This means all container services can be brought up in a single command. Docker Compose is installed by default as part of Docker for Windows and Docker for Mac, however Linux users will need to follow the instructions found here
You can check your current Docker and Docker Compose versions using the following commands:
docker-compose -v
docker version
Please ensure that you are using Docker version 18.03 or higher and Docker Compose 1.21 or higher and upgrade if necessary.
We will start up our services using a simple Bash script. Windows users should download cygwin to provide a command-line functionality similar to a Linux distribution on Windows.
Before you start you should ensure that you have obtained or built the necessary Docker images locally. Please clone the repository and create the necessary images by running the commands as shown:
git clone [email protected]:Fiware/tutorials.IoT-over-MQTT.git
cd tutorials.IoT-over-MQTT

./services create
Thereafter, all services can be initialized from the command-line by running the services Bash script provided within the repository:
./services startℹ️ Note: If you want to clean up and start over again you can do so with the following command:
./services stop
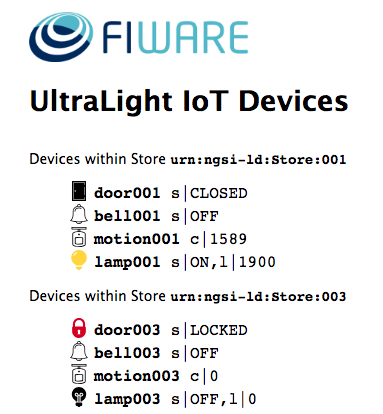
To follow the tutorial correctly please ensure you have the device monitor page available in your browser and click on the page to enable audio before you enter any cUrl commands. The device monitor displays the current state of an array of dummy devices using Ultralight 2.0 syntax
The device monitor can be found at: http://localhost:3000/device/monitor
We will start by mimicking the roles of both the IoT Agent and a dummy IoT device and send and receive some messages using MQTT. This section of the tutorial requires several open terminals.
Eventually once we have wired by the system correctly, IoT Agent will subscribe to all relevant events to listen for northbound traffic in the form of sensor measurements. It therefore will need to make a subscription across all topics. Similarly an actuator must subscribe to a single topic to receive events which effect itself when commands are sent southbound. To check that the lines of communication are open, we can subscribe to a given topic, and see that we are able to receive something when a message is published.
Open a new terminal, and create a new running mqtt-subscriber Docker
container as follows:
docker run -it --rm --name mqtt-subscriber \
  --network fiware_default efrecon/mqtt-client sub -h mosquitto -t "/#"
The terminal will then be ready to receive events
A sensor sending northbound measurements will publish to those measurements to the MQTT Broker to be passed on to any subscriber than wants them. The sensor will not need to make a connection to the subscriber directly.
Open a new terminal, and run a mqtt-publisher Docker container to send a
message as follows:
docker run -it --rm --name mqtt-publisher \
--network fiware_default efrecon/mqtt-client pub -h mosquitto -m "HELLO WORLD" -t "/test"If the MQTT Broker is functioning correctly, the message should be received in the other terminal
HELLO WORLD
To terminate the MQTT subscriber, run the following Docker command:
docker stop mqtt-subscriberTo show that the communication occurred via the MQTT Broker, we can inspect
the log of the mosquitto Docker container as shown:
docker logs --tail 10 mosquitto1529661883: New client connected from 172.18.0.5 as mqttjs_8761e518 (c1, k0).
1529662472: New connection from 172.18.0.7 on port 1883.
1529662472: New client connected from 172.18.0.7 as mosqpub|1-5637527c63c1 (c1, k60).
1529662472: Client mosqpub|1-5637527c63c1 disconnected.
1529662614: New connection from 172.18.0.7 on port 1883.
1529662614: New client connected from 172.18.0.7 as mosqsub|1-64b27d675f58 (c1, k60).
1529662623: New connection from 172.18.0.8 on port 1883.
1529662623: New client connected from 172.18.0.8 as mosqpub|1-ef03e74b0270 (c1, k60).
1529662623: Client mosqpub|1-ef03e74b0270 disconnected.
1529667841: Socket error on client mosqsub|1-64b27d675f58, disconnecting.
You can check if the IoT Agent is running by making an HTTP request to the exposed port:
curl -X GET \
  'http://localhost:4041/iot/about'
The response will look similar to the following:
{
    "libVersion": "2.6.0-next",
    "port": "4041",
    "baseRoot": "/",
    "version": "1.6.0-next"
}
What if I get a
Failed to connect to localhost port 4041: Connection refusedResponse?If you get a
Connection refusedresponse, the IoT Agent cannot be found where expected for this tutorial - you will need to substitute the URL and port in each cUrl command with the corrected IP address. All the cUrl commands tutorial assume that the IoT Agent is available onlocalhost:4041.Try the following remedies:
- To check that the docker containers are running try the following:
docker psYou should see four containers running. If the IoT Agent is not running, you can restart the containers as necessary. This command will also display open port information.
- If you have installed
docker-machineand Virtual Box, the context broker, IoT Agent and Dummy Device docker containers may be running from another IP address - you will need to retrieve the virtual host IP as shown:curl -X GET \ 'http://$(docker-machine ip default):4041/version'Alternatively run all your curl commands from within the container network:
docker run --network fiware_default --rm appropriate/curl -s \
 -X GET 'http://iot-agent:4041/iot/about'
The IoT Agent acts as a middleware between the IoT devices and the context
broker. It therefore needs to be able to create context data entities with
unique IDs. Once a service has been provisioned and an unknown device makes a
measurement the IoT Agent add this to the context using the supplied
<device-id> (unless the device is recognized and can be mapped to a known ID.
There is no guarantee that every supplied IoT device <device-id> will always
be unique, therefore all provisioning requests to the IoT Agent require two
mandatory headers:
fiware-serviceheader is defined so that entities for a given service can be held in a separate mongoDB database.fiware-servicepathcan be used to differentiate between arrays of devices.
For example within a smart city application you would expect different
fiware-service headers for different departments (e.g. parks, transport,
refuse collection etc.) and each fiware-servicepath would refer to specific
park and so on. This would mean that data and devices for each service can be
identified and separated as needed, but the data would not be siloed - for
example data from a Smart Bin within a park can be combined with the GPS
Unit of a refuse truck to alter the route of the truck in an efficient manner.
The Smart Bin and GPS Unit are likely to come from different
manufacturers and it cannot be guaranteed that there is no overlap within
<device-id>s used. The use of the fiware-service and fiware-servicepath
headers can ensure that this is always the case, and allows the context broker
to identify the original source of the context data.
Invoking group provision is always the first step in connecting devices. For MQTT communication, provisioning supplies the authentication key so the IoT Agent will know which topic it must subscribe to.
It is possible to set up default commands and attributes for all devices as well, but this is not done within this tutorial as we will be provisioning each device separately.
This example provisions an anonymous group of devices. It tells the IoT Agent
that a series of devices will be communicating by sending messages to the
/4jggokgpepnvsb2uv4s40d59ov topic
The resource attribute is left blank since HTTP communication is not being
used. The URL location of cbroker is an optional attribute - if it is not
provided, the IoT Agent uses the default context broker URL as defined in the
configuration file, however it has been added here for completeness.
curl -iX POST \
  'http://localhost:4041/iot/services' \
  -H 'Content-Type: application/json' \
  -H 'fiware-service: openiot' \
  -H 'fiware-servicepath: /' \
  -d '{
 "services": [
   {
     "apikey":      "4jggokgpepnvsb2uv4s40d59ov",
     "cbroker":     "http://orion:1026",
     "entity_type": "Thing",
     "resource":    ""
   }
 ]
}'It is common good practice to use URNs following the NGSI-LD draft recommendation when creating entities. Furthermore it is easier to understand meaningful names when defining data attributes. These mappings can be defined by provisioning a device individually.
Three types of measurement attributes can be provisioned:
attributesare active readings from the devicelazyattributes are only sent on request - The IoT Agent will inform the device to return the measurementstatic_attributesare as the name suggests static data about the device (such as relationships) passed on to the context broker.
Note: in the case where individual
ids are not required, or aggregated data is sufficient theattributescan be defined within the provisioning service rather than individually.
curl -iX POST \
  'http://localhost:4041/iot/devices' \
  -H 'Content-Type: application/json' \
  -H 'fiware-service: openiot' \
  -H 'fiware-servicepath: /' \
  -d '{
 "devices": [
   {
     "device_id":   "motion001",
     "entity_name": "urn:ngsd-ld:Motion:001",
     "entity_type": "Motion",
     "protocol":    "PDI-IoTA-UltraLight",
     "transport":   "MQTT",
     "timezone":    "Europe/Berlin",
     "attributes": [
       { "object_id": "c", "name": "count", "type": "Integer" }
     ],
     "static_attributes": [
       { "name":"refStore", "type": "Relationship", "value": "urn:ngsi-ld:Store:001"}
     ]
   }
 ]
}
'
In the request we are associating the device motion001 with the URN
urn:ngsd-ld:Motion:001 and mapping the device reading c with the context
attribute count (which is defined as an Integer) A refStore is defined as
a static_attribute, placing the device within Store
urn:ngsi-ld:Store:001.
The addition of the transport=MQTT attribute in the body of the request is
sufficient to tell the IoT Agent that it should subscribe to the
/<api-key>/<device-id> topic to receive measurements.
You can simulate a dummy IoT device measurement coming from the Motion
Sensor device motion001, by posting an MQTT message to the following
topic
docker run -it --rm --name mqtt-publisher --network \
  fiware_default efrecon/mqtt-client pub -h mosquitto -m "c|1" \
-t "/4jggokgpepnvsb2uv4s40d59ov/motion001/attrs"- The value of the
-mparameter defines the message. This is in UltraLight syntax. - The value of the
-tparameter defines the topic.
The topic must be in the following form:
/<api-key>/<device-id>/attrs
Note In the previous tutorial, when testing HTTP connectivity between the Motion Sensor and an IoT Agent, a similar dummy HTTP request was sent to update the
countvalue. This time the IoT Agent is configured to listen to MQTT topics, and we need to post a dummy message to an MQTT topic.
When running using the MQTT transport protocol, the IoT Agent is subscribing to the MQTT topics and the device monitor will be configured to display all MQTT messages sent to each topic - effectively it is showing the list messages received and sent by Mosquitto.
With the IoT Agent connected via MQTT, the service group has defined the topic which the agent is subscribed to. Since the api-key matches the root of the topic, the MQTT message from the Motion Sensor is passed to the IoT Agent which has previously subscribed.
Because we have specifically provisioned the device (motion001) - the IoT
Agent is able to map attributes before raising a request with the Orion Context
Broker.
You can see that a measurement has been recorded, by retrieving the entity data
from the context broker. Don't forget to add the fiware-service and
fiware-service-path headers.
curl -X GET \
  'http://localhost:1026/v2/entities/urn:ngsd-ld:Motion:001?type=Motion' \
  -H 'fiware-service: openiot' \
-H 'fiware-servicepath: /'{
"id": "urn:ngsd-ld:Motion:001",
"type": "Motion",
"TimeInstant": {
"type": "ISO8601",
"value": "2018-05-25T10:51:32.00Z",
"metadata": {}
},
"count": {
"type": "Integer",
"value": "1",
"metadata": {
"TimeInstant": {
"type": "ISO8601",
"value": "2018-05-25T10:51:32.646Z"
}
}
}
}The response shows that the Motion Sensor device with id=motion001 has
been successfully identified by the IoT Agent and mapped to the entity
id=urn:ngsd-ld:Motion:001. This new entity has been created within the context
data. The c attribute from the dummy device measurement request has been
mapped to the more meaningful count attribute within the context. As you will
notice, a TimeInstant attribute has been added to both the entity and the
metadata of the attribute - this represents the last time the entity and
attribute have been updated, and is automatically added to each new entity
because the IOTA_TIMESTAMP environment variable was set when the IoT Agent was
started up.
Provisioning an actuator is similar to provisioning a sensor. The
transport=MQTT attribute defines the communications protocol to be used. For
MQTT communications, the endpoint attribute is not required as there is no
HTTP URL where the device is listening for commands. The array of commands is
mapped to directly to messages sent to the /<api-key>/<device-id>/cmd
topic The commands array includes a list of each command that can be
invoked.
The example below provisions a bell with the deviceId=bell001.
curl -iX POST \
  'http://localhost:4041/iot/devices' \
  -H 'Content-Type: application/json' \
  -H 'fiware-service: openiot' \
  -H 'fiware-servicepath: /' \
  -d '{
  "devices": [
    {
      "device_id": "bell001",
      "entity_name": "urn:ngsi-ld:Bell:001",
      "entity_type": "Bell",
      "protocol": "PDI-IoTA-UltraLight",
      "transport": "MQTT",
      "commands": [
        { "name": "ring", "type": "command" }
       ],
       "static_attributes": [
         {"name":"refStore", "type": "Relationship","value": "urn:ngsi-ld:Store:001"}
      ]
    }
  ]
}
'
Before we wire-up the context broker, we can test that a command can be sent
from the IoT Agent to a device by making a REST request directly to the IoT
Agent's North Port using the /v1/updateContext endpoint. It is this endpoint
that will eventually be invoked by the context broker once we have connected it
up. To test the configuration you can run the command directly as shown:
curl -iX POST \
  'http://localhost:4041/v1/updateContext' \
  -H 'Content-Type: application/json' \
  -H 'fiware-service: openiot' \
  -H 'fiware-servicepath: /' \
  -d '{
    "contextElements": [
        {
            "type": "Bell",
            "isPattern": "false",
            "id": "urn:ngsi-ld:Bell:001",
            "attributes": [
                { "name": "ring", "type": "command", "value": "" }
            ],
            "static_attributes": [
               {"name":"refStore", "type": "Relationship","value": "urn:ngsi-ld:Store:001"}
            ]
        }
    ],
    "updateAction": "UPDATE"
}'{
"contextResponses": [
{
"contextElement": {
"attributes": [
{
"name": "ring",
"type": "command",
"value": ""
}
],
"id": "urn:ngsi-ld:Bell:001",
"isPattern": false,
"type": "Bell"
},
"statusCode": {
"code": 200,
"reasonPhrase": "OK"
}
}
]
}If you are viewing the device monitor page, you can also see the state of the bell change.
The result of the command to ring the bell can be read by querying the entity within the Orion Context Broker.
curl -X GET \
  'http://localhost:1026/v2/entities/urn:ngsi-ld:Bell:001?type=Bell&options=keyValues' \
  -H 'fiware-service: openiot' \
-H 'fiware-servicepath: /'{
"id": "urn:ngsi-ld:Bell:001",
"type": "Bell",
"TimeInstant": "2018-05-25T20:06:28.00Z",
"refStore": "urn:ngsi-ld:Store:001",
"ring_info": " ring OK",
"ring_status": "OK",
"ring": ""
}The TimeInstant shows last the time any command associated with the entity has
been invoked. The result of ring command can be seen in the value of the
ring_info attribute.
Provisioning a device which offers both commands and measurements is merely a
matter of making an HTTP POST request with both attributes and command
attributes in the body of the request. Once again the transport=MQTT attribute
defines the communications protocol to be used, and no endpoint attribute is
required as there is no HTTP URL where the device is listening for commands.
curl -iX POST \
  'http://localhost:4041/iot/devices' \
  -H 'Content-Type: application/json' \
  -H 'fiware-service: openiot' \
  -H 'fiware-servicepath: /' \
  -d '{
  "devices": [
    {
      "device_id": "door001",
      "entity_name": "urn:ngsi-ld:Door:001",
      "entity_type": "Door",
      "protocol": "PDI-IoTA-UltraLight",
      "transport": "MQTT",
      "commands": [
        {"name": "unlock","type": "command"},
        {"name": "open","type": "command"},
        {"name": "close","type": "command"},
        {"name": "lock","type": "command"}
       ],
       "attributes": [
        {"object_id": "s", "name": "state", "type":"Text"}
       ],
       "static_attributes": [
         {"name":"refStore", "type": "Relationship","value": "urn:ngsi-ld:Store:001"}
       ]
    }
  ]
}
'Similarly, a Smart Lamp with two commands (on and off) and two
attributes can be provisioned as follows:
curl -iX POST \
  'http://localhost:4041/iot/devices' \
  -H 'Content-Type: application/json' \
  -H 'fiware-service: openiot' \
  -H 'fiware-servicepath: /' \
  -d '{
  "devices": [
    {
      "device_id": "lamp001",
      "entity_name": "urn:ngsi-ld:Lamp:001",
      "entity_type": "Lamp",
      "protocol": "PDI-IoTA-UltraLight",
      "transport": "MQTT",
      "commands": [
        {"name": "on","type": "command"},
        {"name": "off","type": "command"}
       ],
       "attributes": [
        {"object_id": "s", "name": "state", "type":"Text"},
        {"object_id": "l", "name": "luminosity", "type":"Integer"}
       ],
       "static_attributes": [
         {"name":"refStore", "type": "Relationship","value": "urn:ngsi-ld:Store:001"}
      ]
    }
  ]
}
'
The full list of provisioned devices can be obtained by making a GET request to
the /iot/devices endpoint.
curl -X GET \
  'http://localhost:4041/iot/devices' \
  -H 'fiware-service: openiot' \
-H 'fiware-servicepath: /'Having connected up the IoT Agent to the IoT devices, we now need to inform the Orion Context Broker that the commands are available. In other words we need to register the IoT Agent as a Context Provider for the command attributes.
Once the commands have been registered it will be possible to ring the Bell, open and close the Smart Door and switch the Smart Lamp on and off by sending requests to the Orion Context Broker, rather than sending UltraLight 2.0 requests directly the IoT devices as we did in the previous tutorial
All the communications leaving and arriving at the North port of the IoT Agent use the standard NGSI syntax. The transport protocol used between the IoT devices and the IoT Agent is irrelevant to this layer of communication. Effectively the IoT Agent is offering a simplified facade pattern of well-known endpoints to actuate any device.
Therefore this section of registering and invoking commands duplicates the instructions found in the previous tutorial
The Bell entity has been mapped to id="urn:ngsi-ld:Bell:001" with an
entity type="Bell". To register the command we need to inform Orion that the
URL http://orion:1026/v1 is able to provide the missing ring attribute. This
will then be forwarded on to the IoT Agent. As you see this is an NGSI v1
endpoint and therefore the legacyForwarding attribute must also be set.
curl -iX POST \
  'http://localhost:1026/v2/registrations' \
  -H 'Content-Type: application/json' \
  -H 'fiware-service: openiot' \
  -H 'fiware-servicepath: /' \
  -d '{
  "description": "Bell Commands",
  "dataProvided": {
    "entities": [
      {
        "id": "urn:ngsi-ld:Bell:001", "type": "Bell"
      }
    ],
    "attrs": ["ring"]
  },
  "provider": {
    "http": {"url": "http://orion:1026/v1"},
    "legacyForwarding": true
  }
}'To invoke the ring command, the ring attribute must be updated in the
context.
curl -iX PATCH \
  'http://localhost:1026/v2/entities/urn:ngsi-ld:Bell:001/attrs' \
  -H 'Content-Type: application/json' \
  -H 'fiware-service: openiot' \
  -H 'fiware-servicepath: /' \
  -d '{
  "ring": {
      "type" : "command",
      "value" : ""
  }
}'
If you are viewing the device monitor page, you can also see the state of the bell change.
The Smart Door entity has been mapped to id="urn:ngsi-ld:Door:001" with an
entity type="Door". To register the commands we need to inform Orion that the
URL http://orion:1026/v1 is able to provide the missing attributes. This will
then be forwarded on to the IoT Agent. As you see this is an NGSI v1 endpoint
and therefore the legacyForwarding attribute must also be set.
curl -iX POST \
  'http://localhost:1026/v2/registrations' \
  -H 'Content-Type: application/json' \
  -H 'fiware-service: openiot' \
  -H 'fiware-servicepath: /' \
  -d '{
  "description": "Door Commands",
  "dataProvided": {
    "entities": [
      {
        "id": "urn:ngsi-ld:Door:001", "type": "Door"
      }
    ],
    "attrs": [ "lock", "unlock", "open", "close"]
  },
  "provider": {
    "http": {"url": "http://orion:1026/v1"},
    "legacyForwarding": true
  }
}'To invoke the open command, the open attribute must be updated in the
context.
curl -iX PATCH \
  'http://localhost:1026/v2/entities/urn:ngsi-ld:Lamp:001/attrs' \
  -H 'Content-Type: application/json' \
  -H 'fiware-service: openiot' \
  -H 'fiware-servicepath: /' \
  -d '{
  "open": {
      "type" : "command",
      "value" : ""
  }
}'The Smart Lamp entity has been mapped to id="urn:ngsi-ld:Lamp:001" with an
entity type="Lamp". To register the commands we need to inform Orion that the
URL http://orion:1026/v1 is able to provide the missing attributes. This will
then be forwarded on to the IoT Agent. As you see this is an NGSI v1 endpoint
and therefore the legacyForwarding attribute must also be set.
curl -iX POST \
  'http://localhost:1026/v2/registrations' \
  -H 'Content-Type: application/json' \
  -H 'fiware-service: openiot' \
  -H 'fiware-servicepath: /' \
  -d '{
  "description": "Lamp Commands",
  "dataProvided": {
    "entities": [
      {
        "id": "urn:ngsi-ld:Lamp:001","type": "Lamp"
      }
    ],
    "attrs": [ "on", "off" ]
  },
  "provider": {
    "http": {"url": "http://orion:1026/v1"},
    "legacyForwarding": true
  }
}'To switch on the Smart Lamp, the on attribute must be updated in the
context.
curl -iX PATCH \
  'http://localhost:1026/v2/entities/urn:ngsi-ld:Lamp:001/attrs' \
  -H 'Content-Type: application/json' \
  -H 'fiware-service: openiot' \
  -H 'fiware-servicepath: /' \
  -d '{
  "on": {
      "type" : "command",
      "value" : ""
  }
}'Want to learn how to add more complexity to your application by adding advanced features? You can find out by reading the other tutorials in this series
MIT © FIWARE Foundation e.V.


