Augmented Reality suits the furniture/interior business perfectly. It is also a fine tool for personalization of customer needs, especially when it comes to furniture/interior. Shoppers really want the ability to see how the items will look at their homes or offices. People want to see virtual interior design ideas in real time, and AR provides them with such ability.
This code pattern will enable developers to build powerful Augmented Reality applications for Android devices, with the help of Google ARCore SDK and IBM Mobile Foundation. To make the interior decorator application more immersive to the user, we will make use of open source 3D poly objects. In order to store all the product information, we will use IBM Cloudant database, which is a fully managed JSON document database that offers independent serverless scaling of provisioned throughput capacity and storage. And to retrieve the product information securely and display it dynamically in the mobile application, we will make use of IBM Mobile Foundation, which provides a rich set of back end capabilities for building, managing and updating your next gen cognitive, engaging, secure and personalized mobile and web applications.
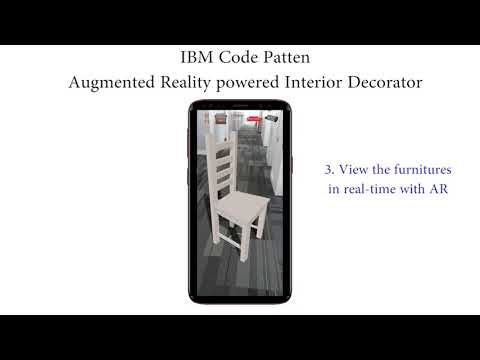
In this code pattern, we will develop an android mobile application on IBM Mobile Foundation with AR capabilities that gives users the ability to select and place the furniture in their desired places, in real time.

- User launches the mobile application.
- Mobile application requests
IBM Mobile Foundationfor product details. IBM Mobile Foundationfetches the product details fromCloudant.- Product details are displayed on the mobile application.
- Users can now view how the furniture would look in their space.
- IBM Cloud account : Create an IBM Cloud account.
- Java 1.8.x: Make sure you have required version (Java 1.8.x).
- Before you begin please note that this application uses AR-Core Library, and not all Android devices support AR-Core. To know which devices support AR-Core visit the Supported Devices page.
- Android Studio : Download and Install Android Studio with SDK Version 26 or Above.
Please follow the below to setup and run this code pattern.
- Clone the repo
- Create Cloudant database and populate it with sample data
- Setup IBM Mobile Foundation Server & CLI, Build & Deploy Adapter
- Setup Poly Objects in Android Studio
- Run the Android App
Clone this git repo. Else, in a terminal, run:
$ git clone https://github.com/IBM/augmented-reality-powered-interior-decorator.git
- Log in to IBM Cloud Dashboard.
- Open Cloudant NoSQL DB service.
- In the
Available authentication methodsdropdown, selectUse both legacy credentials and IAM. - Click on
Create. - From the welcome page of Cloudant service that you just created, launch the Cloudant Dashboard.
- In the Cloudant Dashboard, click on
Databases. - Click on
Create Database. Specify name of database asmydatabaseas shown below. ClickCreate.

Once the database is created, the dashboard will update to show the documents inside mydatabase database (which, as expected, will be empty to begin with).
- Click
Create Document. Under document content, after the auto populated_idfield, enter product details as shown below. Please note that you need to put a comma (,) after the auto populated_idfield.
{
  "_id": "1c8cc4ad5ce9a1823434ebf9004e258e",
  "id": 1,
  "title": "Couch",
  "shortdesc": "Almost Black",
  "rating": 3.2,
  "price": 40000,
  "img": "black_sofa.png"
}
Click Create Document to create/save the document.
- Repeat the above steps and create documents for the remaining sample products: CloudantData/chair.json, CloudantData/corner_table.json, CloudantData/red_sofa.json, CloudantData/table.json.
The mydatabase database should now list the five documents as shown below under Table view.

- In the Cloudant Dashboard, under
mydatabasedatabase, click onPermissionsand then click onGenerate API Keyas shown in the snapshot below. - Make a note of the Key and Password generated.
- The newly added key would get listed under Cloudant users with default permission of reader only. Select the checkbox under writer next to the new key to give it write permission as well.

Make a note of the following things as it will be used in step x.x:
| Sl no. | Note The Following | Example |
|---|---|---|
| 1. | Cloudant URL | https://xxxx-xxx-xxxx-xxxx-xxxxx-bluemix.cloudant.com |
| 2. | Cloudant Key | abcdefxyz1234 |
| 3. | Cloudant Password | 12345678abcd |
| 4. | DB Name | mydatabase |
- Install
Node.jsby downloading the setup from https://nodejs.org/en/ (Node.js 8.x or above)
$ node --version
v10.15.0
- Install IBM Mobile Foundation Platform CLI
$ sudo npm install -g mfpdev-cli
$ mfpdev --version
8.0.0-2018121711
Note: If you are on Windows, instead of using sudo, run the above command without sudo in a command prompt opened in administrative mode.
Note: While installing MFP CLI, if you hit an error saying
npm ERR! package.json npm can't find a package.json file in your current directory., then it is most likely due to MFP CLI not being supported in your npm version. In such a case, downgrade your npm as below, and then install MFP CLI.$ sudo npm install -g [email protected]
- Install Java SDK 8 from https://adoptopenjdk.net/?variant=openjdk8&jvmVariant=openj9
$ java -version
java version "1.8.0_101"
Note: Java version
1.8.xis required to build the Java Adapters. Do not Download Java version11.x. If you already have java version above1.8.xthen you can follow the guide inTROUBLESHOOTING.mdto uninstall the java and reinstall1.8.x.
- Install Maven:
On Mac, you can use
brew installfor installing Maven as shown below:
$ /usr/bin/ruby -e "$(curl -fsSL https://raw.githubusercontent.com/Homebrew/install/master/install)"
$ brew install maven
$ mvn --version
Apache Maven 3.6.0 ...
On Windows, you can follow this Tutorial to install Maven.
-
In the IBM Cloud Dashboard,open Mobile Foundation. Click on
Createas shown below.
-
In the Mobile Foundation service overview page that gets shown, click on
Service credentials. ExpandView credentialsand make a note of theurl,userandpasswordas shown below.
NOTE: The
user,passwordandurlis Important as it will be used in subsequent steps.
NOTE: Make Sure the Cloud Foundry App for Mobile Foundation-Server gets at least 768MB of Memory.(Recommended is 1GB) You can verify it by going to IBM Cloud Dashboard > Resources > Cloud Foundry Apps > MobileFoundation-Server as shown below.

Note: If Mobile Foundation service is not available with your current account type, then you can:
- Upgrade your account, and avail the Mobile Foundation service's free Developer plan which allows the use of the service free for up to ten daily client devices for development and testing activities.
- Back on your local machine, configure MFP CLI to work with Mobile Foundation server by running the following command in console.
Note: For
Enter the fully qualified URL of this server:, enter theurlmentioned in credentials followed by:443(the default HTTPS port).
$ mfpdev server add
- Follow the Instructions.
? Enter the name of the new server profile: MyServer
? Enter the fully qualified URL of this server: https://mobilefoundation-xxxx-xxxxx.xx-xx.mybluemix.net:443
? Enter the Mobile Foundation Server administrator login ID: admin
? Enter the Mobile Foundation Server administrator password: **********
? Save the administrator password for this server?: Yes
? Enter the context root of the Mobile Foundation administration services: mfpadmin
? Enter the Mobile Foundation Server connection timeout in seconds: 30
? Make this server the default?: Yes
Verifying server configuration...
The following runtimes are currently installed on this server: mfp
Server profile 'MyServer' added successfully.
- Next Verify If the Server is added.
$ mfpdev server info
Name         URL
---------------------------------------------------------------------------------------
MyServer  https://mobilefoundation-xxxx-xxxxxx.xx-xx.mybluemix.net:443  [Default]
---------------------------------------------------------------------------------------
Note: If this step fails check
TROUBLESHOOTING.mdto fix commonly occuring errors.
- Go to the
CloudantJavadirectory.
$ cd /CloudantJava
- Add the
URLalong with the port number:443appended with/mfpadmin,UserandPasswordin thepom.xmlfile which is present inCloudantJavadirectory as show bellow.
...
<mfpfUrl>https://mobilefoundation-xxxx-xxxxxx.xx-xx.mybluemix.net:443/mfpadmin </mfpfUrl>
<mfpfUser>admin </mfpfUser>
<mfpfPassword>******** </mfpfPassword>
<mfpfRuntime>mfp </mfpfRuntime>
...
- Build the
CloudantJavaadapter as shown below.
$ mfpdev adapter build
Building adapter...
Successfully built adapter
- Deploy the adapter as shown bellow.
$ mfpdev adapter deploy
Verifying server configuration...
Deploying adapter to runtime mfp on https://mobilefoundation-xxxx-xxxxxx.xx-xx.mybluemix.net:443/mfpadmin...
Successfully deployed adapter
Note: In [Step 3.2], if you specified
NotoMake this server the default?, then you need to specify the name of your server profile (MyServerin our case) at the end ofmfpdev adapter deploycommand as shown below.
$ mfpdev adapter deploy MyServer
Launch MFP Dashboard as below:
- In the IBM Cloud dashboard, under
Cloud Foundry Services, click on theMobile Foundationservice you created in [Step 3.2]. The service overview page that gets shown, will have the MFP dashboard embedded within it. You can also open the MFP dashboard in a separate browser tab by appending/mfpconsoleto the urlhttps://mobilefoundation-xxxx-xxxxx.xx-xx.mybluemix.net.
Example:
https://mobilefoundation-xxxx-xxxxx.xx-xx.mybluemix.net/mfpconsole
NOTE:
username&passwordcan be found inService credentialsin step 3.2.
- Inside the MFP dashboard, in the list on the left, you will see the
CloudantJavaadapter listed.
Update MFP Adapter configuration as below:
-
Inside the MFP dashboard, click on the
CloudantJavaadapter. UnderConfigurationstab, you should see the various properties for accessing Cloudant DB as shown below.
-
All these properties can be found in step 2.2.
-
Save the changes by clicking
Save. -
Click on
Resourcestab. You should see the various REST APIs exposed byCloudantJavaadapter as shown below.
To Test the adapter use any REST Clients like Postman.
After Installing postman type the url created in [step 3.2] and append it with /mfp/api/adapters/CloudantJava/.
Example:
https://mobilefoundation-xxxx-xxxxxx.xx-xx.mybluemix.net/mfp/api/adapters/CloudantJava/.
-
Now click on
Sendbutton to run the GET/mfp/api/adapters/CloudantJava/API. The API response should get shown in theResponse Bodyas shown in snapshot below. -
The GET API on
/mfp/api/adapters/CloudantJava/should return a JSON object containing_id,_rev,id,title,shortdesc,rating,price&imgfrom your Cloudant as shown below.
At this point you have successfully configured the Cloudant and Mobile Foundation.
-
Open the directory
FurnitureStoreAppin Android Studio. -
In Android Studio goto
File > Preferences > Pluginsand click onBrowse Repositoriesbutton. -
Search for the keyword
sceneformand install it as shown.

- Click on
Build > Make Projectto build the android project.
NOTE: The Initial Gradle Build may take much longer time please be patient.
-
Download the poly objects from the bellow URL's.
- Chair by Google: https://poly.google.com/view/13AL0KYItKD
"Chair" by poly by google is licensed under CC-BY 3.0
- Table by Google: https://poly.google.com/view/8cnrwlAWqx7
"Table" by poly by google is licensed under CC-BY 3.0
- Sofa by Google: https://poly.google.com/view/bwd4gui4RZ4
"Sofa" by poly by google is licensed under CC-BY 3.0
- Vintage Corner Table by Danny Bittman: https://poly.google.com/view/7IxmR5JQXyC
"Vintage Corner Table" by Danny Bittman is licensed under CC-BY 3.0
- Couch | Wde by Danny Bittman: https://poly.google.com/view/7Q_Ab2HLll1
"Couch" by Danny Bittman is licensed under CC-BY 3.0
-
Extract the
.zipfiles. -
In Android Studio, in the left panel right click and select
New > Sample Data Directoryas shown.

- Right click on the newly created
sampledatadirectory and selectReveal in Finderfor Mac.
On Windows Right click on the newly created
sampledatadirectory and selectShow in Explorer.

-
Rename the directories and
.objfiles which were extracted from the.zipas shown.NOTE: Rename as exact same names as shown else the app wont work

-
Now copy paste it in the
sampledatadirectory. -
Back to Android Studio, go to
sampledata > black_couchand right click onblack_couch.objfile and selectImport Sceneform Assetas shown.

- You will get an Import Wizard, make sure the
.sfa output pathname and.sfb output pathname is same as the file name as shown.

- Click on
Finish.
- Wait for the Gradle Build to finish. Upon Successful build you will see the poly image on your screen as shown.

-
Now repeat Step 6 to Step 8 for
Chair,corner_table,red_sofa&table. -
Once you have Imported all 5 Sceneforms you can go to
assetsdirectory in the android studio to view it as shown.

Once the Poly Objects are loaded into android studio, the size of each poly object is not uniform. Follow the below steps to calibrate the size of each poly object.
-
In Android Studio under
assetsdirectory double click onblack_couch.sfb. -
In the code window, scroll to the bottom of the window and add the following scale value to
scale: 1.75.
...

model: {
    attributes: [
      'Position',
      'Orientation',
    ],
    collision: {},
    file: 'sampledata/black_couch/black_couch.obj',
    name: 'black_couch',
    recenter: 'root',
    scale: 1.75,
  },
  version: '0.54:2',
}
-
Similarly under
assetsdirectory double click onChair.sfband set the scale value toscale: 0.075, forcorner_table.sfbset the scale value toscale: 0.2, forred_sofa.sfbset the scale value toscale: 0.09and fortable.sfbset the scale value toscale: 0.095.Poly Objects Scale Size black_couch.sfb 1.75 Chair.sfb 0.075 corner_table.sfb 0.2 red_sofa.sfb 0.09 table.sfb 0.095
At this point you will have setup Cloudant DB, Mobile Foundation Server for the Application and setup the Poly Objects in Android Studio. One last thing before you run the android app is to register the application to Mobile Foundation Server so that it can make necessary API calls to Cloudant.
- On the Commandline, enter the following command to register the app to Mobile Foundation server.
$ mfpdev app register
Verifying server configuration...
Registering to server:'https://mobilefoundation-xxxx-xxxxx.xx-xx.mybluemix.net:443' runtime:'mfp'
Registered app for platform: android
Note: In [Step 3.2], if you specified
NotoMake this server the default?, then you need to specify the name of your server profile (MyServerin our case) at the end ofmfpdev app deploycommand as shown below.$ mfpdev app register MyServer
-
Install Android SDK Platform 24 (or higher) as below:
- Launch Android Studio.
- Click on
Configure->SDK Manager. - Under
SDK Platforms, selectAndroid 7.0 (Nougat) API Level 24or higher. ClickApplyand then clickOK. This will install Android SDK Platform on your machine.
-
Enable USB debugging on your Android phone as per the steps in https://developer.android.com/studio/debug/dev-options
- Launch the Settings app on your phone. Select
About Device->Software Info. TapBuild number7 times to enable developer options. - Return to Settings list. Select
Developer optionsand enableUSB debugging.
- Launch the Settings app on your phone. Select
-
If you are developing on Windows, then you need to install the appropriate USB driver as per instructions in https://developer.android.com/studio/run/oem-usb.
-
Connect the Android phone to your development machine by USB cable, you will get a prompt displaying adb access required,
allowthe access.
Note: If you have android adb tools you can check whether your device is connected or not by entering
adb devices.
-
Open the directory
FurnitureStorein Android Studio, click onrun > run 'app'. -
Connect the android device to the deployment machine it will be displayed on the screen. Select that and click
ok.

Note: You will get a prompt displaying adb access required,
allowthe access only then the device will be shown in the above window.
- Wait for Gradle to finish the build and install the Apk on your android device.

- The App first pings the Mobile Foundation Server and checks if it is registered.

- Then the app makes api call to cloudant to fetch the product data and display it.

- Finally you can click on
Open Augmented Playgroundto launch the AR screen on which you can choose the product and click on the anchors to place the object.
For a similar retail pattern, check out Integrate a virtual mirror for e-commerce products.
To explore more on Argument Reality, refer to our argument reality related patterns at https://developer.ibm.com/patterns/category/virtual-reality/.
Please see troubleshooting guide for solutions to some commonly occuring problems.
- Click on the
Logcatbutton at the bottom of the screen in Android Studio to see the console log outputs by the application as shown.

- You can see the console logs here for every action that the app performs.
This code pattern is licensed under the Apache License, Version 2. Separate third-party code objects invoked within this code pattern are licensed by their respective providers pursuant to their own separate licenses. Contributions are subject to the Developer Certificate of Origin, Version 1.1 and the Apache License, Version 2.


