
This exercise allows you to practice and apply the concepts and techniques taught in class.
Upon completion of this exercise, you will be able to:
- Perform side effects in a React component with the
useEffecthook - Fetch data from an API and save it in the component’s state
In this exercise, you will practice working with React Hooks, specifically the useEffect hook. Your task will be to set up effects in different components that fetch data from an API, store the response data in the state, and render it in the components.
- Fork this repo
- Clone this repo
cd lab-react-fake-store
npm install
npm run dev-
Upon completion, run the following commands:
git add . git commit -m "done" git push origin master -
Create a Pull Request and submit your assignment.
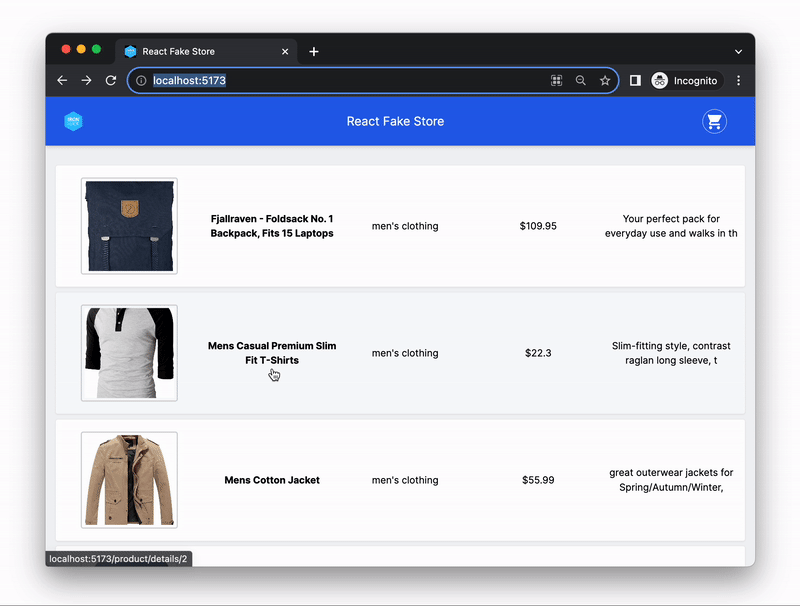
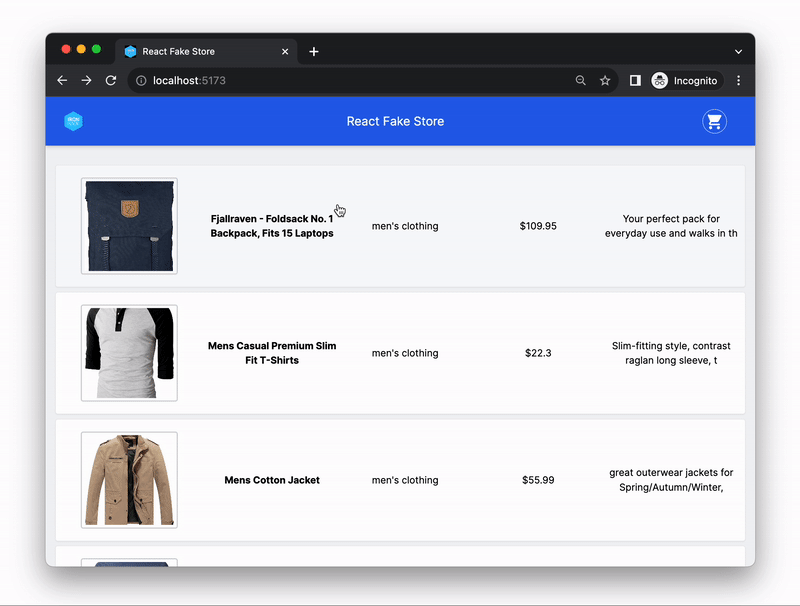
In today's exercise, you will be building a simple React application that displays a list of products and allows you to view the details of each product.
To help you get started quickly, we have provided you with the starter code and all the required page components. The React Router was already set up and app has the following pages:
HomePage- should display a list of all productsProductDetailsPage- should display the details of a single product
You will be using the Fake Store API to get the data that you will show in the app. This API provides endpoints that return mock/fake data for an online store, such as a list of products, product details, and a shopping cart, that you can use to build a simple e-commerce application. The API is publicly available and free.
You will use the following API endpoints in this exercise:
| HTTP Method | URL | Description |
|---|---|---|
GET |
https://fakestoreapi.com/products |
Returns a JSON response with a list of all products |
GET |
https://fakestoreapi.com/products/:id |
Returns a JSON response with the details of a specific product (by its id) |
In the HomePage component, make an HTTP request to the Fake Store API endpoint Get all products to retrieve the list of all products.
The API endpoint you should make a request to is:
GET https://fakestoreapi.com/products
You can find the documentation and response example for this API endpoint here.
Once you have received the response with the list of products, save it in the component's state and render the list of products on the page.
See Expected Result

Hint
The HTTP request to the API should be done after the component loads (mounts). To do this, you need to set up a side effect using the useEffect hook (remember to import the useEffect hook from the React library before using it).
To set up a side effect that runs only once when the component mounts, call the useEffect hook, and pass it an empty array [] as the second argument:
// Code to run when the component mounts
useEffect(() => {

}, [] );

//  ^ [] Means the effect will run only once, when the component mounts
To fetch the data from the API, you can use axios. To install axios, run the command npm install axios from the root folder of your project.
Once you have installed it, import axios in the component where you want to make a HTTP request and then use it in the effect.
To make a GET request to the API, use the following syntax:
  axios.get("https://example.com/example-endpoint")
    .then((response) => {
      // Handle success
      console.log(response);
    })
    .catch((error) => {
      // Handle error
      console.log(error);
    })
Remember to save the response data from the API in the component's state before rendering it on the page.
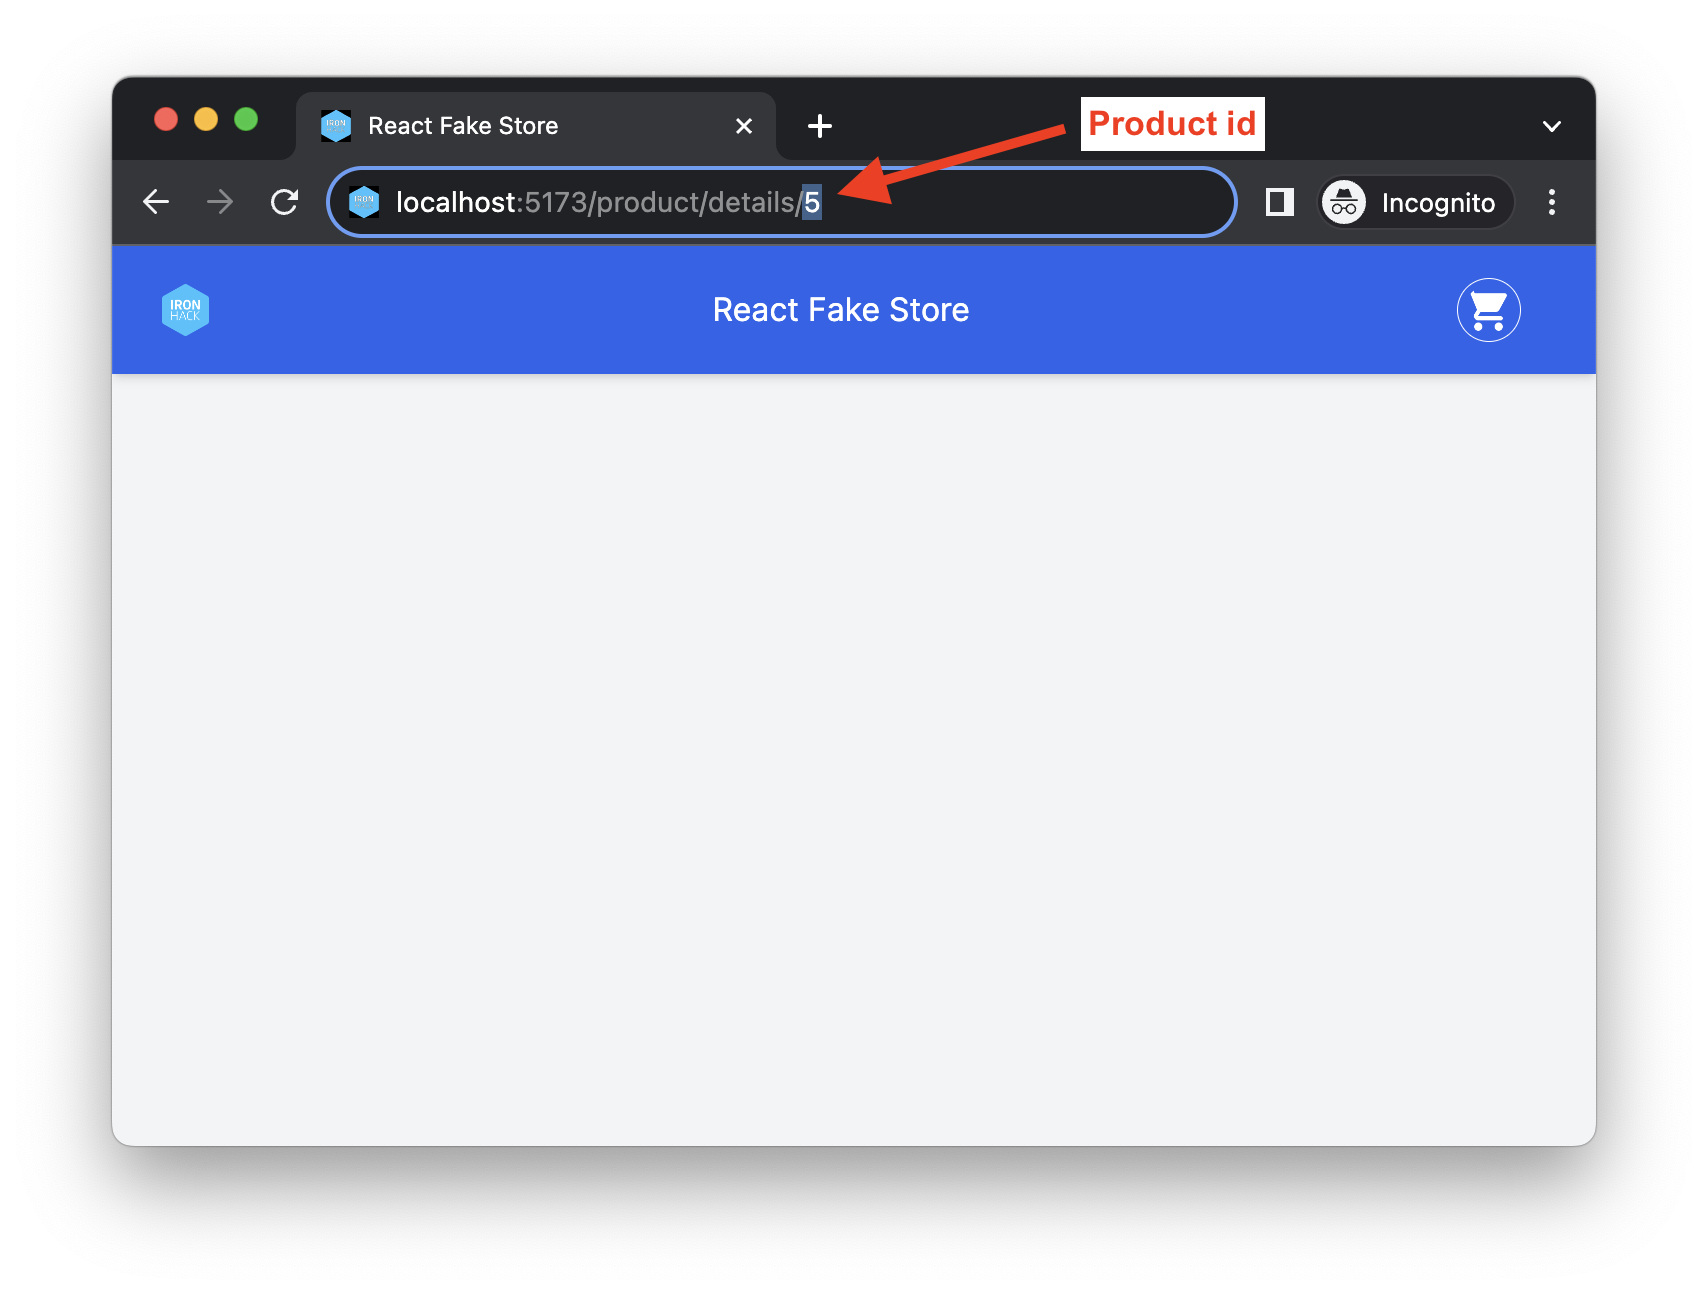
Each product in the list should be clickable and should navigate to the ProductDetailsPage component, where the details of the selected product should be displayed. To do this, you will need to use the React Router's Link element.
Each link should contain the product's id as a URL parameter. The link URL should have the following structure:
/product/details/:productIdThe productId should be replaced with the actual id of the selected product. For example, if the user clicks on the product with the id 5, the URL should be:
/product/details/5See Expected Result
If you have correctly implemented the links in the previous step, when a user clicks on any product card shown on the list, they should be navigated to the ProductDetailsPage. Additionally, the URL displayed in the address bar should change to /product/details/:productId, where the :productId is the actual id of the selected product, for example /product/details/5.
In the ProductDetailsPage component, make a HTTP request to the API endpoint Get a single product to retrieve the details of the selected product.
The API endpoint you should make a request to is:
GET https://fakestoreapi.com/products/:id
Replace the
:idwith the id of the product.
You can find the documentation and response example for this API endpoint here.
Once you have received the response with the product details, save it in the component's state and render the list of products on the page.
See Expected Result
Hint
Before you make an HTTP request to the Fake Store API, you need to get the id of the selected product from the URL. To access the URL parameters from the browser's URL bar, use the React Router hook useParams.
If you need a reminder on how to set up the useParams hook and access the URL parameters, check this example.
The request to the API should happen after the component loads (mounts). To do this, you will need to set up a side effect using the useEffect hook.
The productId coming from the URL parameter should be set as a dependency of the effect, in in the useEffect array like:
useEffect(() => {
  // Code to run

}, [productId] );  //  <-- The effect will run every time the `productId`` changes
This way, the effect will run every time the productId changes.
To fetch the data from the API, you should use axios the same as in the previous iteration.
The next feature we want to implement in our app is the shopping cart.
When the user clicks on the cart icon 🛒 in the top right corner, they should be navigated to the Cart Page. The URL displayed in the address bar should change to /cart.
The Cart Page should display the list of products in the cart. The Fake Store API provides an endpoint that returns a mock/fake shopping cart that you can use to simulate the shopping cart functionality. The endpoint is:
https://fakestoreapi.com/carts/:idThe :id in the URL should be replaced with the actual id of the cart. For example, you can make a request to https://fakestoreapi.com/carts/5 to get the details of the cart with the id 5. You can find the documentation for this endpoint here.
Hint
The carts endpoint https://fakestoreapi.com/carts/:id returns a JSON with a list of products in the cart, but it does not return the details of the products. To get the details of each product, you will need to make a separate request to the products endpoint https://fakestoreapi.com/products and then show the details of the products in the cart.
Happy coding! 💙
I am stuck and don't know how to solve the problem or where to start. What should I do?
If you are stuck in your code and don't know how to solve the problem or where to start, you should take a step back and try to form a clear question about the specific issue you are facing. This will help you narrow down the problem and come up with potential solutions.
For example, is it a concept that you don't understand, or are you receiving an error message that you don't know how to fix? It is usually helpful to try to state the problem as clearly as possible, including any error messages you are receiving. This can help you communicate the issue to others and potentially get help from classmates or online resources.
Once you have a clear understanding of the problem, you will be able to start working toward the solution.
How do you set up the React Router in a React app?
To set up the React Router in your React application, follow these steps:
- Install React Router package by running the following command from the root folder:
npm install react-router-dom- Import the
BrowserRoutercomponent in your app's entry point (usuallymain.jsx) and wrap your<App />component with it:
import { BrowserRouter as Router } from "react-router-dom";

const root = ReactDOM.createRoot(document.getElementById("root"));

root.render(
  <React.StrictMode>
    <Router>
      <App />
    </Router>
  </React.StrictMode>
);- Import the components
RoutesandRouteinApp.js:
import { Routes, Route } from "react-router-dom";- Define the routes (pages) in your app using the components
RoutesandRoutecomponent:
import { Routes, Route } from "react-router-dom";
import HomePage from "./pages/HomePage";
import AboutPage from "./pages/AboutPage";

function App() {
  return (
    <div className="App">
      {/* Add <Route /> components between <Routes> </Routes>   */}
      <Routes>
        <Route path="/" element={<HomePage />} />
        <Route path="/about" element={<AboutPage />} />
      </Routes>
    </div>
  );
}

export default App;I am getting an error: "not defined". How do I fix it?
The "ReferenceError: variable is not defined" error in JavaScript occurs when you try to access a variable or a function that has not been defined yet or is out of scope.
To fix the issue, check that you have defined the variable or function that you are trying to use and double-check the spelling to make sure you are using the correct name.
In case the variable or a function is defined in another file, make sure that the file has been imported or loaded correctly.
I am unable to push changes to the repository. What should I do?
There are a couple of possible reasons why you may be unable to push changes to a Git repository:
-
You have not committed your changes: Before you can push your changes to the repository, you need to commit them using the
git commitcommand. Make sure you have committed your changes and try pushing again. To do this, run the following terminal commands from the project folder:git add . git commit -m "Your commit message" git push
-
You do not have permission to push to the repository: If you have cloned the repository directly from the main Ironhack repository without making a Fork first, you do not have write access to the repository. To check which remote repository you have cloned, run the following terminal command from the project folder:
git remote -v
If the link shown is the same as the main Ironhack repository, you will need to fork the repository to your GitHub account first, and then clone your fork to your local machine to be able to push the changes.
Note: You may want to make a copy of the code you have locally, to avoid losing it in the process.

