
In this lab, we'll be creating a desert drag race with the useEffect and useState React hooks to get practice using these hooks together.
Forkandclonethis repository- A starter app has been provided for you
- Open in VSCode with
code . cdinto the new directory and runnpm ito install our dependencies
In this lab, we'll only be working in 2 of the 4 components in our application, Stoplight.jsx and Highway.jsx. That being said, let's take a look at our App's component hierarchy before we move on:
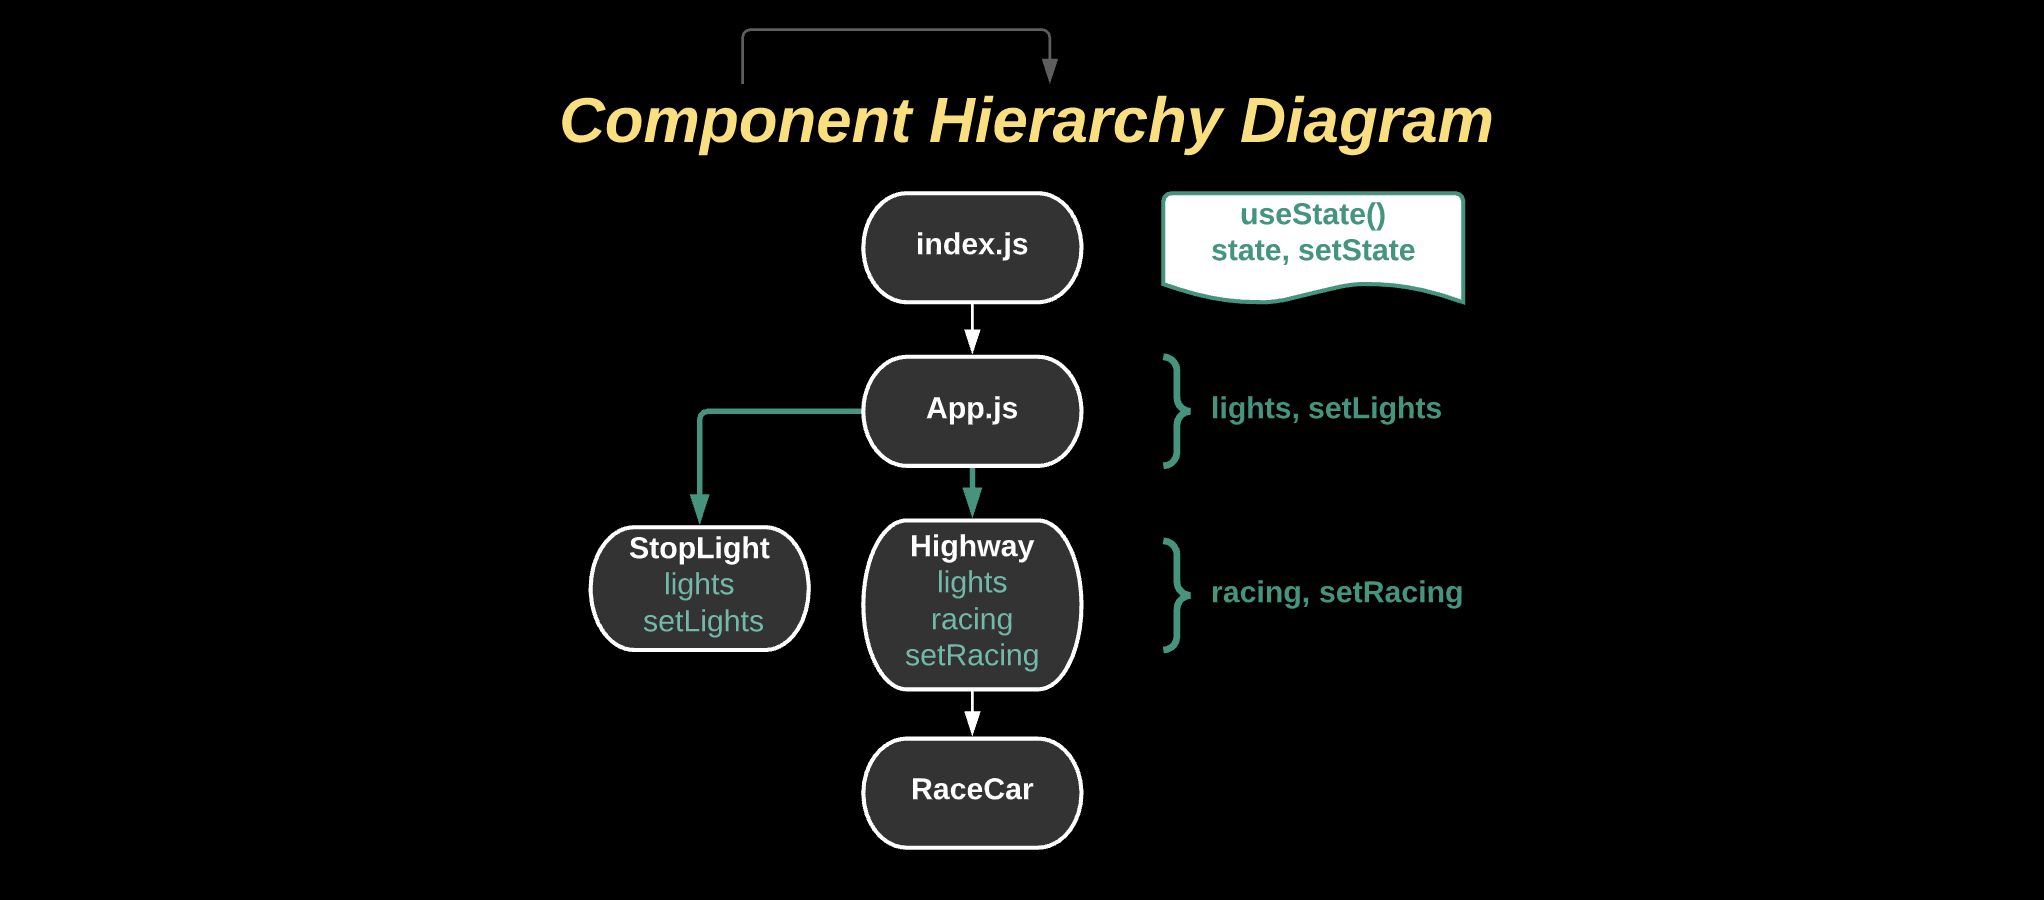
Currently, we have two useState() variables, one in App.js and one in Highway.jsx.
-
lightsis an object with three boolean key value pairs, which we'll be using to control ourStoplightfunctionality:const [lights, setLights] = useState({red: false, yellow: false, green: false})
-
Notice how
lightsandsetLightsare being passed as props into our<Highway>and<Stoplight>components. It's state is lifted up intoApp.jssince we'll be using it in both components.<StopLight lights={lights} setLights={setLights} /> <Highway lights={lights} />
-
racingis initially set to a string value'cars'which is being used as aclassNamewithinHighway.jsxconst[racing, setRacing] = useState('cars')
3 things need to happen for our racing application to function:
- We'll need the button in
StopLight.jsxto be able to set the individual key value pairs in ourlightsstate within anonClickcallback function. - We'll need to add in some conditional rendering in
Stoplight.jsxto reflect the changes in thelightsstate - And lastly, we'll need to use the
lightsstate inHighway.jsxto affect the state of racing in some way.
We've taken a good look at the architecture of our application, so let's start working in Stoplight.jsx!
Since lights and setLights are being passed as props, let's destructure them from our component's arguments so they'll be available to us as lights and setLights within Stoplight.jsx.
const StopLight = ({lights, setLights}) => {We now have access to lights and setLights, so let's use them! We have a <button> in our component with a className of countdown. Currently, it isn't doing anything, so let's give it an onClick callback function that will do the following:
onClick={() => {
  // Condition #1
  // If the state of all three lights (red, yellow, green) is true:
  // set the state of all lights (red, yellow, green) back to false

  // Condition #2
  // If only the red and yellow lights have a value of true:
  // Keep the state of red and yellow as true and set the state of the green light to true

  // Condition #3
  // If only the state of the red light is true
  // Keep the state of the red light as true and set the state of the yellow light to true

  // Condition #4
  // Otherwise, if none of the lights have a state of true
  // Keep the state of the other lights false, and set the state of only the red light to true
}}
Add console.log(lights) to the top of your StopLight component to check if you're properly updating state with your onClick function.
Remember that if you want to keep the existing state of an object and only update one of its keys, you can use the spread ... operator. Example:
setLights({...lights, red: true})Need a hint?
A switch case might be useful here.
if / else might also work if you're more comfortable with that.
After you've finished adding in the conditional state-setting functionality to the onClick of the the button in StopLight.jsx, there are a couple more things we'll need to do to update its UI to reflect the changes in state.
-
First, we'll replace the content of the
<button>, which currently says "Count" with a bit of conditional text:<button className="countdown" onClick={() => { ... }} > {lights.red && lights.yellow && lights.green ? "Reset" : "Countdown"} </button>
-
Our button should be switching between
CountdownandResetdepending on the state of ourlights!
Next, let's add in the actual lights!
- Inside the
<div>with a className ofstoplight, we'll give each of the three child<div>s a conditional className depending on ourlightsstate. Example:<div className={lights.red ? 'red' : undefined}></div>
- If the red light is set to true, the top
<div>will be given a className of'red', otherwise it will be undefined - The middle
<div>will be given a className of'yellow'iflights.yellowis true. - Likewise, the bottom
<div>will be given a className of'green'if the state of the green light is true
- If the red light is set to true, the top
When you've finished, make sure to start up your app with npm start and see if you have all three lights working properly. They should also be able to reset once all three are showing! Great! Now let's move onto Highway.jsx, since we're done with StopLight.jsx.
Now that we're in our Highway component we can work on the fun part - the race!
Let's start out by destructuring lights from its arguments, since they are being passed as props from App.js.
const Highway = ({lights}) => {After destructuring lights, create a function below the useState() declaration in Highway.jsx called toggleRacing. We'll use this function to set the state of racing to either 'cars' or 'cars race' in the following manner:
const [racing, setRacing] = useState('cars')

const toggleRacing = () => {
  racing === 'cars' ? setRacing('cars race') : setRacing('cars')
}
Now what if we wanted to fire this function whenever this component loads? That way we won't have to do it manually from the UI. This would be a great time to implement a useEffect() hook!
Let's add one into our Highway component.
-
Make sure that you've added
useEffectin your imports at the top of the file, next touseStateimport React, {useState, useEffect} from 'react'
-
Once you've added it in, declare a
useEffect()hook below ourtoggleRacingfunction and invoketoggleRacing -
Remember that
useEffect()requires an anonymous callback function:useEffect(() => { // do something here })
Try testing out your stoplight app in the browser with npm start.
Oh no! An endless loop! Render burnout! Spinning our wheels is cool and all, but we're here to race, right?

Every time our Highway component mounts, it will fire the toggleRacing function for us. We've set a condition that will switch between either 'cars' or 'cars race' and set the state of our component. Since the component re-renders every time state is set, we'll be stuck in an endless loop forever.
Let's fix that with some stronger conditions.
Replace the ternary in toggleRacing with these lines of code:
const toggleRacing = () => {
  if (racing==='cars' && lights.green) {
    setRacing('cars race')
  }
  if (racing==='cars race' && !lights.green) {
    setRacing('cars')
  }
}
Since we've added the lights state passed down from props into our conditions to track changes in only the green light, we won't be setting state every time the component loads.
And with that we've done it! Our useEffect() will take care of the work of firing our toggleRacing function and setting the state of racing for us without getting stuck in an endless loop! Try testing your app out in the browser.
In this lab we worked with useState() and useEffect() to build our stoplight racing app. A couple things to note about useEffect():
useEffect()will run every time a component is mounted (rendered in the Virtual DOM)- It's not recommended to set state within a
useEffect()since settting state will cause a component to re-render. - In this case, we set a few conditions inside of our
toggleRacingfunction to prevent our state from being updated continuously, which would create an endless loop. - We used state passed from a parent component,
lightsin this case, to control the state setting of ouruseEffect().