
Help U is a platform that aims to support Ukrainian refugees in Europe and connect people. The website serves as a bridge between those looking to make a difference and those who need help by providing a platform for offering or requesting free services and items such as clothing, furniture, and other necessities. The goal of the website is to create a community of support for Ukrainians who have fled the war and to make it easy for people to get the help they need. The ongoing conflict has had a devastating impact on ordinary people, and it is important to support their rights and dignity. It is a very personal and sensitive issue for many people, including myself, because it affects the country of my heritage and identity. It is important to me as a human being, to support the Ukrainian people and help them to rebuild their lives.
The website is built using the Django framework, which provides the backend functionality, such as user authentication, data management, and routing, and handles the majority of the frontend. One key feature of the website is a React component that allows real-time communication and updates through the use of WebSockets. This allows a seamless and interactive user experience as certain parts of the website update in real-time without the need for page refreshes. Overall, the website combines the power and flexibility of Django with the dynamic capabilities of React and WebSockets to deliver a smooth and responsive user experience.
The website provides all the essential features, such as creating a personal account, searching and filtering posts, the ability to add and manage posts, bookmarking posts the users find useful, commenting on posts and sending direct messages to other users in real-time.
The website was developed as a Milestone Project#4 for the Code Institute's Full Stack Developer course.
The live website is available here
Target audiences:
- Ukrainian refugees in Europe who are in need of assistance and other necessities. (U)
- Individuals who are interested in supporting Ukrainian refugees and want to find an easy way to make a difference. (I)
- Organizations or groups that provide aid to refugees and may be interested in using the platform to connect with potential donors or volunteers. (0)
All target groups have similar needs and purposes, with the only difference - the category of the post.
-
I want to be able to access the website from any device.
-
I want to easily understand the main purpose of the site and learn more about the topic.
-
I want to be able to easily navigate and find content.
-
I want to create my personal account to see posts.
-
I want to sign up with my social accounts, such as Google or Facebook.
-
I want to create an account fast, but I want it to be secure.
-
I want to be able to contact somebody and receive a response without signing up if I have doubts or queries.
-
I want to easily access a category of posts I need and to be able to search through them.
-
I want to open a post on a separate page to see all the details.
-
I want a map attached to each post to understand where the offer/request is.
-
I want to be able to create a post myself.
-
I want to contact another user if I see something that interests me.
-
I want to know more about other users that I interact with.
-
I want to be immediately notified when another user responds.
-
I want to learn more about the project on social media.
-
I want to receive feedback from the website about what's happening to know if something went wrong.
-
I want a messenger to translate messages to Ukrainian for me. (U)
-
I want to be sure my data is protected.
-
I want to be notified about the messages I received.
-
I want to access the messenger from anywhere on the website.
-
I want to be able to access the navbar at any point or go back to the top to navigate fast.
-
I want posts to be paginated so it helps me remember on what page I saw something interesting or stay on the same page if I accidentally refresh the page or there are problems with the internet connection.
-
I want to be able to report content that I find offensive, unsafe or inappropriate.
-
I want the content to be moderated, so I don't need to report it.
-
I want to be able to write comments to describe my experience of interacting with an offer.
-
I want to be able to update and delete my posts.
-
I want to bookmark posts and easily access them.
-
I want to be able to update my user profile.
-
I want to be able to reset my password if I forget it.
User Acceptance Criteria based on the user stories:
1. The website should be fully responsive and accessible on any device, including desktop, tablet, and mobile.
2. The website should have a clear and concise homepage that explains the main purpose and topic of the site.
3. The website should have a clear and intuitive navigation menu that allows users to easily find and access the content.
4. The website should have a navigation bar that is always visible and easily accessible from any page on the site, and a button to quickly scroll back to the top of the page.
5. The website should have a registration form that allows users to create a personal account.
6. The website should allow users to sign up with their existing social media accounts, such as Google or Facebook.
7. The registration process should be fast and easy, but also secure, using encryption and other security measures.
8. The website should have a contact form or email address that allows users to contact the site's support team without needing to sign up.
9. The website should have a search bar that allows users to easily find and access specific categories of posts.
10. Each post should have a link that allows users to view it on a separate page, where they can see all the details and information about the post.
11. Each post should have a map attached that displays the location of the offer or request.
12. The website should have a form that allows registered users to create their own posts.
13. Each post should have a contact button or form that allows users to contact the author of the post.
14. The website should have a user profile page that displays information about other users that a user interacts with.
15. The website should display live notifications to users when another user responds to their message.
16. The website should have links to its social media pages, such as Facebook, Twitter, Instagram, etc.
17. The website should have a feedback form or email address that users can use to report any issues or problems they encounter while using the site.
18. The website should have a messenger feature that allows users to communicate with each other.
19. The messenger should support the Ukrainian language and should be able to translate messages into Ukrainian.
20. The website should be localized to support Ukrainian language and have the option to switch to Ukrainian.
21. The website should have robust security measures in place to protect user data, such as encryption and secure servers.
22. The messenger should be easily accessible from any page on the site.
23. The website should divide the posts into pages so that users can easily navigate through them.
24. The website should have a reporting system that allows users to flag content that they find offensive, unsafe or inappropriate.
25. The website should have a moderation system that reviews and approves or removes content that does not meet the standards of the website.
26. The website should allow registered users to leave comments on posts, in order to share their experience and feedback.
27. The website should allow registered users to edit and delete their own posts, if they need to.
28. The website should allow registered users to bookmark posts and have easy access to them for later reference.
29. The website should allow registered users to update their profile information and personal details.
30. The website should have a password reset feature that allows registered users to reset their password in case they forget it.
31. The website should provide feedback about the status of the processes.
** Some paddings slightly differ from the original website, it didn't display accurately in the x-frames of a mockup generator.

- Explains the main purpose and topic of the site.
- Addresses questions and doubts the first-time users might have and provides a contact form.
- Presents opportunities for possible further actions
- Understand the main purpose of the website.
- Be able to contact the site owners to ask more questions or report technical problems signing up/in.
- Easily navigate and interact with the website.
- Learn more about the project on social media.
- Inform the user about the main purpose.
- Interest and engage the user.
- Call to action.
- Initiate future engagement, such as following on social media, joining the club, attending meetups etc.
- Provide aesthetically pleasing user experience.

-
Allows to sign up.
-
Allows to sign up with existing social media accounts.
- Sign up.
- Allow the user to sign up easily.
- Provide aesthetically pleasing user experience.

- Allows to sign in.
- Allows to sign in with existing social media accounts.
- Sign in.
- Allow the user to sign in easily.
- Provide aesthetically pleasing user experience.

- Shows posts.
- Allows users to easily find and access specific categories of posts.
- Allows opening each post on a separate page.
- Available only for authenticated users.
- Browse the posts.
- Easily find and access specific categories of posts
- Open posts to see them in detail.
- Provide a list of posts.
- Provide comprehensive information on each post in a preview.
- Provide aesthetically pleasing user experience.

- Shows a post in detail including an image and a map.
- Allows to see and write comments about the post.
- Allows bookmarking the post.
- Allows contacting the author of the post in a messenger.
- Allows you to manage the post if you are the author.
- Available only for authenticated users.
- See a post in detail.
- See comments other users left about the post.
- Leave your comments.
- Bookmark a post.
- Contact the author of the post.
- Manage the post, if you are the author.
- Show a post in detail.
- Allow the user to interact with the post.
- Allow users to contact each other.
- Provide aesthetically pleasing user experience.

- Creates a new post.
- Allows updating an existing post.
- Available only for authenticated users.
- Create a new post.
- Update your posts.
- Allow the user to create/update a post.
- Provide aesthetically pleasing user experience.

- Confirms if the user wants to delete their post.
- Available only for authenticated users.
- Delete a post.
- Being able to change your mind if you pressed "Delete" accidentally.
- Confirm with the user deletion of the post.
- Provide aesthetically pleasing user experience.

- Shows a user profile.
- Shows the user's bookmarked posts.
- Allows contacting the user.
- Available only for authenticated users.
- See a profile in detail.
- See your own bookmarked posts.
- Learn more about other users you are going to interact with.
- Contact another user.
- Allow users to see their own and each other's profile.
- Allow the user to see saved posts.
- Allow users to contact each other.
- Provide aesthetically pleasing user experience.

- Manages a user profile.
- Available only for authenticated users.
- Create a new profile (it's created automatically, but the user is asked to complete an empty profile).
- Update your profile.
- Allow the user to complete/update a profile.
- Provide aesthetically pleasing user experience.

- Displays a react component - real-time Messenger.
- Allows users to send and receive messages in real-time.
- Available only for authenticated users.
- Send and receive messages.
- See a list of active conversations.
- Receive message notifications in real-time.
- Allows users to send and receive messages.
- Displays a list of active conversations and individual chats.
- Provides message notifications in real-time.
- Provide aesthetically pleasing user experience.

click to expand

click to expand

click to expand

click to expand

click to expand

click to expand

click to expand

click to expand

The development of the website has followed an Agile methodology, using GitHub's projects to prioritize and track user stories and features. The approach enabled the implementation of ideas based on their level of importance, ensuring that the website functionality and user experience were not compromised. The following categories were applied, as well as corresponding labels were created:
- must have
- should have
- would have
- could have


The development followed an AGILE approach, which allowed for the delivery of a functional and feature-rich site. The project was constrained by time limitations, which resulted in some initially listed features not being implemented. However, AGILE methodology is incredibly helpful in situations like this, as it allows for the prioritization and tracking of user stories. Completed user stories are in the "Done" section and the ones that were not prioritised for the first iteration are currently in the "To Do" section to be covered in the next iteration.
See the current state of the project here.
The website is meant to have a simple layout and a clean design. The home page is aimed at giving a professional and informative impression, whilst cosy and friendly as you log in, which is achieved by little details, such as a cheerful logo and a footer image. A main frame for design, mainly composition and alignment-wise, was a template One Page, which was heavily modified with unique imagery and "Ukrainian twist".

The colour scheme is mainly blue and white, with a touch of yellow to create a visually appealing and cohesive design that is easily recognizable as being associated with Ukraine. The colour scheme is an effective way to create a visual association with the country, it helps to create a sense of familiarity and trust among the visitors. Overall, this colour palette creates a sense of calm and trust, with a touch of happiness and energy. The blue shades are associated with reliability, stability and security, while the yellow colour adds a touch of cheerfulness and enthusiasm.
Poppins was used for the logo for a modern, simple and clean look.
Raleway is elegant, with clean lines and a minimalistic design used for headings.
Open Sans neutral and friendly, and a slightly informal feeling, was used for the navbar and main body text. Lightweight, easy to read and particularly legible at small sizes and also exists in the Ukrainian alphabet, which is not the case for many other fonts.
The images in this project were sourced from Unsplash and Undraw, generated by Midjourney and This Person Doesn't exist or created by me. The logo is designed in Hatchful
AOS (Animate on Scroll) is used to animate the appearance of different sections on the website as the user scrolls down. This helps to make the website more engaging and enhances the user experience by adding visual interest and dynamic movement to the website.
Shadows are used to create a sense of depth and dimension and make elements on the page appear more realistic and three-dimensional. The shadows on the cards and the navbar give them a raised effect, which makes them stand out from the background, especially when white is the dominant colour. Shadows create a visual hierarchy, helping to guide the user's attention to the most important elements on the page. Additionally, shadows create a sense of realism, making the elements look like they are present in the physical space, making the design look more visually interesting and engaging.
The logo is composed of two leaves arranged to form a heart shape. The use of the yellow and blue colours, which are the colours of the Ukrainian flag, suggests a strong connection to the country and its people. The heart shape is a universal symbol of love and care, that effectively represents the project's mission and values, this is a powerful and positive message that the project is trying to convey, it's a way to show that we are here to help and support the people of Ukraine.
The simplistic graphic style of the leaves gives the logo a modern and clean look, making it easy to recognize and remember. The leaves also represent life, which aligns well with the organization's mission of providing help and support. This logo is used throughout the website in the way that almost at any point at the website the logo is present in the view. It conveys a message of love, care, and support while also being visually appealing and easy to recognize.
The use of a smooth fade-in and out effect for a Google map toolkit and cards during live search refreshing can provide a sense of continuity and flow to the user experience. The fade-in effect can be used to smoothly reveal the updated information to the user, rather than abruptly showing the new data. This can help to prevent confusion and disorientation for the user. The fade-out effect is used to smoothly hide the previous data while refreshing the search, which can prevent the user from seeing the previous data that is irrelevant to their current search. This can help to improve the user's focus on the updated information.
The navbar links, all links and buttons include a hover-over effect to make the experience more interactive and navigation more intuitive. When the user engages with the link or hovers over the link, its colour or background colour changes.
A hybrid architecture - a single-page React app (Messenger) integrated into a Django project. This approach allows for multiple types of pages in the same project.
One major advantage of using a hybrid architecture is that it allows for the use of Django's built-in tooling to handle authentication. This means that we can use the @login_required decorator or LoginRequiredMixin on the hybrid Django view serving our template, without having to rely on complex third-party authentication workflows.
Another advantage of a hybrid architecture is the ability to send data to the frontend in two ways: by passing the data directly to the template using Django's built-in templating system, or by providing the data via asynchronous APIs using JavaScript and Django REST framework. This allows for fast data loading using the native fetch API, and the API is loaded by URL and authentication is handled without configuration by the Django session cookie, no wrestling with CORS.
In terms of performance, by using React for the front-end of a web application, in this case just a part - a real-time Messenger, we can take advantage of its performance benefits and provide a smooth and responsive experience for the user. Additionally, React is a highly modular library, and by building a single-page app, you can easily scale the different parts of the application independently as needed. This can make it easier to add new features or make changes to the application without affecting other parts of the codebase. It also allows for easier debugging and testing.
Furthermore, React allows for easier debugging and testing, which can simplify the development process and make the application more maintainable.
As well as the mentioned above, which I prioritised in my project, React for the frontend can significantly improve the user experience. Here is a scheme of the structure:

Auth (uac 1)
Authentication is particularly important for Help U, as the subject is quite sensitive and people are vulnerable asking for help, so it should be confidential within the community and available only for authenticated users. Thus the website, besides the home page is available only for authenticated users.
In a Django project, there are several ways to handle authentication and authorization. One of the most popular libraries django-allauth, provides a flexible solution for handling user authentication and registration. It supports both traditional username and password authentication as well as social authentication through providers like Google, Facebook, and Twitter. It uses session-based authentication and stores user authentication information in the user's session, instead of Django's built-in token-based authentication. When a user logs in, the library creates a new session for the user and stores the user's identifying information (such as the user's ID or username) in the session. The library then sends a session ID to the client, as a session cookie, which the client stores in the browser. With each subsequent request, the client sends the session ID back to the server in the Cookie header of the HTTP request. django-allauth then uses the session ID to look up the associated session and authenticate the user.
One of the key features of django-allauth is its support for OAuth. OAuth is an open standard for authorization that allows users to share their private resources stored on one site with another site, without having to share their credentials. OAuth allows users to grant a third-party application access to their resources without having to reveal their password. This is useful for scenarios where users want to give access to their resources to a third-party application without having to provide their credentials.
One of the main reasons I chose to use django-allauth is because of its flexibility and support for various authentication methods. Another reason is because of its scalability. The library is built on top of the Django framework and it is actively maintained and widely used in production, which means that it is likely to be compatible with the latest Django versions and have a solid user base.
User Authentication (uac 7)
The project uses a custom user model with email as a user id, instead of using Django's built-in User model, which means that users to register and log in to the website need to use their email address instead of a traditional username, it also uses a custom sign up form. Users are logged in automatically after they verify their email addresses. However, users will not be logged in automatically after resetting their password. The ACCOUNT_SESSION_REMEMBER is set to True which means that the session will be remembered even if the user closes the browser. The email confirmation link will be signed using HMAC (Hash-based message authentication code) for security. The account login attempts are limited to 10 which means that the account will be locked for 50 minutes after 10 failed login attempts.
User Registration (uac 5)
Even though the website's registration process includes an email as the primary identifier for user accounts, as well as the requirement for users to provide their first and last name. This is to ensure that users are using their real names and photos, which helps to build trust among the community. To verify the authenticity of users and prevent fraud, the registration process includes email verification. In addition, phone number verification will be set up in production using services like WebOTP, Veriphone, or Twilio, to further secure the registration process. The registration process requires users to enter their password twice to ensure that they have typed it correctly. This is an important security measure, as it helps to prevent users from accidentally entering the wrong password.
Social Auth (uac 6)
AllAuth allows users to quickly and easily register and log in to the website using their existing social media accounts. When a user clicks on the "Sign in with Facebook" or "Sign in with Google" button, django-allauth redirects the user to the social media website where they will be prompted to grant permission to your application. Once the user grants permission, the social media website will redirect the user back to the website with an access token. django-allauth then uses the access token to retrieve the user's information from the social media website and create or update the user's account in the Django project.
In this case, Google and Facebook were chosen as the most of the most popular social media platforms in the world, with billions of active users and robust security protocols. This eliminates the need for users to create a new account or remember a separate username and password for the website, which can help to increase user engagement and retention. By offering social authentication options, we can increase the number of users who register for an account on the website.
Reset password (uac 30)
The website also provides a password reset feature, which is an important security feature that allows users to reset their password if they have forgotten it or if their account has been compromised. AllAuth sends out an email notification to the user with a link to reset their password, which ensures that only the user can reset the password of their account. The password reset feature provides a better user experience by allowing users to regain access to their accounts quickly and easily, which helps to increase user engagement and retention.
Django Messages (uac 31)

Django messages allow us to provide users with feedback on the actions they have taken on your website, such as logging in, logging out, registering, creating or updating a post or profile. This improves the user experience by letting them know that their action was successful or by providing them with an error message if something went wrong. Messages persist across different pages, which means that if a user is redirected to a different page after performing an action, the message will still be displayed. This is particularly useful for informing users about the outcome of an action that they have taken.
Responsive (uac 1)
The website has been designed with flexibility and aesthetic appeal in mind, ensuring that it is responsive and visually pleasing on all screen sizes and resolutions, starting at 350px. Responsiveness was achieved by utilizing Bootstrap in combination with JavaScript. This allowed for the rearrangement of page components to optimize the user experience on different screen sizes. Breakpoints were chosen based on typical device screen sizes and the goal of providing the best possible presentation of content for all screens. Breakpoints are not strictly consistent *particularly for smaller screens) but it is done intentionally to provide a better presentation of the content for all screens, the 992px breakpoint is common for laptops, the media query at this breakpoint adjusts the font size of the logo to make it more suitable for smaller screens. The 1200px breakpoint was chosen to target larger desktop screens and ensure that the website looks good on those devices as well, to stop the content from further expanding and make sure that the website layout is not broken or distorted on large screens.
The website is designed and developed with accessibility in mind: it provides alternative text for images, using semantic HTML elements, aria-labels and providing adequate colour contrast. Keyboard navigation is possible. It also works with screen readers, however, there's room for improvement in this aspect, to ensure that it is fully accessible to users with disabilities.
User Profile (uac 14)
The UserProfile model is a separate model from the CustomUser model and is connected to it through an OneToOneField. The UserProfile model contains additional information about the user such as their profile picture, languages they speak, bio, country, and city. The main reason for this is that it allows for better organization and maintainability of the codebase. The CustomUser model contains fields and methods related to user authentication. On the other hand, the UserProfile model contains fields and methods related to user-specific information such as their profile picture, bio and other details. Another advantage of separating the UserProfile model from the CustomUser model is that it allows for the possibility of adding new fields or functionalities to the UserProfile model without affecting the CustomUser model. Also, it can allow for better scaling of the application, as the data of the user profile can grow separately from the data of the user authentication.
The User Profile page is a dedicated page within the website where users can view and edit their personal information such as profile picture, bio, location, and languages, as it's essential for the purpose of the website. It is accessible to logged-in users and provides them with a central location to manage their account information and bookmarked posts. Many fields are required for security reasons, such as the userpic and bio fields. The userpic field is used to display the user's profile picture, which helps in building trust between users and making the website more personal. The bio field is used to provide more information about the user and make it easier for others to connect with them. The country and city fields are also required as they provide additional information about the user's location which is essential for other users to understand if the offer is relevant based on location.
Bookmarks (uac 28)

Users can save posts that they find interesting or relevant for later viewing by bookmarking them. There is a bookmark icon on the right of the post title on the post detail view page. This feature allows users to easily access the posts they have saved and review them at a later time, without having to search for them again. This feature is beneficial for users who come across a post that they would like to refer to later but may not have the time to fully engage with at the moment. It also allows them to curate a collection of posts that they find valuable, which they can refer to again and again.


When a new user confirms their email address, a User Profile instance is automatically created for them. Once they follow the link provided, they are met with the modal that prompts users to complete their profile and this modal does not have an escape option other than following the link and completing the required fields. Whilst possibly controversial, this solution has a particular purpose, such as ensuring that users complete their profile before being able to engage with the content on the website, which can help to improve the overall quality and safety of the community. Requiring users to complete their profile before being able to browse posts helps to ensure that the website has accurate and complete information about its users. This can improve the overall user experience and can also help to foster a sense of community and trust among users. Having a complete user profile can also help to improve the website's performance, as it can be used to personalize the website experience for each user. For example, implementing geography and showing offers nearby.
Update (uac 29)
Users can update their profile information at any time. This feature allows them to make changes to their personal information and a profile picture. This feature is beneficial for users as it allows them to keep their profile information up to date and accurate, which is in many ways essential for the purpose of the website. It also allows them to update their profile picture to reflect their current appearance.
Users can access the profile update page by clicking on their name in the top right corner of the website, and then clicking on the "Edit Profile" button. Once on the update page, they can edit the fields they wish to change and save the changes by clicking on the "Save" button.
Loader (uac 31)
The website utilizes visual cues, such as spinners, to indicate that a process is currently in progress and that the website is working to load or complete the requested action. This helps to improve the user experience by providing a visual indication of progress and reducing confusion.

The navbar is a key feature of the website, located at the top of the page in a sticky position and it is always visible to the user, even when scrolling down the page. The navbar provides a clear and easy way for users to navigate the website. The website name is prominently displayed in the navbar, providing users with a clear indication of the website they are currently visiting. If the user is logged in, the navbar also displays their username, allowing them to quickly identify their profile. Additionally, there is a messenger icon which is only visible when the user is logged in. This allows users to access the messaging feature and see real-time notifications.
The navbar also includes several links that aid navigation on the website. The "About" link provides information about the website and its purpose. The "Contact" link allows users to get in touch with the website's support team. The "FAQ" link is dedicated to frequently asked questions. The "Login" and "Register" links are used for user authentication and are only visible to unauthenticated users. Once the user logs in, they will not see these links anymore and "Log out" will be displayed instead. The page "Posts" are only displayed to authenticated users, otherwise, it's the "Home" page. The user must be logged in to access all pages on the website, except for the home page.
Message Notifications (uac 15)
The website features real-time message notifications that are displayed in a badge on the messenger icon. This means that whenever a new message is received, a notification will be displayed on the messenger icon, informing the user of the new message, this is achieved through the use of websockets. The badge will display the number of unread messages, allowing the user to quickly assess the number of new messages they have received. This feature is designed to improve the user experience by allowing users to quickly and easily access their messages without having to navigate to a different page. Users can access their messages with a single click on the messenger icon, and the badge serves as a visual cue that there is a new message waiting for them.
![]()
There is a small logo next to the site name, which is designed to be displayed at all times while the user is browsing the site. This logo appears when the page is scrolled and the hero logo disappears from view. This ensures that the logo is always visible to the user, regardless of their scroll position on the page. The use of a smaller logo when the page is scrolled serves a few key purposes. Firstly, it helps to maintain consistency in branding and visual identity, as the logo is always present and easily recognizable to the user. Secondly, it helps to keep the page from becoming overloaded with multiple logos, which can be visually distracting and confusing.

The website's footer is designed to provide users with useful information and navigation options in a clear and organized manner. It is split into three columns, each serving a specific purpose. The first column contains external links that may be useful to users on the related topic. The second column includes a duplicate of the site's main navigation menu, allowing users to easily access the pages they are looking for. It also includes links to the website's terms of use and privacy policy, which are important for users to be aware of. The third column contains links to the website's social media profiles, allowing users to connect with the project activists and each other. The footer also includes an image, that gives a sense of warmth and positivity to the website and improves the overall user experience.
Back to the top (uac 4)

The "back to top" button is located at the bottom right corner of the webpage and appears after the user has scrolled a certain amount down the page. The button is represented by an upward-facing arrow. When clicked, the button uses JavaScript to smoothly scroll the page back to the top, providing a convenient way for users to quickly navigate back to the top of the page without having to manually scroll back up.
Hero (uac 2)
The hero section of the website is designed to be the first thing that users see when they land on the page. It includes a large logo and motto that helps to convey the website's overall ethos and purpose. The section also features two buttons that address different categories of users. These buttons allow users to quickly navigate to the category of posts that most interests them, whether they are looking to give or receive help. This helps to guide users towards the relevant content and makes it easy for them to find what they are looking for, improving the overall user experience.
About (uac 2)

The "About" section of the website provides information about the purpose and mission behind the website. There is a brief introduction about the organization and its objectives, it also calls the visitor to learn more about the topic, empathise and engage.
FAQ (uac 2)

The FAQ (Frequently Asked Questions) section of a website is dedicated to answers to common questions that visitors may have about the website or the project behind it. This section is organized in a question-and-answer format inside a Bootstrap accordion component. It provides advice on how to interact with other users, as it is most likely unfamiliar with international communication. It addresses concerns about the platform's safety and security, such as how user data is protected, how the platform deals with inappropriate content, and what measures are in place to guarantee the community is safe.

The contact form on the website allows users to easily reach out to the website's support team with any questions or concerns they may have. The form includes fields for the user's name, email address, and message, as well as a subject field for specifying the nature of the inquiry. For logged-in users, the form will automatically fill in the name and email fields with the information provided in the user's profile, saving them time and simplifying the process of reaching out to the support team. The form is handled by JS without refreshing the page.
Live Search (uac 9)

The live search feature on the website allows users to quickly and easily find the information they are looking for. As the user types in their query, the website dynamically updates the search results in real-time, providing a list of relevant results that match the user's query. This feature is implemented using a combination of JavaScript and a web API that allows the website to quickly search through its database of content and retrieve the most relevant results. The results are displayed in a list format, with the most relevant results appearing at the top. The live search feature is designed to improve the user experience by making it easy for users to find the information they need quickly and easily.
Type Checkboxes (uac 9)
These checkboxes allow users to filter posts based on whether they are looking to give or receive help. This makes it easy for users to find exactly the kind of posts they are interested in and streamlines the search process for a better user experience.
The posts list page is the main hub for users to browse and discover offers that they are interested in. Each post is presented in a card format, with a title, an image, a location, and a short description preview. This format allows users to quickly scan through the posts and get a general sense of what each offer is about. Additionally, a map toolkit is also provided to help users understand the location of the offer and how relevant it is to them. This allows for an efficient and user-friendly experience, making it easy for users to find what they are looking for. Users can also filter the posts by checking off the "give" or "receive" checkboxes and the posts will be filtered accordingly.

Pagination (uac 23)

The pagination on the website is set to display 12 posts per page. This means that when a user visits the page with posts, they will see a maximum of 12 posts at a time. If there are more than 12 posts, the user will be able to navigate through the pages using the pagination controls. This allows the user to easily view a specific set of posts and avoid scrolling through a large number of posts at once. Additionally, this feature helps to improve the performance of the website by not loading all the posts at once.
Type Badges (uac 9)

Type badges appear when both checkboxes are checked to show all offers to distinguish the different types of posts. This allows the user to quickly identify the type of post and make an informed decision about whether or not to engage with it.
The post detail view provides a detailed view of a specific post. The view includes an image of the offer and a map with a closer view of the location of the offer. The map allows the user to understand the area and neighbourhood of the offer. This map includes different scales, such as a zoomed-in view of the area and neighbourhood, compared to a more distant scale that is given on the Posts List page for an approximate understanding of where the city is located. There is also a detailed description of the offer, a link to the user profile of the author, and buttons to write a comment and contact the author directly. The "Say thank you" button allows the user to express gratitude for the offer, and the "Contact" button allows the user to proceed with discussing the offer with the author.
Comments (uac 26)

The comment section on the post detail view allows users to leave feedback. It is comprised of a list of existing comments that are displayed in chronological order, with the most recent comments appearing at the top. Each comment includes the name and userpic of the person who left the comment, as well as the comment text itself. Additionally, there is a form for users to leave their comments. The comment section is designed to be intuitive and easy to use, with a clear and simple layout that makes it easy for users to understand the context of the conversation.
Comment field (uac 26)

The form to leave a comment appears in a collapsible component when the user clicks the "Say Thank You" button. It is handled by JavaScript without refreshing the page. This allows for a seamless and smooth user experience, as users can leave comments without disrupting their current browsing session.
It is important to note that all comments are moderated to ensure that the content is appropriate and relevant to the post. This helps to maintain a positive and respectful community and ensures that all users have a positive experience while using the website.
The create and update post view is a page that allows users to create or edit a post on the platform. This view includes several fields that users must fill out to create or update a post, such as a title, description, location, and image. Users have to choose whether their post is a request for help or an offer of help and a category, such as items, services, and support. For updating a post, users can change any fields they wish. The view is designed to be user-friendly and easy to navigate, with clear instructions and prompts for each field.
The new posts are moderated before appearing on the platform, to ensure that it follows the community guidelines.
Delete Post (uac 27)
The delete post feature allows users to remove a post that they have previously created. This feature is accessible from the post detail view by clicking on a delete button. When the button is clicked, the user is redirected to the page to confirm the deletion. Once the user confirms the deletion, the post will be removed from the website and will no longer be accessible to other users. This feature is designed to help users clean up their profiles and ensure that the platform remains organized and relevant for all users.
Messenger (React App) (uac 18)
The messenger feature on the website is designed to allow users to communicate with each other in real-time. It was built using React and Typescript. It is built into a Django App page and all navigation related to the messenger happens inside it and is handled by a React router. The real-time functionality is achieved through the use of websockets and Django Channels, a library that allows Django to handle websockets in addition to traditional HTTP requests. This allows for a seamless and responsive experience where users can receive and send messages instantly, without the need to refresh the page. Users can see the message history and receive notifications of new messages.
Django Channels is the package that was used to add websocket support to the Django project. Django Channels provides the necessary tools to set up a robust and efficient websocket connection in the project and enables real-time functionality throughout the website by allowing for real-time notifications and communication. It extends the functionality of Django by allowing the handling of multiple protocols, such as the HTTP protocol which is used by default, and the websocket protocol which enables real-time functionality.
To set up websockets in the project, Django Channels uses an asgi application, which is responsible for handling the HTTP protocol, and a URL router that handles the websocket protocol. The router is responsible for directing the websocket connection to the appropriate view, where the communication between the client and the server takes place.
Daphne
When building a Django project that uses WebSockets, it is common to use either Daphne or Uvicorn as the server. Daphne is a high-performance ASGI server that is specifically designed for use with Django Channels and can handle both HTTP and WebSocket connections, and it also supports HTTP/2.
Uvicorn, on the other hand, is a high-performance ASGI server that is built on top of the asyncio library and it is not specifically designed for use with Django Channels. Uvicorn supports both HTTP and WebSocket connections. Both Daphne and Uvicorn are high-performance servers that are well-suited for use with Django and WebSockets. The main difference between them is that Daphne is specifically designed for use with Django Channels, while Uvicorn is a more general-purpose ASGI server.
In terms of choosing one over the other, Daphne might be the better choice when using Django Channels to take advantage of its built-in support for WebSockets and other asynchronous protocols. Uvicorn, on the other hand, might be better as a more general-purpose ASGI server. Following this notion, Daphne was chosen for this project.
Utilizing Daphne for HTTP request handling may not be optimal, as Daphne is not optimized for handling large numbers of traditional HTTP requests, it is better suited for WebSockets and real-time connections. It may not perform as well as other web servers such as Gunicorn or uWSGI when handling large numbers of traditional HTTP requests. Daphne is primarily designed as a simple HTTP and WebSocket protocol server, and while it may be efficient for small-scale projects, which I believe the current project is, it may not have all the features and performance optimizations needed for high-traffic production environments. Therefore, when the project scales, utilizing a reverse proxy such as Nginx or Apache to handle the HTTP protocol in production environments, with Daphne or other ASGI servers handling WebSockets, would be a more suitable approach.
Redis
Redis is an in-memory data store that can be used with Django Channels to provide a backend for managing WebSockets and other asynchronous protocols. Django Channels uses a concept called "channels" to handle WebSockets and other asynchronous protocols. Each channel is a unique identifier that represents a connection between a client and a server. When a client connects to the server, a channel is created and the client is subscribed to that channel. When the server receives a message from the client, it is broadcasted to all the clients subscribed to that channel. Redis is used as a backend for Django Channels to manage these channels. It stores the list of channels and the clients subscribed to them. When a client connects to the server, a new channel is created and the client's connection information is stored in Redis. When the server receives a message from the client, it uses Redis to look up the list of clients subscribed to that channel and broadcast the message to them. By using Redis as a backend, Django Channels can handle a large number of concurrent connections and handle messages in real-time.
In this project, Redis is utilised as the channel layer for Django Channels to facilitate real-time communication. This allows to store information about groups of users connected to a websocket and enables efficient communication across different instances of the application.
Additionally, Redis can be used as a caching system, and store session data, which can help to improve the performance of the application.
The active conversation list allows users to view and access all of their current conversations. This is presented as a list of conversations, each of which includes the name of the person the user is communicating with, as well as a preview of the most recent message in the thread and a notification with a number of unread messages if there are any. Users can click on any of these threads to open and view the full conversation.
The full conversation view allows users to view all the messages exchanged with another user in a conversation. The conversation is displayed in chronological order, with the most recent messages appearing at the bottom. The view initially loads the last 50 messages, and as the user scrolls up, more messages are loaded via infinite scroll, allowing the user to view the entire conversation without having to reload the page. The interface also includes the ability to send new messages and view the profile of the other user in the conversation.
Loaders (uac 31)

The messenger has its own loaders to indicate that a process is currently in progress and that the website is working to load or complete the requested action. This helps to improve the user experience by providing a visual indication of progress and reducing confusion.
Error Warnings (uac 31)
The messenger handles connection issues within the React app reporting a problem and offering to refresh the page.
The Django REST framework is used to handle the creation and retrieval of data for the Messenger app. Serializers are used to convert the data between the JSON format that is used by the frontend and the Python objects used by the backend. They also handle the validation of incoming data and provide a consistent way to handle the data throughout the application. In the messenger app, serializers are used to handle the creation and retrieval of messages, as well as the creation and retrieval of conversations between users. They also handle the association of messages with a specific conversation and ensure that only authorized users have access to specific conversations and messages.
Stunnel (uac 21)
STunnel is software that provides a secure layer between two network protocols. It can be used to encrypt traffic between a client and a server or to secure connections between servers. Stunnel works by creating a secure "tunnel" between the client and the server. The client connects to stunnel and sends its data to be encrypted. Stunnel then encrypts the data and forwards it to the server. The server receives the encrypted data, decrypts it, and processes it as if it were received directly from the client. The response from the server is then encrypted by stunnel and sent back to the client.
In the project, STunnel is used to add SSL/TLS encryption to network connections. When Daphne is running asynchronously inside of stunnel, it is essentially wrapping the Daphne process in an SSL/TLS layer, providing an additional layer of security for the data being transmitted over the network. This is useful for protecting sensitive information such as login credentials or other user data that is being transmitted between the client and the server.
Admin (uac 25)

The website includes a fully customised Admin panel. The admin panel allows for the management and editing of the application's data through a web interface. This interface is only accessible to users with administrator or superuser privileges. The admin panel provides CRUD functionalities. It allows for the management of the content, users, groups, and permissions. Additionally, it allows for the execution of custom actions on selected records, such as sending an email to multiple users or deactivating multiple accounts. The admin panel can also provide statistics and analytics of the application's usage.
Content Moderation (uac 25)
Content moderation is essential to ensure that the content is appropriate and does not violate any terms of service or community guidelines, protecting against spam or malicious content, and maintaining a positive user experience. In my project, content moderation is done for all posts and comments left on posts and is implemented by the admin users who have access to the admin panel where they can review and approve or reject comments. This helps to ensure that all the content is relevant, respectful and appropriate for the community.
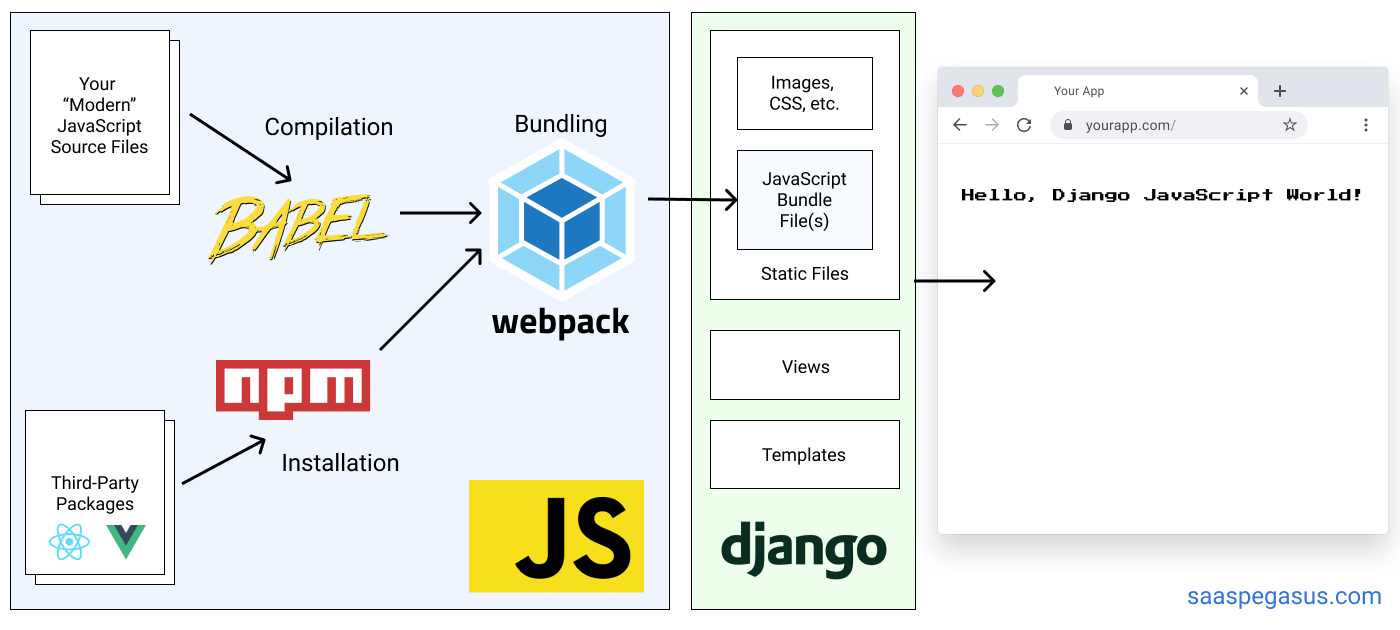
JavaScript bundling is an optimization technique we can use to reduce the number of server requests for JavaScript files. Webpack is a JavaScript bundler that allows to package and optimize JavaScript code for production use. It takes multiple JavaScript files, and any other assets such as images or CSS, and creates a single bundle that can be loaded by the browser. This bundle includes all the code your application needs to run, and it can also optimize the code for faster load times and better performance. The React app Messenger is bundled into a single file, including React library and all the dependencies.
In the project before bundling the code was compiled with Babel, a JavaScript transpiler that allows to write modern JS code and then converting it to a version that is compatible with older browsers. For this reason, the main JS file that handles Django app was also bundled.
-
Phone number verification.
-
Managing conversations in Messenger, deleting conversations and messages.
-
Localisation. (#23) The decision to postpone implementing localisation was made because the project requires the website to be in English and there are issues with the quality of automated translations for Ukrainian. Additionally, it was decided that using a browser extension for translation would suffice for now, as it provides a similar level of translation quality. This allows for the focus to be on other aspects of the project and for localization to be implemented at a later stage, closer to the time of actual production, when manual translation can be done to ensure high-quality translations.
-
Translation integrated into messenger. (#13) As many displaced people are not fluent users of English, it would be useful to fit the messenger with a real-time translation feature. Implementing Google Translate did not provide a good result as the quality of translation to and from other languages, rather than English, to and from Ukrainian, is not very good, as the translation happens through English anyway and Spanish > English > Ukrainian does not produce a reliable result as Latin based English and Slavic Ukrainian are too distant linguistically. To improve the translation quality, we would need to integrate with other translation services, such as Yandex.translate, which translates through Russian, the closest language that has a viable translation solution. However, I have encountered some legal challenges in interacting with a Russian service. So currently I am evaluating alternative solutions and will make a decision on how to proceed in the future.
-
Reporting undesirable content. (#27) Buttons for reporting undesirable content on a website will allow users to quickly and easily flag content that they believe is inappropriate, offensive, or violative of the website's terms of service. This allows website administrators to quickly identify and remove such content, keeping the website safe and enjoyable for all users. Additionally, reporting buttons can help to create a sense of community and shared responsibility among users, encouraging them to take an active role in maintaining the website's standards and quality.
-
Buttons to share posts on social media. Buttons that provide the ability for users to share content on social media allow for an increase in the reach and visibility of the content. This can lead to more traffic to the website and ultimately more engagement. The buttons make it easy for users to share content with their friends and followers on social media.
When content is shared on social media, it includes a link back to the website. This can help with branding, as it increases the visibility of the website and its content, increasing positive impact.
| Expectations | Realisation |
|---|---|
| As a first time user | |
| I want to be able to access the website from any device. | The website is fully responsible and accessible on all screen sizes, starting at 350px. |
| I want to easily understand the main purpose of the site and learn more about the topic. | The Home page concisely and comprehensively introduces the issue, including the FAQ section and the Contact Form in case the user has any questions. |
| I want to be able to easily navigate and find content. | 1. The navbar with a sticky top position is always present on the screen and allows for navigating the website from any point on the website. 2. The main navigation links are duplicated in the footer. 3. The live search is available on the Posts page. |
| I want to create my personal account to see posts. | The user can register a new account. |
| I want to sign up with my social accounts, such as Google or Facebook. | The user can sign up using their existing social media account. |
| I want to create an account fast, but I want it to be secure. | 1. Authentication is handled by Allauth. 2. Email verification is required. |
| I want to be able to contact somebody and receive a response without signing up if I have doubts or queries. | The website provides a contact form. |
| I want to easily access a category of posts I need and to be able to search through them. | 1. There are checkboxes with types of posts. 2.A live search is available. |
| I want to open a post on a separate page to see all the details. | Posts could be opened on a separate page to view them in detail. |
| I want a map attached to each post to understand where the offer/request is. | 1. A map toolkit is available in the post preview on the Posts page. 2. A bigger map in a detailed view. |
| I want to be able to create a post myself. | "New Post" button is available on the Posts page and every user can create their own post, which will be published after moderation. |
| I want to contact another user if I see something that interests me. | "Contact the Author" button is present in the detail view. |
| I want to know more about other users that I interact with. | Links to the user's profile are available from the Posts page, Detail view and Chat. |
| I want to be immediately notified when another user responds. | Real-time notifications are available in the navbar and inside the Messenger app. |
| I want to learn more about the project on social media. | The social media links are available in the footer and accessible from every page. |
| I want to receive feedback from the website about what's happening to know if something went wrong. | 1. Django messages inform the user about the status of their actions. 2. Loaders inform the user about the process of loading. 3. Error messages notify the user if something goes wrong. |
| As a frequent user | |
| I want to be sure my data is protected. | The app is additionally secured by Stunnel. |
| I want to be notified about the messages I received. | Real-time notifications are available in the navbar and inside the Messenger app. |
| I want to access the messenger from anywhere on the website. | The message icon is available in the navbar and accessible at any point. |
| I want to be able to access the navbar at any point or go back to the top to navigate fast. | The navbar with a sticky top position is always present on the screen and allows for navigating the website from any point on the website. |
| I want posts to be paginated | Posts are paginated by 12. |
| I want to be able to report content that I find offensive, unsafe or inappropriate. | For now it is possible via the Contact Form. |
| I want the content to be moderated, so I don't need to report it. | All the content undergoes moderation before being published on the website. |
| I want to be able to write comments to describe my experience of interacting with an offer. | Users can leave their comments in the detailed post view. |
| I want to be able to update and delete my posts. | Users can update and delete their posts, the buttons for it are available in the detailed post view. |
| I want to bookmark posts and easily access them. | Users can bookmark the posts and view them later in their profile. |
| I want to be able to update my user profile. | Users can update their user profile, the button is available in the detailed profile view. |
| I want to be able to reset my password if I forget it. | Password reset is available. |
The project includes extensive automated testing, however, visual features, websockets and React app were tested manually.
The app was manually tested in Chrome, Safari and Firefox on MacBook.
The protocols of manual testing: .numbers , .xls


For this project I intentionally attempted a different from the ones I used in my previous project's testing frameworks to gain additional experience in a variety of testing frameworks.
Feature testing was performed through automated unit testing using Unittest. To run the tests:
- install the project's dependencies (
pip install -r requirements.txt). - set up Redis to run locally, to ensure testing websockets:
-
sudo apt-get update -
sudo apt-get install redis-server -
redis-server --daemonize yesEnv variables:
- REDISC_URL = 'redis://localhost:6379/0'
- REDIS_HOST = 'redis'
- REDIS_PORT = '6379'
set_pgpython3 manage.py test- To see a coverage report use the command
coverage run --source='.' manage.py test myapp coverage report. Specify the path to the file after the command to see a report on the particular file or group of files.
Find the screenshots below:
Main App

Users App

Messenger App

Total


JS unit testing was performed through Jest.
This project does not use a lot of JS and most of it is used for:
-
AJAX requests to handle forms and live search, which is more efficient to test with Selenium, rather than mock responses.
-
DOM manipulation and visual effects are notoriously difficult to unit test because they involve changes to the structure and layout of the document object model as well as changes to the styling and appearance of elements on the page. These changes are often triggered by user interactions or other dynamic events, making them hard to predict and control in a unit testing environment. Many of these effects rely on the underlying layout and styling of the page, which can be hard to replicate in a test environment. It is exacerbated by the fact that visual effects JS is inside IIFE and most of the event listeners are window event listeners, the rest is implemented with jQuery. So, in this case, I rely on manual testing and visual inspection to ensure they are working correctly. However, what was possible to test is tested:
-
npm install -
npm test

Selenium tests are automated tests that simulate user interactions with a web application. They are typically used to test the functionality and usability of a website. In the project, they are used to test forms.
Unfortunately, it is not possible to run Selenium tests from the Gitpod environment, however, there are 2 alternatives:
- Run locally
Download folder to_run_locally and follow insructions from local_tests to run tests locally. The code for these tests is different from BrowserStack version, because it runs remotely, imposes a lot of constraints, and because of them, the code for BrowserStack tests is not very pretty.
••The sleep is quite long in the tests because I have a terrible Internet connection.
- Run on BrowserStack
BrowserStack is a cloud-based web and mobile testing platform that provides testing on a variety of browsers, operating systems, and mobile devices. It allows running automated and manual tests on real devices and browsers, which helps to ensure that web applications are compatible with different browsers, operating systems, and devices.
Even though the code is "not so pretty", we can run tests in three different browsers from different OS. To run these, follow the instructions in BrowserStack tests.
- W3 Markup Validation - HTML Validation
All pages were run through HTML Validator. No errors were detected.
Home Page

Posts Page

••Trailing slashes come from cloudinary template tag.
Post Update Page

••It is toplevel, works fine with screen readers.
New Post Page

••It is toplevel, works fine with screen readers.
Post Detail Page

Messenger

Profile Page

Profile Edit

••It is toplevel, works fine with screen readers.
- W3 Jigsaw - CSS Validation
CSS Stylesheet was run through CSS Validator. No errors were detected.

- CI Python Linter - Python Validation
All Python files were run through CI Python Linter. No errors were detected.
HELP_U APP


MAIN APP


MESSENGER APP


USERS APP


- JS Hint - JS Validation
All JS files were run through JS Hint. No errors were detected.

••Complains about ES6 syntax.
- VSCode TSlint- TypeScript Validation
All TS files were run through VSCode TSlint. No errors were detected.
Home Page

Home Page Mobile

Posts Page

Posts Page Mobile

Post Detail Page

Post Detail Page Mobile

New Post Page

New Post Page Mobile

Profile Page

Profile Page Mobile

SignIn Page

SignIn Page Mobile

SignUp Page

SignUp Page Mobile

Messenger Page

Lighthouse VS Messenger When testing the messenger, Lighthouse times out because the page keeps fetching to make sure it receives updated conversations in real-time, though it does not seem to Lighthouse to be loaded. If inspect the page visually, it loads reasonably fast and is available to interact without a significant delay.
Google Lighthouse may have difficulty testing pages that use WebSockets because it relies on traditional HTTP requests and responses. WebSockets allow for real-time, bidirectional communication between a client and a server, which may not be fully captured by Lighthouse's testing process. Additionally, WebSockets may not have a clear endpoint to test, which could also cause issues for Lighthouse.
- Python+Django, JavaScript, TypeScript, HTML, CSS
- Django for backend and frontend functionality.
- React for Messenger app.
- Django AllAuth for authentication, registration and account management.
- Django Channels for websockets and ASGI.
- Django Rest Framework for building API.
- Redis backend for handling WebSockets, to facilitate. Django Channels channel layers.
- Redis Cloud cloud database service based on Redis.
- Stunel to add TLS encryption.
- PostgreSQL relational database.
- Psycopg PostgreSQL adapter for Python.
- Elephant SQL to manage PostgreSQL databases.
- Babel for compiling JS.
- Webpack for bundling JS.
- Bootstrap for styling.
- React-Bootstrap for styling the React app.
- Crispy Forms for pretty forms.
- Crispy Bootstrap for styling Crispy forms.
- jQuery (JS library) for additional functionality.
- AOS for animation on scroll.
- Boxicons for icons.
- Google Fonts for typography.
- Gitpod IDE to develop the app.
- GitHub to host the source code.
- Heroku to deploy and host the live app.
- Git to provide version control (to commit and push code to the repository).
- Cloudinary for storing and serving static files.
- Django Countries for country choice field.
- Pillow to create fake images for testing.
- Google Maps API for dynamic maps.
- Jest for JS unit-testing.
- Unittest for Python unit-testing.
- Selenium for automated testing.
- TinyJPG to optimise images for readme.
- Favicon.io to create the website favicon.
- Techsini to create the Mockup image in this README.
- W3C HTML Markup Validator to validate HTML code.
- W3C Jigsaw CSS Validator to validate CSS code.
- JS Hint to validate JS code.
- Markdown Tables Generator to generate tables for the readme file.
- CI Python Linter to validate python code.
- LucidChart for flowcharts.
- Code Institute's Template to generate the workspace for the project.
The project was created by navigating to the CI template and clicking 'Use this template'. After a new repository was given a name, I navigated to Gitpod, where the entire project was developed. Then the Project was created and issues were added to follow the Agile methodology.
Heroku was used to host the app. Heroku is a container-based cloud Platform for building, deploying and managing apps. To enable ongoing responsive testing and avoid a heart attack when approaching the deadline this project was deployed to Heroku in its early stages. This was achieved through the following steps:
-
Use the
pip freeze -> requiremnts.txtcommand in the terminal to create a list of libraries that need to be installed. -
Login or create an account on Heroku. Click
newin the top right corner and choosecreate new app. Choose a unique app name and your region and clickcreate app. -
Navigate to the
Settingstab, and clickReveal Config Vars.
Setup External Services:
-
- Log in or create an account on Cloudinary.
- Navigate to the
Dashboardon Cloudinary, copy and store the value of the 'API Environment Variable" ( begins with cloudinary:// ) and paste it into your config varsCLOUDINARY_URL=cloudinary://<your_value>
-
- Log in or create an account on ElephantSQL.
- Create a new instance. Select the free plan Tiny Turtle and leave the tags blank.
- Select the region and choose the nearest data centre to your location or the one that works. The closest to me was down when I was creating mine.
- Click 'review' and check the details and click the button to create the instance.
- Click on the instance you created copy the ElephantSQL database URL from the instance details and paste it into your config vars
DATABASE_URL=postgres://<your_value>
-
-
Create an email account on GMail or anywhere you like, log in.
-
Create an account on Sendinblue, fill out necessary fields to start. Choose a free plan. Skip onboarding.
-
Go to
Settings, choseSenders and IP, and edit a sender - name it. Navigate toSMTP & APIin the menu on the left, and paste:- SMTP Server value into your config vars as
EMAIL_HOST, - Port value as
EMAIL_PORT, - Login value as
EMAIL_HOST_USER, - Master Password as
EMAIL_HOST_PASSWORD.
- SMTP Server value into your config vars as
-
-
-
Set Up Google Maps API. Go to Google Maps Platform and click the
Get Startedbutton. -
Click on the Google Cloud Platform home in the upper left corner. Click on Billing to make sure your billing details are up-to-date. "All Maps Embed API requests are available at no charge with unlimited usage.".
-
Hover to
APIs & Servicesand go toCredentials. SelectCreate a new projectand enter a project name. -
Click
Create credentialsand selectAPI key, copy it and paste it into your config varsGOOGLE_MAPS_API_KEY=<your value> -
Go to the
Credentialspage. Select the API key that you created. The API key property page appears. Under Key restrictions, set theapplication restrictions: to accept requests from the list of websites. Add your app's address when you have it.5
-
-
- Login in or create an account on Redis Cloud.
- Create a new database, click
connect, the side panel will appear on the right. - Click
copybelow theRedic_CLIsection. Paste it in a text file for now and removeredis-clifrom the beginning, you will need it to begin withredis://. - Paste the value to your config vars as
REDISCLOUD_URL. - Paste the same value as
REDIS_URL_STUNNEL
- Add Django secret key to config vars
SECRET_KEYandDISABLE_COLLECT_STATIC= 1 - Set the buildbacks to redis and
python/herokuin that order. - Navigate to the
Deploytab and select GitHub as a deployment method. - Find a repository to connect to and choose the branch to deploy.
- Enable automatic deployment, cross your fingers and deploy the branch.
- Wait for the app to build, click on
View. - Go back to config vars and remove
DISABLE_COLLECT_STATIC= 1
Forking in GitHub allows you to create a copy of a repository on your own account, where you can view or make changes without affecting the original repository. To fork a repository, you can follow these steps:
- Navigate to the repository on GitHub.
- Click the "Fork" button, located on the top right of the page.
- Choose the account where you want to fork the repository.
- Once the process is completed, you will have a copy of the repository on your own account.
It's important to keep in mind that if you are not a member of an organization on GitHub, you will not be able to fork your own repository. You might want to create another account to do so.
Another option is to create a local clone of the repository:
- Navigate to the repository on GitHub.
- Locate the
Codebutton at the top, above the repository file list. - Select a clone method, and click the
copybutton to copy the URL to your clipboard. - Open the IDE of your choice, and open Git Bash.
- Change the current working direction to the location where you want to create a clone.
- Type
git cloneand paste the URL from the clipboard. $ clone https://github.com/oks-erm/help-u- Press
Enterand the local clone will be created.
- Unsplash,
- Undraw,
- logo is designed in Hatchful,
- This Person Doesn't exist for people's faces,
- The rest is produced by me and my imaginary friends Midjourney and locally running Stable Diffusion.
- One Page, significantly modified, media replaced with original.
- Base CSS and JS from One Page, modified and adapted.
- Guidance on Websockets and React app structure and code snippet for implementation were obtained from here and modified.
- Understanding of hybrid architecture and code snippet for setting Django Rest framework was obtained from here and modified.
- A deeper understanding of Django was obtained from documentation and django repo.
- Guidance on Django project architecture was obtained from justdjango.com.
- A deeper understanding of React, advanced JS practices and Selenium testing was obtained from ZTM The Complete Web Developer.
- Understanding of Bootstrap was obtained from documentation.
- Understanding of AllAuth was obtained from documentation.
- Understanding of Django Channels was obtained from documentation.
- Understanding of Redis was obtained from documentation.
- Understanding of setting up Redis Cloud was obtained Heroku Dev Center.
- Knowledge of customising admin was obtained from Real Python.
- Guidance on Selenium testing was obtained from AllSelenium and BrowserStack.
- Django Slug Tutorial.
- Code snippet for pagination was obtained from here
- Understanding and code snippet on creating thumbnail preview from Image field was obtained from here.
- Understanding of incremental search in Django app and code snippet was obtained from here and modified.
- Collective wisdom was obtained from StackOverflow
I would like to thank my mentor, Ronan McClelland, for his guidance, support and motivation.

