flaport / fdtd Goto Github PK
View Code? Open in Web Editor NEWA 3D electromagnetic FDTD simulator written in Python with optional GPU support
Home Page: https://fdtd.readthedocs.io
License: MIT License
A 3D electromagnetic FDTD simulator written in Python with optional GPU support
Home Page: https://fdtd.readthedocs.io
License: MIT License


When loading an array into the "permittivity" parameter, I get the following error:
TypeError: only size-1 arrays can be converted to Python scalars
from "...\fdtd\grid.py" line 159
I believe this is because it's trying to apply "float()" to a numpy array. Changing this to "bd.float()" appears to fix it for numpy, but I don't know if it is compatible with the others.
Just putting it on your radar.
Cheers!
Hello,
I had an issue using the "torch.cuda" backend. Adding an Object yields the following Error.
TypeError                                 Traceback (most recent call last)
[<ipython-input-7-87b12cc5ca33>](https://localhost:8080/#) in <module>()
     34 permittivity = np.ones((180,180,1))
     35 permittivity += circle_mask[:,:,None]*(refractive_index**2 - 1)
---> 36 grid[500-180//2:500+180//2, 500-180//2:500+180//2, 0] = fdtd.Object(permittivity=permittivity, name="object")
     37
     38

[/usr/local/lib/python3.7/dist-packages/fdtd/grid.py](https://localhost:8080/#) in __setitem__(self, key, attr)
    367             x=self._handle_single_key(x),
    368             y=self._handle_single_key(y),
--> 369             z=self._handle_single_key(z),
    370         )
    371

[/usr/local/lib/python3.7/dist-packages/fdtd/objects.py](https://localhost:8080/#) in _register_grid(self, grid, x, y, z)
     67             self.permittivity = self.permittivity[:, :, :, None]
     68         self.inverse_permittivity = (
---> 69             bd.ones((self.Nx, self.Ny, self.Nz, 3)) / self.permittivity
     70         )
     71

[/usr/local/lib/python3.7/dist-packages/torch/_tensor.py](https://localhost:8080/#) in __array__(self, dtype)
    730             return handle_torch_function(Tensor.__array__, (self,), self, dtype=dtype)
    731         if dtype is None:
--> 732             return self.numpy()
    733         else:
    734             return self.numpy().astype(dtype, copy=False)

TypeError: can't convert cuda:0 device type tensor to numpy. Use Tensor.cpu() to copy the tensor to host memory first.
This happened on my local machine and on Google Colab.
As I have understood, the error happens, because self.permittivity in objects.py is not copied to the GPU.
For me, this can be mitigated with self.permittivity = bd.array(self.permittivity) in a previous line.
Greetings,
Hauke
Hello, I found that the calculation results in this project are the amplitude of electromagnetic field, and there is no complex electric field value. What should I do if I want to get the phase value at a certain monitor? thanks!!
Hi,
I am a final year Masters student in Theoretical Physics at IIT Madras. When I started my final year project in August 2020, this was the best suiting cross-platform FDTD module I could find for my simulation project. In past months, I have added many features to this module to fit my purposes, like real-time simulation video, saving simulation video and detector history and grid details, Hanning window pulse sources etc. Once I wrap up my project in next two months, I would like to share my progress on your library and help the community grow.
Hi folks, thanks for the awesome fdtd package!
I'm trying to get a flat PlaneSource, eg a flat plane on z=N, but I haven't found a way to do it. Using something like grid[:,:,5]=fdtd.AnisotropicObject(permittivity=permittivity) gives a diagonal plane. Is there a way to get a flat plane? Thanks!
Hello, I know this package is for 3D electromagnetic simulations, but I was wondering what it would take for it to also be used for acoustic simulations (including in situations where the speed of sound was not constant). Would this be something of interest to you, or is it too far outside the scope of this package? My elementary reading suggests that it shouldn't be too hard to have equations also for sound propagation work in this framework, but curious what you think.
Hi @flaport! For a project I'm working on, I need to calculate the average power (intensity) of light. Ex. simulate imaging it on a detector. Is there a method that you'd recommend for doing that? I've tried using a detector to average the intensity over the last X simulation timesteps, but that so far doesn't seem to give correct results. Thanks!
JAX might potentially offer considerable speedups and offers better overlap with the numpy api.
Hi @flaport, thanks for the excellent toolbox. Just a quick question, may I know the unit of conductivity defined in the absorbing object?
In your example (https://fdtd.readthedocs.io/en/latest/examples/02-absorbing-object.html#), the conductivity was set to 1e-6, but the unit was not provided.
I'm interested in a medium that has a conductivity of 0.6 ohm-1 m-1. However, if I set the conductivity to 0.6, the program gives a absorption_factor larger than 1. Could you give me any suggestions on setting the correct conductivity for your toolbox. Thanks!
Dear author, this framework is very convenient, but I need to solve the S parameter of some devices in use, but there is no Mode Source at present. Can you give me some help?Thank you!!!
In sources.py file, I tried to change the profile to a custom electric field distribution as you defined PlaneSource, but the polarization direction seems to have an impact on the results? Please advise if I am doing this correctly, thank you!
Hi,
I was browsing through objects.py when I came upon this, lines 192-199,
 self.absorption_factor = (
            0.5
            * self.grid.courant_number
            * self.inverse_permittivity
            * self.conductivity
            * self.grid.grid_spacing
            / const.eps0
        )
which is f = 0.5*sc*inv(ε)*σe*du/ε0
In https://github.com/flaport/fdtd#lossy-medium, the following is written:
f = 0.5*dt*σ, where σ := inv(ε)*σe/ε0by taking dt = sc * du/c I can expand f = (0.5*sc*inv(ε)*σe*du)/(ε0*c)
My question is, why wasn't 1/speed of light, 1/c included in self.absorption_factor ? There must be something I'm missing, right?
Any clarification to my confusion would be most appreciated 😄
Hello again @flaport,
I 've been reading through the code, and I have suggestions (that I could also possibly implement):
Automate tests through github Actions. (I ve actually already implemented a PoC on my fork - will open a PR). In the future Actions can also be used for publishing docs and the package itself on pypi.
Some (minor?) code refactoring, hopefully without having to change the current API at all. An example of what I have in mind is changing this to a class factory and generally some clarity changes.
[edit] I would also suggest using another branch for active development/merges were changes are frequent (dev/staging?) and using master as a definitive branch for releases.
Looking forward to your thoughts on the above and more :)
I've tried a minimal example:
wavelength = 1e-6
speed_of_light = 277972458

# Initialize FDTD grid
grid = fdtd.Grid(shape=(20*wavelength, 50*wavelength, 1), grid_spacing=wavelength/10)

# Initialize perfectly matched layer (PML) boundaries
grid[0:10, :, :] = fdtd.PML(name="pml_xlow")
grid[-10:, :, :] = fdtd.PML(name="pml_xhigh")
grid[:, 0:10, :] = fdtd.PML(name="pml_ylow")
grid[:, -10:, :] = fdtd.PML(name="pml_yhigh")

# Initialize source
grid[:, 10, 0] = fdtd.LineSource(period=wavelength/speed_of_light, name="source")

# Initialize objects
#grid[10:190, 50:100, :] = fdtd.AbsorbingObject(permittivity=2.5, conductivity=1e-6, name="absorbing_object")

# Run simulation
start_time = timeit.default_timer()

for i in range(200):
    grid.step()  # Run simulation one timestep at a time and animate
    if i % 10 == 0:
        grid.visualize(z=0, cmap='plasma', animate=True, index=i, save=False)
        plt.title(f"Simulation step {i}")
        #clear_output(wait=True)  # Only necessary in Jupyter notebooks

print(timeit.default_timer() - start_time)
But I'm getting this runtime error:
---------------------------------------------------------------------------
RuntimeError                              Traceback (most recent call last)
Input In [51], in <cell line: 17>()
     13 grid[:, 10, 0] = fdtd.LineSource(period=wavelength/299792458, name="source")
     16 # Initialize objects
---> 17 grid[10:190, 50:100, :] = fdtd.AbsorbingObject(permittivity=2.5, conductivity=1e-6, name="absorbing_object")
     20 # Run simulation
     21 start_time = timeit.default_timer()

File C:\Program Files\Python38\lib\site-packages\fdtd\grid.py:365, in Grid.__setitem__(self, key, attr)
    362 else:
    363     raise KeyError("maximum number of indices for the grid is 3")
--> 365 attr._register_grid(
    366     grid=self,
    367     x=self._handle_single_key(x),
    368     y=self._handle_single_key(y),
    369     z=self._handle_single_key(z),
    370 )

File C:\Program Files\Python38\lib\site-packages\fdtd\objects.py:193, in AbsorbingObject._register_grid(self, grid, x, y, z)
    187     conductivity = conductivity[..., None]
    188 self.conductivity = bd.broadcast_to(
    189     conductivity, self.inverse_permittivity.shape
    190 )
    192 self.absorption_factor = (
--> 193     0.5
    194     * self.grid.courant_number
    195     * self.inverse_permittivity
    196     * self.conductivity
    197     * self.grid.grid_spacing
    198     * const.eta0
    199 )

RuntimeError: Expected all tensors to be on the same device, but found at least two devices, cuda:0 and cpu!
The library could use a frequency domain detector. This can be implemented with a simple Fourier transform.
Hi @flaport , impressive project! Just wondering if GDS loading is on the roadmap. Thanks a lot!
I'm wondering what the units used for each quantity are, both for parameters which are passed in and for values stored internally or produced by the calculation.
A lot of things seem to be unitless, but other things seem to have assumed units. A quick list:
It would be great to track all quantities with units and add this to the documentation. I can try to write that up as long as someone can help answer questions.
Hi,
Thanks for making this amazing package, this could be useful.
May I ask if the PyTorch backend is differentiable?
Thanks.
Is there a simple way to change the polarization of a linear source?
Thanks!
The library could use a mode source for some integrated photonics simulations. This probably requires a [simple] 2D mode solver dependency/addition to the library.
Very cool project! I look forward to seeing where it goes.
Small observation here, after playing around a little bit:
When you add an object, and then later remove it, you end up with a section of the grid with altered permittivity, but without an object present in the visualization. Lacking a grid.remove_object() method, I naively just popped the object from grid.objects... and used grid.reset(). but obviously, that doesn't undo the changes to the grid that occurred when the object was registered.
I'd definitely understand if support for removing items (rather than just re-instantiating a new grid) was low priority for now, but just figured I'd mention it.
thanks again!
Thanks for your code! And I wonder how to define a structure like circle? More generally, how can I define an arbitrary shape? Thanks.
I found this issue in the doc.
'A grid_spacing can be given. For stability reasons, it is recommended to choose a grid spacing that is at least 10 times smaller than the smallest wavelength in the grid. This means that for a grid containing a source with wavelength 1550nm and a material with refractive index of 3.1, the recommended minimum grid_spacing turns out to be 50pm'
This 50 pm seems to be wrong, instead, it should be 50 nm.
AttributeError: module 'fdtd' has no attribute 'Detectors'
changing fdtd.Detectors to fdtd.LineDetector seems to solve the problem but raises another problem:
ValueError: at least one projection plane (x, y or z) should be supplied to visualize the grid!
Hi,
First of all, Thank you for this amazing module!
The issue right now is by defining an absorbing object with a permittivity matrix, perm and a conductivity matrix, cond in a 2D simulation, the code raises an error:
self.grid.E[loc] *= (1 - self.absorption_factor) / (1 + self.absorption_factor)
ValueError: non-broadcastable output operand with shape (64,64,1,3) doesn't match the broadcast shape (64,64,64,3)
perm = np.array([[[item[0]] for item in row] for row in matrix])
cond = np.array([[[item[1]] for item in row] for row in matrix])
grid[10:74, 10:74, 0] = fdtd.AbsorbingObject(permittivity=mask, conductivity = cond, name="object")
Matrix is a 64 by 64 by 2 array containing the permittivity and conductivity at each voxel.
In the code, I'm defining a matrix which will contain the permittivity and conductivity tensor, each with a different value. Removing the conductivity tensor fixes the issue, however and the module works as expected.
Any advice to fix this would be appreciated.
I want to check the matrices for electric and magnetic field at each time update step. How can i do it with your fdtd code? is it possible to show me in an example how? thanks in advance.
Hi, firstly thanks for the amazing code.
How do I introduce the discontinuity in the curls of E and H, and in the update equations of E and H?
I tried to introduce the discontinuity in the curl_E and curl_H and update_E and update_H uisng the decorator with out changing the class . it did not work for me. The discontinuity equations I have introduced are (eqn 5 , 6 from supplimentary and eqn 5, 6 from main paper ) from
https://doi.org/10.1038/s41467-018-05579-6 , if you introduce this into your pakage, it will be grate .
I hope we can solve the issue by using decorator on curl_E and curl_H and update_E and updat_H.
thanks for the reply. please let me know your comments.
I fear I may have caused more problems in issue #4. It appears that commit 3e22a26 has introduced some new bugs relating to PMLs and certain objects. (either that or I'm using them incorrectly, and this commit exposed my errors)
To explain the issue, let me describe my simulation. I have a simply "TIR" example grid where the top half has a higher refractive index (1.55) than the bottom (1.33), an angled LineSource points at the middle of the grid, and a (somewhat strange) very high refractive index "absorbing" object serves to block stray energy on the left side at the interface, and PMLs surround the grid (note: the 1.55 RI region overlaps the PML):

previously, this was the result after running for a while:

these lines in commit 3e22a26 now cause some strange (high magnitude E-field) results in both the PML and my weird high refractive index object at the interface:

I can remove the boundary errors by taking extra care not to have any objects overlapping the PML regions, (though previously, fdtd handled this a bit more gracefully, and it didn't matter whether these overlapped). However, I still have problems with my "absorbing" object at the interface.

it's possible that I'm just not implementing absorbing objects correctly, or that the object edge code just needs some tweaks ... but it also seems like there are generally more "gotchas" now with the new grid permittivity strategy and the PML than there were before you generously dealt with my request to remove objects :)
I tried for a while to figure out a PR to fix it gracefully while leaving the ability to remove objects, but so far have failed. I personally wouldn't mind if you wanted to rollback the grid removal idea for a while, if it's the easiest way to deal with this. I know you're busy with other things!
thanks again!
Hi,
let me first say this repo is quite unique and phantastic!
My question: when using plane sources it seems that something is weird with the polarization, I got an error: TypeError: init() got an unexpected keyword argument 'polarization'.
Should be in the init function https://github.com/flaport/fdtd/blob/master/fdtd/sources.py#L326
For example, this code snippet throws the error:
grid[0, :, :] = fdtd.PlaneSource(
period=WAVELENGTH / SPEED_LIGHT, polarization='z')
I installed via 'pip install fdtd' couple of days ago.
Am I right assuming that default polarization is still the z-axis?
Hi, thank you very much for this awesome repository!
If I understand the code correctly at the moment it's not possible to use Objects with a frequency dependent permittivity (like gold nanoparticles for instance), is there any plan to support it?
I was trying to build a (dubious) test-case for current density by putting a source in a conductive medium, like so:
grid[x_,y_,z_] = fdtd.AbsorbingObject(permittivity=1.0, conductivity=conductivity)
grid[x_,y_,z_] = fdtd.PointSource(period=500)
The source E-field seems to always be forced to zero in this case. The source works when the objects are added in the other order.
I might be doing something wrong, just posting this issue to ask what the expected behavior should be when troubleshooting - is the overlapping case allowed and meaningful?
Thanks!
(tangentially related, should adding an object inside a PML maybe throw an exception? Do you know of any cases where that would be a valid thing to do?)
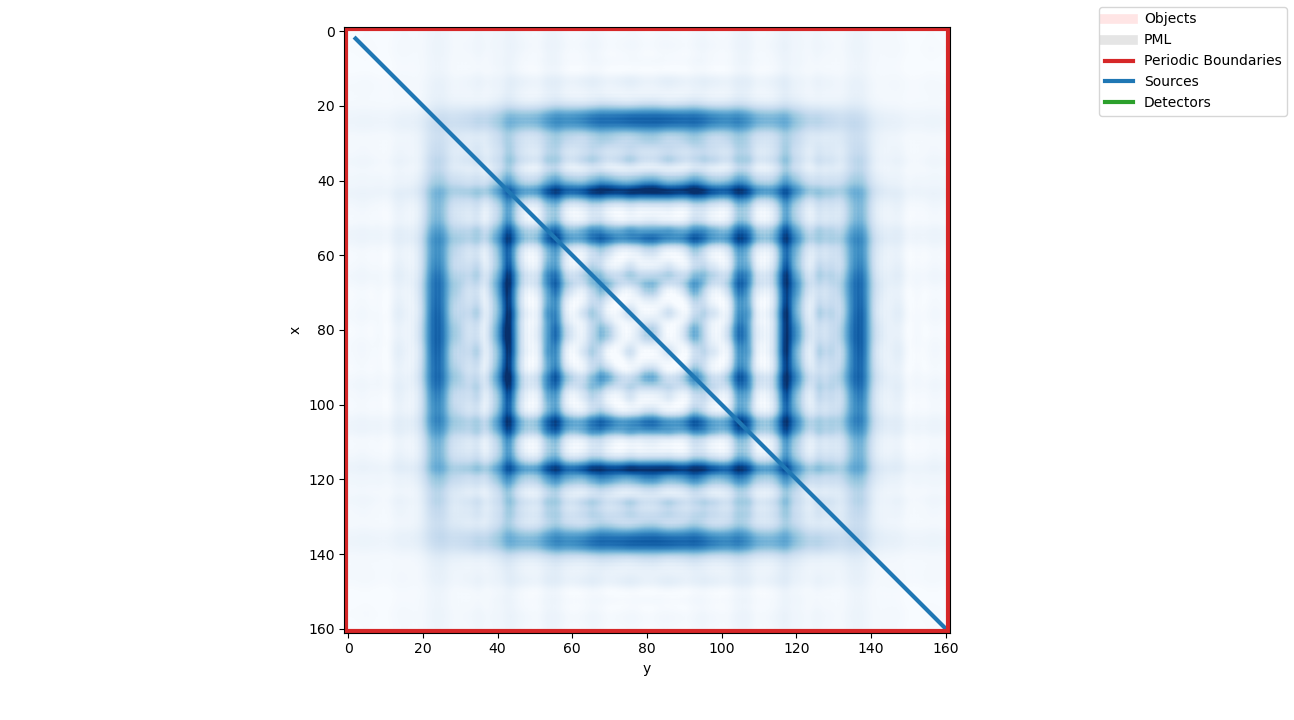
I'm trying to define a plane source such that it outputs a plane wave, but I'm getting some odd-looking outputs. The following code seems to produce some pretty heavy fringes of some sort. Any thoughts? Ideally it would produce a smooth plane wave.
Thanks!
import matplotlib.pyplot as plt

import fdtd
import fdtd.backend as bd
import numpy as np
import torch
import torch.autograd
import torch.nn
fdtd.set_backend("torch.cuda")


WAVELENGTH = 1550e-9
SPEED_LIGHT: float = 299_792_458.0  # [m/s] speed of light


grid = fdtd.Grid(
    (2.5e-5, 2.5e-5, 1.5e-5),
    # (161,161,97),
    grid_spacing=0.1 * WAVELENGTH,
    permittivity=1.0,
    permeability=1.0,
    # courant_number=0.3
)

grid[0, :, :] = fdtd.PeriodicBoundary(name="xbounds")
# grid[0:10, :, :] = fdtd.PML(name="pml_xlow")
# grid[-10:, :, :] = fdtd.PML(name="pml_xhigh")
grid[:, :, 0:10] = fdtd.PML(name="pml_zlow")
grid[:, :, -10:] = fdtd.PML(name="pml_zhigh")
grid[:, 0, :] = fdtd.PeriodicBoundary(name="ybounds")

grid[2:160,2:160,30:31] = fdtd.PlaneSource(
    period=WAVELENGTH / SPEED_LIGHT, name="linesource"
)
grid.run(300)
grid.visualize(z=80,show=True)
When testing 3D geometries, it seemed pretty helpful to dump .vtk files with object and field grids. The pyEVTK lib makes this pretty clean, might perhaps be worth an optional dependency?
On the other hand, perhaps this is something best handled by user code...
I recently installed this on Windows and I'm using Jupyter notebook, It seems to not support the float 128, any thoughts?
AttributeError: module 'numpy' has no attribute 'float128'
Line 17 of constants.py assigns eps0 = 4e-7 * pi, but isn't this the value of mu0? See https://en.wikipedia.org/wiki/Vacuum_permittivity
Dear author, many thanks for your interesting package! In my problem I have to study the field of a source moving with the uniform velocity along the grid. Is there any way to indicate the current position of the point source (depending on current time) while the field update? Thank you in advance.
Hello,
Thanks for your work.
Is there a way to run this code in parallel on cpu?
I assume that it's automatically parallelized if the cuda backend is used.
Is this correct?
Dear Floris Laporte,
Thank you very much for the nice tool!
Recently, I am learning the package for simulation. I noticed that there is a 'detector_value()' function in the class 'detector', however there is not an example for the demonstration usage of it, could you please add an example on this function?
None of your example files will generate a video on Windows.
The error ffmpeg not installed? is thrown despite ffmpeg-python being installed.
I looked up the relevant function generate_video() in your source code and it says Note: this function requires ``ffmpeg`` to be available in your path., so I've tried copying the ffmpeg package folder into the same folder as the .ipynb notebook containing your example simulations and even moving all .py files directly into it, but to no avail.
Could you please check what's wrong and, if necessary, make corrections so that fdtd will recognize the ffmpeg package?
Hi @flaport, is it possible to insert the colorbar to grid.visualize(...) figure? Thanks
Hi! Thank you for this wonderful project.
Can I simulate birefringent material (eg. liquid crystal) with this simulation?
Thank you.
Hi @flaport,
I have to add a cylinder aligned || z in 3D.
There are various references in general how to create a cylinder.
https://stackoverflow.com/questions/26989131/add-cylinder-to-plot
https://stackoverflow.com/questions/64725784/color-of-the-cylinder-in-python
But what may be the optimal way to do that in fdtd?
[03-objects-of-arbitrary-shape]
Thank you in advance.
Version 0.2.6 on pypi doesn't have the commit 3cb63c27455e3f038dbd26b1394549a156 to "don't use bd.float directly for type casting". Without this commit, the initialization of a grid with any of the "torch" backends errors:
---------------------------------------------------------------------------
TypeError                                 Traceback (most recent call last)
Cell In[8], line 1
----> 1 grid = fdtd.Grid(
      2     (2.5e-5, 1.5e-5, 1),
      3     grid_spacing=0.01 * WAVELENGTH,
      4     permittivity=1.0,
      5     permeability=1.0,
      6 )

File ~/projects/compem/venv/lib/python3.10/site-packages/fdtd/grid.py:143, in Grid.__init__(self, shape, grid_spacing, permittivity, permeability, courant_number)
    141 if bd.is_array(permittivity) and len(permittivity.shape) == 3:
    142     permittivity = permittivity[:, :, :, None]
--> 143 self.inverse_permittivity = bd.ones((self.Nx, self.Ny, self.Nz, 3)) / bd.float(
    144     permittivity
    145 )
    147 if bd.is_array(permeability) and len(permeability.shape) == 3:
    148     permeability = permeability[:, :, :, None]

TypeError: 'torch.dtype' object is not callable
Do you plan to push a new version to pypi?
python 3.10.6 (main, Nov 14 2022, 16:10:14) [GCC 11.3.0]
torch 1.13.1+cu117
Hi there, would you say this package is suitable for antenna design, or is it more tailored towards other electromagnetic applications?
Hi @flaport, Happy New Year! At FDTD calculations I need to periodically change the power of a source (initially F_0) dependently on the local field amplitude E_0. So first I have to know the amplitude of field E_0 in current position of a source in 3D. Latter I will modify the power of this source periodically as F_{n+1} = f(E_n)*F_n with the interval dt. As I understand, to do that I have to periodically remove old source (n) from the grid and insert in this position new source (n+1). What is the optimal way to do all of that? Thank you in advance.
Hey @flaport,
In the class LineSource I can't find the pulse variable which is referred in examples. How to reach this pulse? Thanks
how would you extract Sparameters from a GDS file?
# grid.py
def update_E(self):
        """ update the electric field by using the curl of the magnetic field """

        curl = curl_H(self.H)
        self.E += self.courant_number * self.inverse_permittivity * curl

        # update objects
        for obj in self.objects:
            obj.update_E(curl)
Here you update E for the whole grid. Then you update E inside the objects, changing E in-place, locally.
#objects.py
def update_E(self, curl_H):
        """ custom update equations for inside the anisotropic object
        Args:
            curl_H: the curl of magnetic field in the grid.
        """
        loc = (self.x, self.y, self.z)
        self.grid.E[loc] *= (1 - self.absorption_factor) / (1 + self.absorption_factor)
        self.grid.E[loc] += (
            self.grid.courant_number
            * self.inverse_permittivity
            * curl_H[loc]
            / (1 + self.absorption_factor)
        )
Aren't you doing it twice?
# first time
    E += c*dt*inv(ε)*curl(H)
# second time
    f = 0.5*dt*σ
    E *= inv(1 + f) * (1 - f)
E += inv(1 + f)*sc*inv(ε)*curl_HThe library needs tests to prevent bugs. This library uses pytest as test suite, which is by far the most user friendly test-suite for Python. This is great, because this means anyone can add tests; it's super easy! Moreover, it makes you acquainted with the code, which is why it's labeled a good first issue.
When adding tests, keep the following in mind:
test_ pip install black
black tests
pytest.approx and similar.When running the tests:
pip install -e:
    pip uninstall fdtd # uninstall any previous version of the fdtd library
    git clone https://github.com/flaport/fdtd # if not cloned yet, clone the repository now.
    pip install -e fdtd # install as a development library
pip install -e is executed in the folder containing the git repository NOT inside the git repository. pytest tests
pytest-cov)
pytest tests --cov-report html --cov fdtd
htmlcov folder.A declarative, efficient, and flexible JavaScript library for building user interfaces.
🖖 Vue.js is a progressive, incrementally-adoptable JavaScript framework for building UI on the web.
TypeScript is a superset of JavaScript that compiles to clean JavaScript output.
An Open Source Machine Learning Framework for Everyone
The Web framework for perfectionists with deadlines.
A PHP framework for web artisans
Bring data to life with SVG, Canvas and HTML. 📊📈🎉
JavaScript (JS) is a lightweight interpreted programming language with first-class functions.
Some thing interesting about web. New door for the world.
A server is a program made to process requests and deliver data to clients.
Machine learning is a way of modeling and interpreting data that allows a piece of software to respond intelligently.
Some thing interesting about visualization, use data art
Some thing interesting about game, make everyone happy.
We are working to build community through open source technology. NB: members must have two-factor auth.
Open source projects and samples from Microsoft.
Google ❤️ Open Source for everyone.
Alibaba Open Source for everyone
Data-Driven Documents codes.
China tencent open source team.